Spring Boot初学
第一个Spring Boot项目
1、正常创建一个最基础的Maven项目
2、在pom文件中添加Spring Boot起步依赖
- Spring Boot项目要继承Spring Boot的起步依赖spring-boot-starter-parent
 <parent>
        <groupId>org.springframework.boot</groupId>
        <artifactId>spring-boot-starter-parent</artifactId>
        <version>2.3.0.RELEASE</version>
     	<relativePath/>
</parent>
- Spring Boot完成web项目所需的web启动器
<dependency>
            <groupId>org.springframework.boot</groupId>
            <artifactId>spring-boot-starter-web</artifactId>
</dependency>
3、编写Spring Boot引导类
import org.springframework.boot.SpringApplication;
import org.springframework.boot.autoconfigure.SpringBootApplication;

@SpringBootApplication
public class SpringbootApplication {

    public static void main(String[] args) {
        SpringApplication.run(SpringbootApplication.class, args);
    }

}
4、编写测试接口Controller
import org.springframework.stereotype.Controller;
import org.springframework.web.bind.annotation.RequestMapping;
import org.springframework.web.bind.annotation.ResponseBody;

@Controller
public class HelloController {

    @ResponseBody
    @RequestMapping("hello")
    public String hello(){
        return "hello spring Boot";
    }
}
5、启动执行
番外
1、修改端口号
- resources资源文件中的配置文件中加如下代码
server.port=80
2、修改banner图片
- resources资源文件中建立banner.txt文件
- 加入文字图即可
3、Spring Boot项目热部署
3.1、什么是热部署
在开发中,我们需要反复的修改类、页面等资源;每次修改后都需要重新启动项目。这无疑浪费了我们大量的实践,因此,我们需要对项目进行配置,使我们修改代码后不重启项目即可生效。此过程我们称之为热部署。
3.2、导入热部署依赖
<dependency>
    <groupId>org.springframework.boot</groupId>
    <artifactId>spring-boot-devtools</artifactId>
</dependency>
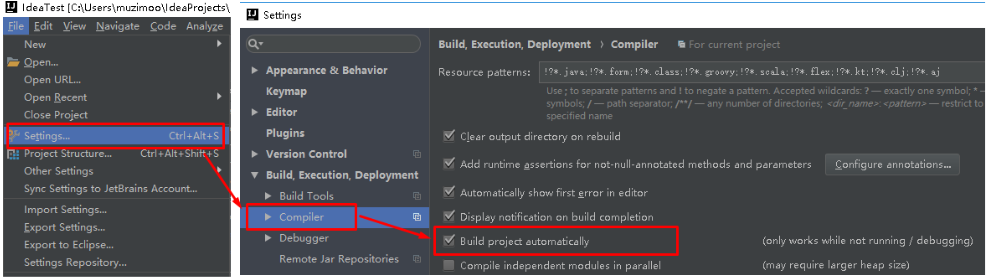
3.3、设置IDEA自动编译
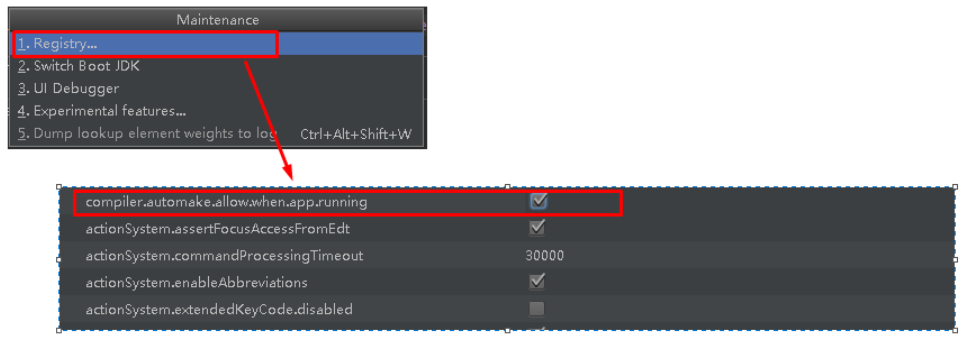
设置完成后---> 【Shift+Ctrl+Alt+/】--->点击Registry

 浙公网安备 33010602011771号