java大数据最全课程学习笔记(3)--HDFS 简介及操作
目前CSDN,博客园,简书同步发表中,更多精彩欢迎访问我的gitee pages
HDFS 简介及操作
HDFS概述
HDFS产出背景及定义
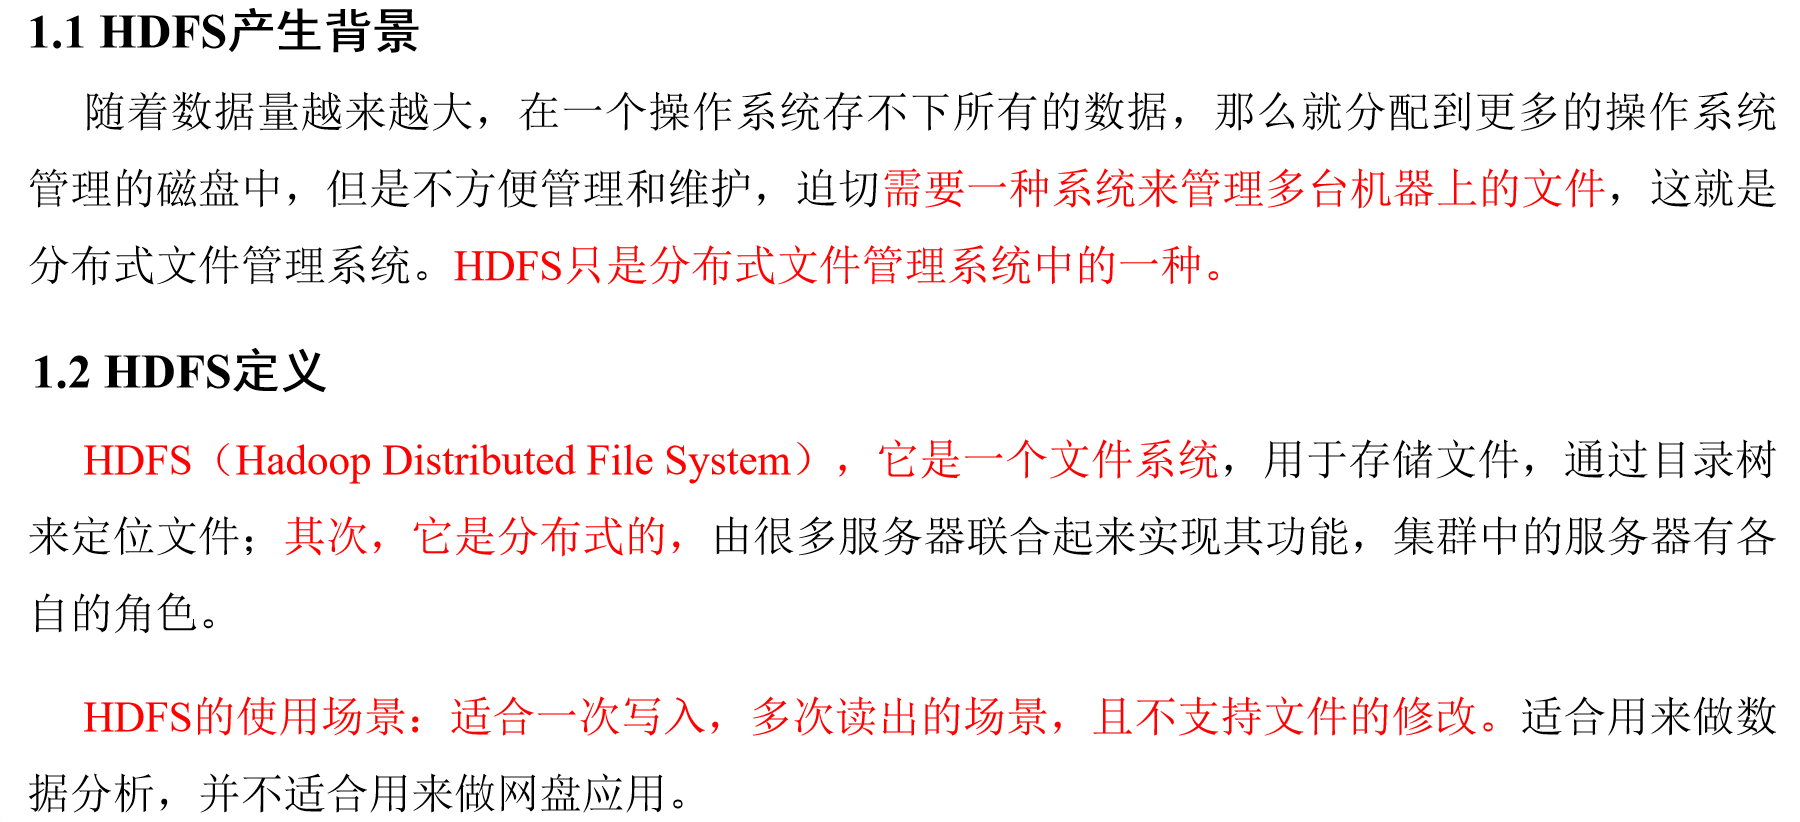
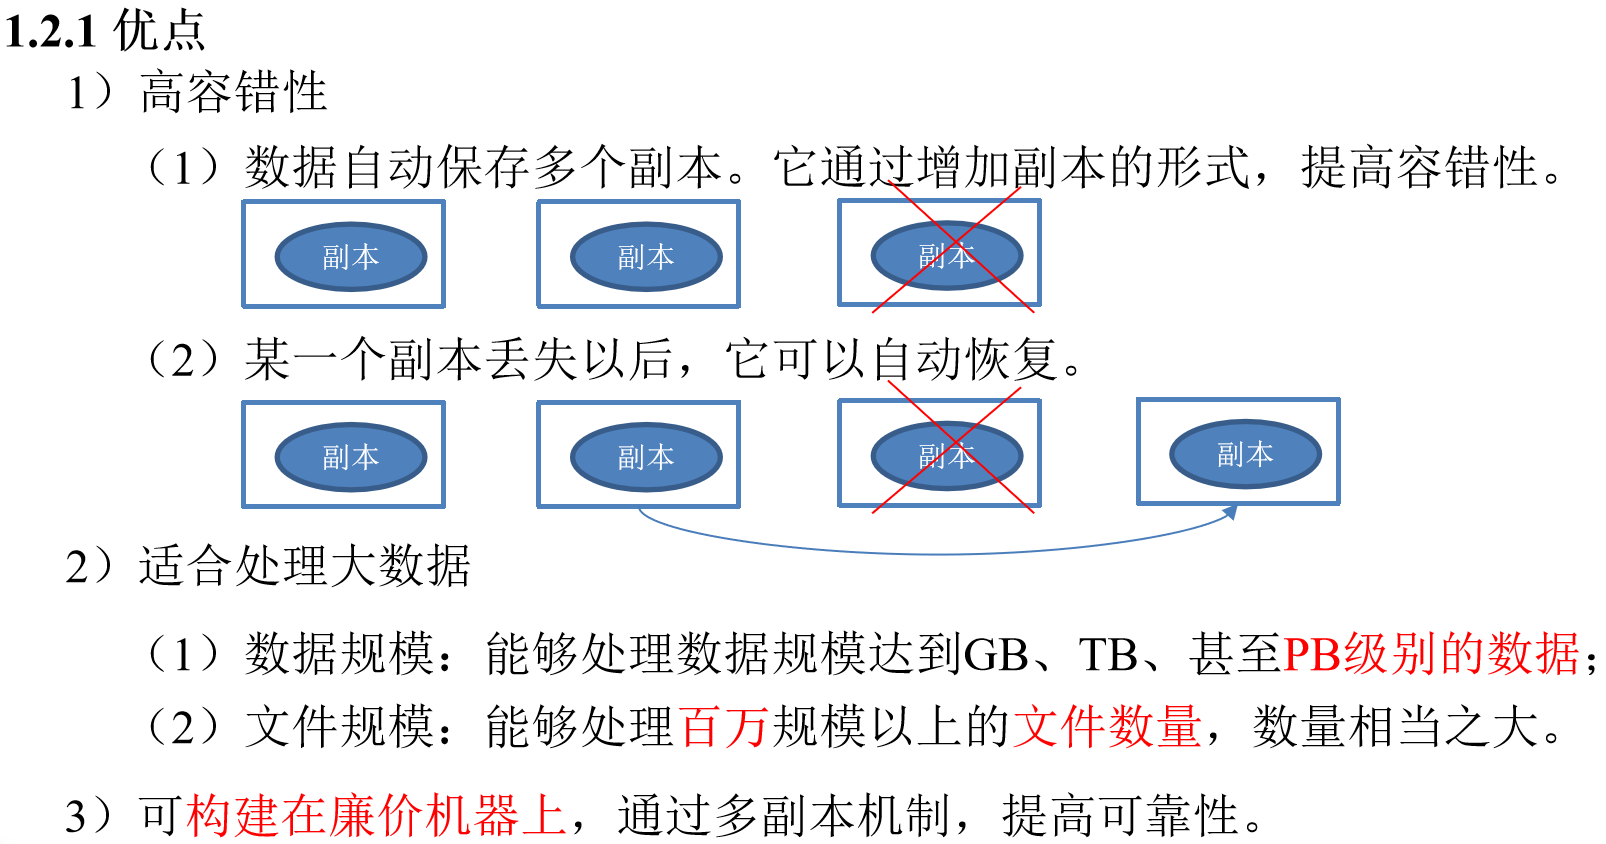
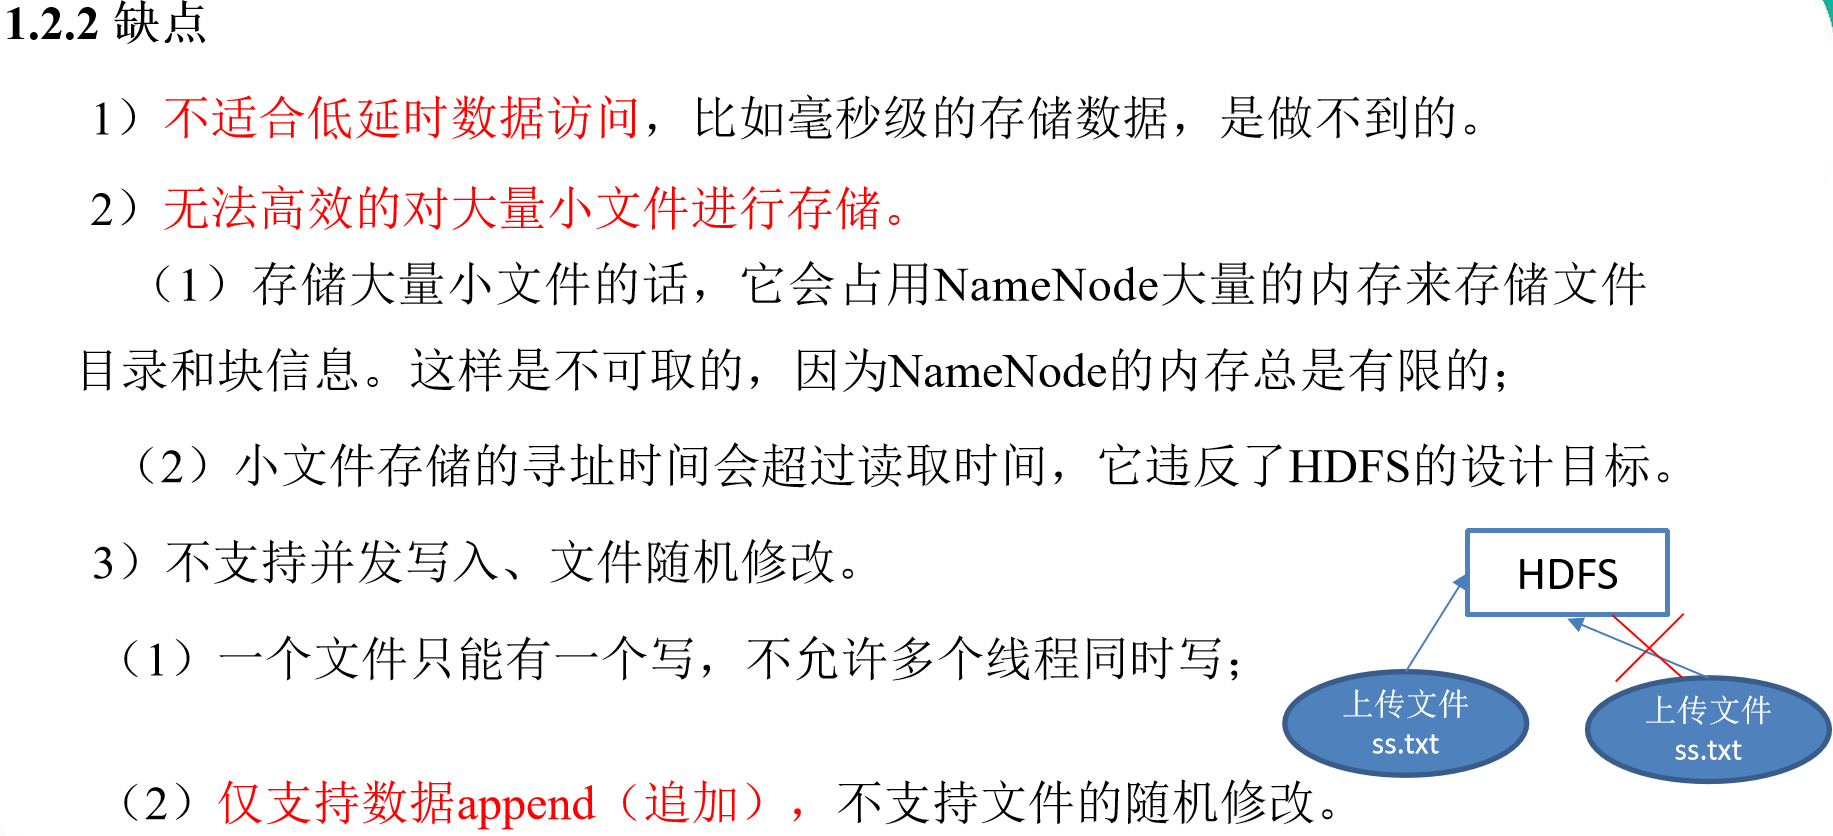
HDFS优缺点
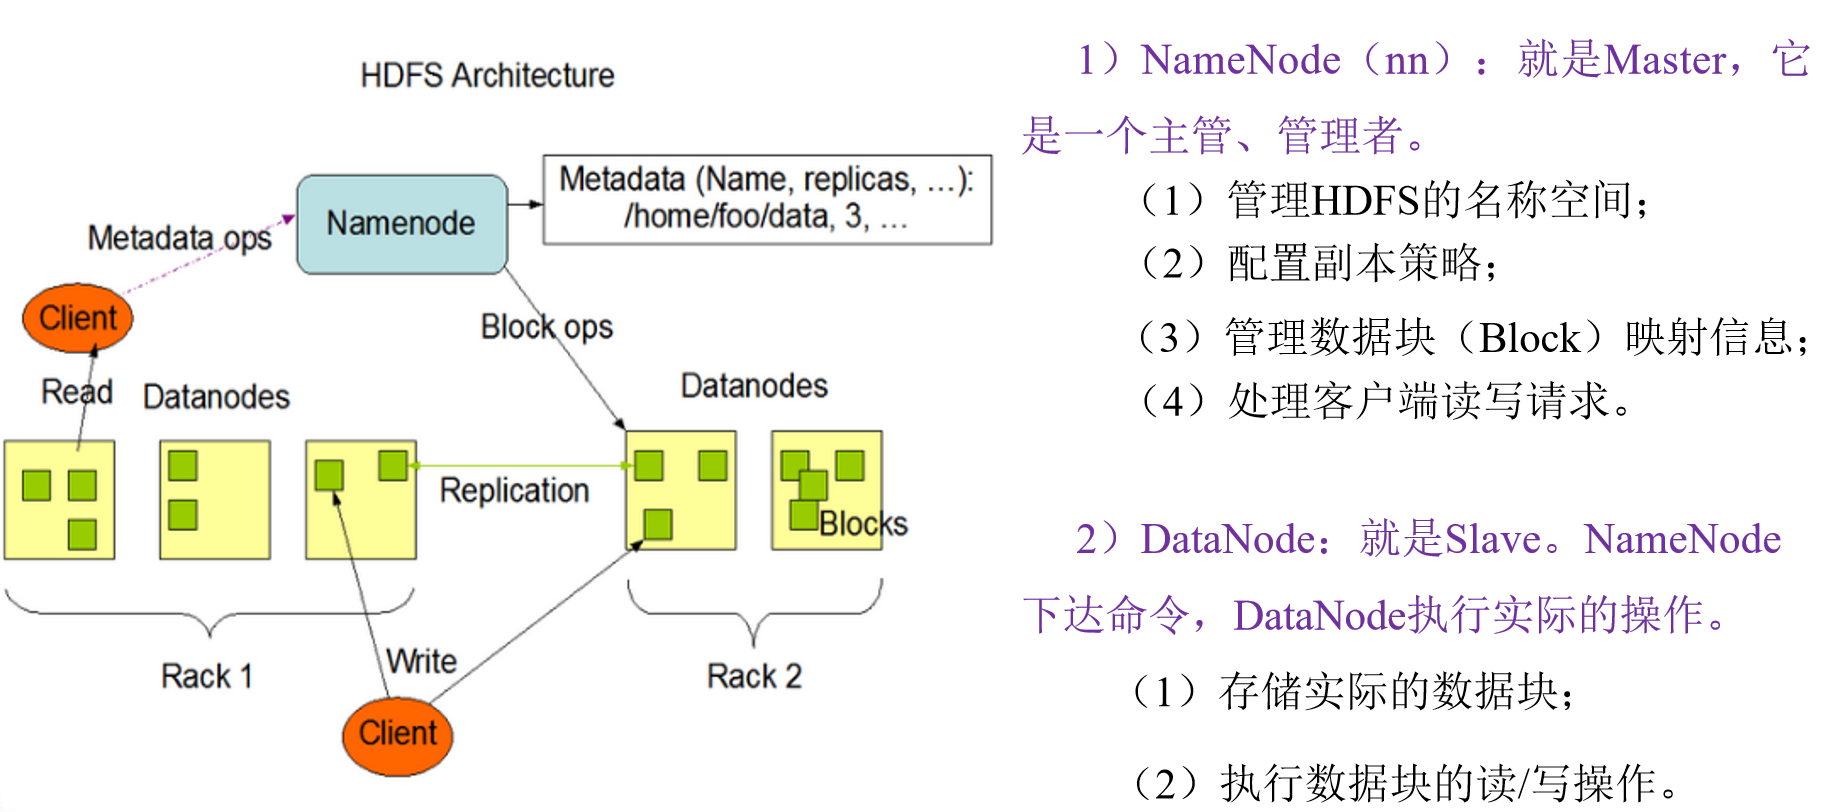
HDFS组成架构
HDFS文件块大小(重点)
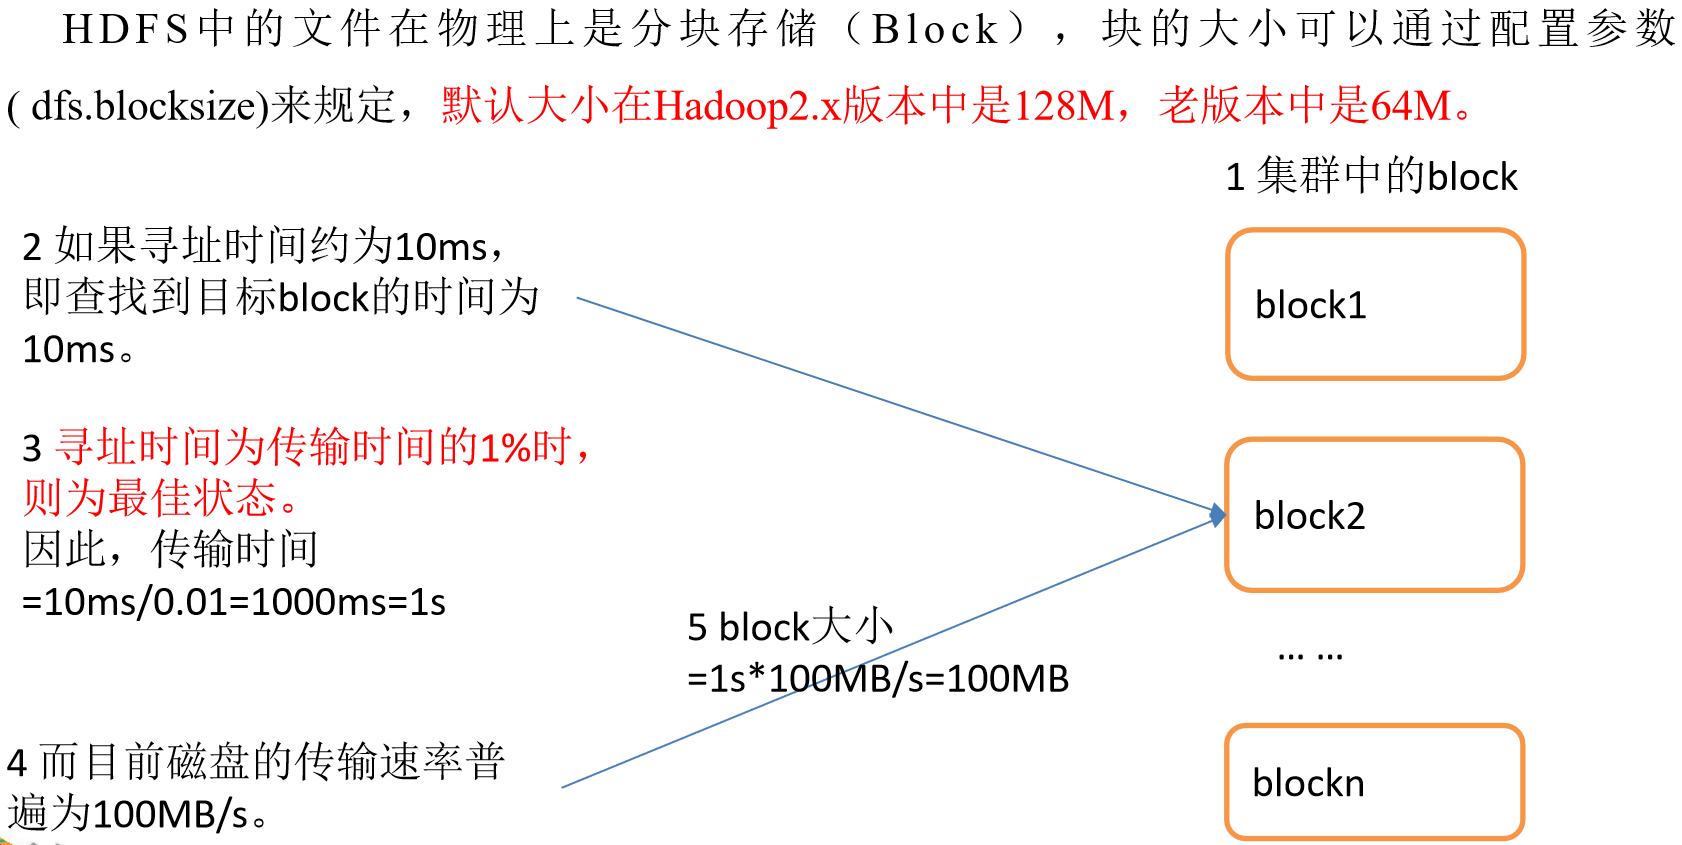
块在传输时,每64K还需要校验一次,因此块大小,必须为2的n次方,最接近100M的就是128M!
如果公司使用的是固态硬盘,写的速度是300M/S,将块大小调整到 256M
如果公司使用的是固态硬盘,写的速度是500M/S,将块大小调整到 512M
-
但是块的大小不能设置太小,也不能设置太大
-
太大
- 在一些分块读取的场景,不够灵活,会带来额外的网络消耗
- 在上传文件时,一旦发生故障,会造成资源的浪费
-
太小
- 同样大小的文件,会占用过多的NN的元数据空间
- 在进行读写操作时,会消耗额外的寻址时间
-

HDFS的Shell操作(开发重点)
基本语法
bin/hadoop fs 具体命令 OR bin/hdfs dfs 具体命令
dfs是fs的实现类。
命令大全
[atguigu@hadoop102 ~]$ hadoop fs
Usage: hadoop fs [generic options]
	[-appendToFile <localsrc> ... <dst>]
	[-cat [-ignoreCrc] <src> ...]
	[-checksum <src> ...]
	[-chgrp [-R] GROUP PATH...]
	[-chmod [-R] <MODE[,MODE]... | OCTALMODE> PATH...]
	[-chown [-R] [OWNER][:[GROUP]] PATH...]
	[-copyFromLocal [-f] [-p] [-l] <localsrc> ... <dst>]
	[-copyToLocal [-p] [-ignoreCrc] [-crc] <src> ... <localdst>]
	[-count [-q] [-h] <path> ...]
	[-cp [-f] [-p | -p[topax]] <src> ... <dst>]
	[-createSnapshot <snapshotDir> [<snapshotName>]]
	[-deleteSnapshot <snapshotDir> <snapshotName>]
	[-df [-h] [<path> ...]]
	[-du [-s] [-h] <path> ...]
	[-expunge]
	[-find <path> ... <expression> ...]
	[-get [-p] [-ignoreCrc] [-crc] <src> ... <localdst>]
	[-getfacl [-R] <path>]
	[-getfattr [-R] {-n name | -d} [-e en] <path>]
	[-getmerge [-nl] <src> <localdst>]
	[-help [cmd ...]]
	[-ls [-d] [-h] [-R] [<path> ...]]
	[-mkdir [-p] <path> ...]
	[-moveFromLocal <localsrc> ... <dst>]
	[-moveToLocal <src> <localdst>]
	[-mv <src> ... <dst>]
	[-put [-f] [-p] [-l] <localsrc> ... <dst>]
	[-renameSnapshot <snapshotDir> <oldName> <newName>]
	[-rm [-f] [-r|-R] [-skipTrash] <src> ...]
	[-rmdir [--ignore-fail-on-non-empty] <dir> ...]
	[-setfacl [-R] [{-b|-k} {-m|-x <acl_spec>} <path>]|[--set <acl_spec> <path>]]
	[-setfattr {-n name [-v value] | -x name} <path>]
	[-setrep [-R] [-w] <rep> <path> ...]
	[-stat [format] <path> ...]
	[-tail [-f] <file>]
	[-test -[defsz] <path>]
	[-text [-ignoreCrc] <src> ...]
	[-touchz <path> ...]
	[-truncate [-w] <length> <path> ...]
	[-usage [cmd ...]]
常用命令实操
-
启动Hadoop集群(方便后续的测试)
[atguigu@hadoop102 hadoop-2.7.2]$ sbin/start-dfs.sh [atguigu@hadoop102 hadoop-2.7.2]$ sbin/start-yarn.sh -
-help:输出这个命令参数
[atguigu@hadoop102 hadoop-2.7.2]$ hadoop fs -help rm -
-ls: 显示目录信息
[atguigu@hadoop102 hadoop-2.7.2]$ hadoop fs -ls / -
-mkdir:在HDFS上创建目录
[atguigu@hadoop102 hadoop-2.7.2]$ hadoop fs -mkdir -p /sanguo/shuguo -
-moveFromLocal:从本地剪切粘贴到HDFS
[atguigu@hadoop102 hadoop-2.7.2]$ touch kongming.txt [atguigu@hadoop102 hadoop-2.7.2]$ hadoop fs -moveFromLocal ./kongming.txt /sanguo/shuguo -
-appendToFile:追加一个文件到已经存在的文件末尾
[atguigu@hadoop102 hadoop-2.7.2]$ touch liubei.txt [atguigu@hadoop102 hadoop-2.7.2]$ vi liubei.txt 输入 san gu mao lu [atguigu@hadoop102 hadoop-2.7.2]$ hadoop fs -appendToFile liubei.txt /sanguo/shuguo/kongming.txt -
-cat:显示文件内容
[atguigu@hadoop102 hadoop-2.7.2]$ hadoop fs -cat /sanguo/shuguo/kongming.txt -
-chgrp 、-chmod、-chown:Linux文件系统中的用法一样,修改文件所属权限
[atguigu@hadoop102 hadoop-2.7.2]$ hadoop fs -chmod 666 /sanguo/shuguo/kongming.txt [atguigu@hadoop102 hadoop-2.7.2]$ hadoop fs -chown atguigu:atguigu /sanguo/shuguo/kongming.txt -
-copyFromLocal:从本地文件系统中拷贝文件到HDFS路径去
[atguigu@hadoop102 hadoop-2.7.2]$ hadoop fs -copyFromLocal README.txt / -
-copyToLocal:从HDFS拷贝到本地
[atguigu@hadoop102 hadoop-2.7.2]$ hadoop fs -copyToLocal /sanguo/shuguo/kongming.txt ./ -
-cp :从HDFS的一个路径拷贝到HDFS的另一个路径
[atguigu@hadoop102 hadoop-2.7.2]$ hadoop fs -cp /sanguo/shuguo/kongming.txt /zhuge.txt -
-mv:在HDFS目录中移动文件
[atguigu@hadoop102 hadoop-2.7.2]$ hadoop fs -mv /zhuge.txt /sanguo/shuguo/ -
-get:等同于copyToLocal,就是从HDFS下载文件到本地
[atguigu@hadoop102 hadoop-2.7.2]$ hadoop fs -get /sanguo/shuguo/kongming.txt ./ -
-getmerge:合并下载多个文件,比如HDFS的目录 /aaa/下有多个文件:log.1, log.2,log.3,...
[atguigu@hadoop102 hadoop-2.7.2]$ hadoop fs -getmerge /sanguo/shuguo* ./zaiyiqi.txt -
-put:等同于copyFromLocal
[atguigu@hadoop102 hadoop-2.7.2]$ hadoop fs -put ./zaiyiqi.txt / -
-tail:显示一个文件的末尾
[atguigu@hadoop102 hadoop-2.7.2]$ hadoop fs -tail /sanguo/shuguo/kongming.txt -
-rm:删除文件或文件夹
[atguigu@hadoop102 hadoop-2.7.2]$ hadoop fs -rm -r -f /zaiyiqi.txt -
-rmdir:删除空目录
[atguigu@hadoop102 hadoop-2.7.2]$ hadoop fs -mkdir /test [atguigu@hadoop102 hadoop-2.7.2]$ hadoop fs -rmdir /test -
-du统计文件夹的大小信息
[atguigu@hadoop102 hadoop-2.7.2]$ hadoop fs -du -s -h /sanguo/shuguo 26 /sanguo/shuguo [atguigu@hadoop102 hadoop-2.7.2]$ hadoop fs -du -h /sanguo/shuguo 13 /sanguo/shuguo/kongming.txt 13 /sanguo/shuguo/zhuge.txt -
-setrep:设置HDFS中文件的副本数量
[atguigu@hadoop102 hadoop-2.7.2]$ hadoop fs -setrep 10 /sanguo/shuguo/kongming.txt
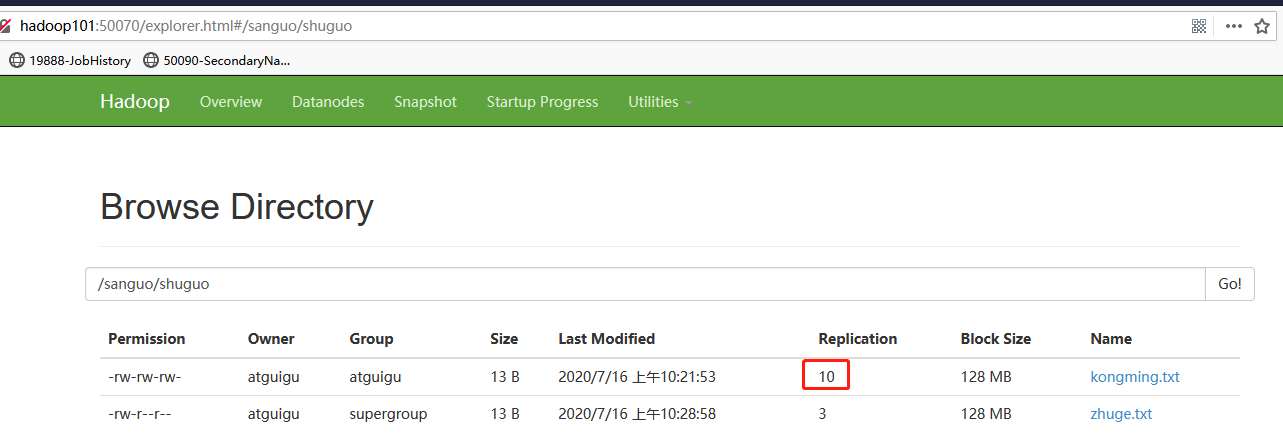
这里设置的副本数只是记录在NameNode的元数据中,是否真的会有这么多副本,还得看DataNode的数量。因为目前只有3台设备,最多也就3个副本,只有节点数的增加到10台时,副本数才能达到10。
HDFS客户端操作(开发重点)
HDFS客户端环境准备
-
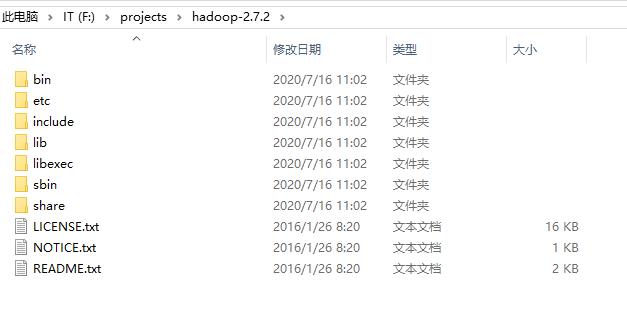
根据自己电脑的操作系统拷贝对应的编译后的hadoop jar包到非中文路径
![]()
-
配置HADOOP_HOME环境变量
![]()
-
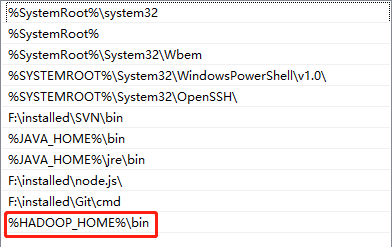
配置Path环境变量
![]()
-
创建一个Maven工程HdfsClientDemo
-
导入相应的依赖坐标+日志添加
<dependencies>
		<dependency>
			<groupId>junit</groupId>
			<artifactId>junit</artifactId>
			<version>RELEASE</version>
		</dependency>
		<dependency>
			<groupId>org.apache.logging.log4j</groupId>
			<artifactId>log4j-core</artifactId>
			<version>2.8.2</version>
		</dependency>
		<dependency>
			<groupId>org.apache.hadoop</groupId>
			<artifactId>hadoop-common</artifactId>
			<version>2.7.2</version>
		</dependency>
		<dependency>
			<groupId>org.apache.hadoop</groupId>
			<artifactId>hadoop-client</artifactId>
			<version>2.7.2</version>
		</dependency>
		<dependency>
			<groupId>org.apache.hadoop</groupId>
			<artifactId>hadoop-hdfs</artifactId>
			<version>2.7.2</version>
		</dependency>
    <!--下面这个可以注释掉,如果找不到jdk.tools再配置上-->
<dependency>
            <groupId>jdk.tools</groupId>
            <artifactId>jdk.tools</artifactId>
            <version>1.8</version>
            <scope>system</scope>
            <systemPath>${JAVA_HOME}/lib/tools.jar</systemPath>
    </dependency>
</dependencies>
注意:如果Eclipse/Idea打印不出日志,在控制台上只显示
1.log4j:WARN No appenders could be found for logger (org.apache.hadoop.util.Shell).
2.log4j:WARN Please initialize the log4j system properly.
3.log4j:WARN See http://logging.apache.org/log4j/1.2/faq.html#noconfig for more info.
需要在项目的src/main/resources目录下,新建一个文件,命名为“log4j.properties”,在文件中填入
log4j.rootLogger=INFO, stdout
log4j.appender.stdout=org.apache.log4j.ConsoleAppender
log4j.appender.stdout.layout=org.apache.log4j.PatternLayout
log4j.appender.stdout.layout.ConversionPattern=%d %p [%c] - %m%n
log4j.appender.logfile=org.apache.log4j.FileAppender
log4j.appender.logfile.File=target/spring.log
log4j.appender.logfile.layout=org.apache.log4j.PatternLayout
log4j.appender.logfile.layout.ConversionPattern=%d %p [%c] - %m%n
常用API
public class TestHDFS {

	private FileSystem fs;

	private Configuration conf = new Configuration();

	@Before
	public void init() throws IOException, URISyntaxException, InterruptedException {

		//创建一个客户端对象
		 fs=FileSystem.get(new URI("hdfs://hadoop101:9000"),conf,"atguigu");

	}

	@After
	public void close() throws IOException {

		if (fs !=null) {
			fs.close();
		}

	}

	//  hadoop fs(运行一个通用的用户客户端)   -mkdir /xxx
	//  创建一个客户端对象 ,调用创建目录的方法,路径作为方法的参数掺入
	@Test
	public void testMkdir() throws IOException {

		fs.mkdirs(new Path("/eclipse2"));
	}

	// 上传文件: hadoop fs -put 本地文件  hdfs
	@Test
	public void testUpload() throws Exception {
		/**
		 * @param delSrc
		 *			  whether to delete the src
		 * @param overwrite
		 *			  whether to overwrite an existing file
		 * @param src path
		 * @param dst path
		 */
		fs.copyFromLocalFile(false, true, new Path("F:/BaiduNetdiskDownload/hadoop-2.7.2.zip"), new Path("/"));

	}

	// 下载文件:  hadoop fs -get hdfs  本地路径
	@Test
	public void testDownload() throws Exception {
		/**
		 * @param delSrc
		 *			  whether to delete the src
		 * @param src path
		 * @param dst path
		 * @param useRawLocalFileSystem
		 *			  whether to use RawLocalFileSystem as local file system or not.
		 *
		 */
		fs.copyToLocalFile(false, new Path("/wcinput"), new Path("f:/test"), true);

	}

	// 删除文件:  hadoop fs -rm -r -f  路径
	@Test
	public void testDelete() throws Exception {

		fs.delete(new Path("/wcoutpout2"), true);


	}

	// 重命名:  hadoop fs -mv  源文件   目标文件
	@Test
	public void testRename() throws Exception {

		fs.rename(new Path("/eclipse1"), new Path("/eclipsedir"));

	}

	// 判断当前路径是否存在
	@Test
	public void testIfPathExsits() throws Exception {

		System.out.println(fs.exists(new Path("/eclipsedir1")));

	}

	// 判断当前路径是目录还是文件
	@Test
	public void testFileIsDir() throws Exception {

		//Path path = new Path("/eclipsedir");
		Path path = new Path("/wcoutput1");

		// 不建议使用此方法,建议好似用Instead reuse the FileStatus returned
		//by getFileStatus() or listStatus() methods.

	/*	System.out.println(fs.isDirectory(path));
		System.out.println(fs.isFile(path));*/

		//FileStatus fileStatus = fs.getFileStatus(path);

		FileStatus[] listStatus = fs.listStatus(path);

		for (FileStatus fileStatus : listStatus) {

			//获取文件名 Path是完整的路径 协议+文件名
			Path filePath = fileStatus.getPath();
			System.out.println(filePath.getName()+"是否是目录:"+fileStatus.isDirectory());
			System.out.println(filePath.getName()+"是否是文件:"+fileStatus.isFile());
		}

	}

	// 获取到文件的块信息
	@Test
	public void testGetBlockInformation() throws Exception {

		Path path = new Path("/hadoop-2.7.2.zip");

		RemoteIterator<LocatedFileStatus> status = fs.listLocatedStatus(path);

		while(status.hasNext()) {

			LocatedFileStatus locatedFileStatus = status.next();

			System.out.println("Owner:"+locatedFileStatus.getOwner());
			System.out.println("Group:"+locatedFileStatus.getGroup());

			//---------------块的位置信息--------------------
			BlockLocation[] blockLocations = locatedFileStatus.getBlockLocations();

			for (BlockLocation blockLocation : blockLocations) {

				System.out.println(blockLocation);
				System.out.println("------------------------");
			}
		}
	}
}
对常用的API做个说明:
-
FileSystem: 文件系统的抽象基类
-
FileSystem的实现取决于fs.defaultFS的配置!有两种实现!
-
LocalFileSystem: 本地文件系统 fs.defaultFS=file:///
-
DistributedFileSystem: 分布式文件系统 fs.defaultFS=hdfs://xxx:9000
-
声明用户身份:
FileSystem fs = FileSystem.get(new URI("hdfs://hadoop101:9000"), conf, "atguigu"); -
-
Configuration : 功能是读取配置文件中的参数
-
Configuration在读取配置文件的参数时,根据文件名,从类路径按照顺序读取配置文件!先读取 xxx-default.xml,再读取xxx-site.xml
-
Configuration类一加载,就会默认读取8个配置文件!
-
将8个配置文件中所有属性,读取到一个Map集合中!
-
也提供了set(name,value),来手动设置用户自定义的参数!
-
-
FileStatus: 代表一个文件的状态(文件的属性信息)
-
offset和length
-
offset是偏移量: 指块在文件中的起始位置
-
length是长度,指块大小
-
刚刚上传的hadoop-2.7.2.zip,210.01MB
hadoop-2.7.2.zip 区间 length offset blk1 0-128MB 128MB 0 blk2 128MB-256MB 82.01MB 128MB -
-
LocatedFileStatus
- LocatedFileStatus是FileStatus的子类,除了文件的属性,还有块的位置信息!
-
参数优先级
参数优先级排序:(1)客户端代码中设置的值 >(2)ClassPath下的用户自定义配置文件 >(3)然后是服务器的默认配置
HDFS的I/O流操作
上面我们学的API操作HDFS系统都是框架封装好的。那么如果我们想自己实现上述API的操作该怎么实现呢?
我们可以采用IO流的方式实现数据的上传和下载。
/*
 * 1. 上传文件时,只上传这个文件的一部分
 *
 * 2. 下载文件时,如何只下载这个文件的某一个块?
 * 			或只下载文件的某一部分?
 */
public class TestCustomUploadAndDownload {

   private FileSystem fs;
   private FileSystem localFs;

	private Configuration conf = new Configuration();

	@Before
	public void init() throws IOException, URISyntaxException, InterruptedException {

		//创建一个客户端对象
		 fs=FileSystem.get(new URI("hdfs://hadoop101:9000"),conf,"atguigu");

		 localFs=FileSystem.get(new Configuration());

	}

	@After
	public void close() throws IOException {

		if (fs !=null) {
			fs.close();
		}
	}

	// 只上传文件的前10M
	/*
	 * 官方的实现
	 * InputStream in=null;
      OutputStream out = null;
      try {
        in = srcFS.open(src);
        out = dstFS.create(dst, overwrite);
        IOUtils.copyBytes(in, out, conf, true);
      } catch (IOException e) {
        IOUtils.closeStream(out);
        IOUtils.closeStream(in);
        throw e;
      }
	 */

	@Test
	public void testCustomUpload() throws Exception {

		//提供两个Path,和两个FileSystem
		Path src=new Path("F:/BaiduNetdiskDownload/hadoop-2.7.2.zip");
		Path dest=new Path("/hadoop10M.zip");

		// 使用本地文件系统中获取的输入流读取本地文件
		FSDataInputStream is = localFs.open(src);

		// 使用HDFS的分布式文件系统中获取的输出流,向dest路径写入数据
		FSDataOutputStream os = fs.create(dest, true);

		// 1k
		byte [] buffer=new byte[1024];

		// 流中数据的拷贝
		for (int i = 0; i < 1024 * 10; i++) {

			is.read(buffer);
			os.write(buffer);

		}

		//关流
		 IOUtils.closeStream(is);
	     IOUtils.closeStream(os);
	}

	/**
	 * 下载第一块
	 */
	@Test
	public void testFirstBlock() throws Exception {
		//提供两个Path,和两个FileSystem
		Path src=new Path("/hadoop-2.7.2.zip");
		Path dest=new Path("f:/test/firstBlock");

		// 使用HDFS的分布式文件系统中获取的输入流,读取HDFS上指定路径的数据
		FSDataInputStream is = fs.open(src);
		// 使用本地文件系统中获取的输出流写入本地文件
		FSDataOutputStream os = localFs.create(dest, true);

		// 1k
		byte [] buffer=new byte[1024];

		// 流中数据的拷贝
		for (int i = 0; i < 1024 * 128; i++) {

			is.read(buffer);
			os.write(buffer);

		}

		//关流
		IOUtils.closeStream(is);
		IOUtils.closeStream(os);

	}

	/**
	 * 下载第二块,这里也就是最后一块
	 */
	@Test
	public void testFinalBlock() throws Exception {
		//提供两个Path,和两个FileSystem
		Path src=new Path("/hadoop-2.7.2.zip");
		Path dest=new Path("f:/test/finalBlock");

		// 使用HDFS的分布式文件系统中获取的输入流,读取HDFS上指定路径的数据
		FSDataInputStream is = fs.open(src);
		// 使用本地文件系统中获取的输出流写入本地文件
		FSDataOutputStream os = localFs.create(dest, true);

		//定位到流的指定位置
		is.seek(1024*1024*128);

		IOUtils.copyBytes(is, os, conf);

	}

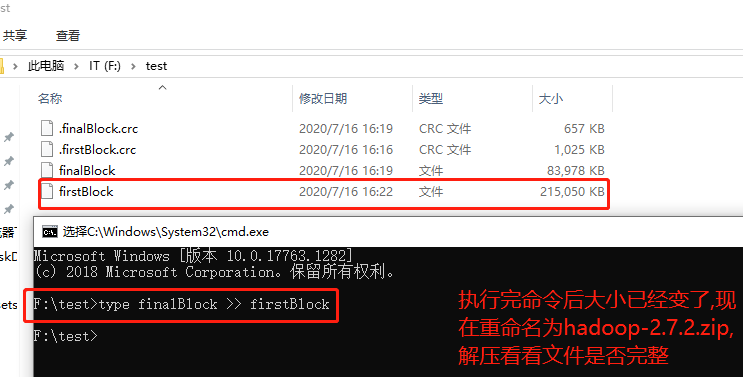
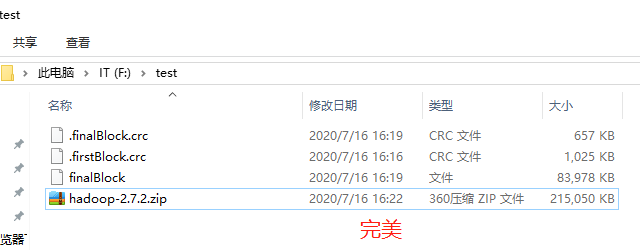
- windows下的合并命令: type finalBlock >> firstBlock
HDFS的数据流(重点)
HDFS写数据流程
剖析文件写入
- HDFS写数据流程,如图所示
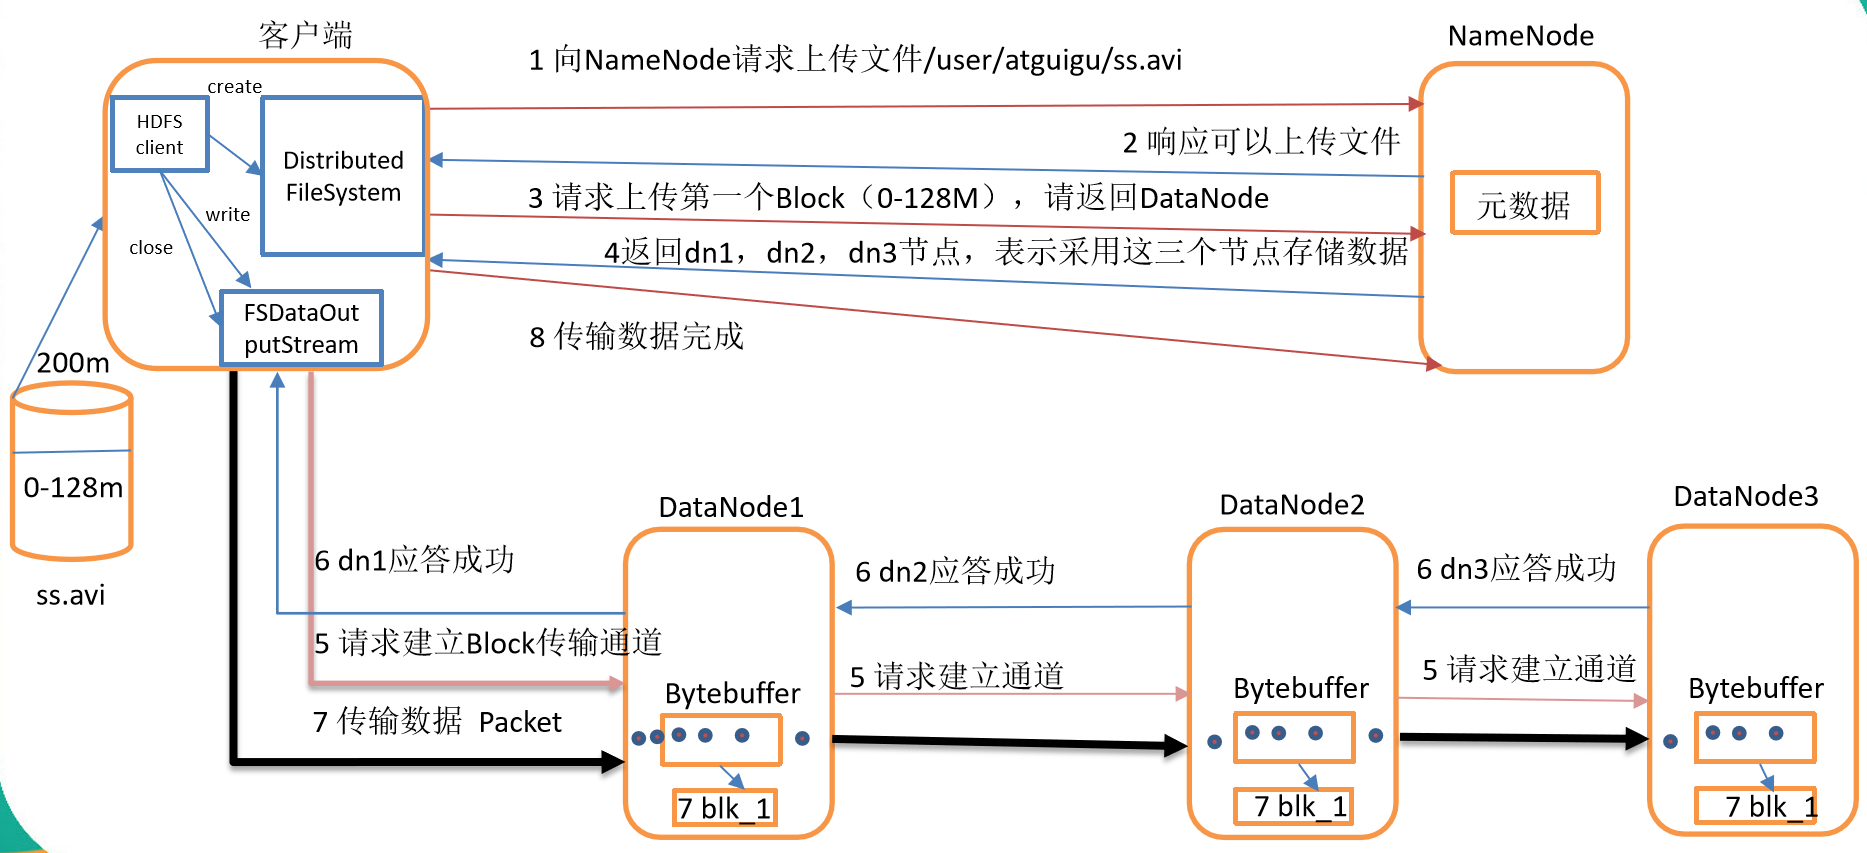
- 客户端通过Distributed FileSystem模块向NameNode请求上传文件,NameNode检查目标文件是否已存在,父目录是否存在。
- NameNode返回是否可以上传。
- 客户端请求第一个 Block上传到哪几个DataNode服务器上。
- NameNode返回3个DataNode节点,分别为dn1、dn2、dn3。
- 客户端通过FSDataOutputStream模块请求dn1上传数据,dn1收到请求会继续调用dn2,然后dn2调用dn3,将这个通信管道建立完成。
- dn1、dn2、dn3逐级应答客户端。
- 客户端开始往dn1上传第一个Block(先从磁盘读取数据放到一个本地内存缓存),以Packet(64k)为单位,dn1收到一个Packet就会传给dn2,dn2传给dn3;dn1每传一个packet会放入一个应答队列等待应答。
- 当一个Block传输完成之后,客户端再次请求NameNode上传第二个Block的服务器。(重复执行3-7步)。
异常写流程
1-6步同上
-
- 客户端每读取64K的数据,封装为一个packet,封装成功的packet,放入到一个队列中,这个队列称为dataQuene(待发送数据包)
- 在发送时,先将dataQuene中的packet按顺序发送,发送后再放入到ackquene(正在发送的队列)。
- 每个节点在收到packet后,向客户端发送ack确认消息!
- 如果一个packet在发送后,已经收到了所有DN返回的ack确认消息,这个packet会在ackquene中删除!
- 假如一个packet在发送后,在收到DN返回的ack确认消息时超时,传输中止,ackquene中的packet会回滚到dataQuene。
- 重新建立通道,剔除坏的DN节点。建立完成之后,继续传输!
- 只要有一个DN节点收到了数据,DN上报NN已经收完此块,NN就认为当前块已经传输成功!
- NN会自动维护副本数!
网络拓扑-节点距离计算
在HDFS写数据的过程中,NameNode会选择距离待上传数据最近距离的DataNode接收数据。那么这个最近距离怎么计算呢?
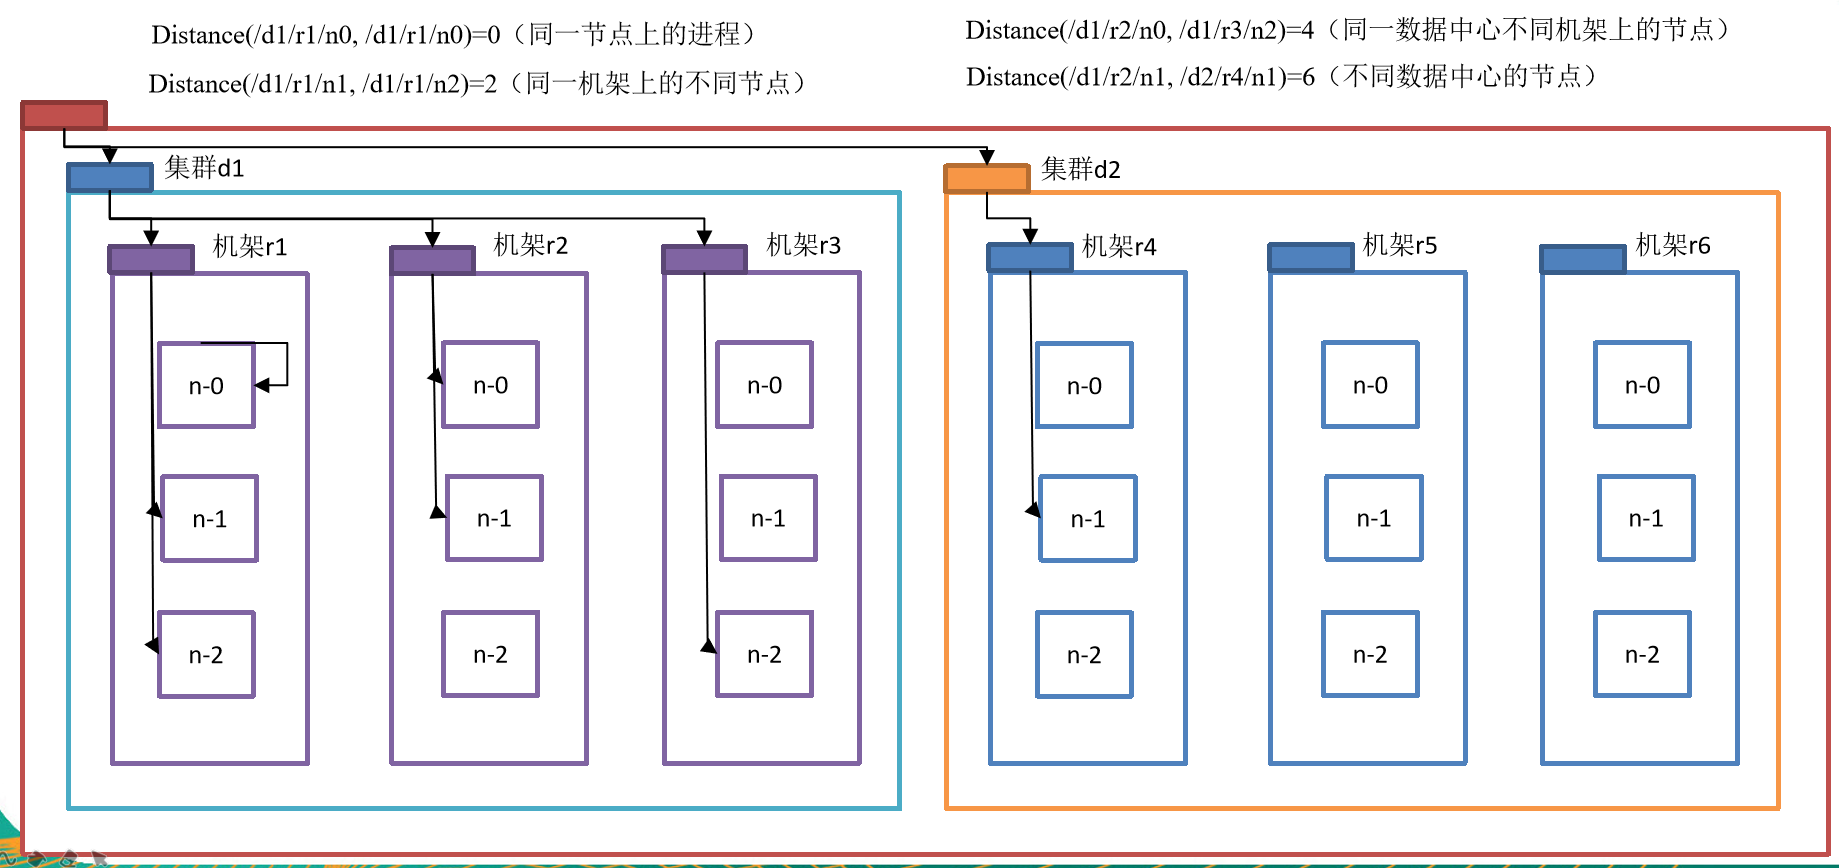
节点距离:两个节点到达最近的共同祖先的距离总和。
例如,假设有数据中心d1机架r1中的节点n1。该节点可以表示为/d1/r1/n1。利用这种标记,这里给出四种距离描述,如图所示
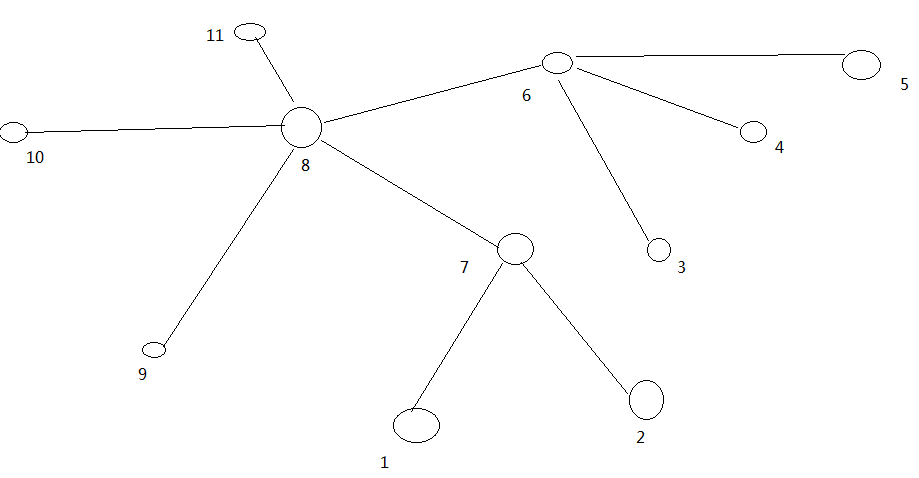
大家算一算每两个节点之间的距离,如图所示。
机架感知(副本存储节点选择)
-
官方ip地址
机架感知说明
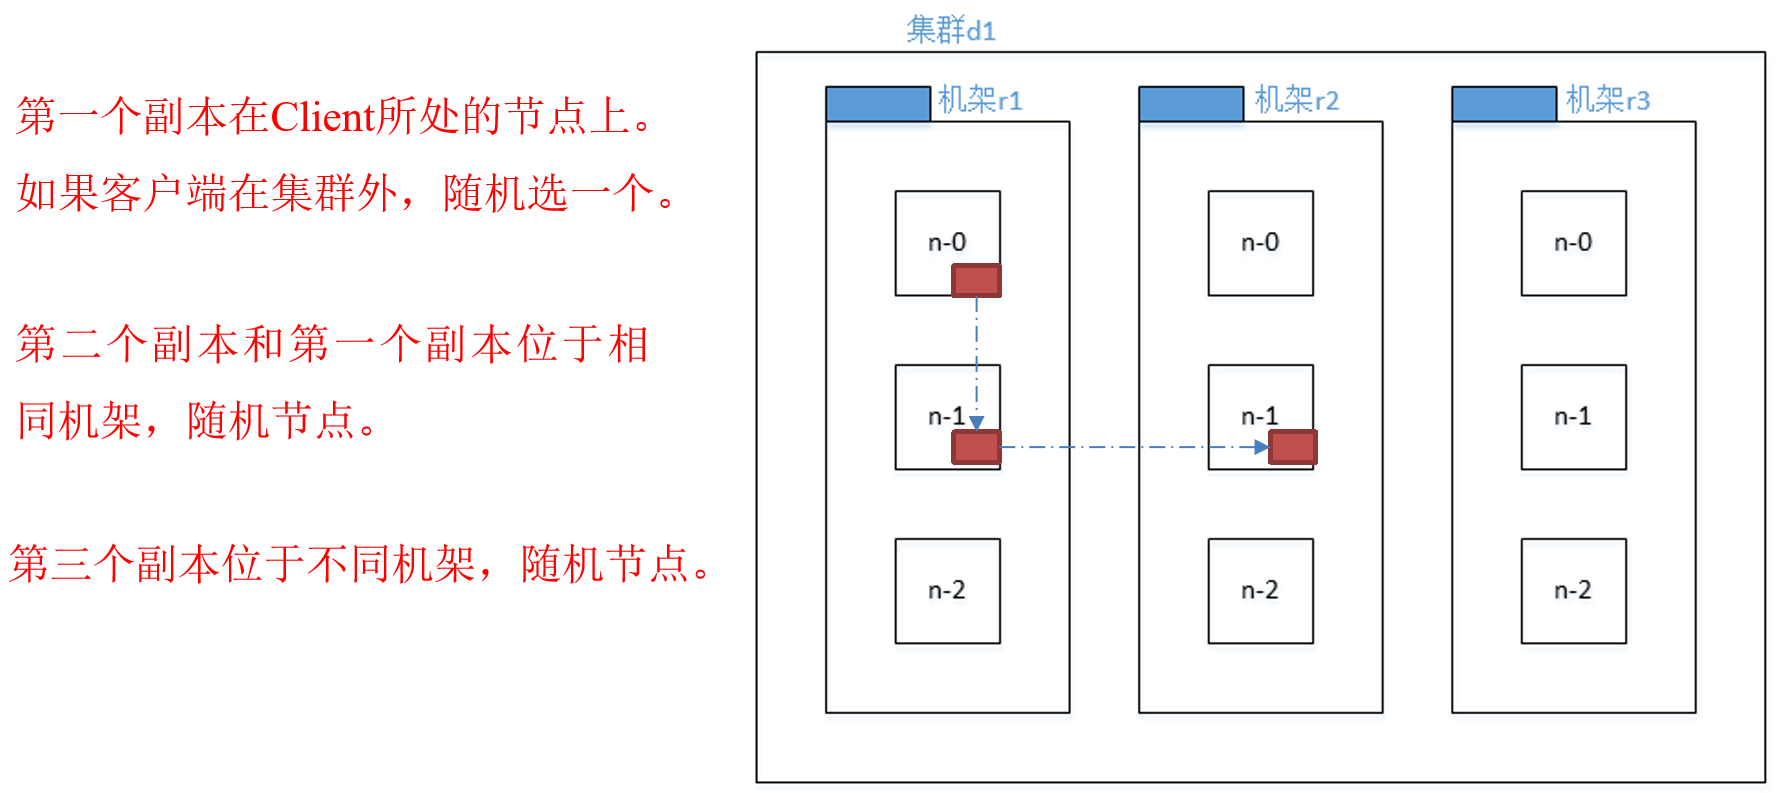
For the common case, when the replication factor is three, HDFS’s placement policy is to put one replica on one node in the local rack, another on a different node in the local rack, and the last on a different node in a different rack.
-
Hadoop2.7.2副本节点选择
![]()
HDFS读数据流程
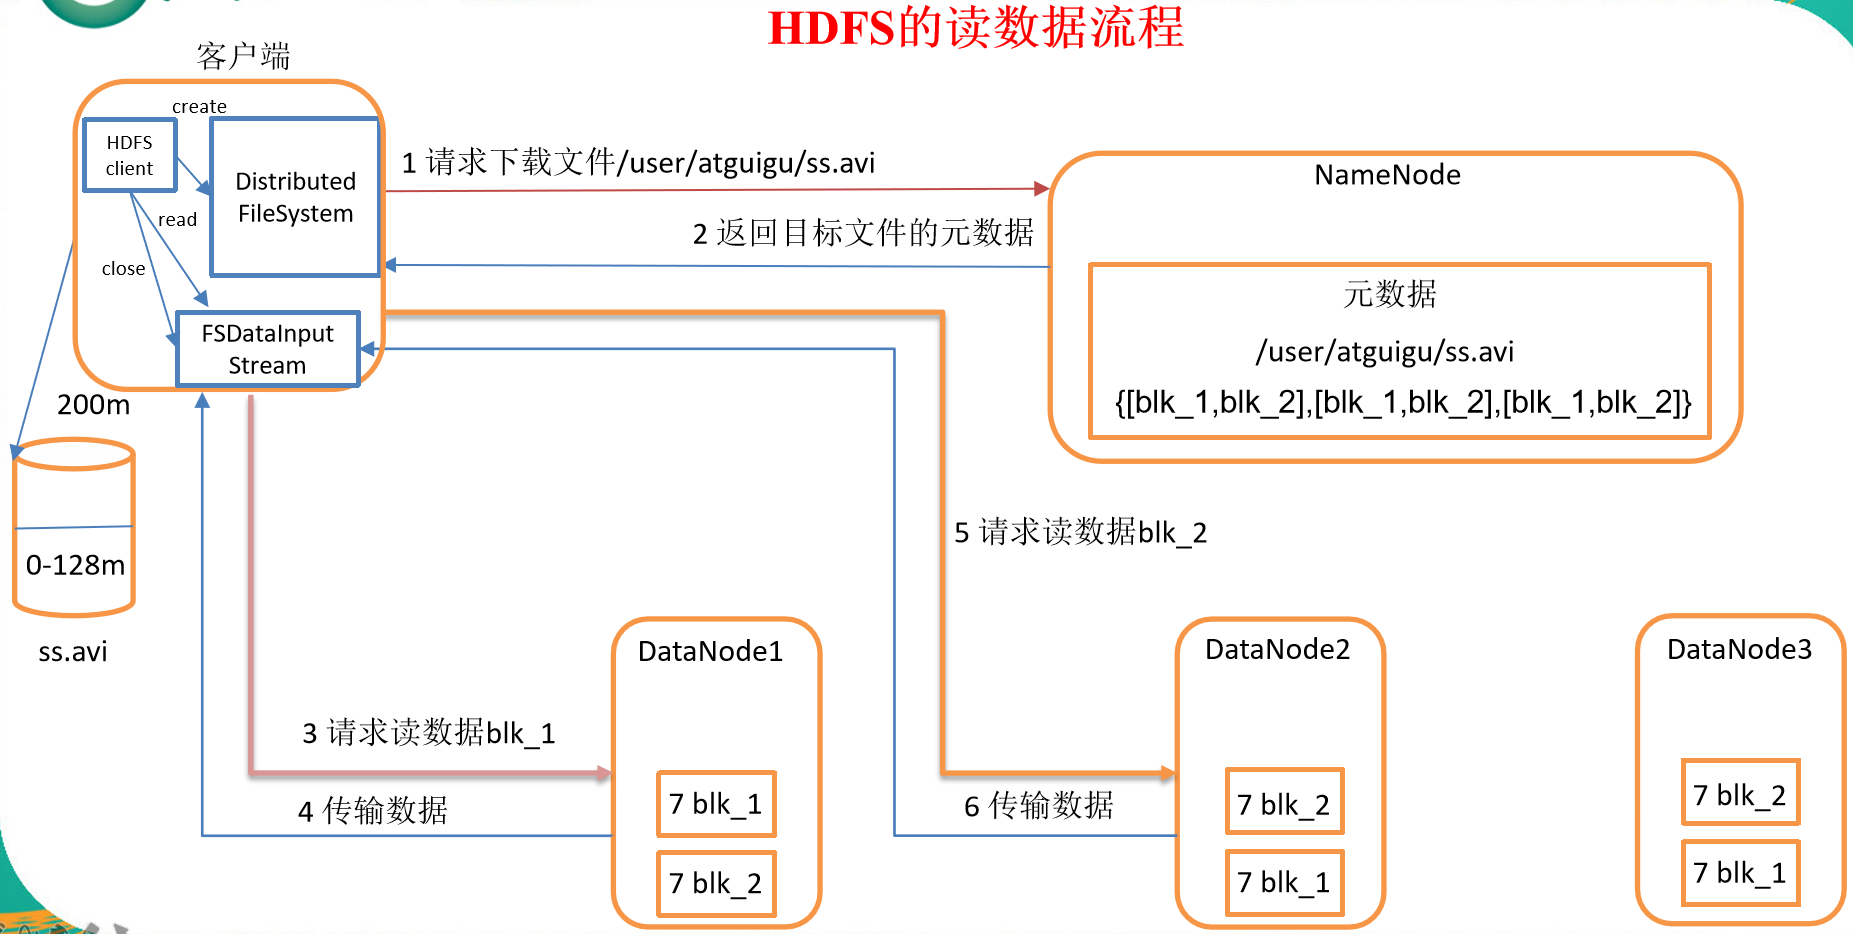
- 客户端通过Distributed FileSystem向NameNode请求下载文件,NameNode通过查询元数据,找到文件块所在的DataNode地址。
- 挑选一台DataNode(就近原则,然后随机)服务器,请求读取数据。
- DataNode开始传输数据给客户端(从磁盘里面读取数据输入流,以Packet为单位来做校验)。
- 客户端以Packet为单位接收,先在本地缓存,然后写入目标文件。
其他注意事项
- HDFS副本数的概念指的是最大副本数!具体存放几个副本需要参考DN节点的数量!每个DN节点最多只能存储一个副本!
- HDFS默认块大小为128M,128M指的是块的最大大小!每个块最多存储128M的数据,如果当前块存储的数据不满128M存了多少数据,就占用多少的磁盘空间!一个块只属于一个文件!
- shell操作命令
- hadoop fs : 既可以对本地文件系统进行操作还可以操作分布式文件系统
- hdfs dfs : 只能操作分布式文件系统




 浙公网安备 33010602011771号