A Simple Faster-RCNN 代码理解学习
写在前面的话
在弄清楚RCNN、Fast-RCNN和Faster-RCNN的原理和区别后,找到了一份开源代码(具体链接见参考资料第一条)研究。第一次看这份代码的时候,我直接去世(doge,pytorch也只是新手的我真的是原地爆炸,后来发现主要是自己沉不住气看,后面看另一篇博主的代码解析的时候(具体链接见参考资料第二条),上面写着“这份代码删除注释只有2000行左右,而我看了差不多7天,自己和大佬的差距真的挺远的”。我...,看都看不下来????
哦呵,上述是发生在这篇博客之前的见闻。因为在上一篇原理部分就faster-rcnn的逻辑就已经梳理的差不多了,所以这里记录一下代码中重要和难理解的部分。
希望自己不要急于求成,沉住气!吾生也有涯,而学也无涯,以有涯随无涯,共勉!
项目的运行流程
train和test相比多出了计算loss的模块,test过程不加入loss模块或者直接跳过
代码理解
三种代码理解和解释,我大部分都在代码(见折叠代码中)中注释了
./utils/eval_tool.py
eval_detection_voc
from __future__ import division

from collections import defaultdict
import itertools
import numpy as np
import six  # 解决python2和python3不兼容的问题
from model.utils.bbox_tools import bbox_iou
def eval_detection_voc(
        pred_bboxes, pred_labels, pred_scores, gt_bboxes, gt_labels,
        gt_difficults=None,
        iou_thresh=0.5, use_07_metric=False):

    # 获取不同类别的precision和recall
    prec, rec = calc_detection_voc_prec_rec(
        pred_bboxes, pred_labels, pred_scores,
        gt_bboxes, gt_labels, gt_difficults,
        iou_thresh=iou_thresh)
    # 获取不同类别的AP
    ap = calc_detection_voc_ap(prec, rec, use_07_metric=use_07_metric)

    # 获取ap和mAP
    return {'ap': ap, 'map': np.nanmean(ap)}
calc_detection_voc_prec_rec
def calc_detection_voc_prec_rec(
        pred_bboxes, pred_labels, pred_scores, gt_bboxes, gt_labels,
        gt_difficults=None,
        iou_thresh=0.5):
    # 将于图片有关的变量转换为迭代器,每次迭代的作用针对下一张图片进行检测
    pred_bboxes = iter(pred_bboxes)
    pred_labels = iter(pred_labels)
    pred_scores = iter(pred_scores)
    gt_bboxes = iter(gt_bboxes)
    gt_labels = iter(gt_labels)
    # 因为VOC数据集中存在难以识别的Ground Truth,所以加上difficult,
    # 如果是difficult可以不参与计算,在下面的代码中体现为标记为-1
    if gt_difficults is None:
        gt_difficults = itertools.repeat(None)
    else:
        gt_difficults = iter(gt_difficults)

    # 初始化记录Precision和Recall数量的字典,第一级键应该是类别
    n_pos = defaultdict(int)
    score = defaultdict(list)
    match = defaultdict(list)

    # 对每张图片进行运算,统计各类别的匹配和不匹配的数量
    for pred_bbox, pred_label, pred_score, gt_bbox, gt_label, gt_difficult in \
            six.moves.zip(
                pred_bboxes, pred_labels, pred_scores,
                gt_bboxes, gt_labels, gt_difficults):

        if gt_difficult is None:
            gt_difficult = np.zeros(gt_bbox.shape[0], dtype=bool)

        for l in np.unique(np.concatenate((pred_label, gt_label)).astype(int)):  # 对类别进行遍历
            # 获取l类的pred_bbox, pred_label, pred_score, gt_bbox, gt_label, gt_difficult
            pred_mask_l = pred_label == l
            pred_bbox_l = pred_bbox[pred_mask_l]
            pred_score_l = pred_score[pred_mask_l]
            order = pred_score_l.argsort()[::-1]
            pred_bbox_l = pred_bbox_l[order]
            pred_score_l = pred_score_l[order]
            # 将预测类别为l的pred_box和pred_score收集起来并且降序排列

            gt_mask_l = gt_label == l
            gt_bbox_l = gt_bbox[gt_mask_l]
            gt_difficult_l = gt_difficult[gt_mask_l]

            n_pos[l] += np.logical_not(gt_difficult_l).sum()
            # 表示一共有多少个ground truth,这里就可以发现忽视了难以判别的ground truth
            score[l].extend(pred_score_l)

            if len(pred_bbox_l) == 0:  # 如果这个图片l类的bbox不存在
                continue
            if len(gt_bbox_l) == 0:  # 如果这个图片存在l类的bbox,但是没有l类的ground truth 就可以标记未不匹配
                match[l].extend((0,) * pred_bbox_l.shape[0])
                continue

            # VOC评估遵循整数类型的边界框。这里不懂?
            pred_bbox_l = pred_bbox_l.copy()
            pred_bbox_l[:, 2:] += 1
            gt_bbox_l = gt_bbox_l.copy()
            gt_bbox_l[:, 2:] += 1

            # 计算这张图片l类的bbox和ground truth 之间的IoU,生成的矩阵大小为(M,N)
            # M :pred_bbox_l的长度,N:gt_bbox_l的长度
            iou = bbox_iou(pred_bbox_l, gt_bbox_l)
            gt_index = iou.argmax(axis=1)
            # 这里应该是找到和pred_bbox_l中IOU最大的ground truth,shape:(M,)
            # pred_bbox_l和ground truth最大的iou都小于阈值的标记为不匹配的,-1
            gt_index[iou.max(axis=1) < iou_thresh] = -1
            del iou

            selec = np.zeros(gt_bbox_l.shape[0], dtype=bool)
            for gt_idx in gt_index:
                if gt_idx >= 0:
                    if gt_difficult_l[gt_idx]:  # 该ground truth是识别困难的,就不参与计算
                        match[l].append(-1)
                    else:
                        if not selec[gt_idx]:  # 该位置的pred_bbox存在超过IOU阈值的ground truth,就标记为匹配成功,1
                            match[l].append(1)
                        else:  # 一个ground truth只能被对应一次
                            match[l].append(0)
                    selec[gt_idx] = True
                else:
                    match[l].append(0)
            # match应该表示pred_bbox有多少个对应上了ground truth,而且留下了列表,可以记录预测框的对应情况

    for iter_ in (
            pred_bboxes, pred_labels, pred_scores,
            gt_bboxes, gt_labels, gt_difficults):
        if next(iter_, None) is not None:
            raise ValueError('Length of input iterables need to be same.')
    # 保证相同长度

    n_fg_class = max(n_pos.keys()) + 1  # 总共的类别数量
    prec = [None] * n_fg_class
    rec = [None] * n_fg_class

    for l in n_pos.keys():
        score_l = np.array(score[l])
        match_l = np.array(match[l], dtype=np.int8)

        # 获取按照得分降序排列的所有pred_bbox
        order = score_l.argsort()[::-1]
        # 匹配列表也按照得分降序排列
        match_l = match_l[order]

        # 我第一看到这里的时候感觉是很不对的,直觉上来说应该是np.sum,而不是np.cumsum,但是这里的指标是AP(下面博文会介绍)
        # 这里按照得分降序排列计算出tp和fp,是为了计算PR曲线和AP。
        tp = np.cumsum(match_l == 1)
        fp = np.cumsum(match_l == 0)

        # 如果fp+tp == 0 ,那么prec[l] = nan
        prec[l] = tp / (fp + tp)
        # 如果n_pos[l] <= 0,那么rec[l] = None
        if n_pos[l] > 0:
            rec[l] = tp / n_pos[l]

    return prec, rec
calc_detection_voc_ap
def calc_detection_voc_ap(prec, rec, use_07_metric=False):
    # 初始化记录的变量
    n_fg_class = len(prec)
    ap = np.empty(n_fg_class)
    for l in six.moves.range(n_fg_class):
        # 提前做成判断,防止程序报错
        if prec[l] is None or rec[l] is None:
            ap[l] = np.nan
            continue

        if use_07_metric:  # 是否使用VOC2007计算方法(下面博文会进行介绍)
            # 11 point metric
            ap[l] = 0
            for t in np.arange(0., 1.1, 0.1):
                if np.sum(rec[l] >= t) == 0:
                    p = 0
                else:
                    p = np.max(np.nan_to_num(prec[l])[rec[l] >= t])
                ap[l] += p / 11
        else:  # VOC 2007以后的方法(下面博文会进行介绍)
            mpre = np.concatenate(([0], np.nan_to_num(prec[l]), [0]))
            mrec = np.concatenate(([0], rec[l], [1]))
            mpre = np.maximum.accumulate(mpre[::-1])[::-1]
            i = np.where(mrec[1:] != mrec[:-1])[0]
            ap[l] = np.sum((mrec[i + 1] - mrec[i]) * mpre[i + 1])

    return ap
三个函数之间的关系:eval_detection_voc将calc_detection_voc_prec_rec的结果传递给calc_detection_voc_ap获得每个种类的AP和mAP。
AP和mAP
AP:Precision-Recall曲线下的面积
mAP:各类别AP的均值
\(AP = \int_0^1p(r)dr\),但是一般情况下是采用通过采样recall值使用分段矩形的面积近似代替积分值,这里就存在着两种方法
计算方法
- VOC2007以前:只需要选取当Recall >= 0, 0.1, 0.2, ..., 1共11个点时的Precision最大值,然后AP就是这11个Precision的平均值。
- VOC2007以后:需要针对每一个不同的Recall值(包括0和1),选取其大于等于这些Recall值时的Precision最大值,然后计算PR曲线下面积(通过采样点计算各个矩形面积之和)作为AP值。
栗子
(本示例来自于参考资料第3条)
假设,对于Aeroplane类别,我们网络有以下输出(BB表示BoundingBox序号,IoU>0.5时GT=1):
| BB | confidence | GT |
|---|---|---|
| BB1 | 0.9 | 1 |
| BB2 | 0.9 | 1 |
| BB1 | 0.8 | 1 |
| BB3 | 0.7 | 0 |
| BB4 | 0.7 | 0 |
| BB5 | 0.7 | 1 |
| BB6 | 0.7 | 0 |
| BB7 | 0.7 | 0 |
| BB8 | 0.7 | 1 |
| BB9 | 0.7 | 1 |
| 因此,我们有 TP=5 (BB1, BB2, BB5, BB8, BB9), FP=5 (重复检测到的BB1也算FP)。除了表里检测到的5个GT以外,我们还有2个GT没被检测到,因此: FN = 2. 这时我们就可以按照Confidence的顺序给出各处的PR值,如下 | ||
| rank | precision | recall |
| -- | -- | -- |
| 1 | 1.00 | 0.14 |
| 2 | 1.00 | 0.29 |
| 3 | 0.66 | 0.29 |
| 4 | 0.50 | 0.29 |
| 5 | 0.40 | 0.29 |
| 6 | 0.50 | 0.43 |
| 7 | 0.43 | 0.43 |
| 8 | 0.38 | 0.43 |
| 9 | 0.44 | 0.57 |
| 10 | 0.50 | 0.71 |
| 对于上述PR值 | ||
| 1.如果我们采用:VOC2010之前的方法,我们选取Recall >= 0, 0.1, ..., 1的11处Percision的最大值:1, 1, 1, 0.5, 0.5, 0.5, 0.5, 0.5, 0, 0, 0。此时Aeroplane类别的 AP = 5.5 / 11 = 0.5 | ||
| 2.VOC2010及以后的方法,对于Recall >= 0, 0.14, 0.29, 0.43, 0.57, 0.71, 1,我们选取此时Percision的最大值:1, 1, 1, 0.5, 0.5, 0.5, 0。此时Aeroplane类别的 AP = (0.14-0)*1 + (0.29-0.14)*1 + (0.43-0.29)*0.5 + (0.57-0.43)*0.5 + (0.71-0.57)*0.5 + (1-0.71)*0 = 0.5 |
./model/utils/bbox_tool.py
loc2bbox
def loc2bbox(src_bbox, loc):
    '''
    通过一开始定义的scr_bbox和变形比例loc,求出变形转换后的dst_bbox
    '''
    if src_bbox.shape[0] == 0:
        return xp.zeros((0, 4), dtype=loc.dtype)

    # 统一数据格式
    src_bbox = src_bbox.astype(src_bbox.dtype, copy=False)
    # 在我上一篇博客中介绍了bounding box的回归可以参考一下
    # 变形比例主要是在x,y,h,w进行转换,所以先求出原始bbox的x,y,w,h
    src_height = src_bbox[:, 2] - src_bbox[:, 0]
    src_width = src_bbox[:, 3] - src_bbox[:, 1]
    # 标记为了中心坐标
    src_ctr_y = src_bbox[:, 0] + 0.5 * src_height
    src_ctr_x = src_bbox[:, 1] + 0.5 * src_width

    # 分隔不同的变形比例
    dy = loc[:, 0::4]
    dx = loc[:, 1::4]
    dh = loc[:, 2::4]
    dw = loc[:, 3::4]
    # 插入x.newaxis变成列向量
    # 变形转换
    ctr_y = dy * src_height[:, xp.newaxis] + src_ctr_y[:, xp.newaxis]
    ctr_x = dx * src_width[:, xp.newaxis] + src_ctr_x[:, xp.newaxis]
    h = xp.exp(dh) * src_height[:, xp.newaxis]
    w = xp.exp(dw) * src_width[:, xp.newaxis]

    # 转换为bbox的形式
    dst_bbox = xp.zeros(loc.shape, dtype=loc.dtype)
    dst_bbox[:, 0::4] = ctr_y - 0.5 * h
    dst_bbox[:, 1::4] = ctr_x - 0.5 * w
    dst_bbox[:, 2::4] = ctr_y + 0.5 * h
    dst_bbox[:, 3::4] = ctr_x + 0.5 * w
    return dst_bbox
bbox2loc
def bbox2loc(src_bbox, dst_bbox):
    '''
    通过原始bbox和已经存在的bbox(一般是ground truth),求出src_bbox到dst_bbox的变形比例
    一般用于损失函数的计算
    '''
    # src_bbox (x,y,h,w)
    height = src_bbox[:, 2] - src_bbox[:, 0]
    width = src_bbox[:, 3] - src_bbox[:, 1]
    ctr_y = src_bbox[:, 0] + 0.5 * height
    ctr_x = src_bbox[:, 1] + 0.5 * width
    # ground truth (x,y,h,w)
    base_height = dst_bbox[:, 2] - dst_bbox[:, 0]
    base_width = dst_bbox[:, 3] - dst_bbox[:, 1]
    base_ctr_y = dst_bbox[:, 0] + 0.5 * base_height
    base_ctr_x = dst_bbox[:, 1] + 0.5 * base_width

    eps = xp.finfo(height.dtype).eps
    # eps是获取非负的最小值,防止除以0
    height = xp.maximum(height, eps)
    width = xp.maximum(width, eps)

    dy = (base_ctr_y - ctr_y) / height
    dx = (base_ctr_x - ctr_x) / width
    dh = xp.log(base_height / height)
    dw = xp.log(base_width / width)

    loc = xp.vstack((dy, dx, dh, dw)).transpose()
    return loc
bbox_iou
def bbox_iou(bbox_a, bbox_b):
    '''
    计算两组bboxes的之间的IoU,bbox_a.shape = (N,4),bbox_b.shape = (M,4)
    生成的IoU矩阵.shape = (N,M)
    '''
    if bbox_a.shape[1] != 4 or bbox_b.shape[1] != 4:
        raise IndexError

    # 左下角
    tl = xp.maximum(bbox_a[:, None, :2], bbox_b[:, :2])
    # 右上角
    br = xp.minimum(bbox_a[:, None, 2:], bbox_b[:, 2:])
    # (tl<br)是为了保证两个bbox是有相交部分的,无相交的部分的就是0
    area_i = xp.prod(br - tl, axis=2) * (tl < br).all(axis=2)
    area_a = xp.prod(bbox_a[:, 2:] - bbox_a[:, :2], axis=1)
    area_b = xp.prod(bbox_b[:, 2:] - bbox_b[:, :2], axis=1)
    return area_i / (area_a[:, None] + area_b - area_i)
generate_anchor_base
def generate_anchor_base(base_size=16, ratios=[0.5, 1, 2],
                         anchor_scales=[8, 16, 32]):
    '''
    这是产生基础的anchor box的函数
    基础指的是这里anchor box不与任何图片有关,只是基于batch_size大小区域和坐标原点为(0,0)的生成的anchor box
    具体我自己的理解会在下面博文中阐述
    '''
    # 这里表示batch_size大小区域的中心点
    py = base_size / 2.
    px = base_size / 2.

    anchor_base = np.zeros((len(ratios) * len(anchor_scales), 4),
                           dtype=np.float32)
    for i in six.moves.range(len(ratios)):
        for j in six.moves.range(len(anchor_scales)):
            # 存在9中不同的anchor box
            h = base_size * anchor_scales[j] * np.sqrt(ratios[i])
            w = base_size * anchor_scales[j] * np.sqrt(1. / ratios[i])
            # 转换成标准的bbox格式,(ymin,xmin,ymax,xmax)
            index = i * len(anchor_scales) + j
            anchor_base[index, 0] = py - h / 2.
            anchor_base[index, 1] = px - w / 2.
            anchor_base[index, 2] = py + h / 2.
            anchor_base[index, 3] = px + w / 2.
    return anchor_base
    # 这里虽然产生了bbox,但是是基于坐标原点为(0,0)产生的9个不同形状的anchor box,是base
    # 在之后的使用中必须加上bbox的偏移量才能正确的表示候选框
    # 偏移量是因为不同像素点除了左上角的一个以外都不是以(0,0)坐标原点绘制候选框的
anchor base
(我写的注释都是我自己的理解,可能会有些抽象,写下来方便自己以后回顾记忆)
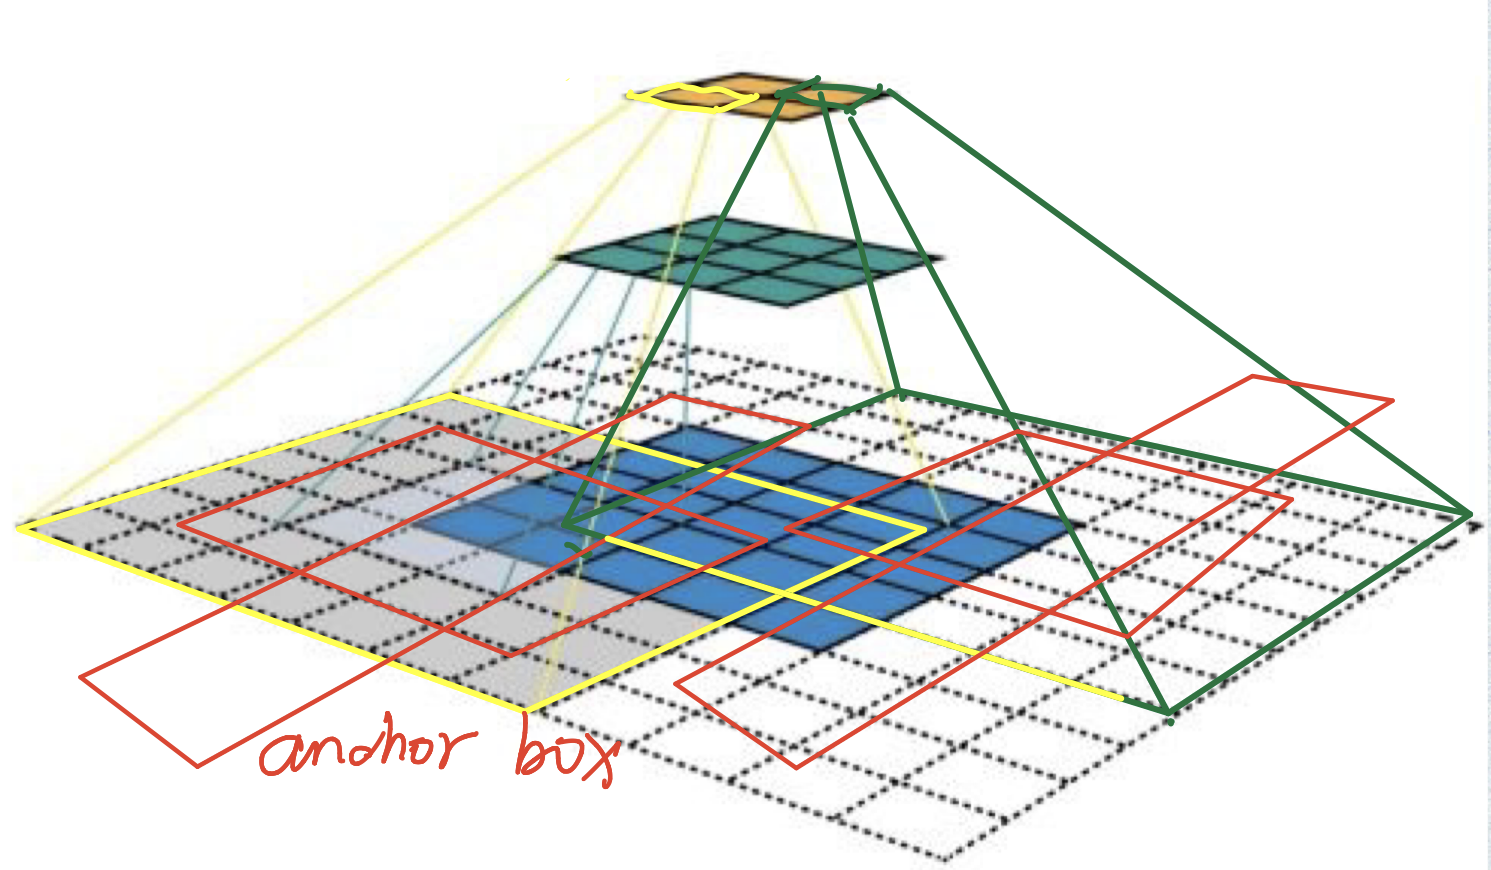
左边的图表示在genenrate_anchor_base函数中生成的anchor,是基于以(0,0)为坐标原点的生成的,但是在任意区域就需要进行偏移。
_enumerate_shifted_anchor_torch
这个函数在./model/region_proposal_network.py中(来看看在这份代码中是如何体现偏移的)
def _enumerate_shifted_anchor_torch(anchor_base, feat_stride, height, width):
    # Enumerate all shifted anchors:
    #
    # add A anchors (1, A, 4) to
    # cell K shifts (K, 1, 4) to get
    # shift anchors (K, A, 4)
    # reshape to (K*A, 4) shifted anchors
    # return (K*A, 4)

    # !TODO: add support for torch.CudaTensor
    # xp = cuda.get_array_module(anchor_base)
    import torch as t
    shift_y = t.arange(0, height * feat_stride, feat_stride)
    shift_x = t.arange(0, width * feat_stride, feat_stride)
    shift_x, shift_y = xp.meshgrid(shift_x, shift_y)
    shift = xp.stack((shift_y.ravel(), shift_x.ravel(),
                      shift_y.ravel(), shift_x.ravel()), axis=1)
    A = anchor_base.shape[0]
    K = shift.shape[0]
    anchor = anchor_base.reshape((1, A, 4)) + \
             shift.reshape((1, K, 4)).transpose((1, 0, 2))
    anchor = anchor.reshape((K * A, 4)).astype(np.float32)
    return anchor
用一张图来介绍一下这个函数的作用:
进行卷积和pooling运算后,特征图变小了,但是anchor是原图上的体现,即(ymin,xmin,ymax,xmax)都是在原图上的坐标,那么在特征图上的每一个像素点感受野的左上角坐标便是根据这个像素点生成anchor box所需要基于的坐标(也就是该像素点anchor base 的偏移量,似乎有点绕)。反正特征图上每个像素点的anchor base都需要偏移,而且偏移的距离是该像素点感受野的左上角坐标。
代码中变量shift就是偏移量, anchor = anchor_base.reshape((1, A, 4)) + shift.reshape((1, K, 4)).transpose((1, 0, 2))便是让每个像素点上的anchor base偏移通过这个像素点计算出来的偏移量。假设特征图是(C,H,W),N = H*W,那么anchor是(K = N*A,4)。
然后偏移量的计算也可以用一张图来表示:(偏移16是因为特征图相比原图缩小了16倍,这里我是不理解的,因为我认为原图与特征图之间的映射是复杂的,具体可以见我上一篇博客)
shift_x,shift_y就是为了生成图中红蓝以及省略号两个矩阵,shift表示每个像素点的偏移量矩阵,为什么是四维的,我认为是(ymin,xmin,ymax,xmax)的原因,也就是说每个偏移量用四个来表示,而不是我图中说的两个就可以了。
最后anchor_base和shift相加生成最终的anchor。最终结果:
./model/utils/creator_tools.py
ProposalTargetCreator
class ProposalTargetCreator(object):
    def __init__(self,
                 n_sample=128,
                 pos_ratio=0.25, pos_iou_thresh=0.5,
                 neg_iou_thresh_hi=0.5, neg_iou_thresh_lo=0.0
                 ):
        self.n_sample = n_sample  # 生成样本的数量
        self.pos_ratio = pos_ratio  # 正样本比例
        self.pos_iou_thresh = pos_iou_thresh  # 将一个ROI划分为正样本的IoU阈值
        self.neg_iou_thresh_hi = neg_iou_thresh_hi  # 将一个ROI划分为负样本的IoU最大值
        self.neg_iou_thresh_lo = neg_iou_thresh_lo  # 将一个ROI划分为负样本的IoU最小值,但是faster-rcnn中默认是0.1

    def __call__(self, roi, bbox, label,
                 loc_normalize_mean=(0., 0., 0., 0.),
                 loc_normalize_std=(0.1, 0.1, 0.2, 0.2)):
        '''
        给定ROIs和bboxes(ground truth),以及bbox的label生成数量合适的正负样本
        正样本指的是和其中一个ground truth的IoU大于阈值的ROIs,或者是ground truth也可以,因为正样本比较少
        负样本指的是和所有ground truth的IoU都在neg_iou_thresh_hi和neg_iou_thresh_lo之间
        '''
        n_bbox, _ = bbox.shape

        # 新的ROI由原来的ROIs和ground truth组成,将ground truth 看成正样本
        roi = np.concatenate((roi, bbox), axis=0)
        # 每张图片上正样本的数量
        pos_roi_per_image = np.round(self.n_sample * self.pos_ratio)
        # iou矩阵下半部分是对角阵
        iou = bbox_iou(roi, bbox)
        # 获得每个ROI对应的ground truth,原来的ground truth便是对应自己
        gt_assignment = iou.argmax(axis=1)
        max_iou = iou.max(axis=1)
        # label偏移 [0, n_fg_class - 1] to [1, n_fg_class].
        # 0表示背景,获取label,最靠近哪个ground truth,便是哪个ground truth的标签
        gt_roi_label = label[gt_assignment] + 1

        # 找到正样本的索引
        pos_index = np.where(max_iou >= self.pos_iou_thresh)[0]
        # 最多构成pos_roi_per_image个正样本
        pos_roi_per_this_image = int(min(pos_roi_per_image, pos_index.size))
        # 在正样本中随机选取和排列
        if pos_index.size > 0:
            pos_index = np.random.choice(
                pos_index, size=pos_roi_per_this_image, replace=False)

        # 找到负样本的索引
        neg_index = np.where((max_iou < self.neg_iou_thresh_hi) &
                             (max_iou >= self.neg_iou_thresh_lo))[0]
        # 下面和正样本采用同样的方式生成负样本
        neg_roi_per_this_image = self.n_sample - pos_roi_per_this_image
        neg_roi_per_this_image = int(min(neg_roi_per_this_image,
                                         neg_index.size))
        if neg_index.size > 0:
            neg_index = np.random.choice(
                neg_index, size=neg_roi_per_this_image, replace=False)

        # 获取正负样本label和ROI
        keep_index = np.append(pos_index, neg_index)
        gt_roi_label = gt_roi_label[keep_index]
        gt_roi_label[pos_roi_per_this_image:] = 0  # negative labels --> 0
        sample_roi = roi[keep_index]

        # 每个样本与最合适的ground truth计算变形比例,gt_assignment[keep_index]就是每个样本对应的ground truth索引
        gt_roi_loc = bbox2loc(sample_roi, bbox[gt_assignment[keep_index]])
        # 因为输出的结果需要放入网络中训练,所以对其标准化
        gt_roi_loc = ((gt_roi_loc - np.array(loc_normalize_mean, np.float32)
                       ) / np.array(loc_normalize_std, np.float32))

        return sample_roi, gt_roi_loc, gt_roi_label
AnchorTargetCreator
class AnchorTargetCreator(object):
    def __init__(self,
                 n_sample=256,
                 pos_iou_thresh=0.7, neg_iou_thresh=0.3,
                 pos_ratio=0.5):
        # 返回ROI的数量,也可以说是anchor box的数量,anchor和ROI在数量上是等价的
        # anchor + loc = ROI
        self.n_sample = n_sample
        self.pos_iou_thresh = pos_iou_thresh  # 将anchor视作正样本的IoU阈值
        self.neg_iou_thresh = neg_iou_thresh  # 将anchor视作负样本的IoU阈值
        self.pos_ratio = pos_ratio  # 正样本的比例

    def __call__(self, bbox, anchor, img_size):
        '''
        给定bbox(ground truth)和anchor,返回每个anchor的label和变形比例loc
        这是为了RPN网络的训练,生成的每个anchor的label和loc,在RPN网络中也会预测一份,两者便可以计算损失
        '''
        img_H, img_W = img_size  # 图片的大小

        n_anchor = len(anchor)
        inside_index = _get_inside_index(anchor, img_H, img_W)  # 获得整个anchor完全在img里面的anchor index
        anchor = anchor[inside_index]
        argmax_ious, label = self._create_label(
            inside_index, anchor, bbox)  # 获得inside_anchor的label和与之最接近的ground truth索引

        # 获得inside_anchor的loc
        loc = bbox2loc(anchor, bbox[argmax_ious])

        # 补充完善,获得所有anchor的变形比例和二分类标签
        label = _unmap(label, n_anchor, inside_index, fill=-1)  # outside_index的label == -1
        loc = _unmap(loc, n_anchor, inside_index, fill=0)  # outside_index的loc == (0,0,0,0)
        return loc, label

    def _create_label(self, inside_index, anchor, bbox):
        # label: 1 is positive, 0 is negative, -1 is dont care
        label = np.empty((len(inside_index),), dtype=np.int32)
        label.fill(-1)

        argmax_ious, max_ious, gt_argmax_ious = \
            self._calc_ious(anchor, bbox, inside_index)

        # 如果anchor与ground truth 的最大iou都小于self.neg_iou_thresh那么该anchor是负样本
        label[max_ious < self.neg_iou_thresh] = 0

        # 每个ground truth都有一个IoU最大的anchor,这个anchor为正样本
        label[gt_argmax_ious] = 1

        # 各个anchor的最大重叠度大于阈值的置为正样本
        label[max_ious >= self.pos_iou_thresh] = 1

        # 正样本的数量
        n_pos = int(self.pos_ratio * self.n_sample)
        pos_index = np.where(label == 1)[0]
        if len(pos_index) > n_pos:
            disable_index = np.random.choice(
                pos_index, size=(len(pos_index) - n_pos), replace=False)
            label[disable_index] = -1
        # 只保留n_pos个正样本

        # 正样本的数量
        n_neg = self.n_sample - np.sum(label == 1)
        neg_index = np.where(label == 0)[0]
        if len(neg_index) > n_neg:  # 按照道理因为存在label == -1的数量>=0,所以这个if应该不可能成立
            disable_index = np.random.choice(
                neg_index, size=(len(neg_index) - n_neg), replace=False)
            label[disable_index] = -1
        # 保证n_neg个负样本
        # 返回:与每个anchor 重叠度最高的ground truth,每个anchor的label
        return argmax_ious, label

    def _calc_ious(self, anchor, bbox, inside_index):
        # ious between the anchors and the gt boxes
        ious = bbox_iou(anchor, bbox)
        argmax_ious = ious.argmax(axis=1)  # 求出与anchor 重叠度最高的ground truth
        max_ious = ious[np.arange(len(inside_index)), argmax_ious]  # 求出与anchor 重叠度最高的ground truth 之间的iou
        gt_argmax_ious = ious.argmax(axis=0)
        gt_max_ious = ious[gt_argmax_ious, np.arange(ious.shape[1])]
        gt_argmax_ious = np.where(ious == gt_max_ious)[0]  # 求出与每个ground truth 重叠度最高的anchor

        return argmax_ious, max_ious, gt_argmax_ious


def _unmap(data, count, index, fill=0):
    # count里面index以外的补充为fill,其他为data
    if len(data.shape) == 1:
        ret = np.empty((count,), dtype=data.dtype)
        ret.fill(fill)
        ret[index] = data
    else:
        ret = np.empty((count,) + data.shape[1:], dtype=data.dtype)
        ret.fill(fill)
        ret[index, :] = data
    return ret


def _get_inside_index(anchor, H, W):
    # 返回完全在H,W(图片的大小)里面的anchor索引
    index_inside = np.where(
        (anchor[:, 0] >= 0) &
        (anchor[:, 1] >= 0) &
        (anchor[:, 2] <= H) &
        (anchor[:, 3] <= W)
    )[0]
    return index_inside
ProposalCreator
class ProposalCreator:
    def __init__(self,
                 parent_model,
                 nms_thresh=0.7,
                 n_train_pre_nms=12000,
                 n_train_post_nms=2000,
                 n_test_pre_nms=6000,
                 n_test_post_nms=300,
                 min_size=16
                 ):
        self.parent_model = parent_model  # 传过来的model,用来表示train或者test,使用不同的nms阈值
        self.nms_thresh = nms_thresh
        self.n_train_pre_nms = n_train_pre_nms
        self.n_train_post_nms = n_train_post_nms
        self.n_test_pre_nms = n_test_pre_nms
        self.n_test_post_nms = n_test_post_nms
        self.min_size = min_size  # 候选框的最小大小,太小的就选择丢弃

    def __call__(self, loc, score,
                 anchor, img_size, scale=1.):
        '''
        给定anchor,loc,score,主要是对anchor进行处理、非极大抑制和选择,返回通过RPN网络选择的ROIs
        '''
        # 通过父网络判断网络模式
        if self.parent_model.training:
            n_pre_nms = self.n_train_pre_nms
            n_post_nms = self.n_train_post_nms
        else:
            n_pre_nms = self.n_test_pre_nms
            n_post_nms = self.n_test_post_nms

        # 生成ROI
        roi = loc2bbox(anchor, loc)

        # 对ROI进行修剪,保证在图片范围内
        roi[:, slice(0, 4, 2)] = np.clip(
            roi[:, slice(0, 4, 2)], 0, img_size[0])
        roi[:, slice(1, 4, 2)] = np.clip(
            roi[:, slice(1, 4, 2)], 0, img_size[1])

        # 抛弃较小的候选框
        min_size = self.min_size * scale
        hs = roi[:, 2] - roi[:, 0]
        ws = roi[:, 3] - roi[:, 1]
        keep = np.where((hs >= min_size) & (ws >= min_size))[0]
        roi = roi[keep, :]
        score = score[keep]

        # 对每个ROI的score降序排列,同时选择n_pre_nms个
        order = score.ravel().argsort()[::-1]
        if n_pre_nms > 0:
            order = order[:n_pre_nms]
        roi = roi[order, :]
        score = score[order]

        # 非极大抑制,按照得分降序排列返回剩下的ROI索引
        keep = nms(
            torch.from_numpy(roi).cuda(),
            torch.from_numpy(score).cuda(),
            self.nms_thresh)
        if n_post_nms > 0:  # 控制数量
            keep = keep[:n_post_nms]
        roi = roi[keep.cpu().numpy()]
        return roi
参考博客和资料
谢谢各位大佬🎉🎉🎉
同一个博主我贴上了一份资料,其他资料地址同源
- simple-faster-rcnn-pytorch -- Github -- chenyuntc
- 目标检测之Faster-RCNN的pytorch代码详解 -- cnblog -- 西红柿炒蛋就加糖
- 目标检测中的mAP是什么含义? -- zhihu -- Wentao
- 图片来源 --zhihu -- 留德华叫兽
