Asp.net core 微服务API网关
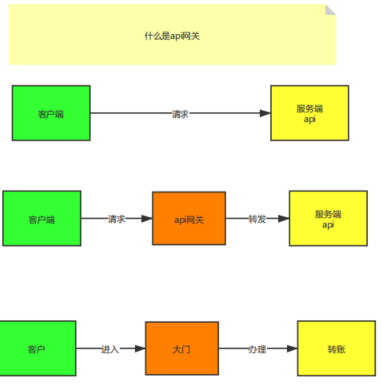
1.什么是API网关
就是用来限制客户端访问服务端api一到门槛,在图例中已经进行了展示:
2.为什么要使用api网关
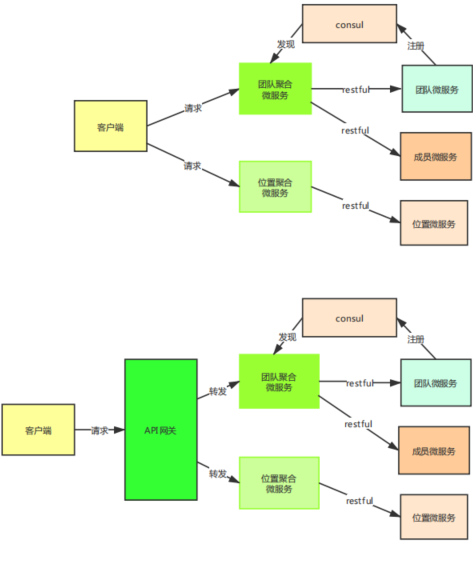
1、聚合微服务增多,导致客户端不好维护
2、聚合微服务进行集群
2.1 增加和修改聚合微服务集群,都要修改客户端,导致客户端不稳定
2.2 服务集群,无法解决复杂均衡的问题
3、客户端访问多个聚合微服务
3.1 如果需要对客户端身份验证和授权,会导致每个服务都进行授权
3.2 如何客户端访问过大,无法限制客户端流量,导致系统宕机
3.3 如果客户端访问微服务系统,每个微服务之间进行调用。会导致耗时操作很难统计。
3.4 如果客户端访问微服务系统,如何统计客户端的调用日志
总结:1 路由 2 负载均衡 3 限流 4认证 5授权 6链路追踪 7 熔断降级 8 Service Fabric
如何在项目中使用API网关
API网关类型
1、Netflix Zuul +java实现
2、Kong nginx +lua脚本实现
3、Tyk go语言开发,收费版本
4、Ocelot aspnetcore开发的
3.网关的内部概念
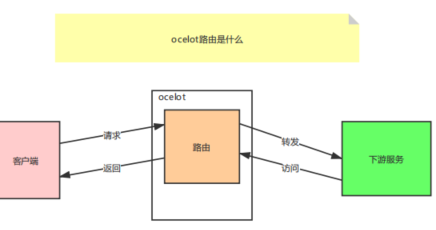
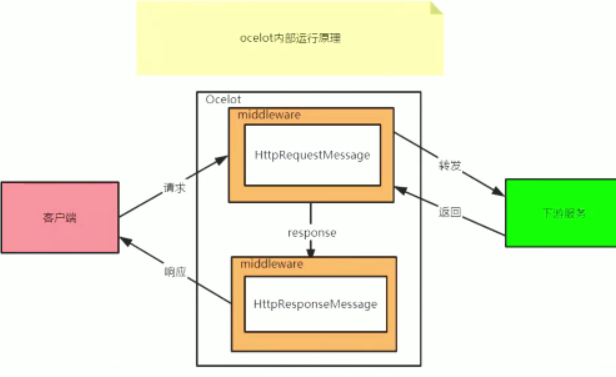
Ocelot是什么
简单的来说Ocelot是一堆的asp.net core middleware组成的一个管道。当它拿到请求之后会用一个request builder来构造一个HttpRequestMessage发到下游的真实服务器,等下游的服务返回response之后再由一个middleware将它返回的HttpResponseMessage映射到HttpResponse上。
Ocelot内部概念
上游
Ocelot为上游:Upstream 指的是api网关
下游
Ocelot下面映射的服务为下游:Downstream 指的是网关下面的 各种微服务
主要功能
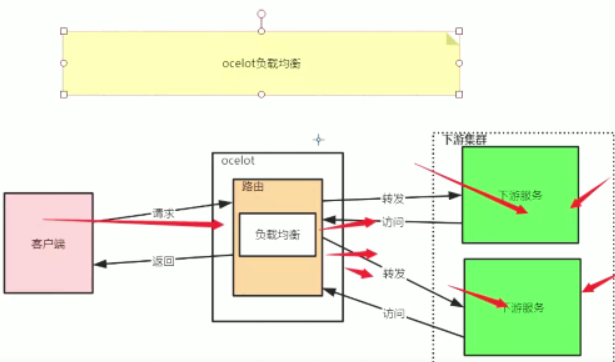
1、路由 (核心)
1.1 接受客户端请求
1.2 将客户端请求转换成下游地址
1.3 调用下游服务,并返回结果
1.4 将下游服务返回的结果返回到前端
2、认证 (核心)
3、授权 (核心)
4、负载均衡 (核心)
5、链路监控
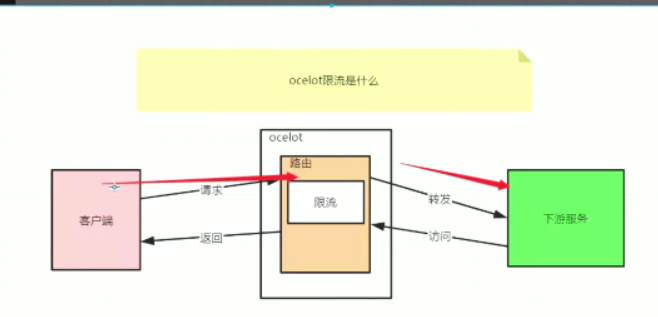
6、限流 (核心)
7、熔断降级
8、请求聚合
9、Service Fabric
Ocelot文档地址
中文文档:http://www.jessetalk.cn/2018/03/19/net-core-apigateway-ocelot-docs/
英文文档:https://ocelot.readthedocs.io/en/latest/introduction/gettingstarted.html
Ocelot如何使用
Ocelot如何使用
条件
三个项目,网关,consul
1、aspnetcore
2、Ocelot
3、团队微服务
4、ocelot.json文件
步骤
1、创建一个空的aspnetcore项目
2、通过nuget安装Ocelot
3、创建Ocelot配置文件ocelot.json
如何创建Ocelot 项目 webapi或者 mvc core 都可以作为Ocelot托管
1 安装nuget包 Ocelot
2 创建Ocelot配置文件ocelot.json Ocelot 都是用json方式操作的
{
    "ReRoutes": [],
    "GlobalConfiguration": {
        "BaseUrl": "https://api.mybusiness.com"
    }
}
要特别注意一下BaseUrl是我们外部暴露的Url,比如我们的Ocelot运行在http://123.111.1.1的一个地址上,但是前面有一个 nginx绑定了域名http://api.jessetalk.cn,那这里我们的BaseUrl就是 http://api.jessetalk.cn。
3 配置Ocelot依赖注入并加载配置文件
public void ConfigureServices(IServiceCollection services)
{
    services.AddOcelot()
}
4 加载ocelot.json配置文件 在Program.cs中添加
 public static IHostBuilder CreateHostBuilder(string[] args) =>
            Host.CreateDefaultBuilder(args)
                .ConfigureWebHostDefaults(webBuilder =>
                {
                    webBuilder.UseStartup<Startup>();
                    webBuilder.ConfigureAppConfiguration((hostingContext, config) =>
                    {
                        // 1、加载ocelot配置文件
                        config.AddJsonFile("ocelot.aggregate.json");
                    });
                });
5 最后配置Ocelot中间件
public void Configure(IApplicationBuilder app, IHostingEnvironment env)
{
if (env.IsDevelopment())
{
app.UseDeveloperExceptionPage();
}
app.UseOcelot().Wait();
}
完成上面的配置就把.net core 项目转换为网关项目了就可以启动网关项目了
那以上配置搞定了如何使用Ocelot 项目呢?
- Downstream是下游服务配置
- UpStream是上游服务配置
- Aggregates 服务聚合配置
- ServiceName, LoadBalancer, UseServiceDiscovery 配置服务发现
- AuthenticationOptions 配置服务认证
- RouteClaimsRequirement 配置Claims鉴权
- RateLimitOptions为限流配置
- FileCacheOptions 缓存配置
- QosOptions 服务质量与熔断
- DownstreamHeaderTransform头信息转发
那么Ocelot的实现原理
Ocelot如何使用路由:
路由基本使用 ReRoutes
最简单的路由配置,上游,下游配置
{
"DownstreamPathTemplate": "/api/post/{postId}",
"DownstreamScheme": "https",
"DownstreamHostAndPorts": [
{
"Host": "localhost",
"Port": 80,
}
],
"UpstreamPathTemplate": "/post/{postId}",
"UpstreamHttpMethod": [ "Get"]
}
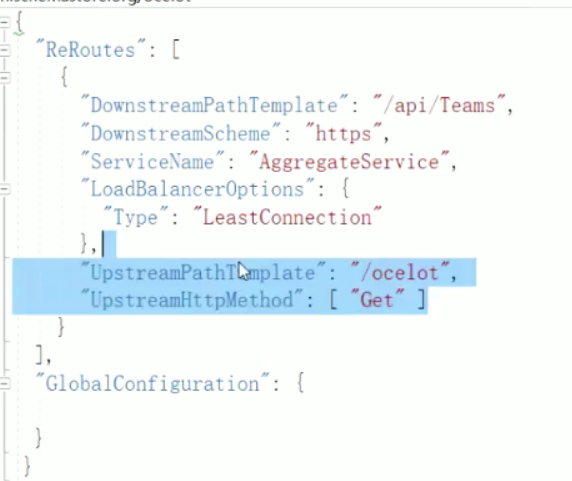
路由负载均衡配置:
LoadBalancer将决定负载均衡的算法
- LeastConnection – 将请求发往最空闲的那个服务器
- RoundRobin – 轮流发送
- NoLoadBalance – 总是发往第一个请求或者是服务发现
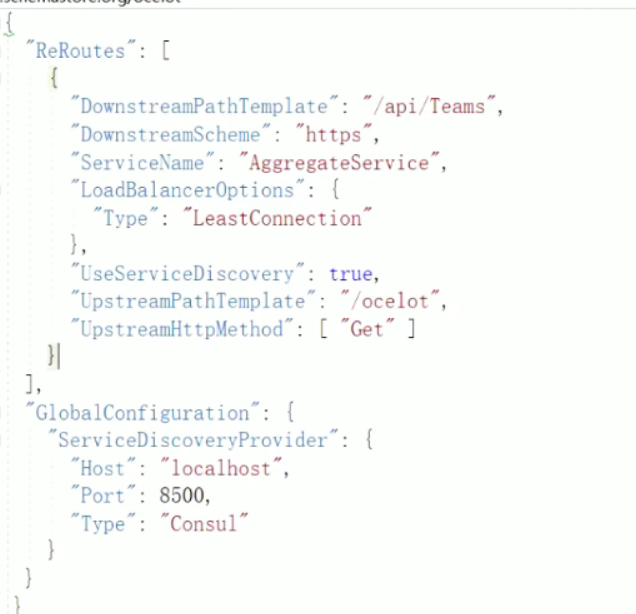
{
    "DownstreamPathTemplate": "/api/posts/{postId}",
    "DownstreamScheme": "https",
    "DownstreamHostAndPorts": [
            {
                "Host": "10.0.1.10",
                "Port": 5000,
            },
            {
                "Host": "10.0.1.11",
                "Port": 5000,
            }
        ],
    "UpstreamPathTemplate": "/posts/{postId}",
    "LoadBalancerOptions": {
        "Type": "LeastConnection"
    },
    "UpstreamHttpMethod": [ "Put", "Delete" ]
}
上面这种配置没有配置健康心跳机制,所以需要加入consul
1 路由Consul负载均衡 添加包 Ocelot + celot.Provider.Consul
2 添加consul依赖注入
public void ConfigureServices(IServiceCollection services)
        {
            // 1、添加网关Ocelot到ioc容器
            services.AddOcelot().AddConsul();
        }
3 路由consul配置在ocelot.json 中添加 其实是把上面配置
DownstreamHostAndPorts 替换 ServiceName
{
    "DownstreamPathTemplate": "/api/posts/{postId}",
    "DownstreamScheme": "https",
    "UpstreamPathTemplate": "/posts/{postId}",
    "UpstreamHttpMethod": [ "Put" ],
    "ServiceName": "product",
    "LoadBalancerOptions": {
        "Type": "LeastConnection"
    },
}
通知再聚合微服务中也要添加consul
添加服务注册
Startup.cs 中的 ConfigureServices添加
services.AddConsulRegistry(Configuration);
和在 Configure添加
app.UseConsulRegistry();
这样操作的话微服务自己既是注册的服务也是发现的服务 双重身份的 哈
当然配置文件也 增加了:
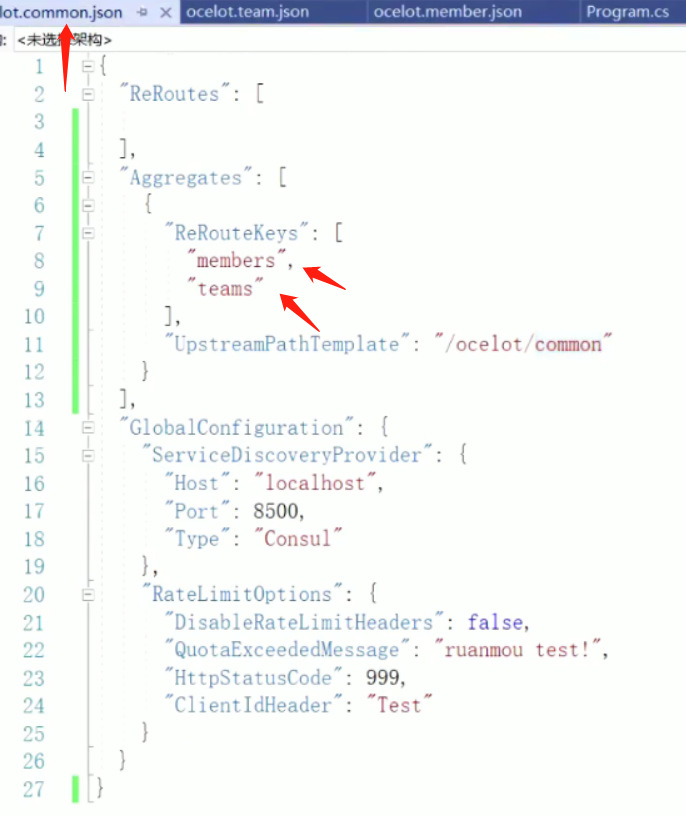
"ConsulRegistry": {
    "Name": "AggregateService",
    "RegistryAddress": "http://127.0.0.1:8500",
    "HealthCheckAddress": "/HealthCheck"
  }
路由限流
"RateLimitOptions": {
    "ClientWhitelist": [],
    "EnableRateLimiting": true,
    "Period": "5m",
    "PeriodTimespan": 1,
    "Limit": 1
}
-
ClientWihteList 白名单,那些客户端不限流
-
EnableRateLimiting 是否启用限流
-
Period 统计时间段:1s, 5m, 1h, 1d
-
PeroidTimeSpan 多少秒之后客户端可以重试
-
Limit 在统计时间段内允许的最大请求数量
限流 在 GlobalConfiguration下我们还可以进行以下配置
"RateLimitOptions": {
  "DisableRateLimitHeaders": false,
  "QuotaExceededMessage": "Customize Tips!",
  "HttpStatusCode": 999,
  "ClientIdHeader" : "Test"
}
网关项目如何加入熔断机制:
1 加入包 Ocelot.Provider.Polly
2 添加polly服务
public void ConfigureServices(IServiceCollection services)
        {
            // 1、添加网关Ocelot到ioc容器
            services.AddOcelot(new ConfigurationBuilder().AddJsonFile("ocelot.aggregate.json").Build())
                .AddConsul()
                .AddPolly();
        }
3、添加熔断配置 在路由中配置
熔断的意思是停止将请求转发到下游服务。当下游服务已经出现故障的时候再请求也是功而返,并且增加下游服务器和API网关的负担。这个功能是用的Pollly来实现的,我们只需要为路由做一些简单配置即可
"QoSOptions": {
    "ExceptionsAllowedBeforeBreaking":3,
    "DurationOfBreak":5,
    "TimeoutValue":5000
}
- ExceptionsAllowedBeforeBreaking 允许多少个异常请求
- DurationOfBreak 熔断的时间,单位为秒
- TimeoutValue 如果下游请求的处理时间超过多少则自动将请求设置为超时(毫秒)
多个路由配置(多项目)
条件
1、TeamService,MemberService
2、ocelot.team.json,ocelot.member.json
步骤
1、创建ocelot.team.json,ocelot.member.json文件
2、配置动态加载ocelot.json配置文件
webBuilder.ConfigureAppConfiguration((hostingContext, config) =>
                    {
                        config
                            // .SetBasePath(hostingContext.HostingEnvironment.ContentRootPath)
                            // .AddJsonFile("appsettings.json", true, true)
                            // .AddJsonFile($"appsettings.{hostingContext.HostingEnvironment.EnvironmentName}.json", true, true)
                            .AddOcelot(hostingContext.HostingEnvironment);
                        // .AddEnvironmentVariables();
                    });

聚合请求(一次性请求多个接口)如何设置:

 浙公网安备 33010602011771号