android充电架构的分析
前言
目前android设备越来越多,对于快速充电和长时间待机的需求就不言而喻。对应于此的就是各大手机厂商不断突破大功率充电新闻频繁的出现。在个人目前遇到的快充方案中,基本上在大的架构下属于同一种类型。故分析记录下来。
基本原理
充电简单粗暴点来说就是把电流灌到电池里面去。那么最简单的方法就是直接拿一个电源接在电池的正负极。只要电源电压高于电池电压就可以把电流灌进去。就如同直接打开水龙头开关接水一样。
但是这样会存在很多问题。例如:电池此时的电压很小,电源电压很高,一怼上电池上的电流就会变得非常大,很可能烧坏电池。所以需要根据电池的电压来调节输入电源的电压。这样又会出现充一会后就调一下电压,太麻烦了。因此可以使用计算机来完成这些动作,通过一颗锂电池充放电芯片来管理充放电的过程。
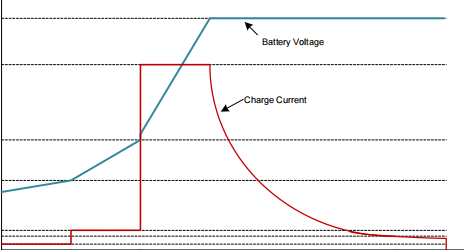
使用锂电池充电芯片,整个充电过程大致分成了三个阶段:分别是预充、恒流、恒压。

上图是各个阶段电池电流,电压的状态。
但是该方案存在转化效率较低的问题,特别是在大功率的情况下,损耗太大。因此在手机里不常采用这个方案,不过无论怎样,基本的充电曲线还是和上图保持一致的。
基本硬件架构
现在手机充电的基本架构如下图所示

电源输入
首先是电源的输入。目前手机上输入电源普遍支持有线和无线两种方式。在该架构下并不是简单让电源输入一个固定电压完成充电。而在由ap在不同阶段调节输入电源的功率。因此电源的提供需要支持调压的过程。现在在无线中常使用qi协议,而有线中常使用pd协议。
充电模块
充电模块现在主要由main charger(充电芯片)和charger pump(电荷泵芯片)构成,因为charger pump在大电流的情况下效率很高。整个充电过程依旧和上面的充电曲线基本一致。只不过此时的cc阶段和前半段的cv阶段由charger pump来完成,其余的由main charger来完成
main charger芯片在自身集成了数字逻辑,所以可以自动的切换各个阶段。而charger pump则不是这样,它只是一个模拟器件,我们可以把它理解成一个开关(经过它以后电流升一倍,电压降一半。譬如输入10v,5a输出就是5v,10a)
故在使用过程中通过ap的程序来模拟充电阶段。比如我们规定在cc阶段下的电流是6a,而此时ap采集到的电流是4a。那我们就通过协议去增大电源的输入;采集到的电流大于6a则降低电源的输入。
电量计模块
电量计模块主要是获取电池的电量信息。然后上层可以获得电池剩余电量百分比等。
软件架构
android手机内核采用的是linux内核,android有很多层。单单对于充电功能来说可以把它分为2层,一层是kernel里的驱动和逻辑实现,另一层是上层。android界面上显示和充电相关的信息就需要从kernel这一层拿。
在内核中一切皆文件,那对于充电这部分来说也不例外。上层获取的信息都是从/sys/class/power supply路径获取的。这个路径是由代码决定的(源码路径:/system/core/healthd/BatteryMonitor.cpp)

在充电信息发生改变的时候kernel就会调用uevent,上层就会接收到,然后执行下面的函数更新状态。
点击查看代码
bool BatteryMonitor::update(void) {
    bool logthis;

    initBatteryProperties(&props);

    if (!mHealthdConfig->batteryPresentPath.isEmpty())
        props.batteryPresent = getBooleanField(mHealthdConfig->batteryPresentPath);
    else
        props.batteryPresent = mBatteryDevicePresent;

    props.batteryLevel = mBatteryFixedCapacity ?
        mBatteryFixedCapacity :
        getIntField(mHealthdConfig->batteryCapacityPath);
    props.batteryVoltage = getIntField(mHealthdConfig->batteryVoltagePath) / 1000;

    if (!mHealthdConfig->batteryCurrentNowPath.isEmpty())
        props.batteryCurrent = getIntField(mHealthdConfig->batteryCurrentNowPath) / 1000;

    if (!mHealthdConfig->batteryFullChargePath.isEmpty())
        props.batteryFullCharge = getIntField(mHealthdConfig->batteryFullChargePath);

    if (!mHealthdConfig->batteryCycleCountPath.isEmpty())
        props.batteryCycleCount = getIntField(mHealthdConfig->batteryCycleCountPath);

    if (!mHealthdConfig->batteryChargeCounterPath.isEmpty())
        props.batteryChargeCounter = getIntField(mHealthdConfig->batteryChargeCounterPath);

    props.batteryTemperature = mBatteryFixedTemperature ?
        mBatteryFixedTemperature :
        getIntField(mHealthdConfig->batteryTemperaturePath);

    std::string buf;

    if (readFromFile(mHealthdConfig->batteryStatusPath, &buf) > 0)
        props.batteryStatus = getBatteryStatus(buf.c_str());

    if (readFromFile(mHealthdConfig->batteryHealthPath, &buf) > 0)
        props.batteryHealth = getBatteryHealth(buf.c_str());

    if (readFromFile(mHealthdConfig->batteryTechnologyPath, &buf) > 0)
        props.batteryTechnology = String8(buf.c_str());

    unsigned int i;
    double MaxPower = 0;

    for (i = 0; i < mChargerNames.size(); i++) {
        String8 path;
        path.appendFormat("%s/%s/online", POWER_SUPPLY_SYSFS_PATH,
                          mChargerNames[i].string());
        if (getIntField(path)) {
            path.clear();
            path.appendFormat("%s/%s/type", POWER_SUPPLY_SYSFS_PATH,
                              mChargerNames[i].string());
            switch(readPowerSupplyType(path)) {
            case ANDROID_POWER_SUPPLY_TYPE_AC:
                props.chargerAcOnline = true;
                break;
            case ANDROID_POWER_SUPPLY_TYPE_USB:
                props.chargerUsbOnline = true;
                break;
            case ANDROID_POWER_SUPPLY_TYPE_WIRELESS:
                props.chargerWirelessOnline = true;
                break;
            default:
                KLOG_WARNING(LOG_TAG, "%s: Unknown power supply type\n",
                             mChargerNames[i].string());
            }
            path.clear();
            path.appendFormat("%s/%s/current_max", POWER_SUPPLY_SYSFS_PATH,
                              mChargerNames[i].string());
            int ChargingCurrent =
                    (access(path.string(), R_OK) == 0) ? getIntField(path) : 0;

            path.clear();
            path.appendFormat("%s/%s/voltage_max", POWER_SUPPLY_SYSFS_PATH,
                              mChargerNames[i].string());

            int ChargingVoltage =
                (access(path.string(), R_OK) == 0) ? getIntField(path) :
                DEFAULT_VBUS_VOLTAGE;

            double power = ((double)ChargingCurrent / MILLION) *
                           ((double)ChargingVoltage / MILLION);
            if (MaxPower < power) {
                props.maxChargingCurrent = ChargingCurrent;
                props.maxChargingVoltage = ChargingVoltage;
                MaxPower = power;
            }
        }
    }

    logthis = !healthd_board_battery_update(&props);

    if (logthis) {
        char dmesgline[256];
        size_t len;
        if (props.batteryPresent) {
            snprintf(dmesgline, sizeof(dmesgline),
                 "battery l=%d v=%d t=%s%d.%d h=%d st=%d",
                 props.batteryLevel, props.batteryVoltage,
                 props.batteryTemperature < 0 ? "-" : "",
                 abs(props.batteryTemperature / 10),
                 abs(props.batteryTemperature % 10), props.batteryHealth,
                 props.batteryStatus);

            len = strlen(dmesgline);
            if (!mHealthdConfig->batteryCurrentNowPath.isEmpty()) {
                len += snprintf(dmesgline + len, sizeof(dmesgline) - len,
                                " c=%d", props.batteryCurrent);
            }

            if (!mHealthdConfig->batteryFullChargePath.isEmpty()) {
                len += snprintf(dmesgline + len, sizeof(dmesgline) - len,
                                " fc=%d", props.batteryFullCharge);
            }

            if (!mHealthdConfig->batteryCycleCountPath.isEmpty()) {
                len += snprintf(dmesgline + len, sizeof(dmesgline) - len,
                                " cc=%d", props.batteryCycleCount);
            }
        } else {
            len = snprintf(dmesgline, sizeof(dmesgline),
                 "battery none");
        }

        snprintf(dmesgline + len, sizeof(dmesgline) - len, " chg=%s%s%s",
                 props.chargerAcOnline ? "a" : "",
                 props.chargerUsbOnline ? "u" : "",
                 props.chargerWirelessOnline ? "w" : "");

        KLOG_WARNING(LOG_TAG, "%s\n", dmesgline);
    }

    healthd_mode_ops->battery_update(&props);
    return props.chargerAcOnline | props.chargerUsbOnline |
            props.chargerWirelessOnline;
}
例如

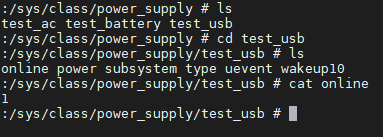
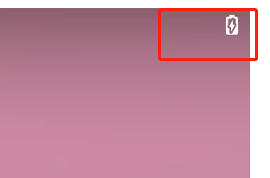
此时我进入到test_usb节点下,type为usb。然后online节点则表示usb连接是否在线,此时为1,则表示usb连接,充电图标会亮起来。

然后通过命令echo 0 > online ,强制将该值写为0。充电图标消失。

故在手机端充电相关的开发基本围绕着power supply架构展开的。下面依次从kernel到上层应用进行分析。
power supply架构
更新ing
*内容持续更新,基本上都是个人的理解。有错误可一起讨论
本文来自博客园,作者:Air-Liu,转载请注明原文链接:https://www.cnblogs.com/ghost-98210/p/15745696.html


