Android Notifications通知
Android提供了三种通知类型方式:Toast Notifications、Status Bar Notification、Dialog Notification
现在分别来看看它们适用的场景与使用方法。
一、Toast Notifications
以背景改变方式,提示一些简短的消息,消息窗口自动淡入淡出,不接受交互事件。
例如:当下载某个文件完成时,可以提示简短的“保存成功”。
显示效果:

创建弹出提示方法:
1、创建Toast对象,可以通过Toast提供的静态方法makeText(Context context, String message, int duration)
context:应用上下文对象,这里可以传递getApplicationContext()
message:提示文本
duration:显示时长,可以使用Toast.LENGTH_SHORT、Toast.LENGTH_LONG
1         Context context = getApplicationContext();
2
3         Toast toast = Toast.makeText(context, "保存成功", Toast.LENGTH_LONG);
2、显示提示,调用show()方法
- toast.show();
toast.show();
上述两步也可简写为:
- Toast.makeText(getApplicationContext(), "保存成功", Toast.LENGTH_LONG).show();
这样,最简单的提示信息已经完成。现在来看看如何创建自定义外观Toast notification。
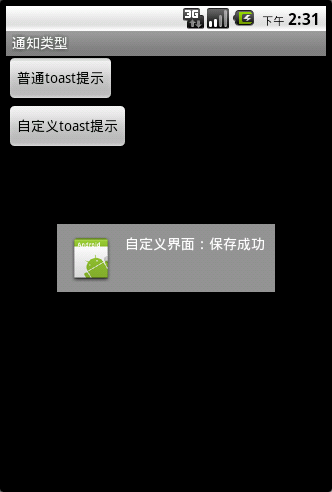
3、自定义外观Toast通知
3.1、定义XML资源视图作为提示的外观
 1 <?xml version="1.0" encoding="utf-8"?>
 2 <LinearLayout xmlns:android="http://schemas.android.com/apk/res/android"
 3               android:id="@+id/toast_layout_root"
 4               android:orientation="horizontal"
 5               android:layout_width="fill_parent"
 6               android:layout_height="fill_parent"
 7               android:padding="10dp"
 8               android:background="#DAAA"
 9               >
10     <ImageView android:id="@+id/image"
11                android:layout_width="wrap_content"
12                android:layout_height="fill_parent"
13                android:layout_marginRight="10dp"
14                android:src="@drawable/icon"
15                />
16     <TextView android:id="@+id/text"
17               android:layout_width="wrap_content"
18               android:layout_height="fill_parent"
19               android:textColor="#FFF"
20               />
21 </LinearLayout>
其中TextView文本组件用来显示需要提示的文本。这里默认没有设置文字。
3.2、解析上述XML资源视图,并设置提示文本
1         LayoutInflater inflater = getLayoutInflater();//XML资源布局填充对象
2         View layout = inflater.inflate(R.layout.toast_layout, (ViewGroup) findViewById(R.id.toast_layout_root));
3
4         //修改自定义布局中TextView文本,作为提示信息
5         TextView textView = (TextView) layout.findViewById(R.id.text);
6         textView.setText("自定义界面:保存成功");
3.3、创建Toast对象,并设置视图、显示视图
1         Toast toast = new Toast(getApplicationContext());
2         //设置垂直居中,水平、垂直偏移值为0,表示正中间。
3         toast.setGravity(Gravity.CENTER_VERTICAL, 0, 0);//设置提示框位置,三个参数分别代表:对其方式、水平偏移值、垂直偏移值。
4         toast.setDuration(Toast.LENGTH_LONG);
5         toast.setView(layout);//设置显示的视图
6         toast.show();
显示效果图:
更多关于Toast Notification的说明可以文档:http://android.toolib.net/guide/topics/ui/notifiers/toasts.html
二、Status Bar Notification
状态栏通知。当某个应用处于后台运行时需要提示用户某些信息时,不可能启动Activity。这时使用状态栏通知就非常合适。
例如:最经典的就是当接收到新短信时,可以在通知栏看到简要信息。

创建状态栏通知的过程:
1.取得通知管理器
- NotificationManager manager = (NotificationManager) getApplicationContext().getSystemService(Context.NOTIFICATION_SERVICE);
NotificationManager manager = (NotificationManager) getApplicationContext().getSystemService(Context.NOTIFICATION_SERVICE);
2.实例化通知对象
- /**
- * new Notification(int icon, String message, long when)
- * 参数1:通知图标
- * 参数2:简短提示文本
- * 参数3:何时显示,这里使用的是时间戳
- */
- Notification notification = new Notification(R.drawable.icon, "状态栏通知测试", System.currentTimeMillis());
    	/**
    	 * new Notification(int icon, String message, long when)
    	 * 参数1:通知图标
    	 * 参数2:简短提示文本
    	 * 参数3:何时显示,这里使用的是时间戳
    	 */
    	Notification notification = new Notification(R.drawable.icon, "状态栏通知测试", System.currentTimeMillis());
3.定义通知的详细信息、及PendIntent来设置激活的Activity
- //这里设置意图处理很简单,仅仅是当用户触摸详细信息时,将会显示MainActivity界面
- Intent notificationIntent = new Intent(this, MainActivity.class);
- PendingIntent pendingIntent = PendingIntent.getActivity(this, 200, notificationIntent, 0);
- notification.setLatestEventInfo(this, "通知完整标题", "通知内容", pendingIntent);
//这里设置意图处理很简单,仅仅是当用户触摸详细信息时,将会显示MainActivity界面
    	Intent notificationIntent = new Intent(this, MainActivity.class);
    	PendingIntent pendingIntent = PendingIntent.getActivity(this, 200, notificationIntent, 0);
    	notification.setLatestEventInfo(this, "通知完整标题", "通知内容", pendingIntent);
4.传递到通知管理器,加入到通知队列
- manager.notify(11, notification);
manager.notify(11, notification);
这样,就完成了一个简单的状态栏通知。
除此之外,还可以设置通知的提示方式,如震动、音乐、闪烁等。
设置提示声音:
- notification.sound = Uri.parse("file:///sdcard/On Call.mp3");
notification.sound = Uri.parse("file:///sdcard/On Call.mp3");
设置震动的交替模式:
- notification.vibrate = new long[]{0,100,200,300};
notification.vibrate = new long[]{0,100,200,300};
这里vibrate是一个长整型数组,用来设置震动交替时长,第一个值表示震动开始之前,第二个值表示第一次震动的时间,第三个值表示第二次震动的时间,一次类推。
5.关于更多的属性设置和自定义通知界面可以参看文档
http://android.toolib.net/guide/topics/ui/notifiers/notifications.html
三、Dialog Notification
一个对话框,用于遮挡当前界面,使得当前界面失去焦点。
通常用于锁定屏幕,提示用户等待等场景。例如:某个文件正在下载,出现提示等待。成功下载之后才能允许用户进行其他操作。
常用Dialog类型有:Alert Dialog、ProgressDialog、Custom Dialog
1.使用AlertDialog创建选择窗口、列表窗口、单选窗口、多选窗口
1.1选择窗口
效果:

创建弹窗方法:
 1         AlertDialog.Builder builder = new AlertDialog.Builder(this);
 2         builder.setCancelable(false);//设置当点击返回按钮后,默认表示的行为。这里设置为false
 3         builder.setMessage("dialog弹窗标题");
 4
 5         //设置true按钮
 6         builder.setPositiveButton("Yes", new OnClickListener() {
 7             @Override
 8             public void onClick(DialogInterface dialog, int which) {
 9                 Toast.makeText(getApplicationContext(), "您选择了Yes", Toast.LENGTH_LONG).show();
10             }
11         });
12
13         //设置false按钮
14         builder.setNegativeButton("No", new OnClickListener() {
15             @Override
16             public void onClick(DialogInterface dialog, int which) {
17                 dialog.cancel();
18             }
19         });
20
21         //显示
22         builder.show();
1.2列表窗口
效果:
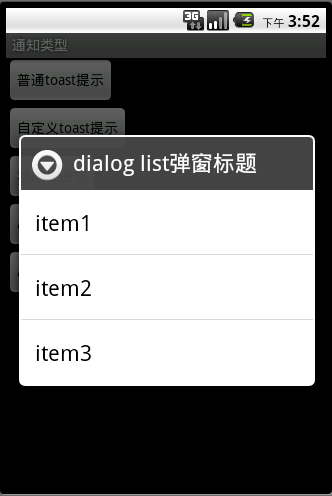
创建方法:
 1         final String[] list = new String[]{"item1", "item2", "item3"};
 2
 3         AlertDialog.Builder builder = new AlertDialog.Builder(this);
 4         builder.setTitle("dialog list弹窗标题");
 5         /**
 6          * setItems(CharSequence[] items, OnClickListener listener)
 7          * items:接收字符串数组,作为下拉列表选项
 8          * listener:监听选中事件
 9          */
10         builder.setItems(list, new OnClickListener() {
11
12             @Override
13             /**
14              * dialog:表示当前弹窗对象
15              * which:表示当前选中项的对应list数组的序号
16              */
17             public void onClick(DialogInterface dialog, int which) {
18                 Toast.makeText(getApplicationContext(), "您选择了:"+list[which], Toast.LENGTH_LONG).show();
19             }
20         });
21
22         builder.show();
1.3单选列表弹窗
效果:
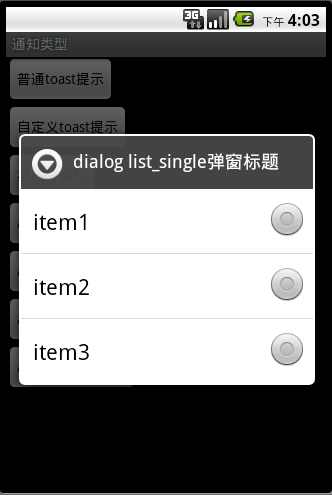
创建方法:
 1         final String[] list = new String[]{"item1", "item2", "item3"};
 2
 3         AlertDialog.Builder builder = new AlertDialog.Builder(this);
 4         builder.setTitle("dialog list_single弹窗标题");
 5         /**
 6          * setSingleChoiceItems(CharSequence[] items, int checkedItem, OnClickListener listener)
 7          * items:下拉列表字符串数组
 8          * checkedItem:默认选中的数组序号,-1表示没有默认选中项
 9          * listener:监听选中事件,注意!,单选、多选弹窗,当选择某个项时,默认是不会关闭弹窗的。需要手动关闭。
10          */
11         builder.setSingleChoiceItems(list, -1, new OnClickListener() {
12
13             @Override
14             public void onClick(DialogInterface dialog, int which) {
15                 Toast.makeText(getApplicationContext(), list[which], Toast.LENGTH_SHORT).show();
16                 dialog.cancel();
17                 //这里,当用户选中某个项时,提示选中文字,并关闭弹窗
18             }
19         });
20
21         builder.show();
1.4多选列表弹窗
效果:

创建方法:
 1         final String[] list = new String[]{"item1", "item2", "item3"};
 2
 3         AlertDialog.Builder builder = new AlertDialog.Builder(this);
 4         builder.setTitle("dialog list_mutil弹窗标题");
 5         /**
 6          * setMultiChoiceItems(CharSequence[] items, boolean[] checkedItems, OnMultiChoiceClickListener listener)
 7          * items:下拉列表字符串数组
 8          * checkedItems:boolean数组,如果需要默认被选中,可以传递。null表示没有默认选中项
 9          * listener:监听选中事件,注意!,单选、多选弹窗,当选择某个项时,默认是不会关闭弹窗的。需要手动关闭。
10          */
11         builder.setMultiChoiceItems(list, null, new OnMultiChoiceClickListener() {
12
13             @Override
14             public void onClick(DialogInterface dialog, int which, boolean isChecked) {
15                 Toast.makeText(getApplicationContext(), list[which], Toast.LENGTH_SHORT).show();
16                 dialog.cancel();
17             }
18         });
19
20         builder.show();
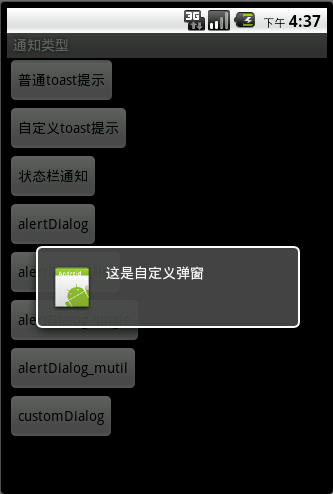
2、自定义弹窗
如果需要自定义弹窗外观,那么可以使用自定义弹窗。
下面一个自定义弹窗效果,并看看是如何实现的。
- AlertDialog.Builder builder;
- LayoutInflater inflater = getLayoutInflater();
- View layout = inflater.inflate(R.layout.custom_dialog, (ViewGroup)findViewById(R.id.layout_root));
- TextView text = (TextView) layout.findViewById(R.id.text);
- text.setText("这是自定义弹窗");
- builder = new AlertDialog.Builder(getApplicationContext());
- builder.setView(layout);
- builder.show();
    	AlertDialog.Builder builder;
    	LayoutInflater inflater = getLayoutInflater();
    	View layout = inflater.inflate(R.layout.custom_dialog, (ViewGroup)findViewById(R.id.layout_root));

    	TextView text = (TextView) layout.findViewById(R.id.text);
    	text.setText("这是自定义弹窗");

    	builder = new AlertDialog.Builder(getApplicationContext());
    	builder.setView(layout);
    	builder.show();
实际上自定义弹窗,就是使用自定义界面并覆盖原有视图内容。
