find命令
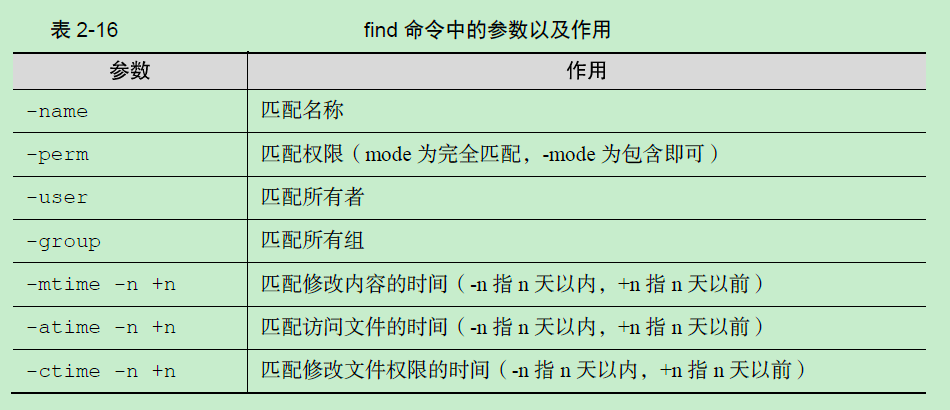
find命令用于按照指定条件查找文件。


查找目录及文件 find/locate
----------------------------------------
搜寻文件或目录,并查看文件类型

    $find ./ -name "core*" | xargs file

查找目标文件夹中是否有obj文件

    $find ./ -name '*.o'

递归当前目录及子目录删除所有.o文件

    $find ./ -name "*.o" -exec rm {} \;

find是实时查找,如果需要更快的查询,可试试locate;locate会为文件系统建立索引数据库,如果有文件更新,需要定期执行更新命令来更新索引库::

    $updatedb

寻找包含有string的路径::

    $locate string

与find不同,locate并不是实时查找。你需要更新数据库,以获得最新的文件索引信息。
将目前目录及其子目录下所有延伸档名是 c 的文件列出来。
. 代表当前目录
# find . -name "*.c"
将目前目录其其下子目录中所有一般文件列出
-type c : 文件类型是 c 的文件。
    d: 目录
    c: 字型装置文件
    b: 区块装置文件
    p: 具名贮列
    f: 一般文件
    l: 符号连结
    s: socket

# find . -type f
将目前目录及其子目录下所有最近 20 天内更新过的文件列出
# find . -ctime -20
查找/var/log目录中更改时间在7日以前的普通文件,并在删除之前询问它们
# find /var/log -type f -mtime +7 -ok rm {} \;

分解:
# find /var/log (-type f) (-mtime +7) (-ok) (rm {}) \;
(-type f)   查找的普通文件;
(-mtime +7) 查找7天内的文件;
{}  代表find命令搜索出的满足条件的每一个文件;
\;  必须以此符号结尾;
在整个文件系统中找出归属于linuxprobe的用户文件并复制到/root/zc目录下;
find / -user linuxprobe -exec cp -a {} /root/zc  \;
分解:
find / (-user linuxprobe) -exec (cp -a {} /root/zc)  \;

-exec参数用于把find命令搜索到的结果交由紧随其后的命令作进一步的处理,
类似于管道技术。
/    代表整个文件系统;
-user linuxprobe 代表查找匹配linuxprobe所有者的文件;
cp -a {} /root/zc  代表拷贝搜索到的结果到/root/zc目录里;

{}  代表find命令搜索出的满足条件的每一个文件;
\; 必须以此符号结尾;
查找前目录中文件属主具有读、写权限,并且文件所属组的用户和其他用户具有读权限的文件
# find . -type f -perm 644 -exec ls -l {} \;
为了查找系统中所有文件长度为0的普通文件,并列出它们的完整路径:
# find / -type f -size 0 -exec ls -l {} \;
实例:
1、find文件查找
查找txt和pdf文件::
    find . \( -name "*.txt" -o -name "*.pdf" \) -print

正则方式查找.txt和pdf::
     find . -regex  ".*\(\.txt\|\.pdf\)$"
-iregex: 忽略大小写的正则

否定参数 ,查找所有非txt文本::
    find . ! -name "*.txt" -print

指定搜索深度,打印出当前目录的文件(深度为1)::
    find . -maxdepth 1 -type f
2、按类型搜索
find . -type d -print  //只列出所有目录
-type f文件  l符号链接   d目录

find支持的文件检索类型可以区分普通文件和符号链接、目录等,但是二进制文件和文本文件无法直接通过find的类型区分出来;
file命令可以检查文件具体类型(二进制或文本)::
    $file redis-cli  # 二进制文件
    redis-cli: ELF 64-bit LSB executable, x86-64, version 1 (SYSV), dynamically linked (uses shared libs), for GNU/Linux 2.6.9, not stripped
    $file redis.pid  # 文本文件
    redis.pid: ASCII text

所以,可以用以下命令组合来实现查找本地目录下的所有二进制文件::
    ls -lrt | awk '{print $9}'|xargs file|grep  ELF| awk '{print $1}'|tr -d ':'
3、按时间搜索
    * -atime 访问时间 (单位是天,分钟单位则是-amin,以下类似)
    * -mtime 修改时间 (内容被修改)
    * -ctime 变化时间 (元数据或权限变化)

最近第7天被访问过的所有文件::
    find . -atime 7 -type f -print

最近7天内被访问过的所有文件::
    find . -atime -7 -type f -print

查询7天前被访问过的所有文件::
    find . -atime +7 -type f -print
4、按大小搜索
w字 k M G

寻找大于2k的文件::
    find . -type f -size +2k

按权限查找::
    find . -type f -perm 644 -print //找具有可执行权限的所有文件

按用户查找::
    find . -type f -user weber -print// 找用户weber所拥有的文件
5、找到后的后续动作
删除当前目录下所有的swp文件::
    find . -type f -name "*.swp" -delete
另一种语法::
    find . type f -name "*.swp" | xargs rm

将当前目录下的所有权变更为weber::
    find . -type f -user root -exec chown weber {} \;
注:{}是一个特殊的字符串,对于每一个匹配的文件,{}会被替换成相应的文件名;

将找到的文件全都copy到另一个目录::
    find . -type f -mtime +10 -name "*.txt" -exec cp {} OLD \;

如果需要后续执行多个命令,可以将多个命令写成一个脚本。
然后 -exec 调用时执行脚本即可::
    -exec ./commands.sh {} \;

-print的定界符,默认使用'\\\n'作为文件的定界符;
-print0 使用'\\\0'作为文件的定界符,这样就可以搜索包含空格的文件;


