TensorFlow+vgg+pytorch
TensorFlow
import tensorflow as tf
from tensorflow import keras
# Helper libraries
import numpy as np
import matplotlib.pyplot as plt
# 查看当前tensorflow版本
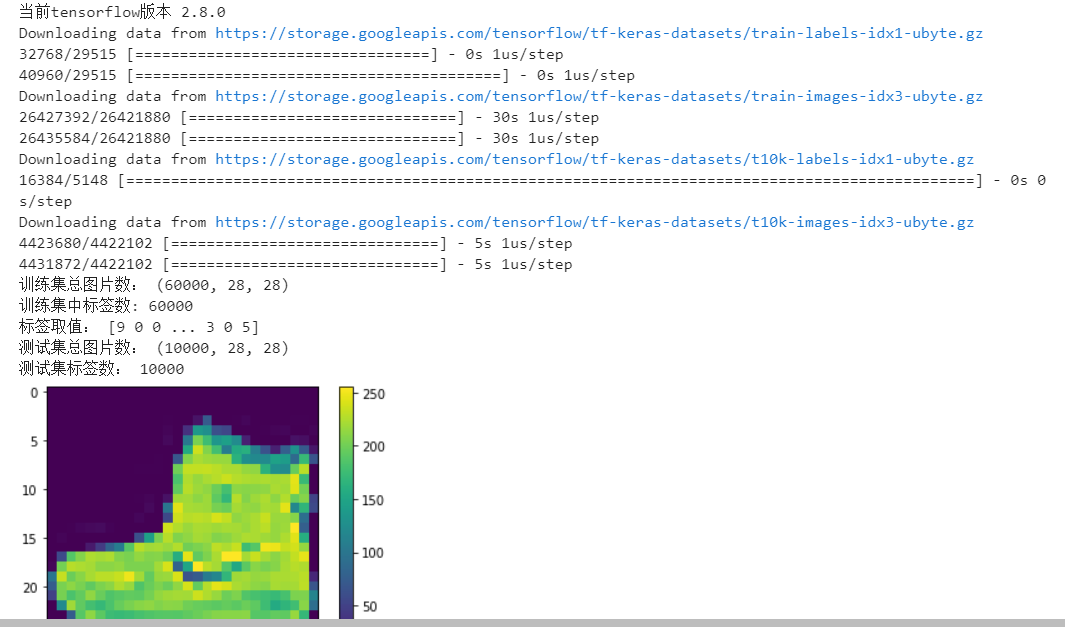
print("当前tensorflow版本", tf.__version__)
# 【1 导入Fashion MNIST数据集】
'''
加载数据集将返回四个NumPy数组:
train_images和train_labels数组是训练集 ,即模型用来学习的数据。
针对测试集 , test_images和test_labels数组对模型进行测试
'''
'''
图像是28x28 NumPy数组,像素值范围是0到255。 标签是整数数组,范围是0到9。这些对应于图像表示的衣服类别 :
标签 类
0 T恤
1 裤子
2 套衫/卫衣
3 连衣裙
4 外衣/外套
5 凉鞋
6 衬衫
7 运动鞋
8 袋子
9 短靴/脚踝靴
'''
fashion_mnist = keras.datasets.fashion_mnist
(train_images, train_labels), (test_images, test_labels) = fashion_mnist.load_data()
# 每个图像都映射到一个标签
class_names = ['T-shirt/top', 'Trouser', 'Pullover', 'Dress', 'Coat',
'Sandal', 'Shirt', 'Sneaker', 'Bag', 'Ankle boot']
# 【2 探索数据】
# 在训练模型之前,让我们探索数据集的格式。下图显示了训练集中有60,000张图像,每个图像表示为28 x 28像素
print("训练集总图片数:", train_images.shape)
# 训练集中有60,000个标签
print("训练集中标签数:", len(train_labels))
# 每个标签都是0到9之间的整数
print("标签取值:", train_labels)
# 测试集中有10,000张图像。同样,每个图像都表示为28 x 28像素
print("测试集总图片数:", test_images.shape)
# 测试集包含10,000个图像标签
print("测试集标签数:", len(test_labels))
# 【3 预处理数据】
# 在训练网络之前,必须对数据进行预处理。如果检查训练集中的第一张图像,将看到像素值落在0到255的范围内
plt.figure()
plt.imshow(train_images[0])
plt.colorbar()
plt.grid(False)
plt.show()
# 将这些值缩放到0到1的范围,然后再将其输入神经网络模型。为此,将值除以255。以相同的方式预处理训练集和测试集非常重要:
train_images = train_images / 255.0
test_images = test_images / 255.0
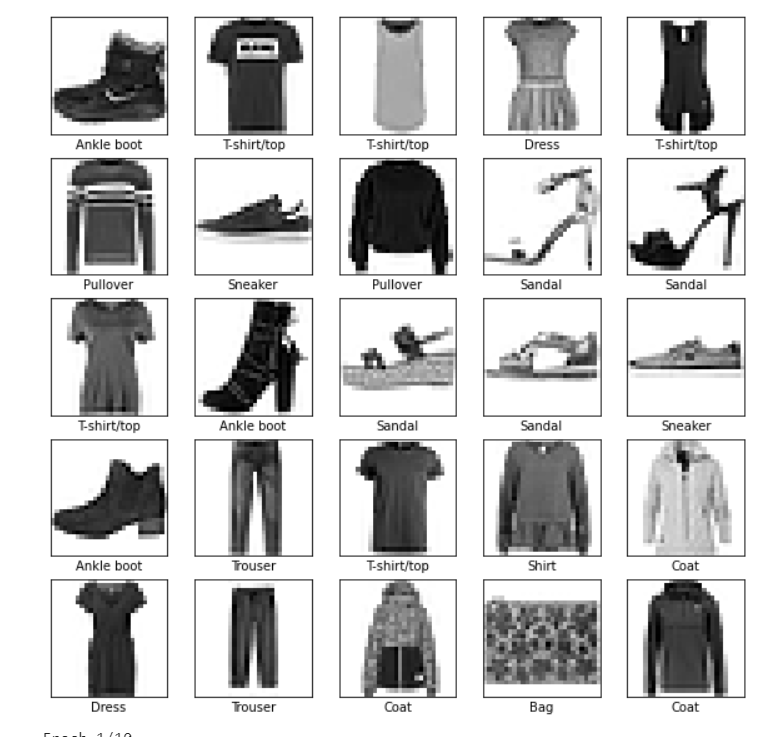
#为了验证数据的格式正确,并且已经准备好构建和训练网络,让我们显示训练集中的前25张图像,并在每张图像下方显示班级名称。
plt.figure(figsize=(10,10))
for i in range(25):
plt.subplot(5,5,i+1)
plt.xticks([])
plt.yticks([])
plt.grid(False)
plt.imshow(train_images[i], cmap=plt.cm.binary)
plt.xlabel(class_names[train_labels[i]])
plt.show()
# 【4 建立模型】
# 建立神经网络需要配置模型的各层,然后编译模型
# 搭建神经网络结构 神经网络的基本组成部分是层 。图层(神经网络结构)从输入到其中的数据中提取表示
# 深度学习的大部分内容是将简单的层链接在一起。大多数层(例如tf.keras.layers.Dense )具有在训练期间学习的参数。
model = keras.Sequential([
keras.layers.Flatten(input_shape=(28, 28)),
keras.layers.Dense(128, activation='relu'),
keras.layers.Dense(10)
])
'''
编译模型
在准备训练模型之前,需要进行一些其他设置。这些是在模型的编译步骤中添加的:
损失函数 -衡量训练期间模型的准确性。您希望最小化此功能,以在正确的方向上“引导”模型。
优化器 -这是基于模型看到的数据及其损失函数来更新模型的方式。
指标 -用于监视培训和测试步骤。以下示例使用precision ,即正确分类的图像比例。
'''
model.compile(optimizer='adam',
loss=tf.keras.losses.SparseCategoricalCrossentropy(from_logits=True),
metrics=['accuracy'])
# 【5 训练模型】
'''
训练神经网络模型需要执行以下步骤:
1.将训练数据输入模型。在此示例中,训练数据在train_images和train_labels数组中。
2.该模型学习关联图像和标签。
3.要求模型对测试集进行预测(在本示例中为test_images数组)。
4.验证预测是否与test_labels数组中的标签匹配。
'''
# 要开始训练,请调用model.fit方法,之所以这么称呼是因为它使模型“适合”训练数据:
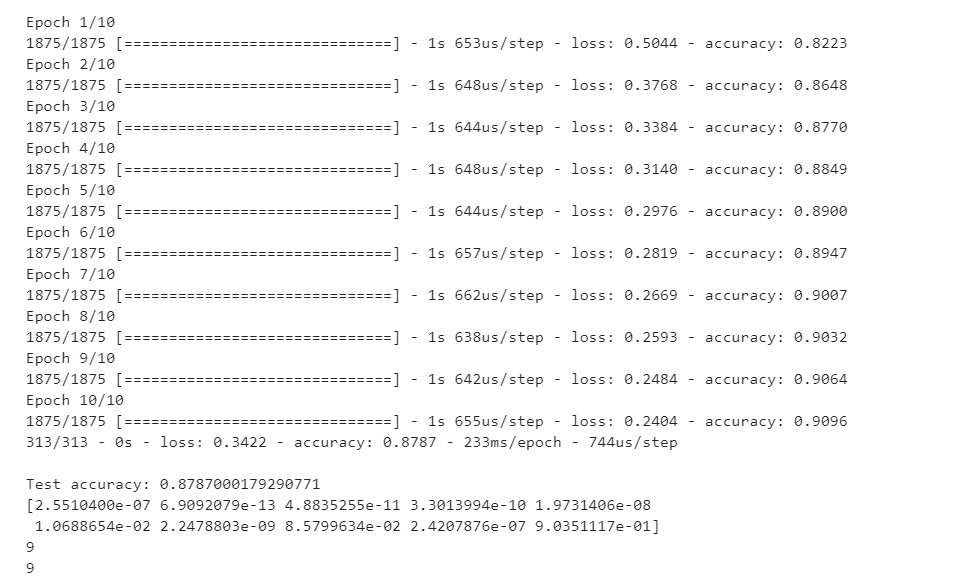
model.fit(train_images, train_labels, epochs=10)
# 比较模型在测试数据集上的表现
test_loss, test_acc = model.evaluate(test_images, test_labels, verbose=2)
print('\nTest accuracy:', test_acc)
# 作出预测 通过训练模型,您可以使用它来预测某些图像。模型的线性输出logits 。附加一个softmax层,以将logit转换为更容易解释的概率。
probability_model = tf.keras.Sequential([model, tf.keras.layers.Softmax()])
predictions = probability_model.predict(test_images)
print(predictions[0])
print(np.argmax(predictions[0]))
print(test_labels[0])
# 以图形方式查看完整的10个类预测。
def plot_image(i, predictions_array, true_label, img):
true_label, img = true_label[i], img[i]
plt.grid(False)
plt.xticks([])
plt.yticks([])
plt.imshow(img, cmap=plt.cm.binary)
predicted_label = np.argmax(predictions_array)
if predicted_label == true_label:
color = 'blue'
else:
color = 'red'
plt.xlabel("{} {:2.0f}% ({})".format(class_names[predicted_label],
100*np.max(predictions_array),
class_names[true_label]),
color=color)
def plot_value_array(i, predictions_array, true_label):
true_label = true_label[i]
plt.grid(False)
plt.xticks(range(10))
plt.yticks([])
thisplot = plt.bar(range(10), predictions_array, color="#777777")
plt.ylim([0, 1])
predicted_label = np.argmax(predictions_array)
thisplot[predicted_label].set_color('red')
thisplot[true_label].set_color('blue')
'''验证预测
通过训练模型,您可以使用它来预测某些图像。
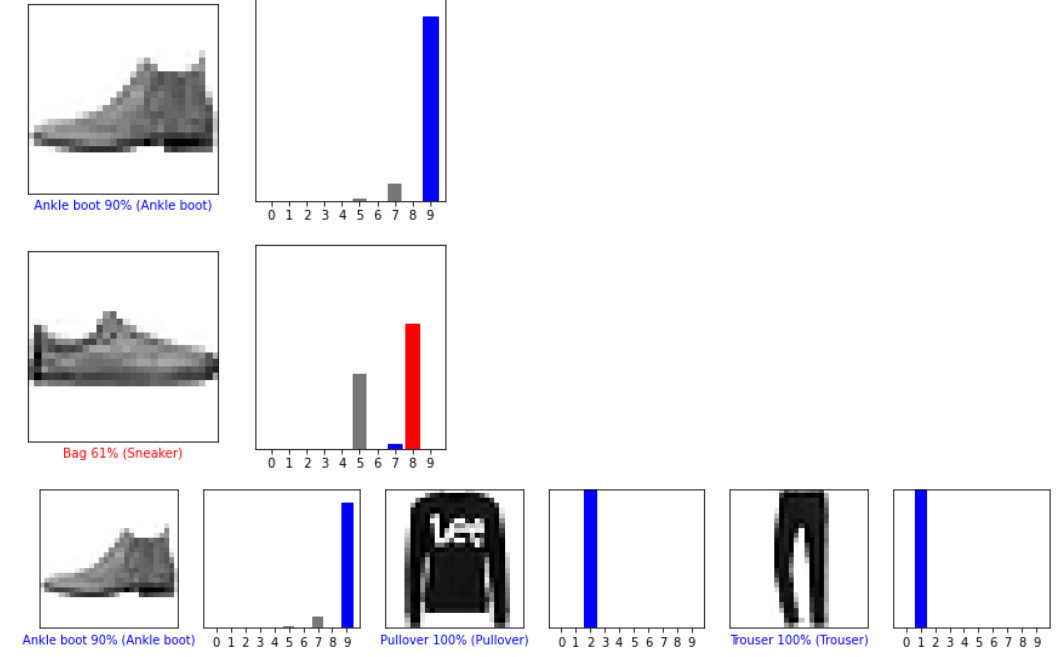
让我们看一下第0张图像,预测和预测数组。正确的预测标签为蓝色,错误的预测标签为红色。该数字给出了预测标签的百分比(满分为100)。'''
i = 0
plt.figure(figsize=(6,3))
plt.subplot(1,2,1)
plot_image(i, predictions[i], test_labels, test_images)
plt.subplot(1,2,2)
plot_value_array(i, predictions[i], test_labels)
plt.show()
i = 12
plt.figure(figsize=(6,3))
plt.subplot(1,2,1)
plot_image(i, predictions[i], test_labels, test_images)
plt.subplot(1,2,2)
plot_value_array(i, predictions[i], test_labels)
plt.show()
# 绘制一些带有预测的图像
# 绘制前X张测试图像,它们的预测标签和真实标签。
# 将正确的预测颜色设置为蓝色,将不正确的预测颜色设置为红色。
num_rows = 5
num_cols = 3
num_images = num_rows*num_cols
plt.figure(figsize=(2*2*num_cols, 2*num_rows))
for i in range(num_images):
plt.subplot(num_rows, 2*num_cols, 2*i+1)
plot_image(i, predictions[i], test_labels, test_images)
plt.subplot(num_rows, 2*num_cols, 2*i+2)
plot_value_array(i, predictions[i], test_labels)
plt.tight_layout()
plt.show()
# 【6 使用训练有素的模型】
# 使用经过训练的模型对单个图像进行预测。
# 从测试数据集中获取图像。
img = test_images[0]
# 将图像添加到唯一的批处理
img = (np.expand_dims(img,0))
# 为该图像预测正确的标签:
predictions_single = probability_model.predict(img)
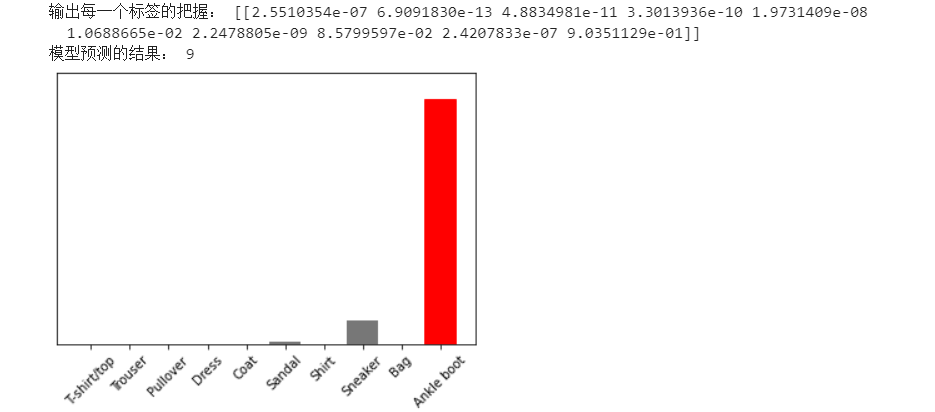
print("输出每一个标签的把握:", predictions_single) # 一共10个标签,索引从0,1,2到9
plot_value_array(1, predictions_single[0], test_labels)
_ = plt.xticks(range(10), class_names, rotation=45)
# keras.Model.predict返回一个列表列表-数据批次中每个图像的一个列表。批量获取我们(仅)图像的预测
print("模型预测的结果:", np.argmax(predictions_single[0]))
vgg
# softmax 将实数值转换为概率值
# 使用Keras接口如何操作
# import 导入模块,每次使用模块中的函数都要是定是哪个模块。
# from…import * 导入模块,每次使用模块中的函数,直接使用函数就可以了;
# 注因为已经知道该函数是那个模块中的了。
import tensorflow as tf
from tensorflow import keras
from tensorflow.keras import layers , Sequential , datasets , optimizers , models , regularizers
import numpy as np
tf.__version__
#零均值归一化
def normalize(X_train, X_test):
X_train = X_train / 255.
X_test = X_test / 255.
mean = np.mean(X_train, axis=(0, 1, 2, 3))
std = np.std(X_train, axis=(0, 1, 2, 3))
print('mean:', mean, 'std:', std)
X_train = (X_train - mean) / (std + 1e-7)
X_test = (X_test - mean) / (std + 1e-7)
return X_train, X_test
#读取数据
(x_train,y_train), (x_test, y_test) = datasets.cifar10.load_data()
(x_train.shape,y_train.shape), (x_test.shape, y_test.shape)
(((50000, 32, 32, 3), (50000, 1)), ((10000, 32, 32, 3), (10000, 1)))
#归一化数据
x_train, x_test = normalize(x_train, x_test)
# y本身就是标签值(0~9)所以不用进行归一化,只需要做one_hot处理即可
def preprocess(x, y):
x = tf.cast(x, tf.float32 )#转换为tftensor
y = tf.cast(y, tf.int32) #转换为tftensor
y = tf.squeeze(y, axis=1) # 注意y是50000,1但是我们希望y直接是batchsize,所以要把1挤压掉
y = tf.one_hot(y, depth=10) # 做hone_hot编码
return x, y
# 训练样本
train_db = tf.data.Dataset.from_tensor_slices((x_train,y_train))
train_db = train_db.shuffle(50000).batch(128).map(preprocess)
test_db = tf.data.Dataset.from_tensor_slices((x_test, y_test))
test_db = test_db.shuffle(50000).batch(128).map(preprocess)
# 由于VGG 16对于这个数据集表现很差,于是做如下改进
num_classes = 10 #如果是imagenet数据集,这里为1000
weight_decay = 0.000
model = models.Sequential() #构造容器
#第一层
model.add(
layers.Conv2D(64,(3,3),
padding='same',
kernel_regularizer = regularizers.l2(weight_decay))) #做一个l2正则化
model.add(layers.Activation('relu'))
model.add(layers.BatchNormalization()) #BN 层
model.add(layers.Dropout(0.3)) # 丢弃一部分神经元,防止过拟合
model.add(
layers.Conv2D(64,(3,3),
padding='same',
kernel_regularizer = regularizers.l2(weight_decay))) #做一个l2正则化
model.add(layers.Activation('relu'))
model.add(layers.BatchNormalization()) #BN 层
model.add(layers.MaxPooling2D(pool_size=(2, 2)))
#第二层
model.add(
layers.Conv2D(128,(3,3),
padding='same',
kernel_regularizer = regularizers.l2(weight_decay))) #做一个l2正则化
model.add(layers.Activation('relu'))
model.add(layers.BatchNormalization()) #BN 层
model.add(layers.Dropout(0.4)) # 丢弃一部分神经元,防止过拟合
model.add(
layers.Conv2D(128,(3,3),
padding='same',
kernel_regularizer = regularizers.l2(weight_decay))) #做一个l2正则化
model.add(layers.Activation('relu'))
model.add(layers.BatchNormalization()) #BN 层
model.add(layers.MaxPooling2D(pool_size=(2,2)))
#第三层
model.add(
layers.Conv2D(256,(3,3),
padding='same',
kernel_regularizer = regularizers.l2(weight_decay))) #做一个l2正则化
model.add(layers.Activation('relu'))
model.add(layers.BatchNormalization()) #BN 层
model.add(layers.Dropout(0.4)) # 丢弃一部分神经元,防止过拟合
model.add(
layers.Conv2D(256,(3,3),
padding='same',
kernel_regularizer = regularizers.l2(weight_decay))) #做一个l2正则化
model.add(layers.Activation('relu'))
model.add(layers.BatchNormalization()) #BN 层
model.add(layers.Dropout(0.4)) # 丢弃一部分神经元,防止过拟合
model.add(
layers.Conv2D(256,(3,3),
padding='same',
kernel_regularizer = regularizers.l2(weight_decay))) #做一个l2正则化
model.add(layers.Activation('relu'))
model.add(layers.BatchNormalization()) #BN 层
model.add(layers. MaxPooling2D(pool_size=(2,2)))
#第四层
model.add(
layers.Conv2D(512,(3,3),
padding='same',
kernel_regularizer = regularizers.l2(weight_decay))) #做一个l2正则化
model.add(layers.Activation('relu'))
model.add(layers.BatchNormalization()) #BN 层
model.add(layers.Dropout(0.4)) # 丢弃一部分神经元,防止过拟合
model.add(
layers.Conv2D(512,(3,3),
padding='same',
kernel_regularizer = regularizers.l2(weight_decay))) #做一个l2正则化
model.add(layers.Activation('relu'))
model.add(layers.BatchNormalization()) #BN 层
model.add(layers.Dropout(0.4)) # 丢弃一部分神经元,防止过拟合
model.add(
layers.Conv2D(512,(3,3),
padding='same',
kernel_regularizer = regularizers.l2(weight_decay))) #做一个l2正则化
model.add(layers.Activation('relu'))
model.add(layers.BatchNormalization()) #BN 层
model.add(layers. MaxPooling2D(pool_size=(2,2)))
#第五层
model.add(
layers.Conv2D(512,(3,3),
padding='same',
kernel_regularizer = regularizers.l2(weight_decay))) #做一个l2正则化
model.add(layers.Activation('relu'))
model.add(layers.BatchNormalization()) #BN 层
model.add(layers.Dropout(0.4)) # 丢弃一部分神经元,防止过拟合
model.add(
layers.Conv2D(512,(3,3),
padding='same',
kernel_regularizer = regularizers.l2(weight_decay))) #做一个l2正则化
model.add(layers.Activation('relu'))
model.add(layers.BatchNormalization()) #BN 层
model.add(layers.Dropout(0.4)) # 丢弃一部分神经元,防止过拟合
model.add(
layers.Conv2D(512,(3,3),
padding='same',
kernel_regularizer = regularizers.l2(weight_decay))) #做一个l2正则化
model.add(layers.Activation('relu'))
model.add(layers.BatchNormalization()) #BN 层
model.add(layers.MaxPooling2D(pool_size=(2,2)))
model.add(layers.Dropout(0.5)) # 丢弃一部分神经元,防止过拟合
#拉平
#将三个全神经网络改成两个
model.add(layers.Flatten())
model.add(layers.Dense(512,kernel_regularizer = regularizers.l2(weight_decay))) #做一个l2正则化
model.add(layers.Activation('relu'))
model.add(layers.BatchNormalization()) #BN 层
model.add(layers.Dropout(0.5)) # 丢弃一部分神经元,防止过拟合
model.add(layers.Dense(num_classes))# VGG 16 为1000
model.add(layers.Activation('softmax'))
model.build(input_shape=(None,32,32,3))
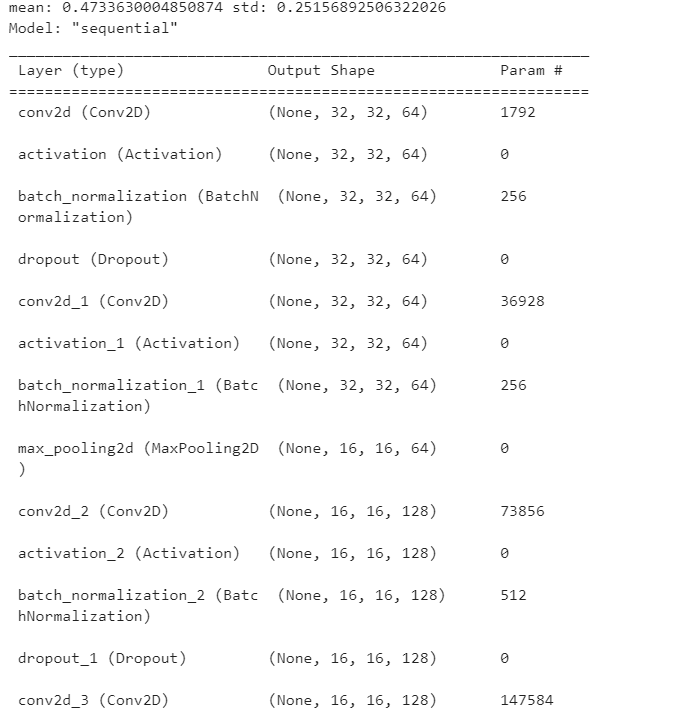
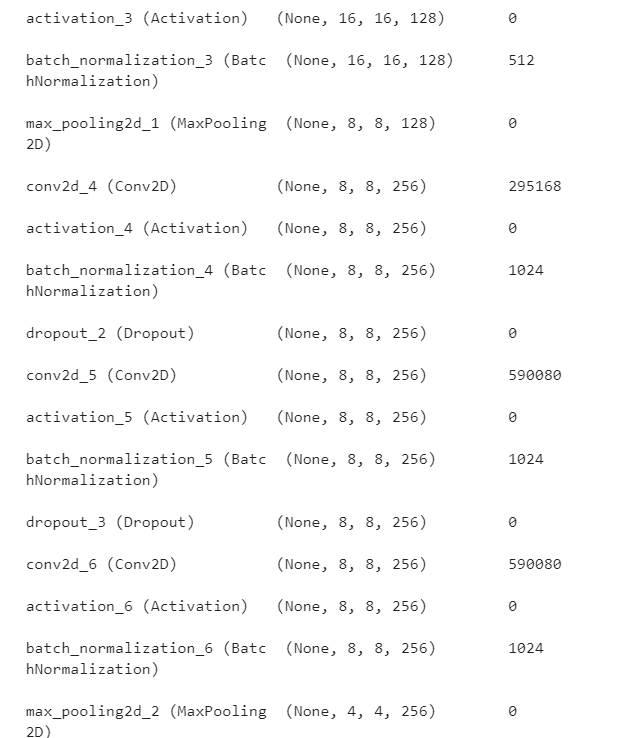
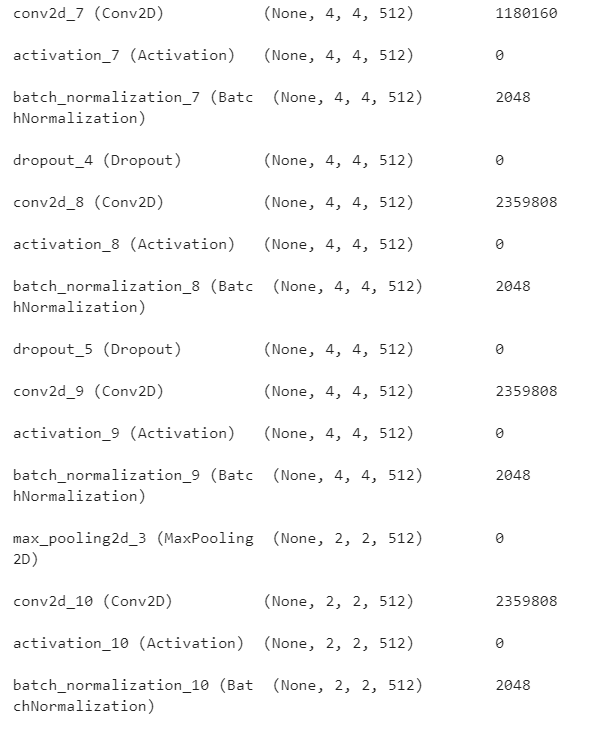
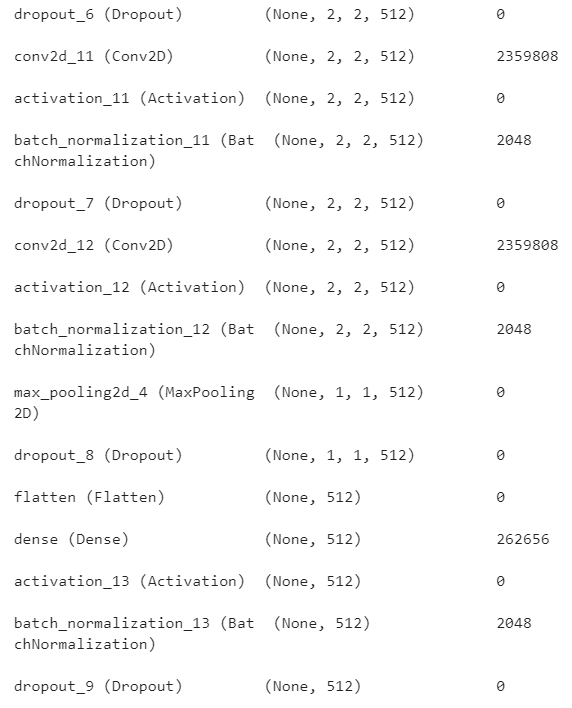
model.summary()
# 优化器
model.compile(optimizer=keras.optimizers.Adam(0.0001),
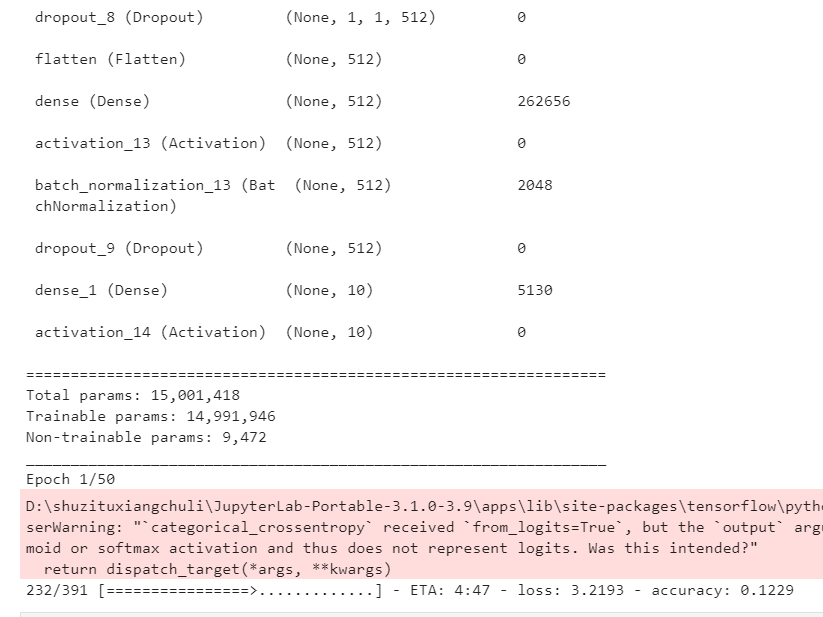
loss = keras.losses.CategoricalCrossentropy(from_logits=True),#加上from_logits=True之后,训练会得到更好的结果
metrics=['accuracy'])
history = model.fit(train_db,epochs=50)
#能保存模型结构
path = 'saved_model_VGG/'
model.save(path, save_format='tf')
import matplotlib.pyplot as plt
plt.plot(history.history['loss'])
plt.title("model loss")
plt.ylabel("1oss" )
plt.xlabel("epoch")
plt.show()
pythorch
import torch
import torch.nn as nn
import torch.nn.functional as F
class Net(nn.Module):
def __init__(self):
super(Net, self).__init__()
# 1 input image channel, 6 output channels, 5x5 square convolution
# kernel
self.conv1 = nn.Conv2d(1, 6, 5)
self.conv2 = nn.Conv2d(6, 16, 5)
# an affine operation: y = Wx + b
self.fc1 = nn.Linear(16 * 5 * 5, 120)
self.fc2 = nn.Linear(120, 84)
self.fc3 = nn.Linear(84, 10)
def forward(self, x):
# Max pooling over a (2, 2) window
x = F.max_pool2d(F.relu(self.conv1(x)), (2, 2))
# If the size is a square you can only specify a single number
x = F.max_pool2d(F.relu(self.conv2(x)), 2)
x = x.view(-1, self.num_flat_features(x))
x = F.relu(self.fc1(x))
x = F.relu(self.fc2(x))
x = self.fc3(x)
return x
def num_flat_features(self, x):
size = x.size()[1:] # all dimensions except the batch dimension
num_features = 1
for s in size:
num_features *= s
return num_features
net = Net()
print(net)

其他代码


【推荐】国内首个AI IDE,深度理解中文开发场景,立即下载体验Trae
【推荐】编程新体验,更懂你的AI,立即体验豆包MarsCode编程助手
【推荐】抖音旗下AI助手豆包,你的智能百科全书,全免费不限次数
【推荐】轻量又高性能的 SSH 工具 IShell:AI 加持,快人一步
· 震惊!C++程序真的从main开始吗?99%的程序员都答错了
· 【硬核科普】Trae如何「偷看」你的代码?零基础破解AI编程运行原理
· 单元测试从入门到精通
· 上周热点回顾(3.3-3.9)
· winform 绘制太阳,地球,月球 运作规律