【人脸检测——Dlib学习1】Face_detector_example
0.目标
本小节解读官网example
1.官网介绍翻译
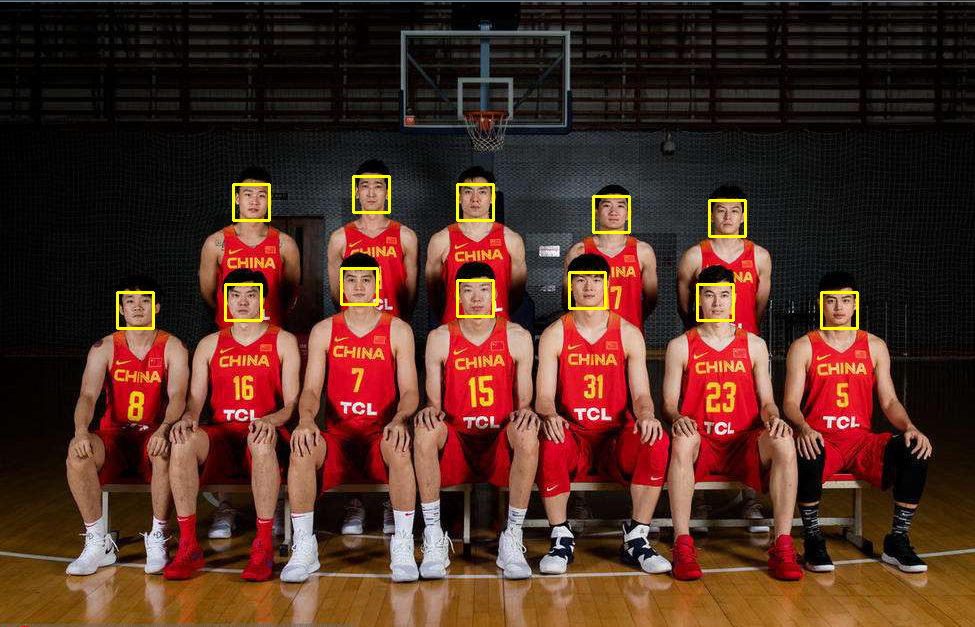
a. 这个例子展示了如何在一个图像中找到正面的人脸。具体来说,它显示了如何从命令行获取图像列表,并在屏幕上显示每个带有红框的人脸。
b. Face_detector采用了HOG特征,结合了线性分类器、图像金字塔和滑动窗口检测方案。这种类型的目标检测是非常普遍的,且有能力检测除人脸外许多半刚性目标。因此,如果你对制作你自己的目标检测感兴趣,那么可以阅读train_object_detector.py文件
2.源码解读
# -*-coding:utf-8-*-
#author: lyp time: 2018/9/7
import sys

import dlib

# 初始化程序
detector = dlib.get_frontal_face_detector()
win = dlib.image_window()

# 读取图片,在cmd中键入 python xx(文件名).py 需要识别的图片名
for f in sys.argv[1:]:
    print("Processing file: {}".format(f))
    img = dlib.load_rgb_image(f)

    # 参数1表示我们对图像进行向上采样1倍,这将使一切变的更大
    # 进而让我们检测出更多的人脸
    dets = detector(img, 1)

    # 输出检测出来的人脸个数
    print("Number of faces detected: {}".format(len(dets)))

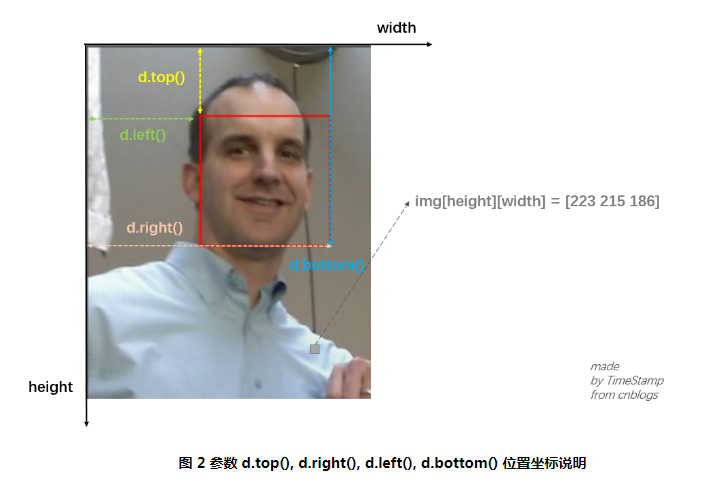
    # 输出第i张人脸矩形框的位置坐标,详情见下图1
    for i, d in enumerate(dets):
        print("Detection {}: Left: {} Top: {} Right: {} Bottom: {}".format(
            i, d.left(), d.top(), d.right(), d.bottom()))

    # 绘制人脸矩形轮廓
    win.clear_overlay()
    win.set_image(img)
    win.add_overlay(dets)

    # 等待点击
    dlib.hit_enter_to_continue()

# 下面这部分的功能是输出第i张人脸的得分
# score分数越大,说明detector更确信是人脸
# detector.run中第三个参数是可选择的检测阈值
    # 检测阈值为负,将会返回更多的检测结果
    # 检测阈值为正,将会返回较少的检测结果
# idx将告诉我们是哪个子检测器与图像中第i张人脸匹配。
    # 这将更广泛地用于识别不同方向的人脸
if (len(sys.argv[1:]) > 0):
    img = dlib.load_rgb_image(sys.argv[1])
    dets, scores, idx = detector.run(img, 1, -1)
    for i, d in enumerate(dets):
        print("Detection {}, score: {}, face_type:{}".format(
            d, scores[i], idx[i]))

a.官网例子需要再windows下的cmd中输入命令运行程序,具体原因与操作可以参考:https://www.cnblogs.com/gfgwxw/p/9618133.html。
这种操作在Windows中非常不友好,各种奇怪的问题。所以,需要更换读取图片的方式
b.我们常用OpenCV处理,下面小节改成OpenCV操作图片。
3. 换为OpenCV后的代码
# -*-coding:utf-8-*-
#author: lyp time: 2018/9/7
import cv2

import dlib

# 初始化程序
detector = dlib.get_frontal_face_detector()


# 读取图片,在cmd中键入 python xx(文件名).py 需要识别的图片名
img = cv2.imread("cba.jpg")


# 参数1表示我们对图像进行向上采样1倍,这将使一切变的更大
# 进而让我们检测出更多的人脸
dets = detector(img, 1)

# 输出检测出来的人脸个数
print("Number of faces detected: {}".format(len(dets)))

# 输出第i张人脸矩形框的位置坐标,详情见下图1
for i, d in enumerate(dets):
    print("Detection {}: Left: {} Top: {} Right: {} Bottom: {}".format(
        i, d.left(), d.top(), d.right(), d.bottom()))
    cv2.rectangle(img, tuple([d.left(), d.top()]), tuple([d.right(), d.bottom()]), (0,255, 255),2)

# cv2.rectangle(img, pt1, pt2, color, thickness=None, lineType=None, shift=None):绘制矩形框图
    # img: 输入的图像
    # pt1: 矩形顶点坐标
    # pt2: 与pt1成对角的顶点坐标
    # color: 矩形框的颜色
    # 2: 所画线的宽度

    # 绘制人脸矩形轮廓
cv2.imshow("img", img)
cv2.waitKey()
cv2.destroyAllWindows()

# 下面这部分的功能是输出第i张人脸的得分
# score分数越大,说明detector更确信是人脸
# detector.run中第三个参数是可选择的检测阈值
    # 检测阈值为负,将会返回更多的检测结果
    # 检测阈值为正,将会返回较少的检测结果
# idx将告诉我们是哪个子检测器与图像中第i张人脸匹配。
    # 这将更广泛地用于识别不同方向的人脸
dets, scores, idx = detector.run(img, 1, -1)
for i, d in enumerate(dets):
    print("Detection {}, score: {}, face_type:{}".format(
        d, scores[i], idx[i]))

4.致谢
https://www.cnblogs.com/AdaminXie/p/7905888.html


