Linux学习笔记(29)linux共享目录,NFS,使用autofs实现NFS 自动挂载
【1】 NFS简介
(1.1)什么是NFS
-
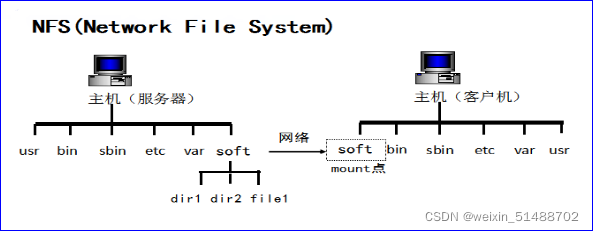
NFS 是Network File System的缩写,即网络文件系统。英文Network File System(NFS),是基于UDP/IP协议的应用,可以通过网络,让不同的机器、不同的操作系统可以共享彼此的文件。
-
NFS在文件传送或信息传送过程中依赖于RPC协议。RPC:远程过程调用 (Remote Procedure Call) 是能使客户端执行其他系统中程序的一种机制。
-
NFS服务器可以看作是一个FILE SERVER。它可以让你的机器(客户端)通过网络将远端的NFS SERVER共享目录MOUNT到自己的系统中。
(1.2)NFS守护进程
- nfsd:它是基本的NFS守护进程,主要功能是管理客户端是否能够登录服务器;
- mountd:它是RPC安装守护进程,主要功能是管理NFS的文件系统。当客户端登录到NFS服务器后,必须通过文件使用权限的验证。它会读取NFS的配置文件/etc/exports来对比客户端权限。
- portmap:主要功能是进行端口映射工作。
(1.3)RPC服务
RPC(Remote Procedure Call)即远程过程调用,记录NFS服务器使用的端口号,在NFS客户端发送请求时,将对应的端口号信息传递给客户端,确保客户端与服务端能连接上。
注意:在启动NFS服务之前,必须先启动PRC服务,在Centos7中叫做 rpcbind 服务,否则 NFS Server 无法向RPC注册信息,另外,如果RPC服务重启,原来注册的NFS服务端的信息也就失效了,也必须重启NFS服务。
特别要注意的是,修改NFS配置⽂件后不需要重启NFS,只需要执⾏ exportfs -rv 命令即可或是 systemctl reload nfs。
原理
(1)服务端启动RPC服务,并开启111端口
(2)然后服务器端启动NFS服务,并向RPC注册端口信息
(3)客户端启动RPC(portmap服务),向服务端的RPC(portmap)服务请求服务端的NFS端口
(4)服务端的RPC(portmap)服务反馈NFS端口信息给客户端。
(5)客户端通过获取的NFS端口来建立和服务端的NFS连接并进行数据的传输。
【2】NFS服务 server 端部署
NFS属于C/S模式,准备两台linux机器,一个server端,一个client端
2.1 安装nfs服务,需要安装如下软件包
- nfs-utils:NFS服务的主程序,包括了rpc.nfsd、rpc.mountd这两个守
- nfs守护进程:以及相关⽂档,命令(见1.2)
- rpcbind:是centos7/6环境下的RPC程序
##安装软件包
[root@junwu_server ~]# yum install nfs-utils rpcbind -y
##检查安装情况
[root@junwu_server ~]# rpm -qa nfs-utils rpcbind
rpcbind-0.2.0-49.el7.x86_64
nfs-utils-1.3.0-0.68.el7.2.x86_64
2.2 创建用于NFS共享的文件夹,并设置好权限
[root@junwu_server ~]# mkdir /opt/nfsShare
[root@junwu_server ~]# chmod -Rf 777 /opt/nfsShare/
2.3 修改NFS服务默认配置文件
[root@junwu_server ~]# cat /etc/exports
/opt/nfsShare/ *(insecure,rw,sync,root_squash)

*表示所有网段的机器都可以进行访问

注意,修改NFS配置⽂件后不需要重启NFS,只需要执⾏ exportfs -rv 命令即可或是 systemctl reload nfs
| 客户端地址 | 具体地址 | 说明 |
| 单一客户端 | 10.0.0.10 | 用的少 |
| 整个网端 | 10.0.0.10/24 | 指定网段,常用 |
| 授权域名客户端 | nfs.cnblogs.com | 弃用 |
| 授权整个域名客户端 | *.nfs.com | 弃用 |
权限参数说明:
| 参数 | 说明 |
|---|---|
| ro | 只读访问 |
| rw | 读写访问 |
| sync | 所有数据在请求时写入共享 |
| async | nfs在写入数据前可以响应请求 |
| secure | nfs通过1024以下的安全TCP/IP端口发送 |
| insecure | nfs通过1024以上的端口发送 |
| wdelay | 如果多个用户要写入nfs目录,则归组写入(默认) |
| no_wdelay | 如果多个用户要写入nfs目录,则立即写入,当使用async时,无需此设置 |
| hide | 在nfs共享目录中不共享其子目录 |
| no_hide | 共享nfs目录的子目录 |
| subtree_check | 如果共享/usr/bin之类的子目录时,强制nfs检查父目录的权限(默认) |
| no_subtree_check | 不检查父目录权限 |
| all_squash | 共享文件的UID和GID映射匿名用户anonymous,适合公用目录 |
| no_all_squash | 保留共享文件的UID和GID(默认) |
| root_squash | root用户的所有请求映射成如anonymous用户一样的权限(默认) |
| no_root_squash | root用户具有根目录的完全管理访问权限 |
| anonuid=xxx | 指定nfs服务器/etc/passwd文件中匿名用户的UID |
| anongid=xxx | 指定nfs服务器/etc/passwd文件中匿名用户的GID |
- 注1:尽量指定IP段最小化授权可以访问NFS 挂载的资源的客户端
- 注2:经测试参数 insecure 必须要加,否则客户端挂载出错 mount.nfs: access denied by server while mounting
2.4 启动RPC和NFS服务
[root@NFS ~]# systemctl start rpcbind # 启动rpc
[root@NFS ~]# systemctl start nfs-server #启动nfs
[root@NFS ~]# systemctl enable rpcbind  #设置开机自启
[root@NFS ~]# systemctl enable nfs-server #设置开机自启
2.4 创建文件并挂载,测试
在客户端做一个简单的测试,创建文件并进行挂载,检查是否存在
[root@junwu_server ~]# cd /opt/nfsShare/
[root@junwu_server nfsShare]# touch nfs_test.txt
#检查服务端NFS挂载情况,查看NFS服务端默认挂载的参数

[root@junwu_server nfsShare]# showmount -e
Export list for junwu_server:
/opt/nfsShare *

[root@junwu_server nfsShare]# cat /var/lib/nfs/etab
/opt/nfsShare *(rw,sync,wdelay,hide,nocrossmnt,insecure,root_squash,no_all_squash,no_subtree_check,secure_locks,acl,no_pnfs,anonuid=65534,anongid=65534,sec=sys,rw,insecure,root_squash,no_all_squash)

##把本地机器当作客户端挂载到本地目录测试

[root@junwu_server nfsShare]# mount -t nfs 10.0.0.10:/opt/nfsShare/ /mnt/

[root@junwu_server nfsShare]# ls /mnt/
nfs_test.txt
2.6 检查挂载情况
[root@junwu_server nfsShare]# df -h|tail -1
10.0.0.10:/opt/nfsShare 20G 2.3G 17G 12% /mnt

[root@junwu_server nfsShare]# mount |tail -1
10.0.0.10:/opt/nfsShare on /mnt type nfs4 (rw,relatime,vers=4.1,rsize=131072,wsize=131072,namlen=255,hard,proto=tcp,timeo=600,retrans=2,sec=sys,clientaddr=10.0.0.10,local_lock=none,addr=10.0.0.10)

服务端配置完毕
【3】NFS Client 端
3.1 安装软件、开启服务
安装软件包,并开启服务,nfs-server默认开启
[root@junwu_client ~]# yum install nfs-utils rpcbind -y
[root@junwu_client ~]# systemctl start rpcbind
3.2 showmount -e ip 检查远程挂载情况
(注意:需要服务端关闭防火墙,或是配置了规则)
[root@junwu_client ~]# showmount -e 10.0.0.10
clnt_create: RPC: Port mapper failure - Unable to receive: errno 113 (No route to host)

##server端关闭防火墙

[root@junwu_server nfsShare]# systemctl stop firewalld

##client端再进行访问

[root@junwu_client ~]# showmount -e 10.0.0.10
Export list for 10.0.0.10:
/opt/nfsShare *
3.3 以nfs协议挂载
[root@junwu_client ~]# mount -t nfs 10.0.0.10:/opt/nfsShare /mnt/

##进入挂载目录,查看远程NFS服务端的文件夹
[root@junwu_client ~]# ls /mnt/
nfs_test.txt
如果挂载出现错误
(1)检查服务端防火墙是否开启
3.4 配置开机自动挂载
##将挂载命令写入到

[root@junwu_client ~]# tail -2 /etc/fstab
10.0.0.10:/opt/nfsShare /mnt nfs defaults 0 0
【Autofs自动挂载服务,client上配置】
(1)安装autofs
##我们应该在需要挂载的机器上执行

[root@junwu_client ~]# yum -y install autofs nfs-utils
(2)修改autofs配置文件如下
/etc/auto.master ,这是一个 index文件,规范什么文件放哪里
[root@junwu_client ~]# grep -v '^#' /etc/auto.master
/misc /etc/auto.misc
/net -hosts
+dir:/etc/auto.master.d
+auto.master
/opt/nfsShare  /etc/auto.home  #服务端文件目录 /opt/nfsShare 在/etc/auto.home 自定义挂载动作。
                               #具体信息在 /etc/auto.home文件里有写
(3)自定义子配置文件挂载内容(将共享目录挂载到本地/mnt/nfs_autofs)
[root@junwu_client ~]# cat /etc/auto.home
/mnt/nfs_autofs -fstype=nfs,rw,soft,intr 10.0.0.10:/opt/nfsShare
(4)检查系统文件挂载情况
[root@junwu_client ~]# df -h
Filesystem Size Used Avail Use% Mounted on
devtmpfs 475M 0 475M 0% /dev
tmpfs 487M 0 487M 0% /dev/shm
tmpfs 487M 7.7M 479M 2% /run
tmpfs 487M 0 487M 0% /sys/fs/cgroup
/dev/mapper/centos-root 17G 1.8G 16G 11% /
/dev/sda1 1014M 138M 877M 14% /boot
tmpfs 98M 0 98M 0% /run/user/0
10.0.0.10:/opt/nfsShare 20G 2.3G 17G 12% /mnt

[root@junwu_client ~]# umount /mnt/
(5)启动autofs
[root@junwu_client ~]# systemctl restart autofs
(6)当我们进入/mnt/nfs_autofs目录后,检查有没有自动挂载
注意,如果你不进入这个 /mnt/nfs_autofs 目录,即使进入了 /mnt,它也不会挂载。
这就是 autofs自动挂载的特性,使用时才挂载。
[root@junwu_client ~]# cd /mnt/nfs_autofs/
[root@junwu_client nfs_autofs]# ls
[root@junwu_client nfs_autofs]# df -h
Filesystem Size Used Avail Use% Mounted on
devtmpfs 475M 0 475M 0% /dev
tmpfs 487M 0 487M 0% /dev/shm
tmpfs 487M 7.7M 479M 2% /run
tmpfs 487M 0 487M 0% /sys/fs/cgroup
/dev/mapper/centos-root 17G 1.8G 16G 11% /
/dev/sda1 1014M 138M 877M 14% /boot
tmpfs 98M 0 98M 0% /run/user/0
并没有,这是为什么!
终于找到原因了
在第二步的时候,修改autofs主配置文件时的要指定挂载点的父目录(或者使用固定搭配 /- )和子配置文件
/- /etc/auto.home

【故障处理】
报错一: clnt_create: RPC: Port mapper failure - Unable to receive: errno 113 (No route to host)
报错二: exportfs: 192.168.3.87:/data/share: Function not implemented
报错三: -bash: showmount: command not found
报错四:ls: cannot open directory '/rhome/ldapuser0': Permission denied
这个时候其实已经挂载成功,但没有权限。这个权限是 server端 目录的权限。
你使用 ls -ld /rhome/ldapuser0 看看就明白。


【推荐】国内首个AI IDE,深度理解中文开发场景,立即下载体验Trae
【推荐】编程新体验,更懂你的AI,立即体验豆包MarsCode编程助手
【推荐】抖音旗下AI助手豆包,你的智能百科全书,全免费不限次数
【推荐】轻量又高性能的 SSH 工具 IShell:AI 加持,快人一步
· 阿里最新开源QwQ-32B,效果媲美deepseek-r1满血版,部署成本又又又降低了!
· SQL Server 2025 AI相关能力初探
· AI编程工具终极对决:字节Trae VS Cursor,谁才是开发者新宠?
· 开源Multi-agent AI智能体框架aevatar.ai,欢迎大家贡献代码
· Manus重磅发布:全球首款通用AI代理技术深度解析与实战指南
2018-05-03 sql server 里的文件和文件组使用
2018-05-03 mysql 大表优化
2018-05-03 top与with ties用法
2018-05-03 sql server收缩数据库,收缩日志文件与数据文件