部署ELFK
部署ELFK
ELFK= ES + logstash+filebeat+kibana
| 服务器类型 | 系统和IP地址 | 需要安装的组件 | 硬件方面 |
|---|---|---|---|
| node1节点 | 192.168.239.10 | JDK、elasticsearch-6.7.2 | 2核4G |
| node2节点 | 192.168.239.20 | JDK、elasticsearch-6.7.2 | 2核4G |
| apache节点 | 192.168.239.30 | JDK、apache、logstash-6.7.2、kabana-6.7.2、filebeat-6.7.2 | 2核4G |
环境准备
所有节点
systemctl stop firewalld.service
systemctl disable firewalld.service
setenforce 0

Elasticsearch 集群部署(在Node1、Node2节点上操作)
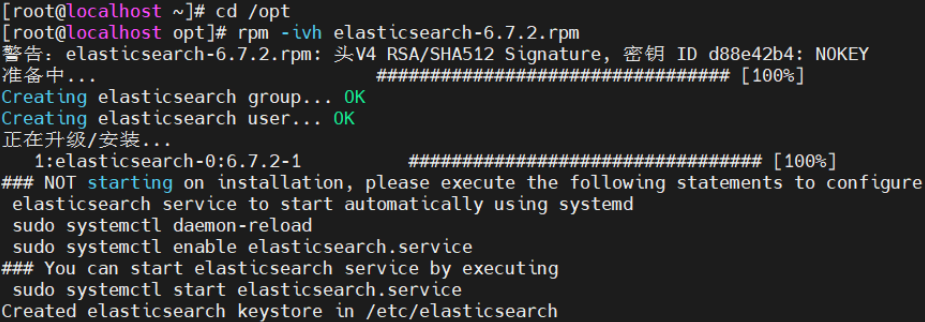
安装elasticsearch—rpm包
#上传elasticsearch-6.7.2.rpm到/opt目录下
cd /opt
rpm -ivh elasticsearch-6.7.2.rpm
修改elasticsearch主配置文件
cp /etc/elasticsearch/elasticsearch.yml /etc/elasticsearch/elasticsearch.yml.bak
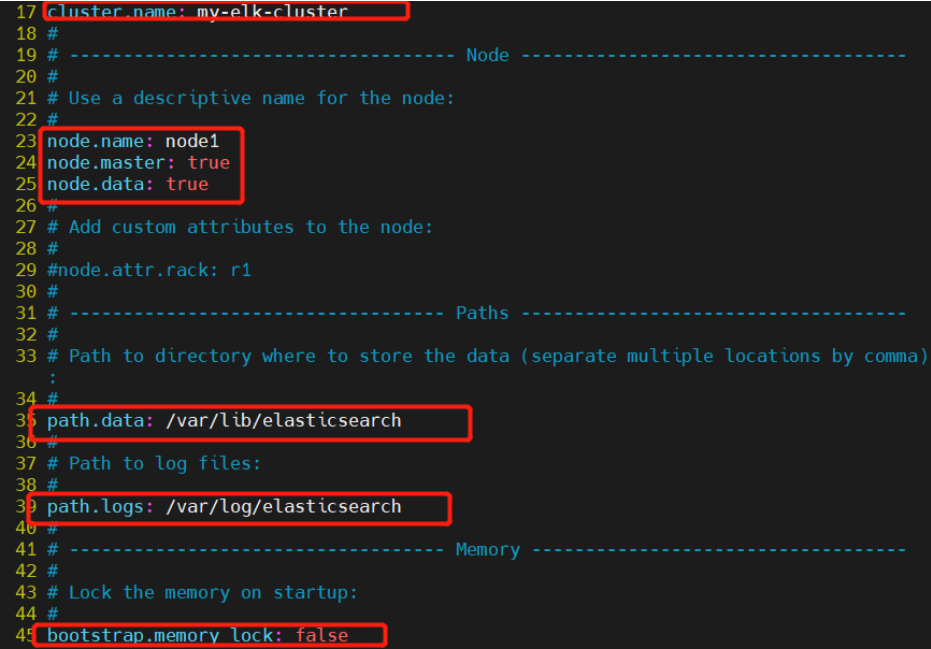
vim /etc/elasticsearch/elasticsearch.yml
--17--取消注释,指定集群名字
cluster.name: my-elk-cluster
--23--取消注释,指定节点名字:Node1节点为node1,Node2节点为node2
node.name: node1
node.master: true		#是否master节点,false为否
node.data: true			#是否数据节点,false为否
--35--取消注释,指定数据存放路径
path.data: /var/lib/elasticsearch
--39--取消注释,指定日志存放路径
path.logs: /var/log/elasticsearch
--45--取消注释,避免es使用swap交换分区
bootstrap.memory_lock: true
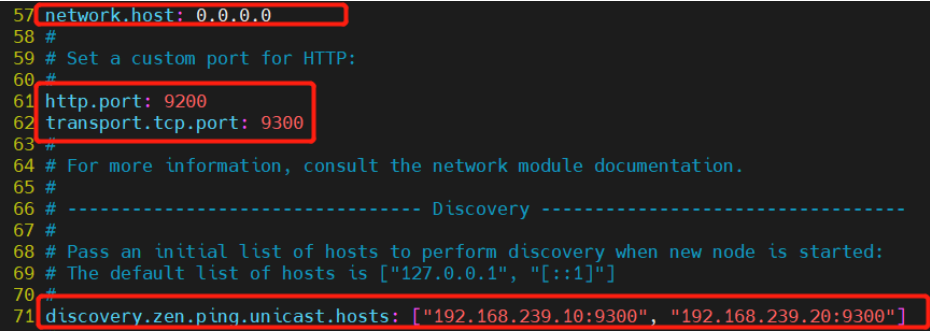
--57--取消注释,设置监听地址,0.0.0.0代表所有地址
network.host: 0.0.0.0
--51--取消注释,ES 服务的默认监听端口为9200
http.port: 9200					#指定es集群提供外部访问的接口
transport.tcp.port: 9300		#指定es集群内部通信接口
--71--取消注释,集群发现通过单播实现,指定要发现的节点
discovery.zen.ping.unicast.hosts: ["192.168.80.10:9300", "192.168.2.11:9300"]

grep -v "^#" /etc/elasticsearch/elasticsearch.yml

es 性能调优参数
优化最大内存大小和最大文件描述符的数量
vim /etc/security/limits.conf
......

*  soft    nofile          65536
*  hard    nofile          131072
*  soft    memlock         unlimited
*  hard    memlock         unlimited
systemctl daemon-reexec

vim /etc/sysctl.conf
#一个进程可以拥有的最大内存映射区域数,参考数据(分配 2g/262144,4g/4194304,8g/8388608)
vm.max_map_count=262144

sysctl -p
sysctl -a | grep vm.max_map_count


启动elasticsearch是否成功开启
systemctl start elasticsearch.service
systemctl enable elasticsearch.service
netstat -antp | grep 9200

查看节点信息
浏览器访问 http://192.168.239.10:9200 、 http://192.168.239.20:9200 查看节点 Node1、Node2 的信息。
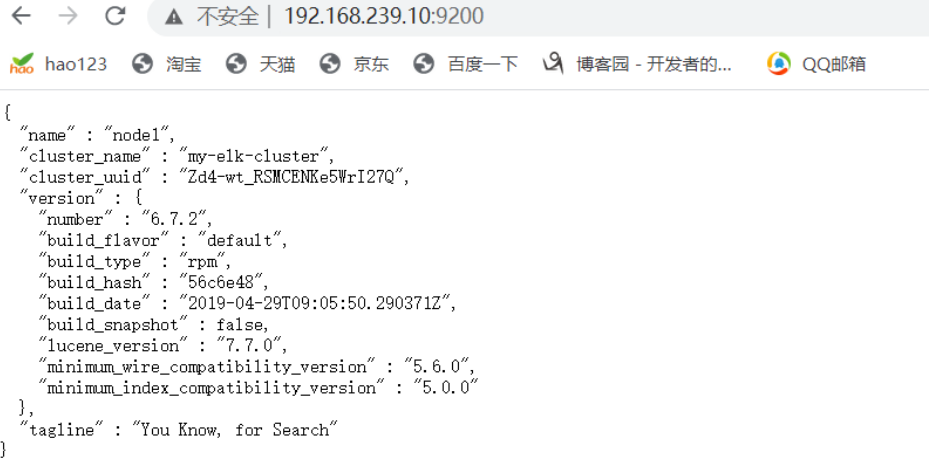
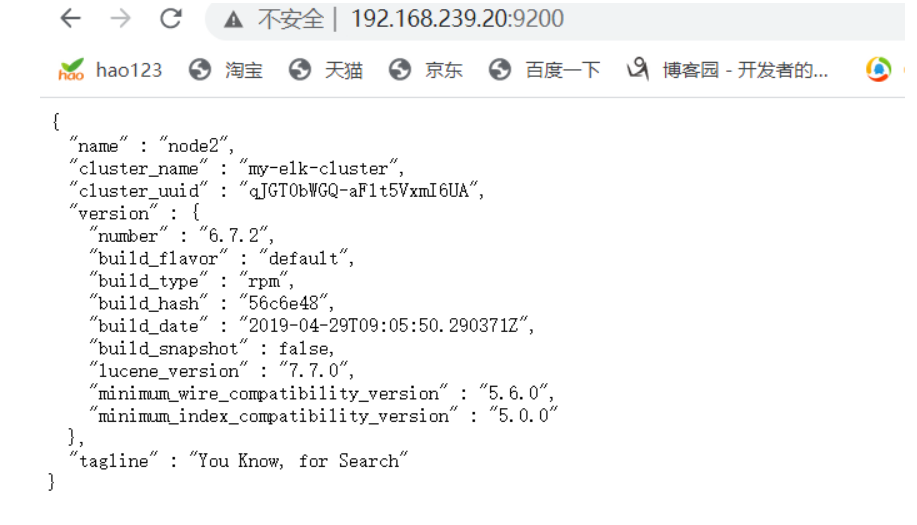
浏览器访问 http://192.168.239.10:9200/_cluster/health?pretty 、 http://192.168.239.20:9200/_cluster/health?pretty查看群集的健康情况,可以看到 status 值为 green(绿色), 表示节点健康运行。

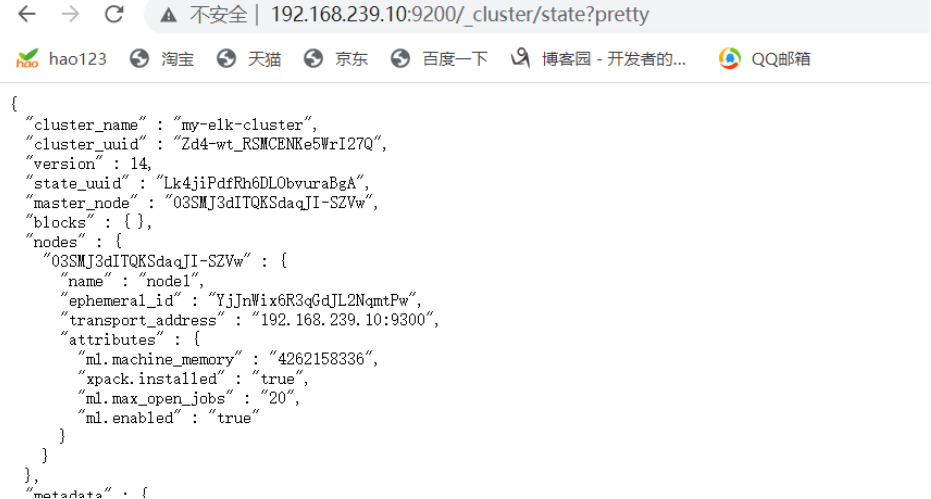
浏览器访问 http://192.168.239.10:9200/_cluster/state?pretty 检查群集状态信息。
Logstash 部署(在 Apache 节点上操作)
安装Apahce服务(httpd)
yum -y install httpd
systemctl start httpd


安装Java环境
yum -y install java
java -version
安装logstash
#上传软件包 logstash-6.7.2.rpm 到/opt目录下
cd /opt
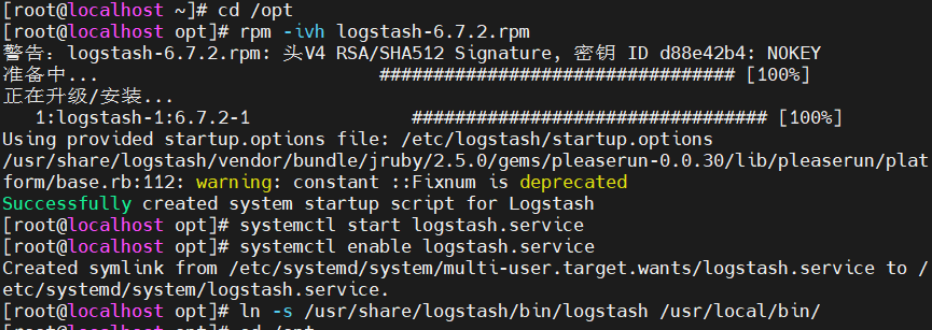
rpm -ivh logstash-6.7.2.rpm
systemctl start logstash.service
systemctl enable logstash.service

ln -s /usr/share/logstash/bin/logstash /usr/local/bin/
安装 Kiabana
#上传软件包 kibana-6.7.2-x86_64.rpm 到/opt目录
cd /opt
rpm -ivh kibana-6.7.2-x86_64.rpm

设置 Kibana 的主配置文件
vim /etc/kibana/kibana.yml
--2--取消注释,Kiabana 服务的默认监听端口为5601
server.port: 5601
--7--取消注释,设置 Kiabana 的监听地址,0.0.0.0代表所有地址
server.host: "0.0.0.0"
--28--取消注释,配置es服务器的ip,如果是集群则配置该集群中master节点的ip
elasticsearch.url:  ["http://192.168.80.10:9200","http://192.168.80.11:9200"]
--37--取消注释,设置在 elasticsearch 中添加.kibana索引
kibana.index: ".kibana"
--96--取消注释,配置kibana的日志文件路径(需手动创建),不然默认是messages里记录日志
logging.dest: /var/log/kibana.log


创建日志文件,启动 Kibana 服务
touch /var/log/kibana.log
chown kibana:kibana /var/log/kibana.log
systemctl start kibana.service
systemctl enable kibana.service
netstat -natp | grep 5601

创建索引
将 Apache 服务器的日志(访问的、错误的)添加到 Elasticsearch 并通过 Kibana 显示
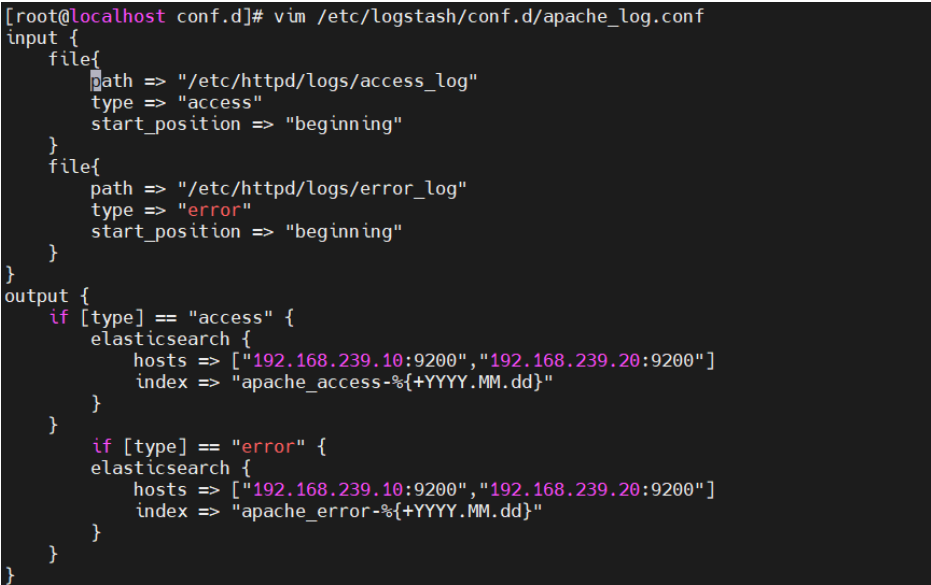
vim /etc/logstash/conf.d/apache_log.conf

input {
    file{
        path => "/etc/httpd/logs/access_log"  #指定真确目录位置
        type => "access"
        start_position => "beginning"
    }
    file{
        path => "/etc/httpd/logs/error_log"   #指定错误日志目录
        type => "error"
        start_position => "beginning"
    }
}
output {
    if [type] == "access" {
        elasticsearch {
            hosts => ["192.168.239.10:9200","192.168.239.20:9200"]
            index => "apache_access-%{+YYYY.MM.dd}"
        }
    }
        if [type] == "error" {
        elasticsearch {
            hosts => ["192.168.239.10:9200","192.168.239.20:9200"]
            index => "apache_error-%{+YYYY.MM.dd}"
        }
    }
}
cd /etc/logstash/conf.d/
logstash -f apache_log.conf
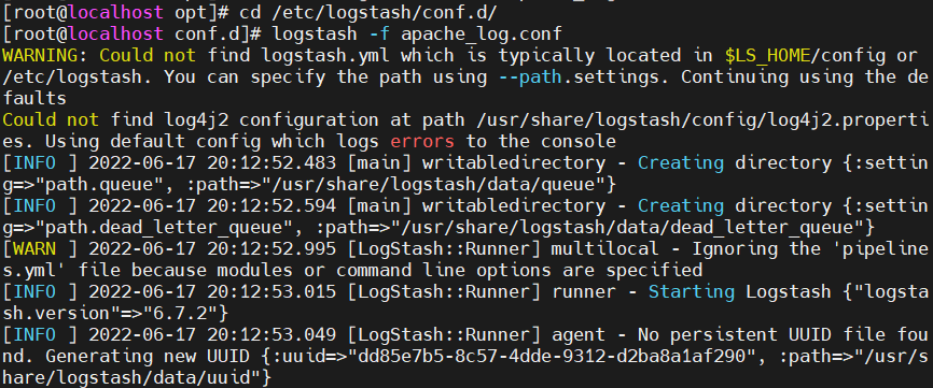
此时浏览器访问http://192.168.239.30添加访问日志

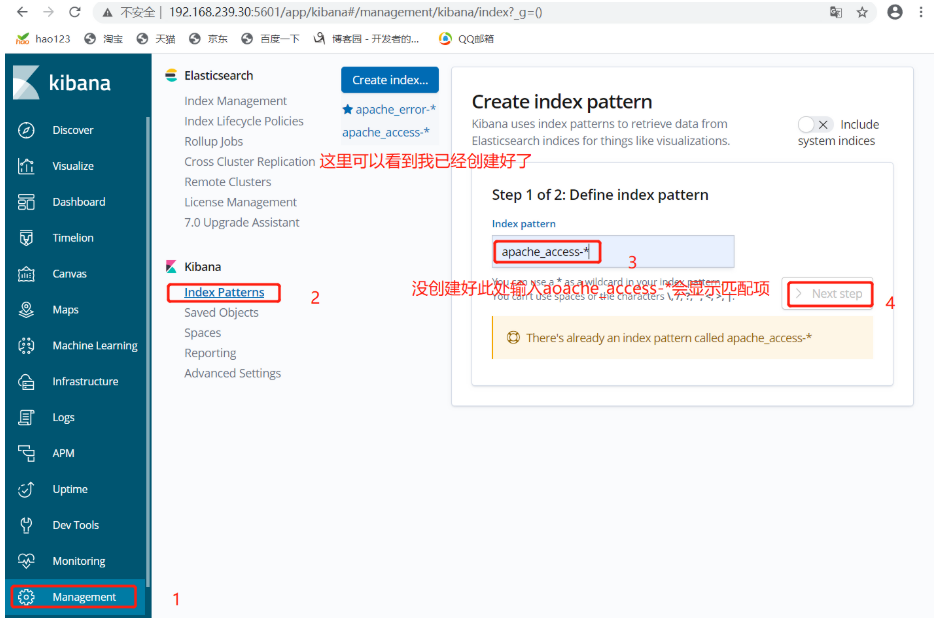
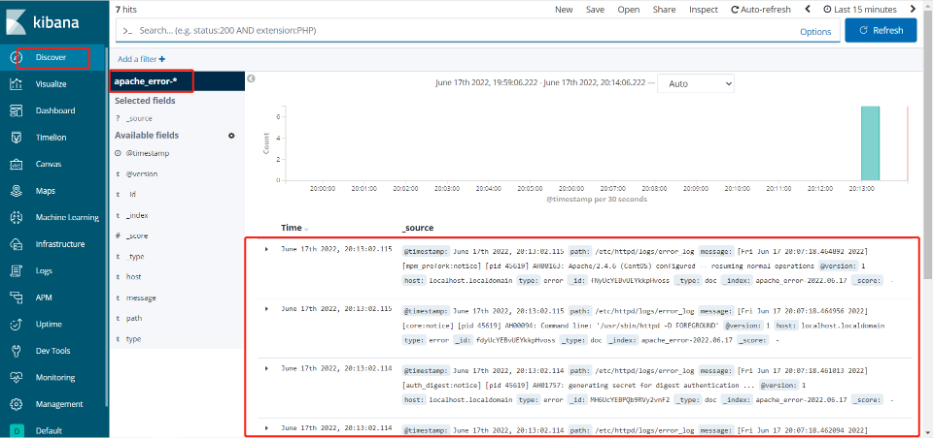
浏览器访问 http://192.168.239.10:5601 登录 Kibana创建索引
Filebeat+ELK 部署
在 apache 节点上操作
安装 Filebeat
#上传软件包 filebeat-6.7.2-linux-x86_64.tar.gz 到/opt目录
tar zxvf filebeat-6.7.2-linux-x86_64.tar.gz
mv filebeat-6.7.2-linux-x86_64/ /usr/local/filebeat


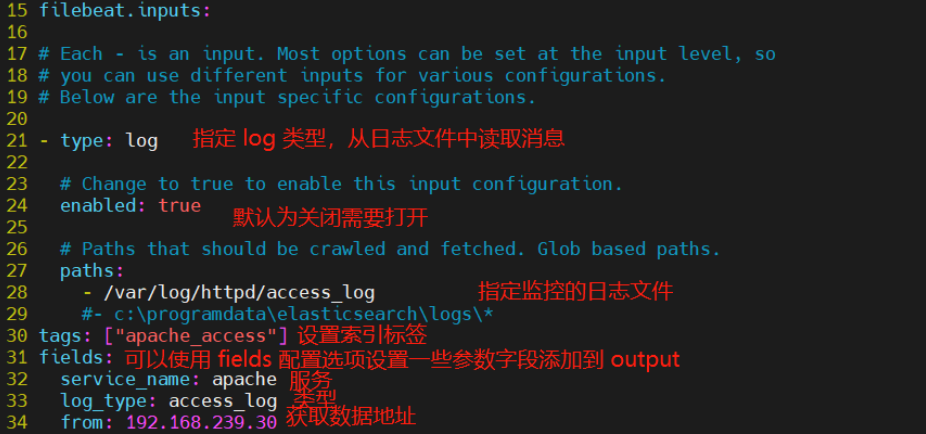
设置 filebeat 的主配置文件
vim filebeat.yml

filebeat.prospectors:

- type: log         #指定 log 类型,从日志文件中读取消息
  enabled: true
  paths:
    - /var/log/messages       #指定监控的日志文件
    - /var/log/*.log
      tags: ["sys"]		#设置索引标签
      fields:           #可以使用 fields 配置选项设置一些参数字段添加到 output 中
        service_name: filebeat
        log_type: syslog
        from: 192.168.80.13

--------------Elasticsearch output-------------------
(全部注释掉)

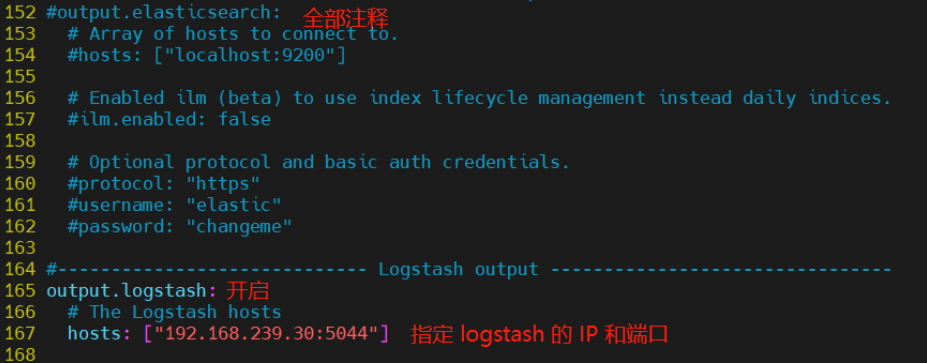
----------------Logstash output---------------------
output.logstash:
  hosts: ["192.168.239.30:5044"]      #指定 logstash 的 IP 和端口

#启动 filebeat
nohup ./filebeat -e -c filebeat.yml > filebeat.out &
#-e:输出到标准输出,禁用syslog/文件输出
#-c:指定配置文件
#nohup:在系统后台不挂断地运行命令,退出终端不会影响程序的运行

在 Logstash 组件所在节点上新建一个 Logstash 配置文件
cd /etc/logstash/conf.d

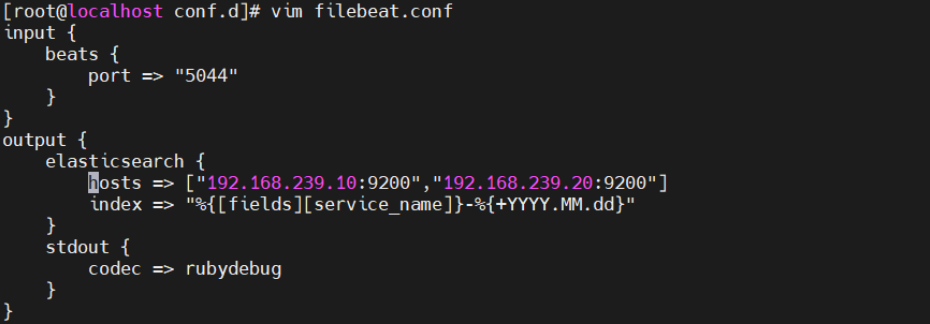
vim filebeat.conf
input {
    beats {
        port => "5044"
    }
}
output {
    elasticsearch {
        hosts => ["192.168.239.10:9200","192.168.239.20:9200"]
        index => "%{[fields][service_name]}-%{+YYYY.MM.dd}"
    }
    stdout {
        codec => rubydebug
    }
}
#启动 logstash
logstash -f filebeat.conf

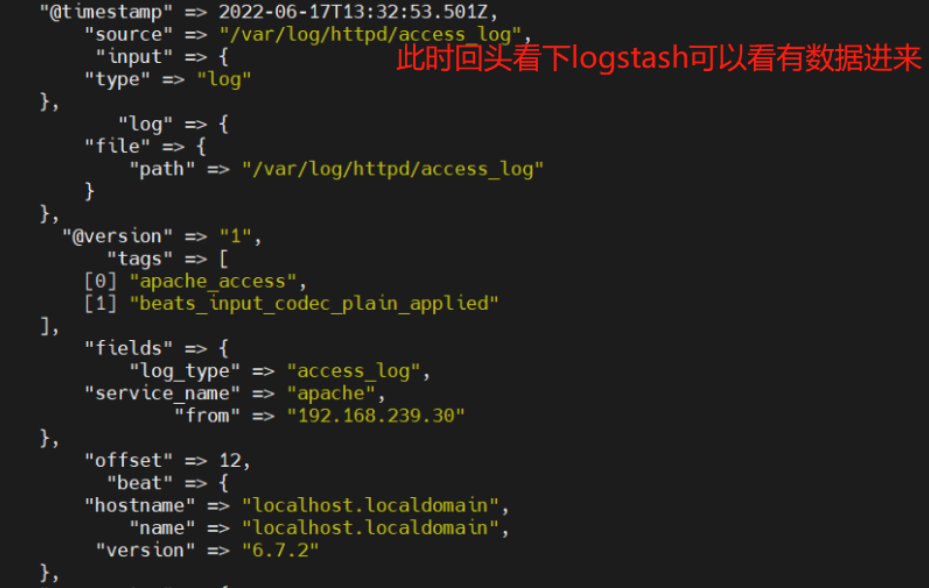
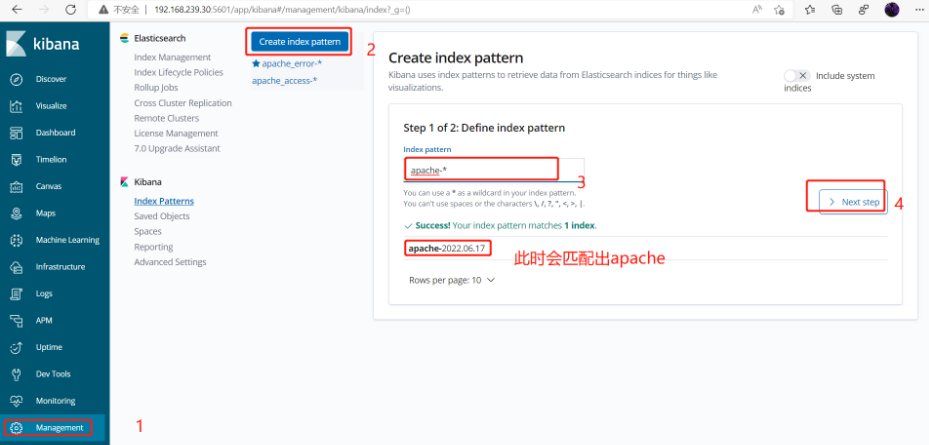
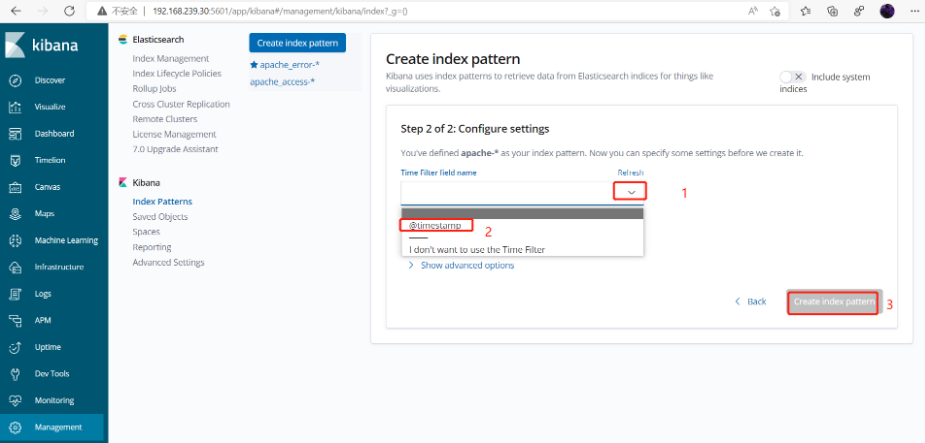
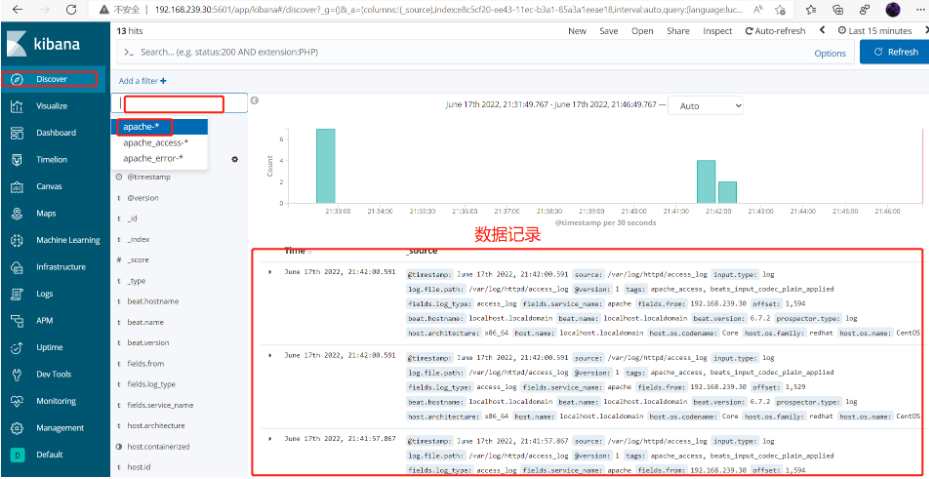
浏览器访问 http://192.168.80.30:5601 登录 Kibana,单击“Create Index Pattern”按钮添加索引“filebeat-*”,单击 “create” 按钮创建,单击 “Discover” 按钮可查看图表信息及日志信息。
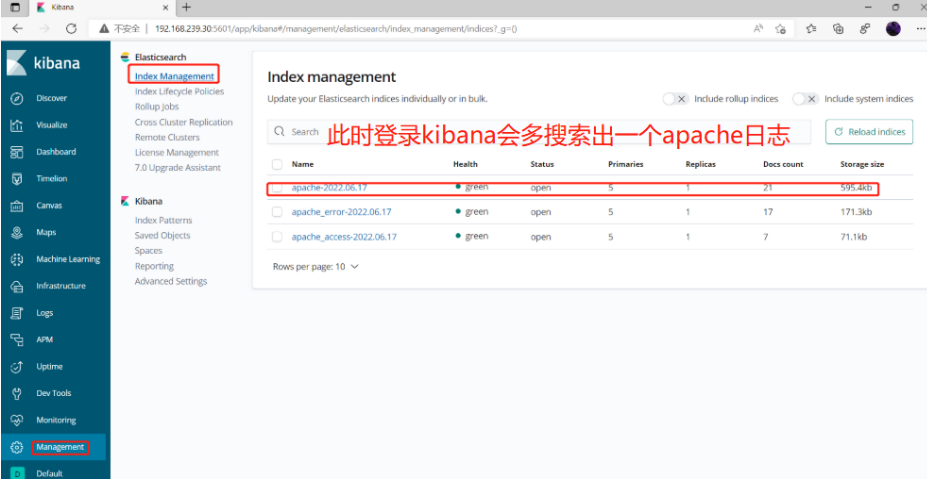
此时再去添加索引
Filter 插件
而对于 Logstash 的 Filter,这个才是 Logstash 最强大的地方。Filter 插件也非常多,我们常用到的 grok、date、mutate、mutiline 四个插件。
对于 filter 的各个插件执行流程,可以看下面这张图:

Filter常用插件的作用
grok :对若干个大文本字段进行再分割成一些小字段
date:对数据中的时间格式进行统一和格式化
mutate:对一些无用的字段进行剔除,或添加字段
mutiline :对多行数据进行统一编排,多行拆分
grok 插件
匹配格式:(?<字段名>正则表达式)
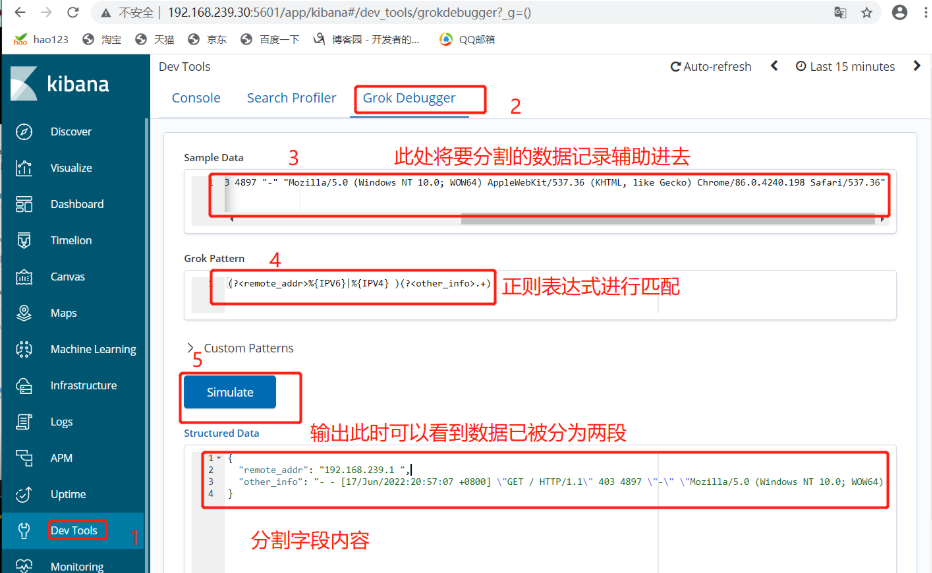
这里就要用到 logstash 的 filter 中的 grok 插件。filebeat 发送给 logstash 的日志内容会放到message 字段里面,logstash 匹配这个 message 字段就可以了。配置项如下所示:


示例1
(?<remote_addr>%{IPV6}|%{IPV4} )(?<other_info>.+)
#对数据进行分割ip字段名为remote_addr, 其他字段名为other_info
示例2
(?<remote_addr>%{IPV6}|%{IPV4} )[\s\-]+\[(?<log_time>.+)\](?<other_info>.+)
#添加匹配时间字段
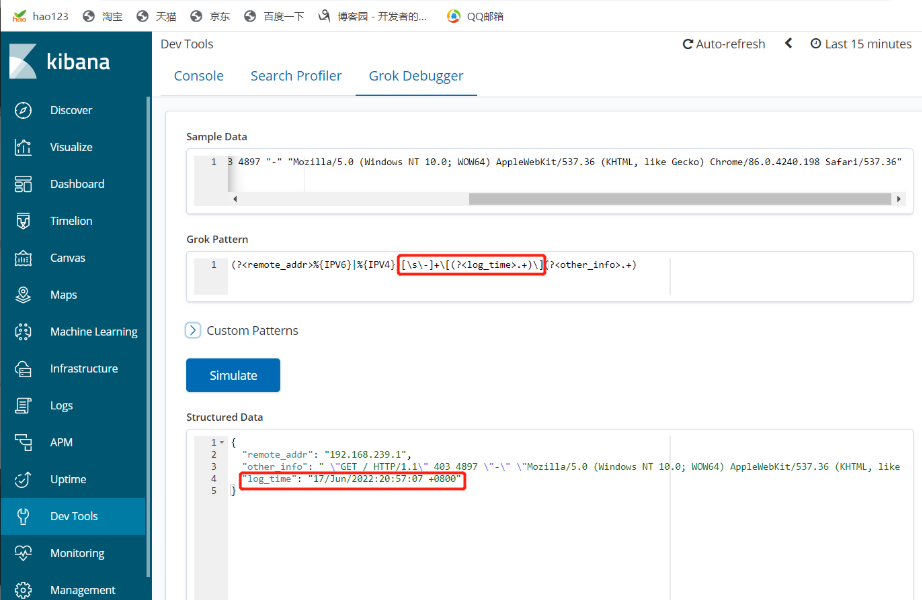
示例3
#分割多个字段
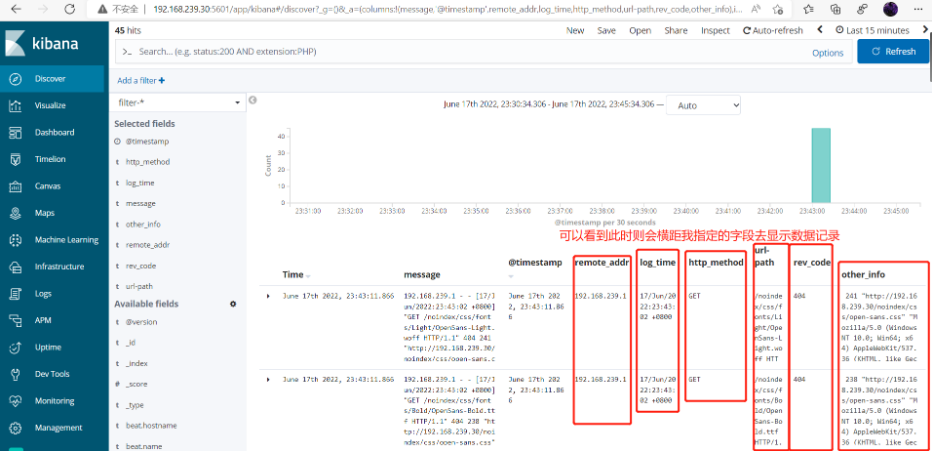
(?<remote_addr>%{IPV6}|%{IPV4})[\s\-]+\[(?<log_time>.+)\]\s+\"(?<http_method>\S+)\s+(?<url-path>.+)\"\s+(?<rev_code>\d+)(?<other_info>.+)
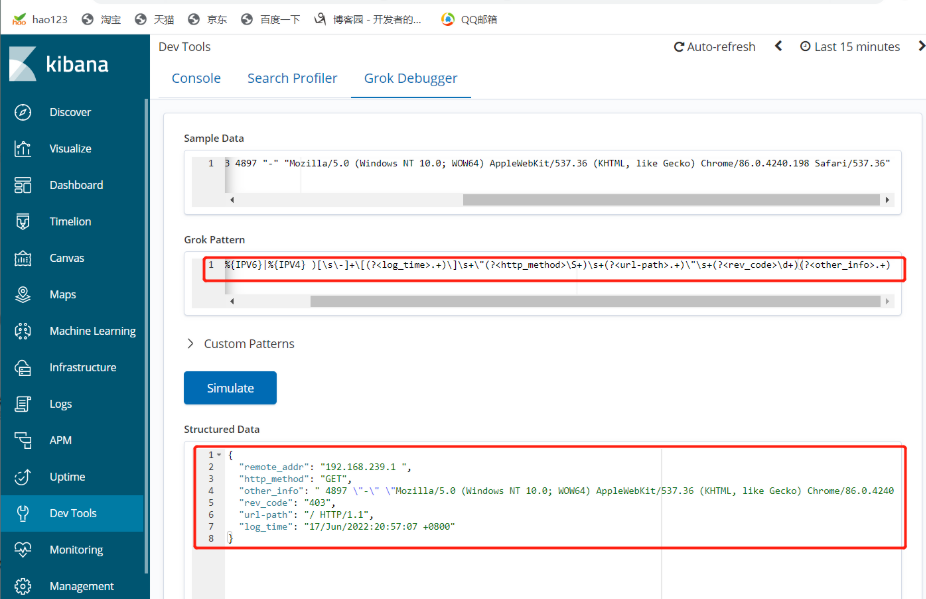
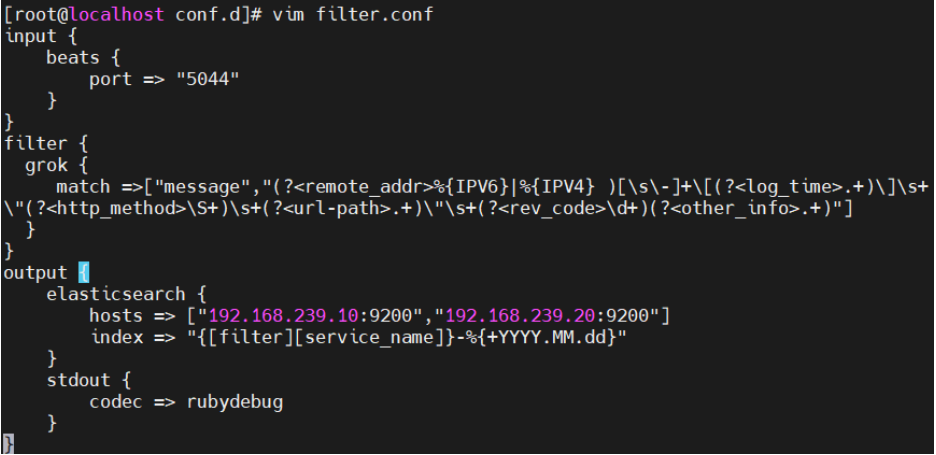
将此正则写入配置文件对数据进行过滤
cd /etc/logstash/conf.d/
cp filebeat.conf filter.conf
vim filter.conf

input {
    beats {
        port => "5044"
    }
}
filter {
  grok {
     match =>["message","(?<remote_addr>%{IPV6}|%{IPV4} )[\s\-]+\[(?<log_time>.+)\]\s+\"(?<http_method>\S+)\s+(?<url-path>.+)\"\s+(?<rev_code>\d+)(?<other_info>.+)"]
  }
}
output {
    elasticsearch {
        hosts => ["192.168.239.10:9200","192.168.239.20:9200"]
        index => "{[filter][service_name]}-%{+YYYY.MM.dd}"
    }
    stdout {
        codec => rubydebug
    }
}
 logstash -f filter.conf#启动

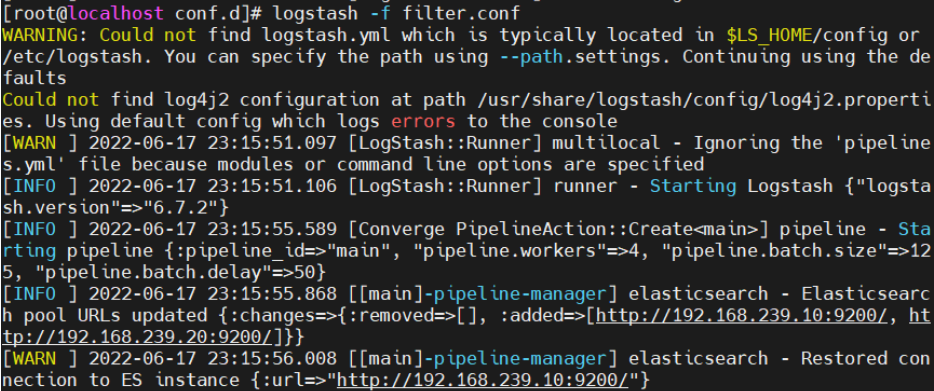
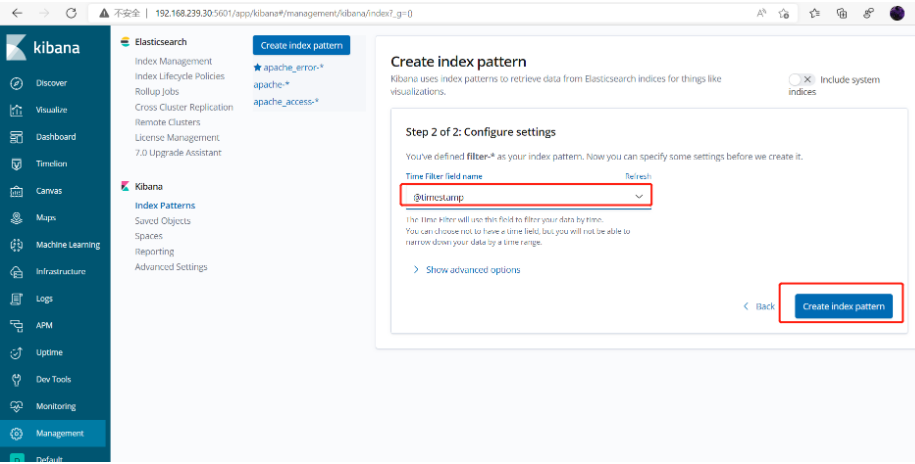
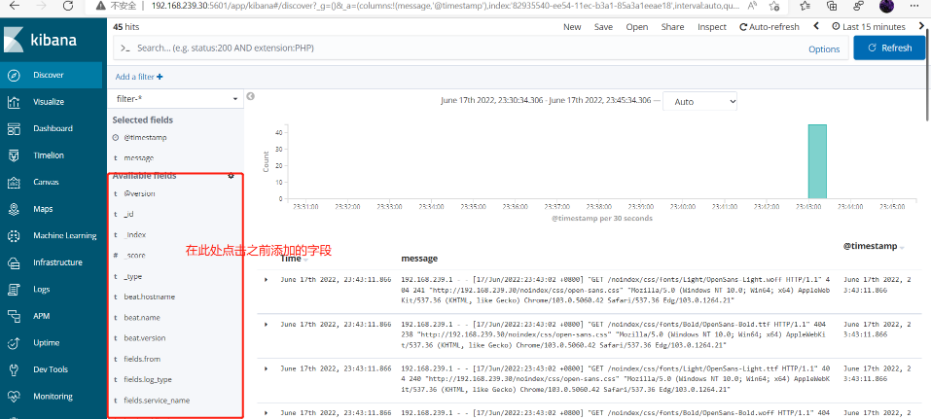
此时在进入kibana查看并添加索引
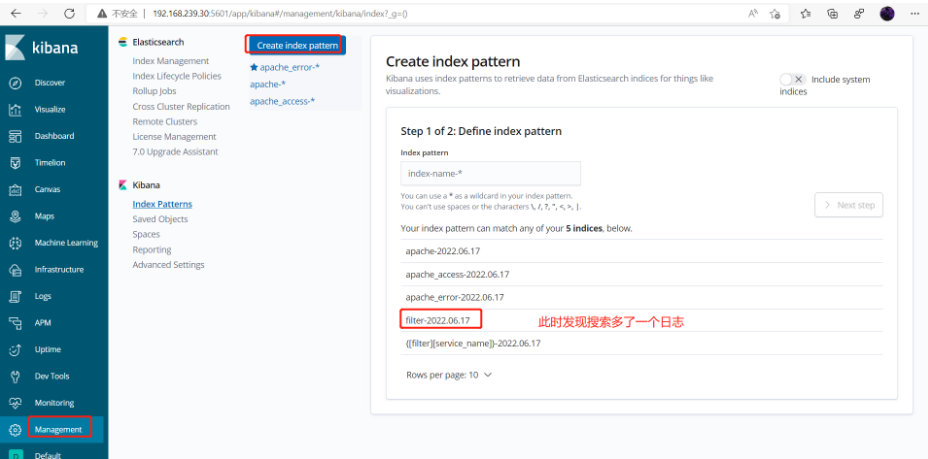
添加索引
查看添加字段


 浙公网安备 33010602011771号