安卓开发笔记(十五):编写一款能够查看任意网站源代码的应用程序
一.使用网络技术
如果你在玩手机的时候不能够上网,那么你一定会感到十分乏味。是的,现在早就不是单机的时代了,因此我们需要跟进时代的步伐,在任何应用当中都应该具备上网的功能,我们在安卓软件当中查看网页代码再解析利用的是webview这个控件,这个控件在之前我的博客当中已经十分详细地介绍了它的使用,如果您阅读我的第五篇安卓开发博客,则可以十分容易地实现对webview控件发起http/https请求从而实现网页的浏览。但这里呢,我们需要直接通过原生的方式获得网页的代码,下面则是我们代码的解说以示例。首先我们应该写上我们主界面的当中的代码,即activity_main2.xml,这里我所运用了activity_main2.xml而没有使用activity_main.xml是因为我在自己的项目当中已经创建了两个活动,因此我们可以暂时忽略不计这个。
activity_main2.xml
<?xml version="1.0" encoding="utf-8"?>
<LinearLayout xmlns:android="http://schemas.android.com/apk/res/android"
    xmlns:app="http://schemas.android.com/apk/res-auto"
    xmlns:tools="http://schemas.android.com/tools"
    android:layout_width="match_parent"
    android:layout_height="match_parent"
    android:orientation="vertical"
    tools:context=".Main2Activity">

    <EditText
        android:id="@+id/web_url"
        android:layout_width="match_parent"
        android:layout_height="wrap_content"
        android:layout_marginTop="15dp"
        android:hint="View which web's code"
        android:textSize="20dp" />

    <Button
        android:layout_width="match_parent"
        android:layout_height="wrap_content"
        android:onClick="querySourceCode"
        android:layout_marginTop="10dp"
        android:text="click to view code"
        android:textSize="20dp" />

    <ScrollView
        android:layout_width="match_parent"
        android:layout_height="match_parent">

        <TextView
            android:id="@+id/display_webContent"
            android:layout_width="match_parent"
            android:layout_height="match_parent"
            android:hint="the blank is ready to show the code now" />
    </ScrollView>
</LinearLayout>
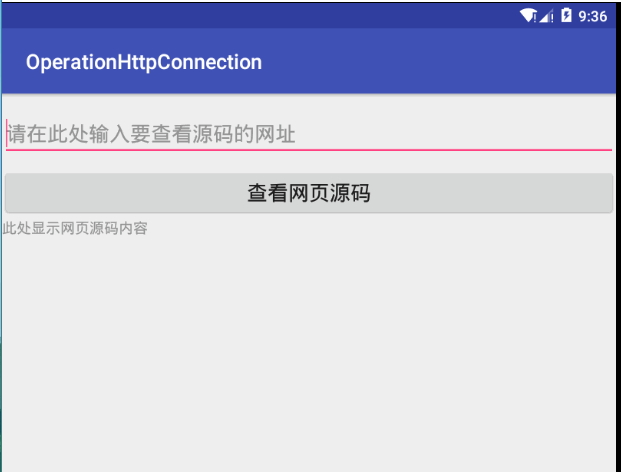
最后我们现实出来的界面如下:
这里我们引用的控件是:
ScrollView则是因为手机屏幕比较小,但是我们又想显示更多的内容,因此借助这个控件,我们还可以利用滚动的形式来查看屏幕之外的内容,因此这个控件的功能比我们的textview好多了。
下面则展示我们的第二个主活动当中的代码:
import android.Manifest;
import android.app.Activity;
import android.content.IntentFilter;
import android.content.SharedPreferences;
import android.content.pm.PackageManager;
import android.net.Uri;
import android.support.v4.app.ActivityCompat;
import android.support.v4.content.ContextCompat;
import android.support.v7.app.AppCompatActivity;
import android.os.Bundle;
import android.view.View;
import android.widget.Button;
import android.content.*;
import android.content.Context;
import android.database.sqlite.SQLiteDatabase;
import android.database.sqlite.SQLiteOpenHelper;
import android.widget.Toast;

public class MainActivity extends AppCompatActivity {
    private MyDatabaseHelper dbHelper;

    @Override
    protected void onCreate(Bundle savedInstanceState) {
        super.onCreate(savedInstanceState);
        setContentView(R.layout.activity_main);
        // 构建MyDatabaseHelper对象,指定数据库名为"BookStore.db、版本号为1,版本号改为2之后则会直接
        dbHelper = new MyDatabaseHelper(this, "BookStore.db", null, 2);
        Button btn_create_database = (Button) findViewById(R.id.creat);
        btn_create_database.setOnClickListener(new View.OnClickListener() {
            @Override
            public void onClick(View view) {
                // 创建或打开一个现有的数据库(已存在则打开,否则创建一个新的)
                dbHelper.getWritableDatabase();
            }
        });
        Button addData= (Button)findViewById(R.id.add);
        addData.setOnClickListener(new View.OnClickListener() {
            @Override
            public void onClick(View view) {
               SQLiteDatabase db=dbHelper.getWritableDatabase();
               ContentValues values=new ContentValues();
               values.put("name","the fuck code");
               values.put("autuor","fuckers");
               db.insert("Book",null,values);
               values.clear();
               values.put("name","the fuck code");
               values.put("autuor","fuckers");
               db.insert("Category",null,values);
               values.clear();

            }
        });
        Button updataData= (Button)findViewById(R.id.updata);
        updataData.setOnClickListener(new View.OnClickListener() {
            @Override
            public void onClick(View view) {
               SQLiteDatabase db=dbHelper.getWritableDatabase();
               ContentValues values=new ContentValues();
               values.put("name","我是傻逼\n");
               db.update("Book",values,"name=?",new String[]{"the fuck code"});//如果名字等于这个就可以进行更新了

            }
        });
        Button deleteData= (Button)findViewById(R.id.deletedata);
        deleteData.setOnClickListener(new View.OnClickListener() {
            @Override
            public void onClick(View view) {
                SQLiteDatabase db=dbHelper.getWritableDatabase();
                ContentValues values=new ContentValues();
                values.put("name","我是傻逼\n");
                db.delete("Book","name=?",new String[]{"the fuck code"});//如果名字等于这个就可以直接删除了

            }
        });
        Button tiaozhuan= (Button)findViewById(R.id.view);
        tiaozhuan.setOnClickListener(new View.OnClickListener() {
            @Override
            public void onClick(View view) {
                Intent wer=new Intent(MainActivity.this,Main2Activity.class);
                startActivity(wer);

            }
        });
        Button call= (Button)findViewById(R.id.call);
        call.setOnClickListener(new View.OnClickListener() {
            @Override
            public void onClick(View view) {
             if(ContextCompat.checkSelfPermission(MainActivity.this, Manifest.permission.CALL_PHONE)!=
                PackageManager.PERMISSION_GRANTED)//这个括号也真是难打,真的难打
                {
                    ActivityCompat.requestPermissions(MainActivity.this,new String[]{Manifest.permission.CALL_PHONE},1);
                }else
                {

                    call2();

                }
            }
        });


    }
    private void call2()
    {
        try{
            Intent intent =new Intent(Intent.ACTION_CALL);
            intent.setData(Uri.parse("tel:13372716502"));
            startActivity(intent);

        }
        catch (SecurityException e)
        {
            e.printStackTrace();
        }

    }
    public void onRequestPermissionsResult(int requestCode,String[] permission,int[] grantResult)
    {
        switch (requestCode)
        {
            case 1:
                if(grantResult.length>0&&grantResult[0]==PackageManager.PERMISSION_GRANTED)
                {
                    call2();
                }
                else {
                    Toast.makeText(this,"你拒绝了这个权限",Toast.LENGTH_LONG).show();
                }
                break;
                default:
        }


    }


}
二.修改我们的网络通讯权限
由于我们的应用程序是需要上网的,因此必须将我们AndroidManifest.xml文件当中的权限申明添加下这一项:
<uses-permission android:name="android.permission.INTERNET" />
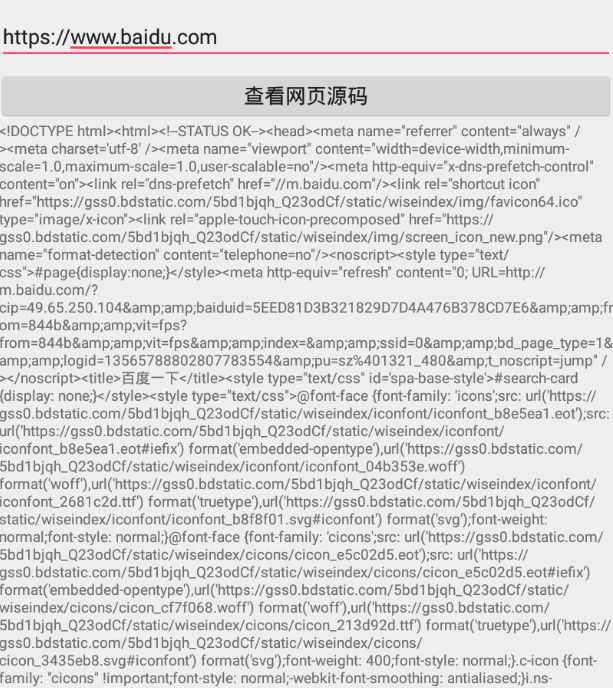
最后运行软件,得到的效果如下图所示:


