1、下载Python3
官网地址:www.python.org
当前版本为Python 3.7.3。
Windows下有个6个下载链接
Windows x86-64 embeddable zip file
Windows x86-64 executable installer
Windows x86-64 web-based installer
Windows x86 embeddable zip file Windows
Windows x86 executable installer
Windows x86 web-based installer
说明:
(1)x86-64适用于64位操作系统、x86适用于32位操作系统;
(2)embeddable zip、executable installer、web-based installer区别
embeddable zip: 下载的是一个压缩文件,解压后即表示安装完成。
executable installer: 下载的是一个几十MB的exe可执行程序,离线安装。
web-based installer: zip 下载的是一个几MB的exe可执行程序,需要联网安装。
3种方式最终都是一样的。
本人选择的是Windows x86-64 executable installer。
(3)20220731说明
Python3.7.9为3.7的最终版本,下载地址:https://www.python.org/downloads/release/python-379/
2、安装Python3
安装时勾选Add Python 3.7 to PATH,表示在环境变量path添加python的安装路径。如果忘记勾选,手动在环境变量path添加python安装路径也可以。
3、在cmd命令行下查看Python命令,会显示版本号等信息
C:\Users\gdjlc>python
Python 3.7.3 (v3.7.3:ef4ec6ed12, Mar 25 2019, 22:22:05) [MSC v.1916 64 bit (AMD6
4)] on win32
Type "help", "copyright", "credits" or "license" for more information.
>>>
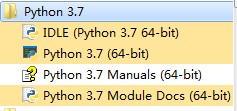
4、开始菜单->程序->Pyhone3.7的四个选项说明

(1)IDLE(Pythone 3.7 64-bit)
Python集成开发环境
(2)Python 3.7(64-bit)
Python的命令提示窗口,和在cmd命令行下输入python一样
(3)Python 3.7 Manuals(64-bit)
Python的全部文档
(4)Python 3.7 Manuals Docs(64-bit)
Python系统中可用的所有已安装模块的文档
5、修改pip下载存放路径
打开命令行输入python -m site 查看安装目录等信息
D:\Projects\python>python -m site
sys.path = [
'D:\\Projects\\python',
'D:\\Program Files\\Python\\Python37\\python37.zip',
'D:\\Program Files\\Python\\Python37\\DLLs',
'D:\\Program Files\\Python\\Python37\\lib',
'D:\\Program Files\\Python\\Python37',
'D:\\Program Files\\Python\\Python37\\lib\\site-packages',
]
USER_BASE: 'C:\\Users\\xxx\\AppData\\Roaming\\Python' (doesn't exist)
USER_SITE: 'C:\\Users\\xxx\\AppData\\Roaming\\Python\\Python37\\site-packages' (doesn't exist)
ENABLE_USER_SITE: True
USER_SITE:自定义Python依赖安装包的基础路径。
USER_BASE:自定义Python脚本
根据上面安装路径,打开配置文件:D:\Program Files\Python\Python37\Lib\site.py
把里面的2行配置
USER_SITE = None
USER_BASE = None
修改路径,例如:
USER_SITE = 'D:\\Program Files\\Python\\Python37\\UserSite'
USER_BASE = 'D:\\Program Files\\Python\\Python37\\UserBase'
6、解决pip安装模块慢的问题
如果pip安装模块很慢,可以临时改为使用国内pip源安装。
(1)国内pip源:
清华:https://pypi.tuna.tsinghua.edu.cn/simple
阿里云:https://mirrors.aliyun.com/pypi/simple
中国科技大学 https://pypi.mirrors.ustc.edu.cn/simple
豆瓣:https://pypi.douban.com/simple
(2)临时使用
格式为:pip install -i 国内源网址 模块名
例如:pip install -i https://pypi.tuna.tsinghua.edu.cn/simple face_recognition
(3)永久更换pip源
pip config set global.index-url https://mirrors.aliyun.com/pypi/simple/
查看设置结果:
pip config list
取消设置:
pip config unset global.index-url
7、从命令提示符运行Python脚本
新建一个hello.py文件,内容如下:
print('hello')
在DOS窗口中切换到此文件所在目录后,执行命令:
python hello.py
结果如下:

命令提示符获取用户输入:
name = input("what is your name?")
print('hello, ' + name)

也可以双击.py文件执行,但窗口会马上关闭,可以在代码末尾添加一个input
name = input("what is your name?")
print('hello, ' + name)

input("按回车退出")

8、print函数用法
# 用逗号可以分隔多个参数,会在参数之前插入一个空格
print("hello", "world", "!")
# 用加号则没有空格
print("hello" + "world")
# 自定义分隔符
print("hello", "world", sep="_")
# 自定义结束字符串代替默认换行符
print('hello,', end='')
print('world')
运行结果如下:

9、部分数学运算
#除法,结果为浮点数
print(1/2) # 0.5
print(2/1) # 2.0
#整除运算,丢弃小数部分,当结果为负数时,向下圆整,即离0更远
print(1//2) # 0
print(3//2) # 1
print(3.0//2) # 1.0
print(3//2.0) # 1.0
print(10 // 3) # 3
print(9 // 3) # 3
print(10 // -3) # -4
#求余(求模)运算
print(10%3) #1
print(10%-3) # -2
#乘方(求幂)运算,优先级比求负高
print(2**3) # 8
print(-3**2)  #-9
print((-3)**2) # 9


