Python数据可视化-seaborn
详细介绍可以看seaborn官方API和example galler。
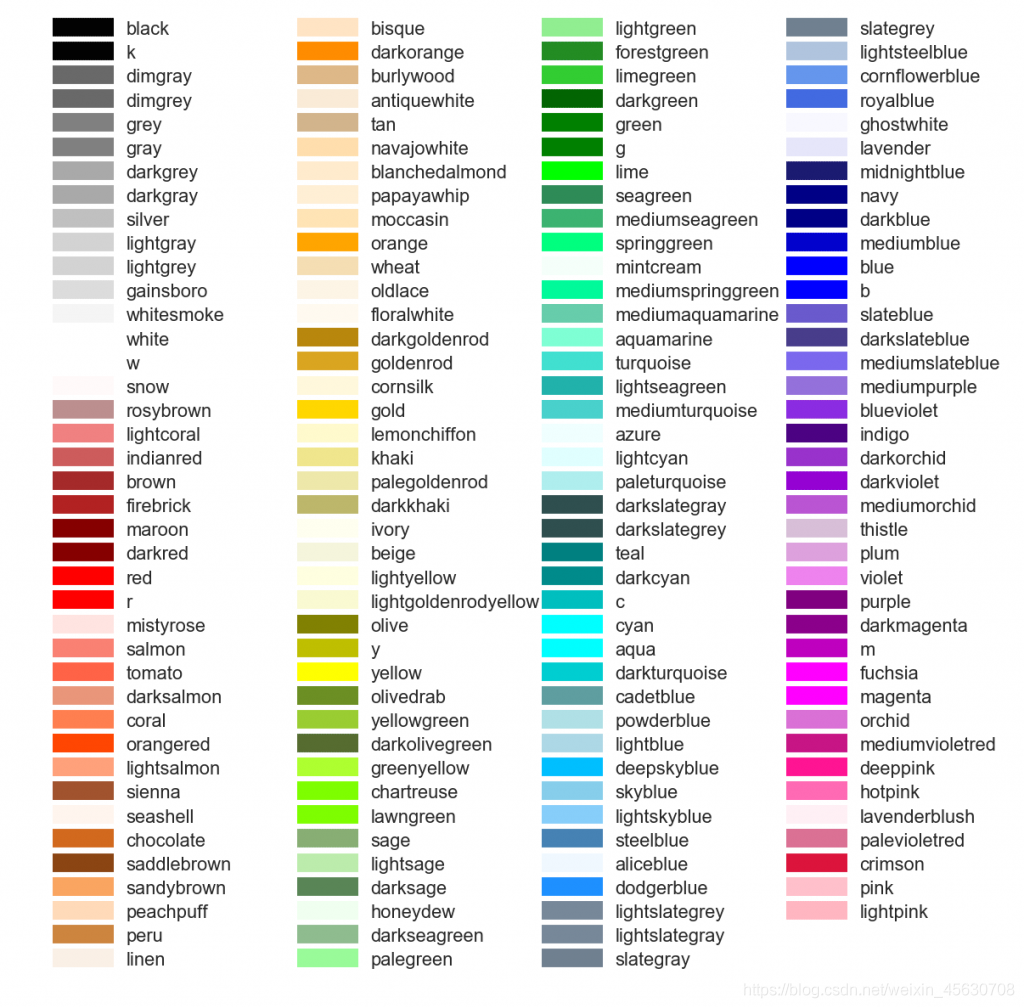
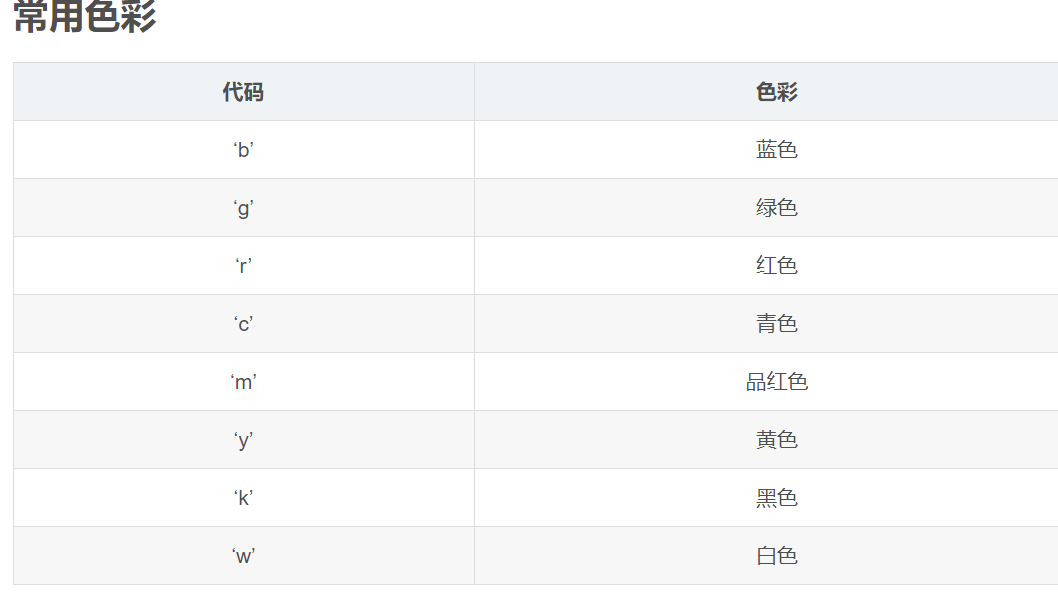
常用颜色:
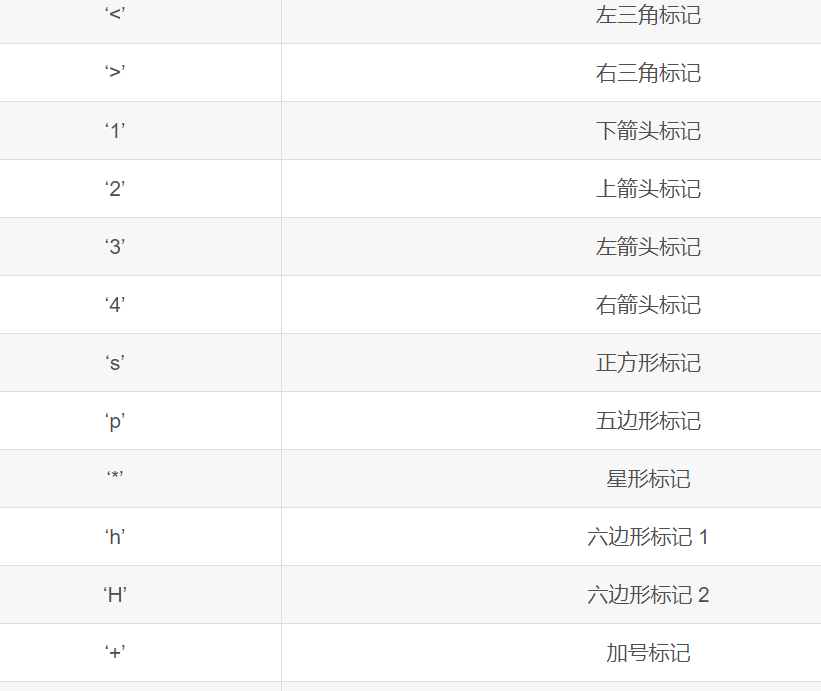
常用样式:


1 set_style( ) set( )
set_style( )是用来设置主题的,Seaborn有五个预设好的主题: darkgrid , whitegrid , dark , white ,和 ticks 默认: darkgrid
- import matplotlib.pyplot as plt
- import seaborn as sns
- sns.set_style("whitegrid")
- plt.plot(np.arange(10))
- plt.show()
- import seaborn as sns
- import matplotlib.pyplot as plt
- sns.set(style="white", palette="muted", color_codes=True) #set( )设置主题,调色板更常用
- plt.plot(np.arange(10))
- plt.show()
2 distplot( ) kdeplot( )
- import matplotlib.pyplot as plt
- import seaborn as sns
- df_iris = pd.read_csv('../input/iris.csv')
- fig, axes = plt.subplots(1,2)
- sns.distplot(df_iris['petal length'], ax = axes[0], kde = True, rug = True) # kde 密度曲线 rug 边际毛毯
- sns.kdeplot(df_iris['petal length'], ax = axes[1], shade=True) # shade 阴影
- plt.show()
- import numpy as np
- import seaborn as sns
- import matplotlib.pyplot as plt
- sns.set( palette="muted", color_codes=True)
- rs = np.random.RandomState(10)
- d = rs.normal(size=100)
- f, axes = plt.subplots(2, 2, figsize=(7, 7), sharex=True)
- sns.distplot(d, kde=False, color="b", ax=axes[0, 0])
- sns.distplot(d, hist=False, rug=True, color="r", ax=axes[0, 1])
- sns.distplot(d, hist=False, color="g", kde_kws={"shade": True}, ax=axes[1, 0])
- sns.distplot(d, color="m", ax=axes[1, 1])
- plt.show()
3 箱型图 boxplot( )
- import matplotlib.pyplot as plt
- import seaborn as sns
- df_iris = pd.read_csv('../input/iris.csv')
- sns.boxplot(x = df_iris['class'],y = df_iris['sepal width'])
- plt.show()
4 联合分布jointplot( )
- tips = pd.read_csv('../input/tips.csv') #右上角显示相关系数
- sns.jointplot("total_bill", "tip", tips)
- plt.show()
- tips = pd.read_csv('../input/tips.csv')
- sns.jointplot("total_bill", "tip", tips, kind='reg')
- plt.show()
5 热点图heatmap( )
internal_chars = ['full_sq', 'life_sq', 'floor', 'max_floor', 'build_year', 'num_room', 'kitch_sq', 'state', 'price_doc']
corrmat = train[internal_chars].corr()
f, ax = plt.subplots(figsize=(10, 7))
plt.xticks(rotation='90')
sns.heatmap(corrmat, square=True, linewidths=.5, annot=True)
plt.show()

plt.scatter(x=train['full_sq'], y=train['price_doc'], c='r')
plt.xlim(0,500)
plt.show()
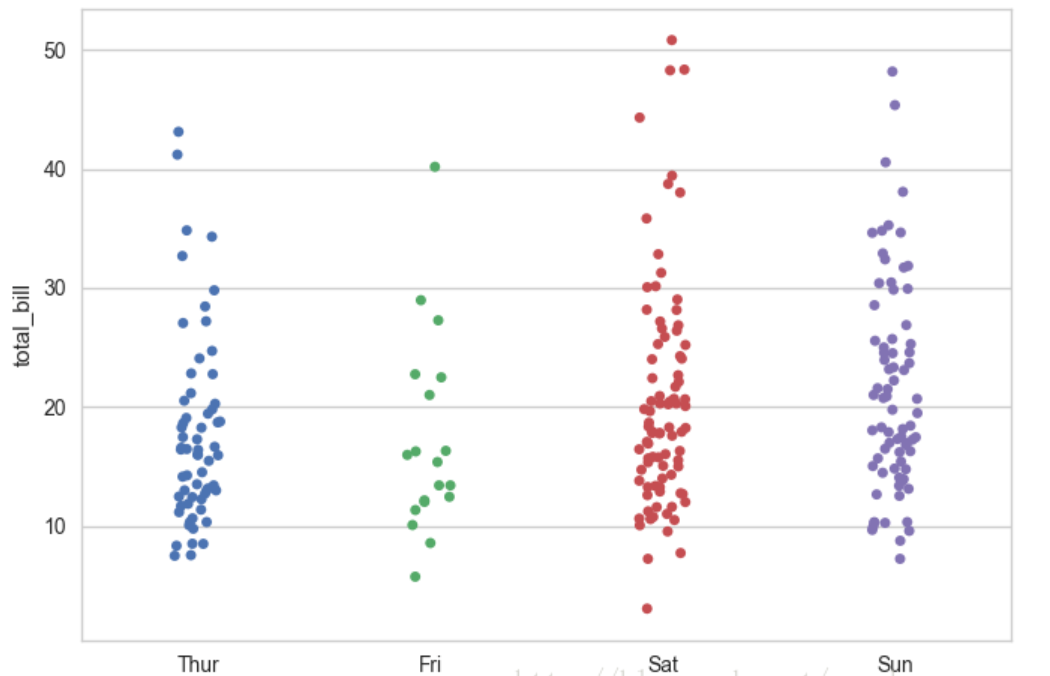
Seaborn画散点图,以类别型的变量画散点图为例子:
sns.stripplot(x="day", y="total_bill", data=tips)
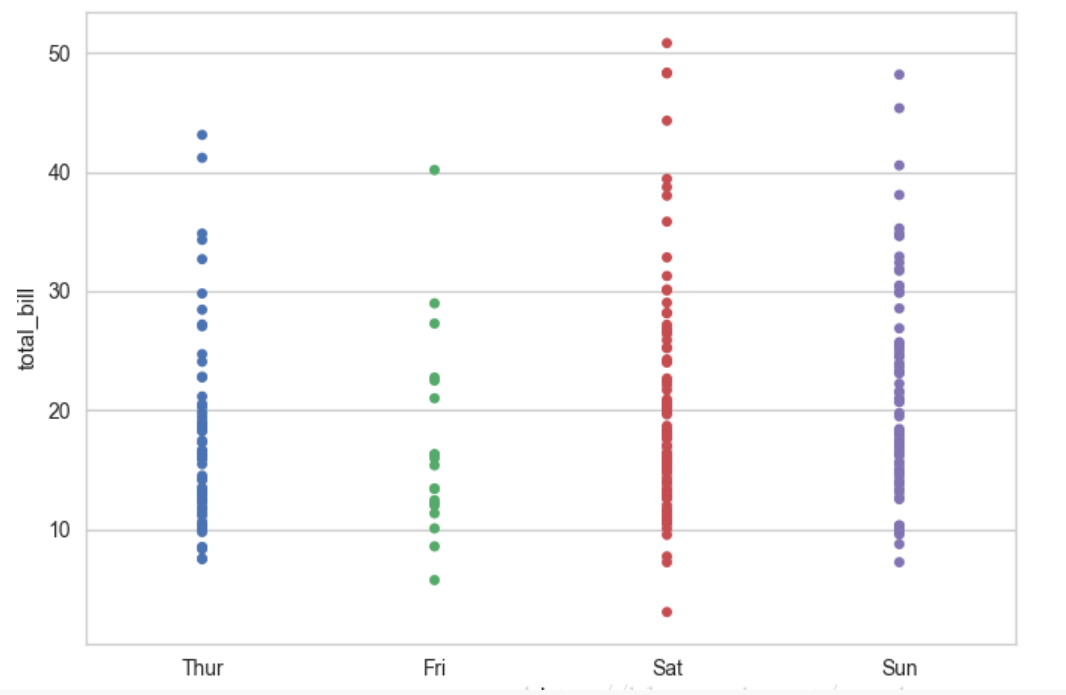
散射点通常会重叠。这使得我们很难看到完整的数据分布。一个简单的解决方法是使用一些随机的“抖动”来调整位置。
jitter参数说明:抖动量(仅沿类别的轴方向)。有许多点并且它们重叠时,很有用,更容易看到分布。可以指定抖动量(统一随机变量支持宽度的一半),或者只使用True作为良好的默认值
sns.stripplot(x="day", y="total_bill",jitter=True, data=tips)
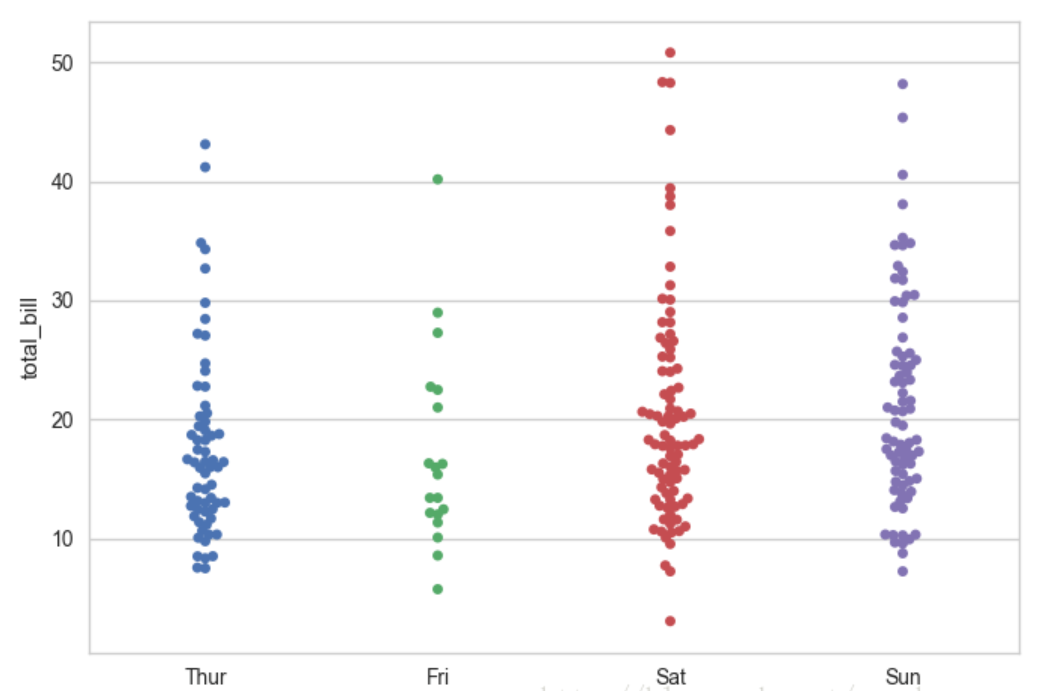
也可使用 swarmplot(),避免散点重叠带分布的散点图
sns.swarmplot(x="day", y="total_bill", data=tips)
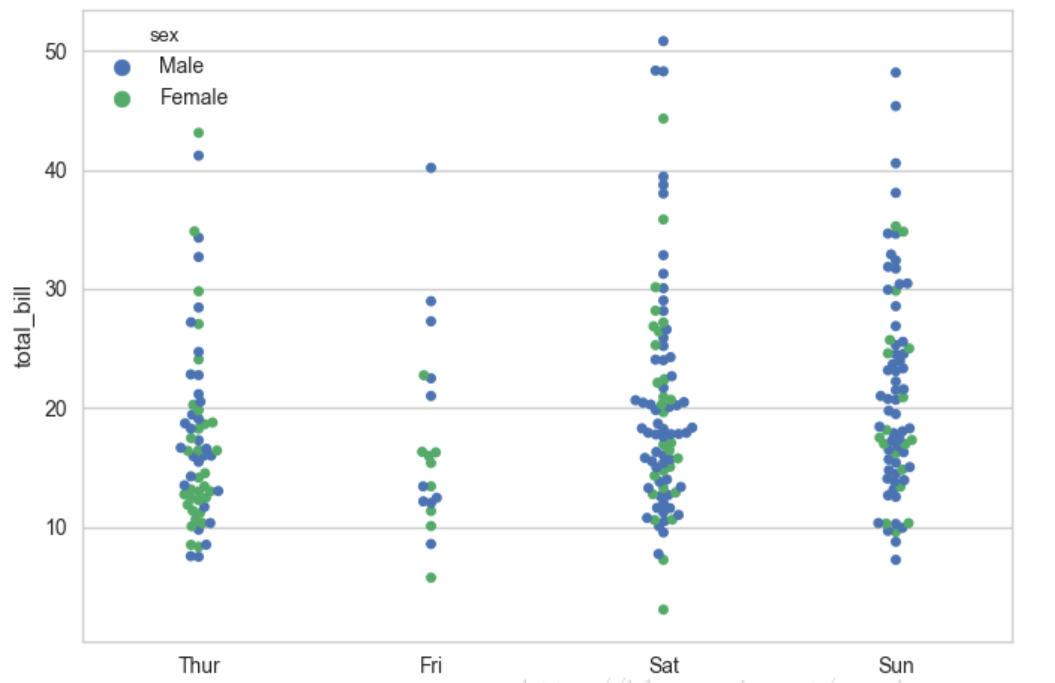
使用hue参数添加一个分类变量
sns.swarmplot(x="day", y="total_bill",hue='sex', data=tips)
7.pointplot画出变量间的关系
grouped_df = train_df.groupby('floor')['price_doc'].aggregate(np.median).reset_index()
plt.figure(figsize=(12,8))
sns.pointplot(grouped_df.floor.values, grouped_df.price_doc.values, alpha=0.8, color=color[2])
plt.ylabel('Median Price', fontsize=12)
plt.xlabel('Floor number', fontsize=12)
plt.xticks(rotation='vertical') plt.show()

8 pairplot( )
- import seaborn as sns
- import matplotlib.pyplot as plt
- iris = pd.read_csv('../input/iris.csv')
- sns.pairplot(iris, vars=["sepal width", "sepal length"],hue='class',palette="husl")
- plt.show()
9 FacetGrid( )
facetGrid可以根据类别特征各种不同组合进行显示,下面就是根据婚姻与学历情况进行分成了10组,横(row)的表示按婚姻分类显示,竖(col)的表示按学历分类显示
grid=sns.FacetGrid(df,row='martial_status',col='education',palette='seismic',size=4)
grid.map(plt.scatter,'gjj_loan_balance','max_overduer_days')
grid.add_legend()
plt.show()

10 barplot( )
f, ax=plt.subplots(figsize=(12,20))
#orient='h'表示是水平展示的,alpha表示颜色的深浅程度
sns.barplot(y=group_df.sub_area.values, x=group_df.price_doc.values,orient='h', alpha=0.8, color='red')
#设置y轴、X轴的坐标名字与字体大小
plt.ylabel('price_doc', fontsize=16)
plt.xlabel('sub_area', fontsize=16)
#设置X轴的各列下标字体是水平的
plt.xticks(rotation='horizontal')
#设置Y轴下标的字体大小
plt.yticks(fontsize=15)
plt.show()
注:如果orient='v'表示成竖直显示的话,一定要记得y=group_df.sub_area.values, x=group_df.price_doc.values调换一下坐标轴,否则报错

f, ax=plt.subplots(figsize=(12,20))
sns.barplot(y='area', x='fre',data=df_idcard_city,orient='h', color='red')
plt.ylabel('地域', fontsize=16)
plt.xlabel('频数', fontsize=16)
plt.xticks(rotation='horizontal')
plt.yticks(fontsize=15)
plt.show()

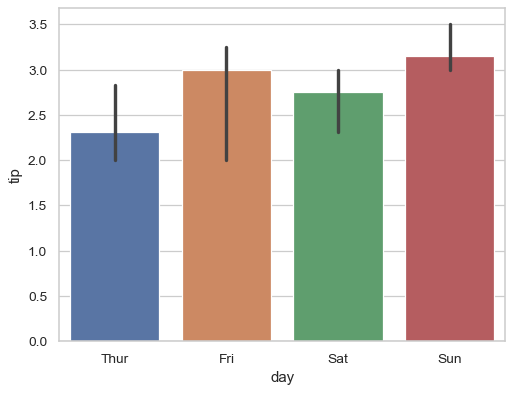
sns.barplot(x="day", y="tip", data=tips, estimator=median)
estimator:表示生成柱状图要调用的函数,同一个x的值是取中位数,还是mean,sum,或者计数(计数的话就等于countplot)
有多种函数可以调用:np.median,np.mean,np.sum,np.count_nonzero(计数)
hue:分组统计
11.countplot () 计数并画成柱状图
sns.countplot(x="deck", data=titanic, palette="Greens_d")
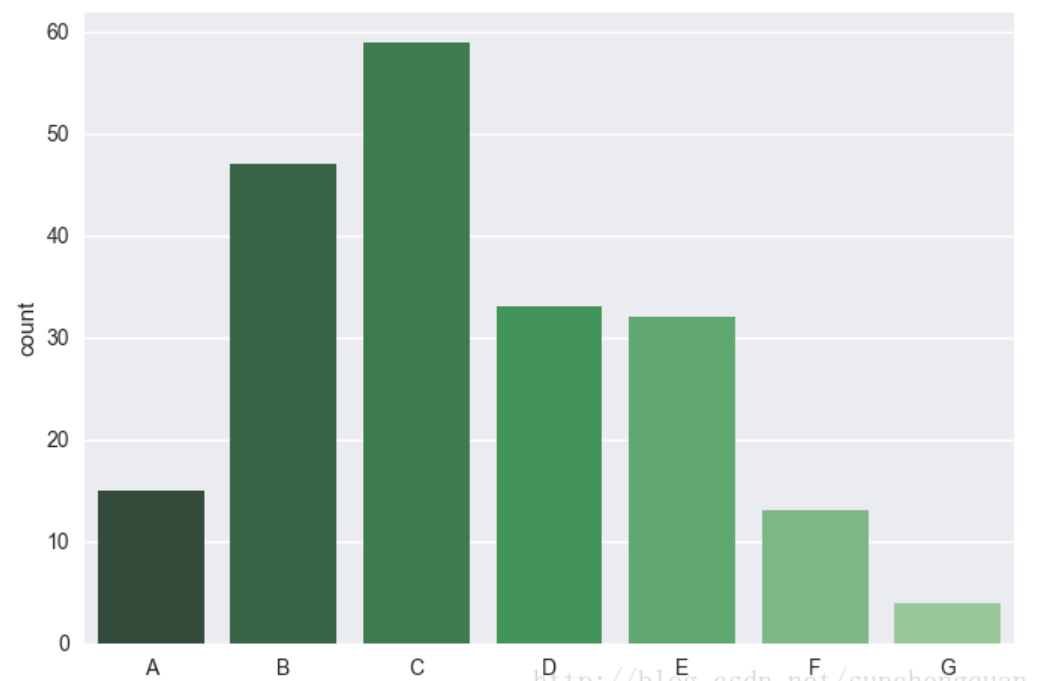
也可以加hue参数再分类计数。
12、sns.relplot()
可视化统计量间的关系(relationship),可以绘制出曲线图,也可以绘制出散点图。
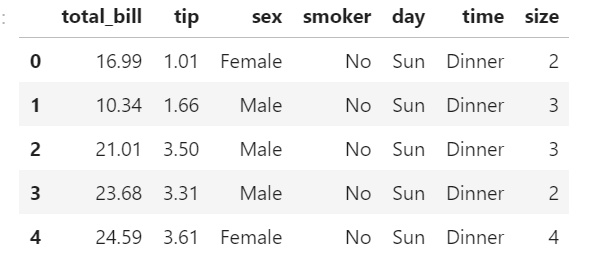
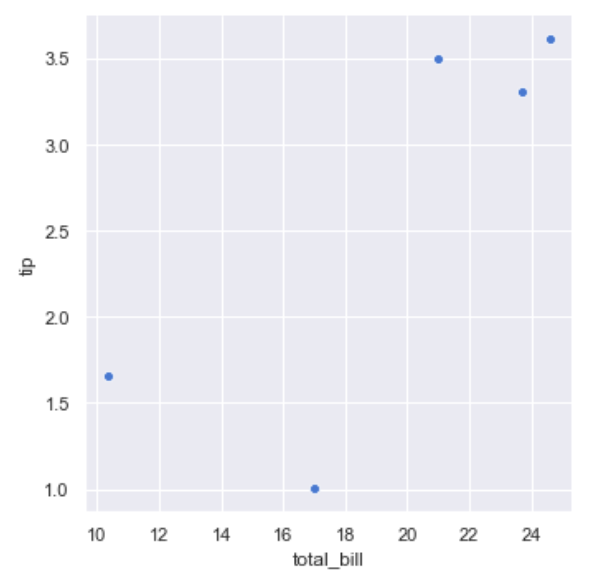
默认是散点图
sns.relplot(x='total_bill', y='tip', data=tips)
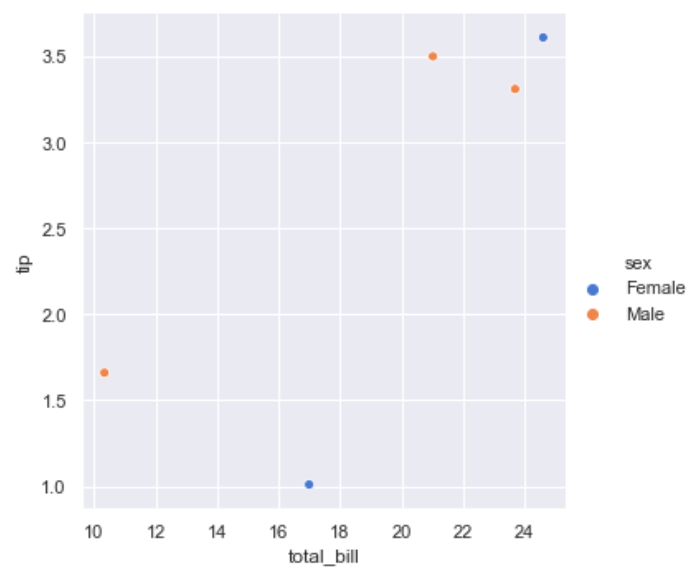
sns.relplot(x='total_bill', y='tip', data=tips, hue='sex')
#style表示显示的形状,形状上和hue分别区分显示
sns.relplot(x='total_bill', y='tip', data=tips, hue='size',style='sex')
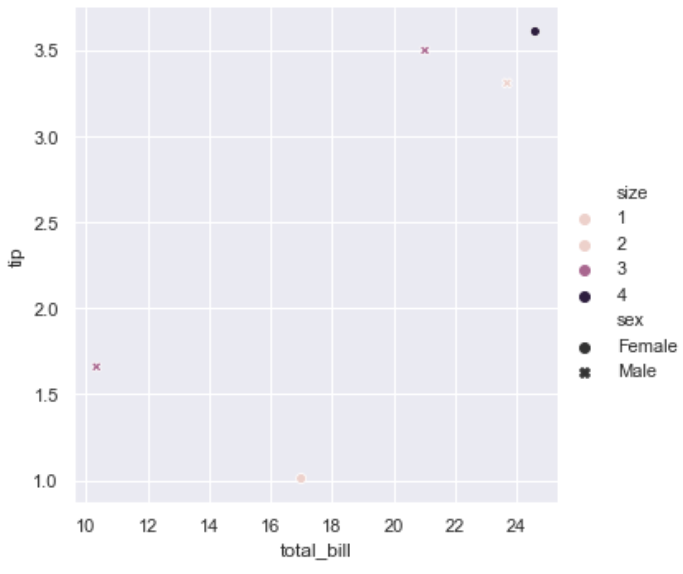
#用size参数显示大小
sns.relplot(x='total_bill', y='tip', data=tips, hue='sex', size='size')
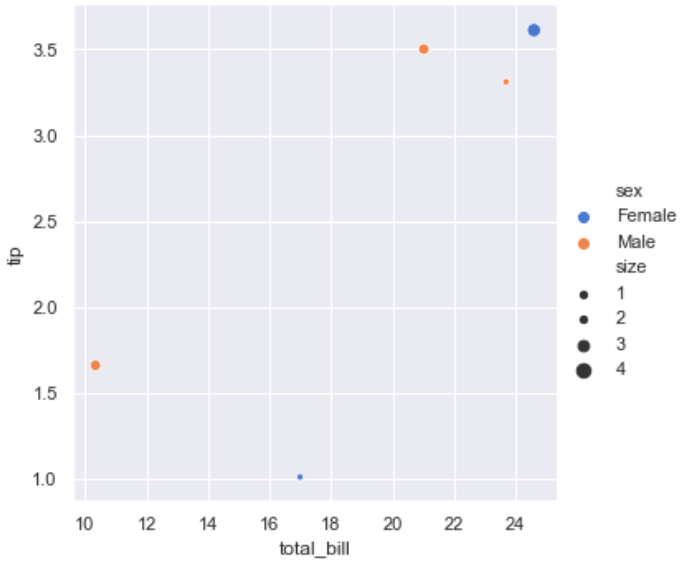
显示曲线图
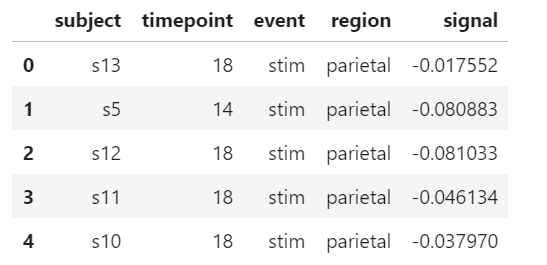
sns.relplot(x="timepoint", y="signal", data=fmri, kind="line",ci='sd') #ci用来控制显示聚合的阴影,不显示则为None即可。
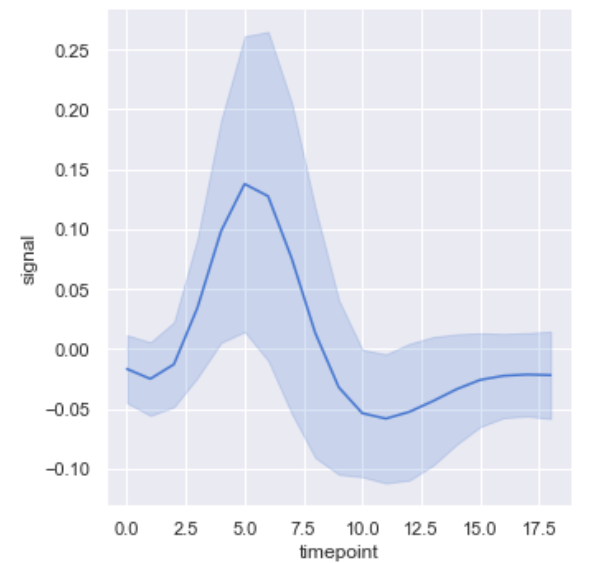
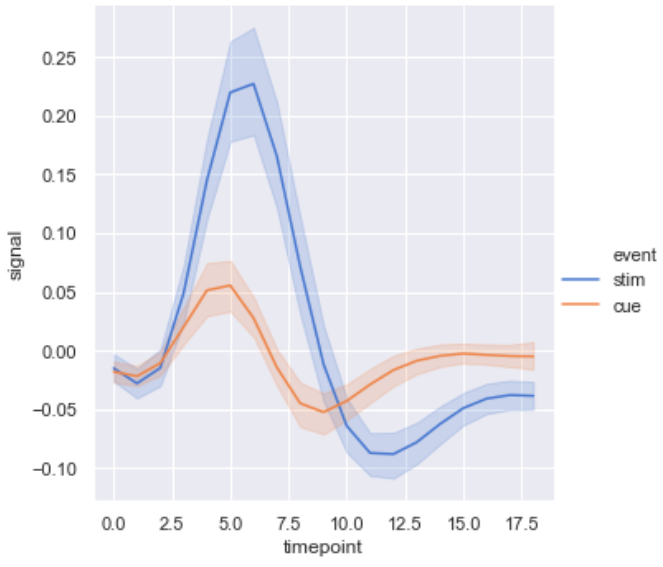
sns.relplot(x="timepoint", y="signal", data=fmri, kind="line",hue="event")
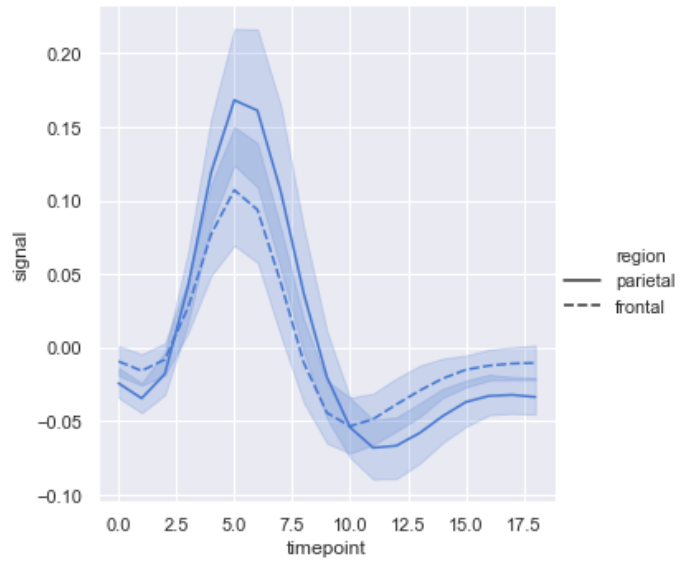
sns.relplot(x="timepoint", y="signal", style="region", kind="line", data=fmri)
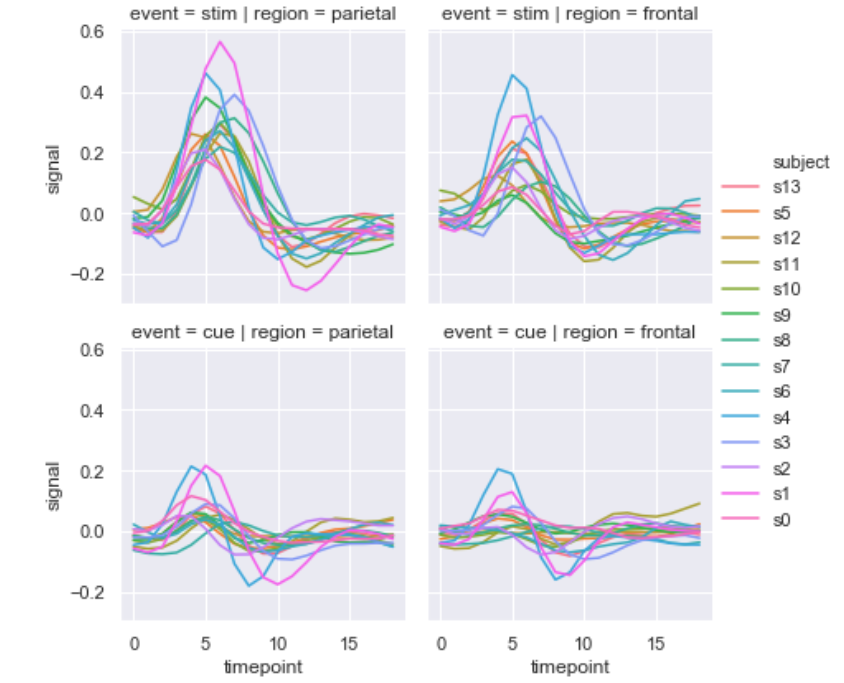
sns.relplot(x='timepoint', y='signal', hue='subject', col='region', row='event', height=3, kind='line', estimator=None, data=fmri)
参考:https://blog.csdn.net/u013317445/article/details/88175366
13、分面网格分类图
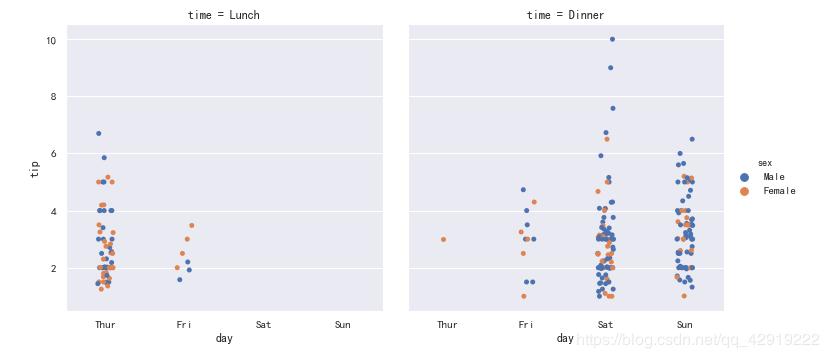
sns.catplot(x='day', y='tip', hue='sex', col='time', data=tips)
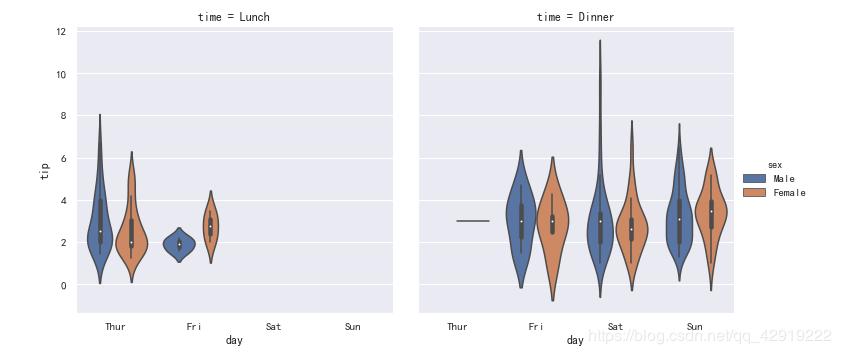
sns.catplot(x='day', y='tip', hue='sex', col='time', kind ='violin', data=tips)
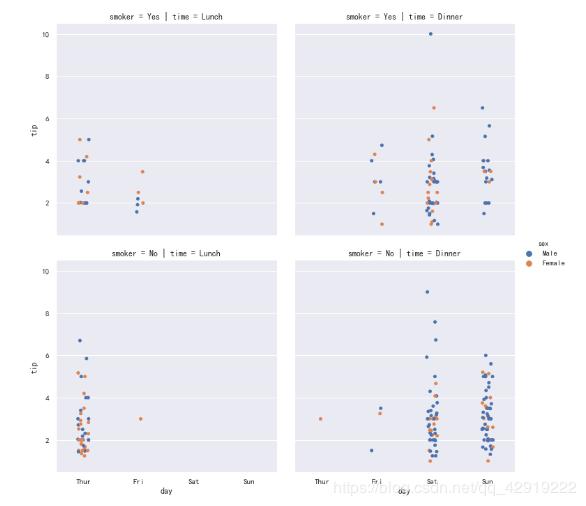
sns.catplot(x='day', y='tip', hue='sex', col='time', row='smoker', data=tips)
sns.catplot(x='day', y='tip', hue='sex', col='size', kind="bar", data=tips)

其它图
bar图
import matplotlib.pyplot as plt
import numpy as np
plt.rc('font', family='SimHei', size=13)
num = np.array([13325, 9403, 9227, 8651])
ratio = np.array([0.75, 0.76, 0.72, 0.75])
men = num * ratio
women = num * (1-ratio)
x = ['聊天','支付','团购\n优惠券','在线视频']
width = 0.5
idx = np.arange(len(x))
plt.bar(idx, men, width, color='red', label='男性用户')
plt.bar(idx, women, width, bottom=men, color='yellow', label='女性用户') #这一块可是设置bottom,top,如果是水平放置的,可以设置right或者left。
plt.xlabel('应用类别')
plt.ylabel('男女分布')
plt.xticks(idx+width/2, x, rotation=40)
#bar图上显示数字
for a,b in zip(idx,men):
plt.text(a, b+0.05, '%.0f' % b, ha='center', va= 'bottom',fontsize=12)
for a,b,c in zip(idx,women,men):
plt.text(a, b+c+0.5, '%.0f' % b, ha='center', va= 'bottom',fontsize=12)
plt.legend()
plt.show()

双Y轴绘图
本例主要用dataframe的两个列进行双Y轴画图
eng_name,chn_name,GDP,rate
a, 中国,100,0.6
b,美国,180,0.3
c,日本,80,0.2
d,瑞典,65,0.15
f,荷兰,56,0.23
#读取的时候,讲索引列变为chn_name,这样画图时候X轴自动为索引
df=pd.read_csv('b.csv',index_col='chn_name')
df.index.name='国家'#这样x轴的label就变成‘国家了’。

plt.rc('font', family='SimHei', size=13)
plt.figure()
df['GDP'].plot(kind='bar')
plt.ylabel('GDP')
plt.title('国家发展情况对比')

p = df['rate']
p.plot(color='black',secondary_y=True,style='--o',linewidth=2)  #style--表示虚线,-表示实线
plt.ylabel('增长速度')
x=[0,1,2,3,4]#因为x轴是汉字,所以默认对应的数值是从0开始的
for a,b in zip(x,p):
plt.text(a+0.1, b+0.02, '%.2f' % b, ha='center', va= 'bottom',fontsize=12)

education=df.education.value_counts()
df_education=pd.DataFrame({'education':education.index[1:],'fre':education.values[1:]})
df_education.index=df_education.education
plt.figure()
df_education.fre.plot(kind='bar')
plt.ylabel('人数')
plt.xlabel('学历')
plt.title('学历分布情况')
plt.show()

画饼状图
import numpy as np
import matplotlib.mlab as mlab
import matplotlib.pyplot as plt
#根据value_counts()结果画饼图
phone=df.phone_operator.value_counts()
df_phone=pd.DataFrame({'phone_operator':phone.index[1:],'fre':phone.values[1:]})
plt.rc('font', family='SimHei', size=13)
fig = plt.figure()
plt.pie(df_phone.fre,labels=df_phone.phone_operator,autopct='%1.2f%%') #画饼图(数据,数据对应的标签,百分数保留两位小数点)
plt.title("手机运营商分布")
plt.show()

Seaborn画多个子图
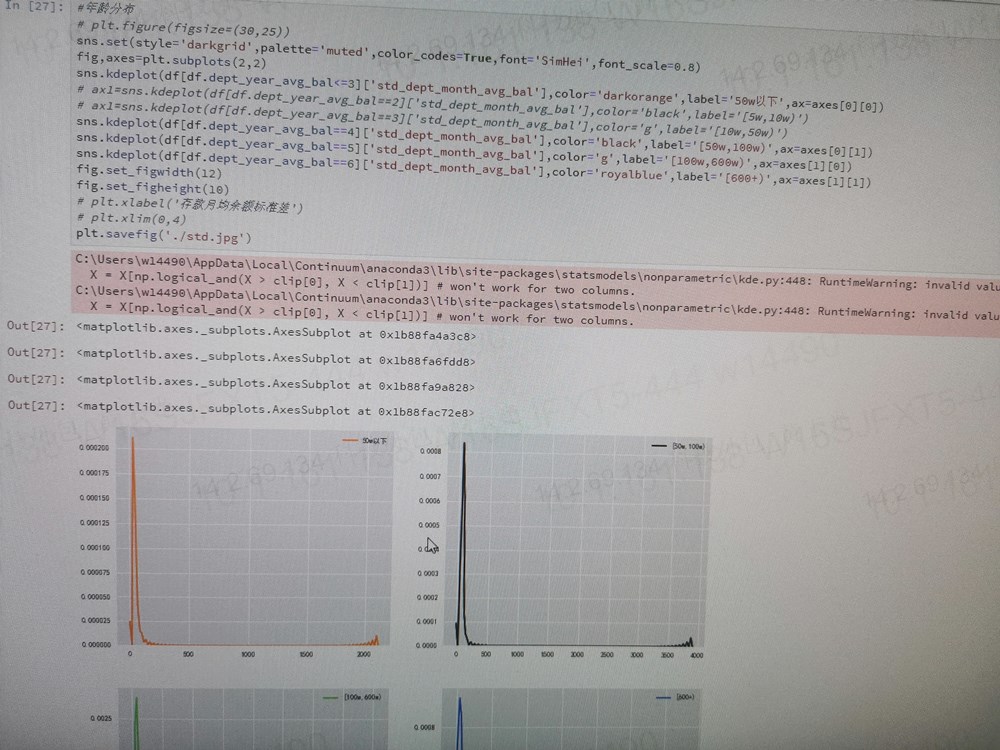
也可以参考:http://seaborn.pydata.org/tutorial/distributions.html
知乎专栏关于seaborn的:https://zhuanlan.zhihu.com/p/27570774


【推荐】凌霞软件回馈社区,博客园 & 1Panel & Halo 联合会员上线
【推荐】轻量又高性能的 SSH 工具 IShell:AI 加持,快人一步