第22章:MySQL之复制模式
第22章:MySQL之复制模式
修订日期:2021-01-08
一. 复制
- 常见数据库复制模式对比

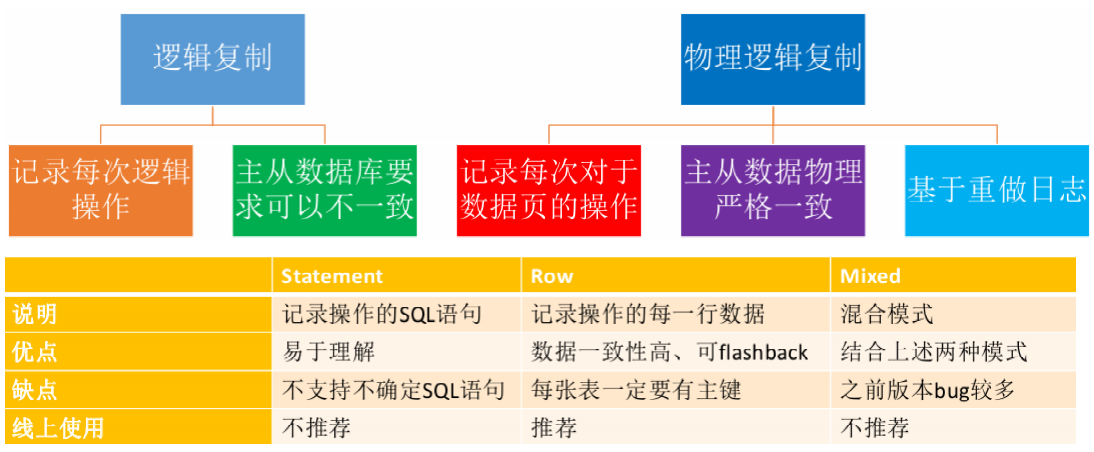
线上必须设置为
binlog_format = row,如果希望通过binlog 实现 flashback的功能(网易的 mysqlbinlog -B ),则必须设置binlog_row_image=FULL(默认),保证所有的列都出现在binlog中。(FULL对性能影响不大,仅仅对空间占用较多)
1. 基于binlog刷新和恢复
1.1 binlog格式
- Table Map : 记录了一些元数据,比如列的类型等等
- 如果没有这个记录,就不知道第一列(@1)是哪个列,是什么类型等等信息
- Rotate :binlog日志分割
- Query:查询
- Update/Write/Delete Rows:对行的操作

命令
flush binary logs; 可以强制刷新binlog到磁盘,并且产生一个新的日志( 重启MySQL 也会产生新的日志),
参数max_binlog_size可以设置一个binlog日志的最大的大小。
[root@node1 mysqldata]# mysqlbinlog binlog.000013 -vv
---------------省略部分-------------------------------------------------------------
create database mytest
/*!*/;
# at 359
#180214 15:05:44 server id 8888  end_log_pos 424 CRC32 0xc8484ebb 	GTID	last_committed=1	sequence_number=2
SET @@SESSION.GTID_NEXT= '9dc847d8-bf72-11e7-9ec4-000c2998e4f1:31'/*!*/;
# at 424
#180214 15:05:44 server id 8888  end_log_pos 530 CRC32 0xf7f59f56 	Query	thread_id=5	exec_time=1	error_code=0
use `mytest`/*!*/;
SET TIMESTAMP=1518591944/*!*/;
create table t1(a int,b int)
/*!*/;
# at 530
#180214 15:06:25 server id 8888  end_log_pos 595 CRC32 0xc2698315 	GTID	last_committed=2	sequence_number=3
SET @@SESSION.GTID_NEXT= '9dc847d8-bf72-11e7-9ec4-000c2998e4f1:32'/*!*/;
# at 595
#180214 15:06:25 server id 8888  end_log_pos 669 CRC32 0x9d13c3d8 	Query	thread_id=5	exec_time=1	error_code=0
SET TIMESTAMP=1518591985/*!*/;
BEGIN
/*!*/;
# at 669
#180214 15:06:25 server id 8888  end_log_pos 717 CRC32 0x05aa5af7 	Table_map: `mytest`.`t1` mapped to number 225
# at 717
-- at后面的数字表示的是文件的 偏移量,也就是常用的 start-position
#180214 15:06:25 server id 8888  end_log_pos 761 CRC32 0x6b56aca9 	Write_rows: table id 225 flags: STMT_END_F

-- 180214 15:06:25 表示该event开始的时间,YYMMDD HH:MM:SS(如果是备机,就是传递到备机上的时间)
-- server id 表示 MySQL服务器的ID
-- end_log_pos 表示下一个event的position
-- Query 表示事件的类型
-- thread_id 表示执行的线程ID
-- exec_time 表示执行的时间
-- error_code 表示执行的code,0表示没有错误

BINLOG '
8d+DWhO4IgAAMAAAAM0CAAAAAOEAAAAAAAEABm15dGVzdAACdDEAAgMDAAP3WqoF
8d+DWh64IgAALAAAAPkCAAAAAOEAAAAAAAEAAgAC//wBAAAACgAAAKmsVms=
'/*!*/;
### INSERT INTO `mytest`.`t1`
### SET
###   @1=1 /* INT meta=0 nullable=1 is_null=0 */
###   @2=10 /* INT meta=0 nullable=1 is_null=0 */
# at 761
#180214 15:06:25 server id 8888  end_log_pos 792 CRC32 0x658b9951 	Xid = 27
COMMIT/*!*/;
# at 792
#180214 15:06:29 server id 8888  end_log_pos 857 CRC32 0xcbef0b52 	GTID	last_committed=3	sequence_number=4
SET @@SESSION.GTID_NEXT= '9dc847d8-bf72-11e7-9ec4-000c2998e4f1:33'/*!*/;
# at 857
#180214 15:06:29 server id 8888  end_log_pos 931 CRC32 0x33da22fc 	Query	thread_id=5	exec_time=0	error_code=0
SET TIMESTAMP=1518591989/*!*/;
BEGIN
/*!*/;
# at 931
#180214 15:06:29 server id 8888  end_log_pos 979 CRC32 0x2e7be109 	Table_map: `mytest`.`t1` mapped to number 225
# at 979
#180214 15:06:29 server id 8888  end_log_pos 1023 CRC32 0xdeda3369 	Write_rows: table id 225 flags: STMT_END_F

BINLOG '
9d+DWhO4IgAAMAAAANMDAAAAAOEAAAAAAAEABm15dGVzdAACdDEAAgMDAAMJ4Xsu
9d+DWh64IgAALAAAAP8DAAAAAOEAAAAAAAEAAgAC//wCAAAAFAAAAGkz2t4=
'/*!*/;
### INSERT INTO `mytest`.`t1`
### SET
###   @1=2 /* INT meta=0 nullable=1 is_null=0 */
###   @2=20 /* INT meta=0 nullable=1 is_null=0 */
# at 1023
#180214 15:06:29 server id 8888  end_log_pos 1054 CRC32 0x8bbeb6e3 	Xid = 28
COMMIT/*!*/;
SET @@SESSION.GTID_NEXT= 'AUTOMATIC' /* added by mysqlbinlog */ /*!*/;
DELIMITER ;
# End of log file
/*!50003 SET COMPLETION_TYPE=@OLD_COMPLETION_TYPE*/;
/*!50530 SET @@SESSION.PSEUDO_SLAVE_MODE=0*/;
[root@node1 mysqldata]#
1.2 binlog恢复
- 注意,如果你有
多个binlog文件想要恢复, 不要一个一个顺序恢复
shell> mysqlbinlog binlog.000001 | mysql -u root -p ## DANGER!!

shell> mysqlbinlog binlog.000002 | mysql -u root -p ## DANGER!!
上面这种恢复方式是错误的,如果 binlog.000001 中创建了一个临时表(CREATE TEMPORARY TABLE),而 binlog.000002 中要使用这个临时表,但是 第一个线程(binlog.000001) 在 释放 的时候会 删除临时表 ,此时 第二个线程(binlog.000002) 就无法使用这个临时表了
正确的做法如下:
shell> mysqlbinlog binlog.000001 binlog.000002 | mysql -u root -p

---------------OR----------------

shell> mysqlbinlog binlog.000001 > /tmp/statements.sql shell> mysqlbinlog binlog.000002 >> /tmp/statements.sql

---------------OR----------------

shell> mysqlbinlog binlog.00000[1-2] > /tmp/statements.sql shell> mysql -u root -p -e "source /tmp/statements.sql"
注意:mysqlbinlog的参数 start/stop-position 不能是中间位置 ,必须是在 binlog 文件中 at 后面跟着的一个数字(必须是一个边界值)。 参数 start/stop-datatime 可以通过时间戳来进行恢复
- 基于position
shell> mysqlbinlog bin.000017 --start-position=1959 --stop-position=2057 -vv > /tmp/a.sql
- 基于datetime
shell> mysqlbinlog bin.000017 --start-datetime="2016-03-02 21:03:58" --stop-datetime="2016-03-02 23:14:06" -vv > /tmp/a.sql
shell> mysql -u root -p < a.sql
start和stop的范围是 [start, stop)
-- 在mysql中查看events信息 (from pos limit N,[M])
(root@localhost) 15:06:35 [mytest]>  show binlog events;
+---------------+-----+----------------+-----------+-------------+--------------------------------------------------------------------+
| Log_name      | Pos | Event_type     | Server_id | End_log_pos | Info                                                               |
+---------------+-----+----------------+-----------+-------------+--------------------------------------------------------------------+
| binlog.000011 |   4 | Format_desc    |      8888 |         123 | Server ver: 5.7.18-log, Binlog ver: 4                              |
| binlog.000011 | 123 | Previous_gtids |      8888 |         194 | 9dc847d8-bf72-11e7-9ec4-000c2998e4f1:1-28                          |
| binlog.000011 | 194 | Gtid           |      8888 |         259 | SET @@SESSION.GTID_NEXT= '9dc847d8-bf72-11e7-9ec4-000c2998e4f1:29' |
| binlog.000011 | 259 | Query          |      8888 |         384 | use `employees`; DROP TABLE `t1` /* generated by server */         |
| binlog.000011 | 384 | Stop           |      8888 |         407 |                                                                    |
+---------------+-----+----------------+-----------+-------------+--------------------------------------------------------------------+
5 rows in set (0.00 sec)
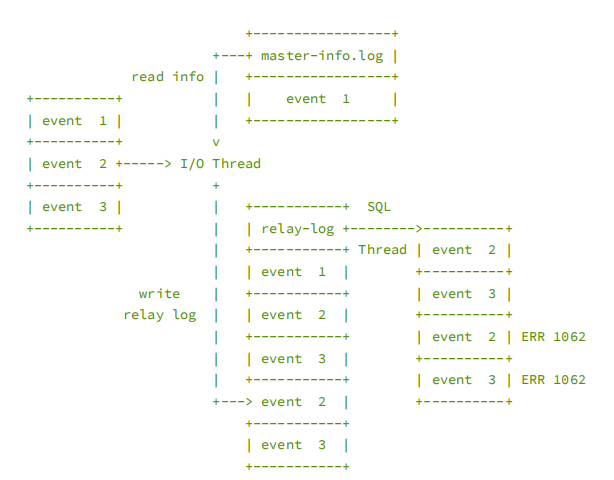
2. MySQL主从复制架构

-
主服务器
-
在
MySQL 5.7中,prepare log部分的日志也是组提交的 -
prepare log和commit log写redo file(iblogfile1、iblogfile2) -
binlog写binlig.00000X文件 -
MySQL Dump Thread 把 binlog
推送到远程的Slave服务器- 每一个Slave,就会对应有一个
dump线程
- 每一个Slave,就会对应有一个
-
同时,在MySQL主机上还有一个
Master Thread在每隔1秒从redo log buffer中写入redo file
-
-
从服务器
-
IO Thread 负责
接收Dump线程发送过来的binlog,并且记录到本地的relay log -
接受的
单位是event -
SQL Thread/Coordinator Thread 负责将relay log中的日志
回放到从机- 回放的
单位也是event
- 回放的
-
有了多线程以后,
coordinator线程负责任务指派,work thread负责回放 -
在 MySQL5.6 中的多线程回放是
基于库的, 单个库还是单线程 -
在 MySQL5.7 中的多线程是在
主上如何并行执行的,从机上也是如何并行回放的 -
master-info.log 存放了
接收到的binlog的位置( event的位置 ) -
relay-info.log 存放了
回放到的relay log的位置( event的位置 )
-
二. 可传输表空间
简单的说,就是将一个表空间文件(ibd文件),拷贝到远程另外一台数据库进行恢复,进行物理复制。
1. innodb 独立表空间导入和导出
-
操作步骤:
- 目的服务器:ALTER TABLE t DISCARD TABLESPACE;
- 源服务器:FLUSH TABLES t FOR EXPORT;
- 源服务器:拷贝t.ibd,t.cfg文件到目的服务器
- 源服务器:UNLOCK TABLES;
- 目的服务器:ALTER TABLE t IMPORT TABLESPACE;
2. 演示
| hostname | 逻辑库 | 表 |
|---|---|---|
| node1.gczheng.com | mytest | t1 |
| node2.gczheng.com | mytest | 空 |
将node1中mytest库下面的t1表 ,传输node2中mytest库中
-
1、源服务器查看迁移表状态
-
源服务器
(root@localhost) 10:44:22 [mysql]> create database tablespace;
Query OK, 1 row affected (0.01 sec)

(root@localhost) 10:44:31 [mysql]> use tablespace;
Database changed

(root@localhost) 10:45:09 [tablespace]> create table qqq(a int);
Query OK, 0 rows affected (0.02 sec)

(root@localhost) 10:45:37 [tablespace]> insert into qqq values(1);
Query OK, 1 row affected (0.01 sec)

(root@localhost) 10:45:50 [tablespace]> select * from qqq;
+------+
| a    |
+------+
|    1 |
+------+
1 row in set (0.00 sec)
-
2、在目标服务器上创建表空间
-
目标服务器
(root@localhost) 10:46:59 [(none)]> create database tablespace;
Query OK, 1 row affected (0.00 sec)

(root@localhost) 10:47:18 [(none)]> use tablespace;
Database changed
(root@localhost) 10:47:24 [tablespace]> create table qqq(a int);
Query OK, 0 rows affected (0.01 sec)
创建完成后进行检查
[root@node2 tablespace]# ll
total 112
-rw-r----- 1 mysql mysql    61 Feb 15 10:47 db.opt
-rw-r----- 1 mysql mysql  8554 Feb 15 10:48 qqq.frm   --表结构
-rw-r----- 1 mysql mysql 98304 Feb 15 10:48 qqq.ibd   --表空间,需要通过 DISCARD 将表空间文件删除
ALTER TABLE qqq DISCARD TABLESPACE; 的含义是
保留qqq.frm文件,删除qqq.ibd。
通过discard 删除ibd文件
(root@localhost) 10:48:07 [tablespace]> ALTER TABLE qqq DISCARD TABLESPACE;
Query OK, 0 rows affected (0.01 sec)
[root@node2 tablespace]# ll
total 16
-rw-r----- 1 mysql mysql   61 Feb 15 10:47 db.opt
-rw-r----- 1 mysql mysql 8554 Feb 15 10:48 qqq.frm

--已经删除表空间qqq.ibd
- 3、源服务器导出表空间
在源服务器上,通过export 命令导出表空间(同时加读锁)
- 源服务器
(root@localhost) 10:45:56 [tablespace]> FLUSH TABLES qqq FOR EXPORT;  --其实是对这个表加一个读锁
Query OK, 0 rows affected (0.01 sec)
将导出的cfg文件和ibd文件,拷贝到目标服务器的mytest库下
[root@node1 mytest]# ll
total 24
-rw-r----- 1 mysql mysql   61 Feb 14 15:05 db.opt
-rw-r----- 1 mysql mysql  416 Feb 14 18:12 t1.cfg    --export后,多出来的文件,里面保存了一些元数据信息
-rw-r----- 1 mysql mysql 8578 Feb 14 16:35 t1.frm
-rw-r----- 1 mysql mysql  416 Feb 14 17:09 t1.ibd

[root@node1 mysqldata]# scp tablespace/qqq.cfg tablespace/qqq.ibd  node2:/r2/mysqldata/tablespace/
qqq.cfg                                                                                                                                   100%  373   360.4KB/s   00:00
qqq.ibd                                                                                                                                   100%   96KB  14.0MB/s   00:00
导出表空间后,尽快解锁
(root@localhost) 10:49:00 [tablespace]> unlock tables;
Query OK, 0 rows affected (0.01 sec)
注意:一定要先拷贝cfg和ibd文件,然后才能unlock,因为 unlock** ****的时候,**cfg文件会被删除
源服务器上的日志
2018-02-14T02:38:16.530256Z 4 [Note] Start binlog_dump to master_thread_id(4) slave_server(8899), pos(, 4)
2018-02-14T09:05:44.342882Z 5 [Note] InnoDB: Sync to disk of `mytest`.`t1` started.
2018-02-14T09:05:44.343641Z 5 [Note] InnoDB: Stopping purge                                     --其实stop purge,找个测试的表 for export 即可
2018-02-14T09:05:44.344836Z 5 [Note] InnoDB: Writing table metadata to './mytest/t1.cfg'
2018-02-14T09:05:44.345158Z 5 [Note] InnoDB: Table `mytest`.`t1` flushed to disk
2018-02-14T09:13:23.812898Z 5 [Note] InnoDB: Deleting the meta-data file './mytest/t1.cfg'      --unlock table后,该文件自动被删除
2018-02-14T09:13:23.812950Z 5 [Note] InnoDB: Resuming purge                                     --unlock后,恢复purge线程
-
4、在目标服务器上修改 cfg文件和ibd文件的 权限
-
目标服务器
[root@node2 tablespace]# ll
total 116
-rw-r----- 1 mysql mysql    61 Feb 15 10:47 db.opt
-rw-r----- 1 root  root    373 Feb 15 10:49 qqq.cfg
-rw-r----- 1 mysql mysql  8554 Feb 15 10:48 qqq.frm
-rw-r----- 1 root  root  98304 Feb 15 10:49 qqq.ibd

[root@node2 tablespace]# chown -R mysql.mysql ./*

[root@node2 tablespace]# ll
total 116
-rw-r----- 1 mysql mysql    61 Feb 15 10:47 db.opt
-rw-r----- 1 mysql mysql   373 Feb 15 10:49 qqq.cfg
-rw-r----- 1 mysql mysql  8554 Feb 15 10:48 qqq.frm
-rw-r----- 1 mysql mysql 98304 Feb 15 10:49 qqq.ibd
在目标服务器上通过import 命令导入表空间
(root@localhost) 10:48:28 [tablespace]> ALTER TABLE qqq IMPORT TABLESPACE;  --导入表空间
Query OK, 0 rows affected (0.02 sec)

(root@localhost) 10:50:49 [tablespace]> select * from qqq;                  -- 可以读取到从源服务器拷贝过来的数据
+------+
| a    |
+------+
|    1 |
+------+
1 row in set (0.00 sec)
error.log中出现的信息
2018-02-15T02:50:49.725304Z 3 [Note] InnoDB: Importing tablespace for table 'tablespace/qqq' that was exported from host 'node1.gczheng.com'
2018-02-15T02:50:49.725433Z 3 [Note] InnoDB: Phase I - Update all pages
2018-02-15T02:50:49.725705Z 3 [Note] InnoDB: Sync to disk
2018-02-15T02:50:49.728143Z 3 [Note] InnoDB: Sync to disk - done!
2018-02-15T02:50:49.729426Z 3 [Note] InnoDB: Phase III - Flush changes to disk
2018-02-15T02:50:49.739010Z 3 [Note] InnoDB: Phase IV - Flush complete
2018-02-15T02:50:49.739496Z 3 [Note] InnoDB: `tablespace`.`qqq` autoinc value set to 0
注意:
表的名称必须相同,经过上述测试,库名可以不同该方法也可以用于分区表的备份和恢复
三 复制环境搭建
| 配置信息 | 主库(master) | 从库(slave) |
|---|---|---|
| 主机 | node1.gczheng.com | node2.gczheng.com |
| IP | 192.168.88.88 | 192.168.88.99 |
| Port | 3306 | 3306 |
| MySQL版本 | MySQL5.7.18 | MySQL5.7.18 |
| Server_ID | 8888 | 8899 |
注意:server-id在主从的配置中必须不同(在一个复制关系中,server-id必须唯一)
1. 创建一个复制用户
在Master节点上创建一个用于复制的用户,供Slave节点使用
- master服务器
mysql root@localhost:(none)> create user 'repl'@'192.168.88.99' identified by '123456';
Query OK, 0 rows affected
Time: 0.005s
mysql root@localhost:(none)> grant replication slave on *.* to 'repl'@'192.168.88.99';  --需要replication和slave的权限,线上建议`限制成内网的网段`
Query OK, 0 rows affected
Time: 0.001s
mysql root@localhost:(none)> flush privileges;
Query OK, 0 rows affected
Time: 0.006s
mysql root@localhost:(none)> select User,Host from mysql.user where user='repl';
+------+---------------+
| User | Host          |
+------+---------------+
| repl | 192.168.88.99 |
+------+---------------+
1 row in set
Time: 0.008s
mysql root@localhost:(none)> show grants for 'repl'@'192.168.88.99';
+----------------------------------------------------------+
| Grants for repl@192.168.88.99                            |
+----------------------------------------------------------+
| GRANT REPLICATION SLAVE ON *.* TO 'repl'@'192.168.88.99' |
+----------------------------------------------------------+
1 row in set
Time: 0.007s
mysql root@localhost:(none)>
测试slave节点是否可以通过 rpl@'%'** **连接成功
- slave服务器
[root@node2 tablespace]# mysql -h192.168.88.88 -urepl -p123456
mysql: [Warning] Using a password on the command line interface can be insecure.
Welcome to the MySQL monitor.  Commands end with ; or \g.
Your MySQL connection id is 17
Server version: 5.7.18-log MySQL Community Server (GPL)

Copyright (c) 2000, 2017, Oracle and/or its affiliates. All rights reserved.

Oracle is a registered trademark of Oracle Corporation and/or its
affiliates. Other names may be trademarks of their respective
owners.

Type 'help;' or '\h' for help. Type '\c' to clear the current input statement.

(repl@192.168.88.88) 11:41:06 [(none)]> select current_user;
+--------------------+
| current_user       |
+--------------------+
| repl@192.168.88.99 |
+--------------------+
1 row in set (0.00 sec)

(repl@192.168.88.88) 11:41:09 [(none)]>
说明此时Slave节点可以连接到Master节点了
2. 备份数据
2.1. 准备测试数据
- master服务器
mysql root@localhost:(none)> show databases
+--------------------+
| Database           |
+--------------------+
| information_schema |
| employees          |
| mysql              |
| performance_schema |
| sys                |
| tablespace         |
+--------------------+
6 rows in set
Time: 0.007s
mysql root@localhost:(none)>
2.2. 导出数据
[root@node1 bakdata]# mydumper  -u root -p root --regex "employees.*|tablespace.*" -o /bakdata/alldb

[root@node1 bakdata]# cd alldb/
[root@node1 alldb]# ls
employees.departments-schema.sql  employees.dept_manager-schema.sql  employees.salaries-schema.sql  employees.titles.sql       tablespace-schema-create.sql
employees.departments.sql         employees.dept_manager.sql         employees.salaries.sql         metadata
employees.dept_emp-schema.sql     employees.employees-schema.sql     employees-schema-create.sql    tablespace.qqq-schema.sql
employees.dept_emp.sql            employees.employees.sql            employees.titles-schema.sql    tablespace.qqq.sql
将备份目录复制到 Slave 节点
[root@node1 alldb]# scp -r /bakdata/alldb  192.168.88.99:/bakdata/
employees-schema-create.sql                                                                                                               100%   68    22.2KB/s   00:00
tablespace-schema-create.sql                                                                                                              100%   69    49.8KB/s   00:00
employees.departments.sql                                                                                                                 100%  351   367.0KB/s   00:00
employees.dept_emp.sql                                                                                                                    100%   14MB  38.7MB/s   00:00
employees.dept_manager.sql                                                                                                                100% 1168   708.4KB/s   00:00
employees.employees.sql                                                                                                                   100%   17MB  48.4MB/s   00:00
employees.salaries.sql                                                                                                                    100%  113MB  56.6MB/s   00:02
employees.titles.sql                                                                                                                      100%   21MB  47.7MB/s   00:00
tablespace.qqq.sql                                                                                                                        100%  132    86.7KB/s   00:00
employees.departments-schema.sql                                                                                                          100%  266   225.5KB/s   00:00
employees.dept_emp-schema.sql                                                                                                             100%  555   127.8KB/s   00:00
employees.dept_manager-schema.sql                                                                                                         100%  567   264.6KB/s   00:00
employees.employees-schema.sql                                                                                                            100%  353   216.5KB/s   00:00
employees.salaries-schema.sql                                                                                                             100%  416   331.3KB/s   00:00
employees.titles-schema.sql                                                                                                               100%  427   468.3KB/s   00:00
tablespace.qqq-schema.sql                                                                                                                 100%  153    54.0KB/s   00:00
metadata                                                                                                                                  100%  175    87.7KB/s   00:00
[root@node1 alldb]#
3. 还原数据
[root@node2 bakdata]# myloader -u root -p root -o -d /bakdata/alldb -v -3
** Message: 4 threads created
** Message: Dropping table or view (if exists) `employees`.`departments`
** Message: Creating table `employees`.`departments`
** Message: Dropping table or view (if exists) `employees`.`dept_emp`
** Message: Creating table `employees`.`dept_emp`
** Message: Dropping table or view (if exists) `employees`.`dept_manager`
** Message: Creating table `employees`.`dept_manager`
** Message: Dropping table or view (if exists) `employees`.`employees`
** Message: Creating table `employees`.`employees`
** Message: Dropping table or view (if exists) `employees`.`salaries`
** Message: Creating table `employees`.`salaries`
** Message: Dropping table or view (if exists) `employees`.`titles`
** Message: Creating table `employees`.`titles`
** Message: Dropping table or view (if exists) `tablespace`.`qqq`
** Message: Creating table `tablespace`.`qqq`
** Message: Thread 1 restoring `employees`.`departments` part 0
** Message: Thread 2 restoring `employees`.`dept_emp` part 0
** Message: Thread 3 restoring `employees`.`dept_manager` part 0
** Message: Thread 4 restoring `employees`.`employees` part 0
** Message: Thread 1 restoring `employees`.`salaries` part 0
** Message: Thread 3 restoring `employees`.`titles` part 0
** Message: Thread 4 restoring `tablespace`.`qqq` part 0
** Message: Thread 4 shutting down
** Message: Thread 2 shutting down
** Message: Thread 3 shutting down
** Message: Thread 1 shutting down
[root@node2 bakdata]#
检查数据是否还原到备库
mysql root@localhost:(none)> show databases;
+--------------------+
| Database           |
+--------------------+
| information_schema |
| employees          |
| mysql              |
| performance_schema |
| sys                |
| tablespace         |
+--------------------+
6 rows in set
Time: 0.063s

mysql root@localhost:(none)> use employees;
You are now connected to database "employees" as user "root"
Time: 0.045s

mysql root@localhost:employees> show tables;
+---------------------+
| Tables_in_employees |
+---------------------+
| departments         |
| dept_emp            |
| dept_manager        |
| employees           |
| salaries            |
| titles              |
+---------------------+
6 rows in set
Time: 0.009s

mysql root@localhost:employees> select * from titles  limit 1;
+--------+-----------------+------------+------------+
| emp_no | title           | from_date  | to_date    |
+--------+-----------------+------------+------------+
| 10001  | Senior Engineer | 1986-06-26 | 9999-01-01 |
+--------+-----------------+------------+------------+
1 row in set
Time: 0.013s
mysql root@localhost:employees>

-- 已经还原到 Slave 节点上了
可以使用mysqldump加master-data参数,将master信息保存在备份中目前而言,主从数据已经是一致的了
4. CHANGE MASTER
由于使用 mydumper备份,没有将 Change Master信息写入SQL,而是写入到metadata中。
4.1. 查看master status
[root@node2 bakdata]# cat alldb/metadata
Started dump at: 2018-02-15 11:55:16
SHOW MASTER STATUS:
	Log: binlog.000013
	Pos: 3581
	GTID:9dc847d8-bf72-11e7-9ec4-000c2998e4f1:1-46

Finished dump at: 2018-02-15 11:55:20
[root@node2 bakdata]#
Log: binlog.000013 和 Pos: 3581 表明该备份开始时的 filename 和 postition
4.2. change master
- slave服务器
mysql root@localhost:employees> change master to master_host='192.168.88.88', master_user='repl', master_password='123456', master_port=3306, master_log_file='binlog.000013', master_log_pos=3581;
Query OK, 0 rows affected
Time: 0.068s
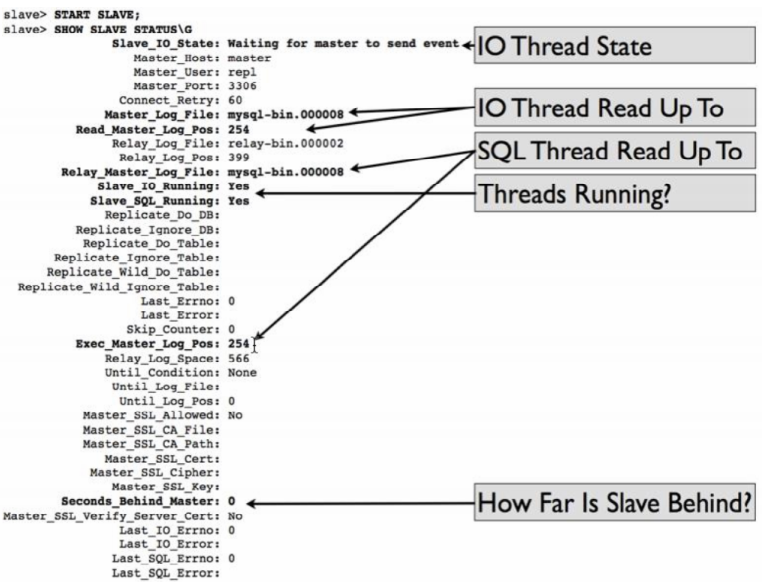
mysql root@localhost:employees> show slave status \G;
***************************[ 1. row ]***************************
Slave_IO_State |
Master_Host | 192.168.88.88
Master_User | repl
Master_Port | 3306
Connect_Retry | 60
Master_Log_File | binlog.000013 --change master中的filename
Read_Master_Log_Pos | 3581 --metadata中指定的pos
Relay_Log_File | node2-relay-bin.000001
Relay_Log_Pos | 4
Relay_Master_Log_File | binlog.000013
Slave_IO_Running | No --未启动slave同步,显示No
Slave_SQL_Running | No --同上
Replicate_Do_DB |
Replicate_Ignore_DB |
Replicate_Do_Table |
Replicate_Ignore_Table |
Replicate_Wild_Do_Table |
Replicate_Wild_Ignore_Table |
Last_Errno | 0
Last_Error |
Skip_Counter | 0
Exec_Master_Log_Pos | 3581
Relay_Log_Space | 194
Until_Condition | None
Until_Log_File |
Until_Log_Pos | 0
Master_SSL_Allowed | No
Master_SSL_CA_File |
Master_SSL_CA_Path |
Master_SSL_Cert |
Master_SSL_Cipher |
Master_SSL_Key |
Seconds_Behind_Master | <null>
Master_SSL_Verify_Server_Cert | No
Last_IO_Errno | 0
Last_IO_Error |
1 row in set
Time: 0.027s
mysql root@localhost:employees> start slave; --开启slave
Query OK, 0 rows affected
Time: 0.053s
mysql root@localhost:employees> show slave status \G;
***************************[ 1. row ]***************************
Slave_IO_State | Waiting for master to send event --IO 线程的状态
Master_Host | 192.168.88.88
Master_User | repl
Master_Port | 3306
Connect_Retry | 60
Master_Log_File | binlog.000013 --IO线程读取到的文件
Read_Master_Log_Pos | 3581 --IO线程读取文件中的位置
Relay_Log_File | node2-relay-bin.000002
Relay_Log_Pos | 317
Relay_Master_Log_File | binlog.000013 --SQL线程执行到的文件
Slave_IO_Running | Yes --IO线程启动成功
Slave_SQL_Running | Yes --SQL线程启动成功
Replicate_Do_DB |
Replicate_Ignore_DB |
Replicate_Do_Table |
Replicate_Ignore_Table |
Replicate_Wild_Do_Table |
Replicate_Wild_Ignore_Table |
Last_Errno | 0
Last_Error |
Skip_Counter | 0
Exec_Master_Log_Pos | 3581 --SQL线程执行到文件的位置
Relay_Log_Space | 564
Until_Condition | None
Until_Log_File |
Until_Log_Pos | 0
Master_SSL_Allowed | No
Master_SSL_CA_File |
Master_SSL_CA_Path |
Master_SSL_Cert |
Master_SSL_Cipher |
Master_SSL_Key |
Seconds_Behind_Master | 0 --Slave落后Master执行的秒数,这个值不准确
Master_SSL_Verify_Server_Cert | No
Last_IO_Errno | 0 --(IO)如果这里有信息的话,就是错误提示信息,可以用来排错
Last_IO_Error | --(SQL)如果这里有信息的话,就是错误提示信息,可以用来排错
1 row in set
Time: 0.020s
mysql root@localhost:employees>
Slave_IO_Running和Slave_SQL_Running这两个指标都为YES,表示目前的复制的状态是正常的
mysql root@localhost:employees> show processlist\G;
***************************[ 1. row ]***************************
Id      | 18
User    | root
Host    | localhost
db      | employees
Command | Query
Time    | 0
State   | starting
Info    | show processlist
***************************[ 2. row ]***************************
Id      | 20
User    | system user
Host    |
db      | <null>
Command | Connect
Time    | 1269
State   | Waiting for master to send event                      -- IO线程
Info    | <null>
***************************[ 3. row ]***************************
Id      | 21
User    | system user
Host    |
db      | <null>
Command | Connect
Time    | 1269
State   | Slave has read all relay log; waiting for more updates  -- SQL线程
Info    | <null>
3 rows in set
Time: 0.010s
mysql root@localhost:employees>
4.3. 添加并行复制
- slave服务器
在/etc/my.cnf文件中配置
slave-parallel-type=LOGICAL_CLOCK
slave-parallel-workers=4
如果开启了并行复制(multi-threaded slave), show processlist 中可以看到 Coordinator 线程
mysql root@localhost:employees> show processlist;
+----+-------------+-----------+-----------+---------+------+--------------------------------------------------------+------------------+
| Id | User        | Host      | db        | Command | Time | State                                                  | Info             |
+----+-------------+-----------+-----------+---------+------+--------------------------------------------------------+------------------+
| 1  | system user |           | <null>    | Connect | 17   | Waiting for master to send event                       | <null>           |
| 2  | system user |           | <null>    | Connect | 17   | Slave has read all relay log; waiting for more updates | <null>           |
| 3  | system user |           | <null>    | Connect | 17   | Waiting for an event from Coordinator                  | <null>           |
| 4  | system user |           | <null>    | Connect | 17   | Waiting for an event from Coordinator                  | <null>           |
| 5  | system user |           | <null>    | Connect | 17   | Waiting for an event from Coordinator                  | <null>           |
| 6  | system user |           | <null>    | Connect | 17   | Waiting for an event from Coordinator                  | <null>           |
| 9  | root        | localhost | employees | Query   | 0    | starting                                               | show processlist |
+----+-------------+-----------+-----------+---------+------+--------------------------------------------------------+------------------+
7 rows in set
Time: 0.009s
mysql root@localhost:employees>
- 主要的监控参数
Relay_Log_File和Relay_Log_Pos是中继日志(Relay_Log)信息。
由于IO线程拉取数据的速度快于SQL线程回放数据的速度,所以Relay_Log可在两者之间起到一个缓冲的作用
Relay_Log的格式和binlog的格式是一样的,但是两者的内容是不一样的(不是和binlog一一对应的)
Relay_Log在SQL线程回放完成后,(默认)就会被删除,而binlog不会(由 expire_logs_days控制)
Relay_Log可以通过设置relay_log_purge=0,使得Relay_Log不被删除(MHA中不希望被Purge),需要通过外部的脚本进行删除
-
验证复制
-
master节点
mysql root@localhost:(none)> insert into tablespace.qqq values(2);
Query OK, 1 row affected
Time: 0.019s
- slave节点
mysql root@localhost:employees> select * from tablespace.qqq ;
+---+
| a |
+---+
| 1 |
| 2 |
+---+
2 rows in set
Time: 0.026s
mysql root@localhost:employees>
- 当前演示时的relay-log文件是 binlog.000029
[root@node2 bakdata]# mysqlbinlog /r2/mysqldata/binlog.000029 -vv
------------------省略其他输出-----------------

# at 1134
#180215 12:39:57 server id 8888  end_log_pos 1174 CRC32 0xe52db744 	Write_rows: table id 233 flags: STMT_END_F

BINLOG '
HQ+FWhO4IgAANAAAAG4EAAAAAOkAAAAAAAEACnRhYmxlc3BhY2UAA3FxcQABAwABY9f0lA==
HQ+FWh64IgAAKAAAAJYEAAAAAOkAAAAAAAEAAgAB//4CAAAARLct5Q==
'/*!*/;
### INSERT INTO `tablespace`.`qqq`                              --- 这个注释的信息就是传过来的插入数据的信息
### SET
###   @1=2 /* INT meta=0 nullable=1 is_null=0 */
# at 1174
#180215 12:39:57 server id 8888  end_log_pos 1205 CRC32 0x8dabbbc4 	Xid = 556
COMMIT/*!*/;
# at 1205
#180215 12:43:53 server id 8899  end_log_pos 1228 CRC32 0x720c1617 	Stop
SET @@SESSION.GTID_NEXT= 'AUTOMATIC' /* added by mysqlbinlog */ /*!*/;
DELIMITER ;
# End of log file
/*!50003 SET COMPLETION_TYPE=@OLD_COMPLETION_TYPE*/;
/*!50530 SET @@SESSION.PSEUDO_SLAVE_MODE=0*/;
5. 复制搭建总结
1.Master 和 Slave 上配置 不同 的 server-id ,且binlog_format设置为 ROW 格式
2.在Master上创建一个rpl@%的用户( %替换为内网网段 )
3.将Master的备份数据恢复到Slave 上,注意记录master status信息( binlog_file 和position)
4.在Slave上进行change master操作,注意 master_log_file和master_log_pos 要和备份中的master status一致
5.在Slave上进行start slave 操作
6.在Slave上进行show slave status\G; 操作,确保Slave_IO_Running 和Slave_SQL_Running均为YES
6. 搭建真正的高可靠复制环境
6.1. 重要的参数
-
Master
-
binlog-do-db = #需要复制的库
-
binlog-ignore-db = #需要被忽略的库
-
max_binlog_size = 2048M #默认为1024M
-
binlog_format = ROW #必须为ROW
-
transaction-isolation = READ-COMMITTED
-
expire_logs_days = 7 # binlog保留多少天,看公司计划安排
-
server-id = 8888 #必须和所有从机不一样,且从机之间也不一样
-
binlog_cache_size = # binlog缓存的大小,设置时要当心
-
sync_binlog = 1 #必须设置为1,默认为0
-
innodb_flush_log_at_trx_commit = 1 #提交事物的时候刷新日志
-
innodb_support_xa = 1 #确保事务日志写入bin-log 的顺序与是事务的time-line是一致的
-
-
Slave
-
log_slave_updates #将SQL线程回放的数据写入到从机的binlog中去(用于级联复制)
-
replicate-do-db = #需要复制的库
-
replicate-ignore-db = #需要忽略的库
-
replicate-do-table = #需要复制的表
-
replicate-ignore-table =需要忽略的表
-
server-id = 8899 #必须在一个复制集群环境中全局唯一
-
relay-log-recovery = 1 #I/O thread crash safe – IO线程安全
-
relay-log-info-repository = TABLE # SQL thread crash safe – SQL线程安全
-
master_info_repository = TABLE
-
read_only = 1
-
6.2. SQL线程高可靠问题
- 如果将
relay_log_info_repository设置为FILE,MySQL会把回放信息记录在一个relay-info.log的文件中,其中包含SQL线程回放到的Relay_log_name和Relay_log_pos,以及对应的Master的Master_log_name和Master_log_pos
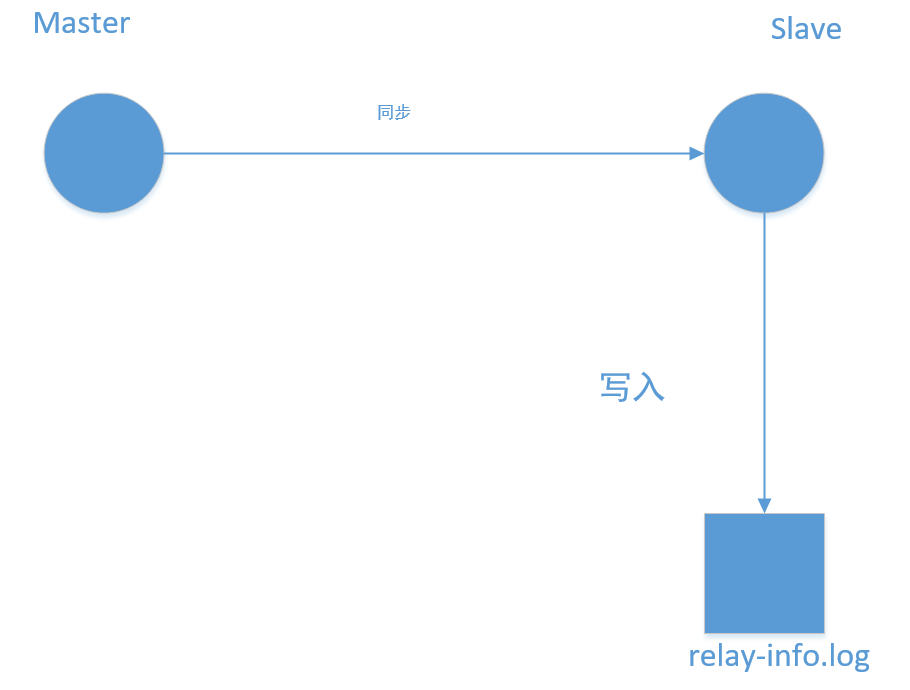
- SQL线程回放event
- 将回放到的binlog的
文件名和位置写到relay-info.log文件 - 参数
sync_relay_log_info = 10000(fsync)代表每回放10000个event,写一次relay-info.log- 如果该参数设置为
1,则表示每回放一个event就写一次relay-info.log,那写入代价很大,且性能很差 - 设置为1后,即使性能上可以接受,还是会丢最有一次的操作,恢复起来后还是有1062的错误(重复执行event)
- 如果该参数设置为
SQL线程的数据回放是写数据库操作,relay-info是写文件操作,这两个操作很难保证一致性
当一个Slave节点在复制数据时,可能发生如下情况,数据2和数据3写入成功(且已经落盘),但是relay-info.log 中的记录还是数据1的位置(因为sync_relay_log_info的关系,此时还没有fsync),如下图所示:

此时Slave宕机,然后重启,便会产生如下的状况:
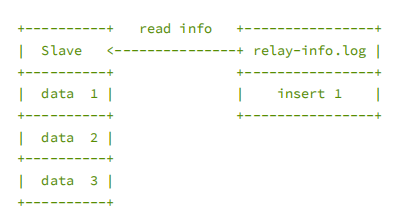
- Slave的库中
存在数据2和数据3 - Slave读取relay-info.log中的 Relay_log_name和Relay_log_pos ,此时记录的是
回放到数据1的位置 - Slave
从数据1开始回放,继续插入数据2和数据3 - 但是,此时的数据库中
存在数据2和数据3,于是发生了1062的错误(重复记录)
mysql root@localhost:(none)> select * from mysql.slave_relay_log_info \G;
***************************[ 1. row ]***************************
Number_of_lines   | 7
Relay_log_name    | ./node2-relay-bin.000013    -- relay日志的文件名
Relay_log_pos     | 317                         -- relay日志的位置
Master_log_name   | binlog.000014               -- 对应回放到的 binlog 文件名(Master节点)
Master_log_pos    | 706                         -- 对应回放到的位置
Sql_delay         | 0
Number_of_workers | 4
Id                | 1
Channel_name      |
1 row in set
Time: 0.006s
mysql root@localhost:(none)>
设置为 TABLE 的原理为:将
event的回放和relay-info的更新放在同一个事物里面,变成原子操作,从而保证一致性(要么都写入,要么都不写)。
每一次事物提交,都会写入mysql.slave_relay_log_info中,sync_relay_log_info=N将被忽略。官方参数解释:
BEGIN;

apply log event; apply log event;

UPDATEmysql.slave_relay_log_info

SETMaster_log_pos = Exec_Master_Log_Pos,

Master_log_name = Relay_Master_Log_File,

Relay_log_name = Relay_Log_File,

Relay_log_pos = Relay_Log_Pos;

COMMIT;
6.3. I/O线程高可用
IO线程也是接收一个个的 event ,将接收到的event,通过设置参数 master_info_repository 可以将master-info 信息(IO线程接收到的位置,Master_log_name 和 Master_log_pos )写入到文件(FILE )或者数据库( TABLE )中。然后将接收到的event 写入relay log file
参数 sync_master_info=10000 表示每接收10000个event,写一次master-info
这里同样存在这个问题, master-info.log 和 relay-log 无法保证一致性。
假设存在下面这个情况,event2和event3已经写入到relay-log,但是master-info还没有同步到master-info.log

此时如果服务宕机后,MySQL重启,I/O线程会读取master-info.log的内容,读取到的位置为event1的位置 ,然后I/O线程会继续将event2和event3拉取过来,然后继续写入到relay-log 中。
如上图所示,event2 和event3 被重复写入到了relay-log文件中,当SQL线程回放时,就会产生 1062 的错误(重复记录)
看到的现象还是 IO线程正常,SQL线程报错
-
解决问题的方法:
- 设置参数
relay-log-recover = 1,该参数表示当前接收到的relay-log全部删除,然后从SQL线程回放到的位置重新拉取(SQL线程通过配置后是可靠的)
- 设置参数
-
所以说,真正的MySQL复制的高可靠是从 5.6 版本开始的,通过设置
- relay-log-recover = 1
- relay_log_info_repository = TABLE
- master_info_repository = TABLE
这三个参数,可以确保整体复制的高可靠(换言之,之前的版本复制不可靠是正常的)。
注意:如果 Slave落后Master 的时间很多,超过了Master上binlog的保存时间,那Master上对应的binlog就会被删除,Slave的I/OThread就拉不到数据了,注意监控主从落后的时间
在已启用主从同步的实例中,设置set GLOBAL relay_log_info_repository='TABLE'; 需要先stop slave,再start slave。
mysql root@localhost:(none)> stop slave;
Query OK, 0 rows affected
Time: 0.002s
mysql root@localhost:(none)> set GLOBAL  relay_log_info_repository='TABLE';
Query OK, 0 rows affected
Time: 0.005s
mysql root@localhost:(none)> start slave;
Query OK, 0 rows affected
Time: 0.008s
mysql root@localhost:(none)> show variables like '%relay%';
+---------------------------+-------------------------------------+
| Variable_name             | Value                               |
+---------------------------+-------------------------------------+
| max_relay_log_size        | 0                                   |
| relay_log                 |                                     |
| relay_log_basename        | /r2/mysqldata/node2-relay-bin       |
| relay_log_index           | /r2/mysqldata/node2-relay-bin.index |
| relay_log_info_file       | relay-log.info                      |
| relay_log_info_repository | TABLE                               |
| relay_log_purge           | ON                                  |
| relay_log_recovery        | ON                                  |
| relay_log_space_limit     | 0                                   |
| sync_relay_log            | 10000                               |
| sync_relay_log_info       | 10000                               |
+---------------------------+-------------------------------------+
11 rows in set
Time: 0.014s
mysql root@localhost:(none)>  select * from mysql.slave_relay_log_info \G;
***************************[ 1. row ]***************************
Number_of_lines   | 7
Relay_log_name    | ./node2-relay-bin.000013
Relay_log_pos     | 317
Master_log_name   | binlog.000014
Master_log_pos    | 706
Sql_delay         | 0
Number_of_workers | 4
Id                | 1
Channel_name      |
1 row in set
Time: 0.006s
mysql root@localhost:(none)>
6.4. master_info_repository设置
master_info_repository 设置为 TABLE 或者 FILE 对 复制的可靠性 是 没有帮助 的,因为设置 relay-log-recover = 1 后,会重新通过SQL线程回放到的位置进行拉取。
但是 master_info_repository 也一定要设置为 TABLE ,性能上比设置为FILE 有很高的提升(官方BUG)
设置为 TABLE 后, master-info 将信息保存到 mysql.slave_master_info 中
mysql root@localhost:(none)> select * from mysql.slave_master_info\G;
***************************[ 1. row ]***************************
Number_of_lines        | 25
Master_log_name        | binlog.000014
Master_log_pos         | 706
Host                   | 192.168.88.88
User_name              | repl
User_password          | 123456
Port                   | 3306
Connect_retry          | 60
Enabled_ssl            | 0
Ssl_ca                 |
Ssl_capath             |
Ssl_cert               |
Ssl_cipher             |
Ssl_key                |
Ssl_verify_server_cert | 0
Heartbeat              | 30.0
Bind                   |
Ignored_server_ids     | 0
Uuid                   | 9dc847d8-bf72-11e7-9ec4-000c2998e4f1
Retry_count            | 86400
Ssl_crl                |
Ssl_crlpath            |
Enabled_auto_position  | 0
Channel_name           |
Tls_version            |
1 row in set
Time: 0.010s
mysql root@localhost:(none)>
6.5. read_only与super_read_only
如果在Slave机器上对数据库进行修改或者删除,会导致主从的不一致,需要对Slave机器设置为 read_only = 1 ,让Slave提供 只读 操作。
注意: read_only 仅仅对 没有SUPER权限 的用户 有效 (即 mysql.user表的Super_priv字段为Y),一般给 App 的权限是 不需要SUPER权限 的。
参数 super_read_only 可以将有 SUPER权限 的用户也设置为 只读 ,且该参数设置为 ON 后, read_only 也跟着 自动 设置为 ON ;
mysql root@localhost:(none)> show variables like "read_only";
+---------------+-------+
| Variable_name | Value |
+---------------+-------+
| read_only     | OFF   |
+---------------+-------+
1 row in set
Time: 0.009s
mysql root@localhost:(none)> set global super_read_only=1;   -- 开启super用户的read_only
Query OK, 0 rows affected
Time: 0.003s
mysql root@localhost:(none)> show variables like "read_only";
+---------------+-------+
| Variable_name | Value |
+---------------+-------+
| read_only     | ON    |      --配置自动启用
+---------------+-------+
1 row in set
Time: 0.007s
mysql root@localhost:(none)>
7. mysqlreplicate 搭建主从复制
使用 mysqlreplicate 需要安装 mysql-utilities 包
[root@node1 software]# rpm -ivh https://cdn.mysql.com//Downloads/Connector-Python/mysql-connector-python-2.1.7-1.el7.x86_64.rpm
[root@node1 software]# rpm -ivh https://cdn.mysql.com//Downloads/MySQLGUITools/mysql-utilities-1.6.5-1.el7.noarch.rpm
7.1. 测试
- 搭建一个备机 node3,并初始化实例;
- node3 上新建一个用户 'gcdb'@'%' (%可以换成内网网段);
- 然后在 node3 或 node1 (或者其他任何可以连接到Master/Slave的机器上)执行如下命令
mysql root@localhost:performance_schema> create user 'repl'@'192.168.88.100' identified by '123456';

mysql root@localhost:performance_schema> select user,host from mysql.user;
+-----------+----------------+
| user      | host           |
+-----------+----------------+
| gcdb      | %              |
| monitor   | %              |
| repl      | 192.168.88.100 |
| repl      | 192.168.88.99  |
| dbbackup  | localhost      |
| mysql.sys | localhost      |
| operator  | localhost      |
| root      | localhost      |
+-----------+----------------+
8 rows in set
Time: 0.005s

mysql root@localhost:performance_schema> grant replication slave on *.* to 'repl'@'192.168.88.100';
Query OK, 0 rows affected
Time: 0.010s

mysql root@localhost:performance_schema> flush privileges;
Query OK, 0 rows affected
Time: 0.004s
[root@node1 software]#  mysqlreplicate --master=gcdb:iforgot@192.168.88.88:3306 --slave=gcdb:iforgot@192.168.88.100:3306 --rpl-user=repl:123456 -b
WARNING: Using a password on the command line interface can be insecure.
# master on 192.168.88.88: ... connected.
# slave on 192.168.88.100: ... connected.
# Checking for binary logging on master...
# Setting up replication...
# ...done.
[root@node1 software]#
然后在 node3 上执行 show slave status 操作, 复制正常
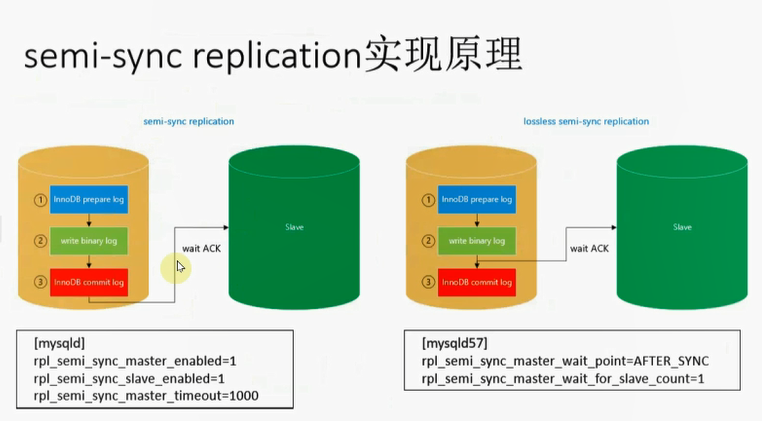
四.半同步和无损复制
主从复制基本上都是 异步复制, Master并不关Slave节点有没有获取到数据 ,所以复制效率很高,但是数据有可能会丢失。
-
从 MySQL5.5 开始,MySQL推出了
semi-sync replication (半同步复制)- 至少有一个Slave节点收到binlog后再返回( IO线程接收到即可 )
- 减少数据丢失风险
- 不能完全避免数据丢失
- 超时后,切换回异步复制
-
从 MySQL5.7.2 开始,MySQL推出了
lossless semi-sync replication (无损复制)- 二进制日志(binlog)先写远程( IO线程接收到即可 )
- 可保证数据完全不丢失
1. loss less / semi-sync replication插件安装
- 1、手工安装
mysql> INSTALL PLUGIN rpl_semi_sync_master SONAME 'semisync_master.so';
mysql> INSTALL PLUGIN rpl_semi_sync_slave SONAME 'semisync_slave.so';
- 2、写入配置文件
[mysqld]
plugin_dir=/usr/local/mysql/lib/plugin
plugin_load = "rpl_semi_sync_master=semisync_master.so;rpl_semi_sync_slave=semisync_slave.so"
上述操作 仅仅是加载了插件 ,还 未启动 对应的功能,需要配置额外的参数:
[mysqld]
# 等同于 rpl_semi_sync_master_enabled = 1
loose_rpl_semi_sync_master_enabled = 1
# 等同于 rpl_semi_sync_slave_enabled = 1
loose_rpl_semi_sync_slave_enabled = 1
# 超时5秒后,则切换回异步方式
loose_rpl_semi_sync_master_timeout = 5000
使用 loose_ 前缀表示如果没有加载 semi_sync 的插件,则 忽略该参数
当Slave在Timeout后,又追上了Master了( IO线程 ),则会 自动切换回半同步复制
注意:
半同步复制 /无损复制在主从上都要安装插件和开启功能。
注意:要保证
任意时刻发生一台机器宕机都不丢失数据的前提是 mastersync_binlog设置为1,slavesync_relay_log设置为1。
2. semi-sync replication
semi-sync replication 称为 半同步复制 ,在一个事务 提交(commit) 的过程时,在 InnoDB 层的 commit log 步骤后,Master节点需要收到 至少一个 Slave节点回复的 ACK (表示 收到了binlog )后,才能继续下一个事务;
如果在一定时间内(Timeout)内 没有收到ACK ,则 切换为异步模式 ,具体流程如下:
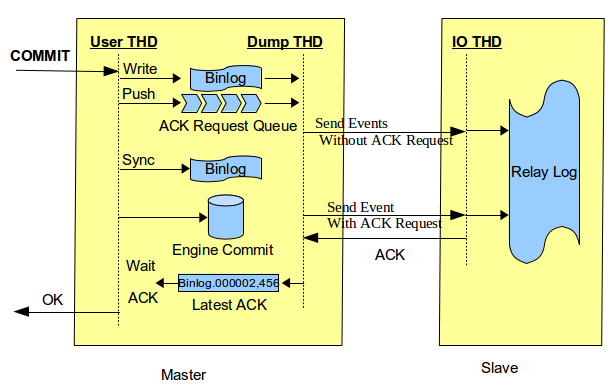
对应的配置参数如下:
[mysqld]
# 开启主的半同步复制
rpl_semi_sync_master_enabled=1
# 开启从的半同步复制
rpl_semi_sync_slave_enabled=1
# 超时1秒,切回异步
rpl_semi_sync_master_timeout=1000
# 至少收到 1 个 slave发回的ack
rpl_semi_sync_master_wait_for_slave_count=1
3. loss less semi-sync replication
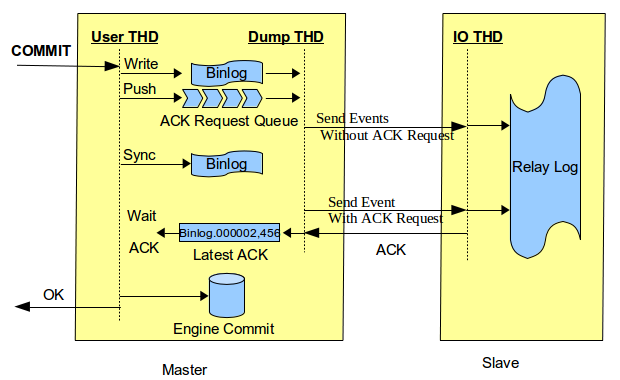
loss less semi-sync replication 称为 无损复制 ,在一个事务 提交(commit) 的过程时,在 MySQL 层的 write binlog 步骤后,Master节点需要收到 至少一个 Slave节点回复的 ACK (表示 收到了binlog )后,才能继续下一个事务;
如果在一定时间内(Timeout)内 没有收到ACK ,则 切换为异步模式 ,具体流程如下:
对应的配置参数如下:
[mysqld]
# 开启主的半同步复制
rpl_semi_sync_master_enabled=1
# 开启从的半同步复制
rpl_semi_sync_slave_enabled=1
# 超时1秒,切回异步
rpl_semi_sync_master_timeout=1000
[mysqld57]
# 控制 半同步复制 还是 无损复制 的参数
# - AFTER_SYNC 表示的是无损复制;(5.7 默认)
# - AFTER_COMMIT 表示的是半同步复制;
rpl_semi_sync_master_wait_point=AFTER_SYNC
# 至少收到 1 个 slave发回的ack
rpl_semi_sync_master_wait_for_slave_count=1
4. 半同步复制与无损复制的对比
-
ACK的时间点不同
半同步复制在InnoDB层的Commit Log后等待ACK,主从切换会有数据丢失风险。无损复制在MySQL Server层的Write binlog后等待ACK,主从切换会有数据变多风险。
-
主从数据一致性
半同步复制意味着在Master节点上,这个刚刚提交的事务对数据库的修改,对其他事务是可见的。因此,如果在等待Slave ACK的时候crash了,那么会对其他事务出现幻读,数据丢失。无损复制在write binlog完成后,就传输binlog,但还没有去写commit log,意味着当前这个事务对数据库的修改,其他事务也是不可见的。因此,不会出现幻读,数据丢失风险。- 因此5.7.2引入了
无损复制(after_sync)模式,带来的主要收益是解决after_commit导致的master crash后数据丢失问题,因此在引入after_sync模式后,所有提交的数据已被复制,故障切换时数据一致性将得到提升。
5. 演示无损/半同步复制
- master server
mysql root@localhost:employees> INSTALL PLUGIN rpl_semi_sync_master SONAME 'semisync_master.so';
Query OK, 0 rows affected
Time: 0.063s

mysql root@localhost:employees>  INSTALL PLUGIN rpl_semi_sync_slave SONAME 'semisync_slave.so';
Query OK, 0 rows affected
Time: 0.005s

mysql root@localhost:employees> set global rpl_semi_sync_master_enabled = 1;
Query OK, 0 rows affected
Time: 0.020s

mysql root@localhost:employees> set global rpl_semi_sync_master_timeout = 5000;
Query OK, 0 rows affected
Time: 0.001s

mysql root@localhost:employees> show global status like "%rpl%";
+--------------------------------------------+-------+
| Variable_name                              | Value |
+--------------------------------------------+-------+
| Rpl_semi_sync_master_clients               | 0     |
| Rpl_semi_sync_master_net_avg_wait_time     | 0     |
| Rpl_semi_sync_master_net_wait_time         | 0     |
| Rpl_semi_sync_master_net_waits             | 0     |
| Rpl_semi_sync_master_no_times              | 0     |
| Rpl_semi_sync_master_no_tx                 | 0     |
| Rpl_semi_sync_master_status                | ON    |   -- status ok
| Rpl_semi_sync_master_timefunc_failures     | 0     |
| Rpl_semi_sync_master_tx_avg_wait_time      | 0     |
| Rpl_semi_sync_master_tx_wait_time          | 0     |
| Rpl_semi_sync_master_tx_waits              | 0     |
| Rpl_semi_sync_master_wait_pos_backtraverse | 0     |
| Rpl_semi_sync_master_wait_sessions         | 0     |
| Rpl_semi_sync_master_yes_tx                | 0     |
| Rpl_semi_sync_slave_status                 | OFF   |
+--------------------------------------------+-------+
15 rows in set
Time: 0.013s
mysql root@localhost:employees>
- slave server
(root@localhost) 09:59:14 [employees]> INSTALL PLUGIN rpl_semi_sync_master SONAME 'semisync_master.so';
Query OK, 0 rows affected (0.05 sec)

(root@localhost) 18:07:15 [employees]> INSTALL PLUGIN rpl_semi_sync_slave SONAME 'semisync_slave.so';
Query OK, 0 rows affected (0.00 sec)

(root@localhost) 18:07:29 [employees]> set global rpl_semi_sync_slave_enabled = 1;
Query OK, 0 rows affected (0.00 sec)

(root@localhost) 18:14:59 [employees]> show global variables like '%semi%';
+-------------------------------------------+------------+
| Variable_name                             | Value      |
+-------------------------------------------+------------+
| rpl_semi_sync_master_enabled              | OFF        |
| rpl_semi_sync_master_timeout              | 10000      |
| rpl_semi_sync_master_trace_level          | 32         |
| rpl_semi_sync_master_wait_for_slave_count | 1          |
| rpl_semi_sync_master_wait_no_slave        | ON         |
| rpl_semi_sync_master_wait_point           | AFTER_SYNC |
| rpl_semi_sync_slave_enabled               | ON         |
| rpl_semi_sync_slave_trace_level           | 32         |
+-------------------------------------------+------------+
8 rows in set (0.02 sec)
半复制切换异步同步过程的状态
- master server
(root@localhost) 10:11:10 [tablespace]>  show global status like "%rpl%";
+--------------------------------------------+-------+
| Variable_name                              | Value |
+--------------------------------------------+-------+
| Rpl_semi_sync_master_clients               | 1     |  -- 半同步复制的client数量
| Rpl_semi_sync_master_net_avg_wait_time     | 0     |
| Rpl_semi_sync_master_net_wait_time         | 0     |
| Rpl_semi_sync_master_net_waits             | 1     |  -- master总的等待slave的次数
| Rpl_semi_sync_master_no_times              | 0     |  -- 切成异步的次数(no = number of)
| Rpl_semi_sync_master_no_tx                 | 0     |  -- 切成异步后提交的事物数
| Rpl_semi_sync_master_status                | ON    |  -- 半同步复制的状态
| Rpl_semi_sync_master_timefunc_failures     | 0     |
| Rpl_semi_sync_master_tx_avg_wait_time      | 2209  |  -- master等待事物的平均时间
| Rpl_semi_sync_master_tx_wait_time          | 2209  |  -- master等待事物的总的时间
| Rpl_semi_sync_master_tx_waits              | 1     |  -- master等待事物的次数
| Rpl_semi_sync_master_wait_pos_backtraverse | 0     |
| Rpl_semi_sync_master_wait_sessions         | 0     |
| Rpl_semi_sync_master_yes_tx                | 1     |
| Rpl_semi_sync_slave_status                 | OFF   |
+--------------------------------------------+-------+
15 rows in set (0.03 sec)
- slave server
(root@localhost) 13:47:48 [tablespace]> stop slave io_thread;  --停掉IO线程
Query OK, 0 rows affected (0.05 sec)
- master server
(root@localhost) 14:48:11 [tablespace]>  show global status like "%rpl%";
+--------------------------------------------+-------+
| Variable_name                              | Value |
+--------------------------------------------+-------+
| Rpl_semi_sync_master_clients               | 1     |
| Rpl_semi_sync_master_net_avg_wait_time     | 0     |
| Rpl_semi_sync_master_net_wait_time         | 0     |
| Rpl_semi_sync_master_net_waits             | 1     |
| Rpl_semi_sync_master_no_times              | 0     |
| Rpl_semi_sync_master_no_tx                 | 0     |
| Rpl_semi_sync_master_status                | ON    |
| Rpl_semi_sync_master_timefunc_failures     | 0     |
| Rpl_semi_sync_master_tx_avg_wait_time      | 2209  |
| Rpl_semi_sync_master_tx_wait_time          | 2209  |
| Rpl_semi_sync_master_tx_waits              | 1     |
| Rpl_semi_sync_master_wait_pos_backtraverse | 0     |
| Rpl_semi_sync_master_wait_sessions         | 0     |
| Rpl_semi_sync_master_yes_tx                | 1     |
| Rpl_semi_sync_slave_status                 | OFF   |
+--------------------------------------------+-------+
15 rows in set (0.00 sec)

(root@localhost) 14:48:14 [tablespace]> insert into qqq values(99);  --插入sql
Query OK, 1 row affected (5.04 sec)    -- 等待5秒后,切成异步

(root@localhost) 14:49:28 [tablespace]>  show global status like "%rpl%";
+--------------------------------------------+-------+
| Variable_name                              | Value |
+--------------------------------------------+-------+
| Rpl_semi_sync_master_clients               | 0     |
| Rpl_semi_sync_master_net_avg_wait_time     | 0     |
| Rpl_semi_sync_master_net_wait_time         | 0     |
| Rpl_semi_sync_master_net_waits             | 1     |
| Rpl_semi_sync_master_no_times              | 1     |  --切成异步的次数
| Rpl_semi_sync_master_no_tx                 | 1     |  --切成异步后的事物数
| Rpl_semi_sync_master_status                | OFF   |  --status 为off
| Rpl_semi_sync_master_timefunc_failures     | 0     |
| Rpl_semi_sync_master_tx_avg_wait_time      | 2209  |
| Rpl_semi_sync_master_tx_wait_time          | 2209  |
| Rpl_semi_sync_master_tx_waits              | 1     |
| Rpl_semi_sync_master_wait_pos_backtraverse | 0     |
| Rpl_semi_sync_master_wait_sessions         | 0     |
| Rpl_semi_sync_master_yes_tx                | 1     |
| Rpl_semi_sync_slave_status                 | OFF   |
+--------------------------------------------+-------+
15 rows in set (0.00 sec)

(root@localhost) 14:49:57 [tablespace]>
6. 两种复制方式的性能
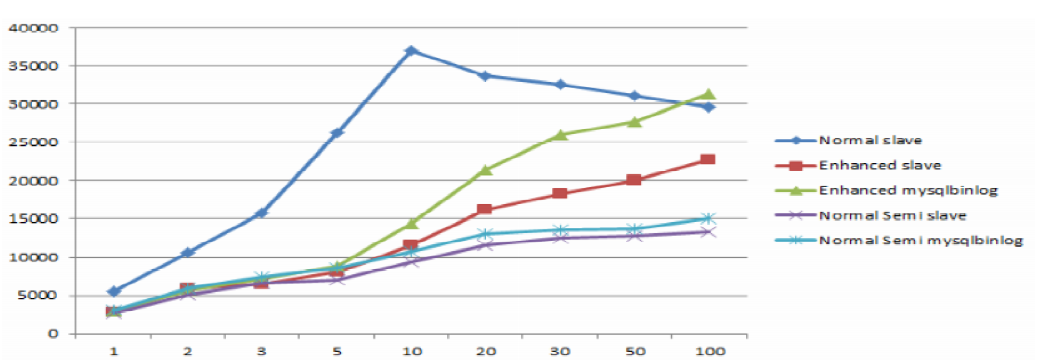
备注:上图是Facebook的测试性能图;其中Y轴是QPS,X轴是并发数
- 蓝色的
Normal Slave是异步复制- 性能很好,但是随着并发数的增长,性能有所下降
- 绿色的
Enhanced mysqlbinlog是无损复制- 随着并发数的增长,性能几乎是线性增长的,在高并发下,性能会优于异步复制
- 紫色的
Normal Semi Slave是 半同步复制- 性能较低
无损复制性能优于半同步复制的原因
等待ACK回包问题上,其实两种复制的开销是一样的,没有区别,都是网络的等待开销。无损复制由于在write binlog(commit 的第二步)后,需要等待ACK,后续的事务无法提交,这样就堆积了N多个需要落盘的事务(半同步复制由于已经提交了事务,没有堆积事务的效果),通过组提交机制一次 fsync的多个事务(半同步复制也有组提交,只是一次fsync的事务数没那么多), 相当于提高了I/O性能;所以线程(事务)越多,效果越明显,以至于有上图中超过异步复制的效果。(无损复制的组提交比例比原版的高3~4倍)
产生上述测试效果的前提:测试用例是
IO Bound的(比如数据量有 100G,而 buffer pool 只有 10G),且并发数足够多。
下面这两个参数不要去设置,设置了反而性能差
(root@localhost) 10:10:47 [tablespace]> show variables like "%binlog_group%";
+-----------------------------------------+-------+
| Variable_name                           | Value |
+-----------------------------------------+-------+
| binlog_group_commit_sync_delay          | 0     |
| binlog_group_commit_sync_no_delay_count | 0     |   -- 等待一组里面有多少事务我才提交
+-----------------------------------------+-------+
2 rows in set (0.01 sec)

(root@localhost) 10:10:50 [tablespace]> show variables like "%binlog_max%";
+-----------------------------+-------+
| Variable_name               | Value |
+-----------------------------+-------+
| binlog_max_flush_queue_time | 0     |               -- 等待多少时间后才进行组提交
+-----------------------------+-------+
1 row in set (0.00 sec)

(root@localhost) 10:11:10 [tablespace]>
7. rpl_semi_sync_master_wait_for_slave_count
该参数控制Master在收到 多少个 Slave的ACK 后,才可以继续commit。配置多个ACK和配置一个ACK的效果是类似的,因为他们是 并行执行 的(理论上来说不会有两倍的等待时间), 取决于最慢的那个 。
五. 并行复制(Multi-Threaded Slave)
1. MTS介绍
在官方文档中,并行复制的叫法为 Multi-Threaded Slave (MTS)
- MySQL的并行复制基于组提交:
一个组提交中的事务都是可以并行执行的 ,因为既然处于组提交中,这意味着事务之间没有冲突(不会去更新同一行数据),否则不可能在同一个组里面。
Slave上开启并行复制,需要在配置文件中增加以下参数:
[mysqld]
slave-parallel-type=LOGICAL_CLOCK
slave_preserve_commit_order=1
slave-parallel-workers=4
-
slave-parallel-type 参数
DATABASE基于库级别的并行复制,如果只有一个库,就还是串行(为了兼容5.6)。LOGICAL_CLOCK基于逻辑时钟,主上怎么并行执行,从上也是怎么并行回放的。
-
slave-parallel-workers
并行复制的线程数,一般设置为一个组内提交的事务数,线上设置为32足够了 -
slave_preserve_commit_order
Slave上commit的顺序保持一致,必须为1,否则可能会有GAP锁产生
2. 动态调整复制线程数
配置并行复制后,Slave节点可以看到4个 Coordinator 线程
mysql root@localhost:(none)> show processlist;
+----+-------------+-----------+--------+---------+--------+--------------------------------------------------------+------------------+
| Id | User        | Host      | db     | Command | Time   | State                                                  | Info             |
+----+-------------+-----------+--------+---------+--------+--------------------------------------------------------+------------------+
| 1  | system user |           | <null> | Connect | 148155 | Waiting for master to send event                       | <null>           |
| 2  | system user |           | <null> | Connect | 57792  | Slave has read all relay log; waiting for more updates | <null>           |
| 3  | system user |           | <null> | Connect | 57791  | Waiting for an event from Coordinator                  | <null>           |
| 4  | system user |           | <null> | Connect | 148155 | Waiting for an event from Coordinator                  | <null>           |
| 7  | system user |           | <null> | Connect | 148155 | Waiting for an event from Coordinator                  | <null>           |
| 8  | system user |           | <null> | Connect | 148155 | Waiting for an event from Coordinator                  | <null>           |
| 12 | root        | localhost | <null> | Query   | 0      | starting                                               | show processlist |
+----+-------------+-----------+--------+---------+--------+--------------------------------------------------------+------------------+
7 rows in set
Time: 0.019s
mysql root@localhost:(none)>

-- 动态调整方式如下:

mysql root@localhost:(none)> set global slave_parallel_workers=8;
Query OK, 0 rows affected
Time: 0.003s
mysql root@localhost:(none)> stop slave;  一定要重启一下slave才能有效
Query OK, 0 rows affected
Time: 0.038s
mysql root@localhost:(none)> start slave;
Query OK, 0 rows affected
Time: 0.080s
mysql root@localhost:(none)> show processlist;
+----+-------------+-----------+--------+---------+------+--------------------------------------------------------+------------------+
| Id | User        | Host      | db     | Command | Time | State                                                  | Info             |
+----+-------------+-----------+--------+---------+------+--------------------------------------------------------+------------------+
| 12 | root        | localhost | <null> | Query   | 0    | starting                                               | show processlist |
| 13 | system user |           | <null> | Connect | 3    | Waiting for master to send event                       | <null>           |
| 14 | system user |           | <null> | Connect | 3    | Slave has read all relay log; waiting for more updates | <null>           |
| 15 | system user |           | <null> | Connect | 3    | Waiting for an event from Coordinator                  | <null>           |
| 16 | system user |           | <null> | Connect | 3    | Waiting for an event from Coordinator                  | <null>           |
| 17 | system user |           | <null> | Connect | 3    | Waiting for an event from Coordinator                  | <null>           |
| 18 | system user |           | <null> | Connect | 3    | Waiting for an event from Coordinator                  | <null>           |
| 19 | system user |           | <null> | Connect | 3    | Waiting for an event from Coordinator                  | <null>           |
| 20 | system user |           | <null> | Connect | 3    | Waiting for an event from Coordinator                  | <null>           |
| 21 | system user |           | <null> | Connect | 3    | Waiting for an event from Coordinator                  | <null>           |
| 22 | system user |           | <null> | Connect | 3    | Waiting for an event from Coordinator                  | <null>           |
+----+-------------+-----------+--------+---------+------+--------------------------------------------------------+------------------+
11 rows in set
Time: 0.019s
mysql root@localhost:(none)>
特别注意:
这里的
并行复制指的是SQL Thread (回放线程),而非IO Thread (IO线程)
Waiting for master to send event这个State在show processlist中只有一个,即只有一个IO Thread
线上环境可以配置成两台Slave做无损复制(保证数据不丢),其他的Slave做异步复制(配置为只读,用于负载均衡),都指向同一台Master。
六. GTID
1. GTID的介绍
-
1.Global Transaction Id entifier -- 全局事物ID
-
2.GTID = Server_UUID + Transaction_ID
- Server_UUID 是全局唯一的
- Transaction_ID 是自增的
-
3.GTID 的作用是替代 Filename + Position
(root@localhost) 14:54:25 [tablespace]> show variables like "server_uuid";
+---------------+--------------------------------------+
| Variable_name | Value                                |
+---------------+--------------------------------------+
| server_uuid   | 9dc847d8-bf72-11e7-9ec4-000c2998e4f1 |
+---------------+--------------------------------------+
1 row in set (0.01 sec)
在MySQL中看到的 UUID ,实际是保存在 $DATADIR/auto.cnf 中的,且该文件是服务器初始化的时候自动生成的。
[root@node1 mysqldata]# cat /r2/mysqldata/auto.cnf
[auto]
server-uuid=9dc847d8-bf72-11e7-9ec4-000c2998e4f1
[root@node1 mysqldata]#
通过
冷备做备份,拷贝$DATADIR时,记得要把备份中的auto.cnf给删除、
2. GTID的意义
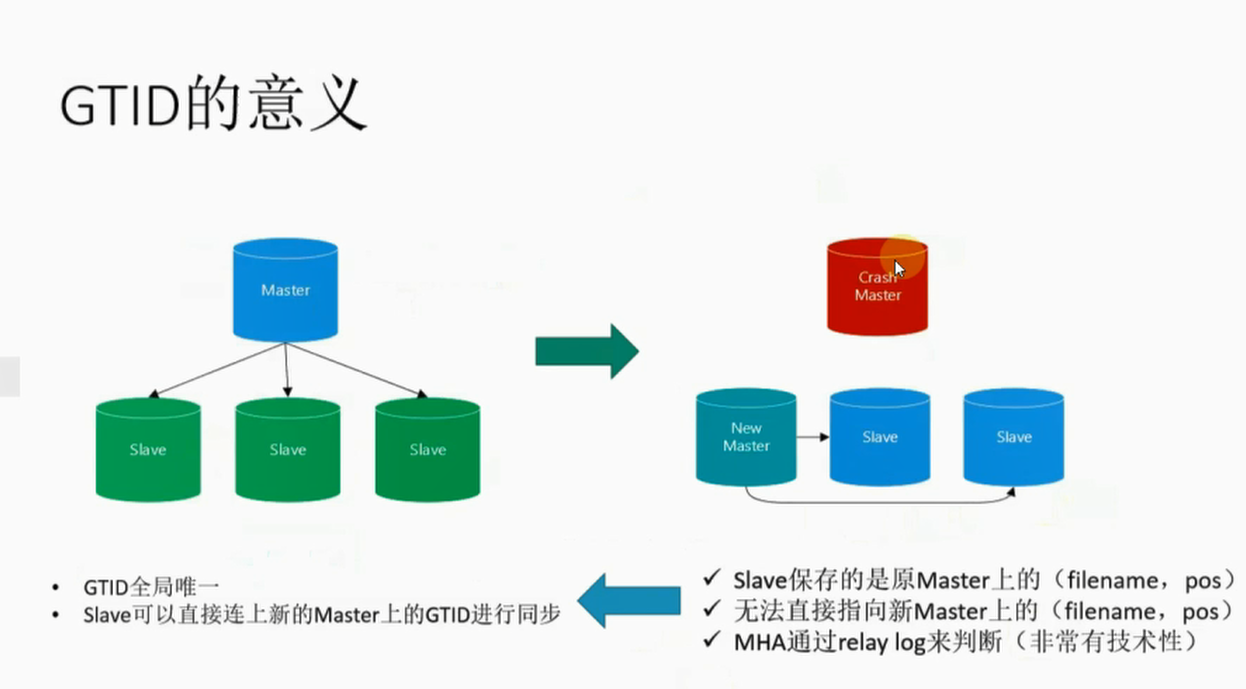
-
未使用GTID
- 当
Master宕机后,一个Slave被选举提升为New Master,如果需要重建复制关系,就需要把另外两个Slave的CHANGE MASTER指向New Master; - 那问题来了,原来Slave是指向
Master的Filename_M + Position_M的位置,现在要指向New Master上新的Filename_N + Position_N的位置,由于基于二进制日志复制,定位两个位置步骤繁琐; 此时两个Slave要继续重建复制关系(CHANGE MASTER)会比较麻烦。
- 当
-
使用GTID
- 和上面一样的场景,
选举机制提升为New Master的GTID执行到最新事务,两个Slave需要重新指向New Master,由于使用了GTID,目前Slave-A获取到的事务对应GTID为GTID_A,Slave-B获取到的事务对应GTID为GTID_B; - 此时
New Master上GTID是存在GTID_A 和 GTID_B,那两个Slave就可以直接使用GTID_A 和 GTID_B这两个GTID,通过指向New Master接着重建复制;
- 和上面一样的场景,
3. GTID的配置
[mysqld]
log_bin = binlog
log_slave_updates = 1
gtid_mode = ON
enforce-gtid-consistency = true
-
注意:
-
1.MySQL5.6 必须开启参数
log_slave_updates(5.6版本的限制) -
2.MySQL5.6 升级到gtid模式需要
停机重启 -
3.MySQL5.7 版本开始可以不开启
log_slave_updates -
4.MySQL5.7.6 版本开始可以
在线升级成gtid模式
-
4. 基于GTID的复制
4.1. 配置基于GTID的复制
| 配置信息 | 主库(master) | 从库(slave) |
|---|---|---|
| 主机 | node1.gczheng.com | node3.gczheng.com |
| IP | 192.168.88.88 | 192.168.88.100 |
| Port | 3306 | 3306 |
| MySQL版本 | MySQL5.7.18 | MySQL5.7.18 |
| Server_ID | 8888 | 88100 |
数据库的备份和还原步骤略过,这里使用 mydumper备份,master上创建账号repl@'192.168.88.100',密码和权限同repl@'192.168.88.99'。
- 1.master节点的配置文件加入
[mysqld]
gtid_mode = ON
enforce-gtid-consistency = true
- 2.slave 节点加入
[mysqld]
gtid_mode = ON
enforce-gtid-consistency = true
- 3.查看metadata信息
[root@node3 alldb]# cat metadata
Started dump at: 2018-02-15 18:53:58                    --dump时间
SHOW MASTER STATUS:
	Log: binlog.000014                                  --Filename
	Pos: 1361                                           --Pos
	GTID:9dc847d8-bf72-11e7-9ec4-000c2998e4f1:1-52      --GTID时间
注意:metadata中的 GTID:9dc847d8-bf72-11e7-9ec4-000c2998e4f1:1-52 表示为:这个GTID对应的
事物已在备份中了,Slave还原备份后,进行复制时要跳过这个GTID即对应的事物。
4.2. 跳过GTIDs
- Slave节点
如果备份使用 mysqldump 进行备份, 请跳过该步骤 ,因为在备份中已经存在下面这个语句:
--
-- GTID state at the beginning of the backup
--
SET @@GLOBAL.GTID_PURGED='9dc847d8-bf72-11e7-9ec4-000c2998e4f1:1-52';
因为我们使用 mydumper 进行备份, myloader还原并不会帮我们执行上述语句,需要手工执行该语句,让 Slave 知道这个GTID需要跳过:
mysql> SET @@GLOBAL.GTID_PURGED='9dc847d8-bf72-11e7-9ec4-000c2998e4f1:1-52';
ERROR 1840 (HY000): @@GLOBAL.GTID_PURGED can only be set when @@GLOBAL.GTID_EXECUTED is empty.
-- 这里报出一个错误,意思为如果要设置 @@GLOBAL.GTID_PURGED ,则 @@GLOBAL.GTID_EXECUTED 必须为空。
需要使用 reset master 命令,将 @@GLOBAL.GTID_EXECUTED清空。
(root@localhost) 09:22:38 [tablespace]> reset master;
Query OK, 0 rows affected (0.07 sec)

(root@localhost) 09:23:18 [tablespace]> SET @@GLOBAL.GTID_PURGED='9dc847d8-bf72-11e7-9ec4-000c2998e4f1:1-52';
Query OK, 0 rows affected (0.02 sec)
至此,我们已经跳过了备份中存在的GTIDs所对应的事物
4.3. CHANGE MASTER
- Slave节点
(root@localhost) 10:33:35 [tablespace]> change master to master_host="192.168.88.88", master_port=3306, master_user='repl',master_password='123456', master_auto_position=1;
Query OK, 0 rows affected, 2 warnings (0.04 sec)

(root@localhost) 10:33:46 [tablespace]> start slave;
Query OK, 0 rows affected (0.03 sec)

(root@localhost) 10:58:50 [tablespace]> show slave status  \G;
*************************** 1. row ***************************
               Slave_IO_State: Waiting for master to send event
                  Master_Host: 192.168.88.88
                  Master_User: repl
                  Master_Port: 3306
                Connect_Retry: 60
              Master_Log_File: binlog.000014
          Read_Master_Log_Pos: 1893
               Relay_Log_File: node3-relay-bin.000007
                Relay_Log_Pos: 445
        Relay_Master_Log_File: binlog.000014
             Slave_IO_Running: Yes                          --IO线程ok
            Slave_SQL_Running: Yes                          --SQL线程ok
              Replicate_Do_DB:
          Replicate_Ignore_DB:
           Replicate_Do_Table:
       Replicate_Ignore_Table:
      Replicate_Wild_Do_Table:
  Replicate_Wild_Ignore_Table:
                   Last_Errno: 0
                   Last_Error:
                 Skip_Counter: 0
          Exec_Master_Log_Pos: 1893
              Relay_Log_Space: 2598
              Until_Condition: None
               Until_Log_File:
                Until_Log_Pos: 0
           Master_SSL_Allowed: No
           Master_SSL_CA_File:
           Master_SSL_CA_Path:
              Master_SSL_Cert:
            Master_SSL_Cipher:
               Master_SSL_Key:
        Seconds_Behind_Master: 0
Master_SSL_Verify_Server_Cert: No
                Last_IO_Errno: 0
                Last_IO_Error:
               Last_SQL_Errno: 0
               Last_SQL_Error:
  Replicate_Ignore_Server_Ids:
             Master_Server_Id: 8888
                  Master_UUID: 9dc847d8-bf72-11e7-9ec4-000c2998e4f1
             Master_Info_File: /r2/mysqldata/master.info
                    SQL_Delay: 0
          SQL_Remaining_Delay: NULL
      Slave_SQL_Running_State: Slave has read all relay log; waiting for more updates
           Master_Retry_Count: 86400
                  Master_Bind:
      Last_IO_Error_Timestamp:
     Last_SQL_Error_Timestamp:
               Master_SSL_Crl:
           Master_SSL_Crlpath:
           Retrieved_Gtid_Set: 9dc847d8-bf72-11e7-9ec4-000c2998e4f1:29-54   --获取到GTID
            Executed_Gtid_Set: 9dc847d8-bf72-11e7-9ec4-000c2998e4f1:29-54   --执行到GTID
                Auto_Position: 1
         Replicate_Rewrite_DB:
                 Channel_Name:
           Master_TLS_Version:
1 row in set (0.00 sec)

ERROR:
No query specified
4.4. 复制完成
- master节点
(root@localhost) 10:57:09 [tablespace]> show slave hosts;
+-----------+------+------+-----------+--------------------------------------+
| Server_id | Host | Port | Master_id | Slave_UUID                           |
+-----------+------+------+-----------+--------------------------------------+
|     88100 |      | 3306 |      8888 | 5d4e3453-0fc5-11e8-b387-000c29c9f498 |  --新建slave
|      8899 |      | 3306 |      8888 | 1951c7ee-c1fb-11e7-ac44-005056305232 |
+-----------+------+------+-----------+--------------------------------------+
2 rows in set (0.00 sec)

(root@localhost) 10:58:34 [tablespace]> insert into qqq values(101);  --插入a的值101
Query OK, 1 row affected (0.02 sec)

(root@localhost) 10:59:07 [tablespace]> select * from  qqq;
+------+
| a    |
+------+
|    1 |
|    2 |
|    3 |
|    4 |
|   10 |
|   99 |
|  101 |
+------+
7 rows in set (0.00 sec)
- slave节点
(root@localhost) 11:02:32 [tablespace]> select * from  qqq;
+------+
| a    |
+------+
|    1 |
|    2 |
|    3 |
|    4 |
|   10 |
|   99 |
|  101 |  --slave同步到值101
+------+
7 rows in set (0.00 sec)

(root@localhost) 11:03:08 [tablespace]>
5. GTID 与 Filename-Pos的对应
在 binlog 中,多了一个 GTID 的 event ,如下所示
(root@localhost) 11:43:24 [tablespace]> show binlog events;
+---------------+-----+----------------+-----------+-------------+--------------------------------------------------------------------+
| Log_name      | Pos | Event_type     | Server_id | End_log_pos | Info                                                               |
+---------------+-----+----------------+-----------+-------------+--------------------------------------------------------------------+
| binlog.000001 |   4 | Format_desc    |     88100 |         123 | Server ver: 5.7.18-log, Binlog ver: 4                              |
| binlog.000001 | 123 | Previous_gtids |     88100 |         154 |                                                                    |
| binlog.000001 | 154 | Gtid           |      8888 |         219 | SET @@SESSION.GTID_NEXT= '9dc847d8-bf72-11e7-9ec4-000c2998e4f1:55' | -- 一个GTID 的 event
| binlog.000001 | 219 | Query          |      8888 |         282 | BEGIN                                                              |
| binlog.000001 | 282 | Table_map      |      8888 |         334 | table_id: 227 (tablespace.qqq)                                     |
| binlog.000001 | 334 | Write_rows     |      8888 |         374 | table_id: 227 flags: STMT_END_F                                    |
| binlog.000001 | 374 | Xid            |      8888 |         405 | COMMIT /* xid=1407 */                                              |
+---------------+-----+----------------+-----------+-------------+--------------------------------------------------------------------+
7 rows in set (0.00 sec)

(root@localhost) 11:43:39 [tablespace]>
通过 扫描 binlog中的GTID值,就可以知道 GTID与Filename-Pos对应的关系 ,但是如果binlog非常大,扫描的量也是会很大的,所以在binlog开头部分有一个 Previous_gtids 的event,如下所示:
(root@localhost) 11:44:57 [tablespace]> show binlog events in 'binlog.000001' \G;
*************************** 1. row ***************************
   Log_name: binlog.000001
        Pos: 4
 Event_type: Format_desc
  Server_id: 88100
End_log_pos: 123
       Info: Server ver: 5.7.18-log, Binlog ver: 4
*************************** 2. row ***************************
   Log_name: binlog.000001
        Pos: 123
 Event_type: Previous_gtids      -- 表示在次之前,GTID运行到的范围是哪里
  Server_id: 88100
End_log_pos: 154
       Info:
*************************** 3. row ***************************
   Log_name: binlog.000001
        Pos: 154
 Event_type: Gtid
  Server_id: 8888
End_log_pos: 219
       Info: SET @@SESSION.GTID_NEXT= '9dc847d8-bf72-11e7-9ec4-000c2998e4f1:55'
*************************** 4. row ***************************
   Log_name: binlog.000001
        Pos: 219
 Event_type: Query
  Server_id: 8888
End_log_pos: 282
       Info: BEGIN
*************************** 5. row ***************************
   Log_name: binlog.000001
        Pos: 282
 Event_type: Table_map
  Server_id: 8888
End_log_pos: 334
       Info: table_id: 227 (tablespace.qqq)
*************************** 6. row ***************************
   Log_name: binlog.000001
        Pos: 334
 Event_type: Write_rows
  Server_id: 8888
End_log_pos: 374
       Info: table_id: 227 flags: STMT_END_F
*************************** 7. row ***************************
   Log_name: binlog.000001
        Pos: 374
 Event_type: Xid
  Server_id: 8888
End_log_pos: 405
       Info: COMMIT /* xid=1407 */
7 rows in set (0.01 sec)

ERROR:
No query specified

(root@localhost) 11:45:19 [tablespace]>
如果我要的
GTID比Previous_gtids的大,就扫描当前文件,反之则扫描之前的文件,依次类推。因为binlog在rotate(rotate events)的时候,是知道当前最大的GTID的,可以将该值写入到下一个新的binlog的开头,即Previous_gtid
6. GTID复制出错的处理
演示人为的在从机上误操作导致的复制失败,如何恢复?
6.1. 演示
-
1.在从机上插入一条记录(模拟误操作)
- slave节点
现在 Slave 上插入一条记录(现实中如果配置了readonly,在app中是无法插入的,app不会给root权限)
mysql root@localhost:(none)> select * from ttt.t1;
+---+
| a |  --a是主键
+---+
| 1 |
| 2 |
| 3 |
+---+
3 rows in set
Time: 0.012s
mysql root@localhost:(none)> insert into ttt.t1 values(null);
Query OK, 1 row affected
Time: 0.003s
mysql root@localhost:(none)> select * from ttt.t1;
+---+
| a |
+---+
| 1 |
| 2 |
| 3 |
| 4 |
+---+
4 rows in set
Time: 0.014s
mysql root@localhost:(none)>
-
2.在主机上插入同样的记录
- master节点
mysql root@localhost:ttt> select * from t1;
+---+
| a |
+---+
| 1 |
| 2 |
| 3 |
+---+
3 rows in set
Time: 0.009s
mysql root@localhost:ttt> insert into t1 values(null);
Query OK, 1 row affected
Time: 0.007s
mysql root@localhost:ttt>
-
3.查看 Slave上的状态
- slave节点
mysql root@localhost:(none)> show slave status \G;
***************************[ 1. row ]***************************
Slave_IO_State                | Waiting for master to send event
Master_Host                   | 192.168.88.88
Master_User                   | repl
Master_Port                   | 3306
Connect_Retry                 | 60
Master_Log_File               | binlog.000014
Read_Master_Log_Pos           | 6195
Relay_Log_File                | node2-relay-bin.000002
Relay_Log_Pos                 | 568
Relay_Master_Log_File         | binlog.000014
Slave_IO_Running              | Yes
Slave_SQL_Running             | No
Replicate_Do_DB               |
Replicate_Ignore_DB           |
Replicate_Do_Table            |
Replicate_Ignore_Table        |
Replicate_Wild_Do_Table       |
Replicate_Wild_Ignore_Table   |
Last_Errno                    | 1062
Last_Error                    | Coordinator stopped because there were error(s) in the worker(s). The most recent failure being: Worker 1 failed executing transaction '9dc847d8-bf72-11e7-9ec4-000c2998e4f1:74' at master log binlog.000014, end_log_pos 6164. See error log and/or performance_schema.replication_applier_status_by_worker table for more details about this failure or others, if any.
Skip_Counter                  | 0
Exec_Master_Log_Pos           | 5944
Relay_Log_Space               | 1026
Until_Condition               | None
Until_Log_File                |
Until_Log_Pos                 | 0
Master_SSL_Allowed            | No
Master_SSL_CA_File            |
Master_SSL_CA_Path            |
Master_SSL_Cert               |
Master_SSL_Cipher             |
Master_SSL_Key                |
Seconds_Behind_Master         | <null>
Master_SSL_Verify_Server_Cert | No
Last_IO_Errno                 | 0
Last_IO_Error                 |
Last_SQL_Errno                | 1062 --错误代码1062,主键重复
Last_SQL_Error                | Coordinator stopped because there were error(s) in the worker(s). The most recent failure being: Worker 1 failed executing transaction '9dc8
47d8-bf72-11e7-9ec4-000c2998e4f1:74' at master log binlog.000014, end_log_pos 6164. See error log and/or performance_schema.replication_applier_status_by_worker table for m
ore details about this failure or others, if any.
Replicate_Ignore_Server_Ids   |
Master_Server_Id              | 8888
Master_UUID                   | 9dc847d8-bf72-11e7-9ec4-000c2998e4f1
Master_Info_File              | mysql.slave_master_info
SQL_Delay                     | 0
SQL_Remaining_Delay           | <null>
Slave_SQL_Running_State       |
Master_Retry_Count            | 86400
Master_Bind                   |
Last_IO_Error_Timestamp       |
Last_SQL_Error_Timestamp      | 180219 16:07:45
Master_SSL_Crl                |
Master_SSL_Crlpath            |
Retrieved_Gtid_Set            | 9dc847d8-bf72-11e7-9ec4-000c2998e4f1:73-74
Executed_Gtid_Set             | 1951c7ee-c1fb-11e7-ac44-005056305232:1,
9dc847d8-bf72-11e7-9ec4-000c2998e4f1:1-73  --回放到这个事务时报错
Auto_Position                 | 0
Replicate_Rewrite_DB          |
Channel_Name                  |
Master_TLS_Version            |
其实从数据一致性看,目前主从数据是一致的,只是复制过来的日志在回放时,发现已有了该部分数据(Error:1062),从而引发了
复制异常(SQL回放线程停止)。 我们只需要告诉MySQL,跳过这部分一样的GTID,继续复制,即可。
6.2. 处理复制错误
这里的 跳过 的方法很巧妙,步骤如下
-
1.将Slave上的
gtid_next指向执行失败的那个gtid- 这里执行失败的 gtid 报错信息中已经给出: '9dc847d8-bf72-11e7-9ec4-000c2998e4f1:73-74'
- 如果不看报错信息,可以看 Retrieved_Gtid_Set 和 Executed_Gtid_Set 的对比结果
-
2.执行一个空的事物,即
begin;commit;- 这样就把
失败的gtid对应到了一个空的事务上,这个步骤即为 “跳过” 的意思
- 这样就把
-
3.将
gtid_next设置(还原)为automatic
操作:
- slave节点
mysql root@localhost:(none)> select @@gtid_next;    -- 当前为默认值,AUTOMATIC
+-------------+
| @@gtid_next |
+-------------+
| AUTOMATIC   |
+-------------+
1 row in set
Time: 0.010s

-- 步骤1 : 设置 gtid_next 为回放失败的gtid
mysql root@localhost:(none)> set  gtid_next="9dc847d8-bf72-11e7-9ec4-000c2998e4f1:74";
Query OK, 0 rows affected
Time: 0.001s

-- 步骤2 : 执行一个空的事物,让回放失败的gtid对应到这个空的事物
mysql root@localhost:(none)> begin;
Query OK, 0 rows affected
Time: 0.000s
mysql root@localhost:(none)> commit;
Query OK, 0 rows affected
Time: 0.000s

-- -- 步骤3 : 还原gtid_next为automatic
mysql root@localhost:(none)> set  gtid_next="automatic";
Query OK, 0 rows affected
Time: 0.000s

-- -- 步骤4 : 重新启动slave
mysql root@localhost:(none)> stop slave;
Query OK, 0 rows affected
Time: 0.001s
mysql root@localhost:(none)> start slave;
Query OK, 0 rows affected
Time: 0.046s
mysql root@localhost:(none)> show slave status \G;
***************************[ 1. row ]***************************
Slave_IO_State                | Waiting for master to send event
Master_Host                   | 192.168.88.88
Master_User                   | repl
Master_Port                   | 3306
Connect_Retry                 | 60
Master_Log_File               | binlog.000014
Read_Master_Log_Pos           | 6195
Relay_Log_File                | node2-relay-bin.000005
Relay_Log_Pos                 | 357
Relay_Master_Log_File         | binlog.000014
Slave_IO_Running              | Yes
Slave_SQL_Running             | Yes
Replicate_Do_DB               |
Replicate_Ignore_DB           |
Replicate_Do_Table            |
Replicate_Ignore_Table        |
Replicate_Wild_Do_Table       |
Replicate_Wild_Ignore_Table   |
Last_Errno                    | 0
Last_Error                    |
Skip_Counter                  | 0
1 row in set
Time: 0.010s
mysql root@localhost:(none)>
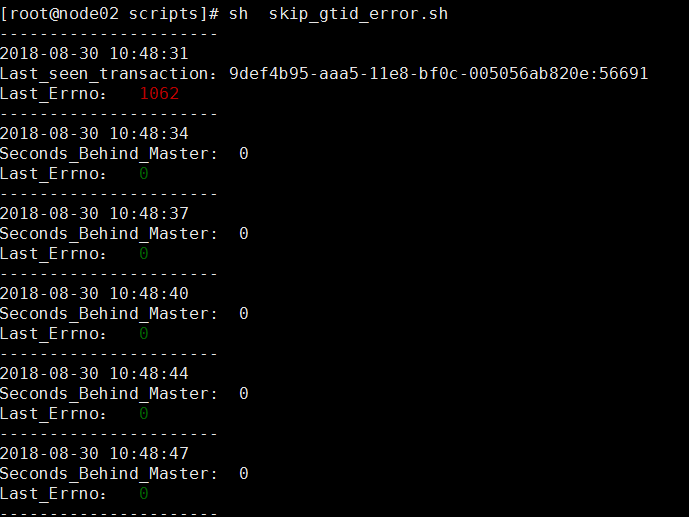
- skip_gtid_errors.sh
#!/bin/bash
# line V1.4
# mail:gczheng@139.com
# data:2020-07-03
# script_name:skip_gtid_errors.sh

user=root
pass='iforgot'
host='127.0.0.1'

for((i=1;i<1000;i++))
do
#sql21=`mysql -u${user} -p${pass} -h${host} -e "show slave status\G;" 2>/dev/null|grep -v Last_Error | grep 'executing transaction'| awk '{print $21}'`

Errno=`mysql -u${user} -p${pass} -h${host} -e "show slave status\G;" 2>/dev/null|grep 'Last_SQL_Errno' | awk -F ":" '{print $2}'`

Seconds=`mysql -u${user} -p${pass} -h${host} -e "show slave status\G;" 2>/dev/null|grep 'Seconds_Behind_Master' | awk -F ":" '{print $2}'`

Last_seen_transaction=`mysql -u${user} -p${pass} -h${host} -NBe "select LAST_SEEN_TRANSACTION from performance_schema.replication_applier_status_by_worker limit 1;" 2>/dev/null`

if [ $Errno -eq 1061 ] || [$Errno -eq 1062 ] || [$Errno -eq 1217 ] || [$Errno -eq 1050 ]
   then
        echo "----------------------------"
        echo $(date +'%Y-%m-%d %H:%M:%S')  && echo "Last_seen_transaction:${Last_seen_transaction}" &&  echo -e "Last_Errno:\033[31m ${Errno}\033[0m"
        mysql -u${user} -p${pass} -h${host} -e "STOP SLAVE;SET @@SESSION.GTID_NEXT='${Last_seen_transaction}';BEGIN; COMMIT;SET @@SESSION.GTID_NEXT = AUTOMATIC;START SLAVE;" 2>/dev/null
    else
        sleep 1
        echo "----------------------------"
        echo  $(date +'%Y-%m-%d %H:%M:%S') && echo  "Seconds_Behind_Master: ${Seconds} " &&  echo -e "Last_Errno:\033[32m ${Errno}\033[0m"
fi
done
6.3. 测试复制
-
1.Master端插入一个测试数据
- *master节点
mysql root@localhost:ttt> insert into t1 values(null);
Query OK, 1 row affected
Time: 0.007s
mysql root@localhost:ttt>
-
2.查看Slave2上的数据是否同步
- *slave节点
mysql root@localhost:(none)> select * from ttt.t1;
+---+
| a |
+---+
| 1 |
| 2 |
| 3 |
| 4 |
| 5 |   -- 立即同步过来的数据
+---+
5 rows in set
Time: 0.011s
mysql root@localhost:(none)>
至此,GTID复制出错的处理就完成了。
注意:这里仅仅是
跳过错误,和原来的sql_slave_skip_counter(该功能在GTID下失效)功能类似,无法保证主从数据是一致的(需要人工介入进行确认,比如仅仅主键一样,其他列不一样)
如果出现了很多的GTID的错误,可能是从机上有大量的操作,建议
重新搭建主从复制
但还是要在源头上避免此类情况的发生,确保在从机上开启read_only=1,并且避免人工的误操作。 最后强调:GTID是基于事务的复制,一致性要求很高, 强烈建议在 Slave 上开启 read_only=1
7. 其他注意事项
- reset slave all
使用该命令时不会清空数据,仅仅是清空show slave status\G里面的信息,所以在使用该命令之前,请先记录show slave status\G的信息。 - GTID
在开启GTID后,不能在一个事物中使用创建临时表的语句,需要使得autocommit=1;才可以。
在开启GTID后,不能使用create table select ...的语法来创建表了,因为这其实是多个事物了,GTID没法对应
七. 级联复制
1. 级联复制的介绍
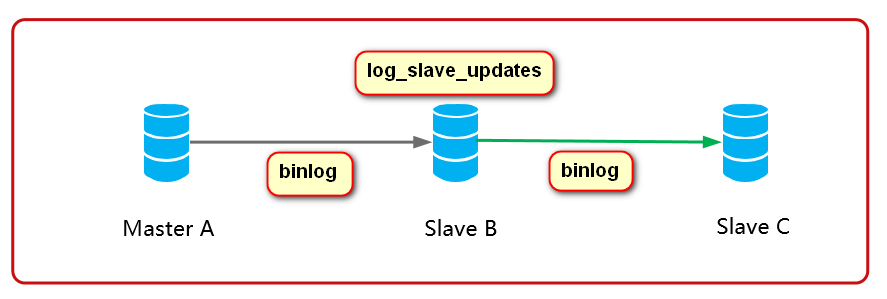
slave B 从 master A 上复制, slave C 从 salve B 上复制,此时 slave B 上就要开启 log_slave_updates 产生binlog ,没有 binlog 则无法传递给
salve c 。
master 配置log_bin参数是当变更时产生binlog, 复制关系中slave获取master的binlog写入relay-log中,slave自身不产生binlog
2. 级联复制的场景
2.1. 跨机房的复制
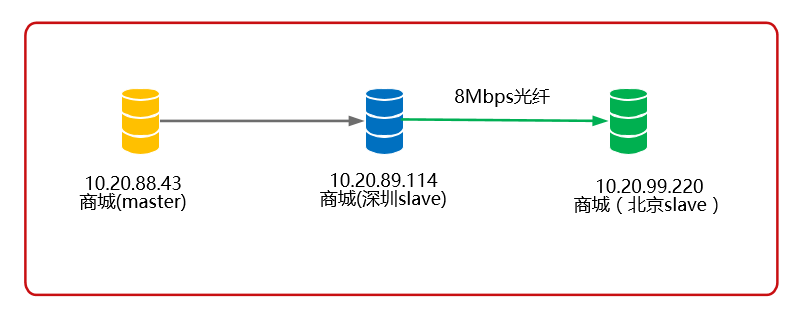
在跨机房搭建复制时,如果
master挂了,深圳slave提升为New Master,此时北京slave是不需要去做CHANGE MASTER操作的。
缺点是复制的延迟会更大(跨机房的延迟本来就很难避免)。
2.2. 库的拆分

当 生产库 压力很大时或者需要做统计分析时,需要把 逻辑库拆分出去,就可以使用 级联复制 ,让 逻辑库 形成单独的库。
3. 级联复制测试

| 配置信息 | 主库(master) | 从库(slave A) | 从库(slave B) | 从库(slave C) |
|---|---|---|---|---|
| 主机 | node1.gczheng.com | node2.gczheng.com | node3.gczheng.com | proxy.gczheng.com |
| IP | 192.168.88.88 | 192.168.88.99 | 192.168.88.100 | 192.168.88.77 |
| Port | 3306 | 3306 | 3306 | 3306 |
| MySQL版本 | MySQL5.7.18 | MySQL5.7.18 | MySQL5.7.18 | MySQL5.7.18 |
| Server_ID | 8888 | 8899 | 88100 | 8877 |
Master --> Slave A --> Slave C是级联复制,Master到Slave A 和 Master到Slave B 之前已部署完,直接做 Slave A到Slave C 的级联复制
-
1、在Master端新建一个DB名为
mts库,用于在 Slave3 上测试参数replicate_do_db。- master节点
(root@localhost) 14:54:28 [tablespace]> create database mts;
Query OK, 1 row affected (0.03 sec)

(root@localhost) 14:54:33 [tablespace]> use mts;
Database changed

(root@localhost) 14:55:34 [mts]> create table t(a int);
Query OK, 0 rows affected (0.07 sec)

(root@localhost) 14:55:38 [mts]> insert into t values(1),(2),(3);
Query OK, 3 rows affected (0.01 sec)
Records: 3  Duplicates: 0  Warnings: 0

(root@localhost) 14:56:10 [mts]> select * from mts.t;
+------+
| a    |
+------+
|    1 |
|    2 |
|    3 |
+------+
3 rows in set (0.00 sec)

(root@localhost) 14:56:22 [mts]>
- 2、在Slave C上增加如下参数
[mysqld]
report-host=192.168.88.77
# 只复制mts的库
replicate_do_db=mts
- 3、确认在slave A 已添加log_slave_updates,并建立通用账号'repl'@'192.168.88.%'
[mysqld]
log_slave_updates=1
-
4、change master
- Slave C 节点
(root@localhost) 16:19:58 [mts]> change master to master_host="192.168.88.99", master_port=3306, master_user='repl', master_password='123456', master_auto_position=1;
Query OK, 0 rows affected, 2 warnings (0.02 sec)

(root@localhost) 16:20:31 [mts]> start slave;
Query OK, 0 rows affected (0.03 sec)

(root@localhost) 16:20:38 [mts]> show slave status \G;
*************************** 1. row ***************************
               Slave_IO_State: Waiting for master to send event
                  Master_Host: 192.168.88.99
                  Master_User: repl
                  Master_Port: 3306
                Connect_Retry: 60
              Master_Log_File: binlog.000035
          Read_Master_Log_Pos: 2707
               Relay_Log_File: proxy-relay-bin.000002
                Relay_Log_Pos: 405
        Relay_Master_Log_File: binlog.000035
             Slave_IO_Running: Yes
            Slave_SQL_Running: Yes
              Replicate_Do_DB: mts
          Replicate_Ignore_DB:
           Replicate_Do_Table:
       Replicate_Ignore_Table:
      Replicate_Wild_Do_Table:
  Replicate_Wild_Ignore_Table:
                   Last_Errno: 0
                   Last_Error:
                 Skip_Counter: 0
          Exec_Master_Log_Pos: 2707
              Relay_Log_Space: 612
              Until_Condition: None
               Until_Log_File:
                Until_Log_Pos: 0
           Master_SSL_Allowed: No
           Master_SSL_CA_File:
           Master_SSL_CA_Path:
              Master_SSL_Cert:
            Master_SSL_Cipher:
               Master_SSL_Key:
        Seconds_Behind_Master: 0
Master_SSL_Verify_Server_Cert: No
                Last_IO_Errno: 0
                Last_IO_Error:
               Last_SQL_Errno: 0
               Last_SQL_Error:
  Replicate_Ignore_Server_Ids:
             Master_Server_Id: 8899
                  Master_UUID: 1951c7ee-c1fb-11e7-ac44-005056305232
             Master_Info_File: mysql.slave_master_info
                    SQL_Delay: 0
          SQL_Remaining_Delay: NULL
      Slave_SQL_Running_State: Slave has read all relay log; waiting for more updates
           Master_Retry_Count: 86400
                  Master_Bind:
      Last_IO_Error_Timestamp:
     Last_SQL_Error_Timestamp:
               Master_SSL_Crl:
           Master_SSL_Crlpath:
           Retrieved_Gtid_Set:
            Executed_Gtid_Set: 1951c7ee-c1fb-11e7-ac44-005056305232:1-17,
9dc847d8-bf72-11e7-9ec4-000c2998e4f1:1-29:47-58
                Auto_Position: 1
         Replicate_Rewrite_DB:
                 Channel_Name:
           Master_TLS_Version:
1 row in set (0.00 sec)

ERROR:
No query specified

(root@localhost) 16:20:44 [mts]>
复制关系:Master-->Slave A-->Slave C ,且使用了基于GTID的复制;
八.多源复制
1. 多源复制的介绍
多源复制 是指多主一从的复制,从 MySQL5.7.6 才有的功能,如下图所示:

在语法层面上,只是在原来的change master 的基础上,增加了 for channel 'channel_name'
2. 多源复制的演示
主机信息:
| 配置信息 | 主库(master A) | 主库(master B) | 从库(slave ) |
|---|---|---|---|
| 主机 | node1.gczheng.com | node2.gczheng.com | node3.gczheng.com |
| IP | 192.168.88.88 | 192.168.88.99 | 192.168.88.100 |
| Port | 3306 | 3306 | 3306 |
| MySQL版本 | MySQL5.7.18 | MySQL5.7.18 | MySQL5.7.18 |
| Server_ID | 8888 | 8899 | 88100 |
master A 和 master B 统一创建同步user `repl@'192.168.88.%'' password为123456
-
- master准备数据
- master A 节点
mysql root@localhost:(none)> create database dbn1;
Query OK, 1 row affected
Time: 0.011s
】
mysql root@localhost:(none)> use dbn1
You are now connected to database "dbn1" as user "root"
Time: 0.007s

mysql root@localhost:dbn1> create table tn1(a int auto_increment primary key);
Query OK, 0 rows affected
Time: 0.062s

mysql root@localhost:dbn1> insert into dbn1.tn1 values(null);
Query OK, 1 row affected
Time: 0.068s

mysql root@localhost:dbn1> insert into dbn1.tn1 values(null);
Query OK, 1 row affected
Time: 0.014s

mysql root@localhost:dbn1> select * from dbn1.tn1;
+---+
| a |
+---+
| 1 |
| 2 |
+---+
2 rows in set
Time: 0.010s

mysql root@localhost:dbn1> show master status \G;
***************************[ 1. row ]***************************
File              | binlog.000014
Position          | 3953
Binlog_Do_DB      |
Binlog_Ignore_DB  |
Executed_Gtid_Set | 9dc847d8-bf72-11e7-9ec4-000c2998e4f1:1-64 --执行到64
1 row in set
Time: 0.007s
mysql root@localhost:dbn1>
- **master B 节点**
mysql gcdb@localhost:(none)> create database dbn2;
Query OK, 1 row affected
Time: 0.010s

mysql gcdb@localhost:(none)> use dbn2;
You are now connected to database "dbn2" as user "gcdb"
Time: 0.015s

mysql gcdb@localhost:dbn2> create table tn2(a int auto_increment primary key);
Query OK, 0 rows affected
Time: 0.061s

mysql gcdb@localhost:dbn2> insert into dbn2.tn2 values(null);
Query OK, 1 row affected
Time: 0.015s

mysql gcdb@localhost:dbn2> insert into dbn2.tn2 values(null);
Query OK, 1 row affected
Time: 0.003s

mysql gcdb@localhost:dbn2> insert into dbn2.tn2 values(null);
Query OK, 1 row affected
Time: 0.003s

mysql gcdb@localhost:dbn2> insert into dbn2.tn2 values(null);
Query OK, 1 row affected
Time: 0.002s

mysql gcdb@localhost:dbn2> select * from  dbn2.tn2;
+---+
| a |
+---+
| 1 |
| 2 |
| 3 |
| 4 |
+---+
4 rows in set
Time: 0.012s

mysql gcdb@localhost:dbn2> show master status \G;
***************************[ 1. row ]***************************
File              | binlog.000001
Position          | 1687
Binlog_Do_DB      |
Binlog_Ignore_DB  |
Executed_Gtid_Set | 1951c7ee-c1fb-11e7-ac44-005056305232:1-7    --执行到7
1 row in set
Time: 0.012s
mysql gcdb@localhost:dbn2>
-
2.mysqldump 备份导出导入
- Slave 节点
[root@node3 ~]# mysqldump -ugcdb -piforgot -h192.168.88.99 -P 3306 -B dbn2 >/tmp/dbn2.sql
[root@node3 ~]# mysqldump -ugcdb -piforgot -h192.168.88.88 -P 3306 -B dbn1 >/tmp/dbn1.sql

[root@node3 tmp]# less dbn2.sql

-----------省略其他输出------------

--在恢复备份的时候,会自动执行该语句,就不需要我们手工跳过了,如果是mydumper之类的,需要手工跳过

SET @@GLOBAL.GTID_PURGED='1951c7ee-c1fb-11e7-ac44-005056305232:1-7';

------------省略其他输出------------

[root@node3 tmp]# mysql -uroot -piforgot < /tmp/dbn2.sql
mysql: [Warning] Using a password on the command line interface can be insecure.
ERROR 1840 (HY000) at line 24: @@GLOBAL.GTID_PURGED can only be set when @@GLOBAL.GTID_EXECUTED is empty.

--还是之前的问题,需要在Slave上,先操作一下 reset master ,以清空 @@GLOBAL.GTID_EXECUTED

[root@node3 tmp]# mysql -uroot -piforgot < /tmp/dbn2.sql
mysql: [Warning] Using a password on the command line interface can be insecure.

[root@node3 tmp]# mysql -uroot -piforgot < /tmp/dbn1.sql
mysql: [Warning] Using a password on the command line interface can be insecure.
ERROR 1840 (HY000) at line 24: @@GLOBAL.GTID_PURGED can only be set when @@GLOBAL.GTID_EXECUTED is empty.

[root@node3 tmp]# mysql -uroot -piforgot < /tmp/dbn1.sql
mysql: [Warning] Using a password on the command line interface can be insecure.
[root@node3 tmp]#
- 3 change master
先在Slave上设置 需要复制的库,如果不设置的话,默认会同步系统的库(mysql),这样可能会复制出错(因为master a和master b上的mysql库中可能有相同的记录)。
- Slave 节点
[mysqld]

# 只复制dbn1 和 dbn2,这个步骤很重要,且有多个时,必须分多行写

replicate_do_db=dbn1
replicate_do_db=dbn2

#mysql5.7多源复制必须添加的参数(不加报错),5.7版本之前不用加

master_info_repository=TABLE
relay_log_info_repository=TABLE
(root@localhost) 13:57:46 [(none)]> change master to master_host='192.168.88.88', master_port=3306, master_user='repl', master_password='123456', master_auto_position=1 for channel 'ch1';
Query OK, 0 rows affected, 2 warnings (0.01 sec)

(root@localhost) 13:58:12 [(none)]> change master to master_host='192.168.88.99', master_port=3306, master_user='repl', master_password='123456', master_auto_position=1 for channel 'ch2';
Query OK, 0 rows affected, 2 warnings (0.01 sec)

(root@localhost) 13:59:19 [(none)]> start slave for channel 'ch1';
Query OK, 0 rows affected (0.00 sec)

(root@localhost) 13:59:59 [(none)]> start slave for channel 'ch2';
Query OK, 0 rows affected (0.00 sec)

(root@localhost) 14:39:13 [(none)]> show slave status for channel 'ch1' \G;
*************************** 1. row ***************************
               Slave_IO_State: Waiting for master to send event
                  Master_Host: 192.168.88.88
                  Master_User: repl
                  Master_Port: 3306
                Connect_Retry: 60
              Master_Log_File: binlog.000014
          Read_Master_Log_Pos: 4349
               Relay_Log_File: node3-relay-bin-ch1.000002
                Relay_Log_Pos: 405
        Relay_Master_Log_File: binlog.000014
             Slave_IO_Running: Yes
            Slave_SQL_Running: Yes
              Replicate_Do_DB: dbn1,dbn2
          Replicate_Ignore_DB:
           Replicate_Do_Table:
       Replicate_Ignore_Table:
      Replicate_Wild_Do_Table:
  Replicate_Wild_Ignore_Table:
                   Last_Errno: 0
                   Last_Error:
                 Skip_Counter: 0
          Exec_Master_Log_Pos: 4349
              Relay_Log_Space: 616
              Until_Condition: None
               Until_Log_File:
                Until_Log_Pos: 0
           Master_SSL_Allowed: No
           Master_SSL_CA_File:
           Master_SSL_CA_Path:
              Master_SSL_Cert:
            Master_SSL_Cipher:
               Master_SSL_Key:
        Seconds_Behind_Master: 0
Master_SSL_Verify_Server_Cert: No
                Last_IO_Errno: 0
                Last_IO_Error:
               Last_SQL_Errno: 0
               Last_SQL_Error:
  Replicate_Ignore_Server_Ids:
             Master_Server_Id: 8888
                  Master_UUID: 9dc847d8-bf72-11e7-9ec4-000c2998e4f1
             Master_Info_File: mysql.slave_master_info
                    SQL_Delay: 0
          SQL_Remaining_Delay: NULL
      Slave_SQL_Running_State: Slave has read all relay log; waiting for more updates
           Master_Retry_Count: 86400
                  Master_Bind:
      Last_IO_Error_Timestamp:
     Last_SQL_Error_Timestamp:
               Master_SSL_Crl:
           Master_SSL_Crlpath:
           Retrieved_Gtid_Set:
            Executed_Gtid_Set: 9dc847d8-bf72-11e7-9ec4-000c2998e4f1:1-66
                Auto_Position: 1
         Replicate_Rewrite_DB:
                 Channel_Name: ch1
           Master_TLS_Version:
1 row in set (0.00 sec)

ERROR:
No query specified

(root@localhost) 14:41:49 [(none)]> show slave status for channel 'ch2' \G;
*************************** 1. row ***************************
               Slave_IO_State: Waiting for master to send event
                  Master_Host: 192.168.88.99
                  Master_User: repl
                  Master_Port: 3306
                Connect_Retry: 60
              Master_Log_File: binlog.000001
          Read_Master_Log_Pos: 2083
               Relay_Log_File: node3-relay-bin-ch2.000002
                Relay_Log_Pos: 801
        Relay_Master_Log_File: binlog.000001
             Slave_IO_Running: Yes
            Slave_SQL_Running: Yes
              Replicate_Do_DB: dbn1,dbn2
          Replicate_Ignore_DB:
           Replicate_Do_Table:
       Replicate_Ignore_Table:
      Replicate_Wild_Do_Table:
  Replicate_Wild_Ignore_Table:
                   Last_Errno: 0
                   Last_Error:
                 Skip_Counter: 0
          Exec_Master_Log_Pos: 2083
              Relay_Log_Space: 1012
              Until_Condition: None
               Until_Log_File:
                Until_Log_Pos: 0
           Master_SSL_Allowed: No
           Master_SSL_CA_File:
           Master_SSL_CA_Path:
              Master_SSL_Cert:
            Master_SSL_Cipher:
               Master_SSL_Key:
        Seconds_Behind_Master: 0
Master_SSL_Verify_Server_Cert: No
                Last_IO_Errno: 0
                Last_IO_Error:
               Last_SQL_Errno: 0
               Last_SQL_Error:
  Replicate_Ignore_Server_Ids:
             Master_Server_Id: 8899
                  Master_UUID: 1951c7ee-c1fb-11e7-ac44-005056305232
             Master_Info_File: mysql.slave_master_info
                    SQL_Delay: 0
          SQL_Remaining_Delay: NULL
      Slave_SQL_Running_State: Slave has read all relay log; waiting for more updates
           Master_Retry_Count: 86400
                  Master_Bind:
      Last_IO_Error_Timestamp:
     Last_SQL_Error_Timestamp:
               Master_SSL_Crl:
           Master_SSL_Crlpath:
           Retrieved_Gtid_Set: 1951c7ee-c1fb-11e7-ac44-005056305232:8-9
            Executed_Gtid_Set: 9dc847d8-bf72-11e7-9ec4-000c2998e4f1:1-66
                Auto_Position: 1
         Replicate_Rewrite_DB:
                 Channel_Name: ch2
           Master_TLS_Version:
1 row in set (0.00 sec)

ERROR:
No query specified

(root@localhost) 14:41:54 [(none)]>
-
验证
- master A 节点
mysql root@localhost:(none)> insert into dbn1.tn1 values(null);
Query OK, 1 row affected
Time: 0.013s
mysql root@localhost:(none)> insert into dbn1.tn1 values(null);
Query OK, 1 row affected
Time: 0.012s
mysql root@localhost:(none)>
- master B 节点
mysql root@localhost:(none)> insert into dbn2.tn2 values(null);
Query OK, 1 row affected
Time: 0.003s
mysql root@localhost:(none)> insert into dbn2.tn2 values(null);
Query OK, 1 row affected
Time: 0.003s
mysql root@localhost:(none)>
- slave A 节点
(root@localhost) 14:41:54 [(none)]> select * from dbn1.tn1;
+---+
| a |
+---+
| 1 |
| 2 |
| 3 |
| 4 |
+---+
4 rows in set (0.00 sec)

(root@localhost) 14:45:14 [(none)]> select * from dbn2.tn2;
+---+
| a |
+---+
| 1 |
| 2 |
| 3 |
| 4 |
| 5 |
| 6 |
+---+
6 rows in set (0.00 sec)

(root@localhost) 14:45:17 [(none)]>
至此,多源复制的主从搭建就完成了。
3.使用场景
如果 Master B 上也有一个 dbn1 的库,会有问题么?
-
如果不做额外的配置,是
会有错误的; -
如果配置了
slave_skip_errors = ddl_exist_errors,且没有重复数据话,复制关系还是正常的。这种操作可以起到
数据聚合的效果。将分库分表后的数据聚合在一起,以供其他应用进行分析(前提是数据不能有重复)。
但是最合适的场景还是将不同的库进行复制。 -
中间件的unique key
中间件可以保证分区键是唯一的(比如order_id),但是对于其他唯一索引来说,需要业务层去保证。
