

Creating Custom Shaped Windows Forms in .NET
Posted on 2010-10-28 10:40 gczhao 阅读(262) 评论(0) 编辑 收藏 举报 本文转自http://www.codeproject.com/KB/cs/customforms.aspx
Introduction
One of the niftiest aspects of Windows Forms is that you can craft them into non-rectangular shapes. Microsoft Windows Media� Player 7 exhibits this feature, and, without doubt, many developers who see this want to incorporate it into their own applications. After much searching, I finally found the answer in MSDN.
Using the code
Following are the steps to create a simple non rectangular form:
- Create a bitmap with a non-rectangular shape. This will serve as your form later on, as shown in Fig. 1.

Fig. 1
Note: Choose an easy-to-remember background color, such as black, as this will be important later on.
- In Microsoft Visual Studio .NET, create a Windows Application Project.
- Set the
FormBorderStyleproperty toNone. - Set the
BackgroundImageproperty of the form to the .bmp you created above. - Set the
TransparencyKeyproperty of the form to the background color of the .bmp file. In the case of the example above, you would set it to black. This will make the black portion of the form disappear.Note: Setting the
FormBorderStyletoNonedisables the standard functionality provided by the title bar. Thus, you must add custom code to the project to allow the form to be moved, closed, minimized, and maximized.
Writing code to close the form
- From the Toolbox, drag a
Buttoncontrol to the form as shown in Fig 2. - In the Properties window, set the
Textproperty to "X". - Double-click the
Buttonto add aClickevent handler. - Enter code similar to the following to Close the form when the button is clicked.
private void button1_Click(object sender, System.EventArgs e)
{
  this.Close();
}
- Similarly, drop another button and enter the following Code for minimizing, and enter code similar to as follows:
private void button2_Click(object sender, System.EventArgs e)
{
  this.WindowState=FormWindowState.Minimized;
}
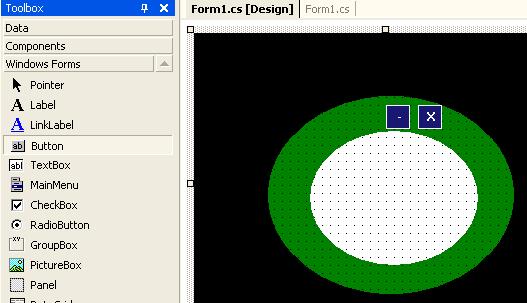 Fig. 2
Writing code to move the form
- Create a new variable:
public Point mouse_offset;This will store the mouse position when the form is clicked.
- Create an event handler for the form's
MouseDownevent. -
Fig. 3
- Enter code similar to the following to assign coordinates to the
mouse_offsetvariable based on the current position of the mouse.private void Form1_MouseDown(object sender, System.Windows.Forms.MouseEventArgs e) { mouse_offset = new Point(-e.X, -e.Y); }
- Similarly, create an event handler for the form's
MouseMoveevent. - Enter code similar to the following. When the left mouse button is clicked and the mouse is dragged, the form's
Locationproperty is set to the new position.private void Form1_MouseMove(object sender, System.Windows.Forms.MouseEventArgs e) { if (e.Button == MouseButtons.Left) { Point mousePos = Control.MousePosition; mousePos.Offset(mouse_offset.X, mouse_offset.Y); Location = mousePos; } }
Save the application. Press F5 to run it. The form will be shaped like the image you drew at the beginning. Click anywhere on the form and drag it to see the move functionality. Click the Close Form button to close the form.
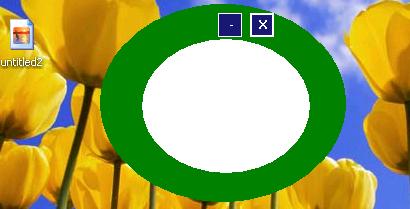
NOTE: Make Sure your VGA Card is set at 16 bit resolution.
License
This article has no explicit license attached to it but may contain usage terms in the article text or the download files themselves. If in doubt please contact the author via the discussion board below.
A list of licenses authors might use can be found here
