
mysql相关问题记录
Ubuntu安装mysql
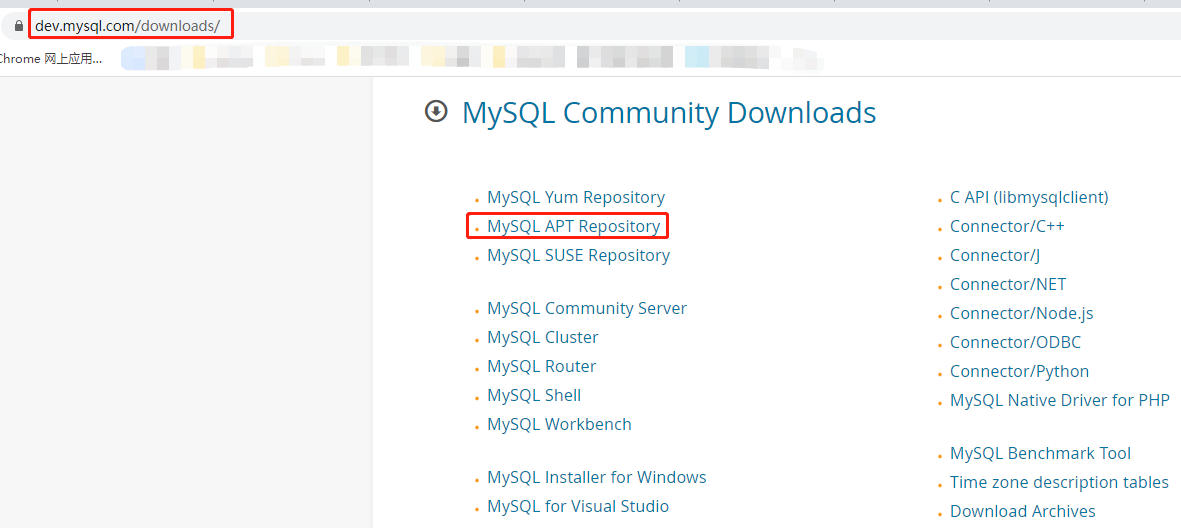
进入mysql下载官网: https://dev.mysql.com/downloads/, 目前最新版本为mysql 8.0.23
这里选择点击MySQL APT Repository即deb源的安装方式安装
进入下载页面后复制deb的下载链接, 在Ubuntu中使用wget命令下载
wget https://dev.mysql.com/get/mysql-apt-config_0.8.16-1_all.deb
下载完成后运行安装命令, 安装过程中按照提示选择就行
sudo dpkg -i mysql-apt-config_0.8.16-1_all.deb
sudo apt-get update
sudo apt-get install mysql-server
安装完成后会自动启动mysql服务
(base) alex@Aliyun-ALex:~/download$ sudo systemctl status mysql.service
● mysql.service - MySQL Community Server
     Loaded: loaded (/lib/systemd/system/mysql.service; enabled; vendor preset: enabled)
     Active: active (running) since Tue 2021-03-09 13:34:45 CST; 17s ago
       Docs: man:mysqld(8)
             http://dev.mysql.com/doc/refman/en/using-systemd.html
    Process: 3739846 ExecStartPre=/usr/share/mysql-8.0/mysql-systemd-start pre (code=exited, status=0/SUCCESS)
   Main PID: 3739898 (mysqld)
     Status: "Server is operational"
      Tasks: 38 (limit: 2318)
     Memory: 331.3M
     CGroup: /system.slice/mysql.service
             └─3739898 /usr/sbin/mysqld

Mar 09 13:34:44 Aliyun-ALex systemd[1]: Starting MySQL Community Server...
Mar 09 13:34:45 Aliyun-ALex systemd[1]: Started MySQL Community Server.
设置mysql远程连接
本台Ubuntu使用的是阿里云服务器, 在本地电脑使用Navicat并使用root连接这台mysql时连接报错:
1130, "Host 'xxxx' is not allowed to connect to this MySQL server"
这是因为root默认只能再localhost上连接, 因此需要修改允许的连接
# mysql -u root -p 登录到mysql中
# 进入mysql这个数据
use mysql;
# 查看root用户允许的host
select host from user where user='root';
# 可以看到只允许localhost
+-----------+
| host      |
+-----------+
| localhost |
+-----------+
1 row in set (0.00 sec)
# 修改host字段, 允许所有的ip都能连接
update user set host = '%' where user ='root';
# 刷新配置
flush privileges;
然后再使用本地的Navicat连接就可以成功了
安装mysqlclient
直接通过pip安装mysqlclient时会报错, 应该是缺少其他相关依赖或者是默认安装的版本不适合当前python的版本, 由于这里使用的是anaconda管理虚拟环境, 所以可以在虚拟环境中通过conda命令进行安装mysqlclient
conda install mysqlclient
conda提示下面两个包会进行安装
The following NEW packages will be INSTALLED:

  mysql-connector-c  pkgs/main/linux-64::mysql-connector-c-6.1.11-h597af5e_1
  mysqlclient        pkgs/main/linux-64::mysqlclient-2.0.3-py39h2531618_1
修改加密方式
安装完mysqlclient后, 在Django中执行数据库迁移命令时, 报错:
2059, "Authentication plugin 'caching_sha2_password' cannot be loaded: /home/alex/anaconda3/envs/dailyfresh/lib/plugin/caching_sha2_password.so: cannot open shared object file: No such file or directory"
是因为目前已有的客户端连接软件还不支持Mysql8新增加的加密方式caching_sha2_password,所以我们需要修改用户的加密方式,将其改为老的加密验证方式 mysql_native_password。
# mysql -u root -p 登录到mysql中
# 进入mysql这个数据
use mysql;
# 查看root用户的加密方式
select user,plugin from user where user='root';
# 可以看到加密方式为caching_sha2_password
+------+-----------------------+
| user | plugin                |
+------+-----------------------+
| root | caching_sha2_password |
+------+-----------------------+
1 row in set (0.00 sec)
# 执行命令将加密方式改为 mysql_native_password
alter user 'root'@'%' identified with mysql_native_password by 'root';
# 刷新配置
flush privileges;
查看mysql版本
- 在终端中
$ mysql -V
mysql  Ver 8.0.23 for Linux on x86_64 (MySQL Community Server - GPL)
- 在mysql中, 连接之后就会提示 Server version: 8.0.23
$ mysql -uroot -p
Enter password:
Welcome to the MySQL monitor.  Commands end with ; or \g.
Your MySQL connection id is 8
Server version: 8.0.23 MySQL Community Server - GPL

Copyright (c) 2000, 2021, Oracle and/or its affiliates.

Oracle is a registered trademark of Oracle Corporation and/or its
affiliates. Other names may be trademarks of their respective
owners.

Type 'help;' or '\h' for help. Type '\c' to clear the current input statement.

mysql>
或者通过SQL语句查询版本
mysql> select version();
+-----------+
| version() |
+-----------+
| 8.0.23    |
+-----------+
1 row in set (0.00 sec)
- 在Navicat中
simpysql库的报错
No module named 'DBUtils'
使用simpysql库作为ORM来操作mysql数据库, 明明安装了DBUtils, 但还是报错No module named 'DBUtils', 原因是安装的DBUtils是2.0版本, 而simpysql中的写法
from DBUtils.PooledDB import PooledDB, SharedDBConnection
是1.3版本的写法, 所以需要将DBUtils降到是1.3版本
pip install DBUtils==1.3
module 'pymysql' has no attribute 'escape_string'
使用pymysql的escape时, 有两种写法
# v1.0.0及以上
from pymysql.converters import escape_string

# v0.10.1及以下
from pymysql import escape_string
默认安装simpysql依赖时安装的pymysql是1.0.2版本, 而在simpysql中使用的却是第二种写法, 所以需要把pymysql的版本降为0.10.1
pip install pymysql==0.10.1
mysql解锁
解除正在死锁的状态有两种方法:

第一种:

1.查询是否锁表

show OPEN TABLES where In_use > 0;

2.查询进程(如果您有SUPER权限,您可以看到所有线程。否则,您只能看到您自己的线程)

show processlist;

3.杀死进程id(就是上面命令的id列)

kill id;


第二种:

1.查看下在锁的事务

SELECT * FROM INFORMATION_SCHEMA.INNODB_TRX;

2.杀死进程id(就是上面命令的trx_mysql_thread_id列)

kill 线程ID

例子:

查出死锁进程:SHOW PROCESSLIST
杀掉进程          KILL 420821;

其它关于查看死锁的命令:

1:查看当前的事务
SELECT * FROM INFORMATION_SCHEMA.INNODB_TRX;

2:查看当前锁定的事务

SELECT * FROM INFORMATION_SCHEMA.INNODB_LOCKS;

3:查看当前等锁的事务
SELECT * FROM INFORMATION_SCHEMA.INNODB_LOCK_WAITS;
数据库字符集
# 设置
CREATE DATABASE IF NOT EXISTS dbname DEFAULT CHARSET utf8;
# 查看
show variables like 'character%';
mysql中执行sql文件
source C:\test.sql
