iOS边练边学--CALayer,非根层隐式动画,钟表练习
一、CALayer
- UIView之所以能显示在屏幕上,完全是因为他内部的一个图层
- 在创建UIView对象时,UIView内部会自动创建一个图层(即CALayer对象),通过UIView的layer属性可以访问这个层
- 当UIView需要显示到屏幕上时,会调用drawRect:方法进行绘制,并且会将所有内容绘制在自己的图层上,绘图完毕后,系统会将图层拷贝到屏幕上,于是就完成了UIView的显示
- UIView本身不具备显示的功能,是他内部的层才有显示功能
二、CALayer的基本使用


三、关于CALayer的疑惑---用CGImage、CGColor 而不用UIImage、UIColor
- 首先CGImageRef、CGColorRef两种数据类型是定义在CoreGraphics框架中的
- UIColor、UIImage是定义在UIKit框架中
- 其次QuartzCore框架和CoreGraphics框架是可以跨平台使用的,在iOS和Mac OS X上都能使用,但是UIKit只能在iOS中使用
- 为了保证可移植性,QuartzCore不能使用UIImage、UIColor,只能使用CGImageRef、CGColorRef
四、UIView和CALayer的选择
- 既然CALayer和UIView都能实现相同的显示效果,那究竟该选择谁好呢?
-
- 其实,对比CALayer,UIView多了一个事件处理的功能。也就是说,CALayer不能处理用户的触摸事件,而UIView可以
-
- 所以,如果显示出来的东西需要跟用户进行交互的话,用UIView;如果不需要跟用户进行交互,用UIView或者CALayer都可以
-
- 当然,CALayer的性能会高一些,因为它少了事件处理的功能,更加轻量级
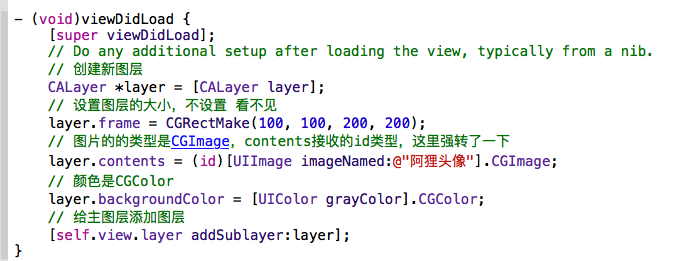
- 下面是创建新CALayer的代码,来展示图片

五、CALayer的两个重要属性 position 和 anchorPoint
- @property CGPoint position;
- 用来设置CALayer在父层中的位置
- 以父层的左上角为原点(0,0)
-
@property CGPoint anchorPoint;
- 称为“定位点”、“锚点”
- 决定着CALayer身上的那个点会在position属性所指的位置
- 以自己的左上角为原点(0,0)
- 他的x、y取值范围都是0~1,默认值为(0.5,0.5)
六、非根层的隐式动画
- 每一个UIView内部都默认关联着一个CALayer,我们可以称这个Layer为Root Layer(根层)
- 所有的非Root Layer,也就是手动创建的CALayer对象,都存在着隐式动画
什么是隐式动画?
当对非Root Layer的部分属性进行修改时,默认会自动产生一些动画效果
而这些属性称为Animatable Properties(可动画属性)
- 代码中实现的是点击屏幕,CALayer的圆角,颜色,position,边框等随机改变并做动画
- (void)viewDidLoad {
    [super viewDidLoad];
    // Do any additional setup after loading the view, typically from a nib.

    CALayer *layer = [CALayer layer];
    layer.bounds = CGRectMake(0, 0, 80, 80);
    layer.backgroundColor = [UIColor redColor].CGColor;
    layer.anchorPoint = CGPointMake(0, 0);
    layer.position = CGPointMake(150, 300);

    [self.view.layer addSublayer:layer];
    _layer = layer;
}

- (void)touchesBegan:(NSSet<UITouch *> *)touches withEvent:(UIEvent *)event
{
    _layer.transform = CATransform3DMakeRotation(angle2rotation(arc4random_uniform(360)), 0, 0, 1);


    _layer.backgroundColor = [self randomColor].CGColor;

    _layer.position = CGPointMake(arc4random_uniform(300) + 100, arc4random_uniform(500) + 100);
    _layer.borderWidth = arc4random_uniform(20);
    _layer.borderColor = [self randomColor].CGColor;
    _layer.cornerRadius = arc4random_uniform(50);
}

- (UIColor *)randomColor
{
    CGFloat r = arc4random_uniform(256) / 255.0;
    CGFloat g = arc4random_uniform(256) / 255.0;
    CGFloat b = arc4random_uniform(256) / 255.0;
    return [UIColor colorWithRed:r green:g blue:b alpha:1];
}
七、钟表的练习--难点是通过NSCalendar获取当前时间

  1 #import "ViewController.h"
  2 // 通过秒数计算秒针转过的角度
  3 #define secondRotation(second) ((second * 6) / 180.0 * M_PI)
  4 // 通过分数计算分针转过的角度
  5 #define minuteRotation(minute) ((minute * 6) / 180.0 * M_PI)
  6 // 通过时数计算时针转过的角度
  7 #define hourRotation(hour) ((hour * 30) / 180.0 * M_PI)
  8
  9 @interface ViewController ()
 10 @property (weak, nonatomic) IBOutlet UIImageView *clockView;
 11 /** second */
 12 @property(nonatomic,strong) CALayer *secondL;
 13 /** minute */
 14 @property(nonatomic,strong) CALayer *minuteL;
 15 /** hour */
 16 @property(nonatomic,strong) CALayer *hourL;
 17 @end
 18
 19 @implementation ViewController
 20
 21 - (void)viewDidLoad {
 22     [super viewDidLoad];
 23
 24     // 添加秒针
 25     [self setUpSecondLayer];
 26
 27     // 添加时针
 28     [self setUpHourLayer];
 29
 30     // 添加分针
 31     [self setUpMinuteLayer];
 32     [NSTimer scheduledTimerWithTimeInterval:1.0 target:self selector:@selector(timeChange) userInfo:nil repeats:YES];
 33     [self timeChange];
 34 }
 35
 36 - (void)timeChange
 37 {
 38     // 获取当前时间,通过秒数计算秒针的旋转弧度
 39     // 当前的日历对象,从日历对象中获取时间组件
 40     NSCalendar *calendar = [NSCalendar currentCalendar];
 41
 42     // 日历组件包含了:年月日时分秒等
 43     // 经验:以后枚举中有移位运算符,通常可以使用并运算(|)
 44     NSDateComponents *compontent = [calendar components:NSCalendarUnitSecond | NSCalendarUnitMinute | NSCalendarUnitHour fromDate:[NSDate date]];
 45
 46     NSInteger second = compontent.second;
 47     NSInteger minute = compontent.minute;
 48     NSInteger hour = compontent.hour;
 49
 50     _hourL.transform = CATransform3DMakeRotation(hourRotation(hour) + minuteRotation(minute) / 12, 0, 0, 1);
 51     _minuteL.transform = CATransform3DMakeRotation(minuteRotation(minute) + secondRotation(second) / 60, 0, 0, 1);
 52     _secondL.transform = CATransform3DMakeRotation(secondRotation(second), 0, 0, 1);
 53
 54 }
 55
 56 - (void)setUpHourLayer
 57 {
 58     // 获取钟表的宽高
 59     CGFloat clockWH = _clockView.frame.size.height * 0.5;
 60     // 创建时针的图层
 61     CALayer *hourL = [CALayer layer];
 62     hourL.bounds = CGRectMake(0, 0, 6, clockWH - 40);
 63     hourL.backgroundColor = [UIColor blackColor].CGColor;
 64     hourL.position = CGPointMake(clockWH, clockWH);
 65     hourL.anchorPoint = CGPointMake(0.5, 1);
 66     hourL.cornerRadius = 3;
 67
 68     [_clockView.layer addSublayer:hourL];
 69     _hourL = hourL;
 70 }
 71
 72 - (void)setUpMinuteLayer
 73 {
 74     // 获取钟表的宽高
 75     CGFloat clockWH = _clockView.frame.size.height * 0.5;
 76     // 创建分针的图层
 77     CALayer *minuteL = [CALayer layer];
 78     minuteL.bounds = CGRectMake(0, 0, 6, clockWH - 30);
 79     minuteL.backgroundColor = [UIColor blackColor].CGColor;
 80     minuteL.position = CGPointMake(clockWH, clockWH);
 81     minuteL.anchorPoint = CGPointMake(0.5, 1);
 82     minuteL.cornerRadius = 3;
 83
 84     [_clockView.layer addSublayer:minuteL];
 85     _minuteL = minuteL;
 86 }
 87
 88 - (void)setUpSecondLayer
 89 {
 90     // 获取钟表的宽高
 91     CGFloat clockWH = _clockView.frame.size.height * 0.5;
 92     // 创建秒针的图层
 93     CALayer *secondL = [CALayer layer];
 94     secondL.bounds = CGRectMake(0, 0, 2, clockWH - 20);
 95     secondL.backgroundColor = [UIColor redColor].CGColor;
 96     secondL.position = CGPointMake(clockWH, clockWH);
 97     secondL.anchorPoint = CGPointMake(0.5, 1);
 98
 99     [_clockView.layer addSublayer:secondL];
100     _secondL = secondL;
101 }
102
103 - (void)didReceiveMemoryWarning {
104     [super didReceiveMemoryWarning];
105     // Dispose of any resources that can be recreated.
106 }
107
108 @end


