vue2+vite初体验
前言
自从 vite 发布之后,社区赞誉无数,而我也一直心水 vite 的轻量快速的热重载的特性,特别是公司的项目巨大,已经严重拖慢了热重载的速度了,每次热重载都要等上一小会,所以急需寻找一个解决方案。也发现自己很久没更新博客了,顺手更新一篇下 😢
虽然,我们通过 webpack 配置,指定了在本地加载的路由,使得热更新更加迅速一些,但是仍然是远远不够的。所以就想着使用 vite 进行尝试了。
const fs = require("fs");
const path = require("path");
function resolve(dir) {
  return path.join(__dirname, dir);
}
const isLocal = process.env.LOCAL === "true";
module.exports = {
  chainWebpack: (config) => {
    if (isLocal && fs.existsSync(resolve("/src/mainDev.js"))) {
      config.entry("app").clear().add("./src/mainDev.js");
    }
  },
};
ps: 我的理想的方案是:
webpack仍然作为打包工具,vite作为开发工具。因为我仍然觉得webpack还是当下构建webapp的最佳实践(带有代码拆分,旧浏览器的 Legecy-build)。所以,我会尽量在vite和webpack环境下维护一份配置。
ps: 为了更加无缝的迁移 Vite,这里使用了 vue-cli 插件,即 vue-cli-plugin-vite
本次教程可能过于啰嗦,可以先到gitee、github下载体验,也可到文末直接下载代码先自行体验。。。
特别说明:项目使用的 Node 版本为 14.17.6,Node10 项目的版本为 10.15.3,皆为 Node 稳定版本
初步体验
有了这个想法,当然就打开官网直接开干呀,打开搭建第一个 Vite 项目,发现 Vite 需要 Node.js 版本 >= 12.0.0,而我公司用的是 Node10 稳定版。
哦豁 😢!!看到这里,本以为本次迁移就到此结束了~~。
Node10 尝试(可选)
当然,我抱着尝着一试的心态,在 Node10 中运行 Vite,然后出现报错了,具体如下:
Error: Cannot find module 'worker_threads'
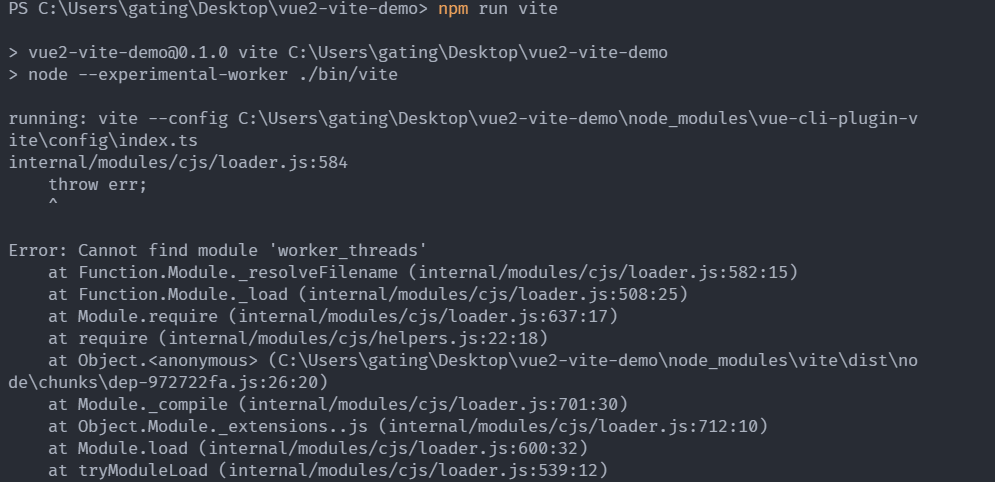
所以我 google 搜索了下 答案,发现 Node10.5 就支持了 workers,不过 Node12 是自动开启,而 Node10 是需要手动开启,所以这边做了如下修改(伪代码):
{
  "scripts": {
    "vite": "node --experimental-worker ./bin/vite"
  }
}
然后- -,Vite 底层出现了新的报错,因为 Vite 的使用了数组的 flat 方法。

所以我们需要对 Vite 进行 Babel 的编译,所以我们需要安装一下 @babel/node,npm i @babel/node -D,伪代码:
{
  "scripts": {
    "vite": "babel-node --experimental-worker ./bin/vite"
  }
}
然后就可以愉快的运行啦
ps: 因为这里使用的是 vue-cli-plugin-vite,他是使用 cross-spawn 执行脚本的,所以这里的 babel-node --experimental-worker 在 scripts 无效,需要在 ./bin/vite 文件里编写,具体参考这个链接-GITEE、这个链接-GITHUB
开始搭建
为了大家尽可能的少改 webpack,我的案例中也覆盖了相对多的常用配置,比如:
- scss 变量注入
- 环境变量的使用
- 使用别名 alias
- 配置 resolve externals
- 使用 jsx
- require 语法
- devServer
- require.context 语法兼容
ps: 兼容这些虽然多数都是 vue-cli-plugin-vite 做的事,但是就是想着大家可以拿来即用 😂,更多兼容参考vue-cli-plugin-vite
为了更好的编写体验,这里提供一个基础的 vue-cli 的demo,可以 download 下来一起尝试编写一下。
安装 vue-cli-plugin-vite
在当前项目打开终端,运行:
vue add vite
忽略 .vue 拓展名
这里后你会发现项目里多了 bin/vite 文件,package.json 的 scripts 也多少了一个 vite 的命令,运行:
npm run vite
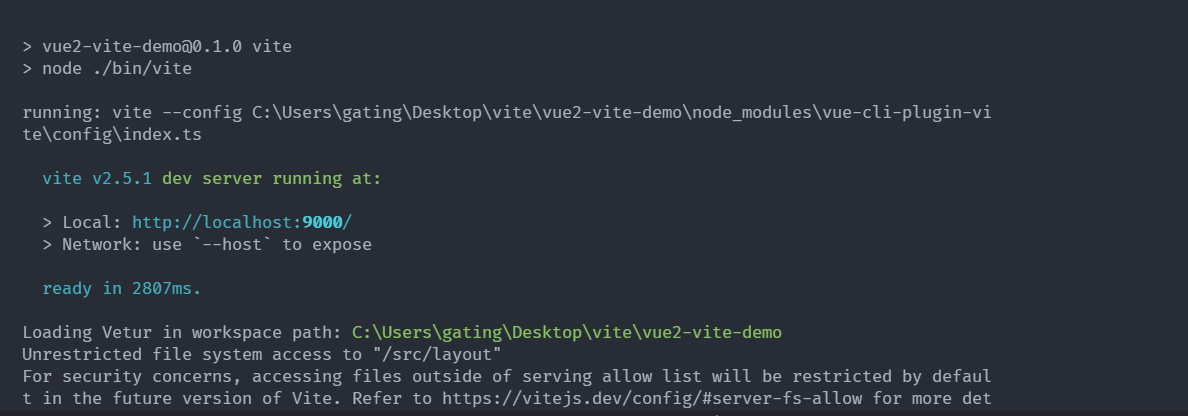
Unrestricted file system access to "/src/layout",这个报错说明找不到这个文件,可是我们看,我们明明有layout/index.vue,但是却报找不到,这是为什么呢?这是因为 Vite 的 resolve.extensions 默认的 .vue 的后缀名,官方也不推荐自定义导入类型的扩展名,因为它会影响 IDE 和类型支持。(查看链接)
当然,我们为了兼容以前的旧项目,还是需要配置的,所以我们需要更新下我们的配置,在vue.config.js中补上 resolve.extensions 的配置,代码如下:
module.exports = {
  // ...
  configureWebpack: {
    resolve: {
      extensions: [".mjs", ".js", ".ts", ".jsx", ".tsx", ".json", ".vue"],
    },
  },
  // ...
};
ps: 小插曲,之前测试的时候发现配了 resolve.extensions 也没有效果,然后翻阅 Vite 文档,发现 Vite 是支持的,但是 vue-cli-plugin-vite 不支持,所以我给作者提了个 Issue,现在也支持了,感谢作者~~
JSX 语法处理
添加完后,再次运行:
npm run vite
发现又报了如下错误:

翻译来说就是说你在 .vue 文件中用了无效的 js 语法(即 JSX),这里就就需要我们在 vue 的 sfc 组件中还得加上 jsx 标识,即(src/components/HelloWorld.vue):
<script lang="jsx">
  import Test from "./Test";
  export default {
    name: "HelloWorld",
    components: {
      Test,
      TestJsx: {
        render() {
          return <div>我是vue文件的JSX渲染的</div>;
        },
      },
    },
    props: {
      msg: String,
    },
  };
</script>
修改完后再次运行,发现又报错了,而且这个错误和上面的还很类似。不过只是说我们在 .js 文件中用了无效的 js 语法(即 JSX),如果您使用的是 JSX 请确保将文件命名为.JSX 或.tsx 扩展名。

js 中不支持 jsx 的原因,尤大也在 issue 有过说明,具体参考这个链接
所以,我们只需要把 .js 文件的后缀名修改为 .jsx 即可
修改完后,再次运行:
npm run vite
这里会发现,浏览器报 require is not defined,这里我们先把 Home.vue 文件的 require 注释掉先(require 的问题下面会讲到),代码如下:
<script>
  // @ is an alias to /src
  import HelloWorld from "@comp/HelloWorld";
  // const { sum } = require('../utils/index')

  export default {
    name: "Home",
    components: {
      HelloWorld,
    },
    methods: {
      handleClick() {
        // console.log(sum(1, 32))
      },
    },
  };
</script>
出现如下报错:

因为我们虽然设置了一堆使用 jsx 的配置,但是没有在插件上配置开启 jsx(即不设置 vitePluginVue2Options: { jsx: true }),所以需要在 vue.config.js 编写下 vite 的配置啦(终于开始配置 vite 了),相关 issue
module.exports = {
  pluginOptions: {
    vite: {
      /**
       * Plugin[]
       * @default []
       */
      plugins: [], // other vite plugins list, will be merge into this plugin\'s underlying vite.config.ts
      /**
       * Vite UserConfig.optimizeDeps options
       * recommended set `include` for speedup page-loaded time, e.g. include: ['vue', 'vue-router', '@scope/xxx']
       * @default {}
       */
      optimizeDeps: {},
      /**
       * type-checker, recommended disabled for large-scale old project.
       * @default false
       */
      disabledTypeChecker: true,
      /**
       * lint code by eslint
       * @default false
       */
      disabledLint: false,
      /**
       * enable css-loader url resolve compat
       * disabled it if you do not use `~@/assets/logo.png` for better performance.
       * @default true
       */
      cssLoaderCompat: true,
      vitePluginVue2Options: {
        jsx: true,
      },
    },
  },
};
再次运行,发现可以打开页面了
总结:在 vite 中使用 jsx 还是稍微有点麻烦的,一是使用到 jsx 语法的 js 文件都必须改成使用 jsx 后缀名,二是在 vue 的 sfc 组件中还得加上 jsx 标识(仅仅引入一个 .jsx 文件 不需要加上)
require 语法处理
把 require 的注释打开,再次运行,f12 打开控制台,出现如下错误:

因为 vite 不支持 require 的,那么怎么解决呢?这时候就需要使用 vite 插件了。
这里说说我是怎么找这些插件的吧,通常不知道怎么办的时候,就去 npm 搜索一下关键字 vite commonjs,然后看下这些插件的下载量,率先选择最高的那个使用,这里发现 @originjs/vite-plugin-commonjs 这个周下载量有 2000+。所以这里就尝试使用这个了,发现一试还真成了。
所以,接下来就跟着我一起安装并且配置一下吧。
npm install @originjs/vite-plugin-commonjs -D
const { viteCommonjs } = require("@originjs/vite-plugin-commonjs");
module.exports = {
  pluginOptions: {
    vite: {
      plugins: [
        viteCommonjs({
          // lodash不需要进行转换
          exclude: ["lodash"],
        }),
      ],
    },
  },
};
ps: 但是标签上的 require 并不支持,所以建议全面拥抱 ES Module
ps: 路由使用
resolve => require(['../components/views/Home.vue'], resolve)导入的,可以通过 vscode 使用下面的正则全局替换
搜索:\(?resolve\)?\s*=>\s*require\(\[(.\*)\], resolve\)
替换:() => import($1)
scss 变量注入
重新运行一下,发现啥问题都没有,看着一切正常,这时候我觉得 HelloWorld 组件缺点样式,我想美化一样,比如修改下字体颜色、文字大小啥的。
所以我对 HelloWorld 组件添加了样式,进行了如下修改:
<template>
  <div class="hello">
    <h1 class="h1">{{ msg }}</h1>
    <test />
    <test-jsx />
  </div>
</template>

<script lang="jsx">
  import Test from "./Test";
  export default {
    name: "HelloWorld",
    components: {
      Test,
      TestJsx: {
        render() {
          return <div>我是vue文件的JSX渲染的</div>;
        },
      },
    },
    props: {
      msg: String,
    },
  };
</script>

<style lang="scss" scoped>
  .h1 {
    font-size: 30px;
    color: skyblue;
  }
  .hello {
    @include bgCover("@/assets/logo.png");
  }
</style>
还没开始写呢,控制台就一堆报错:

猜测是使用了别名导入 scss 后,识别到 url() 后就会输出相对路径,所以这边在 vite 环境时候,使用 src/styles 导入即可,具体 vue.config.js 修改如下:
// npm 正在执行哪个 script,npm_lifecycle_event 就返回当前正在运行的脚本名称。
const isVite = process.env.npm_lifecycle_event.startsWith("vite");

// 兼容vite
function getAdditionalData(str) {
  if (isVite) {
    return str.replace(/@style\//, "src/styles/");
  }
  return str;
}

module.exports = {
  css: {
    requireModuleExtension: true,
    loaderOptions: {
      scss: {
        // 注意:在 sass-loader v7 中,这个选项名是 "data" 官网文档还是prependData   此项目用的7+版本
        // 注意:在 sass-loader v10 使用 additionalData,这里为了兼容vite,所以升级了sass-loader@10
        additionalData: getAdditionalData(`@import '@style/variables.scss';`),
      },
    },
  },
};
ps: 这里也有个小知识点,我们可以通过 npm_lifecycle_event 来获取我们执行了的脚本名称,通过 npm_lifecycle_script 获取执行了什么命令
script 指定环境
通常我们会有 beta、pre、dev 好几个环境,在 vue-cli 开发的时候我们通过会通过 --mode env 指定我们本地的开发环境,现在我们也尝试在 scripts 中的 vite 指定 staging 环境,发现并没有效果:
{
  "scripts": {
    "vite": "node ./bin/vite --mode staging"
  }
}
这是为什么呢?打开 bin/vite 文件一看,发现 使用 cross-spawn 执行脚本的,所以 --mode staging 这个参数根本就没有获取,那么我们怎么可以获取呢?
其实我们可以通过 process.argv 获取我们执行的命令的参数,打印一下发现 argv 是个数组,而我们需要的是最后那两个,所以这里需要进行如下修改(bin/vite):
#!/usr/bin/env node

const path = require("path");
const spawn = require("cross-spawn");
const configPath = require.resolve("vue-cli-plugin-vite/config/index.ts");
const cwd = path.resolve(__dirname, "../");

const params = [
  `${process.env.BUILD ? "build" : ""}`,
  process.env.VITE_DEBUG ? "--debug" : "",
  "--config",
  `${configPath}`,
  ...process.argv.slice(2),
].filter(Boolean);

console.log(`running: vite ${params.join(" ")}`);
const serveService = spawn("vite", params, {
  cwd,
  stdio: "inherit",
});

serveService.on("close", (code) => {
  process.exit(code);
});
至此,我们的 vite 命令也可以指定开发环境啦 😉
额外知识点 - keep-alive 使用动态 key 时,热更新无效
一般的后台管理肯定需要 keep-alive 这个组件,比如我们 layout 组件上就是用了 keep-alive,但是你会发现在你使用 keep-alive 的时候,页面却没有热更新,这个不是 vite 的问题,也不是 webpack 的问题,这是 Vue 的问题(当然也有相关 issue),而且这个 issue 已经从 18 年就开始有了,且现在仍然是 open 状态(相关 issue)
参考评论和 issue,我们也可以编写一个只在开发环境中使用的 keep-alive 组件了。
创建 plugins/keep-alive.js 文件,编写如下代码:
import { isArray, isRegExp } from "lodash";
function remove(arr, item) {
  if (arr.length) {
    var index = arr.indexOf(item);
    if (index > -1) {
      return arr.splice(index, 1);
    }
  }
}
function isDef(v) {
  return v !== undefined && v !== null;
}
function isAsyncPlaceholder(node) {
  return node.isComment && node.asyncFactory;
}

function getFirstComponentChild(children) {
  if (isArray(children)) {
    for (let i = 0; i < children.length; i++) {
      let c = children[i];
      if (isDef(c) && (isDef(c.componentOptions) || isAsyncPlaceholder(c))) {
        return c;
      }
    }
  }
}

function getComponentName(opts) {
  return opts && (opts.Ctor.options.name || opts.tag);
}

function matches(pattern) {
  if (isArray(pattern)) {
    return pattern.indexOf(name) > -1;
  } else if (typeof pattern === "string") {
    return pattern.split(",").indexOf(name) > -1;
  } else if (isRegExp(pattern)) {
    return pattern.test(name);
  }
  /* istanbul ignore next */
  return false;
}

function pruneCache(keepAliveInstance, filter) {
  const { cache, keys, _vnode } = keepAliveInstance;
  for (const key in cache) {
    const entry = cache[key];
    if (entry) {
      const name = entry.name;
      if (name && !filter(name)) {
        pruneCacheEntry(cache, key, keys, _vnode);
      }
    }
  }
}

function pruneCacheEntry(cache, key, keys, current) {
  const entry = cache[key];
  if (entry && (!current || entry.tag !== current.tag)) {
    entry.componentInstance.$destroy();
  }
  cache[key] = null;
  remove(keys, key);
}

export default {
  install(app) {
    //只在开发模式下生效
    if (process.env.NODE_ENV === "development") {
      /**
       * Remove an item from an array.
       */

      const patternTypes = [String, RegExp, Array];

      const KeepAlive = {
        name: "keep-alive",
        abstract: true,

        props: {
          include: patternTypes,
          exclude: patternTypes,
          max: [String, Number],
        },

        methods: {
          cacheVNode() {
            const { cache, keys, vnodeToCache, keyToCache } = this;
            if (vnodeToCache) {
              const { tag, componentInstance, componentOptions } = vnodeToCache;
              cache[keyToCache] = {
                name: getComponentName(componentOptions),
                tag,
                componentInstance,
                cid: vnodeToCache.cid,
              };
              keys.push(keyToCache);
              // prune oldest entry
              if (this.max && keys.length > parseInt(this.max)) {
                pruneCacheEntry(cache, keys[0], keys, this._vnode);
              }
              this.vnodeToCache = null;
            }
          },
        },

        created() {
          this.cache = Object.create(null);
          this.keys = [];
        },

        destroyed() {
          for (const key in this.cache) {
            pruneCacheEntry(this.cache, key, this.keys);
          }
        },

        mounted() {
          this.cacheVNode();
          this.$watch("include", (val) => {
            pruneCache(this, (name) => matches(val, name));
          });
          this.$watch("exclude", (val) => {
            pruneCache(this, (name) => !matches(val, name));
          });
        },

        updated() {
          this.cacheVNode();
        },

        render() {
          const slot = this.$slots.default;
          const vnode = getFirstComponentChild(slot);
          const componentOptions = vnode && vnode.componentOptions;
          if (componentOptions) {
            vnode.cid = componentOptions.Ctor.cid;
            // check pattern
            const name = getComponentName(componentOptions);
            const { include, exclude } = this;
            if (
              // not included
              (include && (!name || !matches(include, name))) ||
              // excluded
              (exclude && name && matches(exclude, name))
            ) {
              return vnode;
            }
            const { cache, keys } = this;
            const key =
              vnode.key == null
                ? // same constructor may get registered as different local components
                  // so cid alone is not enough (#3269)
                  componentOptions.Ctor.cid +
                  (componentOptions.tag ? `::${componentOptions.tag}` : "")
                : vnode.key;
            if (cache[key]) {
              if (vnode.cid === cache[key].cid) {
                vnode.componentInstance = cache[key].componentInstance;
                // make current key freshest
                remove(keys, key);
                keys.push(key);
              } else {
                cache[key].componentInstance.$destroy();
                cache[key] = vnode;
              }
            } else {
              // delay setting the cache until update
              this.vnodeToCache = vnode;
              this.keyToCache = key;
            }
            vnode.data.keepAlive = true;
          }
          return vnode || (slot && slot[0]);
        },
      };

      app.component("keep-alive", KeepAlive);
    }
  },
};
在 main.js 引入:
import KeepAlive from "./plugins/keep-alive";
Vue.use(KeepAlive);
这样子,我们的 keep-alive 就具有热更新功能啦ヾ(≧▽≦*)
未解决的问题
ps: vue-cli-plugin-vite 插件中的 vite 是锁定 vite@2.5.1 版本的相关 issue,而这个 issue 的 相关 pr 是 2.5.3 版本才 merge,不过我尝试使用 vite@2.5.3 也没有成功
ps: 看了下源代码,github上的源码已经 merge 了,但是 npm 上部分包仍然没有发布,比如@vitejs/plugin-vue、@vitejs/plugin-vue-jsx,猜测下个版本应该就能实现 jsx in sfc 的热更新了 😍。
不过我们也可以将 pr 的源码复制到 node_modules 里也可提前体验 jsx in sfc 的热更新🤞
总结
虽然- -这里没有用实际项目对比,也没有实际的数据对比,但是大家可以 download 那个配置在自己项目体验一下,迁移起来还是比较简单的。如果有什么问题欢迎大家留言进行交流~~
最后再强调,在 vite 中使用 jsx 语法的话,一是使用到 jsx 语法的 js 文件都必须改成使用 jsx 后缀名,二是在 vue 的 sfc 组件中还得加上 jsx 标识(仅仅引入一个 .jsx 文件 不需要加上)
仓库代码链接如下:
最后
虽然本文罗嗦了点,但还是感谢各位观众老爷的能看到最后 O(∩_∩)O 希望你能有所收获 😁

 浙公网安备 33010602011771号