处理时间序列数据
这一篇,我也不知道都记了个啥,待我整理一下
time series
时间序列数据就是随着时间发展变化(不变化)的数据
时间序列图
可以画共轴的子图,查看多个属性随时间变化的趋势
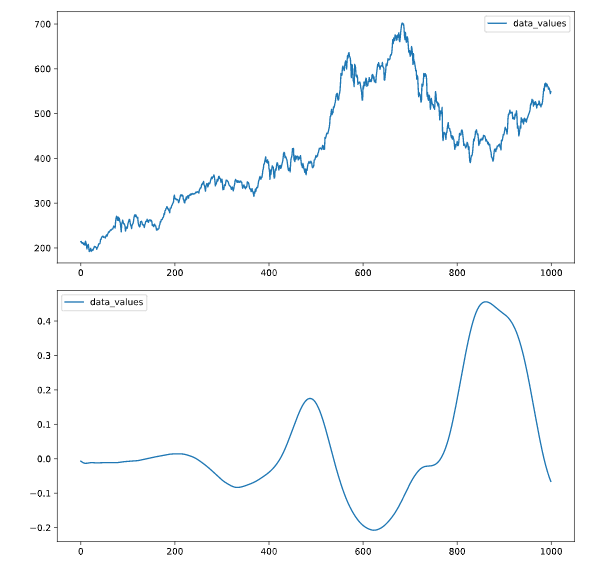
# Plot the time series in each dataset
fig, axs = plt.subplots(2, 1, figsize=(5, 10))
data.iloc[:1000].plot(y='data_values', ax=axs[0])
data2.iloc[:1000].plot(y='data_values', ax=axs[1])
plt.show()
我再一次复习pd[[]]可以同时提取数据框的子集
双中括号提取子列*
from sklearn.svm import LinearSVC

# Construct data for the model
X = data[["petal length (cm)" , "petal width (cm)"]]
y = data[['target']]

# Fit the model
model = LinearSVC()
model.fit(X, y)
还有就是想画在一个图的,公用y轴,如上述
reshape
给定数组或者数据框一个新的形状而不改变数据
其中常见的就是reshape(-1,1):数据集可以变成一列,之前matlab处理图像时候也有一个函数,忘记叫啥了,把像素归为一列
predict
一般拟合完模型,进行预测,可直接使用predict
glob
glob模块的主要方法就是glob,该方法返回所有匹配的文件路径列表(list);该方法需要一个参数用来指定匹配的路径字符串(字符串可以为绝对路径也可以为相对路径),其返回的文件名只包括当前目录里的文件名,不包括子文件夹里的文件。
librosa
librosa是一个非常强大的python语音信号处理的第三方库cnblog
librosa.stft短时傅里叶变化
amplitude_to_db:将普通振幅谱图转为db谱图。
import librosa as lr
from glob import glob

# List all the wav files in the folder
audio_files = glob(data_dir + '/*.wav')

# Read in the first audio file, create the time array
audio, sfreq = lr.load(audio_files[0])
time = np.arange(0, len(audio)) / sfreq

# Plot audio over time
fig, ax = plt.subplots()
ax.plot(time, audio)
ax.set(xlabel='Time (s)', ylabel='Sound Amplitude')
plt.show()
{{uploading-image-900268.png(uploading...)}}
pd.to_datatime()
可以指定时间索引列
# Read in the data
data = pd.read_csv('prices.csv', index_col=0)

# Convert the index of the DataFrame to datetime
data.index = pd.to_datetime(data.index)
print(data.head())

# Loop through each column, plot its values over time
fig, ax = plt.subplots()
for column in data.columns:
    data[column].plot(ax=ax, label=column)
ax.legend()
plt.show()
raw data
补充几个函数
在训练模型之前需要可视化原始数据
arrange
numpy中的arrange主要用于生成数组,而不是和R一样进行排序
np.vstack():在竖直方向上堆叠
np.hstack():在水平方向上平铺
Numpy 中 arange() 主要是用于生成数组
.T.ravel() transposes the array, then unravels it into a 1-D vector for looping
fig,ax = plt.subplots()等价于:
fig = plt.figure()
ax = fig.add_subplot(1,1,1)
fig, ax = plt.subplots(1,3),其中参数1和3分别代表子图的行数和列数,一共有 1x3 个子图像。函数返回一个figure图像和子图ax的array列表。
fig, ax = plt.subplots(1,3,1),最后一个参数1代表第一个子图。
如果想要设置子图的宽度和高度可以在函数内加入figsize值
fig, ax = plt.subplots(1,3,figsize=(15,7)),这样就会有1行3个15x7大小的子图。csdn
.squeeze()
用法:numpy.squeeze(a,axis = None)
这个函数的作用是去掉矩阵里维度为1的维度
1)a表示输入的数组;
2)axis用于指定需要删除的维度,但是指定的维度必须为单维度,否则将会报错;
3)axis的取值可为None 或 int 或 tuple of ints, 可选。若axis为空,则删除所有单维度的条目;
4)返回值:数组
5) 不会修改原数组
emmm。。。感觉这个视频是讲语音识别
.rolling 计算窗口数据
为什么要使用滑动窗口数据呢
时点的数据波动较大,某一点的数据不能很好的表现它本身的特性,于是我们就想,能否用一个区间的的数据去表现呢,这样数据的准确性是不是更好一些呢?因此,引出滑动窗口(移动窗口)的概念,简单点说,为了提升数据的可靠性,将某个点的取值扩大到包含这个点的一段区间,用区间来进行判断,这个区间就是窗口。
这里还是不太理解语音处理的东东,我回头可以补一下,但是这个视频里面基本都是用语音数据做的栗子
column_stack
将两个矩阵按列合并
row_stack
s所以有了按行合并
# Calculate stats
        means = np.mean(audio_rectified_smooth, axis=0)
        stds = np.std(audio_rectified_smooth, axis=0)
        maxs = np.max(audio_rectified_smooth, axis=0)

        # Create the X and y arrays
        X = np.column_stack([means, stds, maxs])
        y = labels.reshape([-1, 1])
        print(X)
        print(y)
        # Fit the model and score on testing data
        from sklearn.model_selection import cross_val_score
        percent_score = cross_val_score(model, X, y, cv=5)
        print(np.mean(percent_score))
[[ 0.04353008  0.07578418  0.35248821]
 [ 0.04553973  0.0791786   0.35960806]
 [ 0.05176417  0.07091632  0.40621971]
 [ 0.00803776  0.03164058  0.24943082]
 [ 0.01602636  0.03359184  0.28992118]
 [ 0.05924991  0.07396314  0.52032055]
 [ 0.00519226  0.00319128  0.0277168 ]
 [ 0.02953012  0.05827377  0.3217972 ]
 [ 0.04101763  0.0733102   0.36731579]
 [ 0.05427804  0.07413921  0.35716804]
 [ 0.00446486  0.00852908  0.03834081]
 [ 0.00312972  0.00461101  0.03460813]
 [ 0.00779525  0.01186303  0.13859426]
 [ 0.05828067  0.08492477  0.35801228]
 [ 0.05789107  0.07687476  0.36183574]
 [ 0.03836938  0.05989346  0.26996217]
 [ 0.00733513  0.01003482  0.07249809]
 [ 0.0009587   0.00297103  0.0412318 ]
 [ 0.00869117  0.00679164  0.04508755]
 [ 0.04969265  0.0804132   0.36128269]
 [ 0.00128295  0.0041209   0.03417803]
 [ 0.0140563   0.01755791  0.11556826]
 [ 0.01933001  0.03507407  0.17939707]
 [ 0.06548801  0.09258776  0.44716162]
 [ 0.00685793  0.00780096  0.0634609 ]
 [ 0.01374334  0.01643459  0.12155181]
 [ 0.00168918  0.00469773  0.03637446]
 [ 0.00299758  0.00464594  0.02329937]
 [ 0.0142429   0.01727787  0.13869272]
 [ 0.03688358  0.06889274  0.35827821]
 [ 0.00407022  0.00975748  0.04922746]
 [ 0.02563171  0.04603735  0.26422961]
 [ 0.0018326   0.00372465  0.01948485]
 [ 0.00124721  0.00277674  0.01798531]
 [ 0.04088449  0.03965533  0.22090677]
 [ 0.01384189  0.02448468  0.22764168]
 [ 0.05830874  0.06938113  0.40844402]
 [ 0.04416311  0.0767876   0.36022628]
 [ 0.01682764  0.03080363  0.19444591]
 [ 0.00122269  0.00272168  0.02165299]
 [ 0.01820436  0.02154413  0.11244557]
 [ 0.0673602   0.07223675  0.41148773]
 [ 0.00753291  0.00998298  0.07238273]
 [ 0.00766106  0.03013048  0.22280851]
 [ 0.03675919  0.06815149  0.3529018 ]
 [ 0.0469868   0.07855918  0.35687109]
 [ 0.07950674  0.08071161  0.48732442]
 [ 0.03037102  0.05754939  0.40854636]
 [ 0.0024377   0.00351598  0.02560532]
 [ 0.01508713  0.01689354  0.09557459]
 [ 0.08335246  0.05728218  0.33726584]
 [ 0.02132238  0.04218739  0.26207528]
 [ 0.03784088  0.04710566  0.32966906]
 [ 0.01718835  0.01782527  0.13329974]
 [ 0.03501877  0.03843854  0.31367514]
 [ 0.03982823  0.04933426  0.22437602]
 [ 0.09964255  0.11005431  0.44836947]
 [ 0.00714682  0.01124386  0.05884965]
 [ 0.07672997  0.08275399  0.36290682]
 [ 0.04954006  0.08006467  0.36331815]]
[['murmur']
 ['murmur']
 ['murmur']
 ['normal']
 ['normal']
 ['murmur']
 ['normal']
 ['normal']
 ['murmur']
 ['murmur']
 ['normal']
 ['murmur']
 ['normal']
 ['murmur']
 ['murmur']
 ['normal']
 ['normal']
 ['normal']
 ['normal']
 ['murmur']
 ['normal']
 ['normal']
 ['murmur']
 ['murmur']
 ['normal']
 ['normal']
 ['normal']
 ['normal']
 ['murmur']
 ['murmur']
 ['murmur']
 ['normal']
 ['normal']
 ['normal']
 ['normal']
 ['murmur']
 ['murmur']
 ['murmur']
 ['normal']
 ['normal']
 ['normal']
 ['murmur']
 ['murmur']
 ['normal']
 ['murmur']
 ['murmur']
 ['murmur']
 ['murmur']
 ['normal']
 ['normal']
 ['murmur']
 ['normal']
 ['normal']
 ['murmur']
 ['murmur']
 ['normal']
 ['murmur']
 ['murmur']
 ['murmur']
 ['murmur']]
0.716666666667
.item()
Python 字典 items() 函数作用:以列表返回可遍历的(键, 值) 元组数组。
字典键值对,额,不要老是忘记这种简单的啊。。。
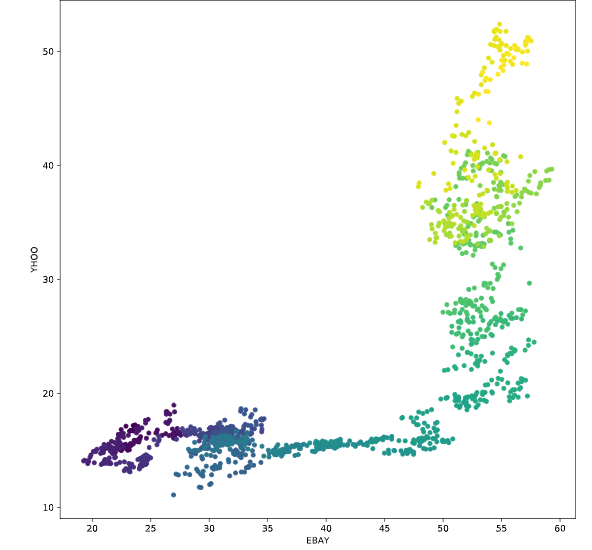
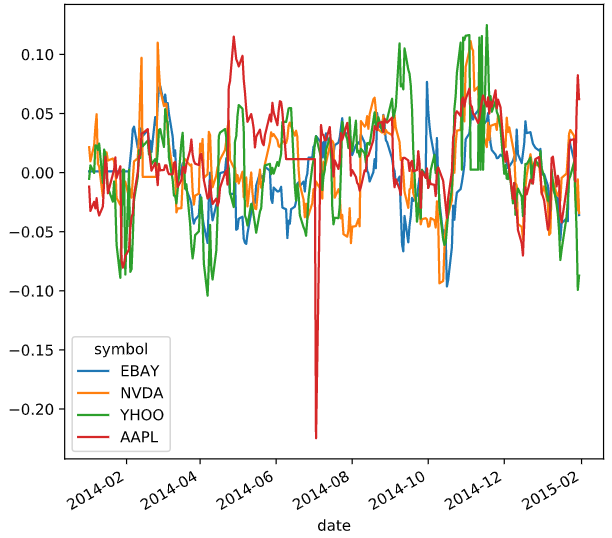
Predicting data over time
画图的时候,可以根据不同的索引对应不同的线条颜色,or散点颜色
# Scatterplot with color relating to time
prices.plot.scatter('EBAY', 'YHOO', c=prices.index,
                    cmap=plt.cm.viridis, colorbar=False)
plt.show()
在做预测之前需要清洗数据
比如outlier:离群值
一般情况下,画个图是可以看到
有离群值的时候可以选择剔除离群值
tight_layout()画图的时候有很多重叠的,可以调用此方法
有缺失值对的时候可以选择插值法
插值法也分很多种
interpolate()
可以借助这个函数进行插值
然后设置不同的参数
1.nearest:最邻近插值法
2.zero:阶梯插值
3.slinear、linear:线性插值
4.quadratic、cubic:2、3阶B样条曲线插值
# Create a function we'll use to interpolate and plot
def interpolate_and_plot(prices, interpolation):

    # Create a boolean mask for missing values
    missing_values = prices.isna()

    # Interpolate the missing values
    prices_interp = prices.interpolate(interpolation)

    # Plot the results, highlighting the interpolated values in black
    fig, ax = plt.subplots(figsize=(10, 5))
    prices_interp.plot(color='k', alpha=.6, ax=ax, legend=False)

    # Now plot the interpolated values on top in red
    prices_interp[missing_values].plot(ax=ax, color='r', lw=3, legend=False)
    plt.show()

# Interpolate using the latest non-missing value
interpolation_type = 'zero'
interpolate_and_plot(prices, interpolation_type)
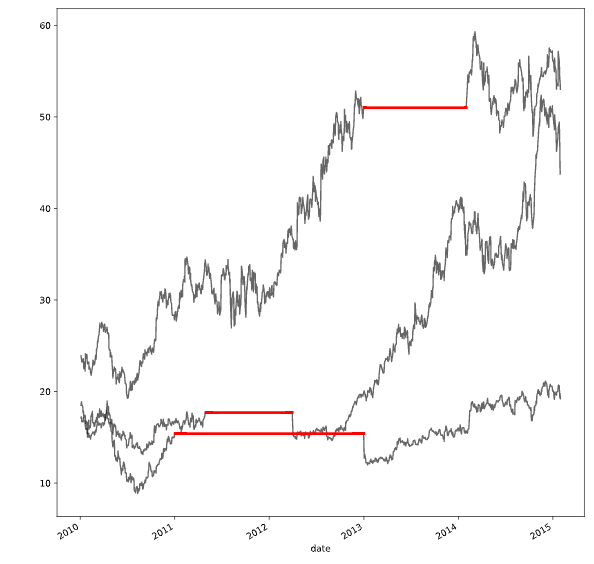
# Interpolate linearly
interpolation_type = 'linear'
interpolate_and_plot(prices, interpolation_type)
# Interpolate with a quadratic function
interpolation_type = 'quadratic'
interpolate_and_plot(prices, interpolation_type)
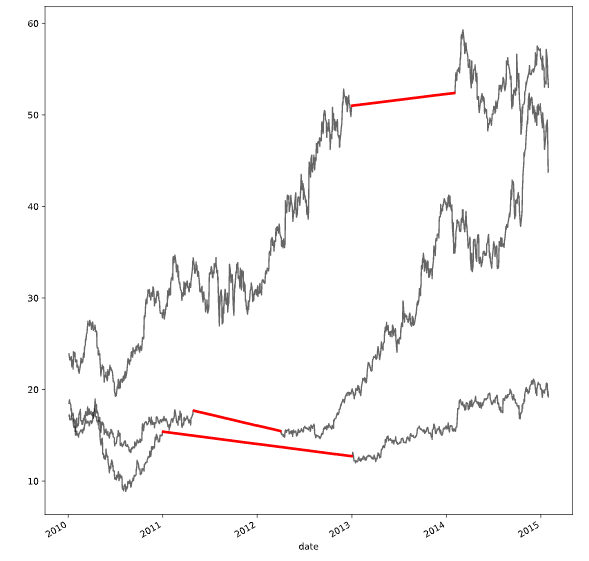
处理离群值的方法
def replace_outliers(series):
    # Calculate the absolute difference of each timepoint from the series mean
    absolute_differences_from_mean = np.abs(series - np.mean(series))

    # Calculate a mask for the differences that are > 3 standard deviations from the mean
    this_mask = absolute_differences_from_mean > (np.std(series) * 3)

    # Replace these values with the median accross the data
    series[this_mask] = np.nanmedian(series)
    return series

# Apply your preprocessing function to the timeseries and plot the results
prices_perc = prices_perc.apply(replace_outliers)
prices_perc.loc["2014":"2015"].plot()
plt.show()
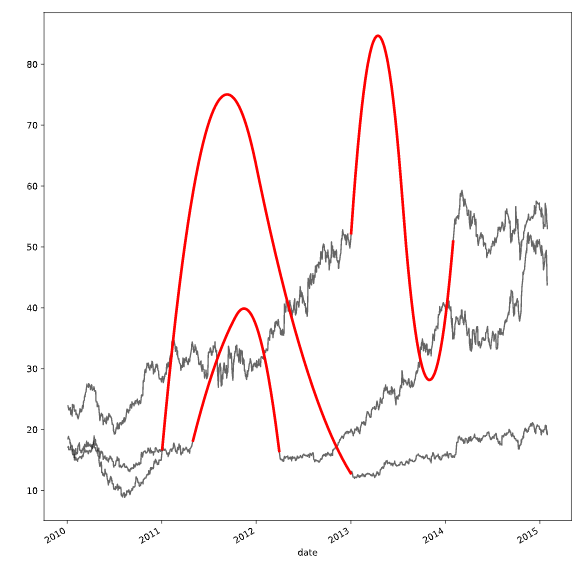
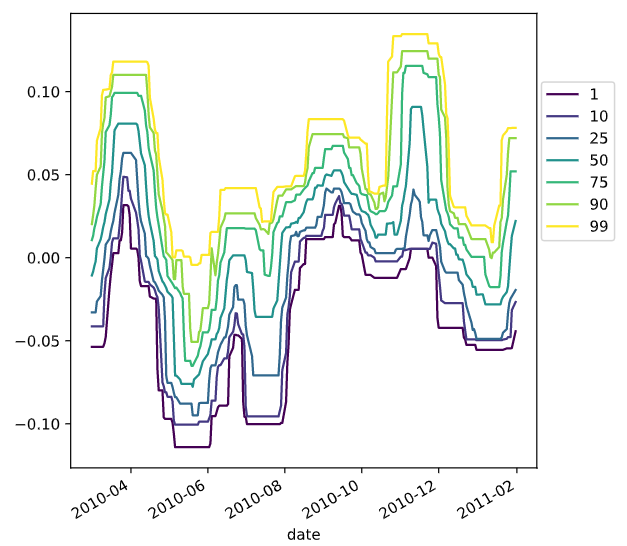
functools.partial
functools模块用于高阶函数:作用于或返回其他函数的函数。一般而言,任何可调用对象都可以作为本模块用途的函数来处理。
functools.partial返回的是一个可调用的partial对象,使用方法是partial(func,*args,**kw),func是必须要传入的,而且至少需要一个args或是kw参数。随风的山羊
# Import partial from functools
from functools import partial
percentiles = [1, 10, 25, 50, 75, 90, 99]

# Use a list comprehension to create a partial function for each quantile
percentile_functions = [partial(np.percentile, q=percentile) for percentile in percentiles]

# Calculate each of these quantiles on the data using a rolling window
prices_perc_rolling = prices_perc.rolling(20, min_periods=5, closed='right')
features_percentiles = prices_perc_rolling.aggregate(percentile_functions)

# Plot a subset of the result
ax = features_percentiles.loc[:"2011-01"].plot(cmap=plt.cm.viridis)
ax.legend(percentiles, loc=(1.01, .5))
plt.show()
可以进一步查看时间
# Extract date features from the data, add them as columns
prices_perc['day_of_week'] = prices_perc.index.dayofweek
prices_perc['week_of_year'] = prices_perc.index.weekofyear
prices_perc['month_of_year'] = prices_perc.index.month

# Print prices_perc
print(prices_perc)
具体解释参考这篇
https://pandas.pydata.org/pandas-docs/stable/reference/api/pandas.DatetimeIndex.dayofweek.html
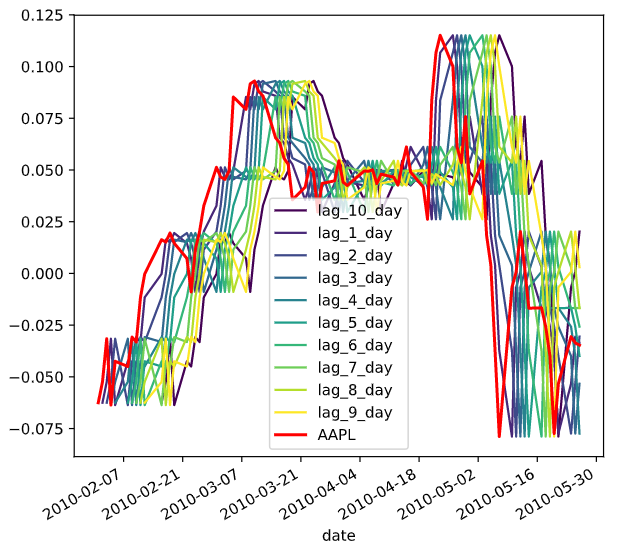
差分,滞后
shift()
pandas里面的平移函数
滞后有时候是为了平稳化数据,,有时候是为了减少内生性
fillna()
填补缺失值
# Replace missing values with the median for each column
X = prices_perc_shifted.fillna(np.nanmedian(prices_perc_shifted))
y = prices_perc.fillna(np.nanmedian(prices_perc))

# Fit the model
model = Ridge()
model.fit(X, y)
时间序列的交叉验证
k折交叉验证
- ShuffleSplit
sklearn.model_selection.ShuffleSplit类用于将样本集合随机“打散”后划分为训练集、测试集(可理解为验证集,下同)csdn
class sklearn.model_selection.ShuffleSplit(n_splits=10, test_size=’default’, train_size=None, random_state=None)
n_splits:int, 划分训练集、测试集的次数,默认为10
test_size:float, int, None, default=0.1; 测试集比例或样本数量,该值为[0.0, 1.0]内的浮点数时,表示测试集占总样本的比例;该值为整型值时,表示具体的测试集样本数量;train_size不设定具体数值时,该值取默认值0.1,train_size设定具体数值时,test_size取剩余部分
train_size:float, int, None; 训练集比例或样本数量,该值为[0.0, 1.0]内的浮点数时,表示训练集占总样本的比例;该值为整型值时,表示具体的训练集样本数量;该值为None(默认值)时,训练集取总体样本除去测试集的部分
random_state:int, RandomState instance or None;随机种子值,默认为Nonecsdn
KFold
折交叉验证:sklearn.model_selection.KFold(n_splits=3, shuffle=False, random_state=None)
思路:将训练/测试数据集划分n_splits个互斥子集,每次用其中一个子集当作验证集,剩下的n_splits-1个作为训练集,进行n_splits次训练和测试,得到n_splits个结果
注意点:对于不能均等份的数据集,其前n_samples % n_splits子集拥有n_samples // n_splits + 1个样本,其余子集都只有n_samples // n_splits样本
参数说明:
n_splits:表示划分几等份
shuffle:在每次划分时,是否进行洗牌
洗牌就是打乱样本
①若为Falses时,其效果等同于random_state等于整数,每次划分的结果相同
②若为True时,每次划分的结果都不一样,表示经过洗牌,随机取样的
random_state:随机种子数
属性:
①get_n_splits(X=None, y=None, groups=None):获取参数n_splits的值
②split(X, y=None, groups=None):将数据集划分成训练集和测试集,返回索引生成器
通过一个不能均等划分的栗子,设置不同参数值,观察其结果csdn
TimeSeriesSplit
时间序列划分数据
class sklearn.model_selection.TimeSeriesSplit(n_splits=5, max_train_size=None)
TimeSeriesSplit是k-fold的一个变体,它首先返回k折作为训练数据集,并且 (k+1) 折作为测试数据集。请注意,与标准的交叉验证方法不同,连续的训练集是超越前者的超集。另外,它将所有的剩余数据添加到第一个训练分区,它总是用来训练模型。这个类可以用来交叉验证以固定时间间隔观察到的时间序列数据样本。(机器学习中的交叉验证
)博客园
enumerate
enumerate()是python的内置函数、适用于python2.x和python3.x
enumerate在字典上是枚举、列举的意思
enumerate参数为可遍历/可迭代的对象(如列表、字符串)
enumerate多用于在for循环中得到计数,利用它可以同时获得索引和值,即需要index和value值的时候可以使用enumerate
enumerate()返回的是一个enumerate对象cnblog
datacamp
# Import TimeSeriesSplit
from sklearn.model_selection import TimeSeriesSplit

# Create time-series cross-validation object
cv = TimeSeriesSplit(n_splits=10)

# Iterate through CV splits
fig, ax = plt.subplots()
for ii, (tr, tt) in enumerate(cv.split(X, y)):
    # Plot the training data on each iteration, to see the behavior of the CV
    ax.plot(tr, ii + y[tr])

ax.set(title='Training data on each CV iteration', ylabel='CV iteration')
plt.show()
resample
重采样
交叉验证
from sklearn.model_selection import cross_val_score
# Generate scores for each split to see how the model performs over time
scores = cross_val_score(model, X, y, cv=cv, scoring=my_pearsonr)
# Convert to a Pandas Series object
scores_series = pd.Series(scores, index=times_scores, name='score')
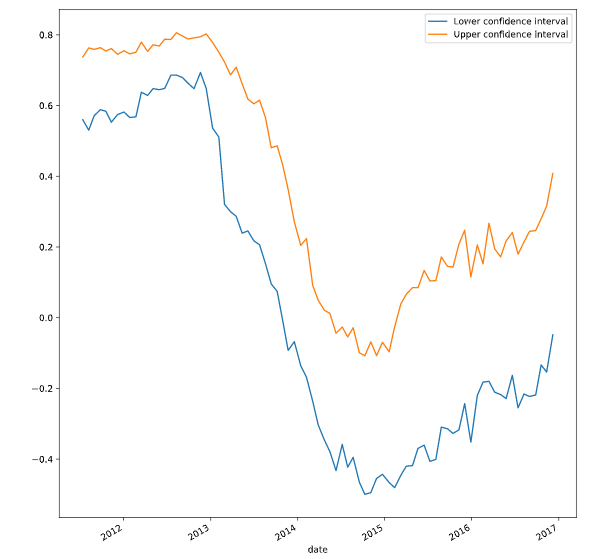
# Bootstrap a rolling confidence interval for the mean score
scores_lo = scores_series.rolling(20).aggregate(partial(bootstrap_interval, percentiles=2.5))
scores_hi = scores_series.rolling(20).aggregate(partial(bootstrap_interval, percentiles=97.5))
# Plot the results
fig, ax = plt.subplots()
scores_lo.plot(ax=ax, label="Lower confidence interval")
scores_hi.plot(ax=ax, label="Upper confidence interval")
ax.legend()
plt.show()