


SpringBoot源码(二):启动流程
码农之路,向死而生,往前走,别往后看
先说一下整体流程,之后在以下的篇章进行详细的解析。
一、上代码
进入run方法后
/**
 * 运行Spring应用程序,创建并刷新一个新的ApplicationContext 。
 * @param args
 * @return
 */
public ConfigurableApplicationContext run(String... args) {
    //1、stopWatch 计时器,允许为多个任务计时,公开总运行时间和每个命名任务的运行时间
    StopWatch stopWatch = new StopWatch();
    //启动计时器
    stopWatch.start();
    //2、创建上下文
    DefaultBootstrapContext bootstrapContext = createBootstrapContext();
    ConfigurableApplicationContext context = null;
    //3、设置系统参数java.awt.headless为true,允许无其他硬件(键盘、鼠标、显示器)的情况下运行。
    // 一般用于运行headless服务器(linux),进行简单的图像绘制,多用在缺少外接设备的系统设置,很多监控工具如jconsole需要将该值设为true
    //java.awt.headless 参数解释  https://blog.csdn.net/wodeyuer125/article/details/50502914
    configureHeadlessProperty();
    //4、获取SpringApplicationRunListener 启动监听器,并初始化。
    //4.1、创建所有spring运行监听器并发布应用启动事件,简单的说是获取 SpringApplicationRunListener类型的实例(EventPublishingRunListener对象),
    // 并进行封装SpringApplicationRunListener类型的实例,然后返回这个SpringApplicationRunListener对象,说简单点就是准备好了运行时监听器EventPublishingRunListener
    SpringApplicationRunListeners listeners = getRunListeners(args);
    //4.2、启动监听器
    listeners.starting(bootstrapContext, this.mainApplicationClass);
    try {
        //5、初始化默认应用参数类
        ApplicationArguments applicationArguments = new DefaultApplicationArguments(args);
        //6、根据运行监听和应用参数来装配spring环境信息
        //6.1、创建配置环境 web/standard
        //6.2、加载属性资源
        //6.3、加入预监听器集合
        ConfigurableEnvironment environment = prepareEnvironment(listeners, bootstrapContext, applicationArguments);
        //6.4、将要忽略的Bean的参数打开
        configureIgnoreBeanInfo(environment);
        //7、创建打印banner的类
        Banner printedBanner = printBanner(environment);
        //8、创建 应用上下文,可以理解为创建一个容器
        context = createApplicationContext();
        context.setApplicationStartup(this.applicationStartup);
        //上下文前置处理:配置监听、environment环境设置、initialize初始化设置(可扩展)、资源获取并且load
        prepareContext(bootstrapContext, context, environment, listeners, applicationArguments, printedBanner);
        //刷新上下文:bean工厂加载、通过工厂生产bean、刷新生命周期
        refreshContext(context);
        //上下文后置结束处理
        afterRefresh(context, applicationArguments);
        //计时器停止计时
        stopWatch.stop();
        if (this.logStartupInfo) {
            //获取运行信息,并且打印启动成功信息
            new StartupInfoLogger(this.mainApplicationClass).logStarted(getApplicationLog(), stopWatch);
        }
        //发布上下文,并且启动
        listeners.started(context);
        callRunners(context, applicationArguments);
    }
    catch (Throwable ex) {
        handleRunFailure(context, ex, listeners);
        throw new IllegalStateException(ex);
    }
    //执行Runner运行器
    try {
        listeners.running(context);
    }
    catch (Throwable ex) {
        handleRunFailure(context, ex, null);
        throw new IllegalStateException(ex);
    }
    return context;
}
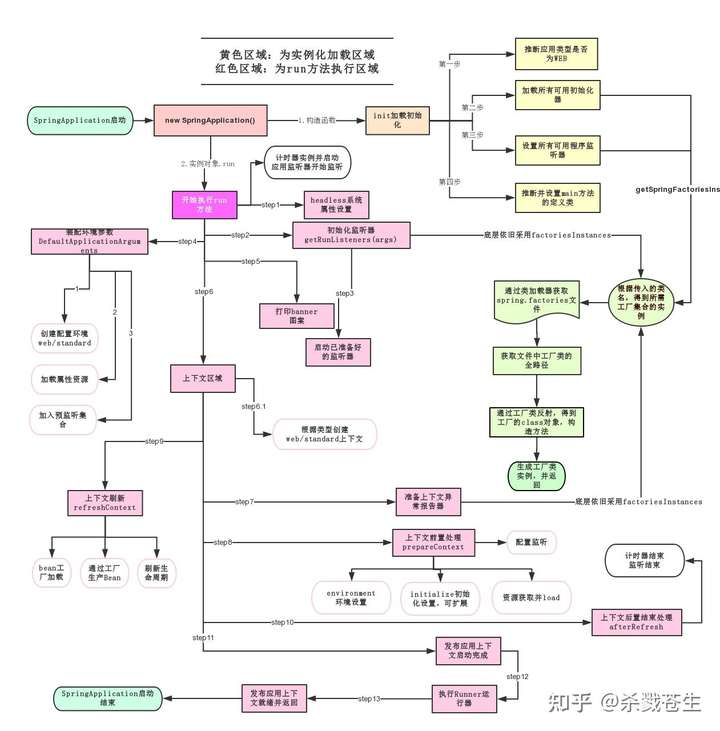
一张图,详细描述了springboot运行的的过程,再贴一下:
发布于 2021-05-14 10:37
源码阅读
Spring Boot
文章被以下专栏收录
努力前行中的程序员。。。。
推荐阅读
java面试题10:spring相关的问题总结
一,spring boot 启动过程 run入口 SpringBoot的启动主要是通过实例化SpringApplication来启动的,启动过程主要做了以下几件事情: 1、创建定时器stopWatch并启动 2、获取并运行listeners[S…
手把手带你剖析 Springboot 启动原理!
我们开发任何一个Spring Boot项目,都会用到如下的启动类 @SpringBootApplication public class Application { public static void main(String[] args) { SpringApplication.run(Applicati…

【5分钟背八股】12:SpringBoot自动装配原理是什么?
Spring整理常见面试问题
1. SpringMVC 请求流程?用户发送请求到 DispatcherServlet;DispatcherServlet 根据收到的请求调用 HandleMappingHandleMapping 根据请求 url 找到具体的处理器;DispatcherServlet 根据处…
 登录即可查看 超5亿 专业优质内容
超 5 千万创作者的优质提问、专业回答、深度文章和精彩视频尽在知乎。


还没有评论