

参考:
官方example项目 :新建cocos项目时选择example
官方文档:spine组件参考
cocos论坛:【方案】Cocos Creator 的 web/原生多平台 Spine 换装方案解析,附 Demo 源码
cocos版本:2.4.4
spine:3.8.x (cocos2.3版本之后,才支持spine3.8导出的二进制格式)
把spine的一些基本应用合在一个文章里了,免得不好找... = =!
测试素材:包含spine源项目和导出的二进制文件,下载素材
一 加载spine
二 挂点
三 骨骼动画的属性设置 enableBatch cacheMode
四 融合动画、叠加动画
五 换装
六 碰撞检测盒子
七 骨骼动画置灰
八 抖动和漩涡效果
九 骨骼跟随鼠标旋转
一 加载Spine
1 加载远程spine
直接从官网复制过来的,测试可用。
1 2 3 4 5 6 7 8 9 10 11 12 13 14 15 16 17 | var spineNode = new cc.Node();var skeleton = spineNode.addComponent(sp.Skeleton);this.node.addChild(spineNode);var image = "http://localhost/download/spineres/1/1.png";var ske = "http://localhost/download/spineres/1/1.skel";var atlas = "http://localhost/download/spineres/1/1.atlas";cc.assetManager.loadAny([{ url: atlas, ext: '.txt' }, { url: ske, ext: '.bin' }], (error, assets) => { cc.assetManager.loadRemote(image, (error, texture) => { var asset = new sp.SkeletonData(); asset._nativeAsset = assets[1]; asset.atlasText = assets[0]; asset.textures = [texture]; asset.textureNames = ['1.png']; skeleton.skeletonData = asset; });}); |
2 加载项目中spine

1 2 3 4 5 6 7 8 9 10 11 | var spineNode = new cc.Node();var skeleton = spineNode.addComponent(sp.Skeleton);this.node.addChild(spineNode);cc.resources.load("spine/raptor-pro", sp.SkeletonData, (error: Error, assets: sp.SkeletonData) => { if (error == null) { //设置数据 skeleton.skeletonData = assets; //播放默认动画 skeleton.setAnimation(0, "walk", true); }}); |
3 spine动画的完成事件和自定义事件监听、替换皮肤
1 2 3 4 5 6 7 8 9 10 | var s: sp.Skeleton;s.setAnimation(0, "run", false); //在track0播放动画"run",不循环s.setCompleteListener((trackEntry, loopCount) => { let name = trackEntry.animation.name; //完成的动画名});s.setEventListener((trackIndex, event) => { let name = event.data.name; //触发的事件名});s.setSkin("01"); //替换皮肤s.clearTrack(0); //停止播放 |
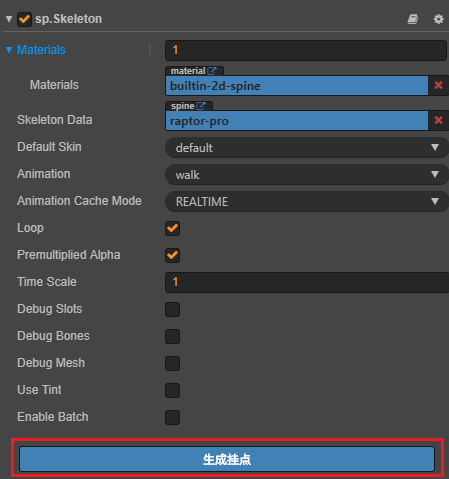
二 挂点
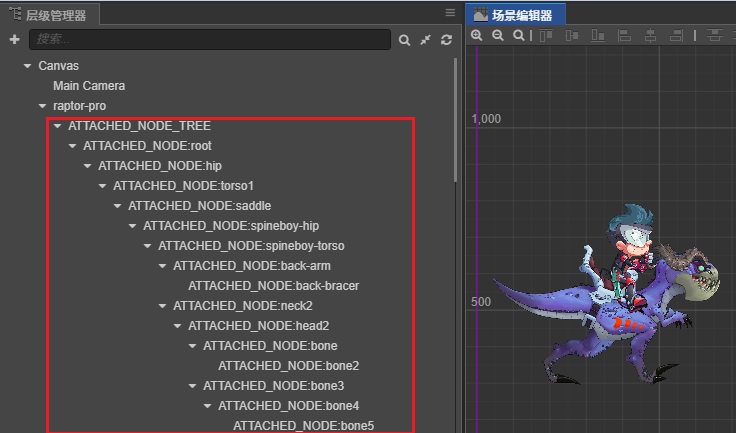
选中一个骨骼动画,在属性面板选择生成挂点。
骨骼动画会生成一堆如下挂点
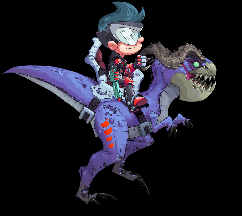
正常的动画如下
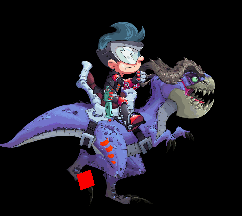
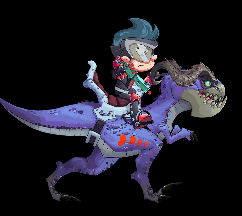
现在在龙脚上添加一个图,这张图可随着脚摆动。找到脚的节点front-foot3,增加了一个red方块
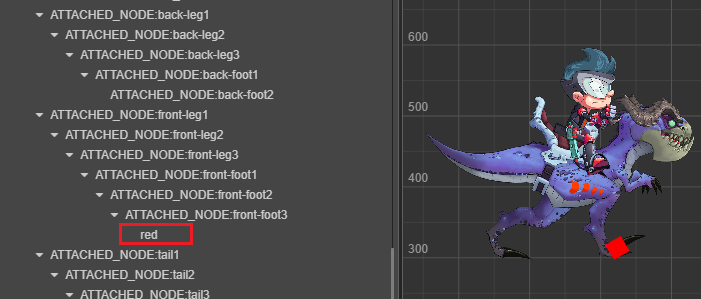
可以看到红色方块是随着脚一起摆动的
代码中动态查找挂点,这是官方example中的代码,但是attachUtil这个没有。其实是有的,只是create.d.ts里没有,导致无法使用代码提示。
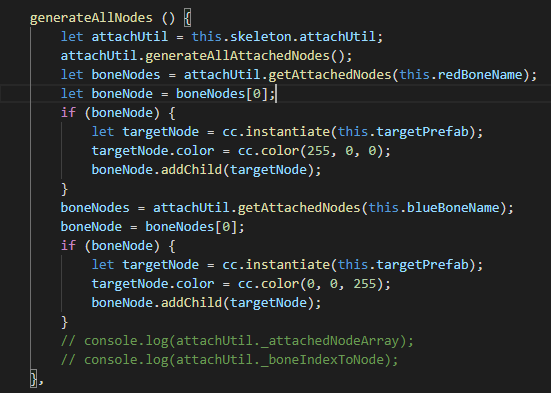
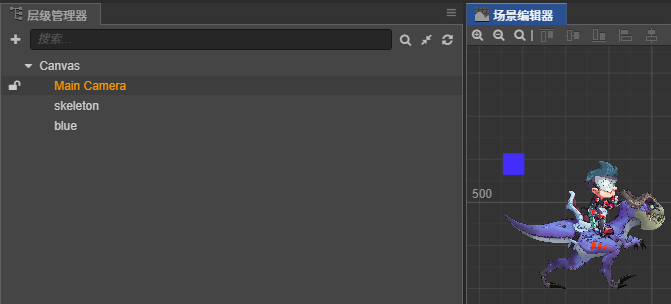
现在使用代码动态生成挂点,并在挂点"front-foot3"上绑定一个蓝色方块。如下图,场景中有一个骨骼动画和一个蓝色方块。
代码中生成挂点,并在挂点中添加蓝色方块
1 2 3 4 5 6 7 8 9 10 11 12 13 14 15 16 17 18 19 20 21 22 23 24 | @ccclassexport default class Attach extends cc.Component { @property(sp.Skeleton) //恐龙骨骼动画 skeleton: sp.Skeleton = null; @property(cc.Node) //蓝色方块 blue: cc.Node = null; onLoad() { //由于create.d.ts里已经没有attachUtil,所以这里skeleton得转成any。 let sk: any = this.skeleton; let attachUtil = sk.attachUtil; //生成挂点 attachUtil.generateAllAttachedNodes(); //找到脚的挂点 let boneNodes = attachUtil.getAttachedNodes("front-foot3"); // let boneNode = boneNodes[0]; if (boneNode) { this.blue.parent = boneNode; } }} |
运行效果如图

三 骨骼动画的属性设置
1 Enable Batch
是否开启合批
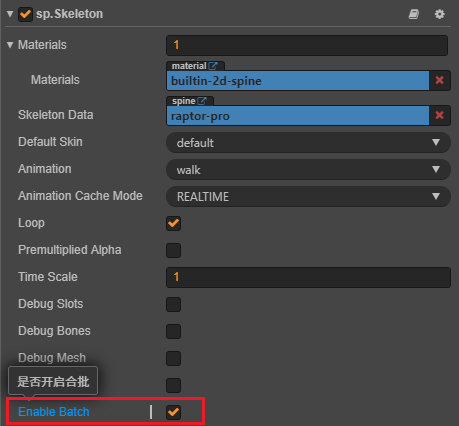
该属性的解释如下

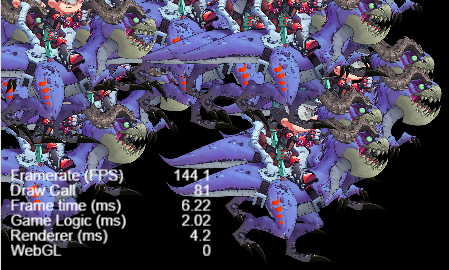
当有80个动画时,开启EnableBatch 关闭EnableBatch
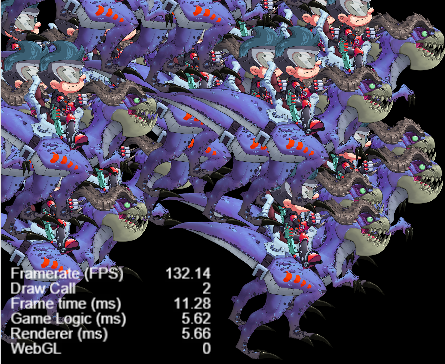

cocos官方的建议是:大量简单动画开启,复杂动画关闭。
2 cache mode

缓存模式解释如下

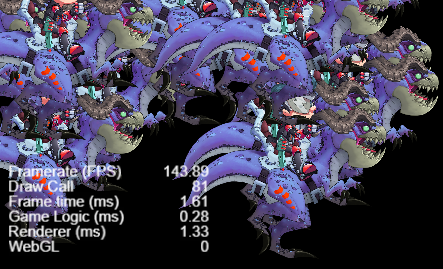
80个动画 realtime模式 shared_cache模式 private_cache模式
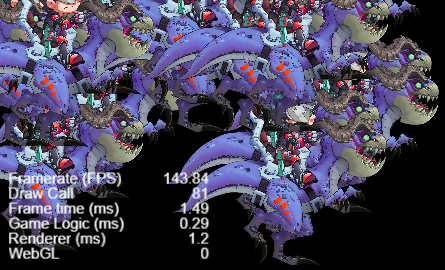

realtime 普通性能,普通内存占用,支持所有功能,动画融合、动作叠加、自定义事件、换装。 适用于有功能需求的场合。
share_cache 高性能,普通内存占用,不支持动画融合、动作叠加、自定义事件、换装。适用于大量动画且不需要额外功能的场合。
private_cache 高性能,高内存占用,不支持动画融合、动作叠加、自定义事件,支持换装。适用于单个或少量动画且需要换装的场合。
四 融合动画、叠加动画
1 融合动画
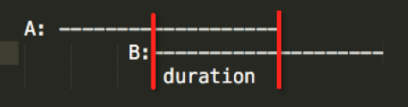
没有融合的动画。直接从walk瞬间切换到jump动画,没有任何过度,直接从一个动作切到另一个动作。

融合的动画。从walk切换到jump有一个过渡动画,可以看到有一个下蹲的过度效果。
使用setMix设置融合动画
1 | this.skeleton.setMix("walk", "jump", 0.5); |
过渡动画原理:
传统的动画,一般是对一个物体对象进行位移、旋转、缩放、变形,然后把关键帧的信息记录下来,在播放的时候按照关键帧时间对物体对象进行位移、
旋转、缩放、变形,并在关键帧与关键帧之间做插值运算。
骨骼动画的特点是,需要做动画的物体对象本身不记录位移、旋转、缩放、变形信息,而是通过了第三方的“骨骼”物体记录动画信息,然后物体对象本身只
记录受到骨骼物体影响的权重。在播放的时候,通过骨骼物体的关键帧和物体对象记录的权重,让动画重现。
2 叠加动画
行走动画walk

枪动画gun-grab

两个动作叠加起来,可以看到一边行走,一边拔枪
代码如下,将两个动画分别播放在traceIndex0和1上。
1 2 | this.skeleton.setAnimation(0, "walk", true);this.skeleton.setAnimation(1, "gun-grab", true); |
当然,你也可以播放3个动画...
1 2 3 | this.skeleton.setAnimation(0, "walk", true);this.skeleton.setAnimation(1, "gun-grab", true);this.skeleton.setAnimation(2, "roar", true); |
五 换装
1 两个骨骼动画之间换装
枪骨骼名"gun"
剑骨骼名 weapon
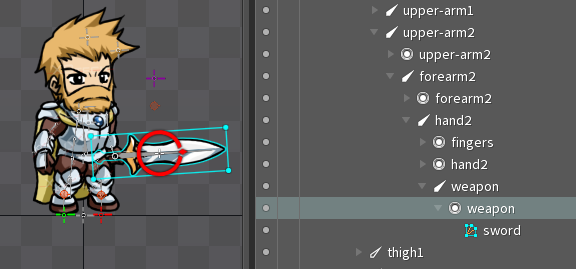
现在把龙骑士的枪替换成剑

1 2 3 4 5 6 7 8 9 10 11 12 13 14 15 16 | @ccclassexport default class Batch extends cc.Component { @property(sp.Skeleton) //龙骑士 raptor: sp.Skeleton = null; @property(sp.Skeleton) //大胡子战士 hero: sp.Skeleton = null; onLoad() { let slot1 = this.raptor.findSlot("gun"); let slot2 = this.hero.findSlot("weapon"); let attachment = slot2.getAttachment(); slot1.setAttachment(attachment); }} |
替换效果,可以看到龙骑士的枪变成了剑。(这里龙骑士动画太大,所以整体缩小到了scale=0.3)

2 动态任意图片更换
现在resouces下有一把刀,将龙骑士的枪替换成这个刀
替换代码如下,sp.SkeletonTexture会报错但是不影响运行。
原理就是用动态加载的图片3000.png生成一个TextureAtlasRegion,用这个TextureAtlasRegion来替换龙骑士枪骨骼的TextureAtlasRegion。
1 2 3 4 5 6 7 8 9 10 11 12 13 14 15 16 17 18 19 20 21 22 23 24 25 26 27 28 29 30 31 32 33 34 35 36 37 38 39 40 41 42 43 44 45 46 47 48 49 50 51 52 | @ccclassexport default class Batch extends cc.Component { @property(sp.Skeleton) //龙骑士 raptor: sp.Skeleton = null; onLoad() { this.changeSlot(this.raptor, "gun", cc.resources.get("img/3000", cc.Texture2D)); } /** * 用外部图片局部换装 * @param sk 骨骼动画 * @param slotName 需要替换的插槽名称 * @param texture 外部图片 */ public changeSlot(sk: sp.Skeleton, slotName: string, texture: cc.Texture2D) { //获取插槽 let slot = sk.findSlot(slotName); //获取挂件 let att = slot.attachment; //创建region let skeletonTexture = new sp.SkeletonTexture(); skeletonTexture.setRealTexture(texture) let page = new sp.spine.TextureAtlasPage() page.name = texture.name page.uWrap = sp.spine.TextureWrap.ClampToEdge page.vWrap = sp.spine.TextureWrap.ClampToEdge page.texture = skeletonTexture page.texture.setWraps(page.uWrap, page.vWrap) page.width = texture.width page.height = texture.height let region = new sp.spine.TextureAtlasRegion() region.page = page region.width = texture.width region.height = texture.height region.originalWidth = texture.width region.originalHeight = texture.height region.rotate = false region.u = 0 region.v = 0 region.u2 = 1 region.v2 = 1 region.texture = skeletonTexture //替换region att.region = region att.setRegion(region) att.updateOffset(); }} |
实现效果,可以看到3000.png这个刀已经被替换上去了

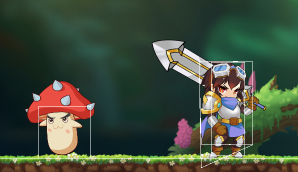
六 碰撞检测盒子
假如动画师在spine骨骼上画了一个BoundingBox,用于伤害判定的范围。
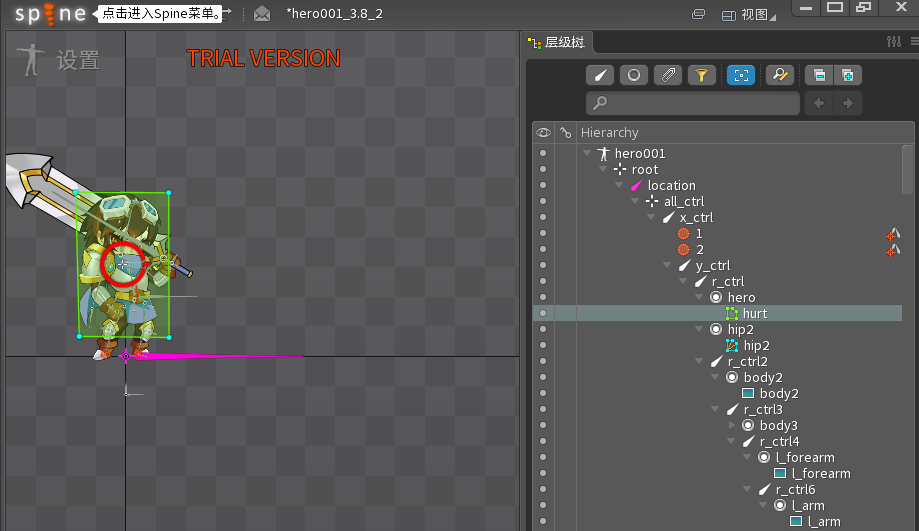
在cocos中,从人物骨骼动画中获取这个hurt多边形,根据顶点创建一个PolygonCollider,并绑定到人物上,然后使用碰撞组件PolygonPolygon和Monster的BoxCollider进行碰撞检测
1 2 3 4 5 6 7 8 9 10 11 12 13 14 15 16 17 18 | //sk是人物的骨骼动画,获取骨骼动画上的挂件let attachment = this.sk.getAttachment('hero', "hurt")//获取hero的骨骼let slot = this.sk.findSlot("hero");//获取hurt的顶点数组let arr = {}let data = attachment.computeWorldVertices(slot, 0, attachment.worldVerticesLength, arr, 0, 2)console.log("多边形挂件:",attachment);console.log("多边形顶点:", arr);//为hero增加多边形Collider this.addComponent(cc.PolygonCollider);let poly:cc.PolygonCollider = this.getComponent(cc.PolygonCollider); for(let i=0;i<4;i++){ poly.points[i].x = arr[i*2]; poly.points[i].y = arr[i*2+1];}//hurt多边形碰撞体,和怪物mosnter的boxCollider进行碰撞检测(Monter.boxCollider为了测试方便保存的static变量)console.log("碰撞:", cc.Intersection.polygonPolygon((poly as any).world.points, (Monster.boxCollider as any).world.points)); |
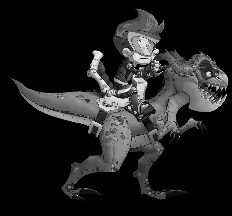
七 骨骼动画置灰
骨骼动画置灰所需要的mtl和effect文件在cocos example的项目里可以找到
置灰后的动画
八 抖动和漩涡效果
官方的examle里还提供了抖动和漩涡效果
抖动效果
1 2 3 4 5 6 7 8 9 10 11 12 | @ccclassexport default class Batch extends cc.Component { @property(sp.Skeleton) //龙骑士 raptor: sp.Skeleton = null; onLoad() { let effect = new sp.VertexEffectDelegate(); effect.initJitter(20, 20); this.raptor.setVertexEffectDelegate(effect); }} |

漩涡效果
1 2 3 4 5 6 7 8 9 10 11 12 13 14 15 16 17 18 19 20 21 22 23 24 25 26 27 28 29 30 31 32 33 | @ccclassexport default class Batch extends cc.Component { @property(sp.Skeleton) //龙骑士 raptor: sp.Skeleton = null; private _swirlTime: number; private _bound: cc.Size; private _swirlEffect: sp.VertexEffectDelegate; onLoad() { this._swirlEffect = new sp.VertexEffectDelegate(); this._swirlEffect.initSwirlWithPowOut(0, 2); this.raptor.setVertexEffectDelegate(this._swirlEffect); this._swirlTime = 0; this._bound = cc.size(this.raptor.node.width, this.raptor.node.height); } update(dt) { this._swirlTime += dt; let percent = this._swirlTime % 2; if (percent > 1) percent = 1 - (percent - 1); let bound = this._bound; let swirlEffect = this._swirlEffect.getSwirlVertexEffect(); swirlEffect.angle = 360 * percent; swirlEffect.centerX = bound.width * 0.5; swirlEffect.centerY = bound.height * 0.5; swirlEffect.radius = percent * Math.sqrt(bound.width * bound.width + bound.height * bound.height); }} |
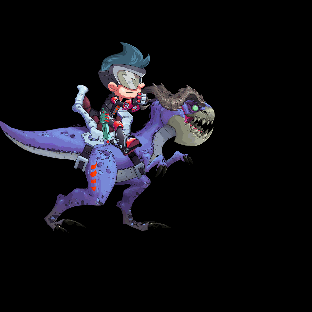
九 骨骼跟随鼠标旋转
让龙骑士的头跟随鼠标旋转,主要是获取鼠标和龙骑士的角度,然后设置头部骨骼的bone.data.rotation角度。
1 2 3 4 5 6 7 8 9 10 11 12 13 14 15 16 17 18 19 20 21 | @ccclassexport default class Batch extends cc.Component { @property(sp.Skeleton) //龙骑士 raptor: sp.Skeleton = null; onLoad() { //鼠标移动事件 this.node.on(cc.Node.EventType.TOUCH_MOVE, (e: cc.Event.EventTouch) => { //将触摸位置转成本地位置 let pos = e.getLocation(); pos = this.node.convertToNodeSpaceAR(pos); //获取触摸位置和龙骑士的角度 let angle = Math.atan2(pos.y - this.raptor.node.y, pos.x - this.raptor.node.x); angle = angle * 180 / Math.PI; //获取头的骨骼,并将角度设置为和鼠标触摸的角度 let bone: sp.spine.Bone = this.raptor.findBone("head"); bone.data.rotation = angle; }, this) }} |
实际效果


【推荐】国内首个AI IDE,深度理解中文开发场景,立即下载体验Trae
【推荐】编程新体验,更懂你的AI,立即体验豆包MarsCode编程助手
【推荐】抖音旗下AI助手豆包,你的智能百科全书,全免费不限次数
【推荐】轻量又高性能的 SSH 工具 IShell:AI 加持,快人一步
· 无需6万激活码!GitHub神秘组织3小时极速复刻Manus,手把手教你使用OpenManus搭建本
· C#/.NET/.NET Core优秀项目和框架2025年2月简报
· Manus爆火,是硬核还是营销?
· 终于写完轮子一部分:tcp代理 了,记录一下
· 【杭电多校比赛记录】2025“钉耙编程”中国大学生算法设计春季联赛(1)