
集群搭建
一. 用三台机器 一台做ansible+playbook 搭建lnmp环境
IP分配
ansible 主机192.168.202.132
lnmp第一台主机 192.168.202.131
lnmp第一台主机 192.168.202.133
1.1 ansible主机安装ansible
[root@localhost ~]# yum -y install ansible
已加载插件:fastestmirror
Loading mirror speeds from cached hostfile
 * base: mirror.jdcloud.com
 * extras: mirror.bit.edu.cn
1.2 ansible主机生成密钥设置免密码登录
[root@localhost ~]# ssh -keygen
Bad escape character 'ygen'.
[root@localhost ~]# ssh-keygen
Generating public/private rsa key pair.
Enter file in which to save the key (/root/.ssh/id_r
Created directory '/root/.ssh'.
Enter passphrase (empty for no passphrase):
Enter same passphrase again:
Your identification has been saved in /root/.ssh/id_
Your public key has been saved in /root/.ssh/id_rsa.
The key fingerprint is:
SHA256:snafmBirD5A4bkRNfs/yraWQ7BqJf4SKpLd0UO5yZyA rhost
The key's randomart image is:
+---[RSA 2048]----+
|   .             |
|  +              |
| . o..           |
|.. +. o          |
|o.E +..oS        |
|oo.*oo+o.        |
|+++o*+*..o       |
|+oo+o*.=++ .     |
| ..++++oo o      |
+----[SHA256]-----+
[root@localhost ~]# ssh-copy-id root@192.168.202.131
/usr/bin/ssh-copy-id: INFO: Source of key(s) to be i "/root/.ssh/id_rsa.pub"
The authenticity of host '192.168.202.131 (192.168.2can't be established.
ECDSA key fingerprint is SHA256:+YOuMKydPwvlPwXHq3Cgj6X6jdlupF1W3A.
ECDSA key fingerprint is MD5:33:f9:54:0f:ce:1e:53:96:96:29:e3:04:7c.
Are you sure you want to continue connecting (yes/no
/usr/bin/ssh-copy-id: INFO: attempting to log in wit key(s), to filter out any that are already installe
/usr/bin/ssh-copy-id: INFO: 1 key(s) remain to be in- if you are prompted now it is to install the new k
root@192.168.202.131's password:

Number of key(s) added: 1

Now try logging into the machine, with:   "ssh 'root202.131'"
and check to make sure that only the key(s) you wantdded.
[root@localhost ~]# ssh-copy-id root@192.168.202.133
1.3 ansible主机配置
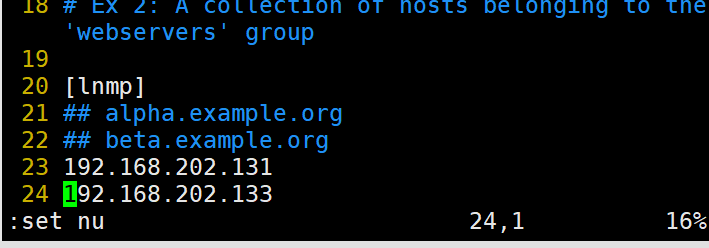
[root@localhost ~]# vim /etc/ansible/hosts

[lnmp]
192.168.202.131
192.168.202.133
如图:
1.4 编写ansible的playbook
---
- hosts: lnmp
tasks:
- name: "安装需要的环境"
yum: name=gcc,gcc-c++,make,php,php-gd,php-mysql,php-fpm,pcre-devel,zlib-devel,mariadb,mariadb-server state=latest
- name: "导入nginx包"
unarchive: src=nginx-1.16.1.tar.gz dest=/root
- name: "编译安装"
shell: cd /root/nginx-1.16.1 && ./configure && make && make install
- name: "分发配置文件"
copy: src=nginx.conf dest=/usr/local/nginx/conf/nginx.conf
- name: "分发主界面"
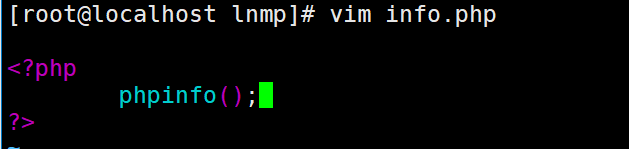
copy: src=info.php dest=/var/www/html/info.php
- name: 启动nginx
shell: /usr/local/nginx/sbin/nginx
- name: "启动mysql"
shell: systemctl restart mariadb
- name: "启动php-fpm"
shell: systemctl restart php-fpm
- name : "关闭防火墙"
shell: systemctl stop firewalld
- name: "关闭selinux"
shell: setenforce 0
~
1.4.2 更改nginx的配置文件


1.4.3 分发一个php的测试界面
1.4.4 执行ansible-playbook


1.4.5 展示效果看看lnmp是否搭建成功

二.lnmp主机配置MySQL实现数据库的同步做数据库的互为主主 然后做高可用
lnmp第一台主机 192.168.202.131 主
lnmp第一台主机 192.168.202.133 备
2.1编辑配置文件
192.168.202.131 操作
[root@localhost ~]# vim /etc/my.cnf
server-id=1
log-bin=mysql-bie
relay-log=mysql-relay
[root@localhost ~]# systemctl restart mariadb
192.168.202.133 操作
[root@localhost ~]# vim /etc/my.cnf
server-id=2
log-bin=mysql-bin
relay-log=mysql-relay
[root@localhost ~]# systemctl restart mariadb
2.2 主mysql授权
192.168.202.131操作
[root@localhost ~]# mysql
Welcome to the MariaDB monitor.  Commands end with ; or \g.
Your MariaDB connection id is 2
Server version: 5.5.64-MariaDB MariaDB Server

Copyright (c) 2000, 2018, Oracle, MariaDB Corporation Ab and others.

Type 'help;' or '\h' for help. Type '\c' to clear the current input statement.

MariaDB [(none)]> grant all on *.* to 'tom'@'%' identified by'123';
Query OK, 0 rows affected (0.00 sec)

MariaDB [(none)]> flush privileges;
Query OK, 0 rows affected (0.00 sec)

MariaDB [(none)]> show master status;
+------------------+----------+--------------+------------------+
| File             | Position | Binlog_Do_DB | Binlog_Ignore_DB |
+------------------+----------+--------------+------------------+
| mysql-bie.000001 |      443 |              |                  |
+------------------+----------+--------------+------------------+
1 row in set (0.00 sec)
2.3 从上接受主的二进制日志更改slave
192.168.202.133 操作
[root@localhost ~]# mysql
Welcome to the MariaDB monitor.  Commands end with ; or \g.
Your MariaDB connection id is 2
Server version: 5.5.64-MariaDB MariaDB Server

Copyright (c) 2000, 2018, Oracle, MariaDB Corporation Ab and others.

Type 'help;' or '\h' for help. Type '\c' to clear the current input statement.

MariaDB [(none)]> stop slave;
Query OK, 0 rows affected, 1 warning (0.00 sec)

MariaDB [(none)]> change master to
-> master_host='192.168.202.131',
    -> master_user='tom',
    -> master_password='123',
    -> master_log_file='mysql-bie.000001',
    -> master_log_pos=443;
Query OK, 0 rows affected (0.01 sec)

MariaDB [(none)]> start slave;
Query OK, 0 rows affected (0.11 sec)
2.4 查看有没有主从设置成功 如果是yes 表示成功
192.168.202.133 操作
2.5 设置主主
192.168.202.133 操作 给权限
MariaDB [(none)]>  grant all on *.* to 'tom'@'%' identified by'123';
Query OK, 0 rows affected (0.00 sec)

MariaDB [(none)]>  flush privileges;
Query OK, 0 rows affected (0.00 sec)

MariaDB [(none)]> show master status;
+------------------+----------+--------------+------------------+
| File             | Position | Binlog_Do_DB | Binlog_Ignore_DB |
+------------------+----------+--------------+------------------+
| mysql-bin.000001 |      443 |              |                  |
+------------------+----------+--------------+------------------+
1 row in set (0.00 sec)
2.6 更改slave
192.168.202.131 操作
[root@localhost ~]# mysql
Welcome to the MariaDB monitor.  Commands end with ; or \g.
Your MariaDB connection id is 4
Server version: 5.5.64-MariaDB MariaDB Server

Copyright (c) 2000, 2018, Oracle, MariaDB Corporation Ab and others.

Type 'help;' or '\h' for help. Type '\c' to clear the current input statement.

MariaDB [(none)]> stop slave;
Query OK, 0 rows affected, 1 warning (0.00 sec)

MariaDB [(none)]> change master to
    -> master_host='192.168.202.133',
    -> master_user='tom',
    -> master_password='123',
    -> master_log_file='mysql-bin.000001',
    -> master_log_pos=443;
Query OK, 0 rows affected (0.13 sec)

MariaDB [(none)]> start slave;
Query OK, 0 rows affected (0.00 sec)
2.7 查看主主有没有配置成功
两台主机都测试 是不是都是yes 主主设置完毕
MariaDB [(none)]> show slave status \G;
*************************** 1. row ***************************
               Slave_IO_State: Waiting for master to send event
                  Master_Host: 192.168.202.131
                  Master_User: tom
                  Master_Port: 3306
                Connect_Retry: 60
              Master_Log_File: mysql-bie.000001
          Read_Master_Log_Pos: 443
               Relay_Log_File: mysql-relay.000002
                Relay_Log_Pos: 529
        Relay_Master_Log_File: mysql-bie.000001
             Slave_IO_Running: Yes
            Slave_SQL_Running: Yes
              Replicate_Do_DB:
          Replicate_Ignore_DB:
           Replicate_Do_Table:
MariaDB [(none)]>  show slave status \G;
*************************** 1. row ***************************
               Slave_IO_State: Waiting for master to send event
                  Master_Host: 192.168.202.133
                  Master_User: tom
                  Master_Port: 3306
                Connect_Retry: 60
              Master_Log_File: mysql-bin.000001
          Read_Master_Log_Pos: 443
               Relay_Log_File: mysql-relay.000002
                Relay_Log_Pos: 529
        Relay_Master_Log_File: mysql-bin.000001
             Slave_IO_Running: Yes
            Slave_SQL_Running: Yes
2.8 设置MySQL的高可用 一台MySQL关闭了以后自动换另一台不影响存储数据
两台主机都操作
[root@localhost ~]# yum -y install keepalived
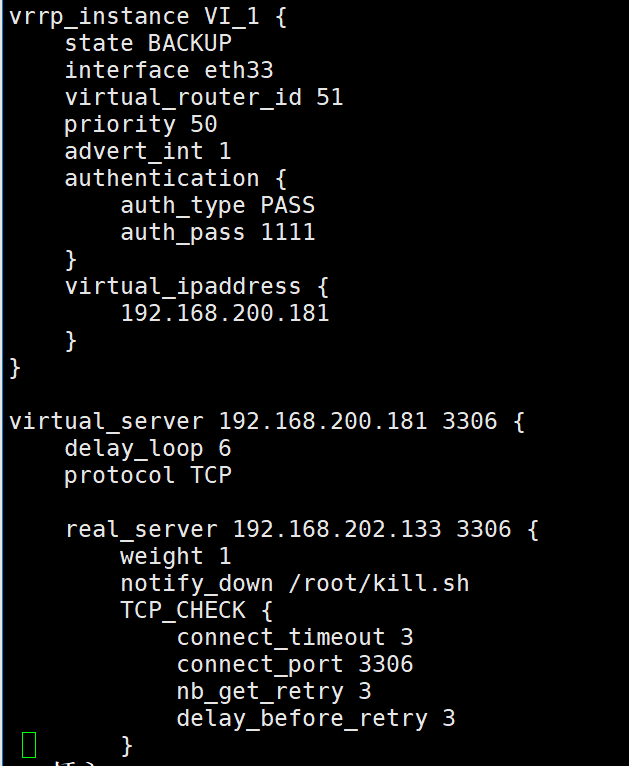
2.9编写配置文件 mysql主 192.168.202.131的配置
[root@localhost ~]# vim /etc/keepalived/keepalived.conf

[root@localhost ~]# vim /root/kill.sh  #编关闭脚本

#!/bin/bash
systemctl stop keepalived

[root@localhost ~]# chmod +x kill.sh # 给关闭keepalived脚本权限
[root@localhost ~]# systemctl start keepalived    #启动keepalived
[root@localhost ~]# ip a
#测试有如下图结果可以看到vip地址 高可用主配置成功

2.9编写配置文件 mysql备 192.168.202.133的配置
[root@localhost ~]# vim /root/kill.sh  #编关闭脚本

#!/bin/bash
systemctl stop keepalived

[root@localhost ~]# chmod +x kill.sh # 给关闭keepalived脚本权限
[root@localhost ~]# systemctl start keepalived    #启动keepalived
三.192.168.202.132 做192.168.202.131和192.168.202.133DR 负载均衡
规划ip
web 192.168.202.133
web 192.168.202.131
DR 192.168.202.132
3.1安装keepalived+ipvsadm
在192.168.202.132主机上
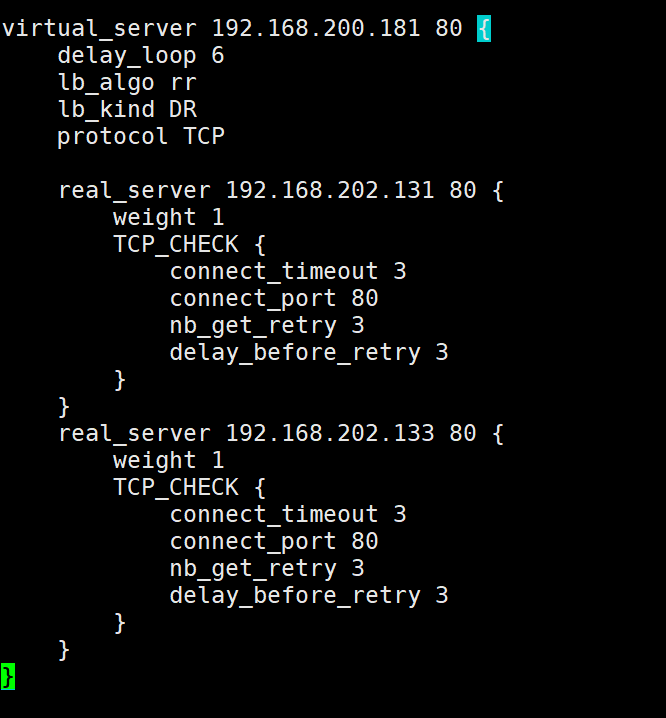
3.2编写配置文件
[root@localhost ~]# vim /etc/keepalived/keepalived.conf
如图

四 memcache 实现会话共享
注:因为没有7的虚拟机了我用的是6安装192.168.202.125memcache
4.1 安装memcache
[root@localhost ~]# yum -y install memcached
4.2 关闭防火墙 selinux 启动memcache
[root@localhost ~]# service iptables stop
[root@localhost ~]# setenforce 0
[root@localhost ~]# service memcached restart
Stopping memcached:                                        [FAILED]
Starting memcached:                                        [  OK  ]
4.3在两台lnmp服务器上安装memcache的扩展 名字不太好记可以搜索yixia
[root@localhost ~]# yum search memcache
[root@localhost ~]# yum -y install php-pecl-memcache
4.4生效的话需要重启php-fpm
[root@localhost ~]# systemctl restart php-fpm
4.5 查看memcache扩展有没有安装成功
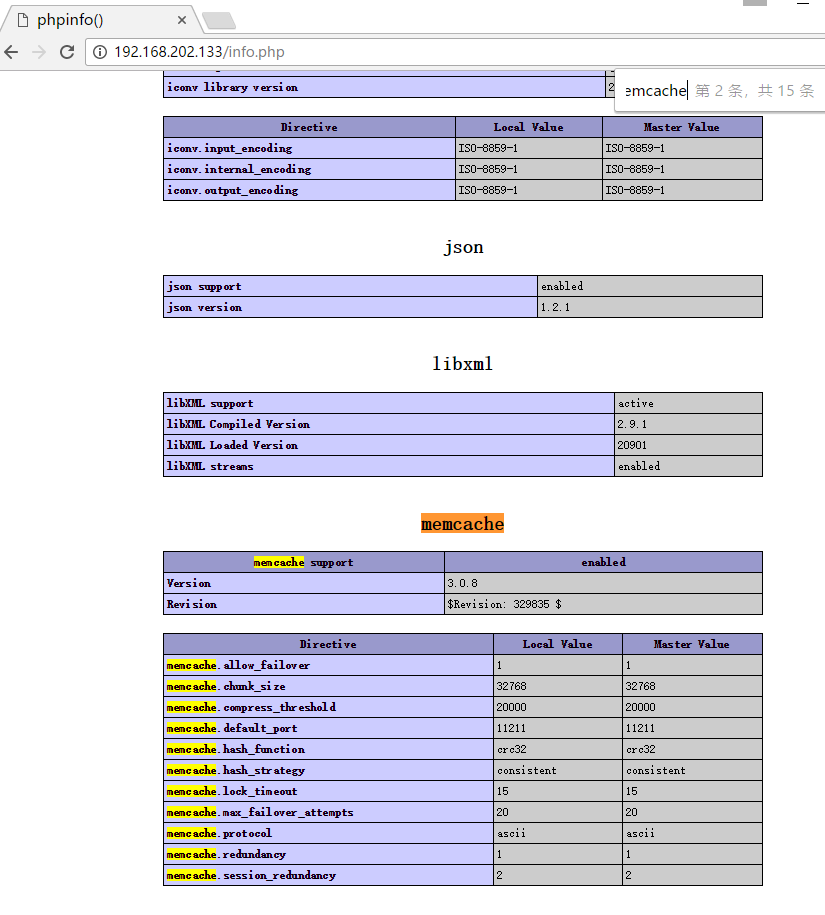
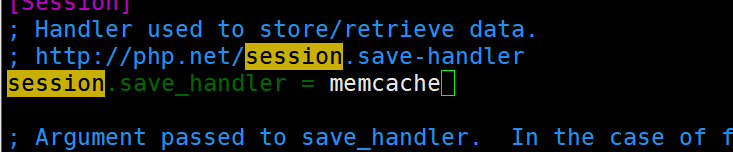
4.6更改存储方式 (这总改法可能会不成功还有第二种改法 看4.7)
[root@localhost ~]# vim /etc/php.ini
如图 大概在1324和1357行

重启php-fpm
[root@localhost ~]# systemctl restart php-fpm
4.7更改存储方式
[root@localhost ~]# vim /etc/php-fpm.d/www.conf
php_value[session.save_handler] = memcache
php_value[session.save_path] = tcp://192.168.202.125:11211
重启php-fpm 看界面 测试有没有更改成功
[root@localhost ~]# systemctl restart php-fpm

五nfs实现 电商同步共享文件
5.1 安装rpc协议
yum -y install rpcbind
5.2 启动rpc 查看
[root@localhost ~]# service rpcbind start
Starting rpcbind:                                          [  OK  ]
[root@localhost ~]# service  rpcbind status
rpcbind (pid  38481) is running...
5.3nfs 插件
[root@localhost ~]# yum -y install nfs-utils
[root@localhost ~]# service nfs start
Starting NFS services:                                     [  OK  ]
Starting NFS quotas:                                       [  OK  ]
Starting NFS mountd:                                       [  OK  ]
Starting NFS daemon:                                       [  OK  ]
Starting RPC idmapd:                                       [  OK  ]
5.4创建一个共享目录
[root@localhost ~]# mkdir /opt/html
5.5 编写文件 重载
[root@localhost html]# vim /etc/exports

/opt/html   192.168.202.0/24(rw)

[root@localhost html]# exportfs -rv
exporting 192.168.202.0/24:/opt/html
/opt/html 192.168.202.0/24(rw,no_root_squash) # 如果想让其他主机也可以修改 就加上下面这条语句里面的参数
[root@localhost html]# showmount -e 192.168.202.125   #查看 这个主机所有的挂载文件
Export list for 192.168.202.125:
/opt/html 192.168.202.0/24
5.6 在lnmp主机下设置挂载 如果没有nfs也需要像6一样安装启动 端口为24480
[root@localhost ~]# systemctl start rpcbind.service
[root@localhost ~]# mount -t nfs 192.168.202.125:/opt/html /var/www/html
六上线电商
6.1 传输包
6.2解压


七读写分离 amoeba 在192.168.202.125主机上操作 centos6系统
7.1软件是基于java开发的所以要安装jdk环境 注: 根据amoeba的版本来选择jdk环境版本 这里的amoeba版本较低所以jdk环境是jdk-6u14-linux-x64.bin
[root@localhost ~]# chmod +x jdk-6u14-linux-x64.bin
[root@localhost ~]# ./jdk-6u14-linux-x64.bin
Do you agree to the above license terms? [yes or no]
yes

[root@localhost ~]# mv jdk1.6.0_14 /usr/local/jdk1.6
[root@localhost ~]# vim /etc/profile

export JAVA_HOME=/usr/local/jdk1.6
export JAVA_BIN=$JAVA_HOME/bin
export PATH=$PATH:$TAVA_HOST/bin

[root@localhost ~]# source /etc/profile
7.2 在数据库里 给权限
MariaDB [(none)]> grant all on *.* to amoeba@'%' identified by '123';
Query OK, 0 rows affected (0.14 sec)
MariaDB [(none)]> flush privileges;
Query OK, 0 rows affected (0.15 sec)
7.3创建一个目录 把amoeba解压到下面
[root@localhost ~]# mkdir /usr/local/amoeba
[root@localhost ~]# tar -zxvf amoeba-mysql-binary-2.2.0.tar.gz  -C /usr/local/amoeba
7.4更改 amoeba的配置文件 为了配置读的主机 和管理MySQL主机的数据
[root@localhost conf]# cd /usr/local/amoeba/conf
[root@localhost conf]# vim dbServers.xml
 20                         <property name="port">3306</property>  #mysql数据库的端口
 23                         <property name="schema">test</property> #mysql里面默认会有的数据库
 26                         <property name="user">amoeba</property> #刚才授权的用户
 28                         <property name="password">123</property> #密码
 46         <dbServer name="mysql-slave"  parent="abstractServer">  #设置主机名字
 49                         <property name="ipAddress">192.168.202.133</property> #主机IP地址
 53         <dbServer name="mysql-master"  parent="abstractServer">  #设置主机名字
 56                         <property name="ipAddress">192.168.202.131</property> #主机IP地址
 60         <dbServer name="mysql-read" virtual="true">  #设置读主机
 66                         <property name="poolNames">mysql-slave</property> # 写刚才定义的数据库的名字从这台主机里读数据
[root@localhost conf]# vim amoeba.xml

 30                 <property name="user">tom</property> # 这里用的是电商的用户
 32                 <property name="password">123</propert> #登录电商的密码:
115                 <property name="defaultPool">mysql-master</property>  #设置默认访问的主机
116                 <property name="writePool">mysql-master</property> #设置写主机
117                 <property name="readPool">mysql-slave</property>   #设置读主机
7.5 启动(如果成功跳转到 7.7) 默认是前台显示
[root@localhost bin]# pwd
/usr/local/amoeba/bin
[root@localhost bin]# ./amoeba start
log4j:WARN log4j config load completed from file:/usr/local/amoeba/conf/log4j.xml
2019-12-19 19:28:38,014 INFO context.MysqlRuntimeContext - Amoeba for Mysql current versoin=5.1.45-mysql-amoeba-proxy-2.2.0
7.6 如果版本不匹配需要如下操作
[root@localhost bin]# ./amoeba
Error: JAVA_HOME environment variable is not set.
[root@localhost bin]# whereis java   #查找自己的java环境在哪
java: /usr/bin/java /usr/share/man/man1/java.1
[root@localhost bin]# cd /usr/java/
[root@localhost java]# ls
default  jdk1.8.0_131  latest
[root@localhost java]# cd jdk1.8.0_131/ #进入
[root@localhost jdk1.8.0_131]# pwd    #找到具体位置 复制
/usr/java/jdk1.8.0_131
[root@localhost jdk1.8.0_131]# vim /etc/profile  #增加一个环境变量 在最后一行

export JAVA_HOME=/usr/java/jdk1.8.0_131
[root@localhost jdk1.8.0_131]# source /etc/profile #让它生效
7.7 读写分离完成 可以通过登录amoeba插入数据 停掉主从来验证
mysql -utom -p123 -h192.168.202.125 -p8066 #登录amoeba
八 zabbix监控
我在七上装的zabbix 监控剩下的几台主机192.168.202.133
8.1安装 zabbix
[root@localhost ~]# rpm -ivh http://repo.zabbix.com/zabbix/4.4/rhel/7/x86_64/zabbix-release-4.4-1.el7.noarch.rpm
8.2
[root@localhost ~]# yum -y install zabbix-agent zabbix-web-mysql zabbix-server-mysql
8.3数据库授权
mysql> create database zabbix;
Query OK, 1 row affected (0.00 sec)

mysql> grant all on zabbix.* to 'tom'@'localhost' identified by '123';
Query OK, 0 rows affected (0.00 sec)

mysql> flush privileges;
Query OK, 0 rows affected (0.00 sec)
8.4 初始数据库
[root@localhost ~]# cd /usr/share/doc/zabbix-server-mysql-4.4.4/
[root@localhost zabbix-server-mysql-4.4.4]# zcat create.sql.gz |mysql -utom -p123 zabbix;
8.5修改配置文件
[root@localhost zabbix]# vim zabbix_server.conf

91 DBHost=localhost
99 DBName=zabbix
115 DBUser=tom
123 DBPassword=123
8.6启动zabbix
[root@localhost conf.d]# service zabbix-agent restart
Shutting down Zabbix agent:                                [FAILED]
Starting Zabbix agent:                                     [  OK  ]
[root@localhost conf.d]# service zabbix-server restart
Shutting down Zabbix server:                               [FAILED]
Starting Zabbix server:                                    [  OK  ]
8.7 解决页面出不来
我这里出现了一个小问题 测试界面出不来 找了一下 发现是httpd停不掉 这条是解决报错的 可以跳过
[root@localhost ~]#  rpm -qa|grep httpd
httpd-tools-2.2.15-69.el6.centos.x86_64
httpd-2.2.15-69.el6.centos.x86_64
九 jenkins
9.1
9.2
9.3
9.4
9.5
十 git
10.1
10.2
10.3
10.4
10.5
十一 mysql自动备份脚本 每天三点自动执行

 浙公网安备 33010602011771号