canvas绘制图片
canvas保存为data:image扩展功能的实现
【已知】
canvas提供了toDataURL的接口,可以方便的将canvas画布转化成base64编码的image。目前支持的最好的是png格式,jpeg格式的现代浏览器基本也支持,但是支持的不是很好。
【想要的】
往往这么简单直接的接口通常都满足不了需求。我想要的不仅是简单的通过画布生成一个png,我不想新开一个tab,然后还要右键另存为...
我还需要更方便的自由的配置生成的图片的大小,比例等。
另外如果我还要别的图片格式,比如位图bmp,gif等怎么办...
【解决办法】
a)想直接把图片生成后download到本地,其实办法也很简单。直接改图片的mimeType,强制改成steam流类型的。比如‘image/octet-stream’,浏览器就会自动帮我们另存为..
b)图片大小,及比例的可控倒也好办,我们新建一个我们想要大小的canvas,把之前的canvas画布重新按照所要的比例,及大小draw到新的canvas上,然后用新的canvas来toDataURL即可。
c)想要bmp位图会麻烦些... 没有直接的接口,需要我们自己来生成。生成图片的响应头和响应体有一定的规则,略显麻烦。不过还能接受。剩下的就是性能问题,按像素级别来操作,对于一个大图来说计算量很有压力。
【实现】

/**
 * covert canvas to image
 * and save the image file
 */

var Canvas2Image = function () {

    // check if support sth.
    var $support = function () {
        var canvas = document.createElement('canvas'),
            ctx = canvas.getContext('2d');

        return {
            canvas: !!ctx,
            imageData: !!ctx.getImageData,
            dataURL: !!canvas.toDataURL,
            btoa: !!window.btoa
        };
    }();

    var downloadMime = 'image/octet-stream';

    function scaleCanvas (canvas, width, height) {
        var w = canvas.width,
            h = canvas.height;
        if (width == undefined) {
            width = w;
        }
        if (height == undefined) {
            height = h;
        }

        var retCanvas = document.createElement('canvas');
        var retCtx = retCanvas.getContext('2d');
        retCanvas.width = width;
        retCanvas.height = height;
        retCtx.drawImage(canvas, 0, 0, w, h, 0, 0, width, height);
        return retCanvas;
    }

    function getDataURL (canvas, type, width, height) {
        canvas = scaleCanvas(canvas, width, height);
        return canvas.toDataURL(type);
    }

    function saveFile (strData) {
        document.location.href = strData;
    }

    function genImage(strData) {
        var img = document.createElement('img');
        img.src = strData;
        return img;
    }
    function fixType (type) {
        type = type.toLowerCase().replace(/jpg/i, 'jpeg');
        var r = type.match(/png|jpeg|bmp|gif/)[0];
        return 'image/' + r;
    }
    function encodeData (data) {
        if (!window.btoa) { throw 'btoa undefined' }
        var str = '';
        if (typeof data == 'string') {
            str = data;
        } else {
            for (var i = 0; i < data.length; i ++) {
                str += String.fromCharCode(data[i]);
            }
        }

        return btoa(str);
    }
    function getImageData (canvas) {
        var w = canvas.width,
            h = canvas.height;
        return canvas.getContext('2d').getImageData(0, 0, w, h);
    }
    function makeURI (strData, type) {
        return 'data:' + type + ';base64,' + strData;
    }


    /**
     * create bitmap image
     * 按照规则生成图片响应头和响应体
     */
    var genBitmapImage = function (data) {
        var imgHeader = [],
            imgInfoHeader = [];

        var width = data.width,
            height = data.height;

        imgHeader.push(0x42); // 66 -> B
        imgHeader.push(0x4d); // 77 -> M

        var fsize = width * height * 3 + 54; // header size:54 bytes
        imgHeader.push(fsize % 256); // r
        fsize = Math.floor(fsize / 256);
        imgHeader.push(fsize % 256); // g
        fsize = Math.floor(fsize / 256);
        imgHeader.push(fsize % 256); // b
        fsize = Math.floor(fsize / 256);
        imgHeader.push(fsize % 256); // a

        imgHeader.push(0);
        imgHeader.push(0);
        imgHeader.push(0);
        imgHeader.push(0);

        imgHeader.push(54); // offset -> 6
        imgHeader.push(0);
        imgHeader.push(0);
        imgHeader.push(0);

        // info header
        imgInfoHeader.push(40); // info header size
        imgInfoHeader.push(0);
        imgInfoHeader.push(0);
        imgInfoHeader.push(0);

        // 横向info
        var _width = width;
        imgInfoHeader.push(_width % 256);
        _width = Math.floor(_width / 256);
        imgInfoHeader.push(_width % 256);
        _width = Math.floor(_width / 256);
        imgInfoHeader.push(_width % 256);
        _width = Math.floor(_width / 256);
        imgInfoHeader.push(_width % 256);

        // 纵向info
        var _height = height;
        imgInfoHeader.push(_height % 256);
        _height = Math.floor(_height / 256);
        imgInfoHeader.push(_height % 256);
        _height = Math.floor(_height / 256);
        imgInfoHeader.push(_height % 256);
        _height = Math.floor(_height / 256);
        imgInfoHeader.push(_height % 256);

        imgInfoHeader.push(1);
        imgInfoHeader.push(0);
        imgInfoHeader.push(24); // 24位bitmap
        imgInfoHeader.push(0);

        // no compression
        imgInfoHeader.push(0);
        imgInfoHeader.push(0);
        imgInfoHeader.push(0);
        imgInfoHeader.push(0);

        // pixel data
        var dataSize = width * height * 3;
        imgInfoHeader.push(dataSize % 256);
        dataSize = Math.floor(dataSize / 256);
        imgInfoHeader.push(dataSize % 256);
        dataSize = Math.floor(dataSize / 256);
        imgInfoHeader.push(dataSize % 256);
        dataSize = Math.floor(dataSize / 256);
        imgInfoHeader.push(dataSize % 256);

        // blank space
        for (var i = 0; i < 16; i ++) {
            imgInfoHeader.push(0);
        }

        var padding = (4 - ((width * 3) % 4)) % 4;
        var imgData = data.data;
        var strPixelData = '';
        var y = height;
        do {
            var offsetY = width * (y - 1) * 4;
            var strPixelRow = '';
            for (var x = 0; x < width; x ++) {
                var offsetX = 4 * x;
                strPixelRow += String.fromCharCode(imgData[offsetY + offsetX + 2]);
                strPixelRow += String.fromCharCode(imgData[offsetY + offsetX + 1]);
                strPixelRow += String.fromCharCode(imgData[offsetY + offsetX]);
            }
            for (var n = 0; n < padding; n ++) {
                strPixelRow += String.fromCharCode(0);
            }

            strPixelData += strPixelRow;
        } while(-- y);

        return (encodeData(imgHeader.concat(imgInfoHeader)) + encodeData(strPixelData));

    };

    /**
     * saveAsImage
     * @param canvasElement
     * @param {String} image type
     * @param {Number} [optional] png width
     * @param {Number} [optional] png height
     */
    var saveAsImage = function (canvas, width, height, type) {
        if ($support.canvas && $support.dataURL) {
            if (type == undefined) { type = 'png'; }
            type = fixType(type);
            if (/bmp/.test(type)) {
                var data = getImageData(scaleCanvas(canvas, width, height));
                var strData = genBitmapImage(data);
                saveFile(makeURI(strData, downloadMime));
            } else {
                var strData = getDataURL(canvas, type, width, height);
                saveFile(strData.replace(type, downloadMime));
            }

        }
    }

    var convertToImage = function (canvas, width, height, type) {
        if ($support.canvas && $support.dataURL) {
            if (type == undefined) { type = 'png'; }
            type = fixType(type);

            if (/bmp/.test(type)) {
                var data = getImageData(scaleCanvas(canvas, width, height));
                var strData = genBitmapImage(data);
                return genImage(makeURI(strData, 'image/bmp'));
            } else {
                var strData = getDataURL(canvas, type, width, height);
                return genImage(strData);
            }
        }
    }


    return {
        saveAsImage: saveAsImage,
        saveAsPNG: function (canvas, width, height) {
            return saveAsImage(canvas, width, height, 'png');
        },
        saveAsJPEG: function (canvas, width, height) {
            return saveAsImage(canvas, width, height, 'jpeg');
        },
        saveAsGIF: function (canvas, width, height) {
            return saveAsImage(canvas, width, height, 'gif')
        },
        saveAsBMP: function (canvas, width, height) {
            return saveAsImage(canvas, width, height, 'bmp');
        },

        convertToImage: convertToImage,
        convertToPNG: function (canvas, width, height) {
            return convertToImage(canvas, width, height, 'png');
        },
        convertToJPEG: function (canvas, width, height) {
            return convertToImage(canvas, width, height, 'jpeg');
        },
        convertToGIF: function (canvas, width, height) {
            return convertToImage(canvas, width, height, 'gif');
        },
        convertToBMP: function (canvas, width, height) {
            return convertToImage(canvas, width, height, 'bmp');
        }
    };

}();
【Demo】
http://hongru.github.com/proj/canvas2image/index.html
可以试着在canvas上涂涂画画,然后保存看看。如果用bmp格式的话,需要支持 btoa 的base64编码,关于base64编码规则可看上一篇博文
【不完美的地方】
1)jpeg接口本身就不完善,当canvas没有填充颜色或图片时,保存的jpeg由于是直接由png的alpha通道强制转换过来的,所以在png的透明部分在jpeg里面就是黑色的。
2)gif的限制太多。且可用性不大,有png就够了
3)bmp位图生成,计算量稍显大了。
4)由于是强制改mimeType来实现的自动下载,所以下载的时候文件类型不会自动识别。
----------------------------------------------------------------------------
从这里开始,我只会附上js代码,html代码里面只是一个canvas节点.
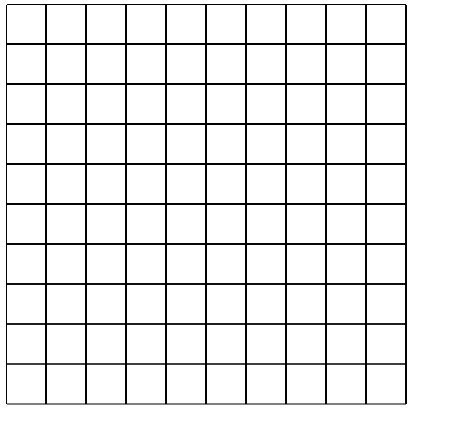
02drawTable.js
window.onload = function () {
    var table = document.getElementById('table'),
        context = table.getContext('2d');

    // 绘制表格
    var width = 400,
        height = 400;
    for (var i = 0; i <= width; i = i + 40) {
        context.moveTo(i, 1);
        context.lineTo(i, height);
        context.stroke();
    }

    for (var i = 0; i <= height; i = i + 40) {
        context.moveTo(1, i);
        context.lineTo(width, i);
        context.stroke();
    }
};
这个代码看起来更简单了.
首先,我是画横线,注意: 没开始画一条横线,就需要把将画笔定位到起点,画完一条线,画笔就会定位到横线的重点. 画完横线,然后话竖线.
下面是效果
在给img对象赋值了src 属性的时候,浏览器会立即开始加载图片,只有当图片加载完毕的时候,我们才能开始绘制图片,所以使用了img.onload = functioin(){...}; 的方式
context.drawImage()有三种方法,下面开始介绍
- drawImage(image, x, y)
其中 image 是 image 或者 canvas 对象,x 和 y 是其在目标 canvas 里的起始坐标。
这里就会按照原生图片进行绘制,不会进行缩放或者裁剪
- drawImage(image, x, y, width, height)
这个方法多了2个参数:width 和 height,这两个参数用来控制 当像canvas画入时应该缩放的大小.
由于我们在画图的时候,希望图片应该按照原比例来呈现.所以就想在页面中写入img标签一样,我们通常情况下只是放入一个参数,然后使用公式计算另一个参数.
由于要求
width/height==originWidth/originHeight
故
height=width/originWidth*originHeight
使用这个公式用宽度来计算高度就可以很按照源比例绘制, 当然如果你想把脸瘦下来,那就另说了.....
- drawImage(image, sx, sy, sWidth, sHeight, dx, dy, dWidth, dHeight)
drawImage方法的第三个也是最后一个变种有8个新参数,用于控制做切片显示的。
第一个参数和其它的是相同的,都是一个图像或者另一个 canvas 的引用。其它8个参数最好是参照下面的图解,前4个是定义图像源的切片位置和大小,后4个则是定义切片的目标显示位置和大小

02移动精灵.html
   <article>
        <canvas height="200" width="400" id="genius"></canvas>
        <div>
            <button id="forward">forward</button>
            <button id="right"> right</button>
            <button id="back">back</button>
            <button id="left">left</button>
        </div>
    </article>
    <script src="02移动精灵.js"></script>
我放置了一个canvas画布和4个按钮,让他前后左右动.
02移动精灵.js
var ctx = document.getElementById('genius').getContext('2d');
var img = new Image();
var intervalId;
var draw = function (direction) {
    var rowIndex = direction,  // 当前是第几行的图片
        columnIndex = 0, // 当前是第几列的图片
        frame = 6,  // 一秒有几帧
        singleWidth = 40,  // 每一个小图片的宽度
        singleHeight = 65;  // 每一个小图片的高度
    window.clearInterval(intervalId);
    intervalId = setInterval(function () {
        // 在没绘制一张小图片之前,都要清空之前绘制的图片,这样才能显示出动画效果来,
        ctx.clearRect(10, 10, singleWidth, singleHeight);
        //  在大图上剪切绘制绘制
        ctx.drawImage(img, columnIndex * singleWidth, rowIndex * singleHeight, singleWidth, singleHeight, 10, 10, singleWidth, singleHeight);
        columnIndex++;
        columnIndex %= 4;
    }, 1000 / frame);

}
这里draw函数里防止了主要的代码,通过计时器来使图片动起来(注意不要使用循环)
注意在每一次移动方向后都要清除计时器,
columnIndex %= 4;columnIndex++; 这两句是常用的循环控制语句.
02移动精灵.js
onload = function () {
    img.src = "./img/DMMban.png";
    img.onload = function () {
        // 用数字表示这个精灵移动的方向.
        // forward: 0,left:1,right:2,back:3
        draw(0);
    }
    document.querySelector('#forward').addEventListener('click', () => {
        draw(0);
    });
    document.querySelector('#left').addEventListener('click', () => {
        draw(1);
    });
    document.querySelector('#right').addEventListener('click', () => {
        draw(2);
    });
    document.querySelector('#back').addEventListener('click', () => {
        draw(3);
    });
};
下面是效果图.
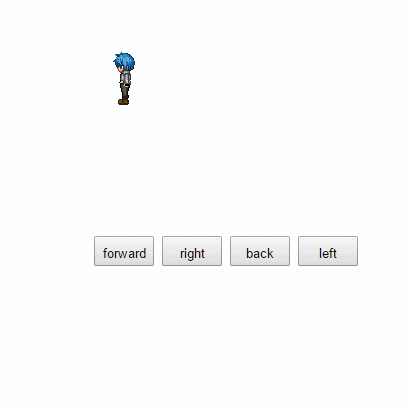
这个精灵并不是很好看,不过因为我不是做动画的,找不到比较漂亮的素材,将就看吧...
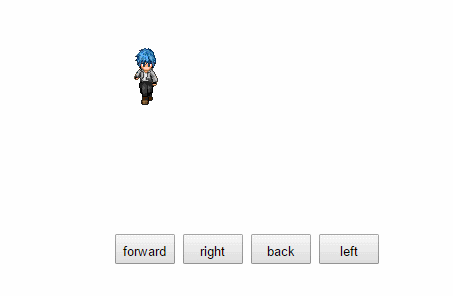
面向对象版本
好了,这个列子相对于第一篇文章例子要复杂一点,所以我也做了一个面向对象的版本,使用到了原型继承和一些其他的知识点.(关于原型继承和JavaScript面向对象在这里有介绍: JavaScript面向对象高级(一)
注意封装对象的方式,我个人认为这样封装对象时非常好的. 这也是很多大牛推荐的.在我的JavaScript高级框架设计部分将会介绍jQuery对象封装的方式.
01-移动精灵-面向对象版本.htm
<body>
    <article>
        <canvas height="200" width="400" id="genius"></canvas>
        <div>
            <button id="forward">forward</button>
            <button id="right"> right</button>
            <button id="back">back</button>
            <button id="left">left</button>
        </div>
    </article>
    <script src="01-移动精灵-面向对象版本.js"></script>
</body>
01-移动精灵-面向对象版本.js
- Genius 类的封装
var Genius = function (option) {
    Genius.prototype._init_(option);
}
Genius.prototype = {
    constructor: Genius,
    // 把对象的初始化代码都放在这里,把它需要用到的所有变量都绑定到它的原型上.
    _init_: function (option) {
        this.img = option.img;
        this.rowIndex = option.rowIndex;
        this.columnIndex = option.columnIndex;
        this.frame = option.frame;
        this.singleWidth = option.singleWidth;
        this.singleHeight = option.singleHeight
    },
    // 由于js面向对象的特点,获取会从父对象的prorotype里面获取,但是设置只会设置自己的
    draw: function (ctx, direction) {
        window.clearInterval(this.intervalId);
        this.rowIndex = direction;
        // 一定要设置,因为在setInterval里面,this指的就是window变量
        var that = this;
        this.intervalId = setInterval(function () {
            // 在没绘制一张小图片之前,都要清空之前绘制的图片,这样才能显示出动画效果来,
            ctx.clearRect(10, 10, that.singleWidth, that.singleHeight);
            //  在大图上剪切绘制绘制
            ctx.drawImage(that.img, that.columnIndex * that.singleWidth, that.rowIndex * that.singleHeight, that.singleWidth, that.singleHeight, 10, 10, that.singleWidth, that.singleHeight);
            that.columnIndex++;
            that.columnIndex %= 4;
        }, 1000 / that.frame);

    }

}
window.onload = function () {
    var ctx = document.getElementById('genius').getContext('2d');
    var oringinImg = new Image();
    oringinImg.src = "./img/DMMban.png";
    var genius;
    oringinImg.onload = function () {
        // 实例化构造一个对象
        genius = new Genius({
            img: oringinImg,
            rowIndex: 0,
            columnIndex: 0,
            frame: 6,
            singleWidth: 40,
            singleHeight: 65
        });
        // 调用Genius的prototype里面的draw方法.
        genius.draw(ctx, 0);

    }
    document.querySelector('#forward').addEventListener('click', () => {
        genius.draw(ctx, 0);
    });
    document.querySelector('#left').addEventListener('click', () => {
        genius.draw(ctx, 1);
    });
    document.querySelector('#right').addEventListener('click', () => {
        genius.draw(ctx, 2);
    });
    document.querySelector('#back').addEventListener('click', () => {
        genius.draw(ctx, 3);
    });
};
这是效果图
邮箱:steven9801@163.com
QQ: 48039387

 浙公网安备 33010602011771号