
1 kmalloc/vmalloc区别
| 函数 | 位置 | 特性 | 大小限制 |
|---|---|---|---|
| kmalloc | 物理内存映射区域 | 物理地址虚拟地址均连续 | 不能超过128K |
| kzalloc | 物理内存映射区域 | 物理地址虚拟地址均连续 | 不能超过128K |
| vmalloc | 虚拟内存映射区域 | 虚拟地址连续,物理地址不一定连续 | 无限制 |
| vzalloc | 虚拟内存映射区域 | 虚拟地址连续,物理地址不一定连续 | 无限制 |
kzalloc只是相当于附加了 __GFP_ZERO 标志。所以它除了申请内核内存外,还会对申请到的内存内容清零。
同理,vzalloc也是一样,会对申请内存内容清零。

1.1 kmalloc函数原型:
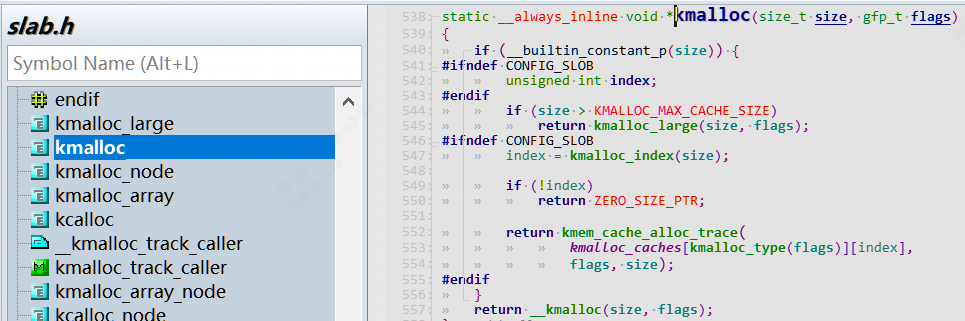
static __always_inline void *kmalloc(size_t size, gfp_t flags);
1.1.1 gpf flags含义
|– 在进程上下文,可以睡眠     GFP_KERNEL
 |– 在进程上下文,不可以睡眠,如: GFP_ATOMIC
 |  |– 中断处理程序       GFP_ATOMIC
 |  |– 软中断          GFP_ATOMIC
 |  |– Tasklet         GFP_ATOMIC
 |– 用于DMA的内存,可以睡眠   GFP_DMA | GFP_KERNEL
 |– 用于DMA的内存,不可以睡眠  GFP_DMA |GFP_ATOMIC
如果进程上下文允许睡眠情况下尽量用GFP_KERNEL, 如果进程上下文禁止休眠的话(如中断,taskletd等)必须用GFP_ATOMIC
1.2 vmalloc函数原型:
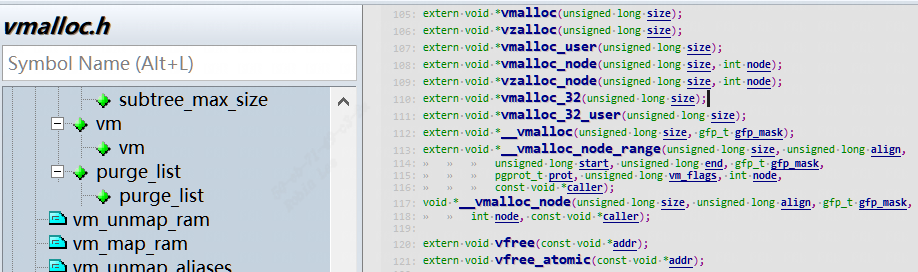
extern void *vmalloc(unsigned long size);
注意:vmalloc和vfree可以睡眠,因此中断上下文禁止使用。
1.3 内存释放
void kfree(const void *);
extern void vfree(const void *addr);
2 kmalloc/vmalloc内存分配原理
slab机制,等后面学习完后介绍。
3 CMA介绍
3.0 引入Linux内核Buddy系统
Linux伙伴系统(Buddy)使用 Page 粒度来管理内存,每个页面大小为4K。伙伴系统按照空闲内存块的长度,把内存挂载到不同长度的 free_list链表中。free_list 的单位是以 (2^order个Page) 来递增的,即 1 page、2 page、… 2^n,通常情况下最大 order 为10 对应的空闲内存大小为 4M bytes。我们使用伙伴系统来申请连续的物理页面最大的页面最大小4M bytes。
当系统内存碎片化严重的时候,也很难分配到高order的页面,这时就引入了CMA概念,接着往下看。
3.1 CMA概述
连续内存分配器(Contiguous Memory Allocator),简称CMA。在系统长时间运行后,内存可能碎片化,很难找到连续的物理页,CMA很好的避免了这个问题。
举个例子:
手机上1300万像素的摄像头,一个像素占用3字节,拍摄一张照片需要大约37MB内存。在系统长时间运行后,内存可能碎片化,很难找到连续的物理页,页分配器(kmalloc)和块分配器(vmalloc)很可能无法分配这么大的连续内存块。
方案1:
最开始的一种解决方案是为设备保留一块大的内存区域,比如为摄像头驱动预留一块大内存,通过ioremap来映射后作为私有内存使用,缺点是:当设备驱动不使用的时候(大多数时间手机摄像头是空闲的),内核的其他模块不能使用这块内存。
方案2:
连续内存分配器CMA很好的解决了这个问题,保留一块大的内存区域,当设备驱动不使用的时候,内核的其他模块可以使用。一般我们把这块区域定义为reserved-memory。
3.2 CMA内核使能
编译内核时需要开启以下配置宏:
(1)配置宏CONFIG_CMA,启用连续内存分配器。
(2)配置宏CONFIG_CMA_AREAS,指定CMA区域的最大数量,默认值是7。
(3)配置宏CONFIG_DMA_CMA,启用允许设备驱动分配内存的连续内存分配器
3.3 CMA的定义
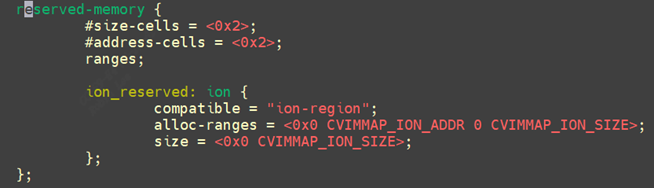
CMA每个区域实际上就是一个reserved memory。CMA分两种:
- 通用的CMA区域,该区域是给整个系统分配使用的;如下面的
"linux,cma" - 专用的CMA区域,这种是专门为单个模块定义的。如下面的
"“ion”"
dts中CMA属性:
1. reusable:表示当前的内存区域除了被dma使用之外,还可以被内存管理(buddy)子系统reuse。
2. no-map:表示是否需要创建页表映射,对于通用的内存,必须要创建映射才可以使用,共享CMA是可以作为通用内存进行分配使用的,因此必须要创建页表映射。
3. 对于共享的CMA区域,需要配置上linux,cma-default属性,标志着它是共享的CMA。
4. alignment:对齐参数,保留内存的起始地址需要向该参数对齐
5. alloc-ranges:指定可以用来申请动态保留内存的区间
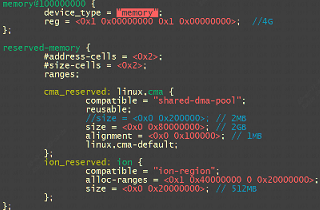
下面定义了3段区域CMA:
1.全局CMA区域,节点名称是“linux,cma”,大小是2GB,8K对齐。配置上linux,cma-default属性,reusable属性。
2.私有CMA区域,节点名字“de_mem0” “de_mem1”,128M给GPU 2D engine使用,私有无需建立页表映射。
3.私有CMA区域,节点名字“ion”,给video pipeline使用,私有无需建立页表映射。
2de模块中定义memory-region属性,并且把对应dts定义的cma节点de_reserved0,de_reserved1传递给该模块。
    reserved-memory {
            #address-cells = <0x2>;
            #size-cells = <0x2>;
            ranges;
            cma_reserved: linux,cma {
                    compatible = "shared-dma-pool";
                    reusable;//表示 cma 内存可被 buddy 系统使用
                    size = <0x0 0x80000000>; // 2GB
                    alignment = <0x0 0x2000>; // 8KB
                    linux,cma-default;
            };
            de_reserved0: de_mem0 {
                            reg = <0x1 0x10000000 0x0 0x8000000>; // 128M, for 2de
                            no-map;
            };
            de_reserved1: de_mem1 {
                            reg = <0x1 0x18000000 0x0 0x8000000>; // 128M, for 2de
                            no-map;
            };
            ion_reserved: ion {
                    compatible = "ion-region";
                    size = <0x0 0x04000000>; // 64MB
            };
            vo_2de0 {
                    compatible = "sophgo,vg-lite0";
                    memory-region = <&de_reserved0>;
                    interrupt-parent = <&gic>;
                    interrupts = <GIC_SPI 27 IRQ_TYPE_LEVEL_HIGH>;
                    interrupt-names = "vo_2de0";
            };
            vo_2de1 {
                    compatible = "sophgo,vg-lite1";
                    memory-region = <&de_reserved1>;
                    interrupt-parent = <&gic>;
                    interrupts = <GIC_SPI 28 IRQ_TYPE_LEVEL_HIGH>;
                    interrupt-names = "vo_2de1";
            };
3.5 CMA内存原理和流程
设备驱动程序不能直接使用连续内存分配器,而是调用DMA映射框架来使用连续内存分配器CMA。
3.5.1 CMA调用层次框架
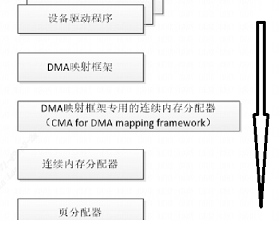
- 最底层为
页分配器(以后分析)。 - cma_alloc用来从CMA区域分配页,cma_release用来释放从CMA区域分配的页。
- 第3层为DMA映射框架专用的连续内存分配器,简称DMA专用连续内存分配器,提供的接口
dma_alloc_from_contiguous用来从CMA区域分配页,接口dma_release_from_contiguous用来释放从CMA区域分配的页。 - 第4层就是DMA通用映射框架,供驱动程序调用
dma_alloc_coherent和dma_alloc_noncoherent用来分配内存,接口dma_free_coherent和dma_free_noncoherent用来释放内存。
3.5.2 CMA结构体
mm/cma.h
struct cma {
	 unsigned long    base_pfn; //该CMA区域的起始页帧号
	 unsigned long    count; //该cma区域的页数
	 unsigned long    *bitmap; //位图,每个位描述对应的页的分配状态,0表示空闲,1表示已分配
	 unsigned int order_per_bit;//位图中的每个位描述的物理页的阶数,目前取值为0,表示每个位描述一页
	 struct mutex     lock;
	 const char *name;
};

mm/cma.c
struct cma cma_areas[MAX_CMA_AREAS];//定义多个CMA区域。
unsigned cma_area_count;//表示实际使用的cma区域数量
cma模块使用bitmap来管理其内存的分配,0表示free,1表示已经分配。
重点解释order_per_bit:如果order_per_bit等于0,表示按照一个一个page来分配和释放,如果order_per_bit等于1,表示按照2个page组成的block来分配和释放,以此类推。
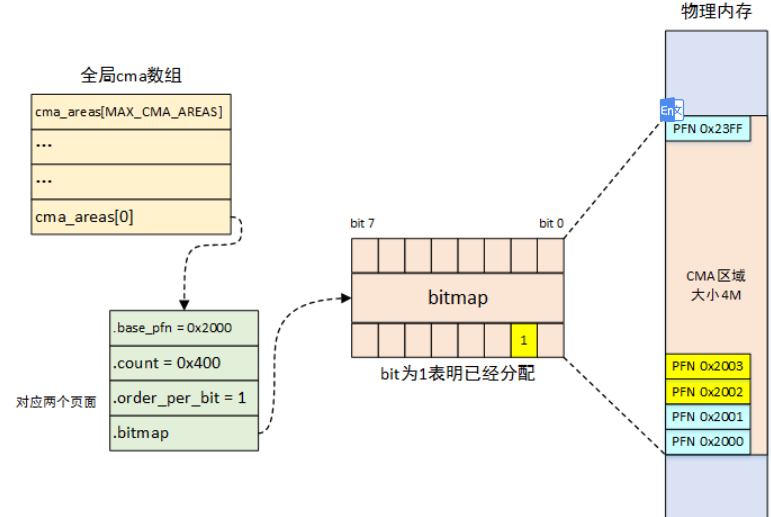
上图cma_area[0]的.order_per_bit = 1,对应2个page,起始页帧号为0x2000, 0x400个页数,对应size为0x400 *2* 2K = 4M
刚好对应4M。
3.5.3 CMA区域初始化
3.5.3.0 整个memory初始化
start_kernel
    ------>setup_arch
        ------>setup_machine_fdt
            ------>early_init_dt_scan_nodes
                ------>of_scan_flat_dt
                    ------>early_init_dt_scan_memory
                        ------>early_init_dt_add_memory_arch
                            ------>memblock_add
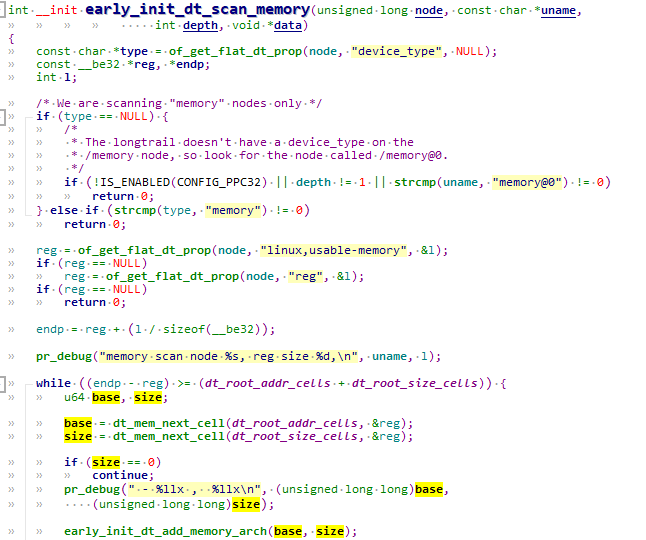
3.5.3.1 dts描述中cma内存的初始化
linux内核首先需要解析dtb中节点“memory”,把内存块添加到memblock的memory类型,memory类型保存内存块的物理地址范围,reserved类型保存保留内存块的物理地址范围,CMA区域就属于保留内存块。
创建CMA区域的执行流程如下所示:
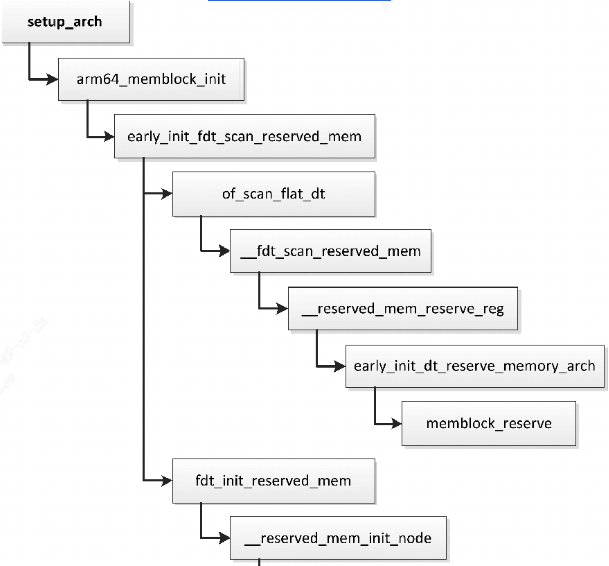
start_kernel
    ------>setup_arch
        ------>arm_memblock_init
            ------>early_init_fdt_scan_reserved_mem
                ------>of_scan_flat_dt
                     ------> __fdt_scan_reserved_mem
                        ------> fdt_init_reserved_mem
                            ------> memblock_add
linux内核启动时,当调用到__reserved_mem_init_node时会调用所有使用RESERVEDMEM_OF_DECLARE声明的CMA区域。
__reserved_mem_init_node会遍历__reservedmem_of_table section中的内容,检查到dts中有compatible匹配(CMA这里为“shared-dma-pool”)就进一步执行对应的initfn。通过RESERVEDMEM_OF_DECLARE定义的都会被链接到__reservedmem_of_table这个section段中,最终会调到使用RESERVEDMEM_OF_DECLARE定义的函数:
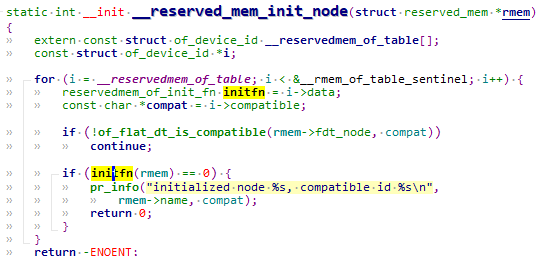
其中全局CMA区域的初始化函数是rmem_cma_setup:
3.5.3.1.1 全局cma内存初始化rmem_cma_setup
rmem_cma_setup的作用就是将reserved-memory添加到cma子系统:

rmem_cma_setup
|------>cma_init_reserved_mem // 将reserved-memory 添加到cma_areas数组中
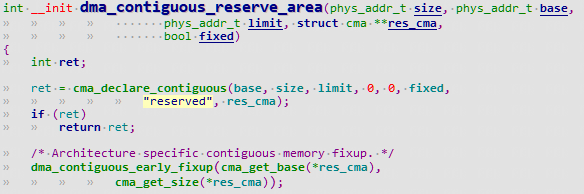
|------>dma_contiguous_early_fixup// dma remap
|------>dma_contiguous_set_default// set_default cma area
3.5.3.1.1.1 cma_init_reserved_mem
来看调用的cma_init_reserved_mem:
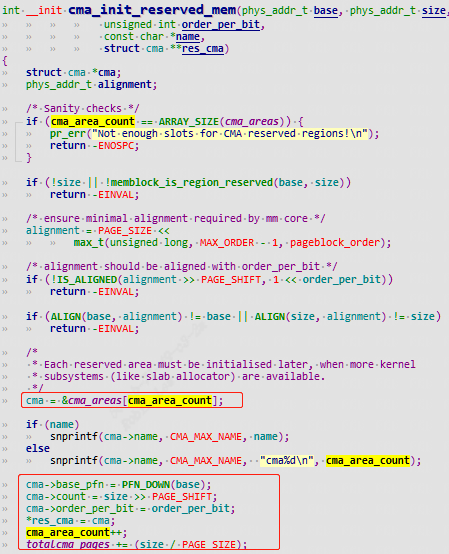
从数组cma_areas分配一个数组项,保存CMA区域的起始页帧号和页数。dts指定了属性“linux,cma-default”,那么这个CMA区域是默认的CMA区域,最后设置全局变量dma_contiguous_default_area指向这个CMA区域(默认全局CMA区域)
红色圈出了该cma区域的dts描述和dts是不是完全吻合。
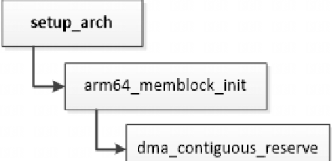
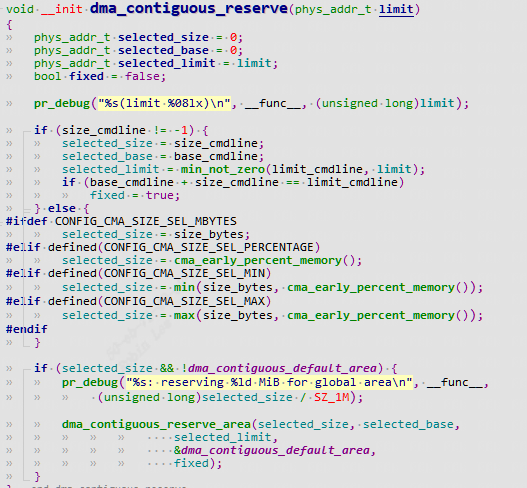
3.5.3.2 dts没有描述cma内存的初始化
如果内核参数或配置宏配置全局CMA区域,cma初始化则流程如下所示:
3.5.4 CMA 区域内存映射
CMA 区域创建初始化完后还不能直接使用,需要单独进行页表映射。前面:
linux内核-3.Linux 内核启动流程 - fuzidage - 博客园 (cnblogs.com) 2.1.1.1.1 start_kernel
Linux内核启动流程 | Hexo (fuzidage.github.io)
小结有介绍start_kernel启动流程。
start_kernel
    ------>setup_arch
        ------>paging_init//建立页表映射,包括非保留内存和保留内存。
            ------>dma_contiguous_remap
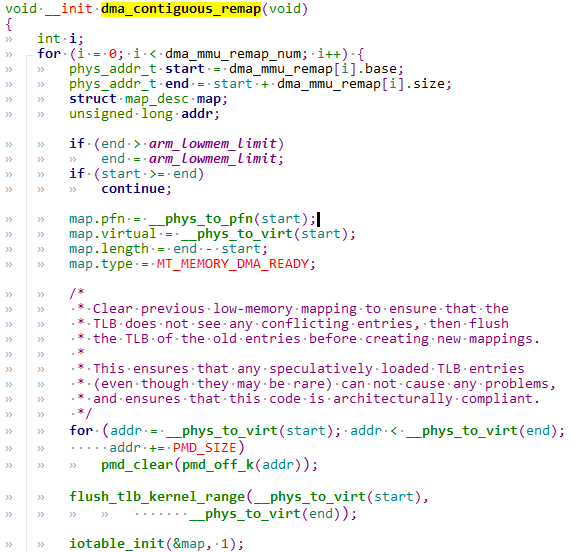
3.5.4.1 dma_contiguous_remap-建立cma area的页表映射
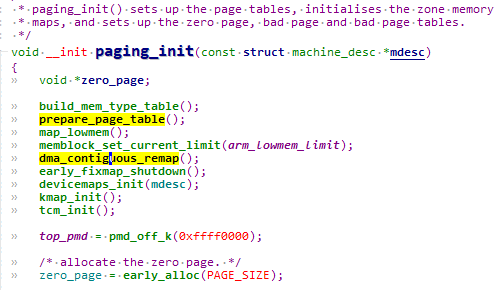
prepare_page_table负责普通内存的页表映射。dma_contiguous_remap建立cma area的页表映射:
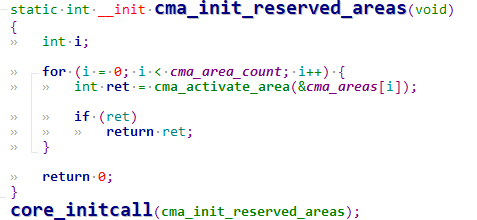
3.5.5 cma_init_reserved_areas-激活cma area内存
cma_activate_area函数用于将 CMA 区域内的预留页全部释放添加到 Buddy 管理器内,然后激活 CMA 区域供系统使用。
3.5.5.1 cma_activate_area
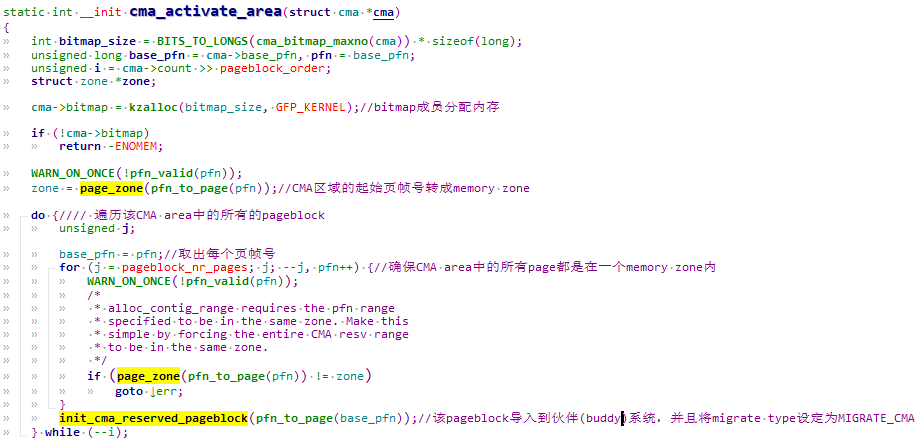
3.5.5.1.1 init_cma_reserved_pageblock
cma默认是从reserved memory中分配的,通常情况这块内存是直接分配并预留不做任何使用,无形之中造成了浪费。所以在不用的时候放入伙伴系统,作为普通内存使用。
4 CMA内存使用
struct page   *page = NULL;
page = cma_alloc(dev_get_cma_area(dev),mem_size, 0, GFP_KERNEL);
dev_get_cma_area可以获取对应的cma handler,如果获取不到,比如对应模块中并未定义memory-region,那么就会返回共享的cma handler,还记的上面的 linux,cma-default属性吗,共享cma区域会被作为缺省cma来使用。
4.1 dma_alloc_from_contiguous
4.2 dma_release_from_contiguous
不过一般内核模块要使用CMA内存时,使用的接口依然是dma的接口:
extern void *dma_alloc_coherent(struct device *dev, size_t size, dma_addr_t *dma_handle, gfp_t flag);
extern void dma_free_coherent(struct device *dev, size_t size, void *cpu_addr, dma_addr_t dma_handle);
最终也会进入dma_alloc_from_contiguous调用cma_alloc分配内存。
struct page *dma_alloc_from_contiguous(struct device *dev, size_t count,
	unsigned int align, bool no_warn)
{
	if (align > CONFIG_CMA_ALIGNMENT)
		align = CONFIG_CMA_ALIGNMENT;
	return cma_alloc(dev_get_cma_area(dev), count, align, no_warn);
}

bool dma_release_from_contiguous(struct device *dev, struct page *pages,
	 int count)
{
	return cma_release(dev_get_cma_area(dev), pages, count);
}
/**
 * cma_alloc() - allocate pages from contiguous area
 * @cma:   Contiguous memory region for which the allocation is performed.
 * @count: Requested number of pages.
 * @align: Requested alignment of pages (in PAGE_SIZE order).
 * @no_warn: Avoid printing message about failed allocation
 *
 * This function allocates part of contiguous memory on specific
 * contiguous memory area.
 */
struct page *cma_alloc(struct cma *cma, size_t count, unsigned int align,
			   bool no_warn);
extern void *dma_alloc_coherent(struct device *dev, size_t size, dma_addr_t *dma_handle, gfp_t flag);
extern void dma_free_coherent(struct device *dev, size_t size, void *cpu_addr, dma_addr_t dma_handle);
struct page *dma_alloc_from_contiguous(struct device *dev, size_t count,
	unsigned int align, bool no_warn);
bool dma_release_from_contiguous(struct device *dev, struct page *pages,
	 int count);
4.3 cma_alloc

从指定的CMA 区域上分配count个连续的页面,按照align对齐。
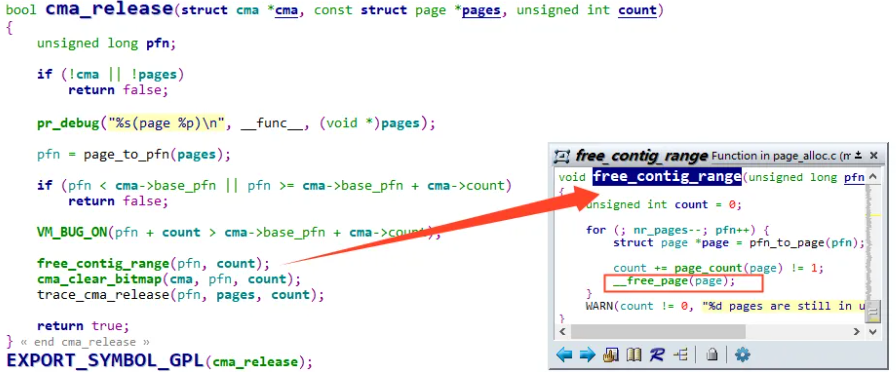
4.4 cma_release

释放已经分配count个连续的页面。
/**
 * cma_release() - release allocated pages
 * @cma:   Contiguous memory region for which the allocation is performed.
 * @pages: Allocated pages.
 * @count: Number of allocated pages.
 *
 * This function releases memory allocated by cma_alloc().
 * It returns false when provided pages do not belong to contiguous area and
 * true otherwise.
 */
bool cma_release(struct cma *cma, const struct page *pages, unsigned int count);
5 通过procfs查看cma area
5.1 获得ram地址范围
第一个比较重要的是获得系统物理内存的范围:
$ cat /proc/iomem
10000000-17ffffff : System RAM
  10008000-107fffff : Kernel code
  10900000-10960677 : Kernel data
40002000-4000201f : serial
4000a000-4000a01f : codec@4000a000
40010000-40011fff : i2c0@40010000
40014000-4001401f : serial
40016000-4001601f : serial
40020000-40021fff : i2c2@40020000
4003a000-4003a01f : wdt0@4003a000
40056000-40056fff : video0@40056000
4005a000-4005bfff : dma0@4005a000
40064000-40064fff : video1@40064000
40068000-40069fff : dma1@40068000
4006a000-4006a1ff : lsacc2d@4006a000
40080000-40081fff : clock@40080000
40082000-40082027 : msgunit@40082000
400a0000-400a00ff : mmc0@400a0000
400aa000-400aa1ff : gauss@400aa000
到 “System RAM”, 其代表系统物理内存的起始物理地址和终止物理地址。
5.2 获得reserved-memory范围
$ cat /sys/kernel/debug/memblock/reserved
   0: 0x10004000..0x10007fff
   1: 0x10100000..0x10960677
   2: 0x12000000..0x127fffff
   3: 0x1579b000..0x157a1fff
   4: 0x17ea1cc0..0x17eb9fc3
   5: 0x17eba000..0x17ee0fff
   6: 0x17ee3180..0x17ee347f
   7: 0x17ee34b0..0x17ffefff
   8: 0x17fff100..0x17fff177
   9: 0x17fff180..0x17fff1c4
  10: 0x17fff200..0x17fff23b
  11: 0x17fff240..0x17fff3c3
  12: 0x17fff400..0x17fff5c4
  13: 0x17fff600..0x17fff677
  14: 0x17fff680..0x17fff68b
  15: 0x17fff6c0..0x17fff6cb
......
通过这个命令可以知道系统已预留的内存信息,这些已预留的内存信息不可使用。
6 dts的reserved-memory内容解析
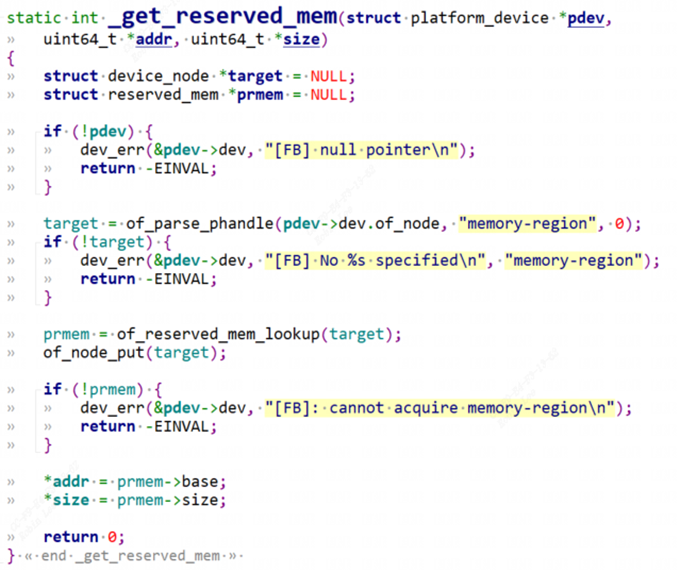
通常使用memory-region将设备和reserved memory 关联起,cvifb 通过 memory-region 关联到 fb_reserved 这块 reserved memory 上面.
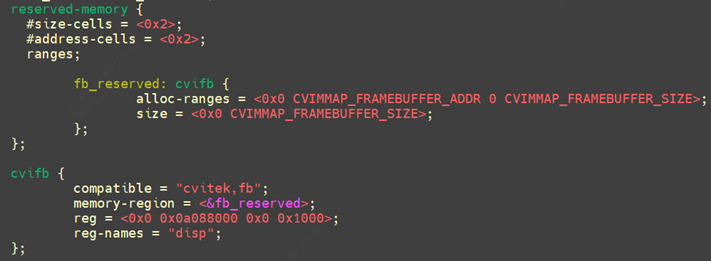
通过cvifb节点的memory-region属性找到reserved-memory,of_reserved_mem_lookup根据关联的reserved-momory节点找到预留内存地址.

 浙公网安备 33010602011771号