1 中断在设备树中的表述
1.1 中断控制器
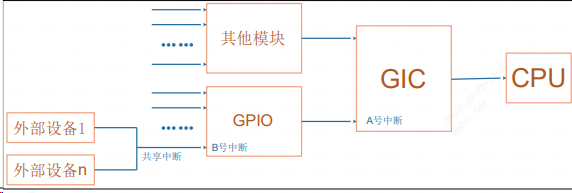
如图:GPIO1 连接到 GIC,GPIO2 连接到 GIC,所以 GPIO1 的父亲是 GIC,GPIO2的父亲是 GIC。假设 GPIO1 有 32 个中断源,但是它把其中的 16 个汇聚起来向 GIC 发出一个中断,把另外 16 个汇聚起来向 GIC 发出另一个中断。这就意味着 GPIO1 会用到 GIC 的两个中断,会涉及 GIC 里的 2 个 hwirq
1.2 设备树中断相关属性
设备树中,中断控制器节点中必须有一个属性:
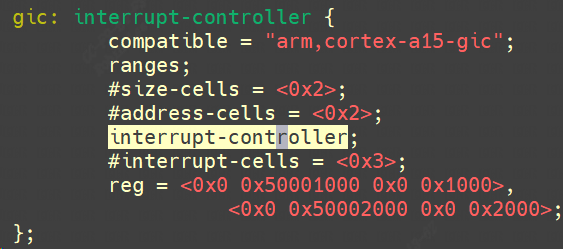
1.2.1 interrupt-controller
表明它是 “中断控制器”。
1.2.2 interrupt-cells
⚫ #interrupt-cells=<1>
别的节点要使用这个中断控制器时,只需要一个 cell 来表明使用 “哪一个中断”
vic: intc@10140000 {
compatible = "arm,versatile-vic";
interrupt-controller;
#interrupt-cells = <1>;
reg = <0x10140000 0x1000>;
};
⚫ #interrupt-cells=<2>
别的节点要使用这个中断控制器时,需要一个 cell 来表明使用 “哪一个中断”;还需要另一个 cell 来描述中断,一般是表明触发类型:
第 2 个 cell 的 bits[3:0] 用来表示中断触发类型(trigger type and level flags):
	1 = low-to-high edge triggered,上升沿触发
	2 = high-to-low edge triggered,下降沿触发
	4 = active high level-sensitive,高电平触发
	8 = active low level-sensitive,低电平触发
gpio2: gpio@020a0000 {
	compatible = "fsl,imx6q-gpio", "fsl,imx35-gpio";
	reg = <0x020a0000 0x4000>;
	interrupts = <0 68 4>,
		  <0 69 4>;
	gpio-controller;
	#gpio-cells = <2>;
	interrupt-controller;
	#interrupt-cells = <2>;
   };
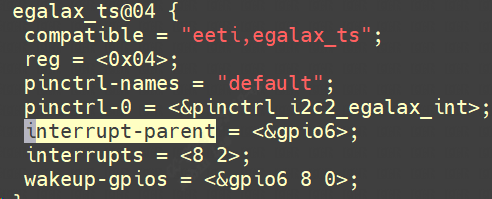
1.2.3 interrupt-parent
你要用哪一个中断控制器里的中断?
1.2.4 interrupts
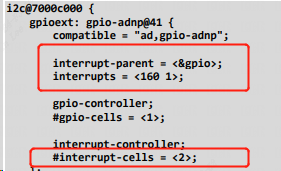
你要用哪一个中断?
Interrupts 里要用几个 cell,由interrupt-parent对应的中断控制器决定。在中断控制器里有“#interrupt-cells”属性,它指明了要用几个 cell来描述中断。比如下图表示用到gpio中断控制器的160号中断,上升沿触发。
1.3 dts中获取中断
1.3.1 对于 platform_device
1.3.1.1 platform_get_resource
当平台设备和平台驱动match上后,一个节点能被转换为 platform_device,调用platform_get_resource可获取节点资源信息。
extern struct resource *platform_get_resource(struct platform_device *,unsigned int, unsigned int);


如果需要获取中断信息,传入IORESOURCE_IRQ。
1.3.2 对于 I2C 设备、SPI 设备
I2C 总线驱动在处理设备树里的 I2C 子节点时,Linux总线会自动处理其中的中断信息。一个 I2C 设备会被转换为一个 i2c_client结构体,中断号会保存在 i2c_client 的 irq 成员里,代码如下(drivers/i2c/i2c-core.c),probe函数里面of_irq_get函数会根据dts中的i2c节点获取中断资源。

GIC_SPI表示中断类型为共享中断。
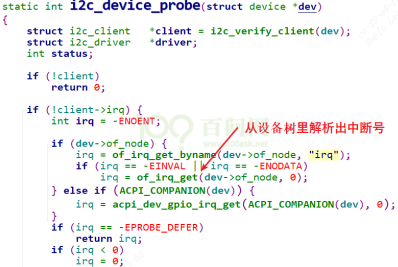

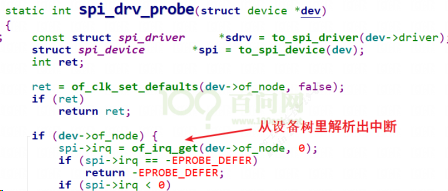
SPI总线同理,一个 SPI 设备会被转换为一个spi_device结构体,中断号会保存在 spi_device 的 irq 成员里,代码如下(drivers/spi/spi.c):
1.3.2.1 调用 of_irq_get 获得中断号
如果我们没用platform device架构写字符设备驱动,也可以直接调用of_irq_get获取。

1.3.3 对于 GPIO
1.3.3.1 gpio_to_irq或 gpiod_to_irq
参考:drivers/input/keyboard/gpio_keys.c, api路径linux_5.10\include\linux\of_gpio.h
可以使用 gpio_to_irq 或 gpiod_to_irq 获得中断号。
button->gpio = of_get_gpio_flags(pp, 0, &flags);
bdata->gpiod = gpio_to_desc(button->gpio);
//再去使用 gpiod_to_irq 获得中断号:
irq = gpiod_to_irq(bdata->gpiod);
2 编写一个按键中断
2.1 按键dts配置
linux内核自带的input sub system本身就包含了gpio按键驱动,驱动程序 drivers/input/keyboard/gpio_keys.c 就可以,然后你需要做
的只是修改设备树指定引脚及键值。
为了简化我们直接写一个例子:强化熟悉对gpio中断的使用。
我们确定好用gpio5_1, gpio4_14这2个按键来展开实验:定义好dts节点,这里定义gpio_keys_100ask,内核有函数自动把gpio num转成irq。在其他地方dts中(imx6ull.dts中)会描述好gpio5,gpio4节点信息,里面会有
#gpio-cells = <2>;
因此,这里表示引用gpio5的第0个引脚,gpio4的第14个引脚,节点如下,需要把原来的节点gpio-keys disable掉,添加下面的gpio_keys_100ask。进入内核目录 make dtbs
gpio_keys_100ask {
	compatible = "100ask,gpio_key";
	gpios = <&gpio5 1 GPIO_ACTIVE_HIGH
	&gpio4 14 GPIO_ACTIVE_HIGH>;
	pinctrl-names = "default";
	pinctrl-0 = <&key1_pinctrl &key2_pinctrl>;
};
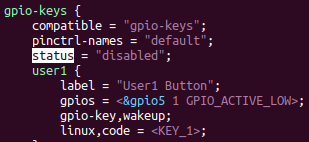
设备树中并没有对这2个引脚进行pinctrl配置,也就是iomux配置,那为什么这2个引脚还能工作,是因为这个个引脚默认就是gpio状态,不用进行iomux切换。
为了保险起见,按照标准流程还需要对其添加pinctrl信息。
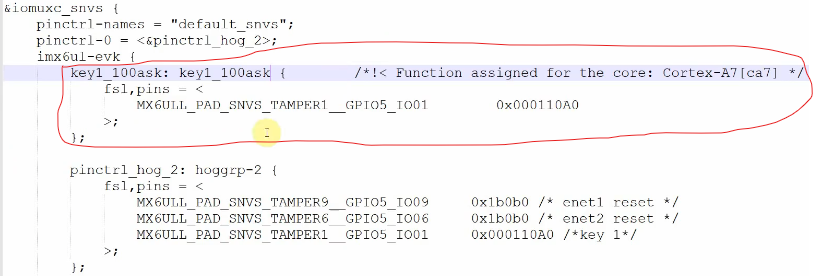
2.1.1 添加2个按键的iomux配置
imx6ull工具有制作好pinctrl如何配置:


填入到对应的子节点下面:gpio5的iomux配置放在iomuxc_snvs节点下,gpio4的配置放在iomuxc下。

2.1.2 定义按键dts描述
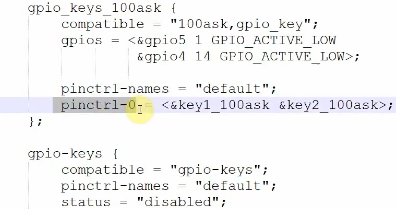
再到定义的gpio_keys_100ask引用这2个pinctrl信息 key1_100ask和 key2_100ask。这里pinctrl只有一个default状态,pinctrl-0表示该默认状态,因此最终gpio5_1, gpio4_14就被iomux成了gpio状态。
2.2 驱动代码
驱动代码如下
#include <linux/module.h>
#include <linux/fs.h>
#include <linux/errno.h>
#include <linux/miscdevice.h>
#include <linux/kernel.h>
#include <linux/major.h>
#include <linux/mutex.h>
#include <linux/proc_fs.h>
#include <linux/seq_file.h>
#include <linux/stat.h>
#include <linux/init.h>
#include <linux/device.h>
#include <linux/tty.h>
#include <linux/kmod.h>
#include <linux/gfp.h>
#include <linux/gpio/consumer.h>
#include <linux/platform_device.h>
#include <linux/of_gpio.h>
#include <linux/of_irq.h>
#include <linux/interrupt.h>
#include <linux/irq.h>
#include <linux/slab.h>
struct gpio_key{
	int gpio;
	struct gpio_desc *gpiod;
	int flag;
	int irq;
};
static struct gpio_key *gpio_keys_100ask;
static int major = 0;
static struct class *gpio_key_class;
static int g_key = 0;
static DECLARE_WAIT_QUEUE_HEAD(gpio_key_wait);

static ssize_t gpio_key_drv_read (struct file *file, char __user *buf, size_t size, loff_t *offset) {
	int err;
	wait_event_interruptible(gpio_key_wait, g_key);
	err = copy_to_user(buf, &g_key, 4);
	g_key = 0;
	return 4;
}
static struct file_operations gpio_key_drv = {
	.owner	 = THIS_MODULE,
	.read    = gpio_key_drv_read,
};

static irqreturn_t gpio_key_isr(int irq, void *dev_id){
	struct gpio_key *gpio_key = dev_id;
	int val;
	val = gpiod_get_value(gpio_key->gpiod);
	printk("key %d %d\n", gpio_key->gpio, val);
	g_key = (gpio_key->gpio << 8) | val;
	wake_up_interruptible(&gpio_key_wait);
	return IRQ_HANDLED;
}

/* 1. 从platform_device获得GPIO
 * 2. gpio=>irq
 * 3. request_irq
 */
static int gpio_key_probe(struct platform_device *pdev){
	int err;
	struct device_node *node = pdev->dev.of_node;
	int count;
	int i;
	enum of_gpio_flags flag;

	count = of_gpio_count(node);
	if (!count)
		printk("%s %s line %d, there isn't any gpio available\n", __FILE__, __FUNCTION__, __LINE__);
		return -1;
	}
	gpio_keys_100ask = kzalloc(sizeof(struct gpio_key) * count, GFP_KERNEL);
	for (i = 0; i < count; i++)
		gpio_keys_100ask[i].gpio = of_get_gpio_flags(node, i, &flag);
		if (gpio_keys_100ask[i].gpio < 0) {
			printk("%s %s line %d, of_get_gpio_flags fail\n", __FILE__, __FUNCTION__, __LINE__);
			return -1;
		}
		gpio_keys_100ask[i].gpiod = gpio_to_desc(gpio_keys_100ask[i].gpio);
		gpio_keys_100ask[i].flag = flag & OF_GPIO_ACTIVE_LOW;
		gpio_keys_100ask[i].irq  = gpio_to_irq(gpio_keys_100ask[i].gpio);
	}

	for (i = 0; i < count; i++) {
		err = request_irq(gpio_keys_100ask[i].irq, gpio_key_isr, IRQF_TRIGGER_RISING | IRQF_TRIGGER_FALLING
                          , "100ask_gpio_key", &gpio_keys_100ask[i]);
	}
	major = register_chrdev(0, "100ask_gpio_key", &gpio_key_drv);  /* /dev/100ask_gpio_key */
	gpio_key_class = class_create(THIS_MODULE, "100ask_gpio_key_class");
	if (IS_ERR(gpio_key_class)) {
		printk("%s %s line %d\n", __FILE__, __FUNCTION__, __LINE__);
		unregister_chrdev(major, "100ask_gpio_key");
		return PTR_ERR(gpio_key_class);
	}
	device_create(gpio_key_class, NULL, MKDEV(major, 0), NULL, "100ask_gpio_key"); /* /dev/100ask_gpio_key */
    return 0;
}
static int gpio_key_remove(struct platform_device *pdev){
	struct device_node *node = pdev->dev.of_node;
	int count;
	int i;

	device_destroy(gpio_key_class, MKDEV(major, 0));
	class_destroy(gpio_key_class);
	unregister_chrdev(major, "100ask_gpio_key");
	count = of_gpio_count(node);
	for (i = 0; i < count; i++){
		free_irq(gpio_keys_100ask[i].irq, &gpio_keys_100ask[i]);
	}
	kfree(gpio_keys_100ask);
    return 0;
}

static const struct of_device_id ask100_keys[] = {
    { .compatible = "100ask,gpio_key" },
    { },
};
static struct platform_driver gpio_keys_driver = {
    .probe      = gpio_key_probe,
    .remove     = gpio_key_remove,
    .driver     = {
        .name   = "100ask_gpio_key",
        .of_match_table = ask100_keys,
    },
};
static int __init gpio_key_init(void){
    return platform_driver_register(&gpio_keys_driver);
}
static void __exit gpio_key_exit(void){
    platform_driver_unregister(&gpio_keys_driver);
}
module_init(gpio_key_init);
module_exit(gpio_key_exit);
MODULE_LICENSE("GPL");
2.2.1 驱动代码分析
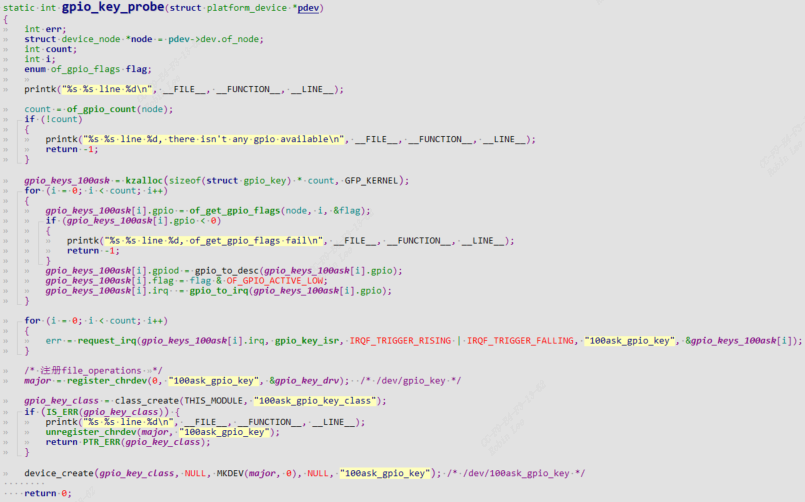
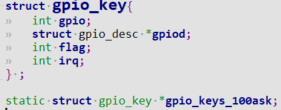
定义gpio_key
通过.compatible = "100ask,gpio_key"匹配plateform_device和platform_driver, 当insmod ko时probe函数被调用。
struct device_node *node = pdev->dev.of_node;//可以从platform_device获取到device_node。

of_gpio_count可以根据设备树节点获取到gpio的数量。

of_get_gpio_flags可以根据设备树节点获取到gpio编号和gpio flags

获取gpio描述子和gpio中断号:

注册中断服务程序gpio_key_isr,当按键按下会触发gpio中断,执行gpio_key_isr

中断服务程序就简单的打印按键的电平状态:
static irqreturn_t gpio_key_isr(int irq, void *dev_id){
	struct gpio_key *gpio_key = dev_id;
	int val;
	val = gpiod_get_value(gpio_key->gpiod);
	printk("key %d %d\n", gpio_key->gpio, val);
	return IRQ_HANDLED;
}


