17注释元素
注释元素
本节介绍Revit注释元素,例如尺寸标注、文字注释、注释记号、标记和符号。
请注意:
- 尺寸标注是视图专有的图元,用于显示项目中的尺寸和距离。
- 为详图创建详图曲线。它们仅在绘制它们的视图中可见。它们通常绘制在模型视图上。
- 标签是用于标识图形中图元的注释。与标签关联的特性可以显示在明细表中。
- AnnotationSymbol在加载到项目中时具有多个引线选项。
有关Revit Element分类的详细信息,请参见元素要点。
尺寸标注和约束
永久性尺寸标注和尺寸标注相关约束。
Dimension类表示永久性尺寸标注和与尺寸标注相关的约束元素。在UI中编辑元素时创建的临时尺寸标注不可访问。高程点和高程点坐标由SpotDimension类表示。
下面的代码示例在结尾处说明了如何区分永久性尺寸标注和约束元素。
代码区域16-1:区分永久性尺寸标注和约束
public void GetInfo_Dimension(Dimension dimension)
{
    string message = "Dimension : ";
    // Get Dimension name
    message += "\nDimension name is : " + dimension.Name;

    // Get Dimension Curve
    Autodesk.Revit.DB.Curve curve = dimension.Curve;
    if (curve != null && curve.IsBound)
    {
        // Get curve start point
        message += "\nCurve start point:(" + curve.GetEndPoint(0).X + ", "
                + curve.GetEndPoint(0).Y + ", " + curve.GetEndPoint(0).Z + ")";
        // Get curve end point
        message += "; Curve end point:(" + curve.GetEndPoint(1).X + ", "
                + curve.GetEndPoint(1).Y + ", " + curve.GetEndPoint(1).Z + ")";
    }

    // Get Dimension type name
    message += "\nDimension type name is : " + dimension.DimensionType.Name;

    // Get Dimension view name
    message += "\nDimension view name is : " + dimension.View.Name;

    // Get Dimension reference count
    message += "\nDimension references count is " + dimension.References.Size;

    if ((int)BuiltInCategory.OST_Dimensions == dimension.Category.Id.IntegerValue)
    {
        message += "\nDimension is a permanent dimension.";
    }
    else if ((int)BuiltInCategory.OST_Constraints == dimension.Category.Id.IntegerValue)
    {
        message += "\nDimension is a constraint element.";
    }

    TaskDialog.Show("Revit",message);
}
尺寸标注
有五种永久尺寸标注:
- Linear dimension 线性尺寸标注
- Radial dimension 半径尺寸标注
- Diameter Dimension 直径尺寸标注
- Angular dimension 角度尺寸标注
- Arc length dimension 弧长尺寸标注
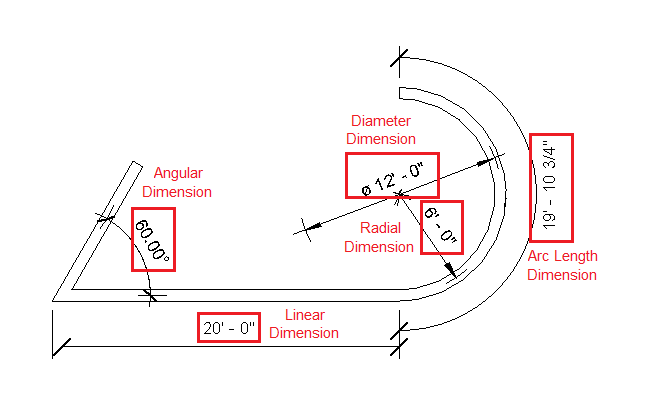
图66:永久尺寸标注
所有永久性尺寸标注的BuiltInCategory为OST_Dimensions。没有一种使用API区分四个维度的简单方法。
除半径尺寸标注和直径尺寸标注外,每个尺寸标注都有一条尺寸线。尺寸线可从始终未绑定的Dimension.Curve属性中获得。换句话说,尺寸线没有起点或终点。基于上一张图片:
- 将为线性标注返回Line对象。
- 将为半径标注或角度标注返回弧对象。
- 径向尺寸标注返回空。
- 直径尺寸标注返回空。
图67:尺寸参考
如上图所示,通过选择几何参照来创建尺寸。几何参照在API中表示为Reference类。以下尺寸参照可从“参照”(References)属性中获得。有关参考的更多信息,请参见几何部分中的几何辅助程序类。
- 半径和直径尺寸标注-返回曲线的一个参考对象
- 角度和弧长尺寸标注-返回两个参照对象。
- 线性尺寸标注-返回两个或多个参照对象。在下图中,线性标注有五个Reference对象。
图68:线性尺寸参考
与其他注释元素一样,尺寸标注也是视图专有的。它们仅显示在添加它们的视图中。Dimension.View属性返回特定的视图。
约束元素
具有类别约束的标注对象(BuitInCategory.OST_Constraints)表示两种与标注相关的约束:
- Linear and radial dimension constraints
线性和半径尺寸标注约束 - Equality constraints 等式约束
在下图中,两种锁定约束分别对应于线性标注和半径标注。在应用程序中,它们显示为带有绿色虚线的挂锁。(绿色虚线可从“尺Dimension.Curve"属性中获得。)线性标注约束和半径标注约束都从Dimension.References属性返回两个Reference对象。
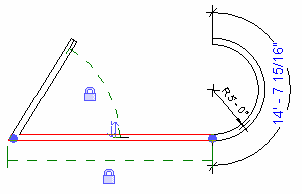
图69:线性和半径尺寸约束
约束图元不是视图专有的,可以显示在不同的视图中。因此,View属性总是返回null。在下图中,上一图中的约束元素在3D视图中也可见。
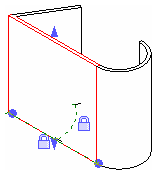
图70:3D视图中的线性和半径尺寸约束
虽然等分约束基于尺寸标注,但它们也由Dimension类表示。在API中,没有使用类别或类型区分线性标注约束和等式约束的直接方法。相等约束返回三个或更多引用,而线性尺寸约束返回两个或更多引用。
图71:等分约束
注意:并非所有约束元素都由Dimension类表示,但都属于约束(OST_Constraints)类别,如对齐约束。
高程点标注
高程点坐标和高程点由SpotDimension类表示,并按类别区分。与永久性尺寸标注一样,高程点尺寸标注也是视图专有的。下表列出了每个高程点标注的类型和类别:
表35:点尺寸类型和类别
| Type 类型 | Category 类别 |
|---|---|
| Spot Coordinates 高程点坐标 | OST_SpotCoordinates |
| Spot Elevations 高程点 | OST_SpotElevations |
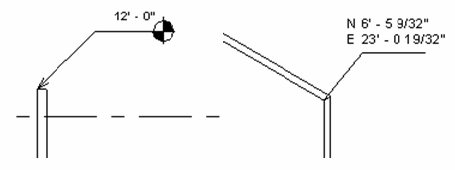
图72:SpotCoordinates和SpotElevations
可以将SpotDimension Location向下转换为LocationPoint,以便可以从LocationPoint.Point属性中获得点尺寸所指向的点坐标。SpotDimensions没有尺寸曲线,因此其Curve属性始终返回null。SpotDimension References属性返回一个Reference,表示高程点标注引用的点或边。* 若要控制文本和标记显示样式,请修改SpotDimension和SpotExpressionType参数。
对比下表对比了API中不同类型的维度和约束:
表36:Dimension类别对比
| Dimension or Constraint | Dimension or Constraint | API Class | BuiltInCategory | Curve | Geometry Helper Classes | View | Location |
|---|---|---|---|---|---|---|---|
| Permanent Dimension | linear dimension | Dimension | OST_Dimensions | A Line | =2 | Specific view | null |
| Permanent Dimension | radial dimension | Dimension | OST_Dimensions | Null | 1 | Specific view | null |
| Permanent Dimension | diameter dimension | Dimension | OST_Dimensions | Null | 1 | Specific view | null |
| Permanent Dimension | angular dimension | Dimension | OST_Dimensions | An Arc | 2 | Specific view | null |
| Permanent Dimension | arc length dimension | Dimension | OST_Dimensions | An Arc | 2 | Specific view | null |
| Dimension Constraint | linear dimension constraint | Dimension | OST_Constraints | An Arc | 2 | null | |
| Dimension Constraint | angular dimension | Dimension | OST_Constraints | An Arc | 2 | null | |
| Equality Constraint | Equality Constraint | Dimension | OST_Constraints | A Line | =3 | null |
创建和删除
NewDimension()方法在Creation.Document类中可用。此方法只能创建线性标注。
代码区域16-2:NewDimension()
public Dimension NewDimension (View view, Line line, ReferenceArray references)
public Dimension NewDimension (View view, Line line, ReferenceArray references,
DimensionType dimensionType)
使用NewDimension()方法输入参数,可以定义可见的View、尺寸线和References(两个或多个)。但是,没有简单的方法将线性标注类型与其他类型区分开来。很少使用带有ExcisionType参数的重载NewDimension()方法。 下面的代码演示如何使用NewDimension()方法复制标注。
代码区域16-3:使用NewDimension()复制标注
public void DuplicateDimension(Document document, Dimension dimension)
{
        Line line = dimension.Curve as Line;
        if (null != line)
        {
                Autodesk.Revit.DB.View view = dimension.View;
                ReferenceArray references = dimension.References;
                Dimension newDimension = document.Create.NewDimension(view, line, references);
        }
}
尽管只创建了线性标注,但您可以使用Document.Delete()方法删除由Dimension和SpotDimension表示的所有标注和约束。
标注文本操作 Dimension和ExpressionSegment类提供了类似的属性和方法,用于查询和调整文本相对于尺寸曲线的位置。 Dimension.Origin返回尺寸曲线中点的XYZ值,而ExpressionSegment.Origin将返回组成线段的直线的中点。 通过调用IsTextPositionAdjustable()方法确定标注或标注段的文本位置是否可调,该方法将指示是否可以设置文本和引线位置。 使用属性TextPosition和LeaderEndPosition查询或修改文本或引线(标注或标注段)的位置。 通过调用ResetTextPosition()方法将文本重置为其在尺寸上的默认位置。
注意:TextPosition和LeaderEndPosition不一定适用于所有标注(例如,标注样式为纵坐标时,使用相等约束的高程点标注、多段标注)。如果这些值不适用,它们将返回NULL,并且不允许设置值。
代码区域:重新定位标注文字
// Moves all of the text in this dimension one unit in the Y direction
public bool DimensionTextReposition(Dimension dimToModify)
{
    bool modified = false;
    if (dimToModify == null)
        return false;

    // Check to see if we have a non-multisegment dimension and if text position is adjustable
    if (dimToModify.NumberOfSegments == 0 && dimToModify.IsTextPositionAdjustable())
    {
        // Get the current text XYZ position
        XYZ currentTextPosition = dimToModify.TextPosition;
        // Calculate a new XYZ position by transforming the current text position
        XYZ newTextPosition = Transform.CreateTranslation(new XYZ(0.0, 1.0, 0.0)).OfPoint(currentTextPosition);
        // Set the new text position
        dimToModify.TextPosition = newTextPosition;

        modified = true;
    }
    else if (dimToModify.NumberOfSegments > 0)
    {
        foreach (DimensionSegment currentSegment in dimToModify.Segments)
        {
            if (currentSegment != null && currentSegment.IsTextPositionAdjustable())
            {
                modified = true;
                // Get the current text XYZ position
                XYZ currentTextPosition = currentSegment.TextPosition;
                // Calculate a new XYZ position by transforming the current text position
                XYZ newTextPosition = Transform.CreateTranslation(new XYZ(0, 1, 0)).OfPoint(currentTextPosition);
                // Set the new text position for the segment's text
                currentSegment.TextPosition = newTextPosition;
            }
        }
    }
    return modified;
}
详图线
详图线是一种重要的详图构件,通常用于详图或绘图视图中。可以在DetailCurve类及其派生类中访问详图曲线。
DetailCurve与其他注释元素一样,是视图专有的。但是,没有DetailCurve.View属性。创建详图曲线时,必须将详图曲线与模型曲线视图进行比较。
代码区域16-4:NewDetailCurve()和NewModelCurve()
public DetailCurve NewDetailCurve (View, Curve, SketchPlane)
public ModelCurve NewModelCurve (Curve, SketchPlane)
通常,只有二维视图(如平面视图和立面视图)是可接受的,否则将引发异常。
除了与视图相关的功能外,DetailCurve与ModelCurve非常相似。有关ModelCurve属性和用法的详细信息,请参见“草图”部分中的ModelCurve。
标签
标签是用于标识图形元素的注释。API公开IndependentTag和RoomTag类,以涵盖Revit应用程序中使用的大多数标签。有关RoomTag的更多详细信息,请参阅房间。
注意:IndependentTag类表示Revit中的标签图元和其他特定标记,如注释标签、梁系统标签、电子电路符号等。在Revit内部代码中,特定标记具有从IndependentTag派生的相应类。因此,特定功能不会由API公开,并且无法使用IndependentTag.xml创建。它们可按以下类别加以区分:
表37:标签名称和类别
| Tag Name 标记名称 | BuiltInCategory |
|---|---|
| Keynote Tag | OST_KeynoteTags |
| Beam System Tag | OST_BeamSystemTags |
| Electronic Circuit Tag | OST_ElectricalCircuitTags |
| Span Direction Tag | OST_SpanDirectionSymbol |
| Path Reinforcement Span Tag | OST_PathReinSpanSymbol |
| Rebar System Span Tag | OST_IOSRebarSystemSpanSymbolCtrl |
族库中的每个类别都有一个预先制作的标记。某些标记会随默认的Revit应用程序样板自动加载,而其他标记则会手动加载。如果主体元素是使用“按类别”选项创建的,则IndependentTag对象将根据主体元素返回不同的类别。例如,Wall和Floor IndependentTag分别是OST_WallTags和OST_FloorTags。
如果标记是使用“Multi-Category ”或“Material”样式创建的,则它们的类别分别为OST_MultiCategoryTags和OST_MaterialTags。
请注意IndependentTag.Create只在2D视图或锁定的3D视图中工作,否则将引发异常。下面的代码是创建IndependentTag的示例。当标高视图为活动视图时运行该命令。
注意:您无法直接更改IndependentTag中显示的文本。您需要修改用于在要标记的图元的族类型中填充标记文字的参数。在下面的示例中,该参数为“Type Mark”,但可以在Revit UI的族编辑器中更改此设置。
代码区域16-5:创建IndependentTag
private IndependentTag CreateIndependentTag(Autodesk.Revit.DB.Document document, Reference reference)
{
    // make sure active view is not a 3D view
    Autodesk.Revit.DB.View view = document.ActiveView;
    if (view is View3D)
        return null;

    // define tag mode and tag orientation for new tag
    TagMode tagMode = TagMode.TM_ADDBY_CATEGORY;
    TagOrientation tagorn = TagOrientation.Horizontal;

    // Add the tag to the middle of the wall
    Wall wall = document.GetElement(reference) as Wall;
    if (wall == null)
        return null;

    LocationCurve wallLoc = wall.Location as LocationCurve;
    XYZ wallStart = wallLoc.Curve.GetEndPoint(0);
    XYZ wallEnd = wallLoc.Curve.GetEndPoint(1);
    XYZ wallMid = wallLoc.Curve.Evaluate(0.5, true);

    IndependentTag newTag = IndependentTag.Create(document, view.Id, reference, true, tagMode, tagorn, wallMid);
    if (null == newTag)
    {
        throw new Exception("Create IndependentTag Failed.");
    }

    // newTag.TagText is read-only, so we change the Type Mark type parameter to
    // set the tag text.  The label parameter for the tag family determines
    // what type parameter is used for the tag text.

    WallType type = wall.WallType;

    Parameter foundParameter = type.LookupParameter("Type Mark");
    bool result = foundParameter.Set("Hello");

    // set leader mode free
    // otherwise leader end point move with elbow point

    newTag.LeaderEndCondition = LeaderEndCondition.Free;
    XYZ elbowPnt = wallMid + new XYZ(5.0, 5.0, 0.0);
    newTag.LeaderElbow = elbowPnt;
    XYZ headerPnt = wallMid + new XYZ(10.0, 10.0, 0.0);
    newTag.TagHeadPosition = headerPnt;

    return newTag;
}
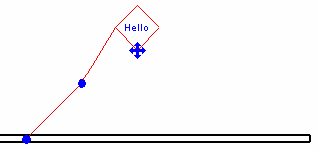
图74:使用示例代码创建IndependentTag
文本
可以从TextNote类访问文本和关联的引线。注意TextNote可以包含纯文本或格式化文本。重载的TextNote.Create()方法提供了用于创建展开和换行文本注释元素的选项。文本内容区域的宽度可以在创建时指定,但受基于文本及其类型的属性的最小和最大宽度的限制。从TextElement继承的重载方法GetMinimumAllowedWidth()和GetMaximumAllowedWidth()返回特定TextNote或给定文档和文本类型ID的约束。
下面的示例在用户指定的点处使用给定的宽度和TextNoteOptions创建一个新的TextNote。
代码区域:创建文本注释
public TextNote AddNewTextNote(UIDocument uiDoc)
{
    Document doc = uiDoc.Document;
    XYZ textLoc = uiDoc.Selection.PickPoint("Pick a point for sample text.");
    ElementId defaultTextTypeId = doc.GetDefaultElementTypeId(ElementTypeGroup.TextNoteType);
    double noteWidth = .2;

    // make sure note width works for the text type
    double minWidth = TextNote.GetMinimumAllowedWidth(doc, defaultTextTypeId);
    double maxWidth = TextNote.GetMaximumAllowedWidth(doc, defaultTextTypeId);
    if (noteWidth < minWidth)
    {
        noteWidth = minWidth;
    }
    else if (noteWidth > maxWidth)
    {
        noteWidth = maxWidth;
    }

    TextNoteOptions opts = new TextNoteOptions(defaultTextTypeId);
    opts.HorizontalAlignment = HorizontalTextAlignment.Left;
    opts.Rotation = Math.PI / 4;

    TextNote textNote = TextNote.Create(doc, doc.ActiveView.Id, textLoc, noteWidth, "New sample text", opts);

    return textNote;
}
无论TextNote具有纯文本还是格式化文本,始终可以从TextNote.Text属性检索未格式化的文本。
格式化文本 当第一次创建时,TextNote将具有纯文本。使用TextNote. GetNotedText()方法获取TextNote的NotedText对象。类可以用于对文本应用各种格式,如粗体、下划线、上标或全部大写。在使用修改后的TextText调用SetSetNotedText()之前,TextNote不会更新。 可以使用TextRange全部或部分地格式化已删除文本中的文本。TextRange基于TextedText对象中的文本指定起始索引和长度。当格式化方法(如SetItalicStatus()或SetAllCapsStatus())的重载使用TextRange时,将只修改该范围内的字符。TextRange可以使用其构造函数显式定义,也可以使用FormattedText.Find()方法检索以获取给定搜索字符串的范围。Find()方法指定搜索的开始索引,以及是否匹配搜索字符串的大小写或是否进行全词搜索。如果在搜索字符串中找不到文本,或者如果给定的起始索引超出了整个文本的长度,则将返回一个空的TextRange。在使用返回的范围设置文本格式之前,请确保该范围不为空,以避免异常。 下面的示例演示如何设置TextNote中的文本格式并将其设置回TextNote。它使用Find()方法对文本中的特定单词加粗体和下划线。
代码区域:设置TextNote中的文本格式
public void FormatText(TextNote textNote)
{
    // TextNote created with "New sample text"
    FormattedText formatText = textNote.GetFormattedText();

    // italicize "New"
    TextRange range = new TextRange(0, 3);
    formatText.SetItalicStatus(range, true);

    // make "sample" bold
    range = formatText.Find("sample", 0, false, true);
    if (range.Length > 0)
        formatText.SetBoldStatus(range, true);

    // make "text" underlined
    range = formatText.Find("text", 0, false, true);
    if (range.Length > 0)
        formatText.SetUnderlineStatus(range, true);

    // make all text uppercase
    formatText.SetAllCapsStatus(true);

    textNote.SetFormattedText(formatText);
}
可以将新文本添加到已添加文本对象中的现有文本中。如果使用了具有TextRange参数的重载,SetPlainText()方法将替换某些现有文本,否则将替换整个文本。若要插入文本而不替换现有文本,请使用Length为0的TextRange。新文本将插入到TextRange.Start属性指定的索引处。请注意,插入文本时,它可能会选择相邻文本的格式,类似于将未格式化的文本粘贴到Word文档中将导致文本具有插入点的当前格式。如果格式设置已经应用于整个multitedText,如上面示例中的SetAllCapsStatus(true)调用,则该格式设置将应用于插入的任何新文本。 在下面的示例中,通过首先查找当前文本的结尾并将其设置为要添加的范围的开始,新文本将被追加到现有文本的结尾。它还演示了如何创建一个列表(可以是项目符号,编号或字母)。请注意,它还为新文本的范围调用GetAllCapsStatus(),并在状态不是“大写状态.无”(其他选项是“全部”和“混合”)时关闭大写。
代码区域:插入新文本
public void AppendText(TextNote textNote)
{
    FormattedText formatText = textNote.GetFormattedText();

    TextRange range = formatText.AsTextRange();

    range.Start = range.End - 1;
    // set Length to 0 to insert
    range.Length = 0;
    string someNewText = "\rThis is a new paragraph\vThis is a new line without a paragraph break\r";
    formatText.SetPlainText(range, someNewText);

    // get range for entire text
    range = formatText.AsTextRange();
    range.Start = range.End - 1;
    range.Length = 0;
    string someListText = "\rBulleted List item 1\rItem 2\vSecond line for Item 2\rThird bullet point";
    formatText.SetPlainText(range, someListText);
    range.Start++;
    range.Length = someListText.Length;
    formatText.SetListType(range, ListType.Bullet);

    if (formatText.GetAllCapsStatus(range) != FormatStatus.None)
    {
        formatText.SetAllCapsStatus(range, false);
    }

    textNote.SetFormattedText(formatText);
}
上面的代码显示了如何使用\r创建换行符,使用\v创建不打断段落的垂直制表符。在项目符号列表的文本中,“\v”用于创建两行项目符号。仅在使用“\r”时才插入新项目符号。
文本编辑器 TextEditorOptions类可用于控制Revit中文本编辑器的外观和功能。这些设置保存在Revit.ini文件中,不与文档绑定。
代码区域:设置文本编辑器选项
public void SetEditorOptions()
{
    TextEditorOptions editorOptions = TextEditorOptions.GetTextEditorOptions();
    editorOptions.ShowBorder = false;
    editorOptions.ShowOpaqueBackground = true;
}
引线
Revit支持两种引线:直线引线和圆弧引线。可以使用AddLeader()方法将引线添加到TextNote,并使用TextNoteLeaderType枚举类型指定引线类型:
表39:引线类型
| Function 功能 | Member Name 成员名称 |
|---|---|
 -添加右弧引线 -添加右弧引线 |
TNLT_ARC_R |
 -添加左弧引线 -添加左弧引线 |
TNLT_ARC_L |
 -添加右引线。 -添加右引线。 |
TNLT_STRAIGHT_R |
 -添加左引线。 -添加左引线。 |
TNLT_STRAIGHT_L |
注意:直线引线和圆弧引线不能同时添加到文本类型。
TextNote.LeaderCount属性返回引线数,GetLeaders()方法返回当前附加到文本组件的所有引线。LeaderLeftAttachment和LeaderRightAttachment指示引线在TextNote的相应侧上的附着位置。LeaderAttachment的选项有TopLine、MidPoint和BottomLine。使用RemoveLeaders()方法从TextNote中删除所有引线。
注释符号
注释符号是应用于族的符号,用于在项目中唯一标识该族。
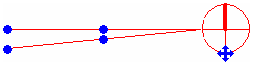
图76:带有两条引线的注释符号
创建和删除
可以使用Creation.Document.NewFamilyInstance()方法的以下重载创建注释符号:
代码区域16-6:创建新注释符号
public FamilyInstance NewFamilyInstance Method (XYZ origin, FamilySymbol symbol, View specView)
可以使用Document.Delete()方法删除注释符号。
添加和删除Leader 使用addLeader()和removeLeader()方法添加和删除引线。
代码区域16-7:使用addLeader()和removeLeader()
public void AddAndRemoveLeaders(AnnotationSymbol symbol)
{
    // check if there are any leaders currently attached, and remove them
    IList leaders = symbol.GetLeaders();

    if (leaders != null && leaders.Count > 0)
    {
        for (int i = leaders.Count; i > 0; i--)
        {
            symbol.removeLeader();
        }
    }

    // add one new leader instead
    symbol.addLeader();}

 浙公网安备 33010602011771号