14族文档
族文档
本节讨论族以及如何:
- 创建和修改族文档
- 访问族类型和参数
本节中的页面
- 关于族文档
- 在族中创建图元
- 族元素的可见性
- 管理族类型和参数
关于族文档
族
族对象表示整个Revit族。族文档是表示族的文档(rfa)而不是Revit项目。
使用Revit API的族创建功能,可以创建和编辑族及其类型。当您有来自外部系统的现有数据并希望将其转换为Revit族库时,此功能特别有用。
对系统族编辑的API访问不可用。
类别
如前一节所述,Family.FamilyCategory属性指示族的类别,如柱、家具、结构框架或窗。
以下代码可用于确定打开的Revit族文档中族的类别。
string categoryName = familyDoc.OwnerFamily.FamilyCategory.Name;
还可以设置FamilyCategory,以允许更改正在编辑的族的类别。
参数设置 可以从族文档的OwnerFamily属性访问族参数,如下例所示。
代码区域13-2:打开的Revit族文档的类别
// get the owner family of the family document.
Family family = familyDoc.OwnerFamily;
Parameter param = family.get_Parameter(BuiltInParameter.FAMILY_WORK_PLANE_BASED);
// this param is a Yes/No parameter in UI, but an integer value in API
// 1 for true and 0 for false
int isTrue = param.AsInteger();
// param.Set(1); // set value to true.
创建族文档
如果文档是族文档(由IsFamilyDocument属性确定),则可以通过Document类修改Revit族文档并访问族类型和参数。若要在处理Project文档时编辑现有族,请使用Document类中提供的EditFamily()函数,然后在编辑完成后使用LoadFamily()将族重新加载回所有者文档。要创建新的族文档,请使用Application.NewFamilyDocument():
代码区域13-3:创建新的族文档
// create a new family document using Generic Model.rft template
string templateFileName = @"C:\Documents and Settings\All Users\Application Data\Autodesk\RST 2011\Imperial Templates\Generic Model.rft";

Document familyDocument = application.NewFamilyDocument(templateFileName);
if (null == familyDocument)
{
        throw new Exception("Cannot open family document");
}
嵌套族符号
可以过滤FamilySymbols的族文档,以将所有FamilySymbols加载到族中。在此代码示例中,列出了给定FamilyInstance的族中的所有嵌套FamilySymbol。
代码区域13-4:在族中获取嵌套的族符号
public void GetLoadedSymbols(Autodesk.Revit.DB.Document document, FamilyInstance familyInstance)
{
        if (null != familyInstance.Symbol)
        {
                // Get family associated with this
                Family family = familyInstance.Symbol.Family;

                // Get Family document for family
                Document familyDoc = document.EditFamily(family);
                if (null != familyDoc && familyDoc.IsFamilyDocument == true)
                {
                        String loadedFamilies = "FamilySymbols in " + family.Name + ":\n";
                        FilteredElementCollector collector = new FilteredElementCollector(document);
                        ICollection collection =
                                collector.OfClass(typeof(FamilySymbol)).ToElements();
                        foreach (Element e in collection)
                        {
                                FamilySymbol fs = e as FamilySymbol;
                                loadedFamilies += "\t" + fs.Name + "\n";
                        }

                        TaskDialog.Show("Revit",loadedFamilies);
                }
        }
}
在族中创建元素
FamilyItemFactory类提供了在族文档中创建图元的功能。可以通过Document.FamilyCreate属性访问它。FamilyItemFactory派生自ItemFactoryBase类,该类是一个实用的用于在Revit项目文档和族文档中创建元素。
本节中的页面
- 创建形状元素
- 创建注释
创建形状元素
FamilyItemFactory类提供了在族中创建形状图元的功能,例如拉伸、旋转、放样和融合。有关这些3D草图表格的更多信息,请参见3D草图部分。
下面的示例演示如何创建新的Extrusion元素。它将创建一个简单的矩形截面轮廓,然后将新创建的“拉伸”移动到新位置。
代码区域:创建新拉伸
private Extrusion CreateExtrusion(Autodesk.Revit.DB.Document document, SketchPlane sketchPlane)
{
    Extrusion rectExtrusion = null;

    // make sure we have a family document
    if (true == document.IsFamilyDocument)
    {
        // define the profile for the extrusion
        CurveArrArray curveArrArray = new CurveArrArray();
        CurveArray curveArray1 = new CurveArray();
        CurveArray curveArray2 = new CurveArray();
        CurveArray curveArray3 = new CurveArray();

        // create a rectangular profile
        XYZ p0 = XYZ.Zero;
        XYZ p1 = new XYZ(10, 0, 0);
        XYZ p2 = new XYZ(10, 10, 0);
        XYZ p3 = new XYZ(0, 10, 0);
        Line line1 = Line.CreateBound(p0, p1);
        Line line2 = Line.CreateBound(p1, p2);
        Line line3 = Line.CreateBound(p2, p3);
        Line line4 = Line.CreateBound(p3, p0);
        curveArray1.Append(line1);
        curveArray1.Append(line2);
        curveArray1.Append(line3);
        curveArray1.Append(line4);

        curveArrArray.Append(curveArray1);

        // create solid rectangular extrusion
        rectExtrusion = document.FamilyCreate.NewExtrusion(true, curveArrArray, sketchPlane, 10);

        if (null != rectExtrusion)
        {
            // move extrusion to proper place
            XYZ transPoint1 = new XYZ(-16, 0, 0);
            ElementTransformUtils.MoveElement(document, rectExtrusion.Id, transPoint1);
        }
        else
        {
            throw new Exception("Create new Extrusion failed.");
        }
    }
    else
    {
        throw new Exception("Please open a Family document before invoking this command.");
    }

    return rectExtrusion;
}
以下示例显示了如何从族文档中的实心卵形轮廓创建新放样。
代码区域:创建新放样
private Sweep CreateSweep(Autodesk.Revit.DB.Document document, SketchPlane sketchPlane)
{
    Sweep sweep = null;

    // make sure we have a family document
    if (true == document.IsFamilyDocument)
    {
        // Define a profile for the sweep
        CurveArrArray arrarr = new CurveArrArray();
        CurveArray arr = new CurveArray();

        // Create an ovoid profile
        XYZ pnt1 = new XYZ(0, 0, 0);
        XYZ pnt2 = new XYZ(2, 0, 0);
        XYZ pnt3 = new XYZ(1, 1, 0);
        arr.Append(Arc.Create(pnt2, 1.0d, 0.0d, 180.0d, XYZ.BasisX, XYZ.BasisY));
        arr.Append(Arc.Create(pnt1, pnt3, pnt2));
        arrarr.Append(arr);
        SweepProfile profile = document.Application.Create.NewCurveLoopsProfile(arrarr);

        // Create a path for the sweep
        XYZ pnt4 = new XYZ(10, 0, 0);
        XYZ pnt5 = new XYZ(0, 10, 0);
        Curve curve = Line.CreateBound(pnt4, pnt5);

        CurveArray curves = new CurveArray();
        curves.Append(curve);

        // create a solid ovoid sweep
        sweep = document.FamilyCreate.NewSweep(true, curves, sketchPlane, profile, 0, ProfilePlaneLocation.Start);

        if (null != sweep)
        {
            // move to proper place
            XYZ transPoint1 = new XYZ(11, 0, 0);
            ElementTransformUtils.MoveElement(document, sweep.Id, transPoint1);
        }
        else
        {
            throw new Exception("Failed to create a new Sweep.");
        }
    }
    else
    {
        throw new Exception("Please open a Family document before invoking this command.");
    }

    return sweep;
}
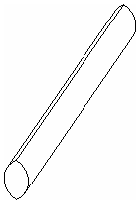
图50:由上一个示例创建的卵形扫描
FreeFormElement类允许创建从输入实体轮廓创建的非参数化几何体。FreeFormElement可以与其他可组合元素一起参与连接和空切割。元素的平面可以在面法线方向上以交互方式和编程方式偏移。
将子类别转换为形状 在族中创建新形状后,可能需要修改形状的子类别。例如,您可能有一个门族,并且希望创建多个门的子类别,并将不同的子类别指定给族中的不同门类型。 下面的示例演示如何创建新的子类别,为其指定材质,然后将该子类别指定给窗体。
代码区域:指定子类别
public void AssignSubCategory(Document document, GenericForm extrusion)
{
    // create a new subcategory
    Category cat = document.OwnerFamily.FamilyCategory;
    Category subCat = document.Settings.Categories.NewSubcategory(cat, "NewSubCat");

    // create a new material and assign it to the subcategory
    ElementId materialId = Material.Create(document, "Wood Material");
    subCat.Material = document.GetElement(materialId) as Material;

    // assign the subcategory to the element
    extrusion.Subcategory = subCat;
}
创建注释
还可以在族中创建新注释(例如尺寸标注和ModelText和TextNote对象)以及曲线注释元素(例如SymbolicCurve、ModelCurve和DetailCurve)。有关注释元素的详细信息,请参见注释元素。
此外,还可以添加新路线,并参照确定路线方向的视图和两个几何图形参照。
以下示例演示如何创建新的弧长标注。
代码区域:创建标注
public Dimension CreateArcDimension(Document document, SketchPlane sketchPlane)
{
    Autodesk.Revit.Creation.Application appCreate = document.Application.Create;
    Line gLine1 = Line.CreateBound(new XYZ(0, 2, 0), new XYZ(2, 2, 0));
    Line gLine2 = Line.CreateBound(new XYZ(0, 2, 0), new XYZ(2, 4, 0));
    Arc arctoDim = Arc.Create(new XYZ(1, 2, 0), new XYZ(-1, 2, 0), new XYZ(0, 3, 0));
    Arc arcofDim = Arc.Create(new XYZ(0, 3, 0), new XYZ(1, 2, 0), new XYZ(0.8, 2.8, 0));

    Autodesk.Revit.Creation.FamilyItemFactory creationFamily = document.FamilyCreate;
    ModelCurve modelCurve1 = creationFamily.NewModelCurve(gLine1, sketchPlane);
    ModelCurve modelCurve2 = creationFamily.NewModelCurve(gLine2, sketchPlane);
    ModelCurve modelCurve3 = creationFamily.NewModelCurve(arctoDim, sketchPlane);
    //get their reference
    Reference ref1 = modelCurve1.GeometryCurve.Reference;
    Reference ref2 = modelCurve2.GeometryCurve.Reference;
    Reference arcRef = modelCurve3.GeometryCurve.Reference;

    Dimension newArcDim = creationFamily.NewArcLengthDimension(document.ActiveView, arcofDim, arcRef, ref1, ref2);
    if (newArcDim == null)
    {
        throw new Exception("Failed to create new arc length dimension.");
    }

    return newArcDim;
}
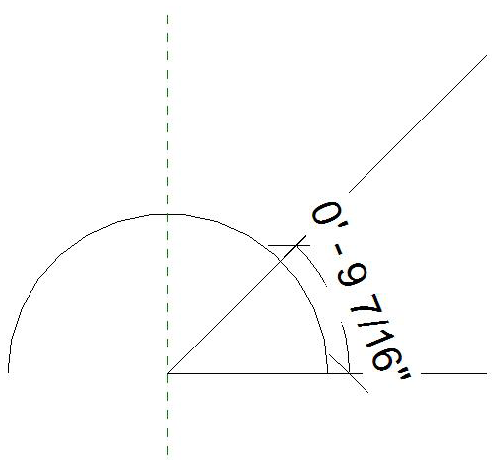
图51:产生的弧长尺寸
某些类型的尺寸标注可以使用FamilyParameter进行标记。如果尝试获取或设置Label属性,则无法标记的尺寸标注将引发Autodesk.Revit. Revit.InvalidOperationException。在下面的示例中,在两条线之间创建了一个新的线性尺寸标注,并将其标记为“width”。
代码区域:标注尺寸
public Dimension CreateLinearDimension(Document document)
{
    // first create two lines
    XYZ pt1 = new XYZ(5, 5, 0);
    XYZ pt2 = new XYZ(5, 10, 0);
    Line line = Line.CreateBound(pt1, pt2);
    Plane plane = Plane.CreateByNormalAndOrigin(pt1.CrossProduct(pt2), pt2);
    SketchPlane skplane = SketchPlane.Create (document, plane);
    ModelCurve modelcurve1 = document.FamilyCreate.NewModelCurve(line, skplane);

    pt1 = new XYZ(10, 5, 0);
    pt2 = new XYZ(10, 10, 0);
    line = Line.CreateBound(pt1, pt2);
    plane = Plane.CreateByNormalAndOrigin(pt1.CrossProduct(pt2), pt2);
    skplane = SketchPlane.Create (document, plane);
    ModelCurve modelcurve2 = document.FamilyCreate.NewModelCurve(line, skplane);

    // now create a linear dimension between them
    ReferenceArray ra = new ReferenceArray();
    ra.Append(modelcurve1.GeometryCurve.Reference);
    ra.Append(modelcurve2.GeometryCurve.Reference);

    pt1 = new XYZ(5, 10, 0);
    pt2 = new XYZ(10, 10, 0);
    line = Line.CreateBound(pt1, pt2);

    Dimension dim = document.FamilyCreate.NewLinearDimension(document.ActiveView, line, ra);

    // create a label for the dimension called "width"
    FamilyParameter param = document.FamilyManager.AddParameter("width",
        BuiltInParameterGroup.PG_CONSTRAINTS,
        ParameterType.Length, false);

    dim.FamilyLabel = param;

    return dim;
}
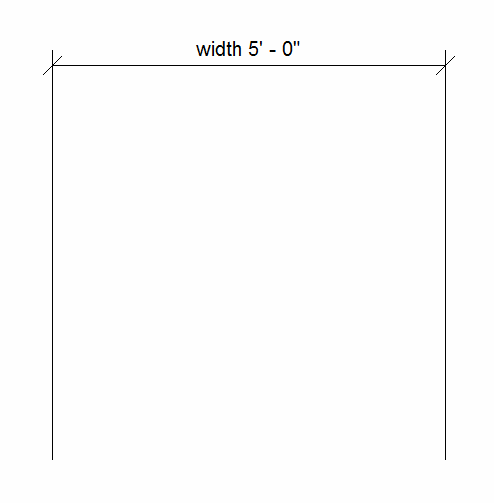
图52:标记的线性尺寸
族元素的可见性
FamilyElementVisibility类可用于控制族图元在项目文档中的可见性。例如,如果有门族,则可能只希望门开启方向在放置门的项目文档的平面视图中可见,而在三维视图中不可见。通过设置门开启方向的可见性,您可以控制其可见性。FamilyElementVisibility适用于以下具有SetVisibility()函数的族图元类:
- GenericForm
- SymbolicCurve
- ModelText
- CurveByPoints
- ModelCurve
- ReferencePoint
- ImportInstance
在下面的示例中,生成的族文档将显示文本“Hello World”,其下有一条线。当族载入到Revit项目文档中并放置实例时,在平面视图中,只有该线可见。在3D视图中,将同时显示线条和文本,除非将“详细程度”设置为“粗”,在这种情况下,线条将消失。
代码区域13-10:设置族图元可见性
public void CreateAndSetVisibility(Autodesk.Revit.DB.Document familyDocument, SketchPlane sketchPlane)
{
    // create a new ModelCurve in the family document
    XYZ p0 = new XYZ(1, 1, 0);
    XYZ p1 = new XYZ(5, 1, 0);
    Line line1 = Line.CreateBound(p0, p1);

    ModelCurve modelCurve1 = familyDocument.FamilyCreate.NewModelCurve(line1, sketchPlane);

    // create a new ModelText along ModelCurve line
    ModelText text = familyDocument.FamilyCreate.NewModelText("Hello World", null, sketchPlane, p0, HorizontalAlign.Center, 0.1);

    // set visibility for text
    FamilyElementVisibility textVisibility = new FamilyElementVisibility(FamilyElementVisibilityType.Model);
    textVisibility.IsShownInTopBottom = false;
    text.SetVisibility(textVisibility);

    // set visibility for line
    FamilyElementVisibility curveVisibility = new FamilyElementVisibility(FamilyElementVisibilityType.Model);
    curveVisibility.IsShownInCoarse = false;
    modelCurve1.SetVisibility(curveVisibility);

}
管理族类型和参数
族文档提供对FamilyManager属性的访问。FamilyManager类提供对族类型和参数的访问。使用此类,可以添加和删除类型、添加和删除族参数和共享参数、设置不同族类型中的参数值以及定义公式来驱动参数值。
在族中获取种类
FamilyManager可用于遍历族中的种类,如下例所示。
代码区域13-11:获取族中的种类
public void GetFamilyTypesInFamily(Document familyDoc)
{
    if (familyDoc.IsFamilyDocument)
    {
        FamilyManager familyManager = familyDoc.FamilyManager;

        // get types in family
        string types = "Family Types: ";
        FamilyTypeSet familyTypes = familyManager.Types;
        FamilyTypeSetIterator familyTypesItor = familyTypes.ForwardIterator();
        familyTypesItor.Reset();
        while (familyTypesItor.MoveNext())
        {
            FamilyType familyType = familyTypesItor.Current as FamilyType;
            types += "\n" + familyType.Name;
        }
        TaskDialog.Show("Revit",types);
    }
}
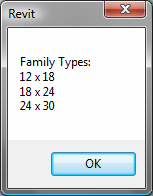
图53:混凝土矩形柱族中的族种类
编辑族种类
FamilyManager提供了遍历族中现有种类以及添加和修改种类及其参数的功能。
下面的示例演示如何添加新种类(familysymbol),设置其参数,然后将新种类分配给FamilyInstance。种类编辑是通过使用Set()函数在当前种类上完成的。当前种类可从CurrentType属性获得。CurrentType属性可用于在编辑之前设置当前种类,或使用NewType()函数创建新种类并将其设置为当前种类以进行编辑。
请注意,一旦创建并修改了新种类,就会使用Document.LoadFamily()将族重新载入到Revit项目中,以使新种类可用。
代码区域13-12:编辑族类型
public void EditFamilyTypes(Document document, FamilyInstance familyInstance)
{
    // example works best when familyInstance is a rectangular concrete element

    if ((null == document) || (null == familyInstance.Symbol))
    {
        return;   // invalid arguments
    }

    // Get family associated with this
    Family family = familyInstance.Symbol.Family;
    if (null == family)
    {
        return;    // could not get the family
    }

    // Get Family document for family
    Document familyDoc = document.EditFamily(family);
    if (null == familyDoc)
    {
        return;    // could not open a family for edit
    }

    FamilyManager familyManager = familyDoc.FamilyManager;
    if (null == familyManager)
    {
        return;  // cuould not get a family manager
    }

    // Start transaction for the family document
    using (Transaction newFamilyTypeTransaction = new Transaction(familyDoc, "Add Type to Family"))
    {
        int changesMade = 0;
        newFamilyTypeTransaction.Start();

        // add a new type and edit its parameters
        FamilyType newFamilyType = familyManager.NewType("2X2");

        if (newFamilyType != null)
        {
            // look for 'b' and 'h' parameters and set them to 2 feet
            FamilyParameter familyParam = familyManager.get_Parameter("宽度");
            if (null != familyParam)
            {
                familyManager.Set(familyParam, 2.0);
                changesMade += 1;
            }

            familyParam = familyManager.get_Parameter("高度");
            if (null != familyParam)
            {
                familyManager.Set(familyParam, 2.0);
                changesMade += 1;
            }
        }

        if (2 == changesMade)   // set both paramaters?
        {
            newFamilyTypeTransaction.Commit();
        }
        else   // could not make the change -> should roll back
        {
            newFamilyTypeTransaction.RollBack();
        }

        // if could not make the change or could not commit it, we return
        if (newFamilyTypeTransaction.GetStatus() != TransactionStatus.Committed)
        {
            return;
        }
    }

    // now update the Revit project with Family which has a new type
    LoadOpts loadOptions = new LoadOpts();

    // This overload is necessary for reloading an edited family
    // back into the source document from which it was extracted
    family = familyDoc.LoadFamily(document, loadOptions);
    if (null != family)
    {
        // find the new type and assign it to FamilyInstance
        ISet familySymbolIds = family.GetFamilySymbolIds();
        foreach (ElementId id in familySymbolIds)
        {
            FamilySymbol familySymbol = family.Document.GetElement(id) as FamilySymbol;
            if ((null != familySymbol) && familySymbol.Name == "2X2")
            {
                using (Transaction changeSymbol = new Transaction(document, "Change Symbol Assignment"))
                {
                    changeSymbol.Start();
                    familyInstance.Symbol = familySymbol;
                    changeSymbol.Commit();
                }
                break;
            }
        }
    }
}

class LoadOpts : IFamilyLoadOptions
{
    public bool OnFamilyFound(bool familyInUse, out bool overwriteParameterValues)
    {
        overwriteParameterValues = true;
        return true;
    }

    public bool OnSharedFamilyFound(Family sharedFamily, bool familyInUse, out FamilySource source, out bool overwriteParameterValues)
    {
        source = FamilySource.Family;
        overwriteParameterValues = true;
        return true;
    }
}
FamilyManager类提供对所有族参数的访问。这包括族内置参数、类别内置参数和与族类型关联的共享参数。有两种方法可以获取族参数:
- Parameters property - 获取族中的所有参数
- GetParameters()-按族中所有参数在Revit UI中出现的顺序获取这些参数使用GetParameters()方法时,Revit UI顺序首先按组确定,然后按各个参数的顺序确定。
可以从给定族的API(不支持重新排序参数的钢筋形状族除外)重新排序(在其组内)族参数。这允许参数以最符合逻辑的顺序呈现给用户。排序仅影响同一参数组中的可见参数。属于不同组的参数将保持分离,并且组的顺序不会受到影响。
对参数重新排序的最简单方法是使用FamilyManager.SortParameters()方法,该方法接受一个指示所需排序顺序的参数。下面的示例按升序对参数进行排序。
代码区域:对族参数排序
private void DisplayParametersInAscendingOrder(Document familyDoc)
{
    FamilyManager familyManager = familyDoc.FamilyManager;
    familyManager.SortParameters(ParametersOrder.Ascending);
}
注意:排序是一次性操作。当添加新参数时,它们不会自动排序。若要对参数的排序方式进行更多控制,请使用FamilyManager.ReorderParameters()方法,该方法以新顺序接受族参数列表。此列表必须包含GetParameters()方法返回的所有参数,包括任何不可见的参数,否则将引发异常。

 浙公网安备 33010602011771号