springboot下使用rabbitMQ之开发配置方式(一)
springboot下使用rabbitMQ之开发配置方式(一)
距离上次发布博客已经小一年了,这次...嗯,没错,我又回来啦...😂😂😂
本次结合着B站某MQ视频以及最近在MQ上的实践聊一聊个人在使用rabbitMQ中所得。
在本章开始前,默认您已通过各种途径安装并在springboot中集成了rabbitMQ~
一.是否需要在配置类中定义exchange、queue、routingKey及绑定关系
这个问题我先不表结论,先看一下如果没有定义会出现什么问题吧?
在没有新增default.yy这个queue的情况下新建个consumer(别忘记@Service注解),具体代码如下:
    @RabbitListener(queues = "default.yy")
    public void execYY(Message message, Channel channel){
        LOG.info("default.yy 被执行...");
    }
启动springboot后立马会看到以下错误
2023-07-17 10:11:10.534 -> [org.springframework.amqp.rabbit.RabbitListenerEndpointContainer#1-1] -> WARN  o.s.amqp.rabbit.listener.BlockingQueueConsumer:753 - Failed to declare queue: default.yy
2023-07-17 10:11:10.540 -> [org.springframework.amqp.rabbit.RabbitListenerEndpointContainer#1-1] -> WARN  o.s.amqp.rabbit.listener.BlockingQueueConsumer:687 - Queue declaration failed; retries left=3
org.springframework.amqp.rabbit.listener.BlockingQueueConsumer$DeclarationException: Failed to declare queue(s):[default.yy]
	at org.springframework.amqp.rabbit.listener.BlockingQueueConsumer.attemptPassiveDeclarations(BlockingQueueConsumer.java:760)
	at org.springframework.amqp.rabbit.listener.BlockingQueueConsumer.passiveDeclarations(BlockingQueueConsumer.java:637)
	at org.springframework.amqp.rabbit.listener.BlockingQueueConsumer.start(BlockingQueueConsumer.java:624)
	at org.springframework.amqp.rabbit.listener.SimpleMessageListenerContainer$AsyncMessageProcessingConsumer.initialize(SimpleMessageListenerContainer.java:1385)
	at org.springframework.amqp.rabbit.listener.SimpleMessageListenerContainer$AsyncMessageProcessingConsumer.run(SimpleMessageListenerContainer.java:1230)
	at java.base/java.lang.Thread.run(Thread.java:833)
Caused by: java.io.IOException: null
	at com.rabbitmq.client.impl.AMQChannel.wrap(AMQChannel.java:129)
	at com.rabbitmq.client.impl.AMQChannel.wrap(AMQChannel.java:125)
	at com.rabbitmq.client.impl.AMQChannel.exnWrappingRpc(AMQChannel.java:147)
	at com.rabbitmq.client.impl.ChannelN.queueDeclarePassive(ChannelN.java:1012)
	at com.rabbitmq.client.impl.ChannelN.queueDeclarePassive(ChannelN.java:46)
	at java.base/jdk.internal.reflect.NativeMethodAccessorImpl.invoke0(Native Method)
	at java.base/jdk.internal.reflect.NativeMethodAccessorImpl.invoke(NativeMethodAccessorImpl.java:77)
	at java.base/jdk.internal.reflect.DelegatingMethodAccessorImpl.invoke(DelegatingMethodAccessorImpl.java:43)
	at java.base/java.lang.reflect.Method.invoke(Method.java:568)
	at org.springframework.amqp.rabbit.connection.CachingConnectionFactory$CachedChannelInvocationHandler.invoke(CachingConnectionFactory.java:1162)
	at jdk.proxy2/jdk.proxy2.$Proxy109.queueDeclarePassive(Unknown Source)
	at org.springframework.amqp.rabbit.listener.BlockingQueueConsumer.attemptPassiveDeclarations(BlockingQueueConsumer.java:738)
	... 5 common frames omitted
Caused by: com.rabbitmq.client.ShutdownSignalException: channel error; protocol method: #method<channel.close>(reply-code=404, reply-text=NOT_FOUND - no queue 'default.yy' in vhost 'vhost', class-id=50, method-id=10)
	at com.rabbitmq.utility.ValueOrException.getValue(ValueOrException.java:66)
	at com.rabbitmq.utility.BlockingValueOrException.uninterruptibleGetValue(BlockingValueOrException.java:36)
	at com.rabbitmq.client.impl.AMQChannel$BlockingRpcContinuation.getReply(AMQChannel.java:502)
	at com.rabbitmq.client.impl.AMQChannel.privateRpc(AMQChannel.java:293)
	at com.rabbitmq.client.impl.AMQChannel.exnWrappingRpc(AMQChannel.java:141)
	... 14 common frames omitted
Caused by: com.rabbitmq.client.ShutdownSignalException: channel error; protocol method: #method<channel.close>(reply-code=404, reply-text=NOT_FOUND - no queue 'default.yy' in vhost 'vhost', class-id=50, method-id=10)
	at com.rabbitmq.client.impl.ChannelN.asyncShutdown(ChannelN.java:517)
	at com.rabbitmq.client.impl.ChannelN.processAsync(ChannelN.java:341)
	at com.rabbitmq.client.impl.AMQChannel.handleCompleteInboundCommand(AMQChannel.java:182)
	at com.rabbitmq.client.impl.AMQChannel.handleFrame(AMQChannel.java:114)
	at com.rabbitmq.client.impl.AMQConnection.readFrame(AMQConnection.java:739)
	at com.rabbitmq.client.impl.AMQConnection.access$300(AMQConnection.java:47)
	at com.rabbitmq.client.impl.AMQConnection$MainLoop.run(AMQConnection.java:666)
	... 1 common frames omitted
这是重点Failed to declare queue(s):[default.yy]看来确实有必要配置,不然找不到绝对会抛错😂
接下来看看在springboot开发中可以配置方法
二. 可以配置的方法
方法一. 使用配置类(@Configuration+@Bean)的方式配置
- 具体代码如下
import com.mee.api.common.enums.RabbitMQCfgEnum;
import org.springframework.amqp.core.Binding;
import org.springframework.amqp.core.BindingBuilder;
import org.springframework.amqp.core.DirectExchange;
import org.springframework.amqp.core.Queue;
import org.springframework.beans.factory.annotation.Qualifier;
import org.springframework.context.annotation.Bean;
import org.springframework.context.annotation.Configuration;

@Configuration
public class RabbitConfig {
    //使用注入方式声明对应的Queue
    @Bean("yyQueue")
    public Queue defaultQueue() {
        // durable:是否持久化,默认是false,持久化队列:会被存储在磁盘上,当消息代理重启时仍然存在,暂存队列:当前连接有效
        // exclusive:默认也是false,只能被当前创建的连接使用,而且当连接关闭后队列即被删除。此参考优先级高于durable
        // autoDelete:是否自动删除,当没有生产者或者消费者使用此队列,该队列会自动删除。
        return new Queue("yy.queue", true,false,false);
    }

    //声明交换机,不同的交换机类型不同:DirectExchange/FanoutExchange/TopicExchange/HeadersExchange
    @Bean("defaultExchange")
    public c defaultExchange() {
        return new DirectExchange("yy_exchange", true, false);
    }

    //绑定关系:将队列和交换机绑定, 并设置用于匹配键:routingKey
    @Bean("queueBinding")
    public Binding queueBinding(@Qualifier("yyQueue") Queue defaultQueue,@Qualifier("yyExchange") DirectExchange defaultExchange) {
        return BindingBuilder.bind(defaultQueue).to(defaultExchange).with("");

    }
}
以上只是很简单的一个mq的配置例子,看起来非常好,可以添加非常多的默认参数,配置无误之后启动即可看到starter已经贴心的为我们创建好了所需的一切:
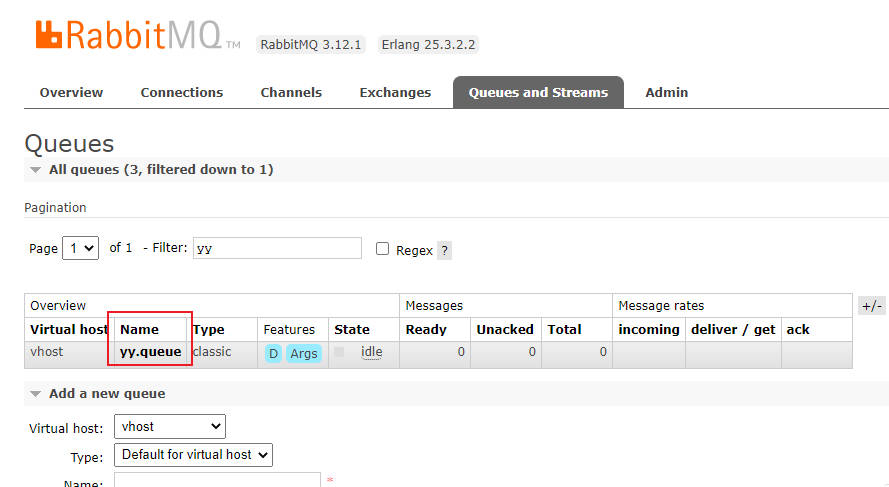
这种通用配置方法稍显麻烦不过也足够精细,同时你每次启动时starter都会检查是否有创建这些配置(在rabbitmq上),没有就会创建一个,这样看似好也不好~
再看看有没有其他方式配置呢?
方法二. 可在业务类中使用注解定义并绑定
- 这是
starter提供的一套注解方法,使用方式如下:
import com.rabbitmq.client.Channel;
import org.slf4j.Logger;
import org.slf4j.LoggerFactory;
import org.springframework.amqp.core.ExchangeTypes;
import org.springframework.amqp.core.Message;
import org.springframework.amqp.rabbit.annotation.*;
import org.springframework.amqp.support.converter.SimpleMessageConverter;
import org.springframework.stereotype.Service;

@RabbitListener(
        bindings = {
                @QueueBinding(
                        value = @Queue(value = "yy.queue", autoDelete = "false"),
                        exchange = @Exchange(value = "yy_exchange", type = ExchangeTypes.DIRECT),
                        key = ""
                )
        })
@Service
public class MQConsumerYyHandler {

    private static final Logger LOG = LoggerFactory.getLogger(MQConsumerYyHandler.class);

    @RabbitHandler(isDefault = true)
    public void yyDefault(Message message, Channel channel){
        // 注意,发送的消息类型必须是实现了Serializable接口的类型,消费者接口类型不能随便写!
        Object dto = new SimpleMessageConverter().fromMessage(message);
        String receivedRoutingKey = message.getMessageProperties().getReceivedRoutingKey();
        LOG.info("接收到消息(deadDefault):{},key:{}", dto,receivedRoutingKey);
    }

}
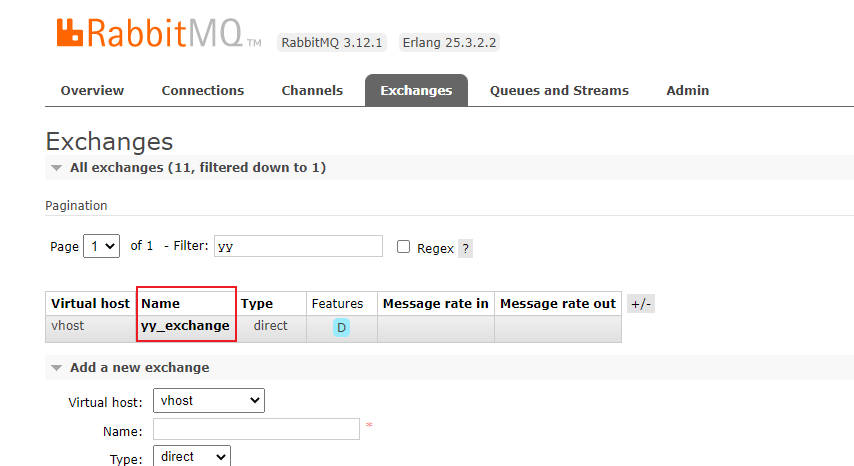
看起来也很不错,启动后依然能看到starter为我们创建(没有创建的话)exchange、queue以及exchange与queue的绑定(图略)
这样看起来似乎比方法一所使用的配置类更清晰结构也更加好。
另需要说明的是@RabbitListener注解也是可以配置在方法上的,如这样:
    @RabbitListener(
            bindings = {
                    @QueueBinding(
                            value = @Queue(value = "yy.queue", autoDelete = "false"),
                            exchange = @Exchange(value = "yy_exchange", type = ExchangeTypes.DIRECT),
                            key = ""
                    )
            })
    @RabbitHandler
    public void yyDefault2(Message message, Channel channel){
        // 注意,发送的消息类型必须是实现了Serializable接口的类型,消费者接口类型不能随便写!
        Object dto = new SimpleMessageConverter().fromMessage(message);
        String receivedRoutingKey = message.getMessageProperties().getReceivedRoutingKey();
        LOG.info("接收到消息(deadDefault):{},key:{}", dto,receivedRoutingKey);
    }
看起来只是位置发生了变化,当然这其中也是有坑的,如果将@RabbitListener配置在类上则必须指定其上的参数(isDefault):@RabbitHandler(isDefault = true),否则springboot无法找到消费者。
那有没有一种更加灵活的配置方式,当然是有的~
方法三. rabbitMQ后台手动创建
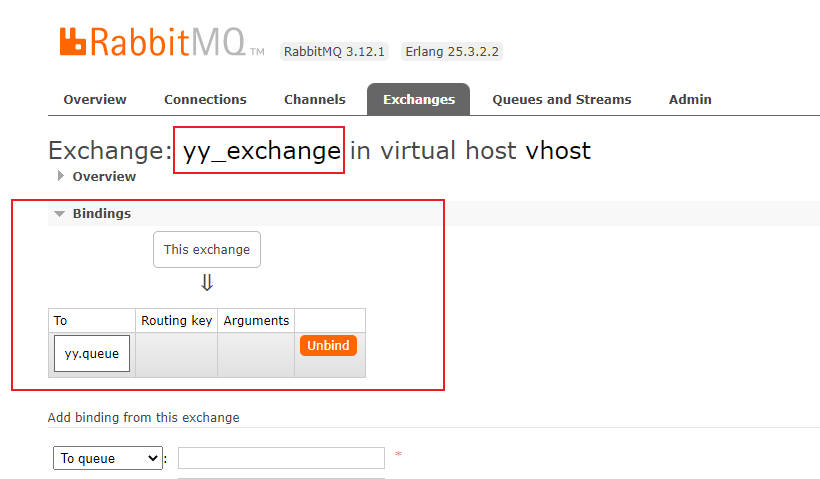
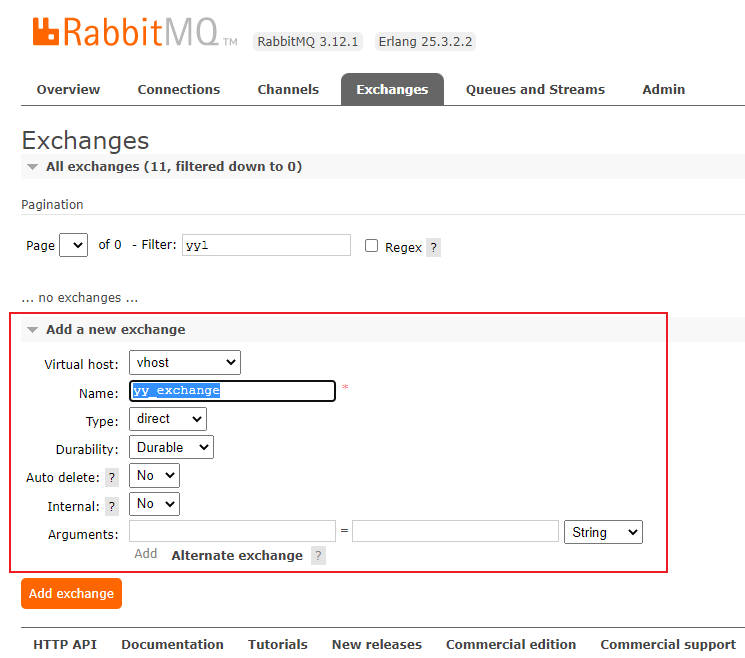
在rabbitMQ提供的web配置后台操作大致如下:
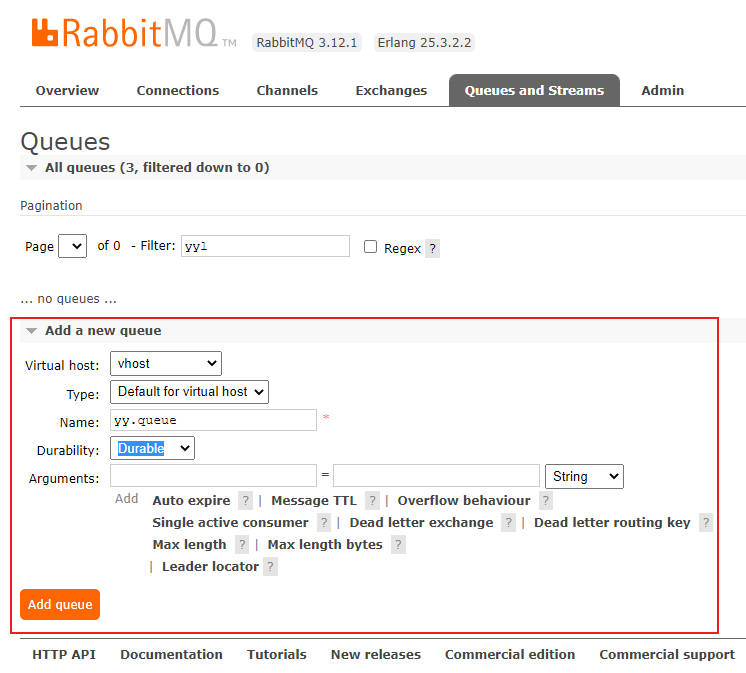
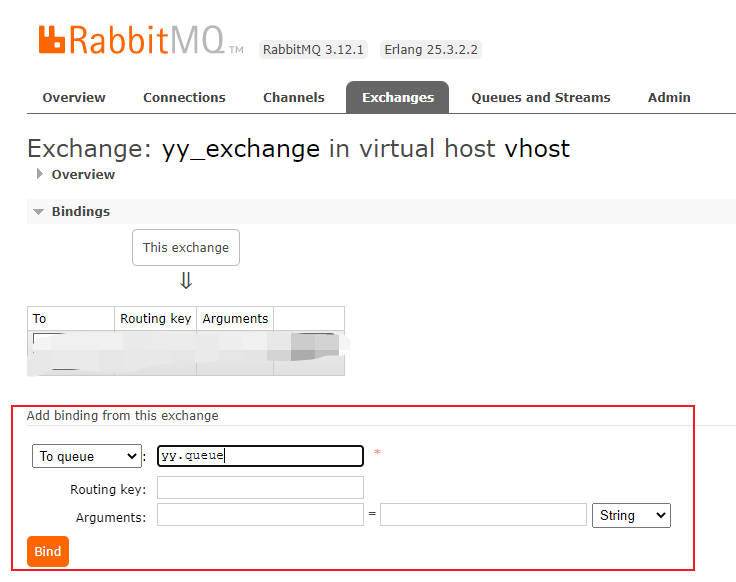
这种方法看起来不是很简便但更加可靠,在一定程度上不会因为starter自动创建而导致一些莫名其妙的问题,同时使用起来也非常简单。
更简洁的使用:
@RabbitListener(queues = "yy.queue")
public void yyDefault(Message message, Channel channel){
 // 注意,发送的消息类型必须是实现了Serializable接口的类型,消费者接口类型不能随便写!
 Object dto = new SimpleMessageConverter().fromMessage(message);
 String receivedRoutingKey = message.getMessageProperties().getReceivedRoutingKey();
 LOG.info("接收到消息(deadDefault):{},key:{}", dto,receivedRoutingKey);
}
如果使用的是direct模式+固定单一routingKey则极力推荐方法三的配置方式,如果是多exchange+多queue(或多routingKey) 也只是需要在注解内定义binding参数即可。
最后
基于个人MQ的实践,总结如下:
- 1.建议先(手动)定义再使用
- 2.配置能简化应尽量简化
- 3.一定要弄清楚所使用mq的工作流程再行测试开发(重要)
顺带给下我的配置:
# rabbitMQ
## 配置rabbitmq服务(http://127.0.0.1:15672/#/exchanges)
spring.rabbitmq.host=10.156.122.215
spring.rabbitmq.port=5672
spring.rabbitmq.username=shadow
spring.rabbitmq.password=shadow
spring.rabbitmq.virtual-host=vhost
### 确认消息已发送到交换机(Exchange)
#spring.rabbitmq.publisher-returns=true
### 确认消息已发送到队列(Queue)
#spring.rabbitmq.publisher-confirm-type=correlated
### 消息发送失败返回队列中
#spring.rabbitmq.template.mandatory=true
## 设置手动确认消息
#spring.rabbitmq.listener.simple.acknowledge-mode=manual
#spring.rabbitmq.listener.simple.default-requeue-rejected=false
#spring.rabbitmq.listener.simple.concurrency=1
#spring.rabbitmq.listener.simple.max-concurrency=4
#spring.rabbitmq.listener.simple.prefetch=1
#spring.rabbitmq.listener.simple.retry.enabled=false
### 死信队列相关配置
#spring.rabbitmq.listener.simple.acknowledge-mode=auto
#spring.rabbitmq.listener.simple.default-requeue-rejected=false
#spring.rabbitmq.listener.simple.retry.enabled=false
#spring.rabbitmq.listener.simple.retry.max-attempts=3
#spring.rabbitmq.listener.simple.retry.initial-interval=1000ms
#spring.rabbitmq.listener.simple.retry.max-interval=3000ms
## 重试
spring.rabbitmq.listener.simple.retry.enabled=true
spring.rabbitmq.listener.simple.retry.max-attempts=3
spring.rabbitmq.listener.simple.retry.initial-interval=1000ms

 浙公网安备 33010602011771号