Redis笔记-单机版安装
1、几个相关概念
| 概念 | 现象描述 | 规避措施 |
| 穿透 | 通过访问一个缓存中不存在的key,导致程序一定要在数据库中执行查询 | 将访问结果进行处理,如果返回是null,也存储在缓存中,可以将过期时间设置较短 |
| 雪崩 | 某一个时间段内,大量缓存key同时失效,导致访问直接查询数据库 | 讲不同的缓存数据进行分级分类,并进行不通的过期时间设置,例如可以通过定值+随机的方式生成过期时间,防止集中失效的的情况 |
| 击穿 | 缓存中某个key被访问的频率极高,在缓存失效的瞬间,访问直接访问数据库,比如商城的爆款等 | 可以将对应的缓存过期时间设置较大甚至是永不过期来规避 |
2、Linux安装(以CentOS 7.X为例)
step1、到官网下载对应的tar安装包http://download.redis.io/releases截止目前,最新版本已经发布到5.X

下载:wget http://download.redis.io/releases/redis-5.0.4.tar.gz
解压:tar zxvf redis-5.0.4.tar.gz
step2、编译
cd redis-5.0.4 然后执行make
编译完进入src目录,可以看到生成对应的文件如下:
[root@VM_0_14_centos redis-5.0.4]# ll
total 264
-rw-rw-r--  1 root root 99445 Mar 19 00:21 00-RELEASENOTES
-rw-rw-r--  1 root root    53 Mar 19 00:21 BUGS
-rw-rw-r--  1 root root  1894 Mar 19 00:21 CONTRIBUTING
-rw-rw-r--  1 root root  1487 Mar 19 00:21 COPYING
drwxrwxr-x  6 root root  4096 Mar 20 16:00 deps
-rw-rw-r--  1 root root    11 Mar 19 00:21 INSTALL
-rw-rw-r--  1 root root   151 Mar 19 00:21 Makefile
-rw-rw-r--  1 root root  4223 Mar 19 00:21 MANIFESTO
-rw-rw-r--  1 root root 20555 Mar 19 00:21 README.md
-rw-rw-r--  1 root root 62155 Mar 19 00:21 redis.conf
-rwxrwxr-x  1 root root   275 Mar 19 00:21 runtest
-rwxrwxr-x  1 root root   280 Mar 19 00:21 runtest-cluster
-rwxrwxr-x  1 root root   281 Mar 19 00:21 runtest-sentinel
-rw-rw-r--  1 root root  9710 Mar 19 00:21 sentinel.conf
drwxrwxr-x  3 root root  4096 Mar 20 16:01 src
drwxrwxr-x 10 root root  4096 Mar 19 00:21 tests
drwxrwxr-x  8 root root  4096 Mar 19 00:21 utils
[root@VM_0_14_centos redis-5.0.4]#
[root@VM_0_14_centos redis-5.0.4]#
[root@VM_0_14_centos redis-5.0.4]#
[root@VM_0_14_centos redis-5.0.4]#
[root@VM_0_14_centos redis-5.0.4]#
[root@VM_0_14_centos redis-5.0.4]# cd src
[root@VM_0_14_centos src]# ls -lrt redis-*
-rwxr-xr-x 1 root root 8100759 Mar 20 16:01 redis-server
-rwxr-xr-x 1 root root 8100759 Mar 20 16:01 redis-sentinel
-rwxr-xr-x 1 root root 4805624 Mar 20 16:01 redis-cli
-rwxr-xr-x 1 root root 4365280 Mar 20 16:01 redis-benchmark
-rwxr-xr-x 1 root root 8100759 Mar 20 16:01 redis-check-rdb
-rwxr-xr-x 1 root root 8100759 Mar 20 16:01 redis-check-aof
step3、新建redis目录/usr/redis,并将文件copy进去(目前以单节点测试,先可以不用copy其他文件)
1 [root@VM_0_14_centos /]# mkdir /usr/redis
2 [root@VM_0_14_centos /]# cp /data01/redis-5.0.4/redis.conf /usr/redis/
3 [root@VM_0_14_centos /]# cp /data01/redis-5.0.4/src/redis-server /usr/redis/
4 [root@VM_0_14_centos /]# cp /data01/redis-5.0.4/src/redis-cli /usr/redis/
5 [root@VM_0_14_centos /]#
step4、启动测试 ./redis-server redis.conf
 1 [root@VM_0_14_centos redis]#
 2 [root@VM_0_14_centos redis]# ./redis-server redis.conf
 3 6440:C 20 Mar 2019 16:16:13.047 # oO0OoO0OoO0Oo Redis is starting oO0OoO0OoO0Oo
 4 6440:C 20 Mar 2019 16:16:13.047 # Redis version=5.0.4, bits=64, commit=00000000, modified=0, pid=6440, just started
 5 6440:C 20 Mar 2019 16:16:13.047 # Configuration loaded
 6                 _._
 7            _.-``__ ''-._
 8       _.-``    `.  `_.  ''-._           Redis 5.0.4 (00000000/0) 64 bit
 9   .-`` .-```.  ```\/    _.,_ ''-._
10  (    '      ,       .-`  | `,    )     Running in standalone mode
11  |`-._`-...-` __...-.``-._|'` _.-'|     Port: 6379
12  |    `-._   `._    /     _.-'    |     PID: 6440
13   `-._    `-._  `-./  _.-'    _.-'
14  |`-._`-._    `-.__.-'    _.-'_.-'|
15  |    `-._`-._        _.-'_.-'    |           http://redis.io
16   `-._    `-._`-.__.-'_.-'    _.-'
17  |`-._`-._    `-.__.-'    _.-'_.-'|
18  |    `-._`-._        _.-'_.-'    |
19   `-._    `-._`-.__.-'_.-'    _.-'
20       `-._    `-.__.-'    _.-'
21           `-._        _.-'
22               `-.__.-'
23
24 6440:M 20 Mar 2019 16:16:13.048 # WARNING: The TCP backlog setting of 511 cannot be enforced because /proc/sys/net/core/somaxconn is set to the lower value of 128.
25 6440:M 20 Mar 2019 16:16:13.048 # Server initialized
26 6440:M 20 Mar 2019 16:16:13.048 # WARNING overcommit_memory is set to 0! Background save may fail under low memory condition. To fix this issue add 'vm.overcommit_memory = 1' to /etc/sysctl.conf and then reboot or run the command 'sysctl vm.overcommit_memory=1' for this to take effect.
27 6440:M 20 Mar 2019 16:16:13.048 # WARNING you have Transparent Huge Pages (THP) support enabled in your kernel. This will create latency and memory usage issues with Redis. To fix this issue run the command 'echo never > /sys/kernel/mm/transparent_hugepage/enabled' as root, and add it to your /etc/rc.local in order to retain the setting after a reboot. Redis must be restarted after THP is disabled.
28 6440:M 20 Mar 2019 16:16:13.048 * Ready to accept connections
开启客户端,并测试:
1 [root@VM_0_14_centos redis]#
2 [root@VM_0_14_centos redis]# ./redis-cli
3 127.0.0.1:6379>
4 127.0.0.1:6379>
5 127.0.0.1:6379> set name hello
6 OK
7 127.0.0.1:6379> get name
8 "hello"
9 127.0.0.1:6379>
OK,显示成功。
重启:./redis-cli -h 127.0.0.1 -p 6379 shutdown 或 kill -9 进程号
3、Redis数据备份模式
Redis支持RDB和AOF两种方式实现数据备份,可以在重启后实现数据恢复。关于RDB和AOF说明如下:
RDB:redis默认开启的数据备份方式,会将数据定时dump到磁盘上,缺点是可能在定时间隔时间内断电,数据未完全写入磁盘,导致数据部分丢失
AOF:通过记录操作日志追加操作日志的方式写入文件,在数据恢复时执行日志分析实现数据恢复,缺点是在大量数据备份时效率略低于RDB
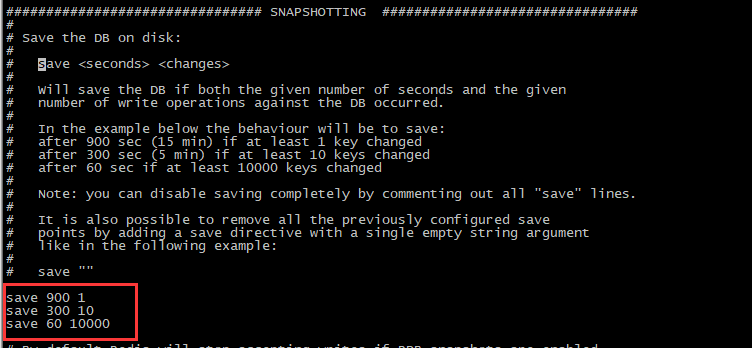
关于RDB和AOF的持久化配置可以参考redis的配置文件redis.conf配置项:
RDB持久化配置: save m n 表示在m秒后,如果有n个key发生变化,则dump内存快照

AOF持久化配置:

appendfsync always #每次有数据修改发生时都会写入AOF文件。
appendfsync everysec #每秒钟同步一次,该策略为AOF的缺省策略。
appendfsync no #从不同步,高效但是数据不会被持久化。
说明:AOF默认是没开启的,需要将appendonly no的值设置为yes,重启后生效
修改后重启:

测试,set一条记录:

然后查看appendonly.aof文件,set操作记录已被追加到aof文件:

4、开启远程访问
配置protected-mode no (redis 3.2版本以后),注释掉bind 地址即可。
5、开启守护进程
redis采用的是单进程多线程的模式,当redis.conf中选项daemonize设置成yes时,代表开启守护进程模式。在该模式下,redis会在后台运行,并将进程pid号写入至redis.conf选项pidfile设置的文件中,此时redis将一直在后台运行
关于Redis集群模式下节再接着说。
posted on 2019-03-20 17:08 funnyboy0128 阅读(279) 评论(0) 编辑 收藏 举报


【推荐】国内首个AI IDE,深度理解中文开发场景,立即下载体验Trae
【推荐】编程新体验,更懂你的AI,立即体验豆包MarsCode编程助手
【推荐】抖音旗下AI助手豆包,你的智能百科全书,全免费不限次数
【推荐】轻量又高性能的 SSH 工具 IShell:AI 加持,快人一步
· AI与.NET技术实操系列:基于图像分类模型对图像进行分类
· go语言实现终端里的倒计时
· 如何编写易于单元测试的代码
· 10年+ .NET Coder 心语,封装的思维:从隐藏、稳定开始理解其本质意义
· .NET Core 中如何实现缓存的预热?
· 分享一个免费、快速、无限量使用的满血 DeepSeek R1 模型,支持深度思考和联网搜索!
· 25岁的心里话
· 基于 Docker 搭建 FRP 内网穿透开源项目(很简单哒)
· 闲置电脑爆改个人服务器(超详细) #公网映射 #Vmware虚拟网络编辑器
· ollama系列01:轻松3步本地部署deepseek,普通电脑可用