day06 谷歌pixel刷机
一. 谷歌Pixel相关-刷机
线上文档:https://zhuanlan.zhihu.com/p/598414059
Pixel手机相关内容:
- 刷机,官方包。
- ROOT
- 集成charles证书
本节手把手带大家完成对自己新买的Piexl手机进行刷机(Pixel所有机型通用)。
刷机的意义:
以后手机系统出问题,可以自如的重新刷自己喜欢的安卓系统(安卓8/9/10/11/12等)
注意:务必购买oem解锁的手机,否则无法刷机。
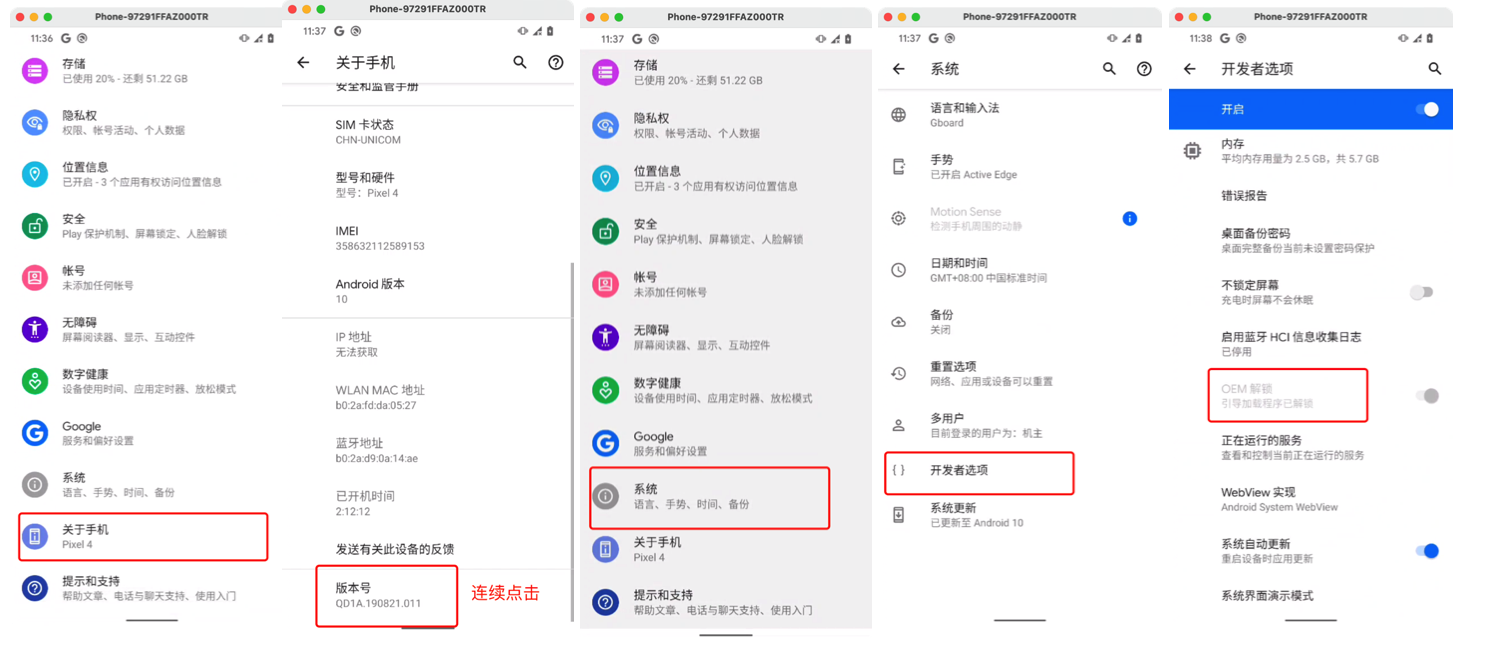
1.adb和fastboot
在刷机的过程中需要使用adb 和 fastboot命令来连接手机,并对手机下发相关指令。
所以,必须在刷机前确保自己电脑上已有adb和fastboot。
如何安装呢?
1.1 platform-tools
下载platform-tools(压缩包)内部包含adb 和 fastboot。
地址:https://developer.android.google.cn/studio/releases/platform-tools
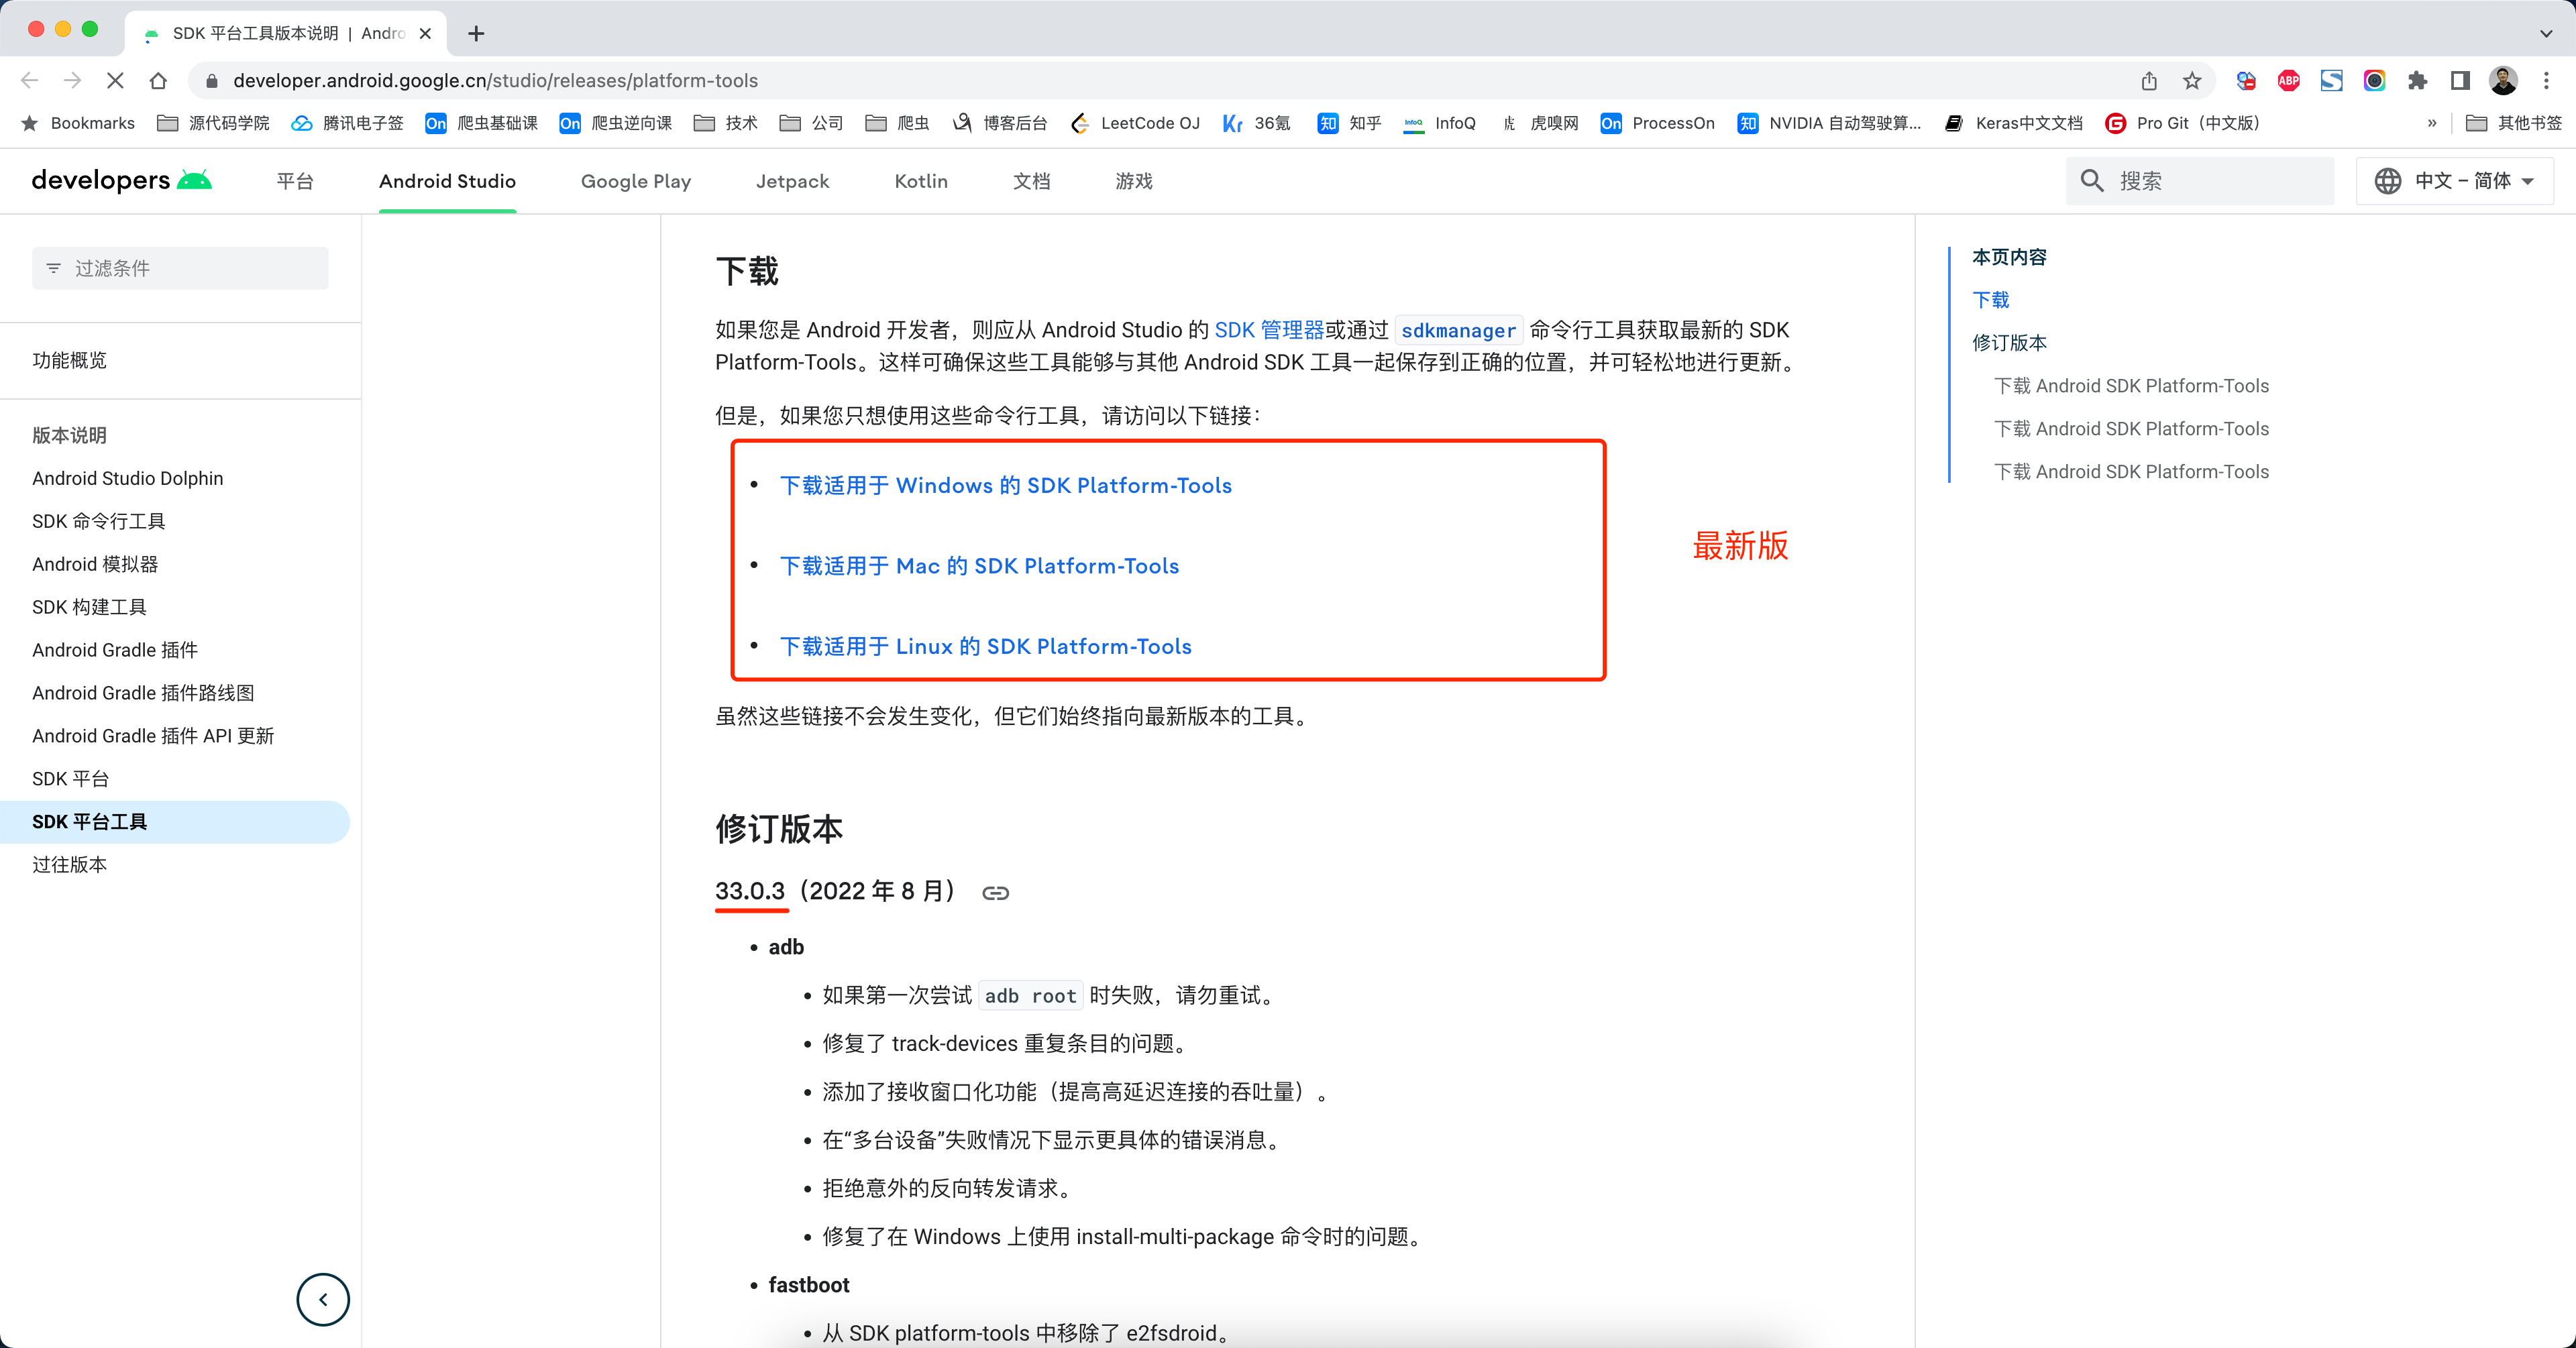
但是有些同学会发现,自己电脑上下载的最新版 platform-tools 无法使用,此时可以选择下载低一点的版本。
推荐:r30.0.5版本
https://dl.google.com/android/repository/platform-tools_r30.0.5-windows.zip
https://dl.google.com/android/repository/platform-tools_r30.0.5-linux.zip
https://dl.google.com/android/repository/platform-tools_r30.0.5-mac.zip
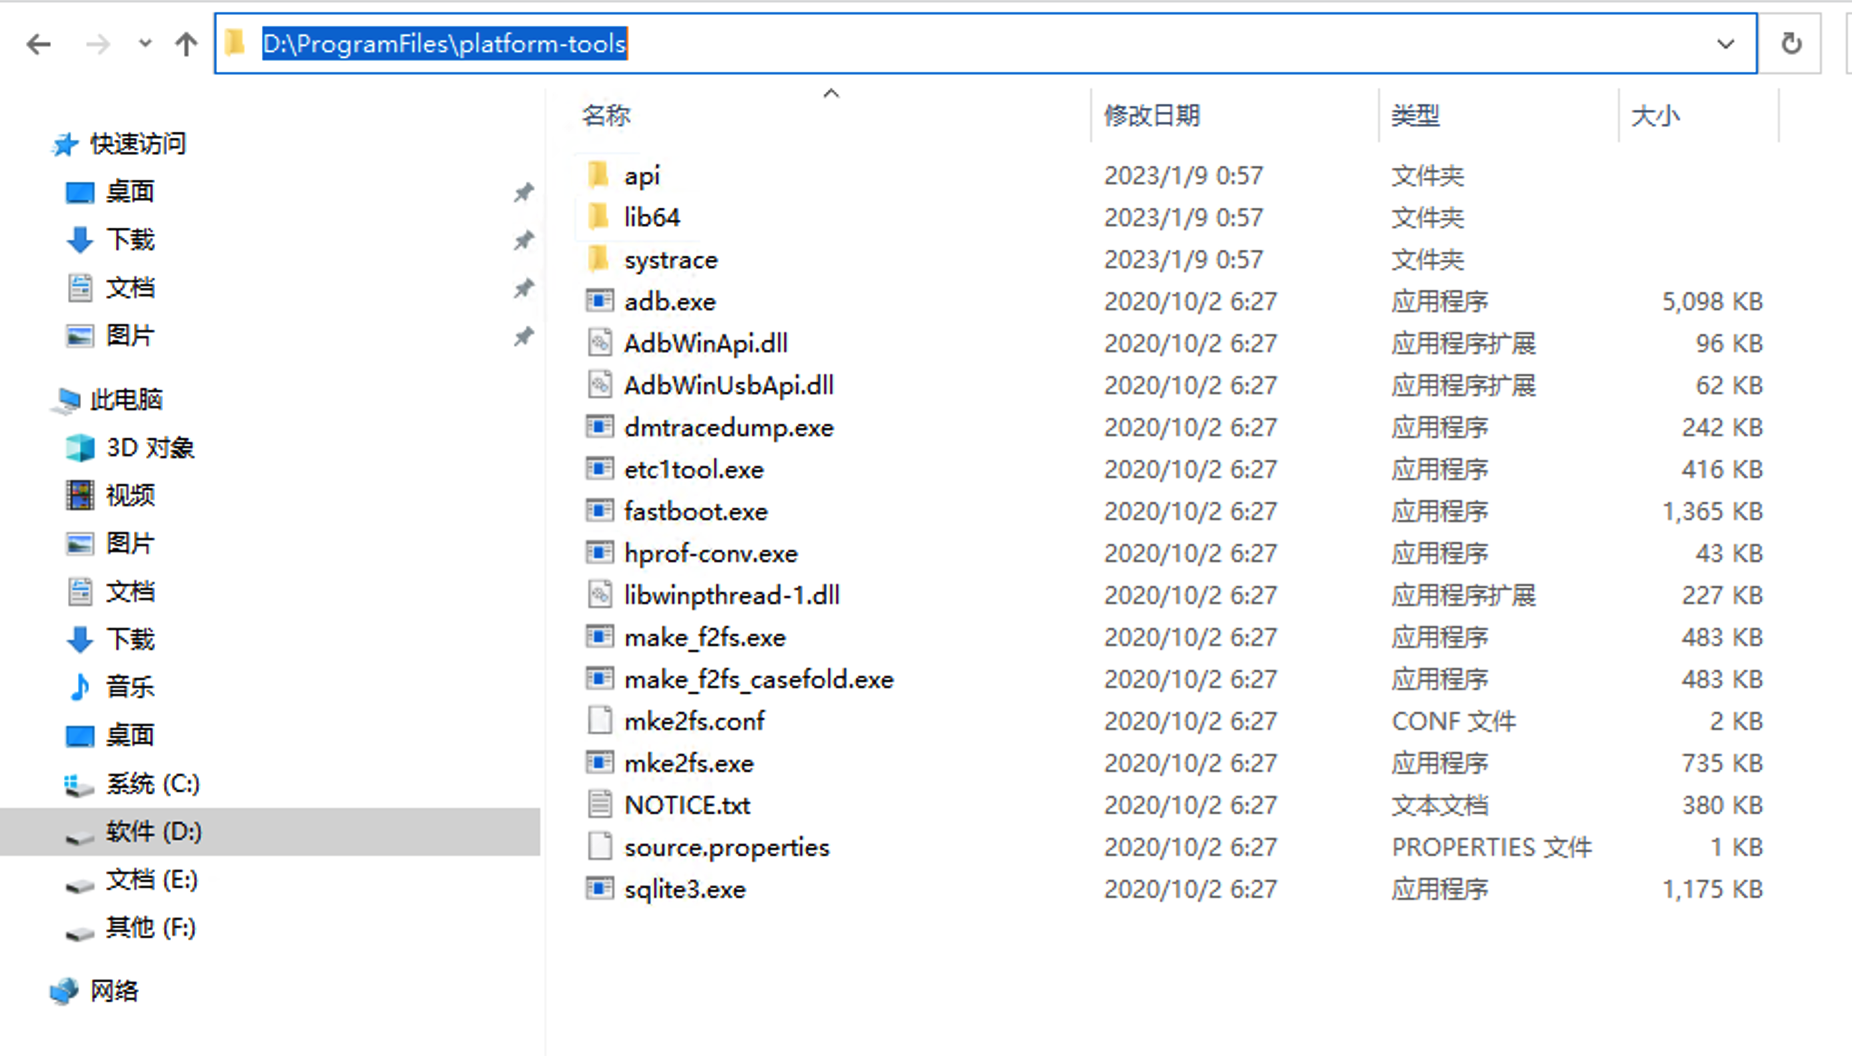
1.2 解压
platform-tools是一个压缩包,解压后就是一个普通的文件夹(内部包含adb、fastboot)。
将解压后的文件夹拷贝到指定目录(当做安装目录),不要有中文路径。
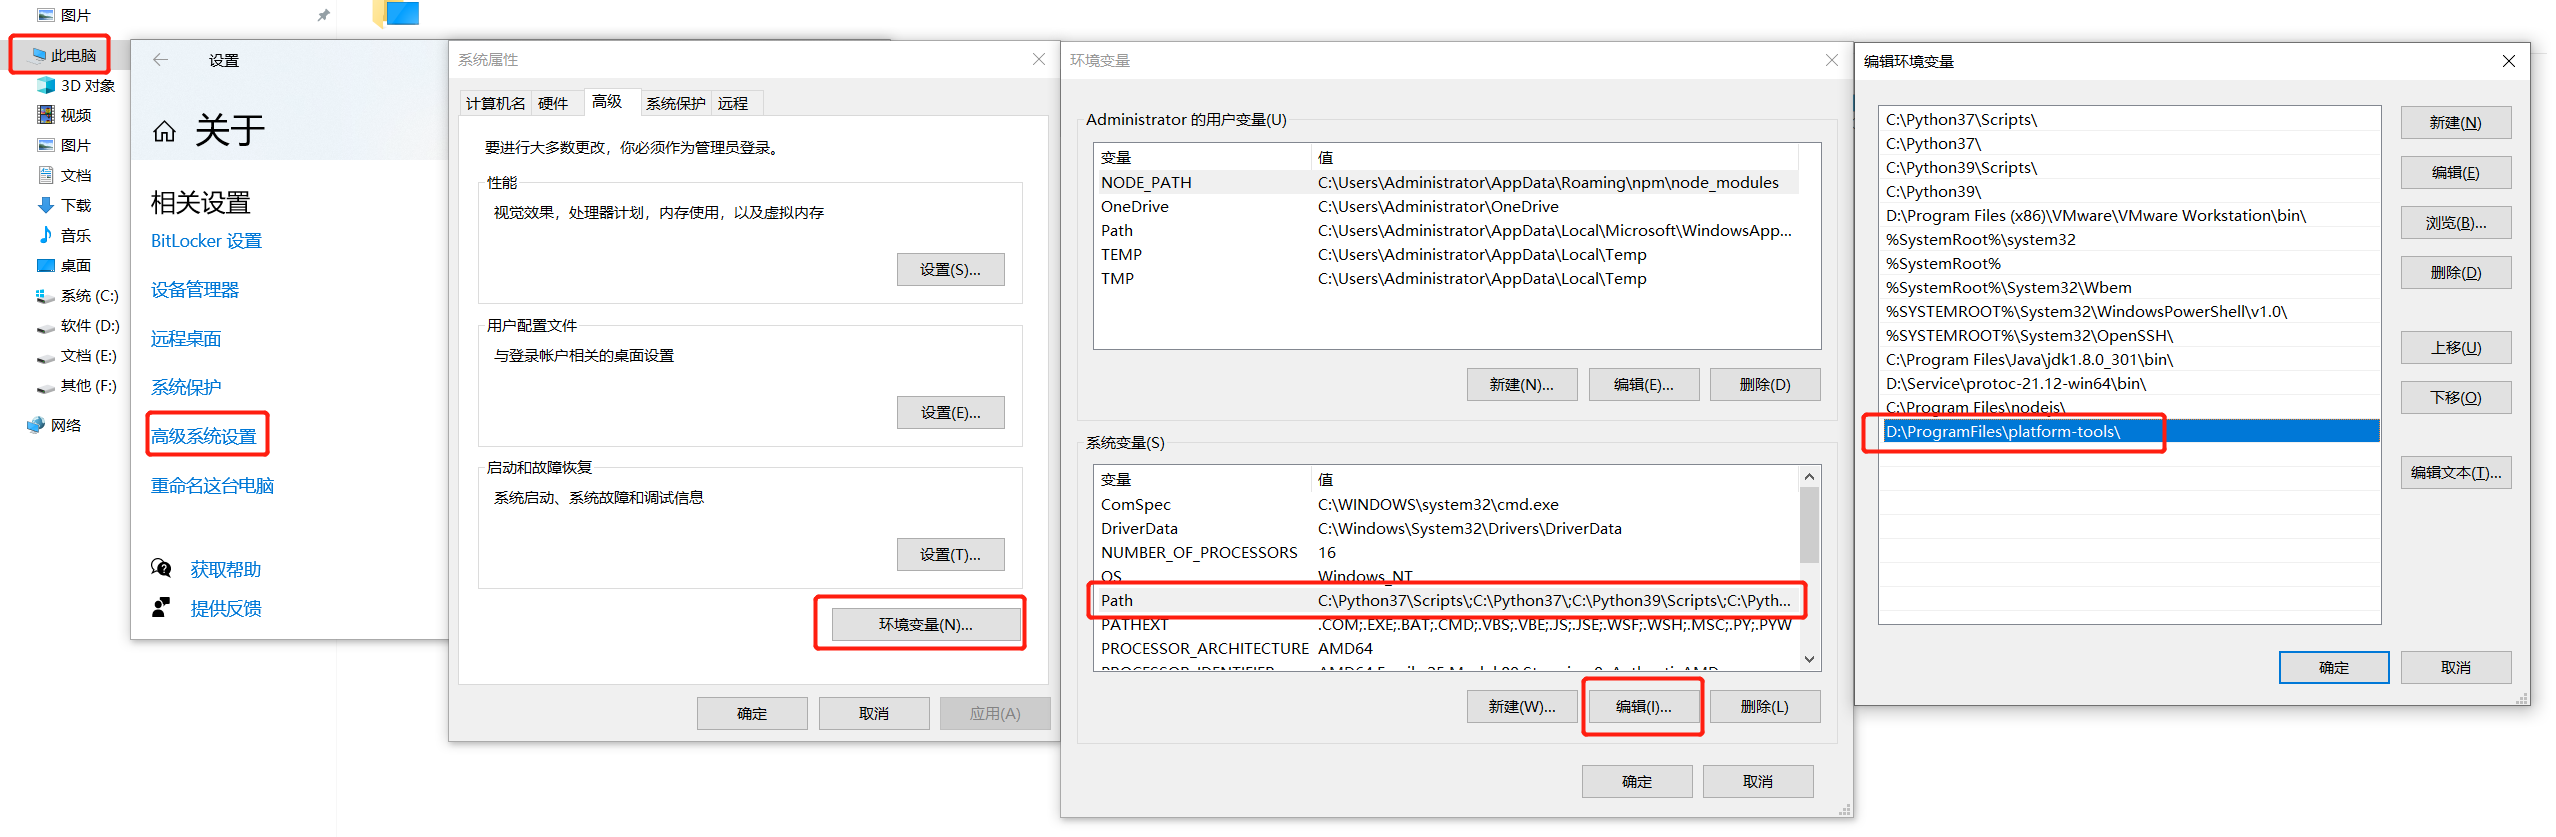
1.3 环境变量
为了以后更加方便的使用adb和fastboot,我要讲将platform-tools的目录加入到系统环境变量。
-
win系统:
-
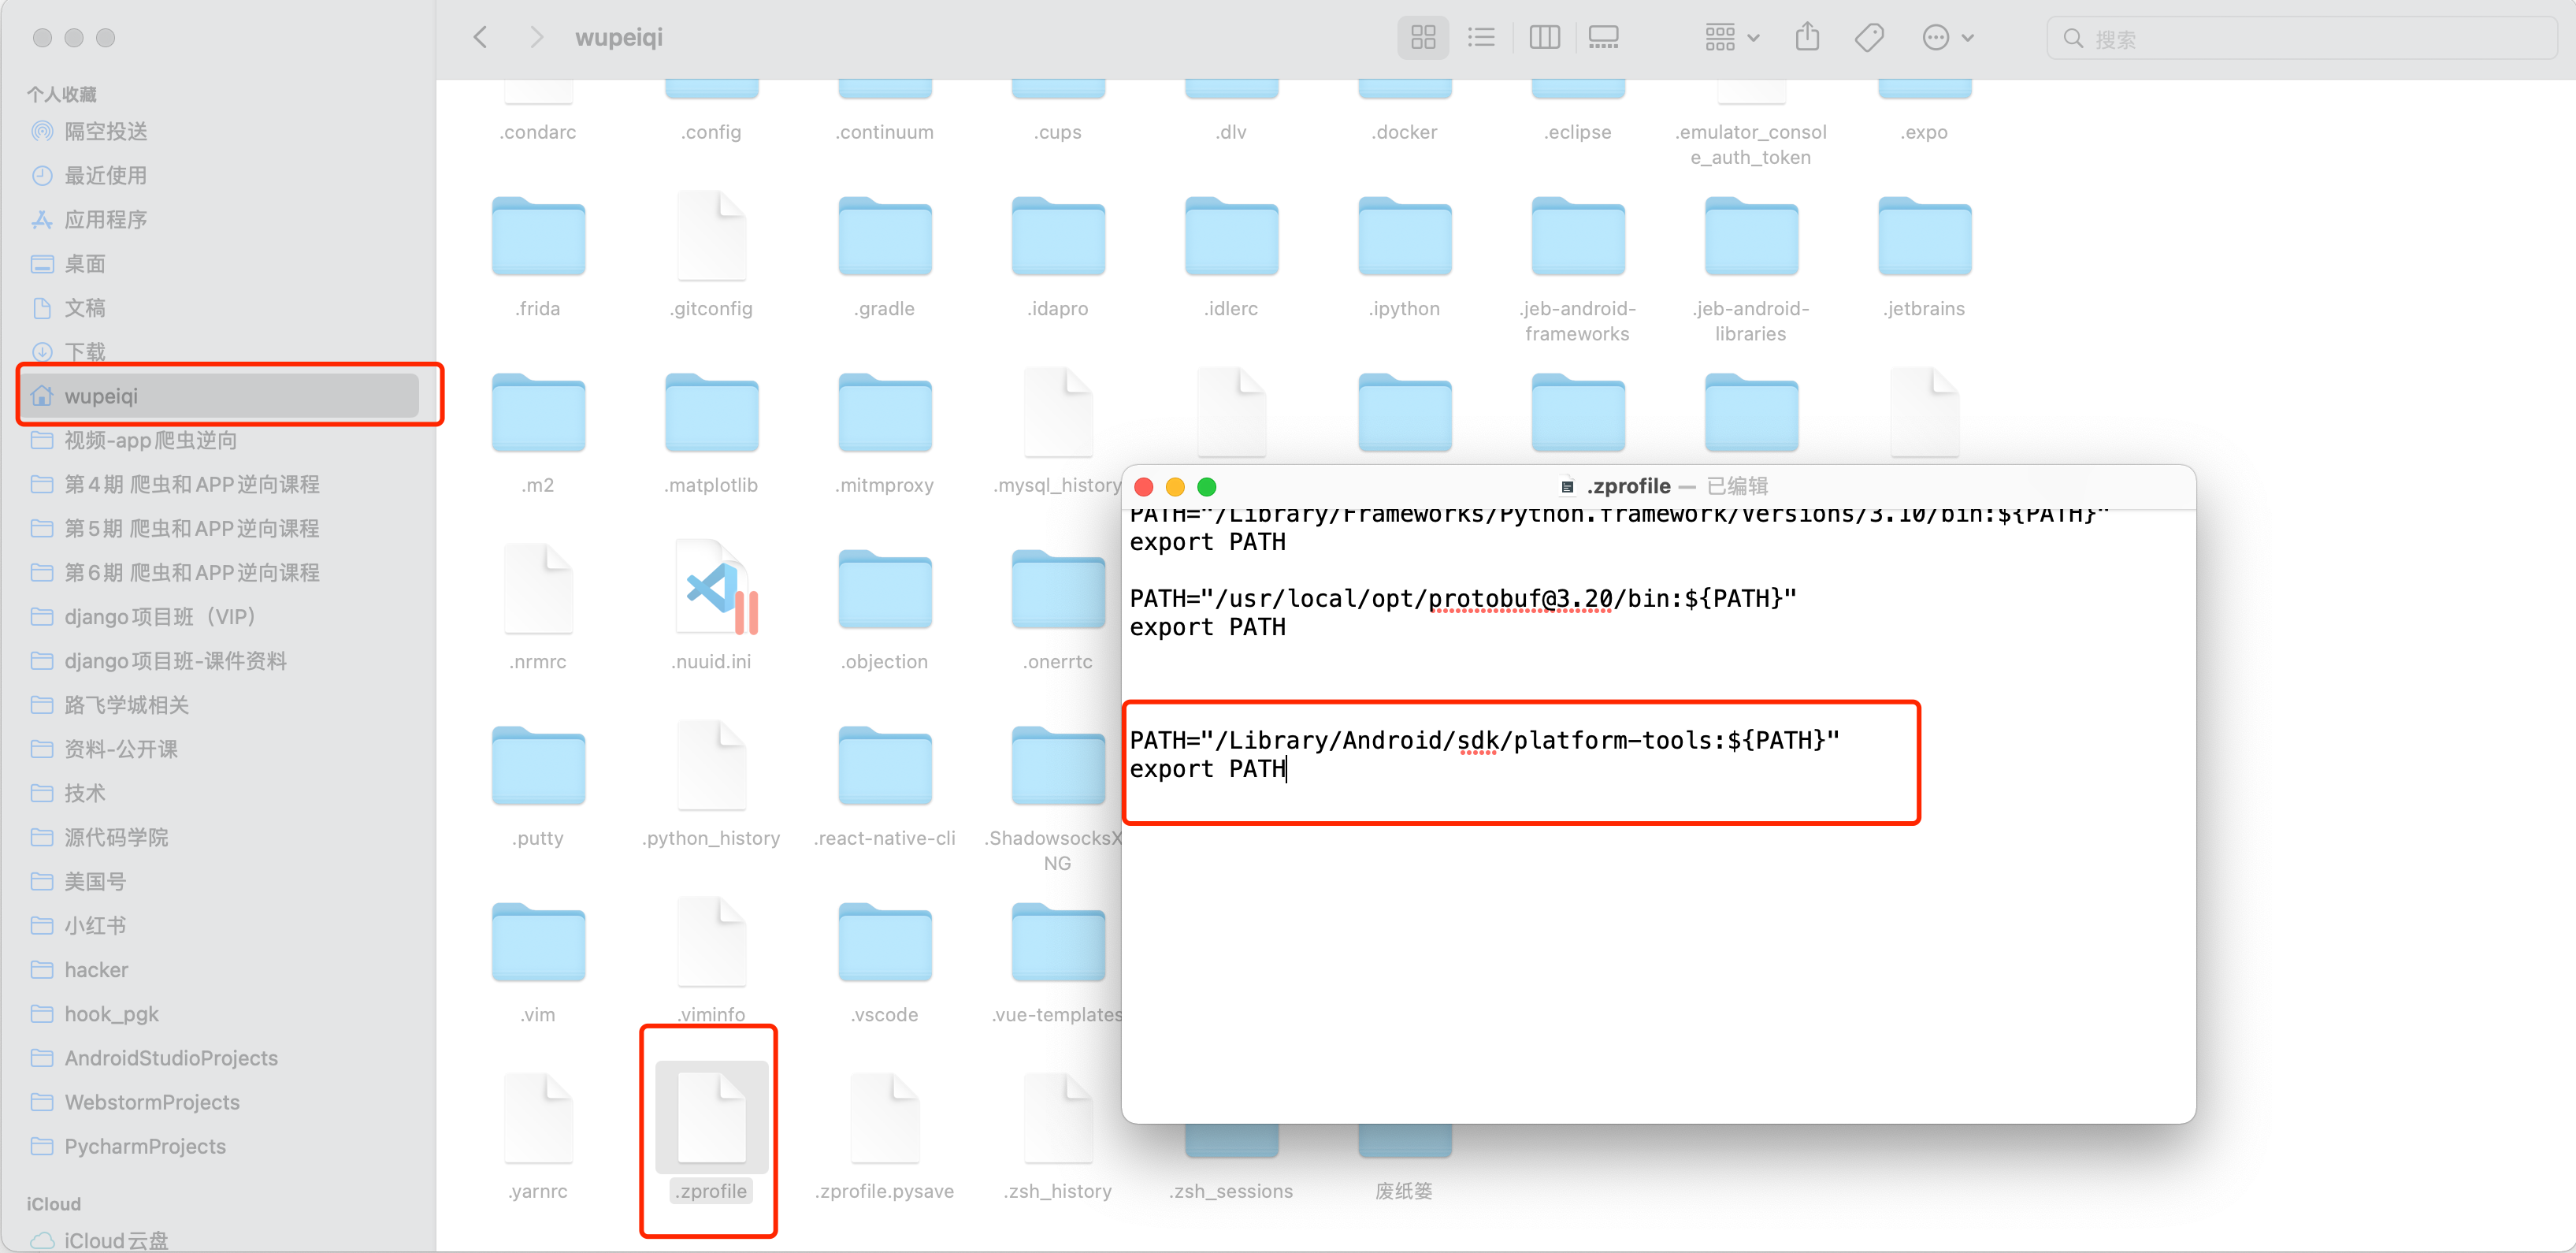
mac系统:将以下两行代码,添加到你的
~.zprofile文件中PATH="/Library/Android/sdk/platform-tools:${PATH}" export PATH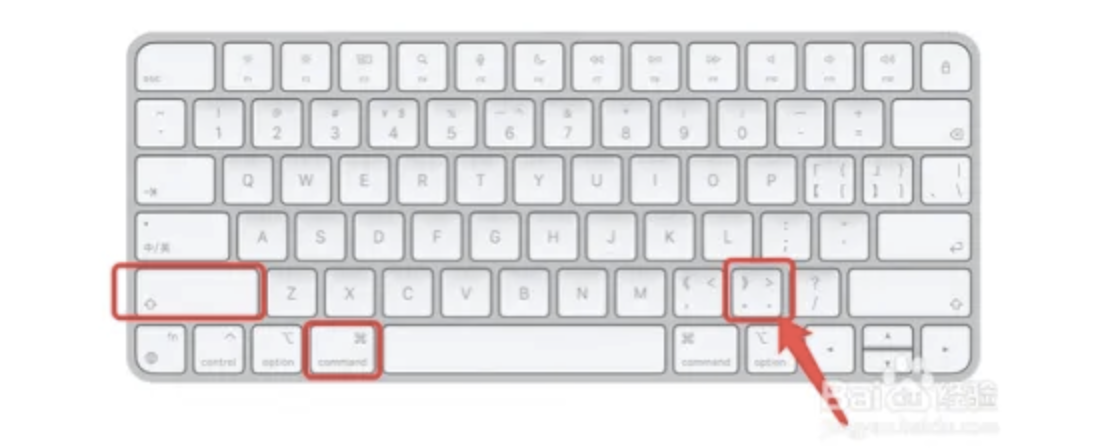
-
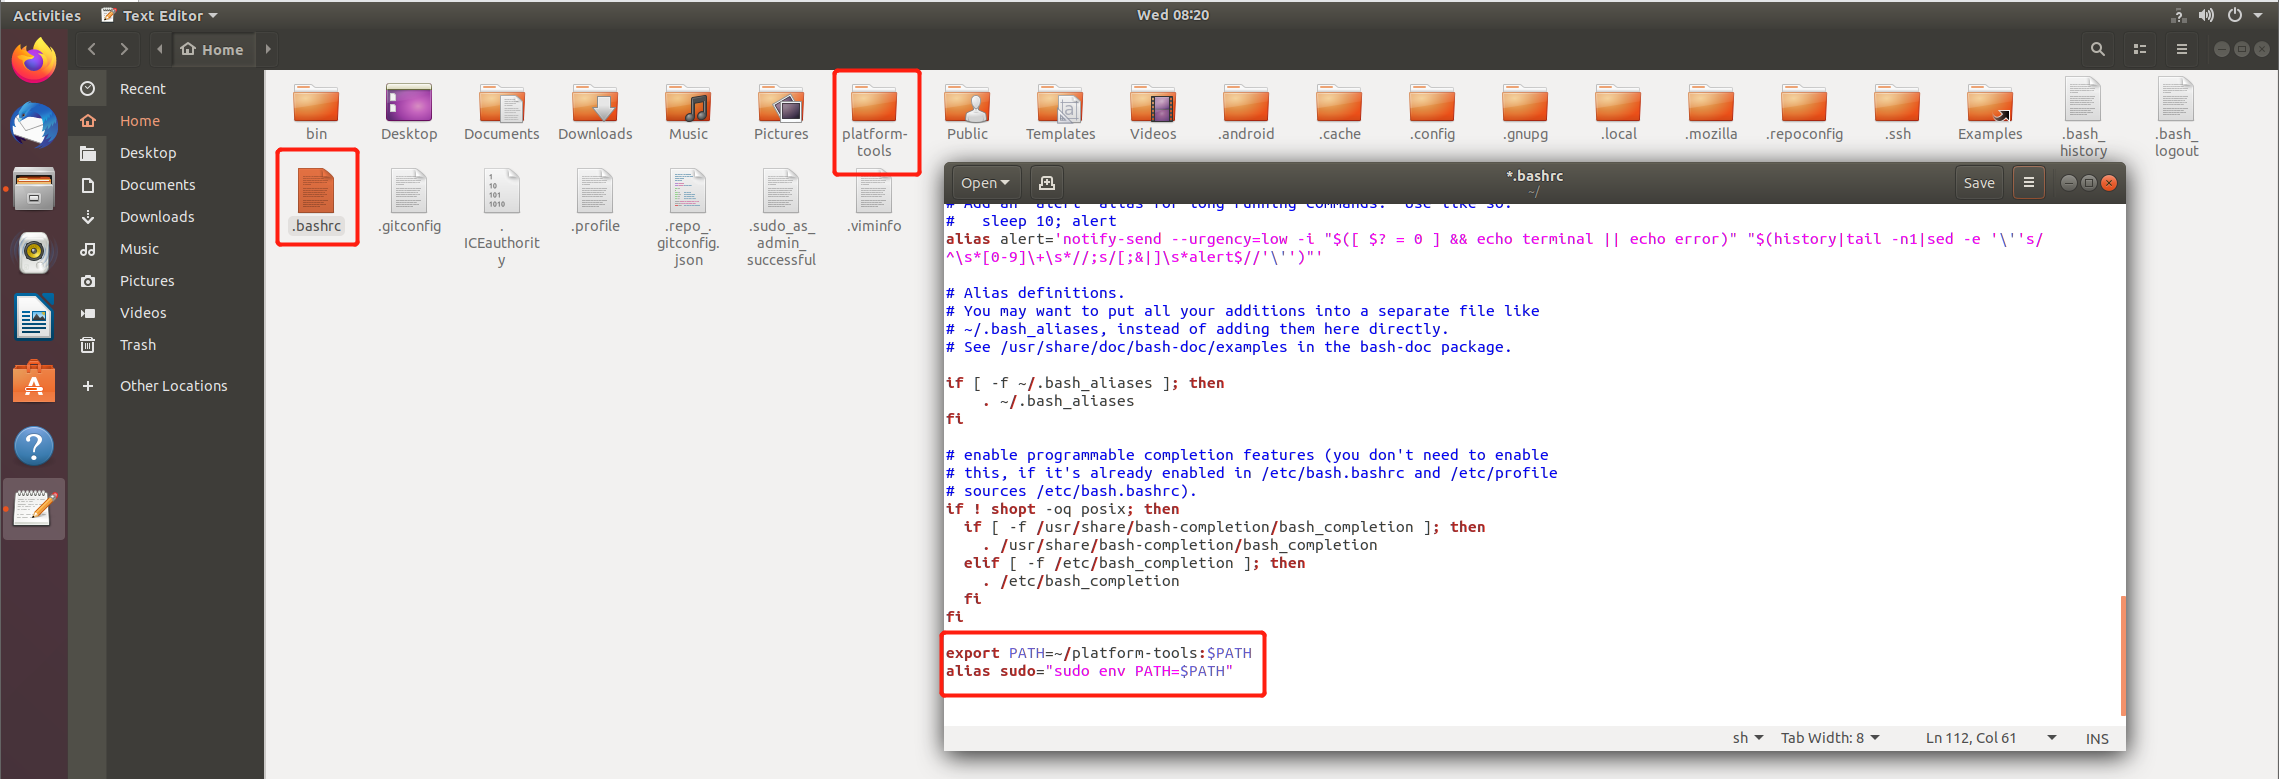
ubuntu系统:将一下两行代码加入到
~/.bashrc文件中。export PATH=~/platform-tools:$PATH alias sudo="sudo env PATH=$PATH"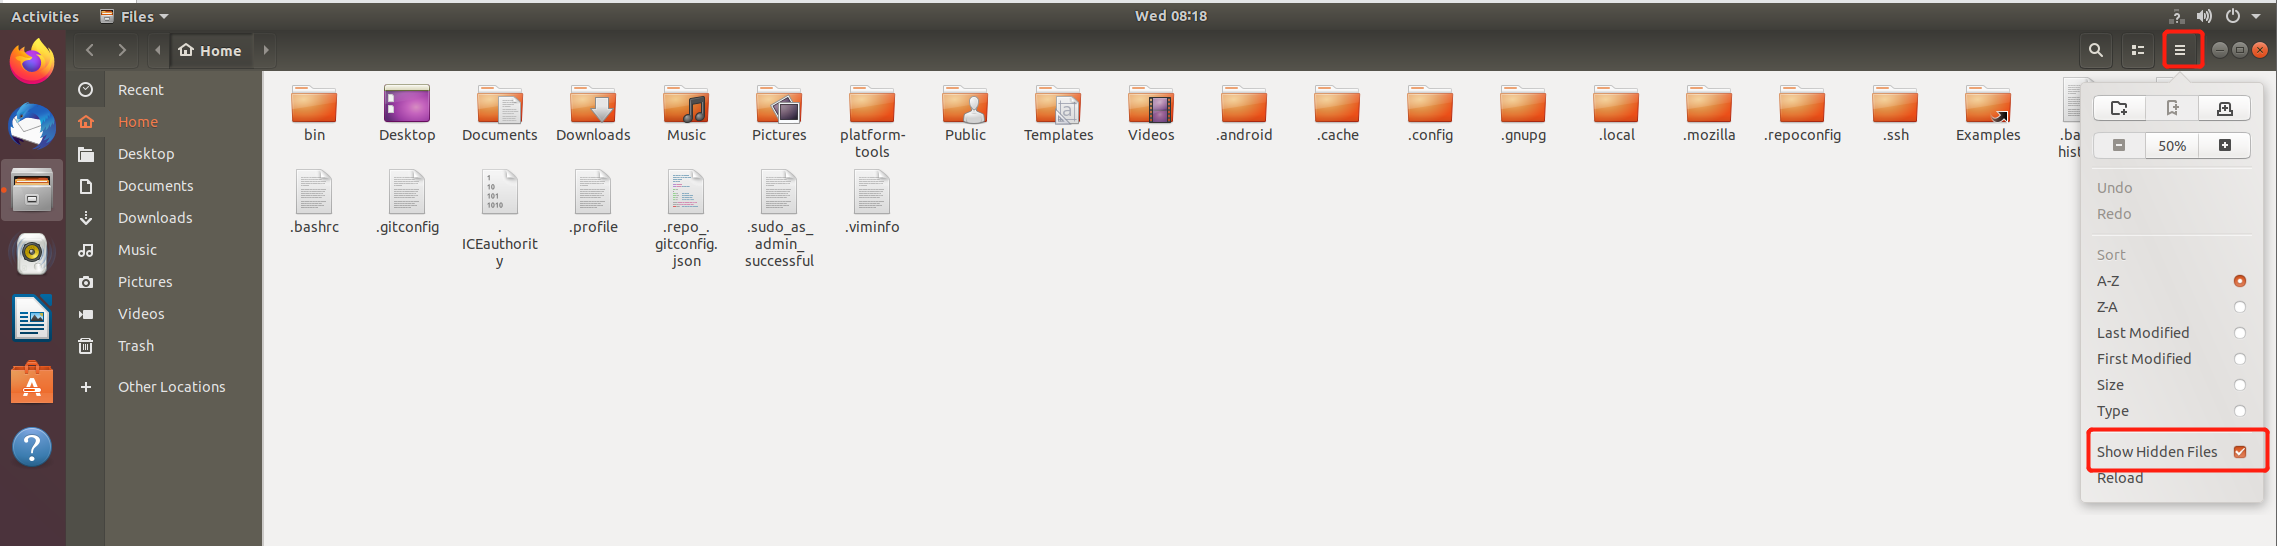
1.4 测试adb和fastboot
-
win
adb --version
fastboot --version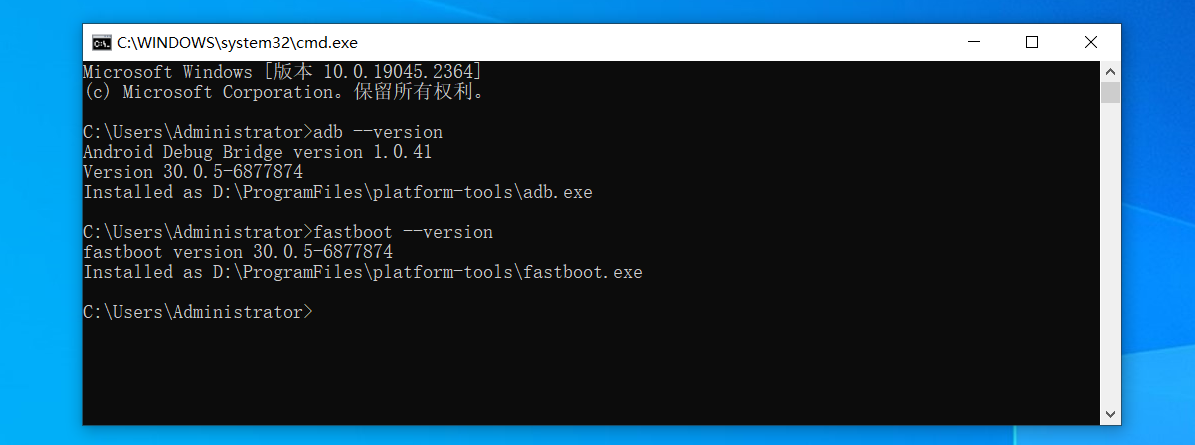
-
mac
adb --version
fastboot --version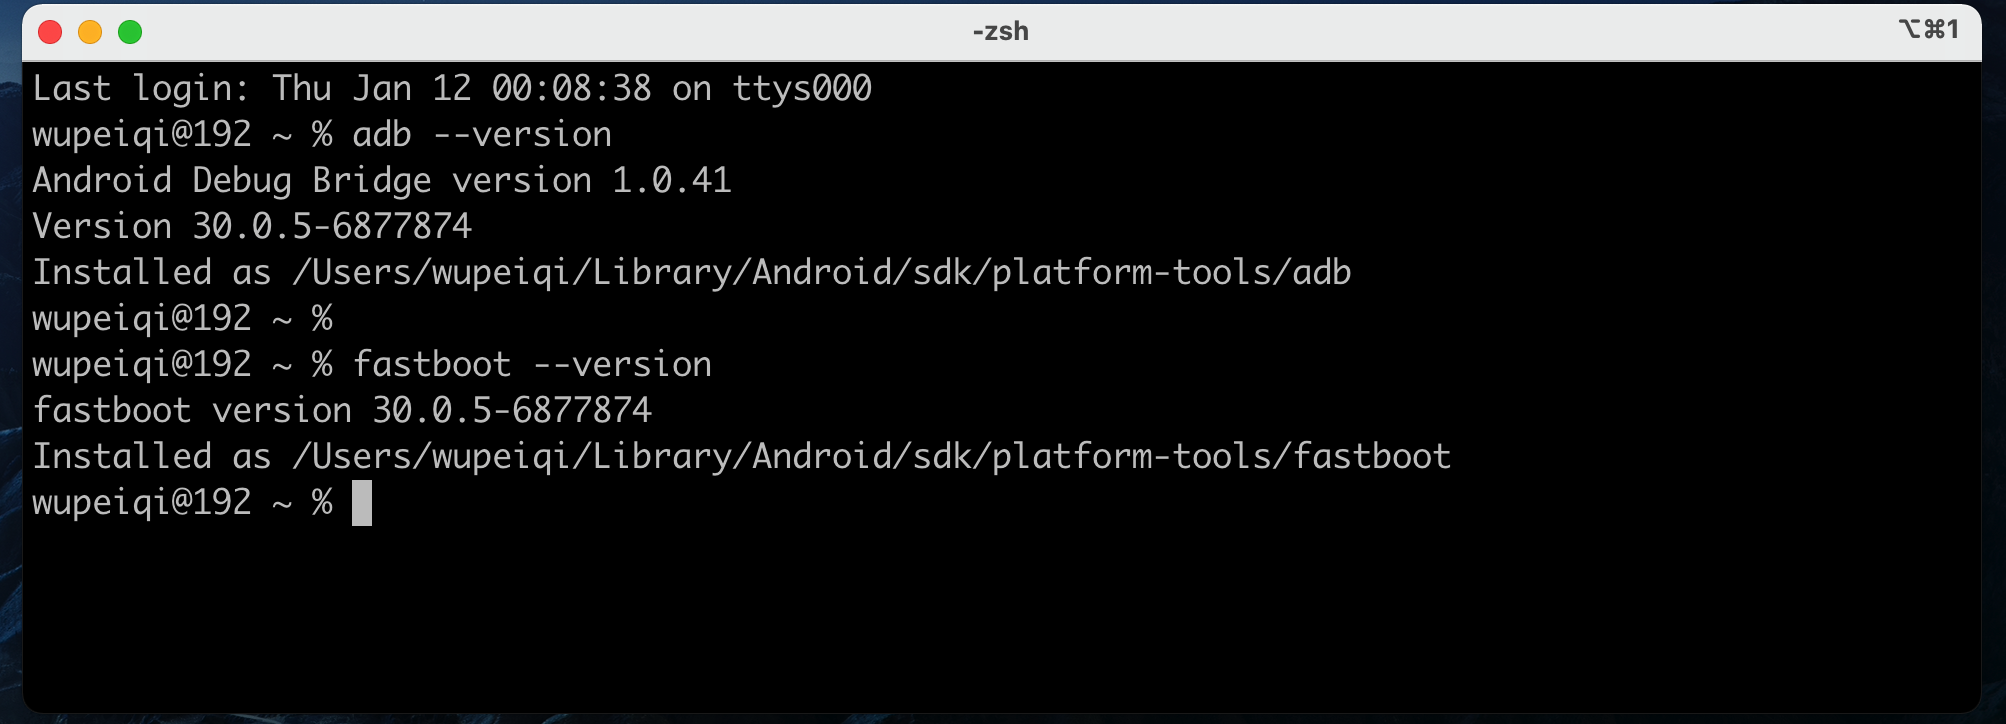
-
ubuntu
sudo adb --version
sudo fastboot --version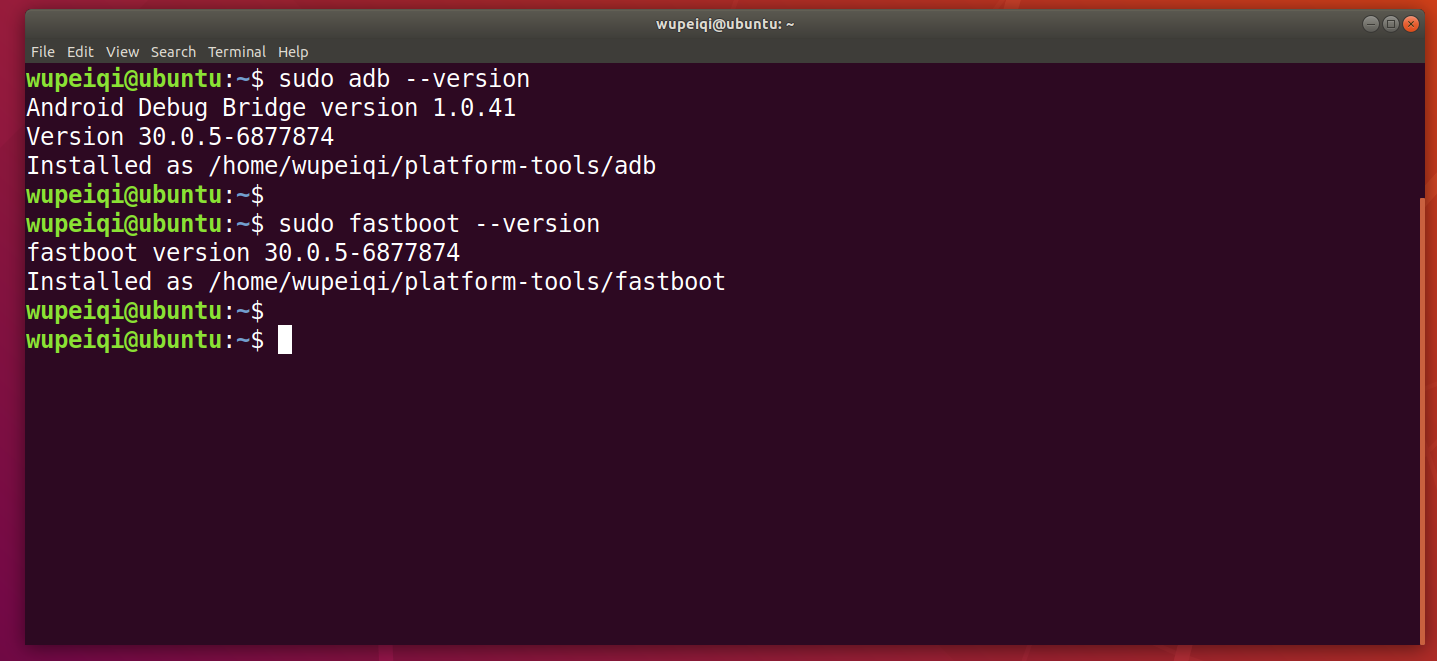
注意:在ubuntu上如果不配置root用户组,必须使用sudo来运行adb和fastboot,否则后续会提示无法连接手机,例如:

1.5 连接手机
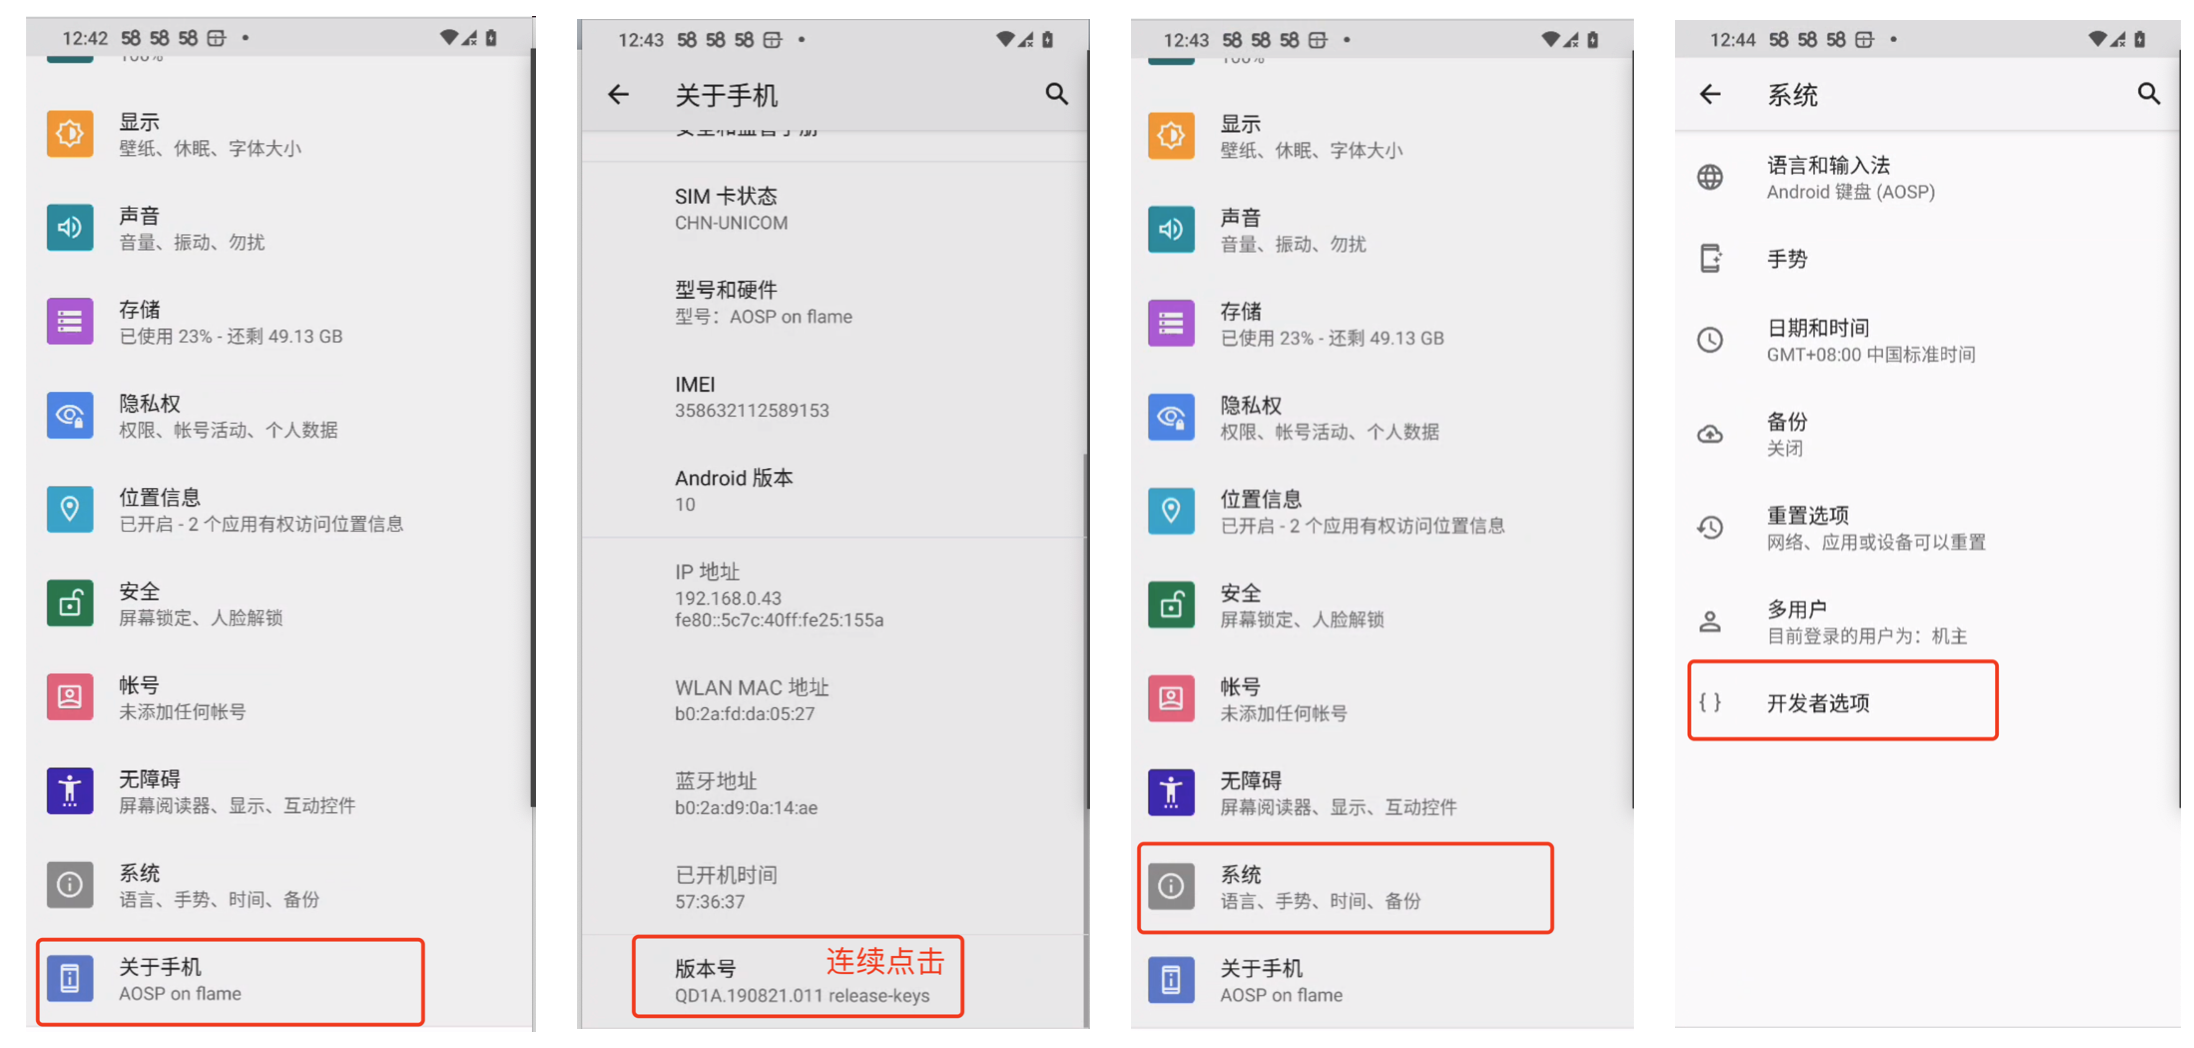
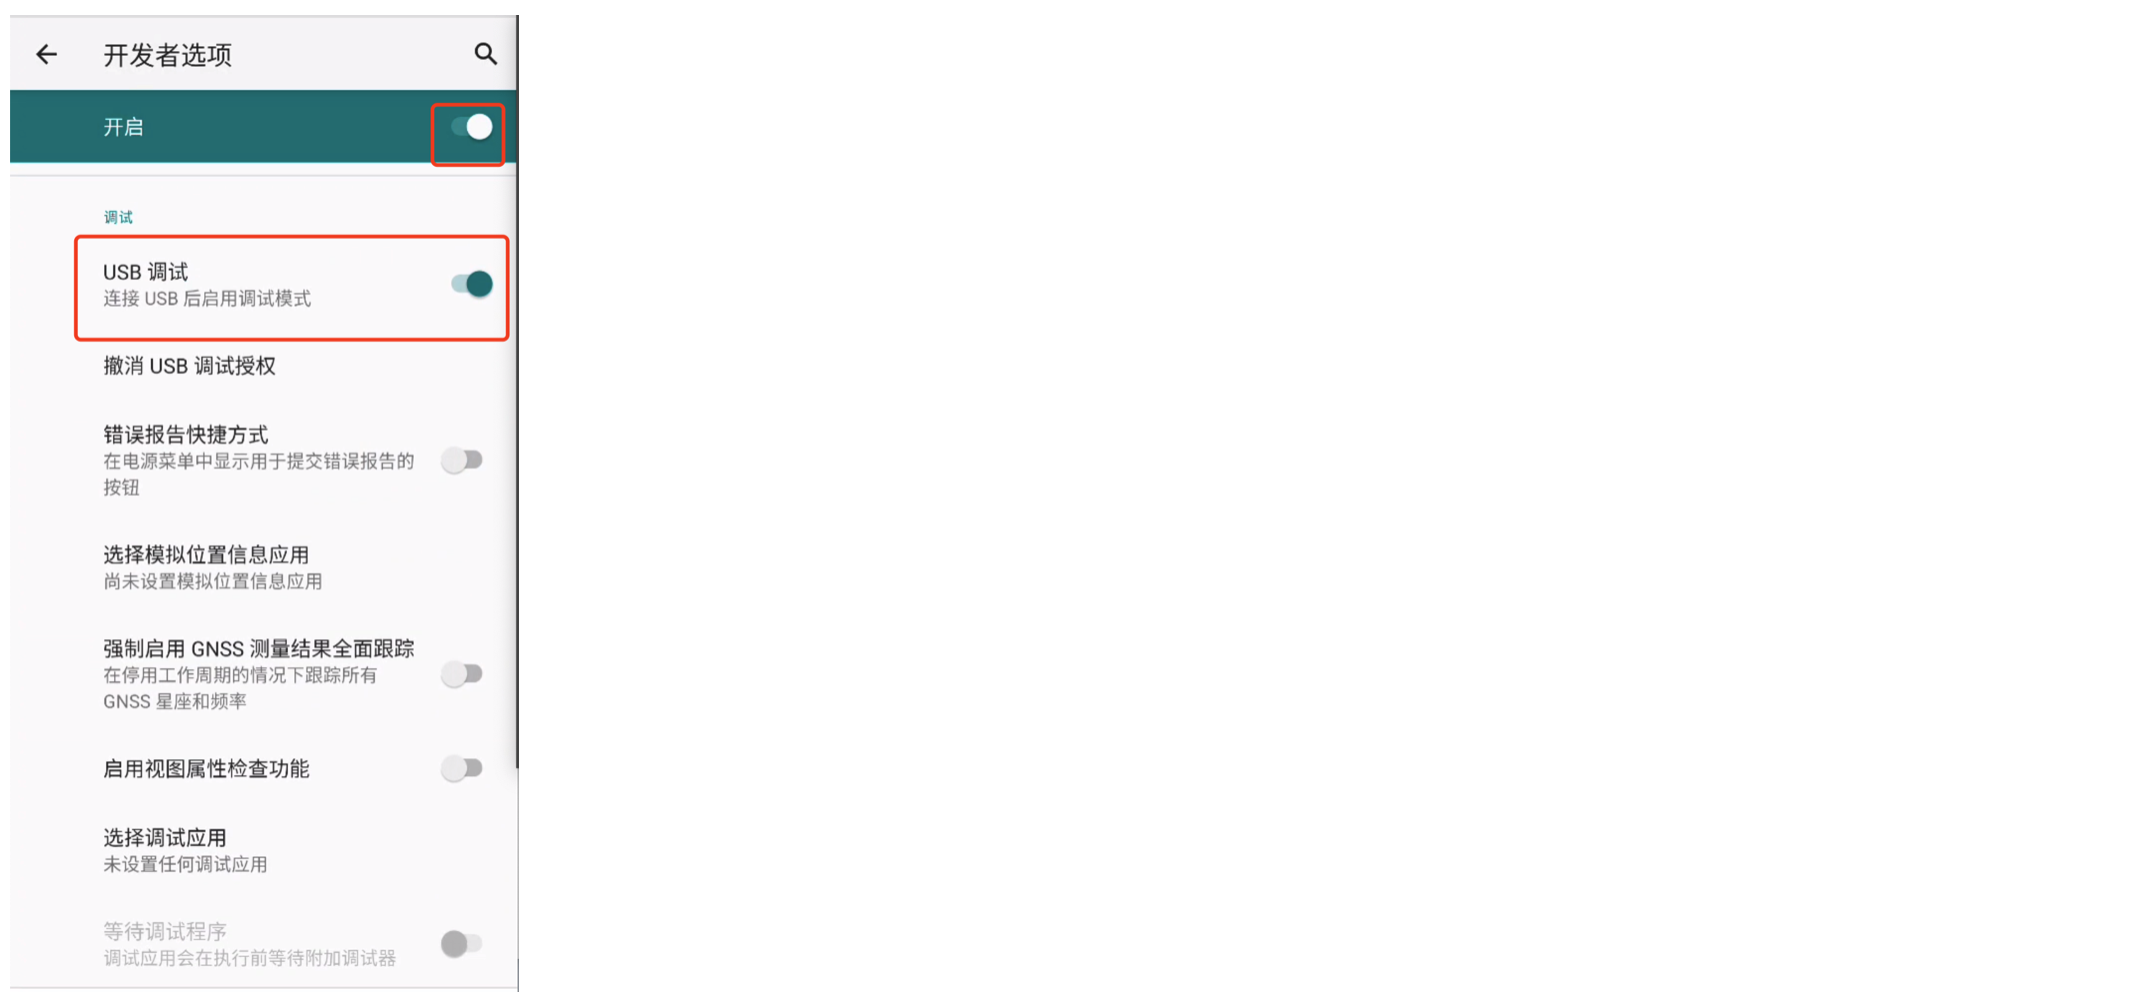
开启手机的USB调试,然后:
-
用数据线连(官方线)接手机和电脑,会提示是否授权窗口,点击授权。
尽量使用官方自带的数据线,不要用自己网上几块钱买的。 -
打开终端输入
adb devices查看是否连接:win和mac系统:adb devices ubuntu系统:sudo adb devices
看到设备信息,则表示连接成功。。。
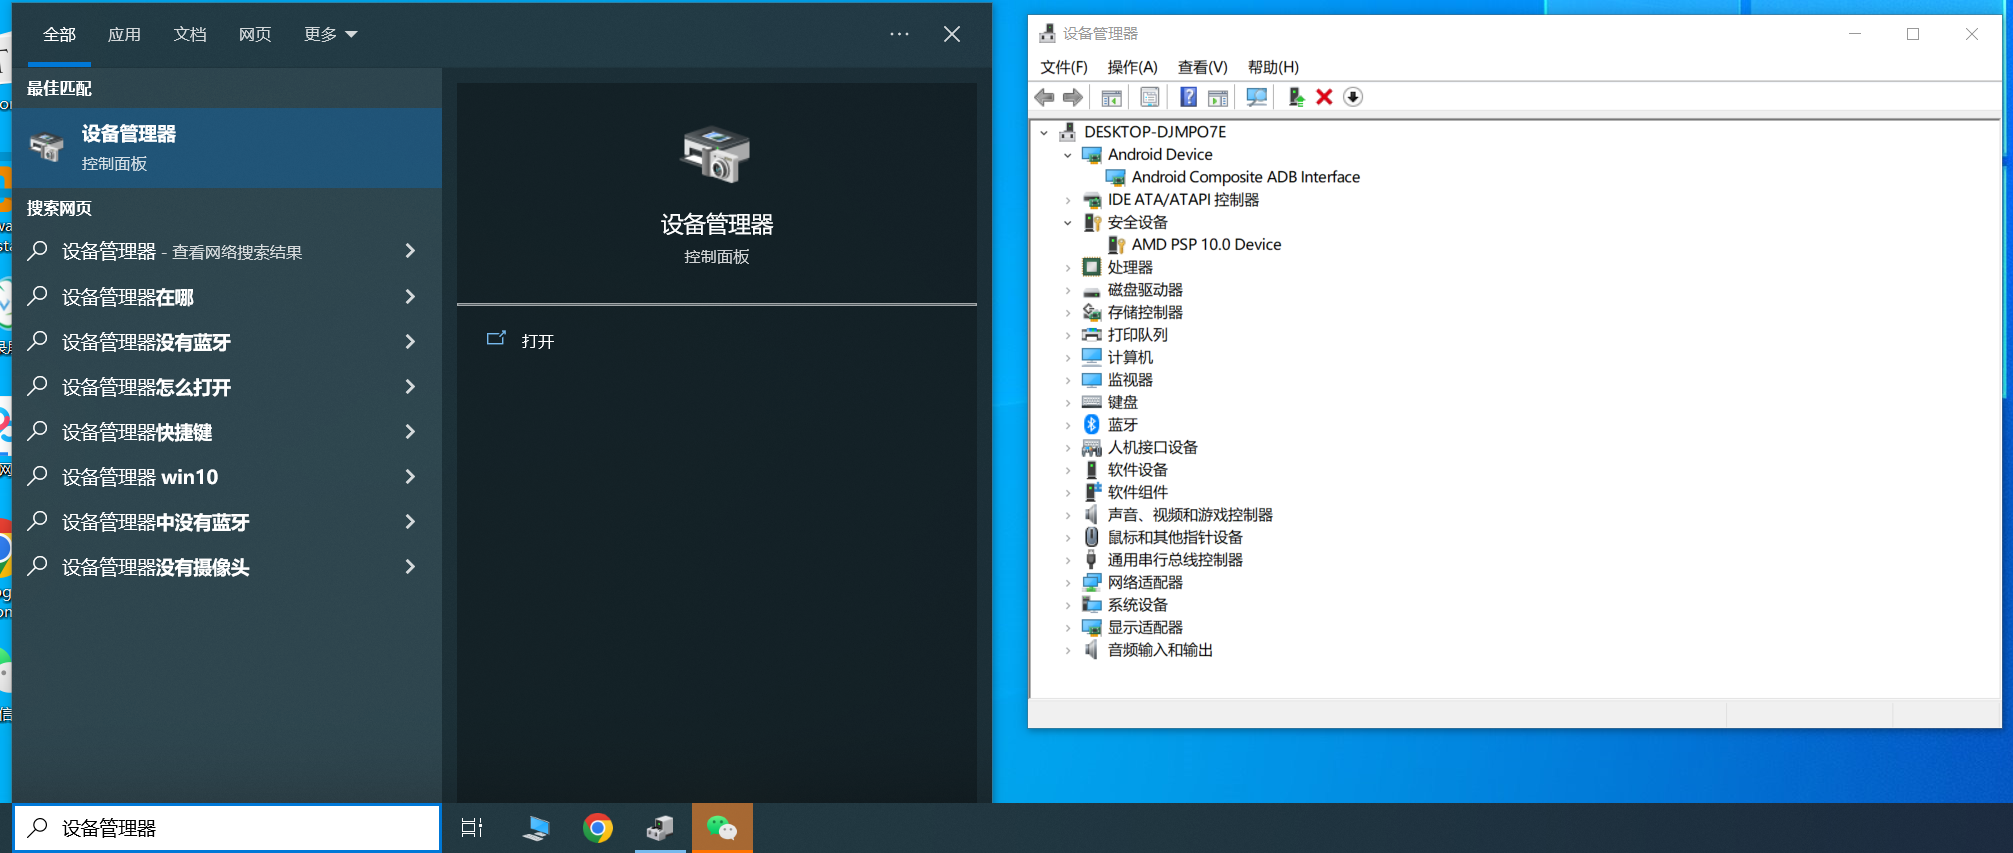
如果你是windows操作系统,可能一直无法显示连接的设备,可能是因为电脑为安装谷歌USB驱动导致。
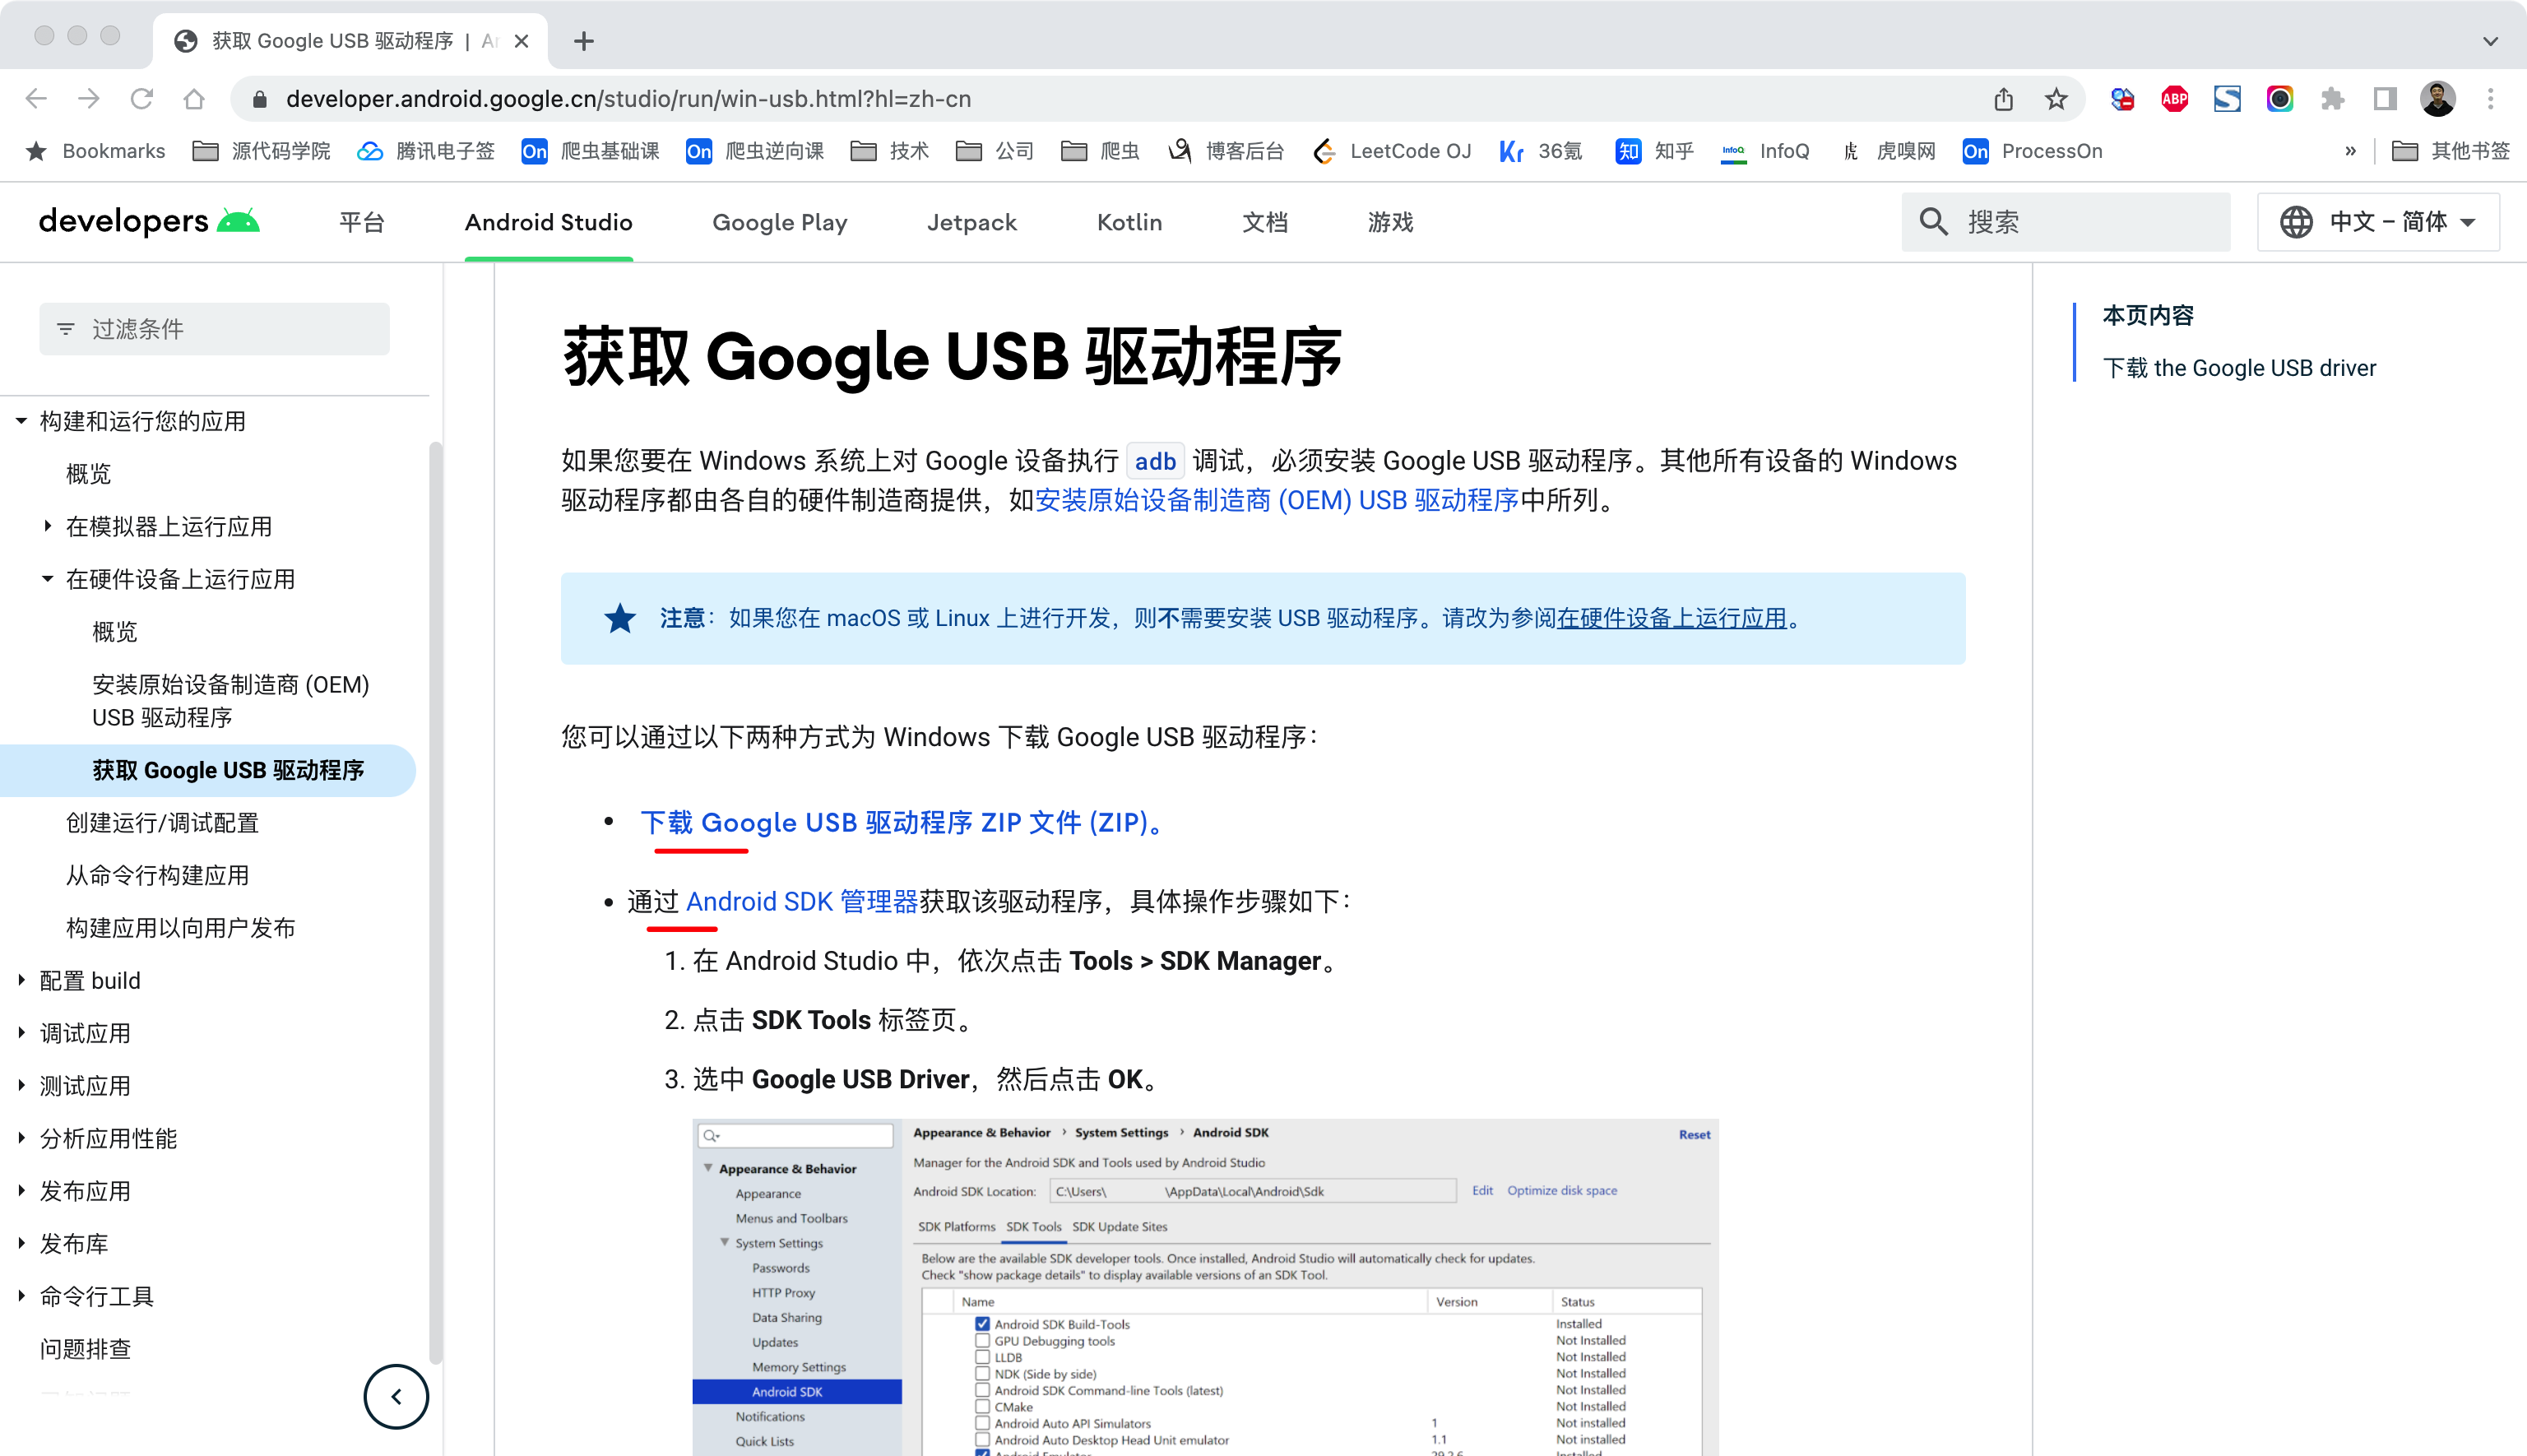
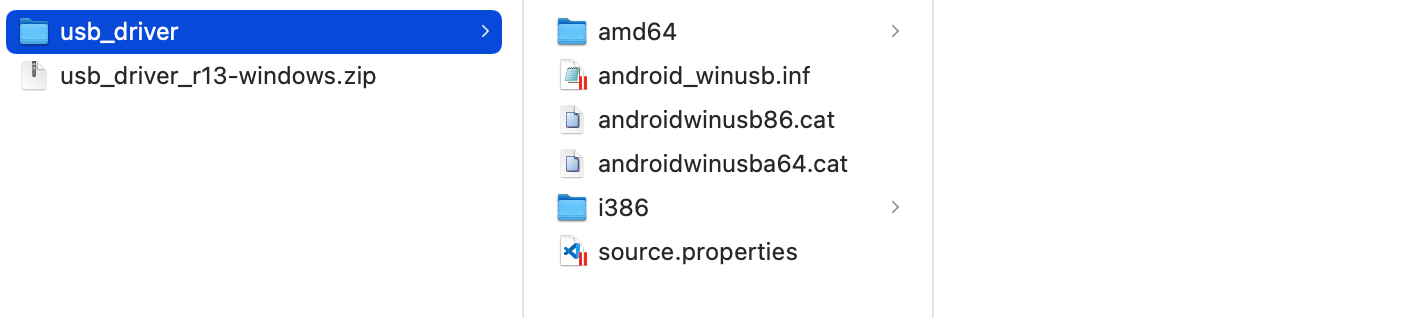
1.6 谷歌USB驱动
1.6.1 下载
https://developer.android.google.cn/studio/run/win-usb.html?hl=zh-cn
1.6.2 安装
https://developer.android.google.cn/studio/run/oem-usb?hl=zh-cn#InstallingDriver
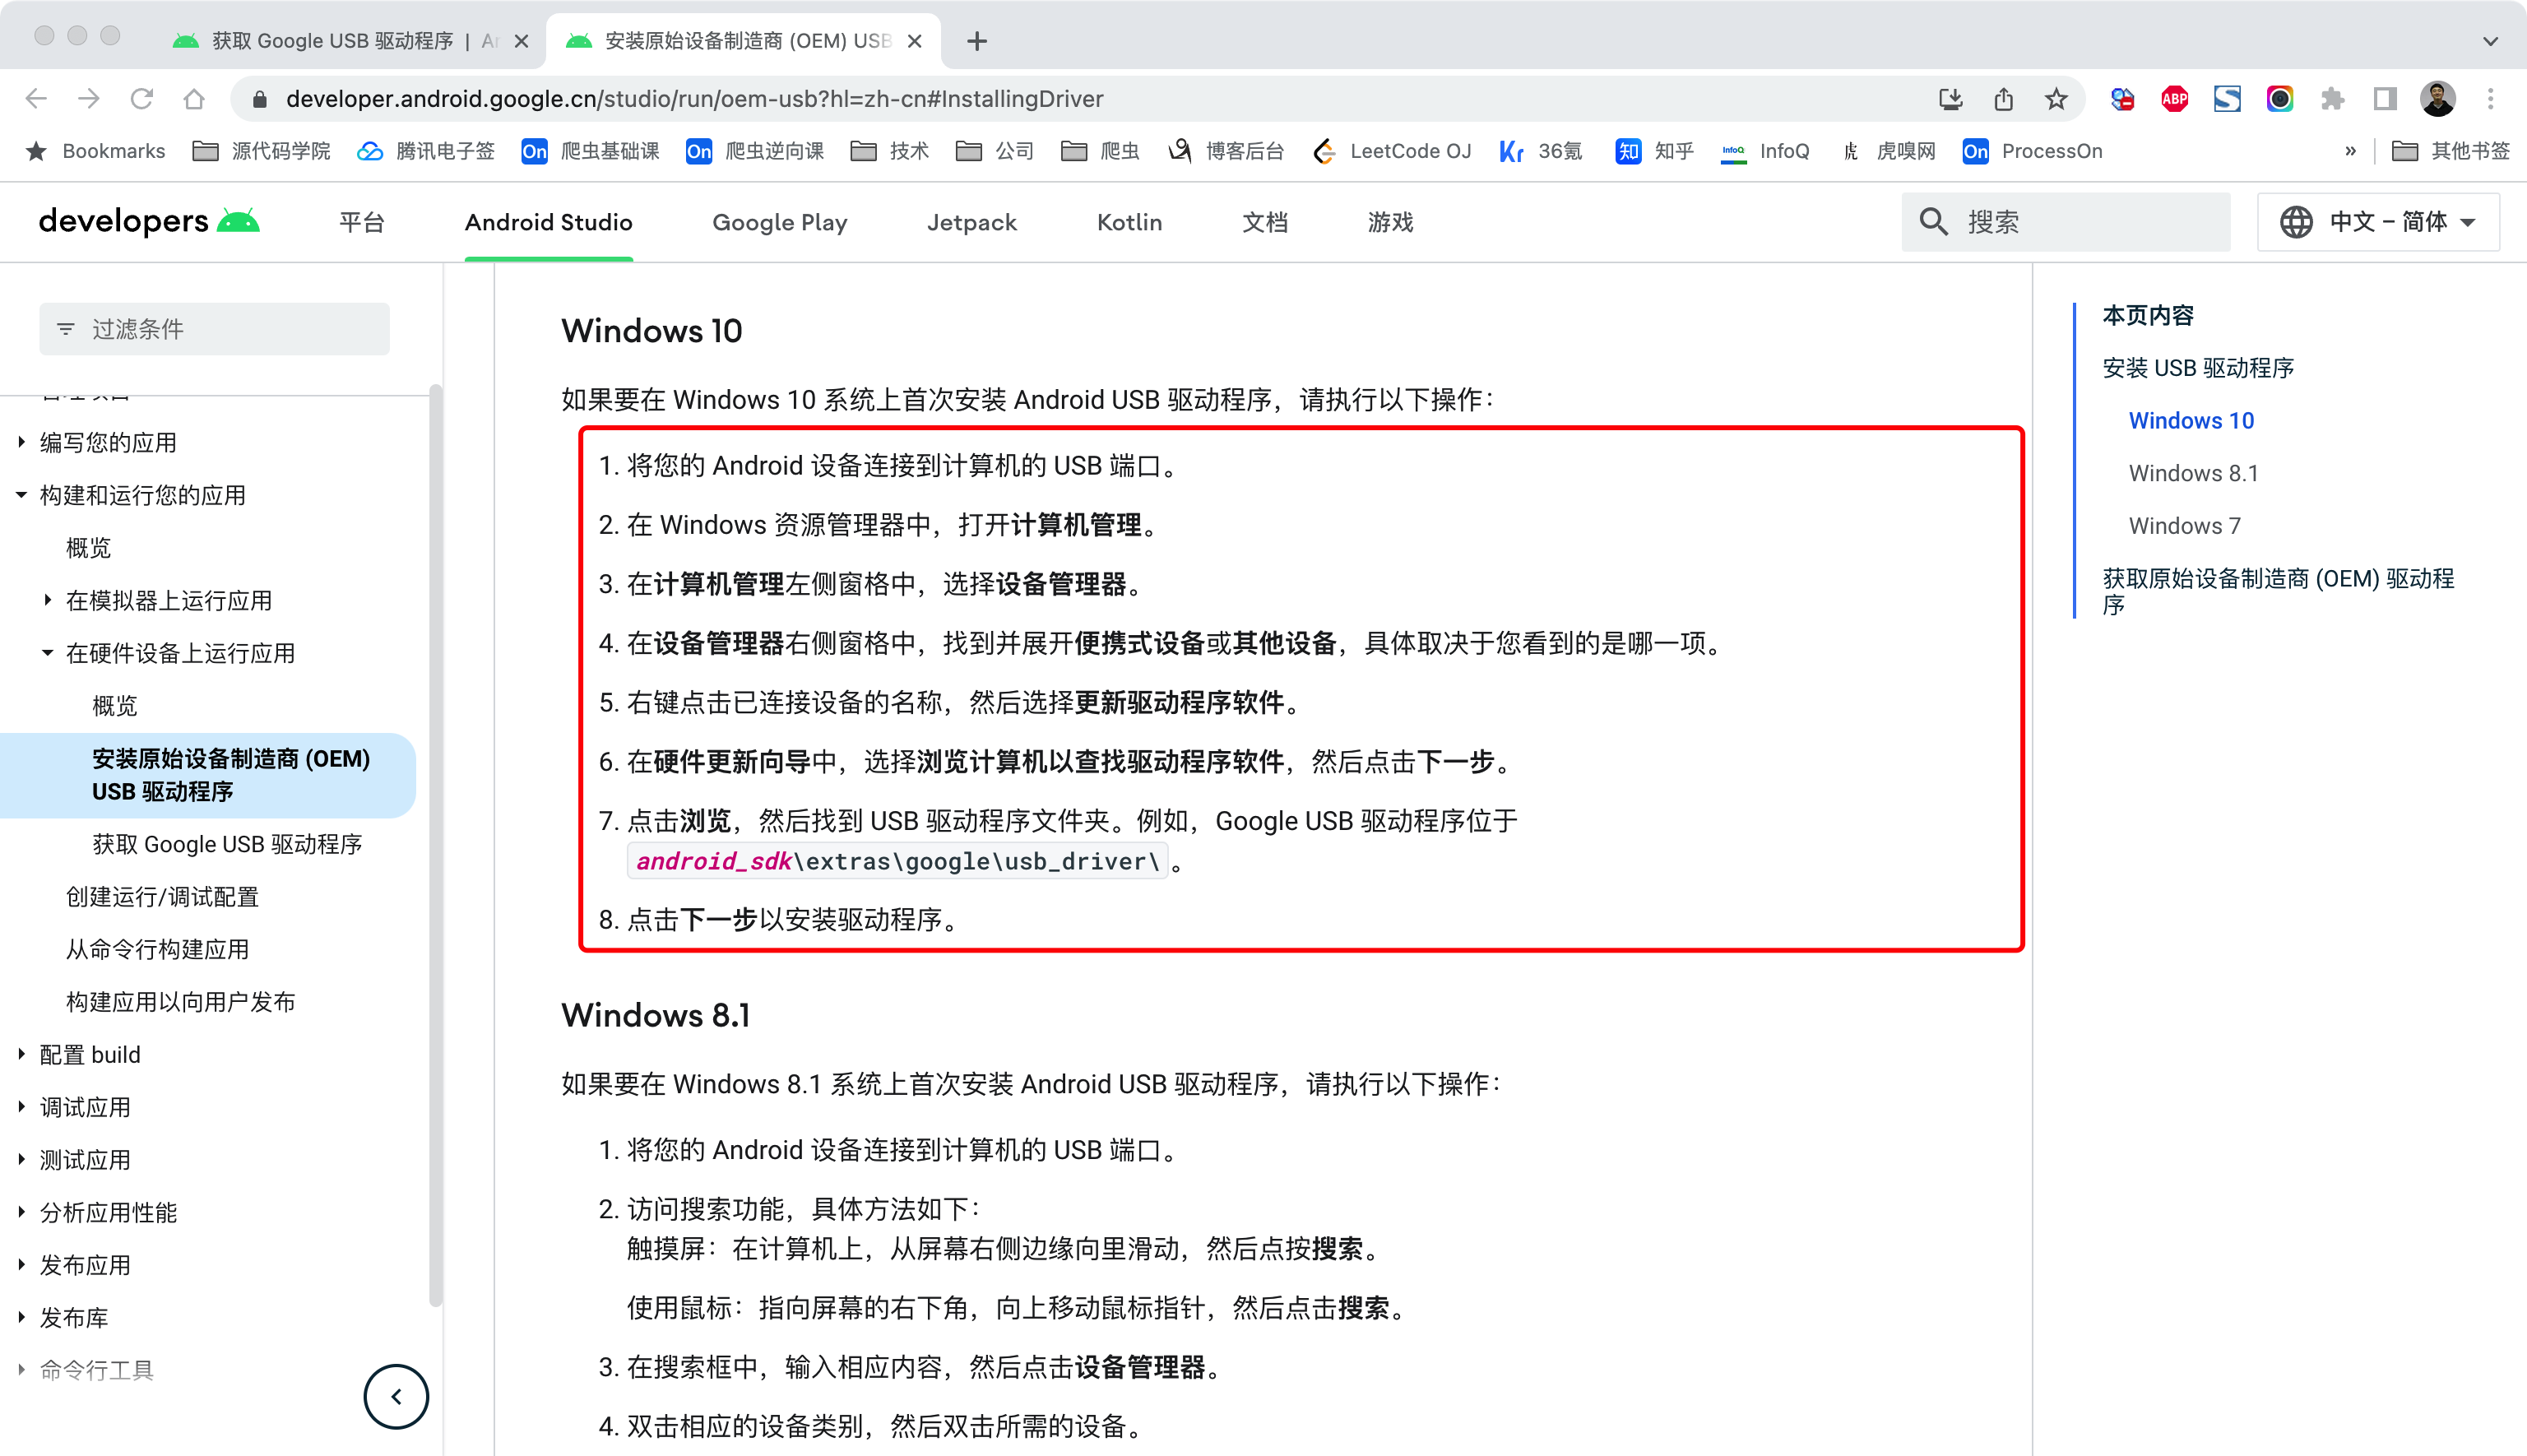
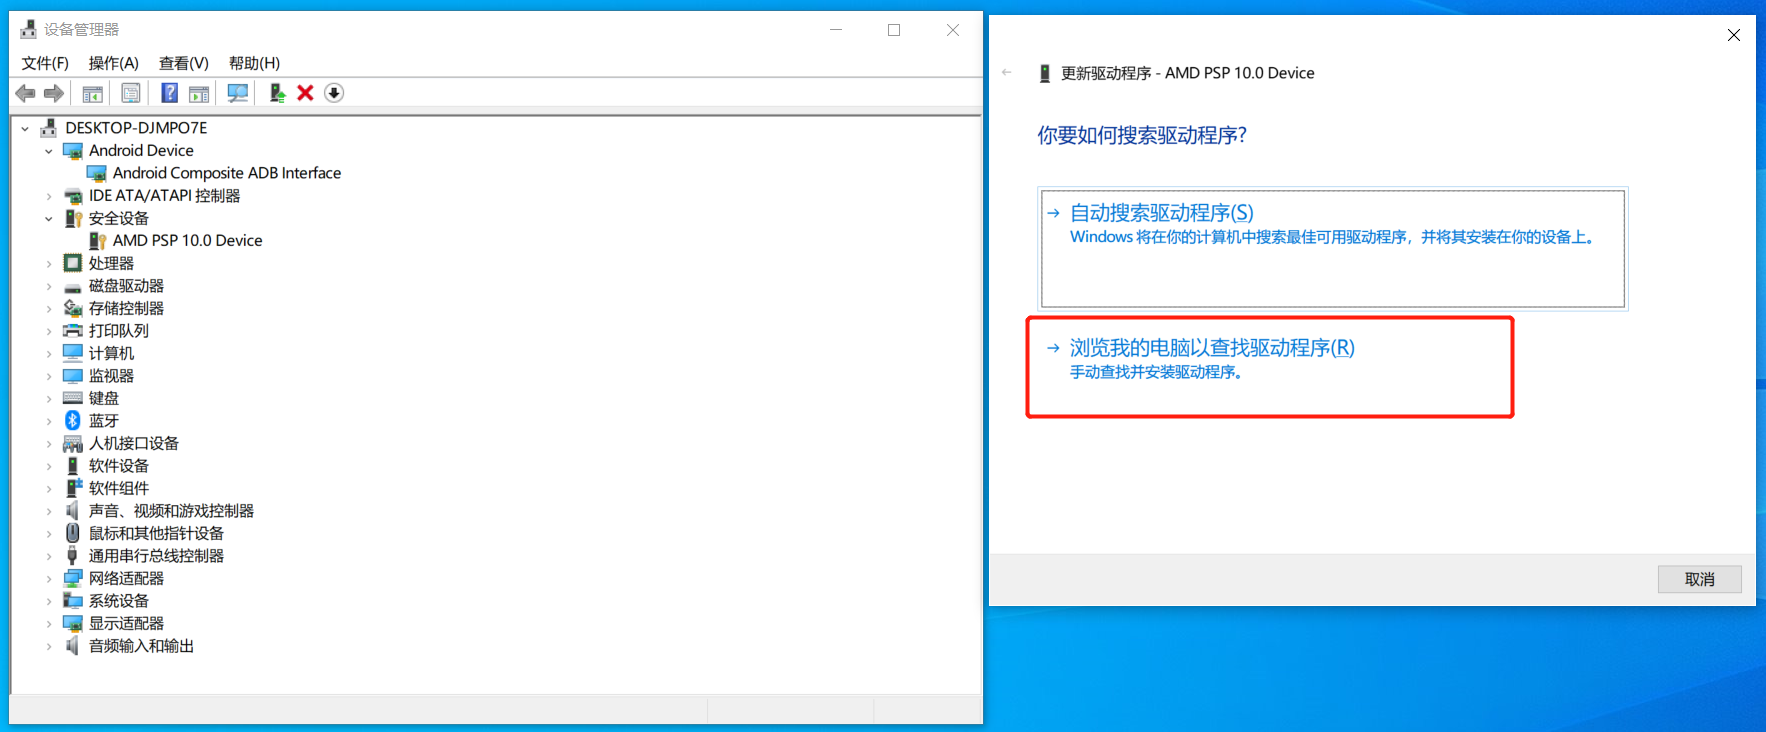
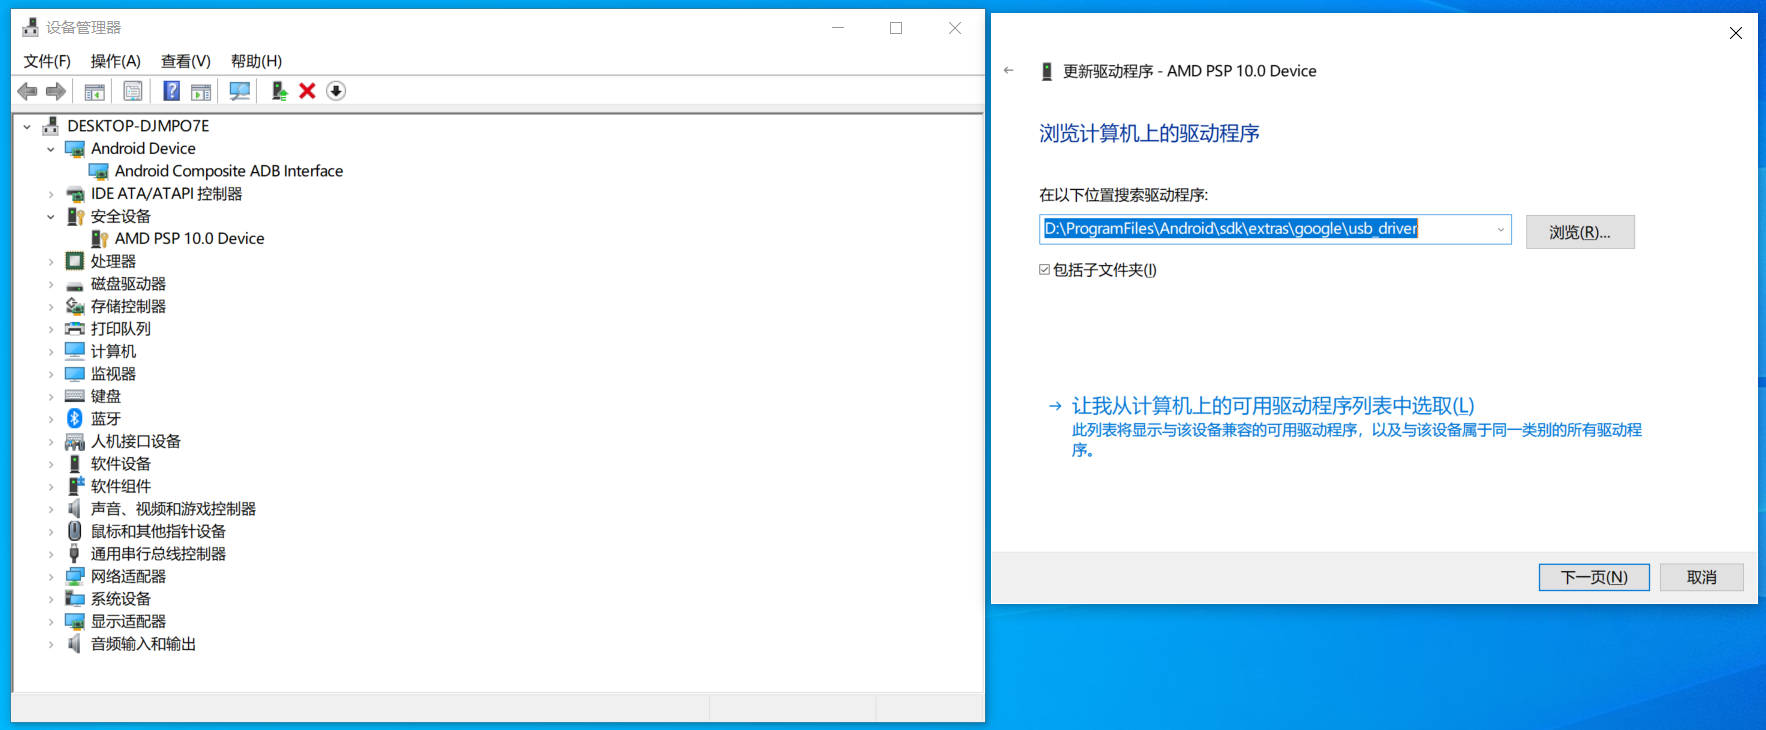
驱动安装成功后,就可以正常使用 adb 和 fastboot了。。。
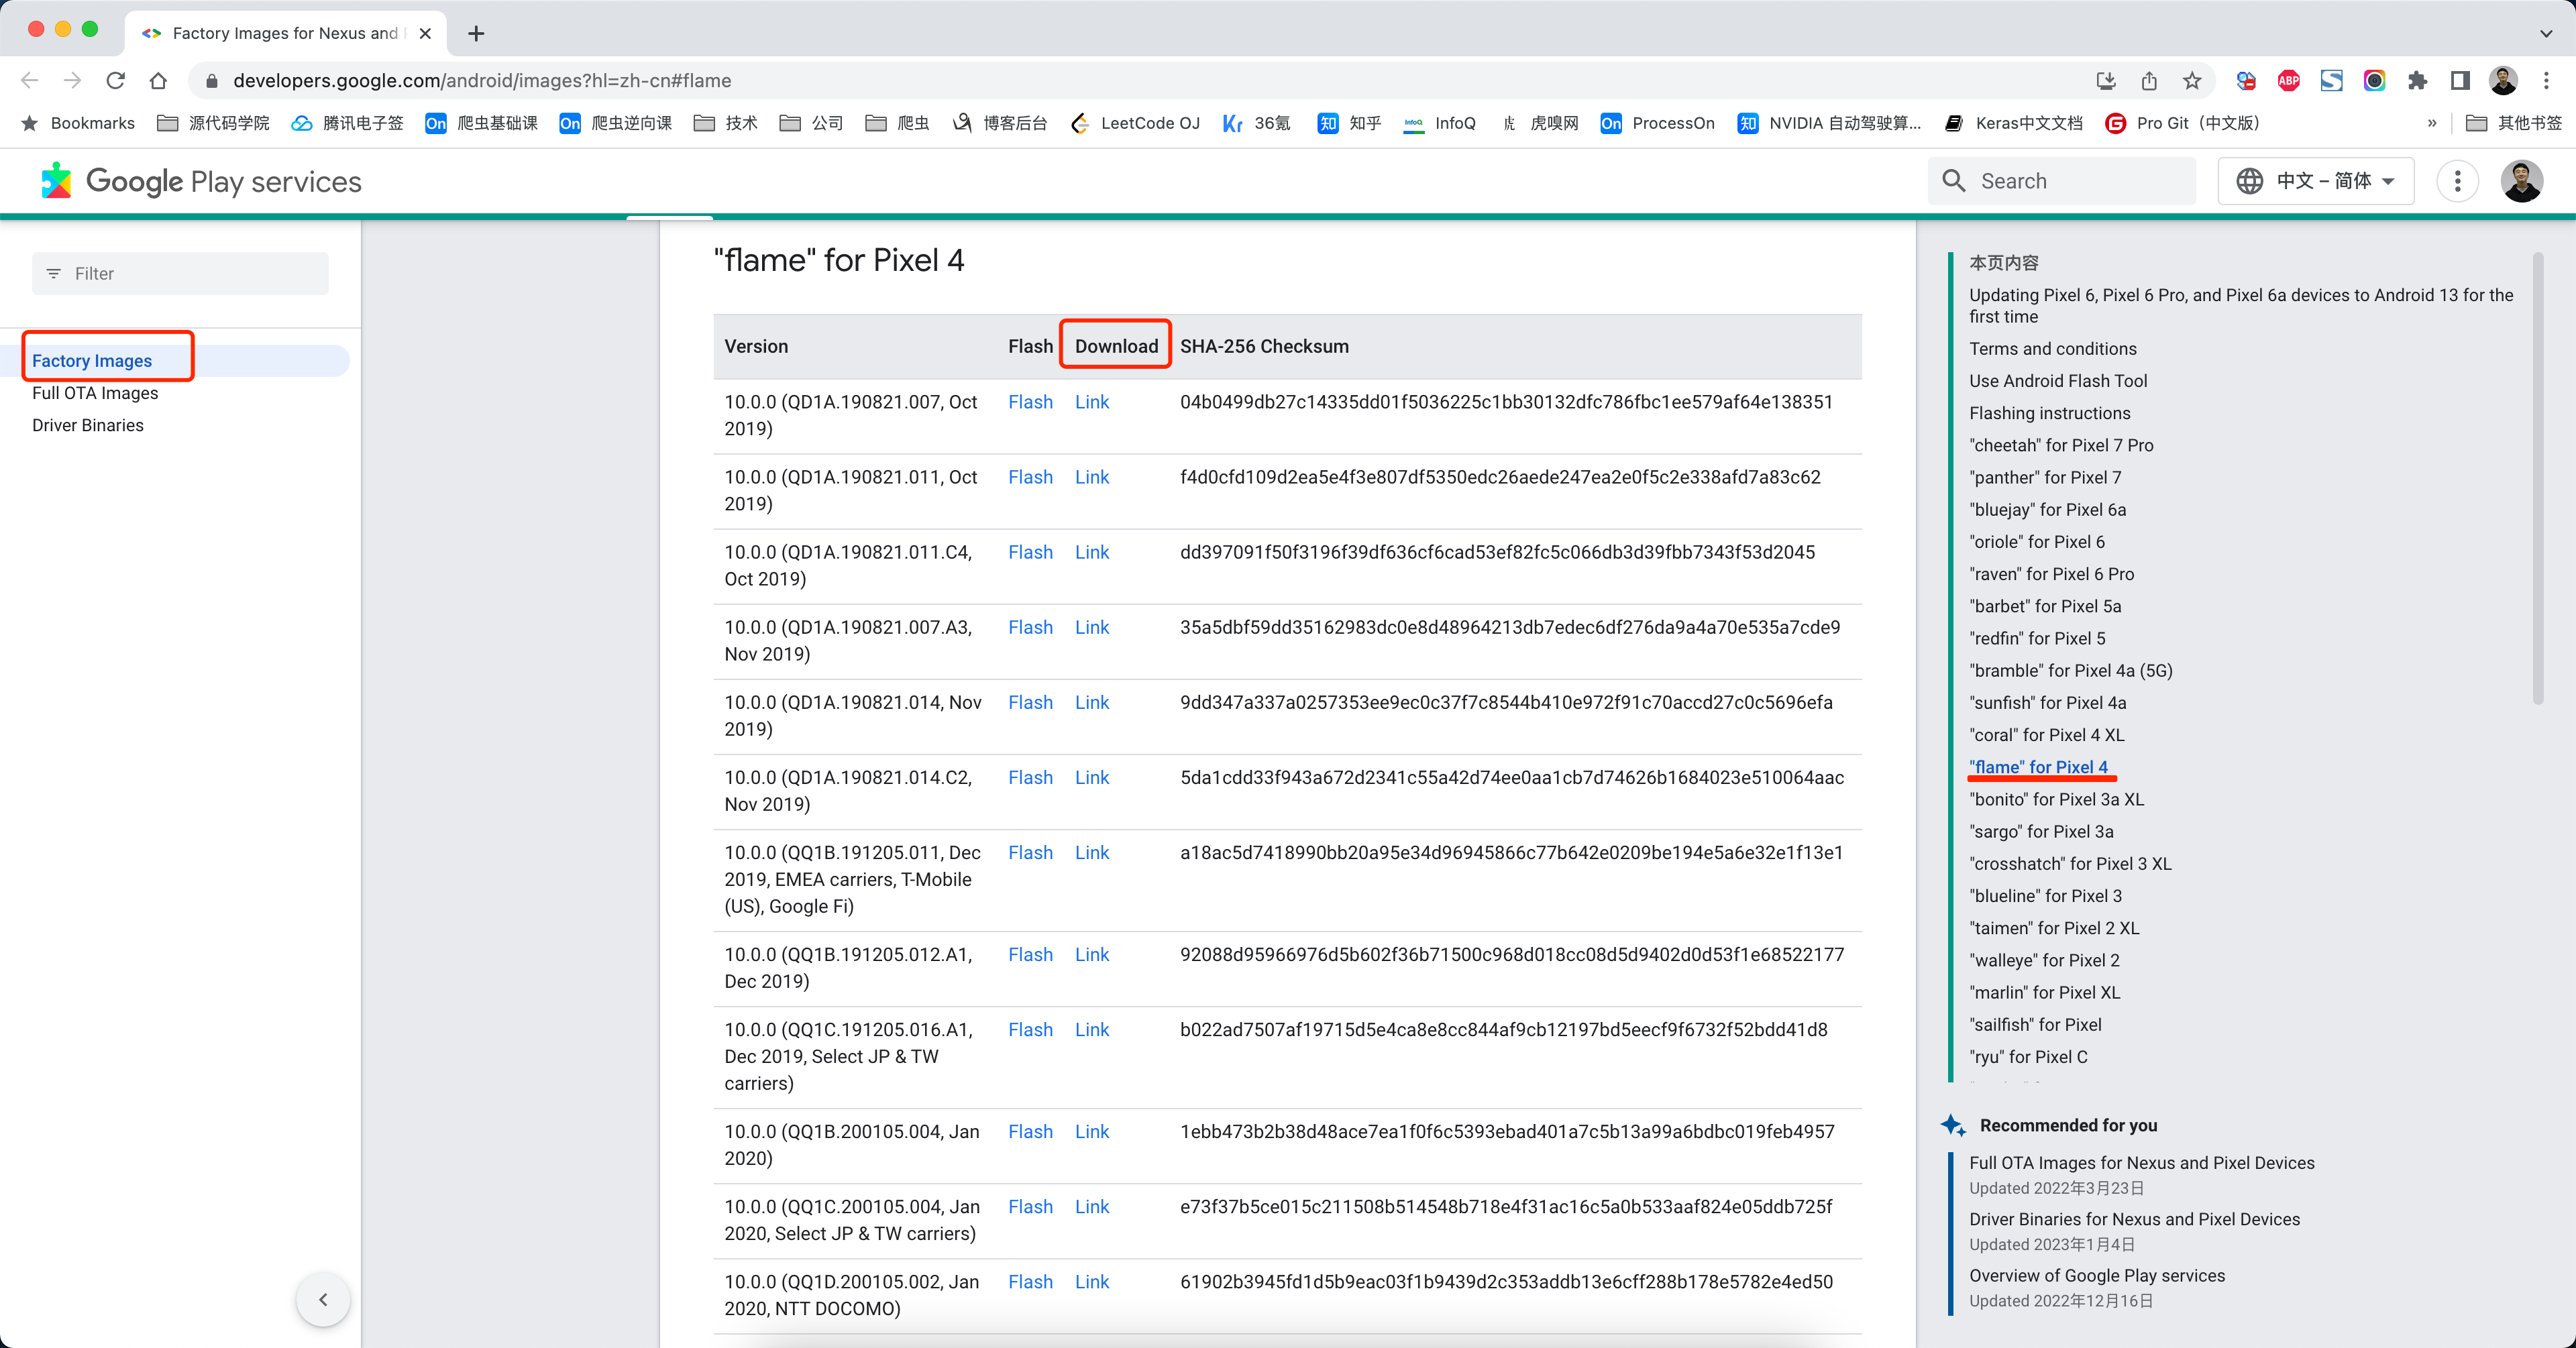
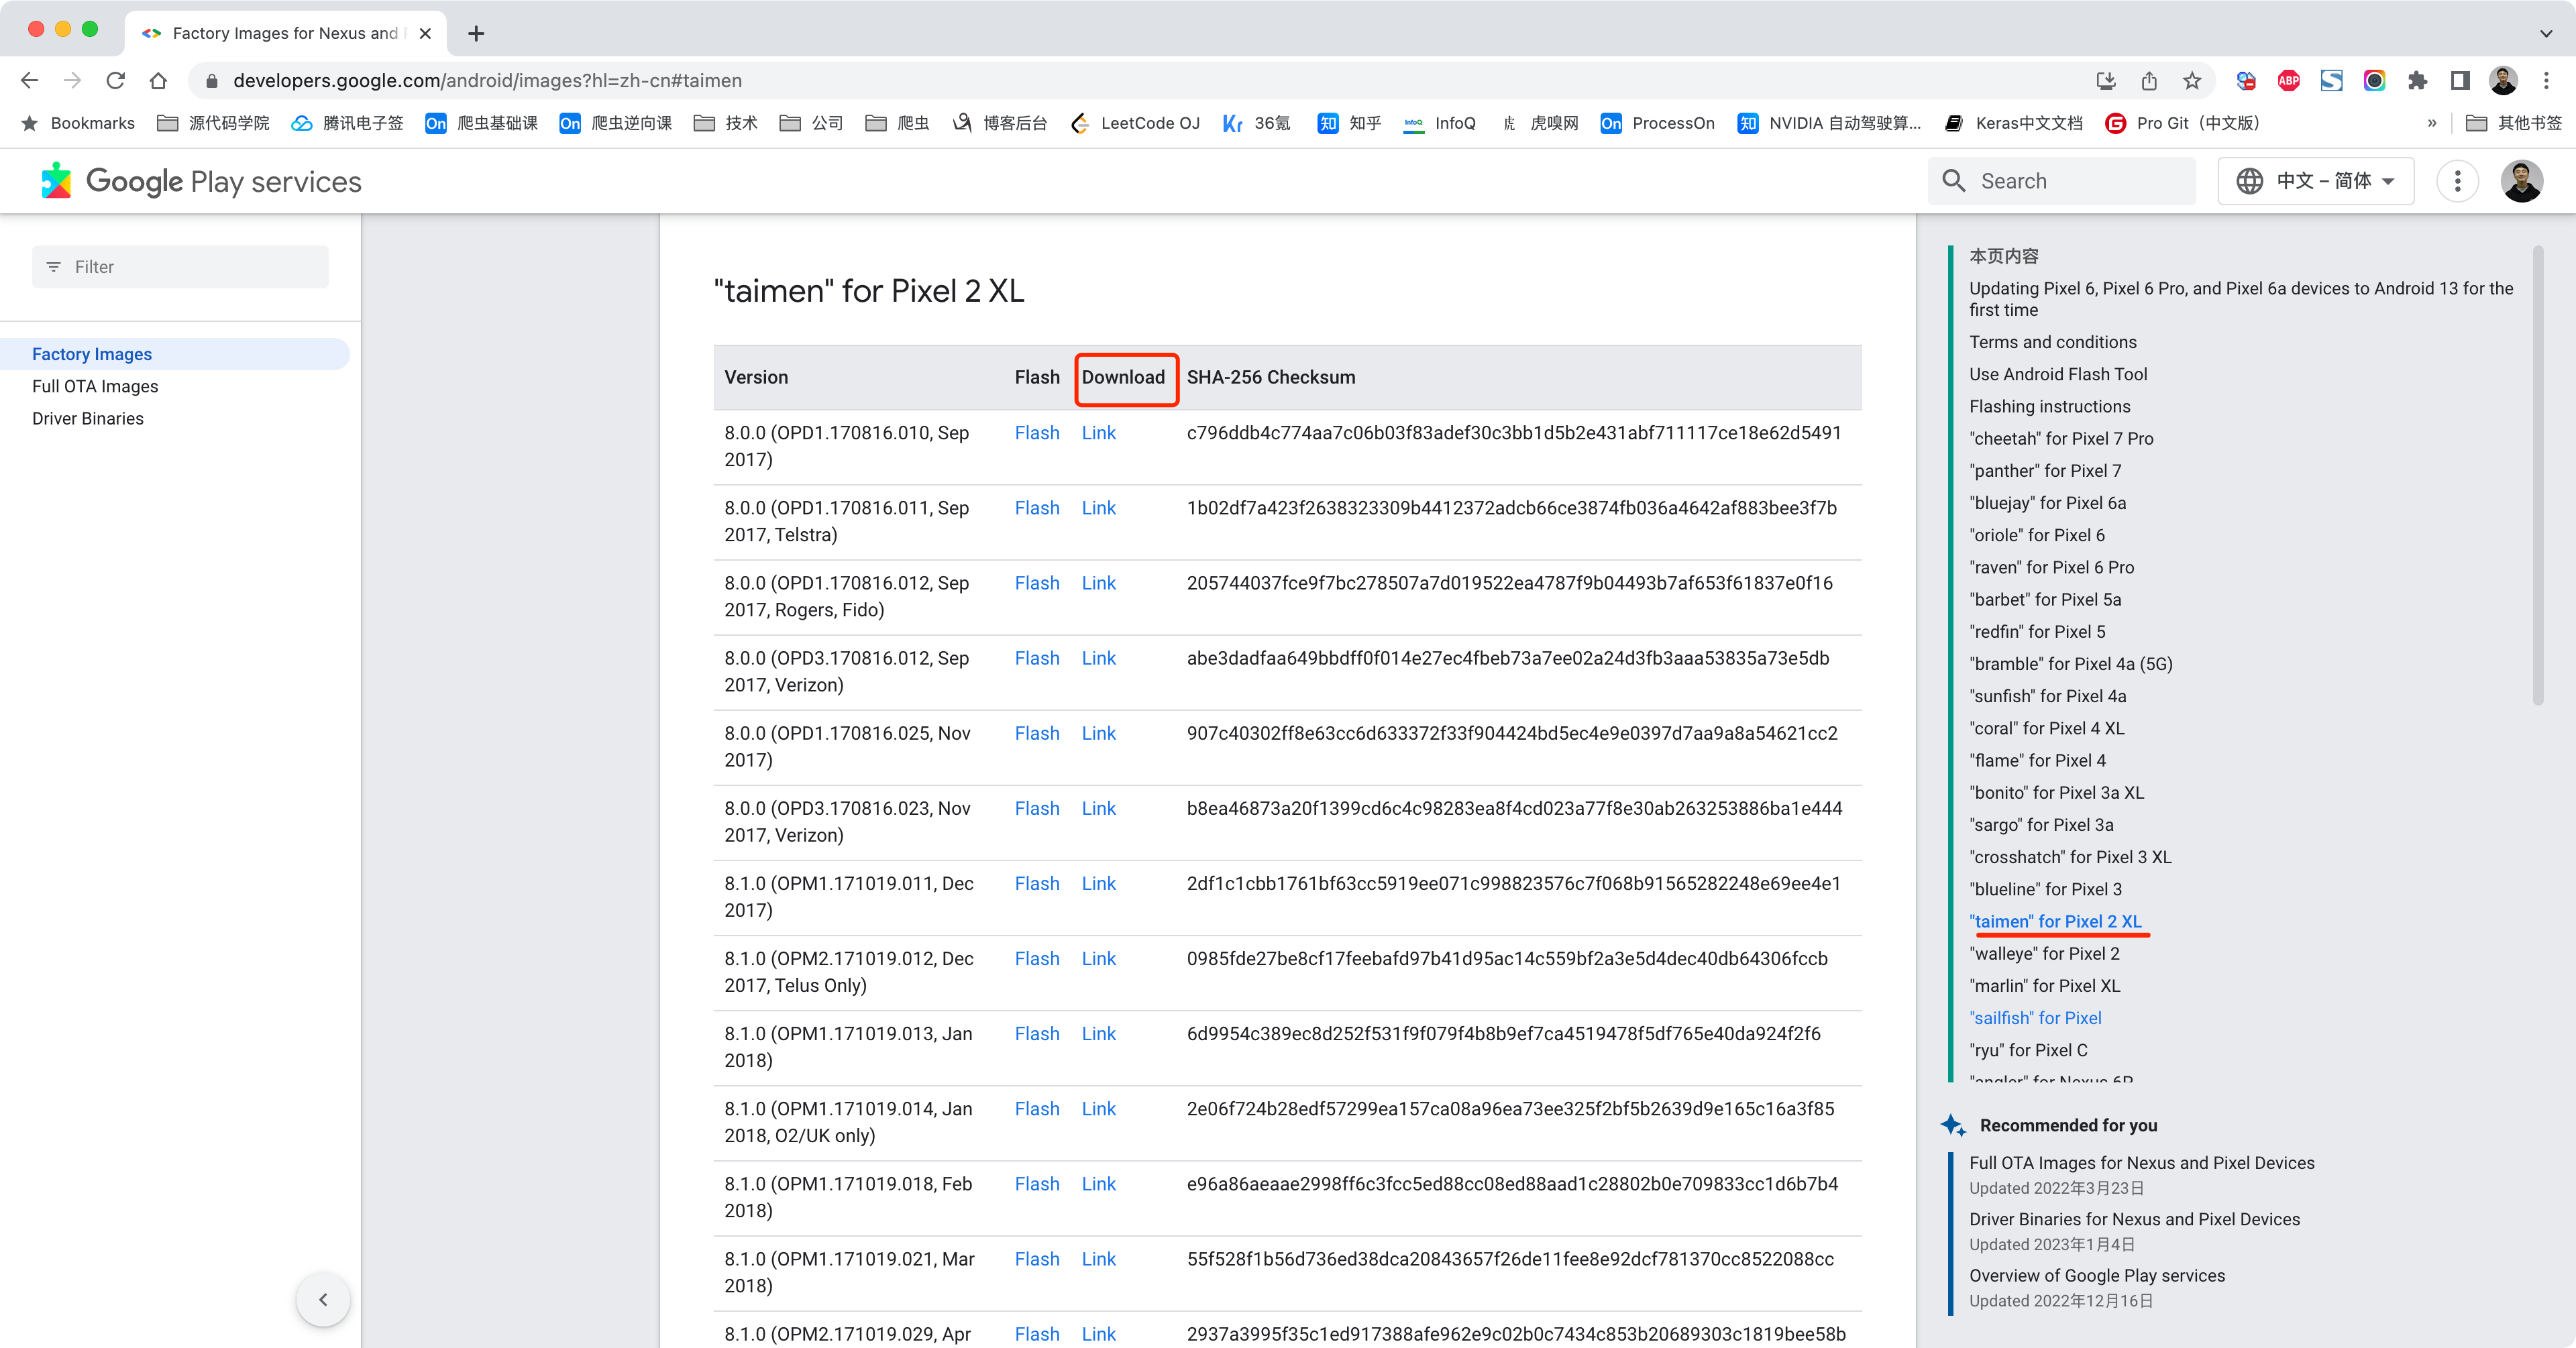
2.系统包
2.1 下载
根据自己的机型,下载自己希望刷系统版本的镜像包。
https://developers.google.com/android/images?hl=zh-cn#flame
注意:科学网上工具推荐
下载链接(推荐使用浏览器访问)
	https://bitbucket.org/letsgogo/letsgogo_10/src/master/README.md
备用链接(推荐使用浏览器访问):
	https://github.com/LetsGo666/LetsGo_2

安装后打开填写我的ID:95239424 你还能多得3天会员!
2.2 解压
-
win系统:使用
flash-all.bat进行刷机 -
mac/ubuntu系统:使用
flash-all.sh进行刷机。

3.刷机
刷机本质上需要两个步骤:
- 让手机进入bootloader
- 基于fastboot讲下载系统镜像刷入到手机
3.1 bootloader
让手机进入bootloader有两种方式:
-
adb方法(推荐)
- 手机通过USB线连接电脑
- adb 连接上手机
- 执行命令让手机重启并进入bootloader
	>>>adb reboot bootloader

注意:如果是ubuntu系统,则执行 sudo adb reboot bootloader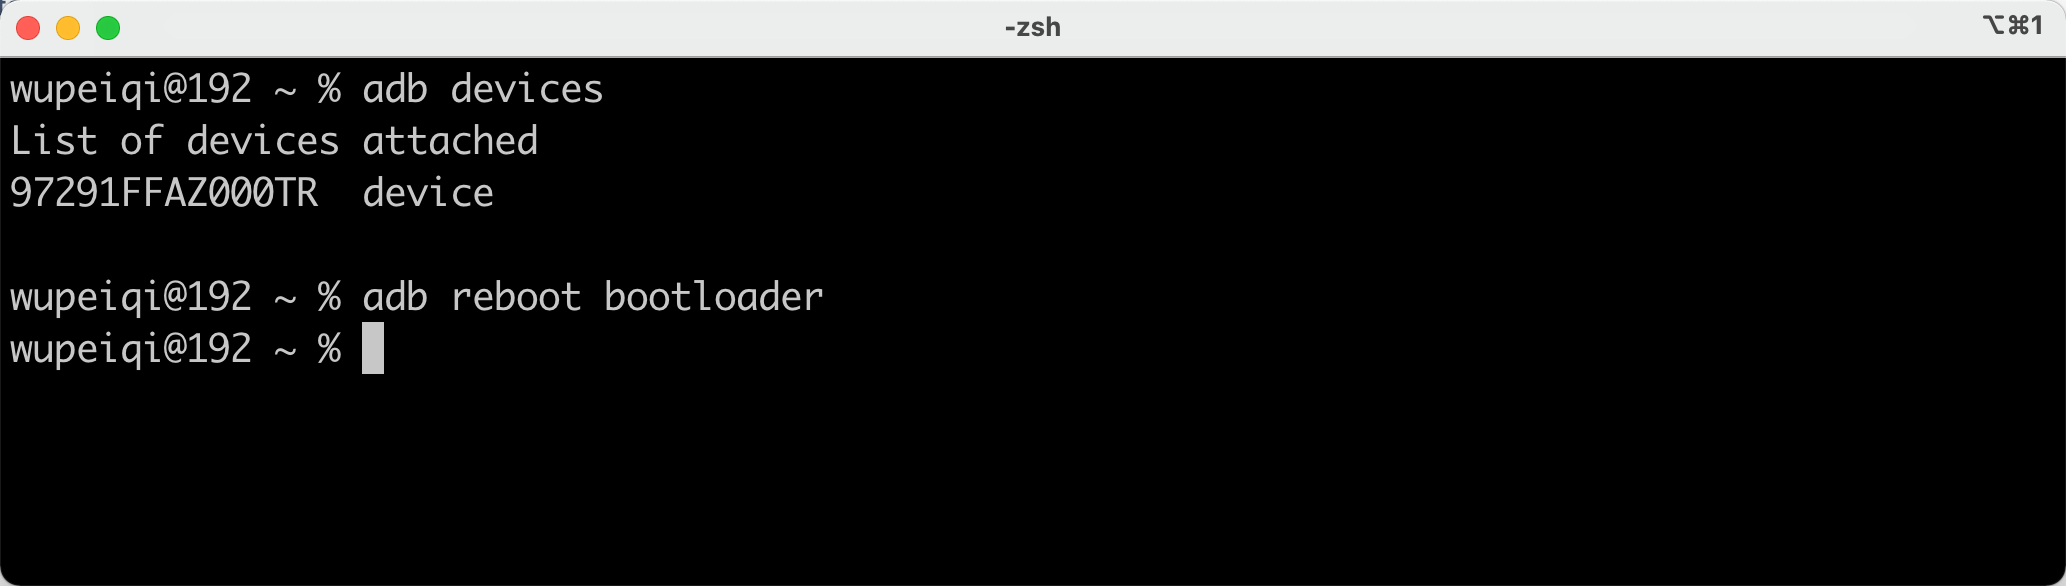
-
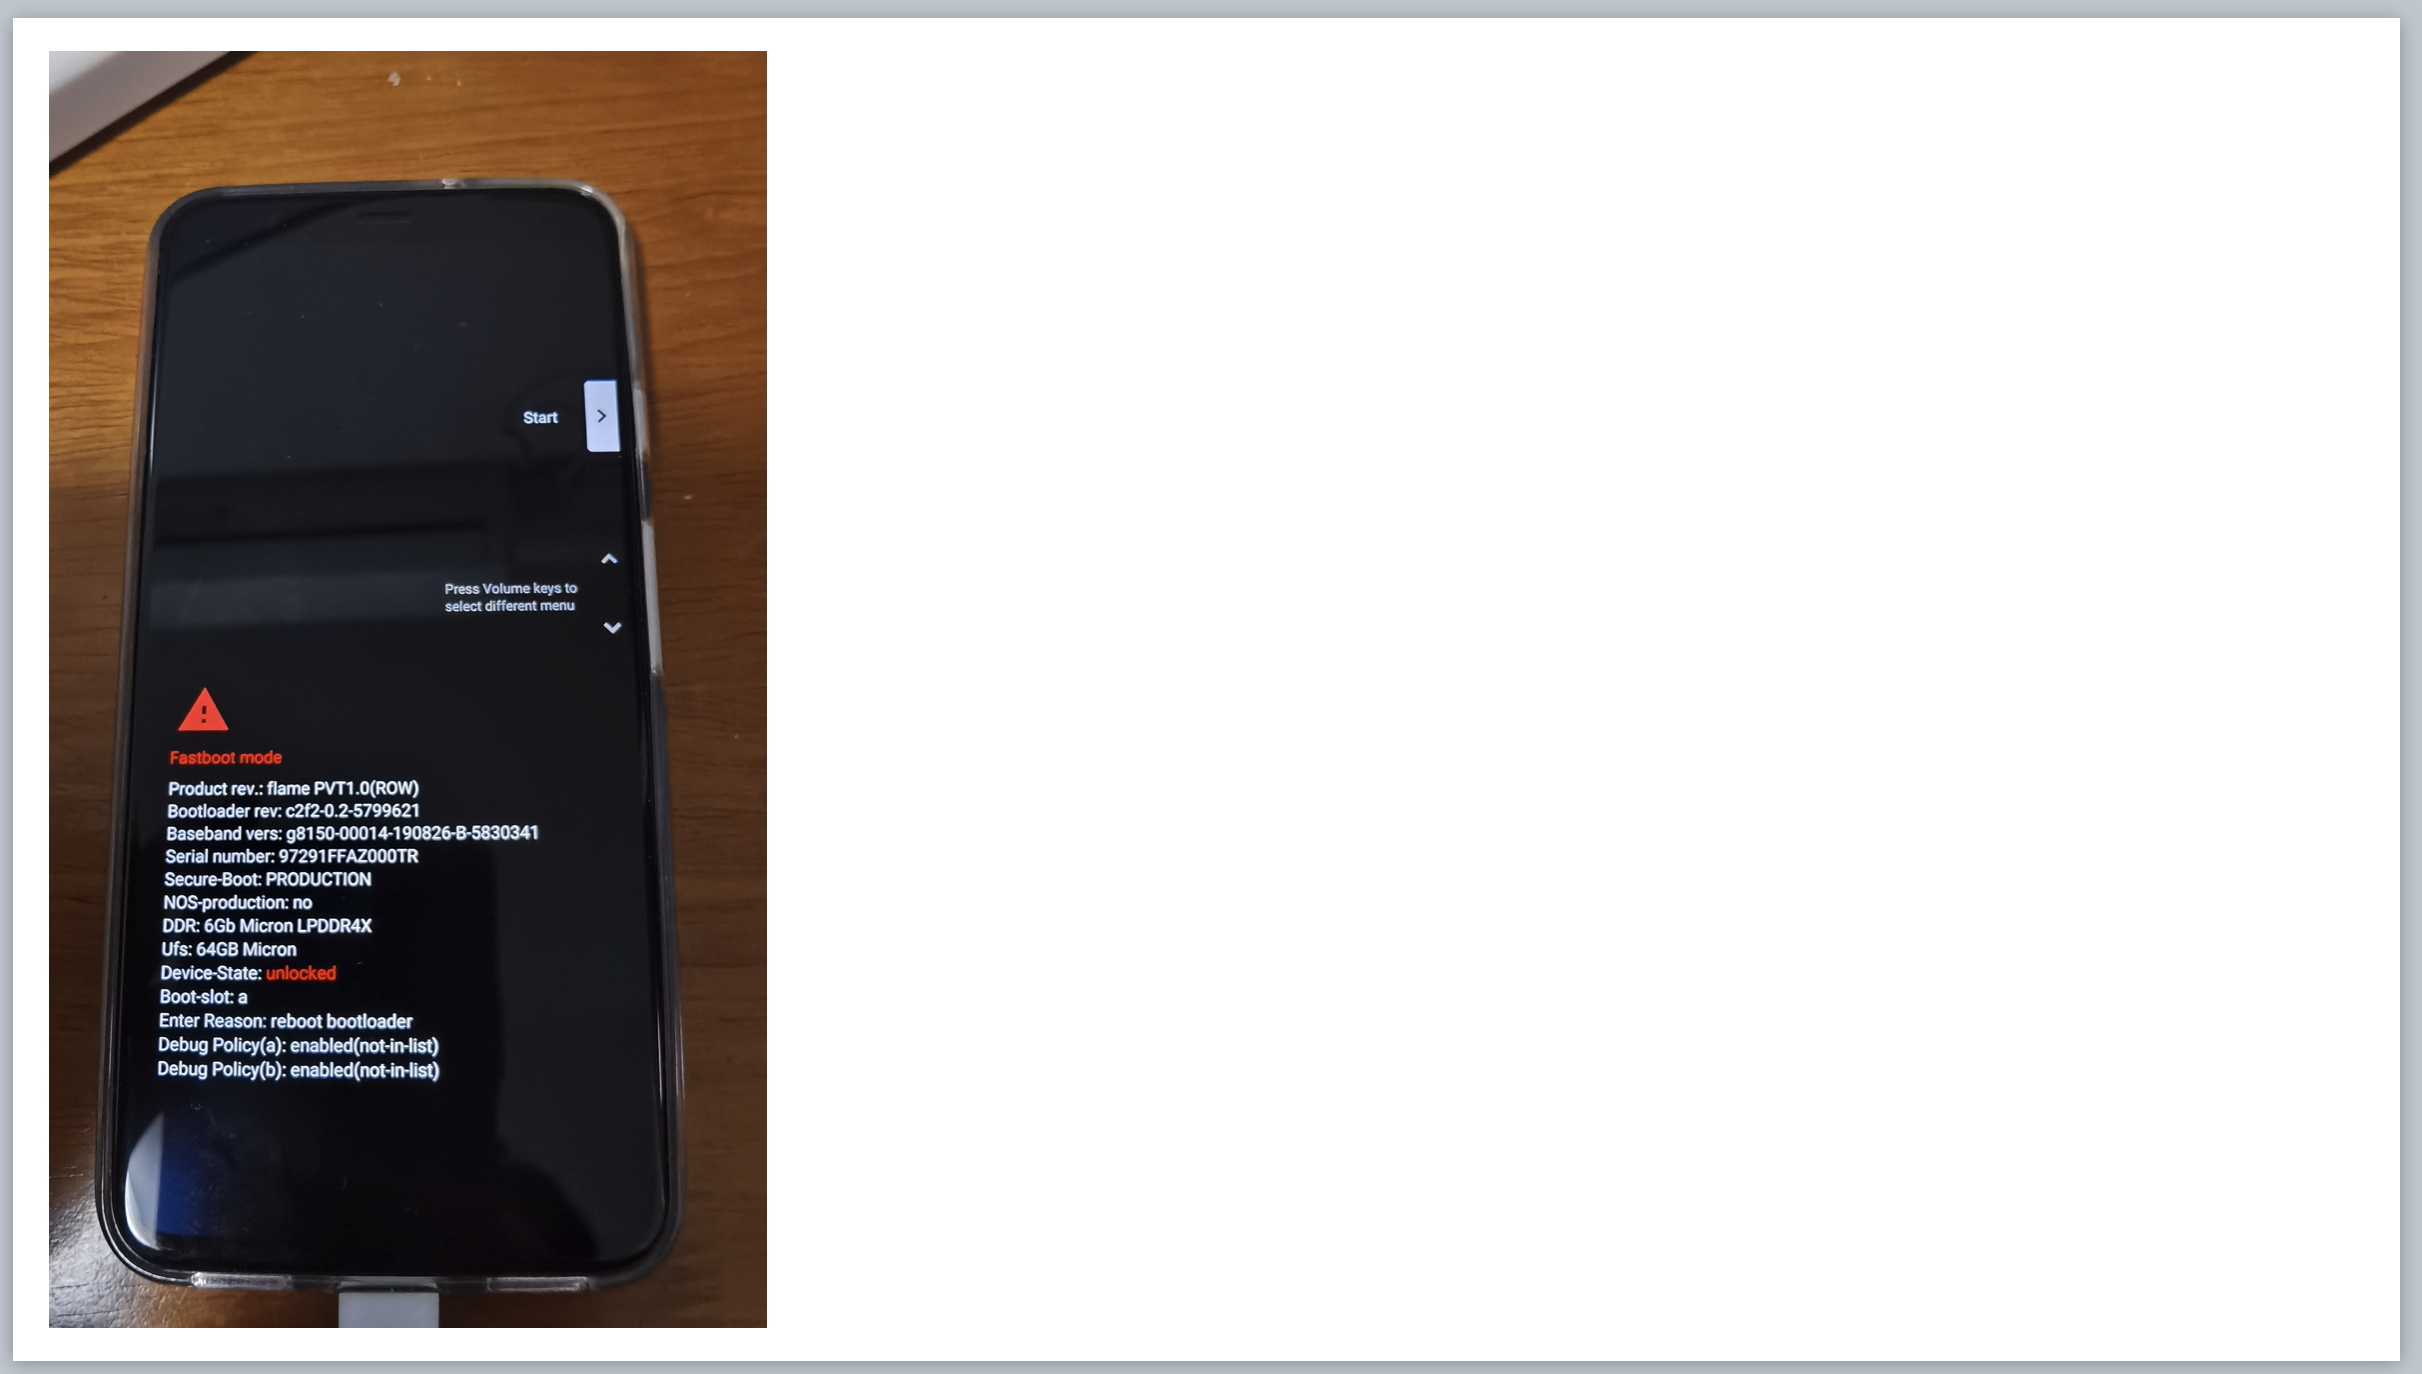
手机按键
- 先将手机关机
- 在关机状态下,长按:开机键 + 音量下键

稍等片刻,手机将键入bootloader状态。
手机进入Bootloader状态显示:
3.2 刷机
当手机进入bootloader状态后,接下来就需要基于fastboot来进行刷机,具体步骤如下:
-
基于USB线将手机连接至电脑
-
电脑终端执行命令,查看手机是否与电脑连接上。
>>>fastboot devices
注意:ubuntu系统使用 sudo fastboot devices
-
终端进入系统包解压的路径
cd ....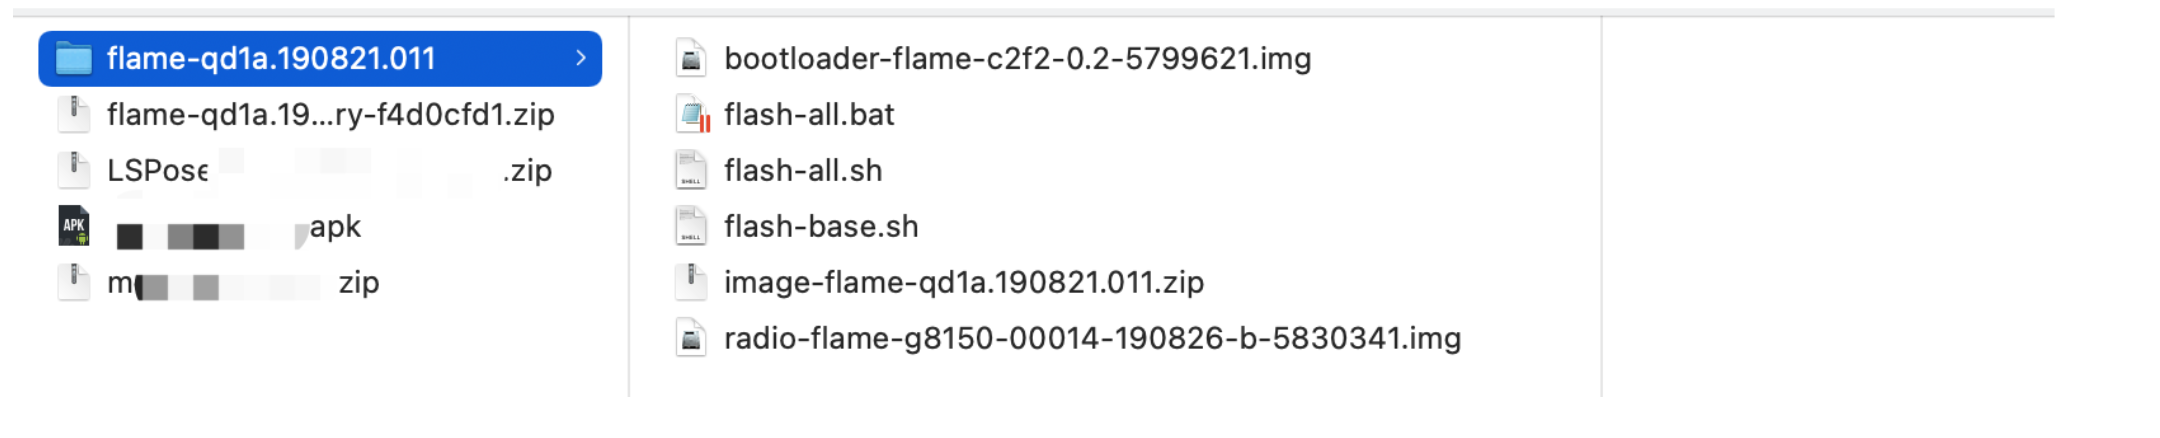
-
执行刷机命令
mac或ubuntu系统:
	>>>./flash-all.sh
windows系统:
	>>>flash-all.bat
执行命令后,手机将开始自动进行刷机,等待刷机完成后,会自动重启。。。
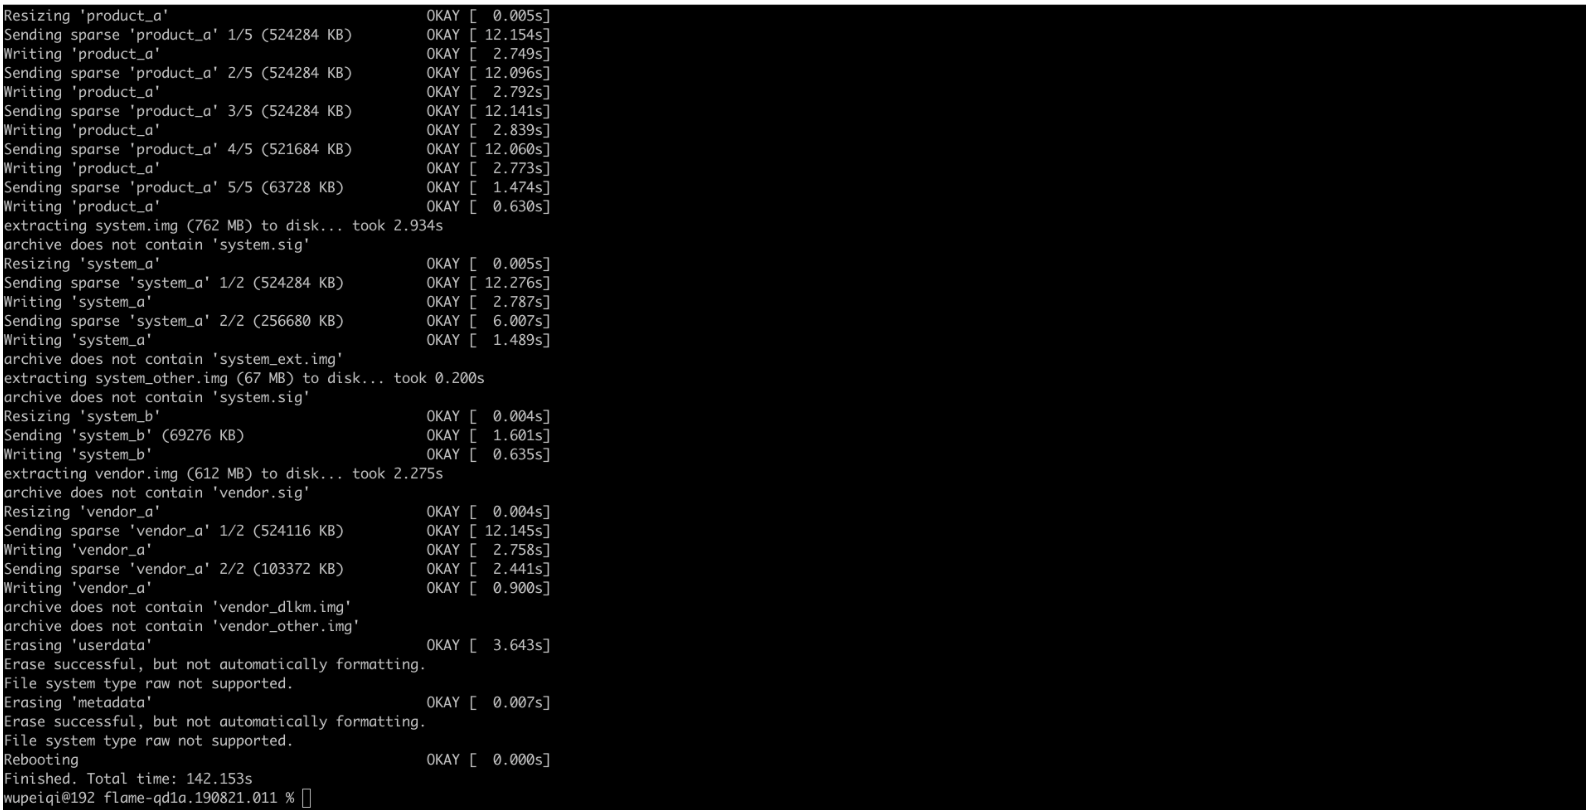
3.3 成功
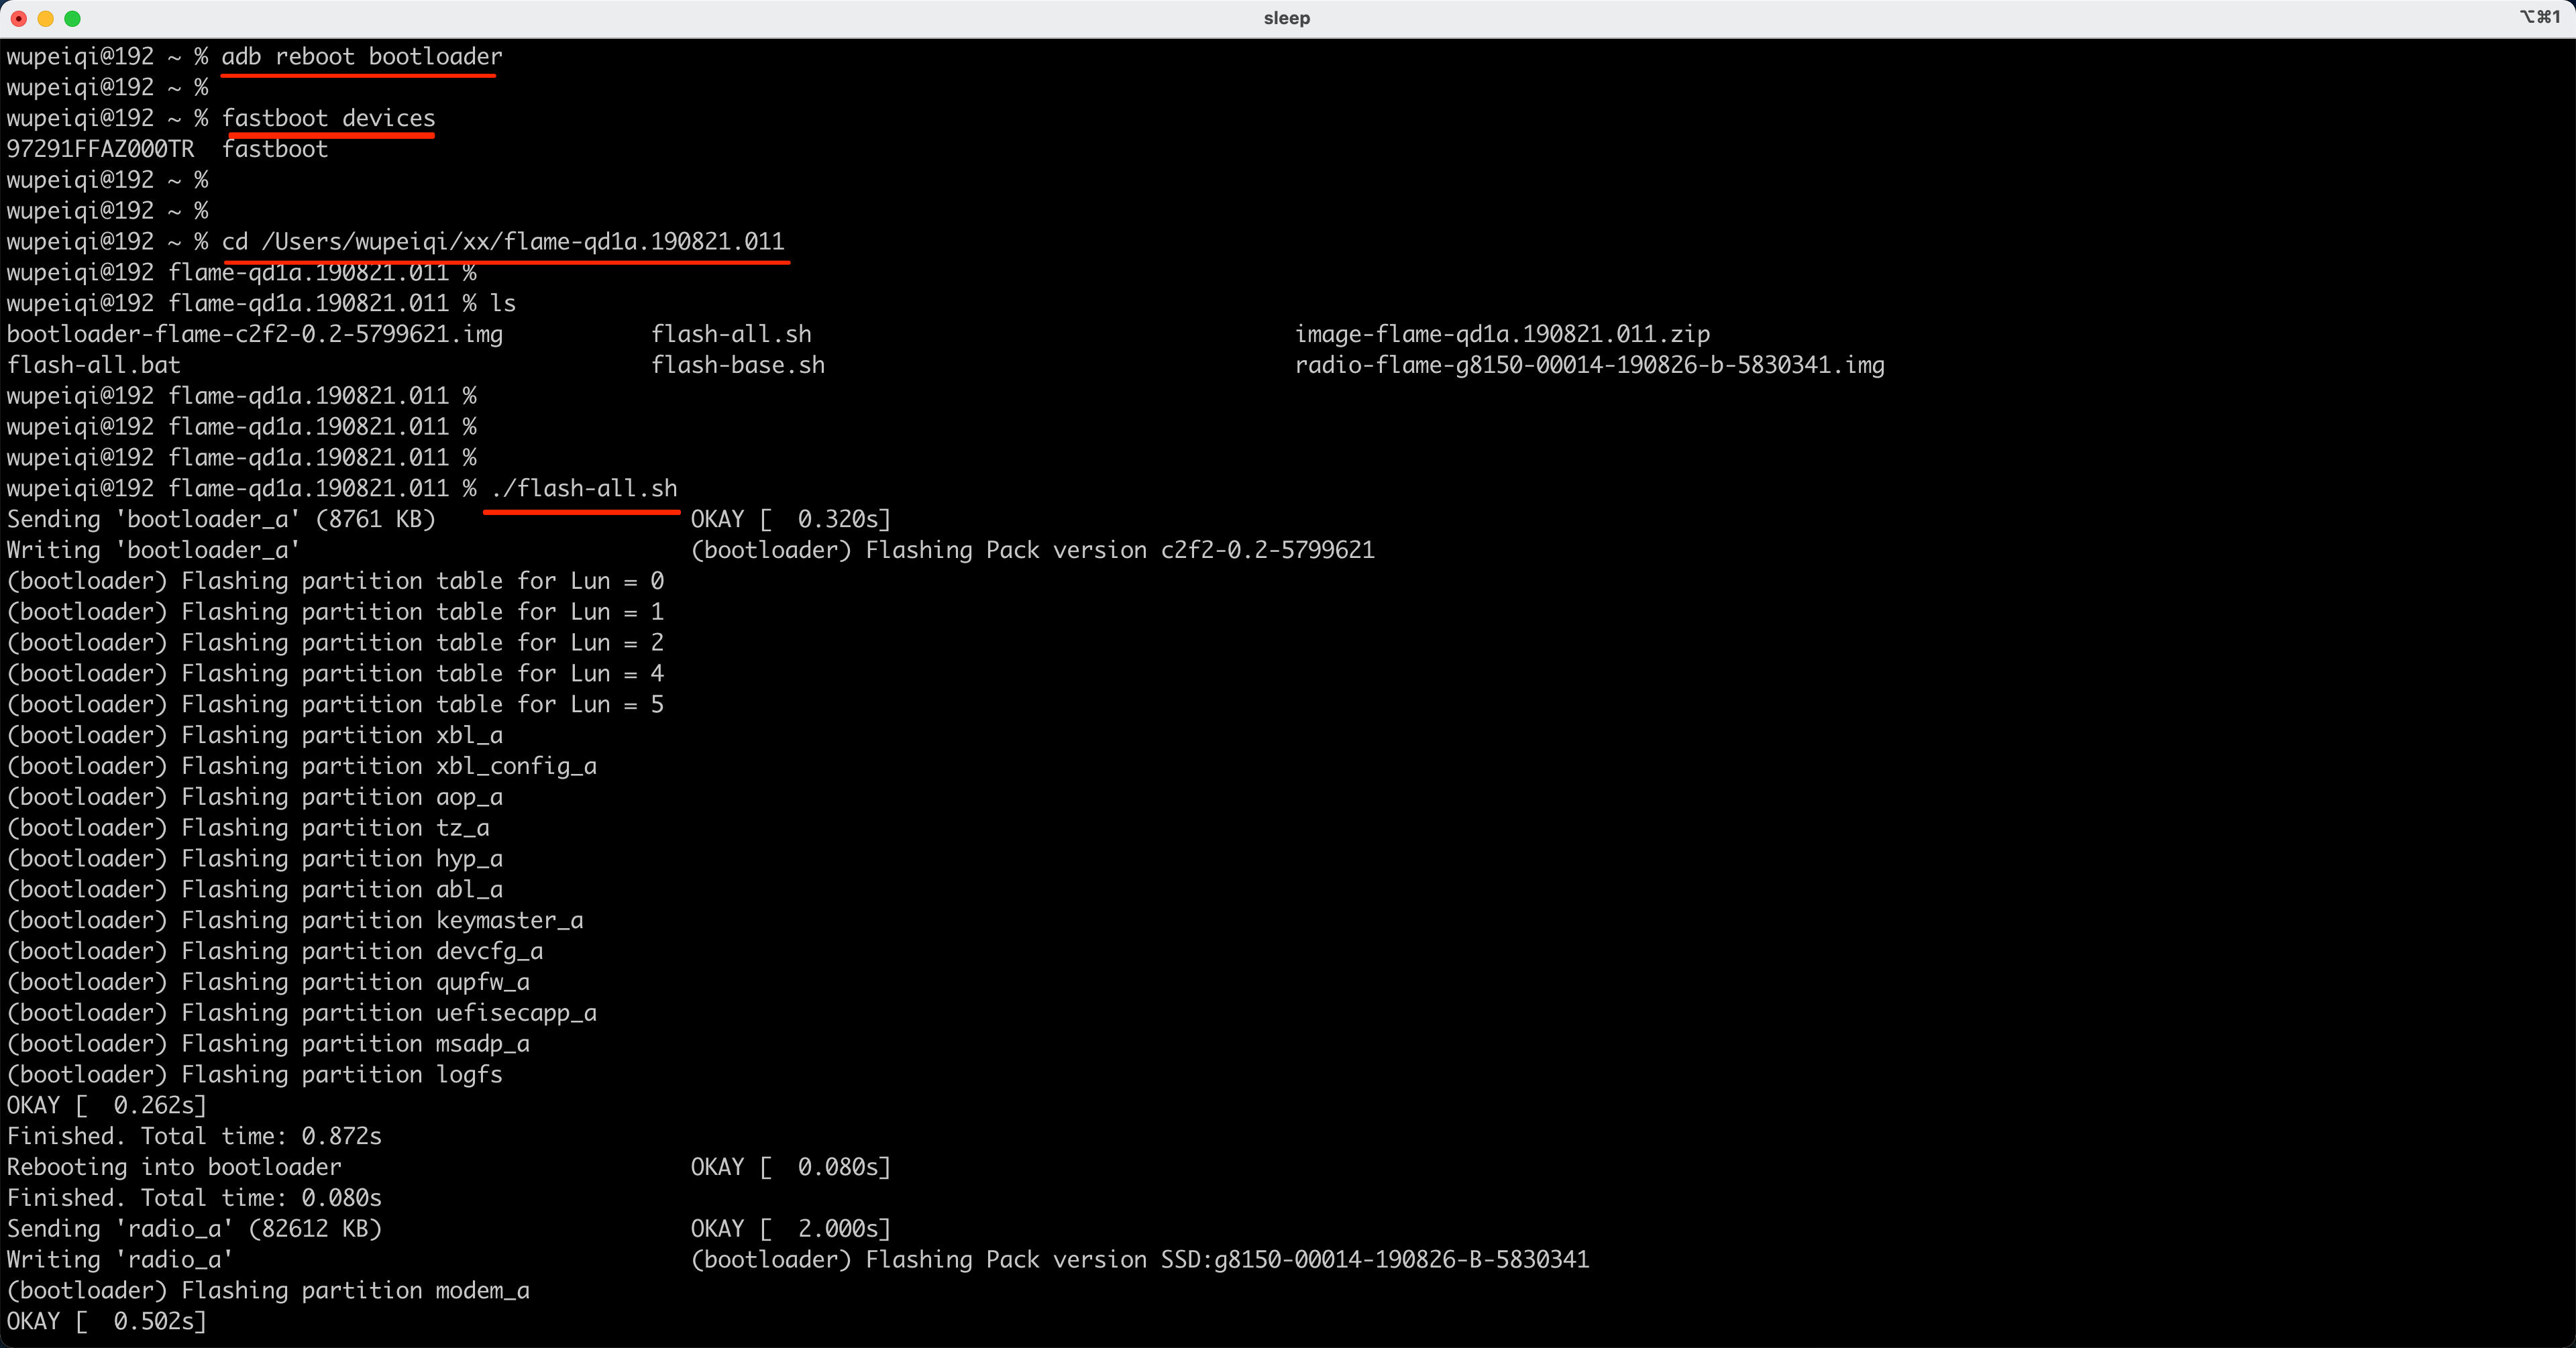
点击查看刷机成功的代码
./flash-all.sh
Warning: skip copying bootloader_a image avb footer (bootloader_a partition size: 0, bootloader_a image size: 9066264).
Sending 'bootloader_a' (8853 KB)                   OKAY [  0.350s]
Writing 'bootloader_a'                             (bootloader) Flashing Pack version c2f2-0.5-8906123
(bootloader) Flashing partition table for Lun = 0
(bootloader) Flashing partition table for Lun = 1
(bootloader) Flashing partition table for Lun = 2
(bootloader) Flashing partition table for Lun = 4
(bootloader) Flashing partition table for Lun = 5
(bootloader) Flashing partition xbl_a
(bootloader) Flashing partition xbl_config_a
(bootloader) Flashing partition aop_a
(bootloader) Flashing partition tz_a
(bootloader) Flashing partition hyp_a
(bootloader) Flashing partition abl_a
(bootloader) Flashing partition keymaster_a
(bootloader) Flashing partition devcfg_a
(bootloader) Flashing partition qupfw_a
(bootloader) Flashing partition uefisecapp_a
(bootloader) Flashing partition msadp_a
(bootloader) Flashing partition logfs
OKAY [  0.273s]
Finished. Total time: 1.122s
Rebooting into bootloader                          OKAY [  0.080s]
Finished. Total time: 0.080s
Warning: skip copying radio_a image avb footer (radio_a partition size: 0, radio_a image size: 84709516).
Sending 'radio_a' (82724 KB)                       OKAY [  2.290s]
Writing 'radio_a'                                  (bootloader) Flashing Pack version SSD:g8150-00123-220708-B-8810441
(bootloader) Flashing partition modem_a
OKAY [  0.625s]
Finished. Total time: 3.415s
Rebooting into bootloader                          OKAY [  0.080s]
Finished. Total time: 0.080s
--------------------------------------------
Bootloader Version...: c2f2-0.5-8906123
Baseband Version.....: g8150-00123-220708-B-8810441
Serial Number........: 9C181C03B55C35
--------------------------------------------
extracting android-info.txt (0 MB) to RAM...
Checking 'product'                                 OKAY [  0.069s]
Checking 'version-bootloader'                      OKAY [  0.070s]
Checking 'version-baseband'                        OKAY [  0.070s]
Setting current slot to 'a'                        OKAY [  0.079s]
archive does not contain 'fastboot-info.txt'
extracting boot.img (64 MB) to disk... took 0.281s
archive does not contain 'init_boot.img'
extracting dtbo.img (8 MB) to disk... took 0.018s
archive does not contain 'dt.img'
archive does not contain 'pvmfw.img'
archive does not contain 'recovery.img'
extracting vbmeta.img (0 MB) to disk... took 0.000s
extracting vbmeta_system.img (0 MB) to disk... took 0.000s
archive does not contain 'vbmeta_vendor.img'
archive does not contain 'vendor_boot.img'
archive does not contain 'vendor_kernel_boot.img'
extracting super_empty.img (0 MB) to RAM...
extracting super_empty.img (0 MB) to RAM...
extracting super_empty.img (0 MB) to RAM...
extracting super_empty.img (0 MB) to RAM...
extracting super_empty.img (0 MB) to RAM...
extracting super_empty.img (0 MB) to RAM...
extracting super_empty.img (0 MB) to RAM...
extracting super_empty.img (0 MB) to RAM...
extracting super_empty.img (0 MB) to RAM...
extracting super_empty.img (0 MB) to RAM...
extracting super_empty.img (0 MB) to RAM...
archive does not contain 'boot_other.img'
archive does not contain 'odm.img'
archive does not contain 'odm_dlkm.img'
extracting product.img (2440 MB) to disk... took 12.278s
extracting system.img (821 MB) to disk... took 3.103s
archive does not contain 'system_dlkm.img'
extracting system_ext.img (298 MB) to disk... took 0.894s
extracting system_other.img (23 MB) to disk... took 0.074s
extracting vendor.img (823 MB) to disk... took 3.414s
archive does not contain 'vendor_dlkm.img'
archive does not contain 'vendor_other.img'
extracting super_empty.img (0 MB) to RAM...
extracting super_empty.img (0 MB) to RAM...
extracting super_empty.img (0 MB) to RAM...
extracting super_empty.img (0 MB) to RAM...
extracting super_empty.img (0 MB) to RAM...
extracting super_empty.img (0 MB) to RAM...
extracting super_empty.img (0 MB) to RAM...
extracting super_empty.img (0 MB) to RAM...
extracting super_empty.img (0 MB) to RAM...
extracting super_empty.img (0 MB) to RAM...
extracting super_empty.img (0 MB) to RAM...
extracting boot.img (64 MB) to disk... took 0.173s
archive does not contain 'boot.sig'
extracting super_empty.img (0 MB) to RAM...
Sending 'boot_a' (65536 KB)                        OKAY [  1.750s]
Writing 'boot_a'                                   OKAY [  0.423s]
extracting super_empty.img (0 MB) to RAM...
extracting dtbo.img (8 MB) to disk... took 0.024s
archive does not contain 'dtbo.sig'
extracting super_empty.img (0 MB) to RAM...
Sending 'dtbo_a' (8192 KB)                         OKAY [  0.310s]
Writing 'dtbo_a'                                   OKAY [  0.145s]
extracting super_empty.img (0 MB) to RAM...
extracting vbmeta.img (0 MB) to disk... took 0.000s
archive does not contain 'vbmeta.sig'
extracting super_empty.img (0 MB) to RAM...
Sending 'vbmeta_a' (8 KB)                          OKAY [  0.140s]
Writing 'vbmeta_a'                                 OKAY [  0.077s]
extracting super_empty.img (0 MB) to RAM...
extracting vbmeta_system.img (0 MB) to disk... took 0.000s
archive does not contain 'vbmeta_system.sig'
extracting super_empty.img (0 MB) to RAM...
Sending 'vbmeta_system_a' (4 KB)                   OKAY [  0.140s]
Writing 'vbmeta_system_a'                          OKAY [  0.077s]
extracting super_empty.img (0 MB) to disk... took 0.000s
Rebooting into fastboot                            OKAY [  0.070s]
< waiting for any device >
Sending 'super' (4 KB)                             OKAY [  0.001s]
Updating super partition                           OKAY [  0.019s]
Resizing 'product_a'                               OKAY [  0.003s]
Resizing 'system_a'                                OKAY [  0.003s]
Resizing 'system_ext_a'                            OKAY [  0.003s]
Resizing 'system_a'                                OKAY [  0.003s]
Resizing 'vendor_a'                                OKAY [  0.004s]
extracting super_empty.img (0 MB) to RAM...
extracting product.img (2440 MB) to disk... took 8.281s
archive does not contain 'product.sig'
Resizing 'product_a'                               OKAY [  0.006s]
Sending sparse 'product_a' 1/10 (262116 KB)        OKAY [  6.916s]
Writing 'product_a'                                OKAY [  1.482s]
Sending sparse 'product_a' 2/10 (262120 KB)        OKAY [  8.469s]
Writing 'product_a'                                OKAY [  1.500s]
Sending sparse 'product_a' 3/10 (262128 KB)        OKAY [  6.879s]
Writing 'product_a'                                OKAY [  1.498s]
Sending sparse 'product_a' 4/10 (262120 KB)        OKAY [  6.872s]
Writing 'product_a'                                OKAY [  1.490s]
Sending sparse 'product_a' 5/10 (262124 KB)        OKAY [  6.836s]
Writing 'product_a'                                OKAY [  1.498s]
Sending sparse 'product_a' 6/10 (262120 KB)        OKAY [  6.900s]
Writing 'product_a'                                OKAY [  1.468s]
Sending sparse 'product_a' 7/10 (262128 KB)        OKAY [  6.880s]
Writing 'product_a'                                OKAY [  1.468s]
Sending sparse 'product_a' 8/10 (262124 KB)        OKAY [  6.885s]
Writing 'product_a'                                OKAY [  1.473s]
Sending sparse 'product_a' 9/10 (262140 KB)        OKAY [  6.859s]
Writing 'product_a'                                OKAY [  1.493s]
Sending sparse 'product_a' 10/10 (131504 KB)       OKAY [  3.529s]
Writing 'product_a'                                OKAY [  0.846s]
extracting super_empty.img (0 MB) to RAM...
extracting system.img (821 MB) to disk... took 2.999s
archive does not contain 'system.sig'
Resizing 'system_a'                                OKAY [  0.005s]
Sending sparse 'system_a' 1/4 (262116 KB)          OKAY [  7.095s]
Writing 'system_a'                                 OKAY [  1.523s]
Sending sparse 'system_a' 2/4 (262116 KB)          OKAY [  6.923s]
Writing 'system_a'                                 OKAY [  1.486s]
Sending sparse 'system_a' 3/4 (262140 KB)          OKAY [  6.861s]
Writing 'system_a'                                 OKAY [  1.520s]
Sending sparse 'system_a' 4/4 (51716 KB)           OKAY [  1.367s]
Writing 'system_a'                                 OKAY [  0.348s]
extracting super_empty.img (0 MB) to RAM...
extracting system_ext.img (298 MB) to disk... took 0.893s
archive does not contain 'system_ext.sig'
Resizing 'system_ext_a'                            OKAY [  0.005s]
Sending sparse 'system_ext_a' 1/2 (262140 KB)      OKAY [  6.327s]
Writing 'system_ext_a'                             OKAY [  1.479s]
Sending sparse 'system_ext_a' 2/2 (42520 KB)       OKAY [  1.157s]
Writing 'system_ext_a'                             OKAY [  0.314s]
extracting super_empty.img (0 MB) to RAM...
extracting system_other.img (23 MB) to disk... took 0.162s
archive does not contain 'system_other.sig'
Resizing 'system_b'                                OKAY [  0.005s]
Sending 'system_b' (24428 KB)                      OKAY [  0.593s]
Writing 'system_b'                                 OKAY [  0.155s]
extracting super_empty.img (0 MB) to RAM...
extracting vendor.img (823 MB) to disk... took 3.072s
archive does not contain 'vendor.sig'
Resizing 'vendor_a'                                OKAY [  0.010s]
Sending sparse 'vendor_a' 1/4 (262116 KB)          OKAY [  6.990s]
Writing 'vendor_a'                                 OKAY [  1.505s]
Sending sparse 'vendor_a' 2/4 (262096 KB)          OKAY [  7.037s]
Writing 'vendor_a'                                 OKAY [  1.521s]
Sending sparse 'vendor_a' 3/4 (262140 KB)          OKAY [  6.980s]
Writing 'vendor_a'                                 OKAY [  1.478s]
Sending sparse 'vendor_a' 4/4 (54536 KB)           OKAY [  1.456s]
Writing 'vendor_a'                                 OKAY [  0.353s]
Erasing 'userdata'                                 OKAY [  5.445s]
Erase successful, but not automatically formatting.
File system type raw not supported.
wipe task partition not found: cache
Erasing 'metadata'                                 OKAY [  0.004s]
Erase successful, but not automatically formatting.
File system type raw not supported.
Rebooting                                          OKAY [  0.000s]
Finished. Total time: 220.019s
fumi@fumideMac-mini coral-tp1a.221005.002.b2 %
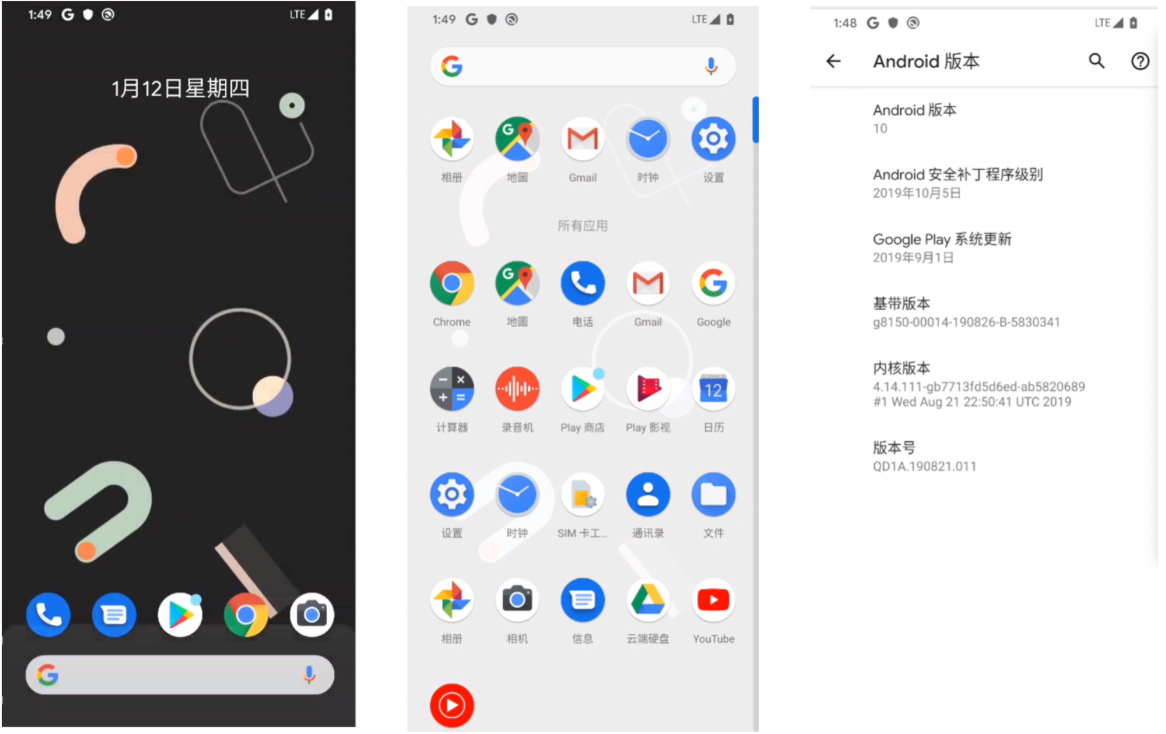
以后如果手机有任何问题,都可以使用此方法重新刷机,不用担心,尽情的鼓捣你的手机吧。。。
二. 谷歌Pixel相关:root手机
Pixel手机相关内容:
- 刷机,官方包。
- root,获取root权限。
- 集成charles证书
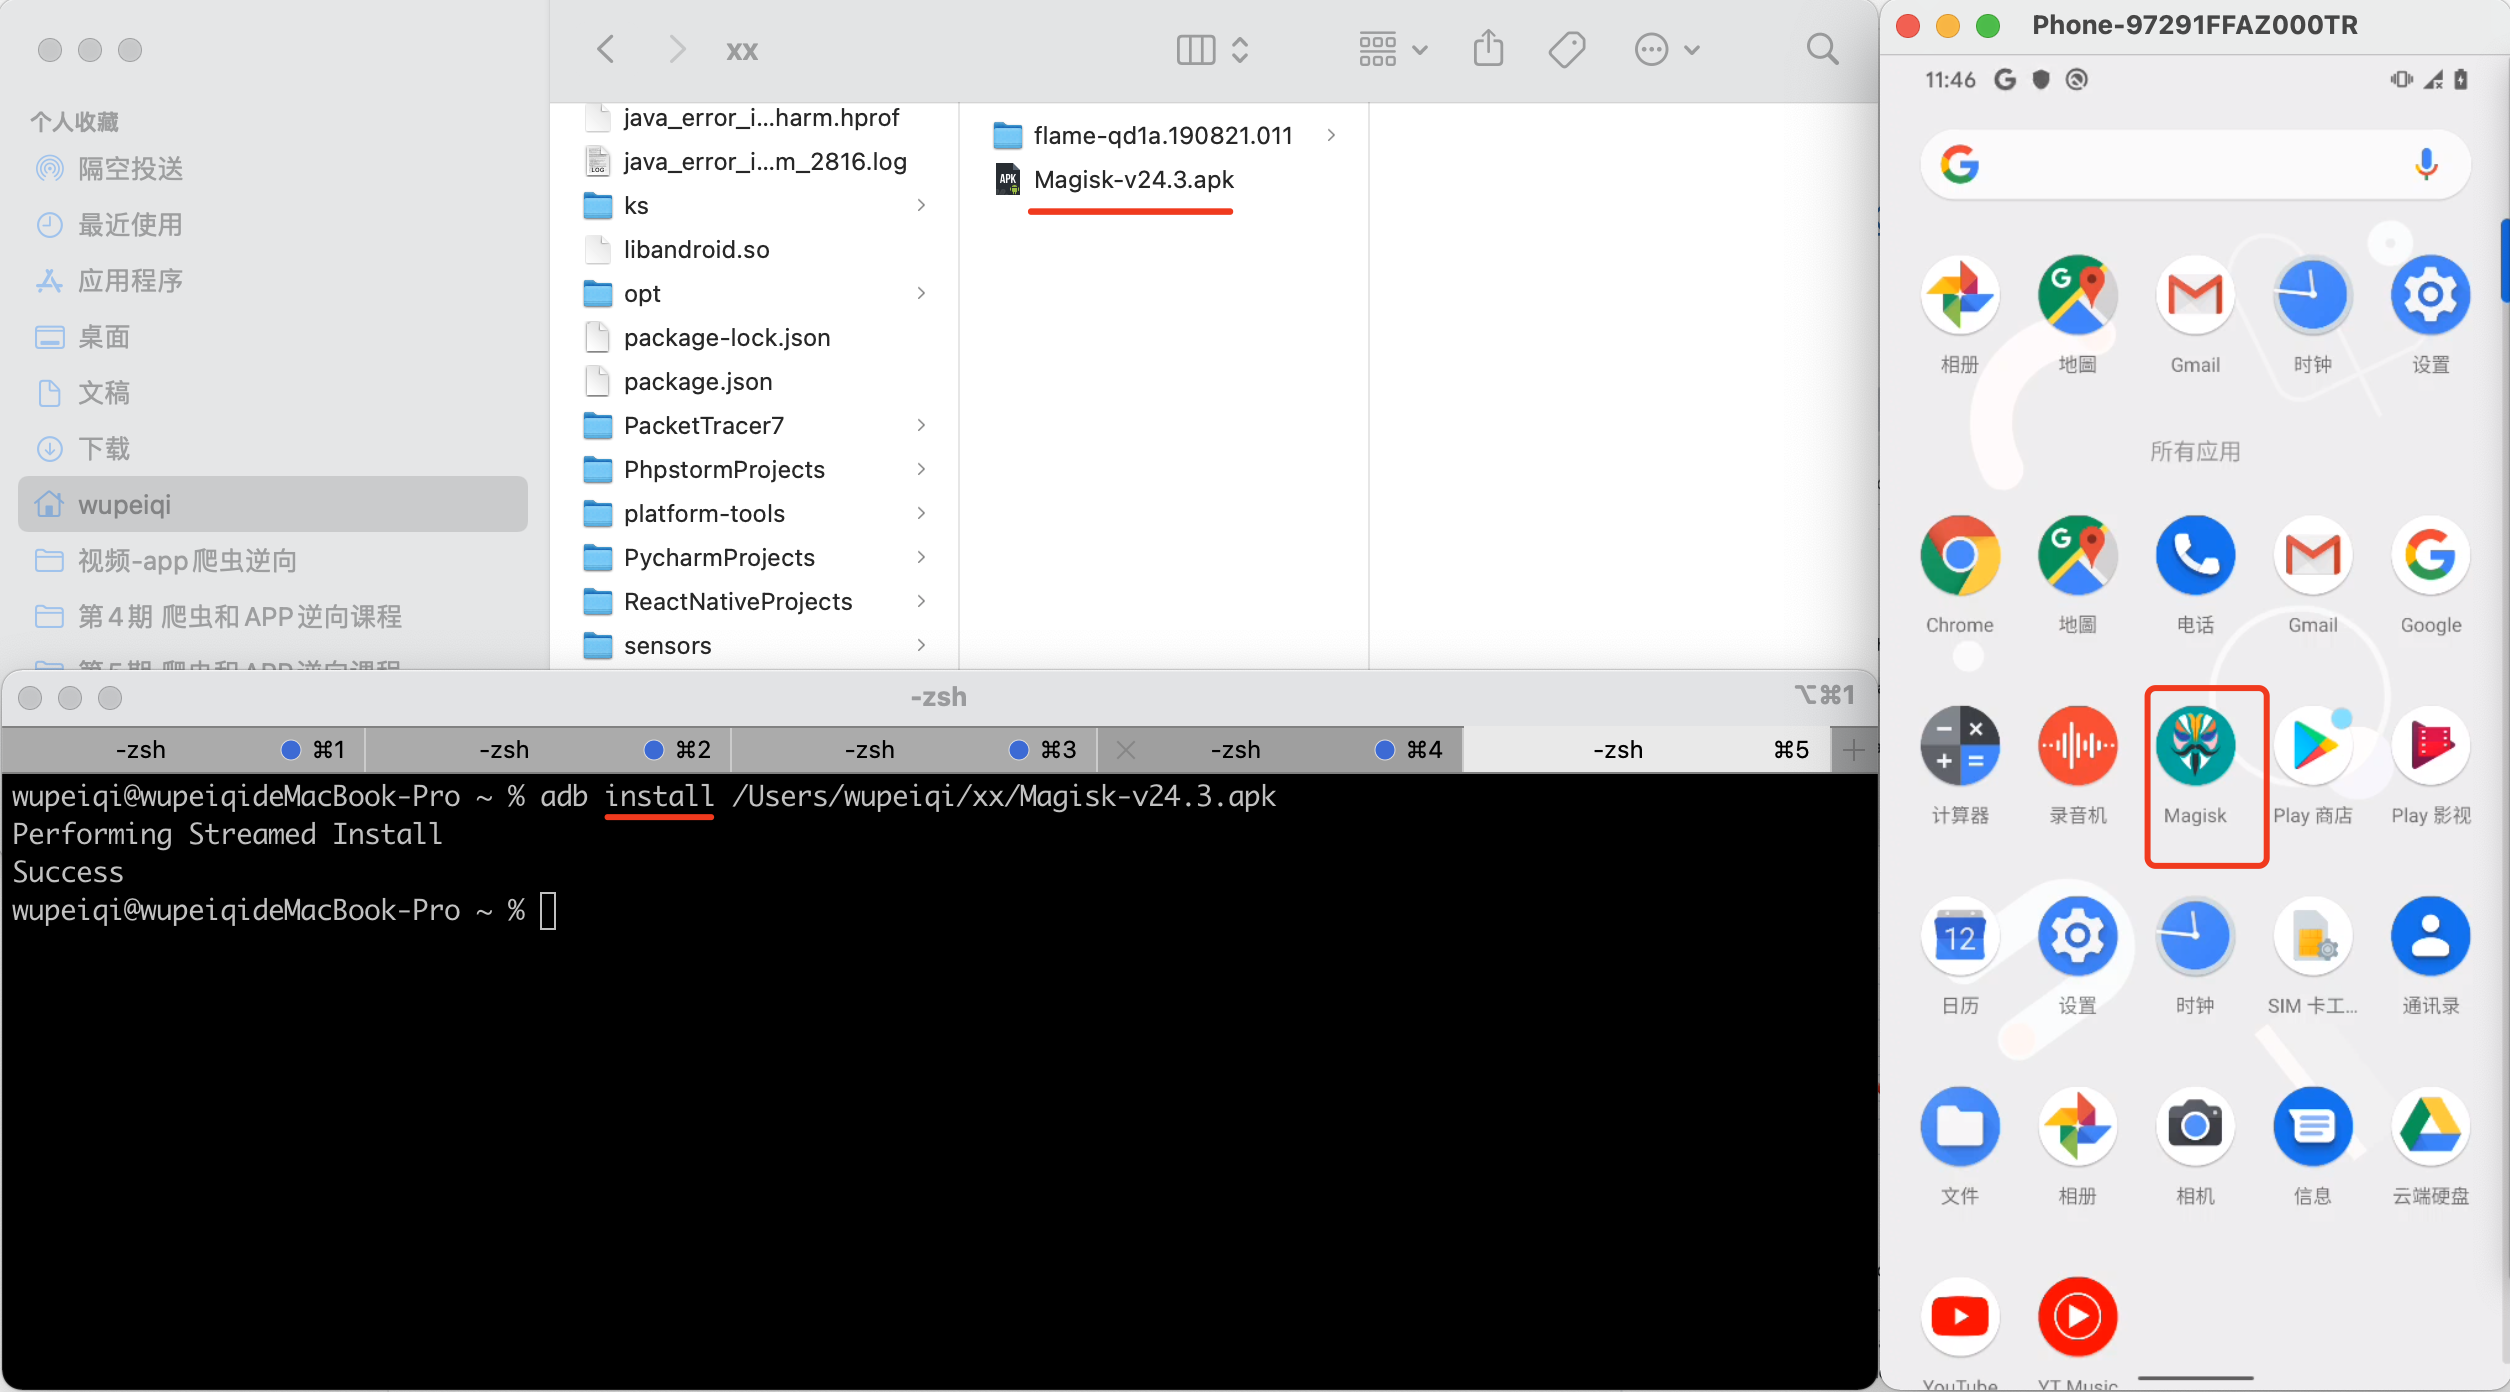
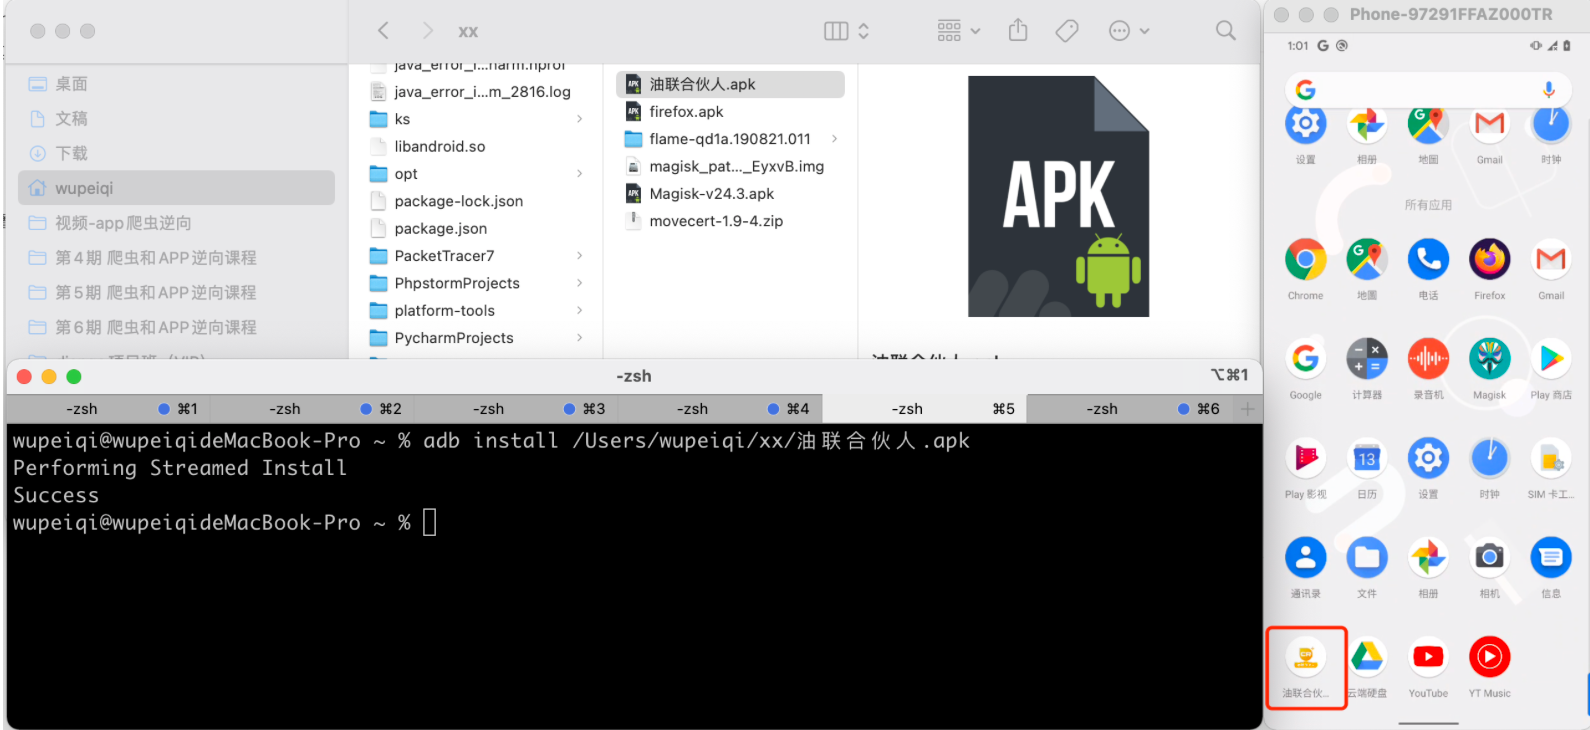
1.安装magisk
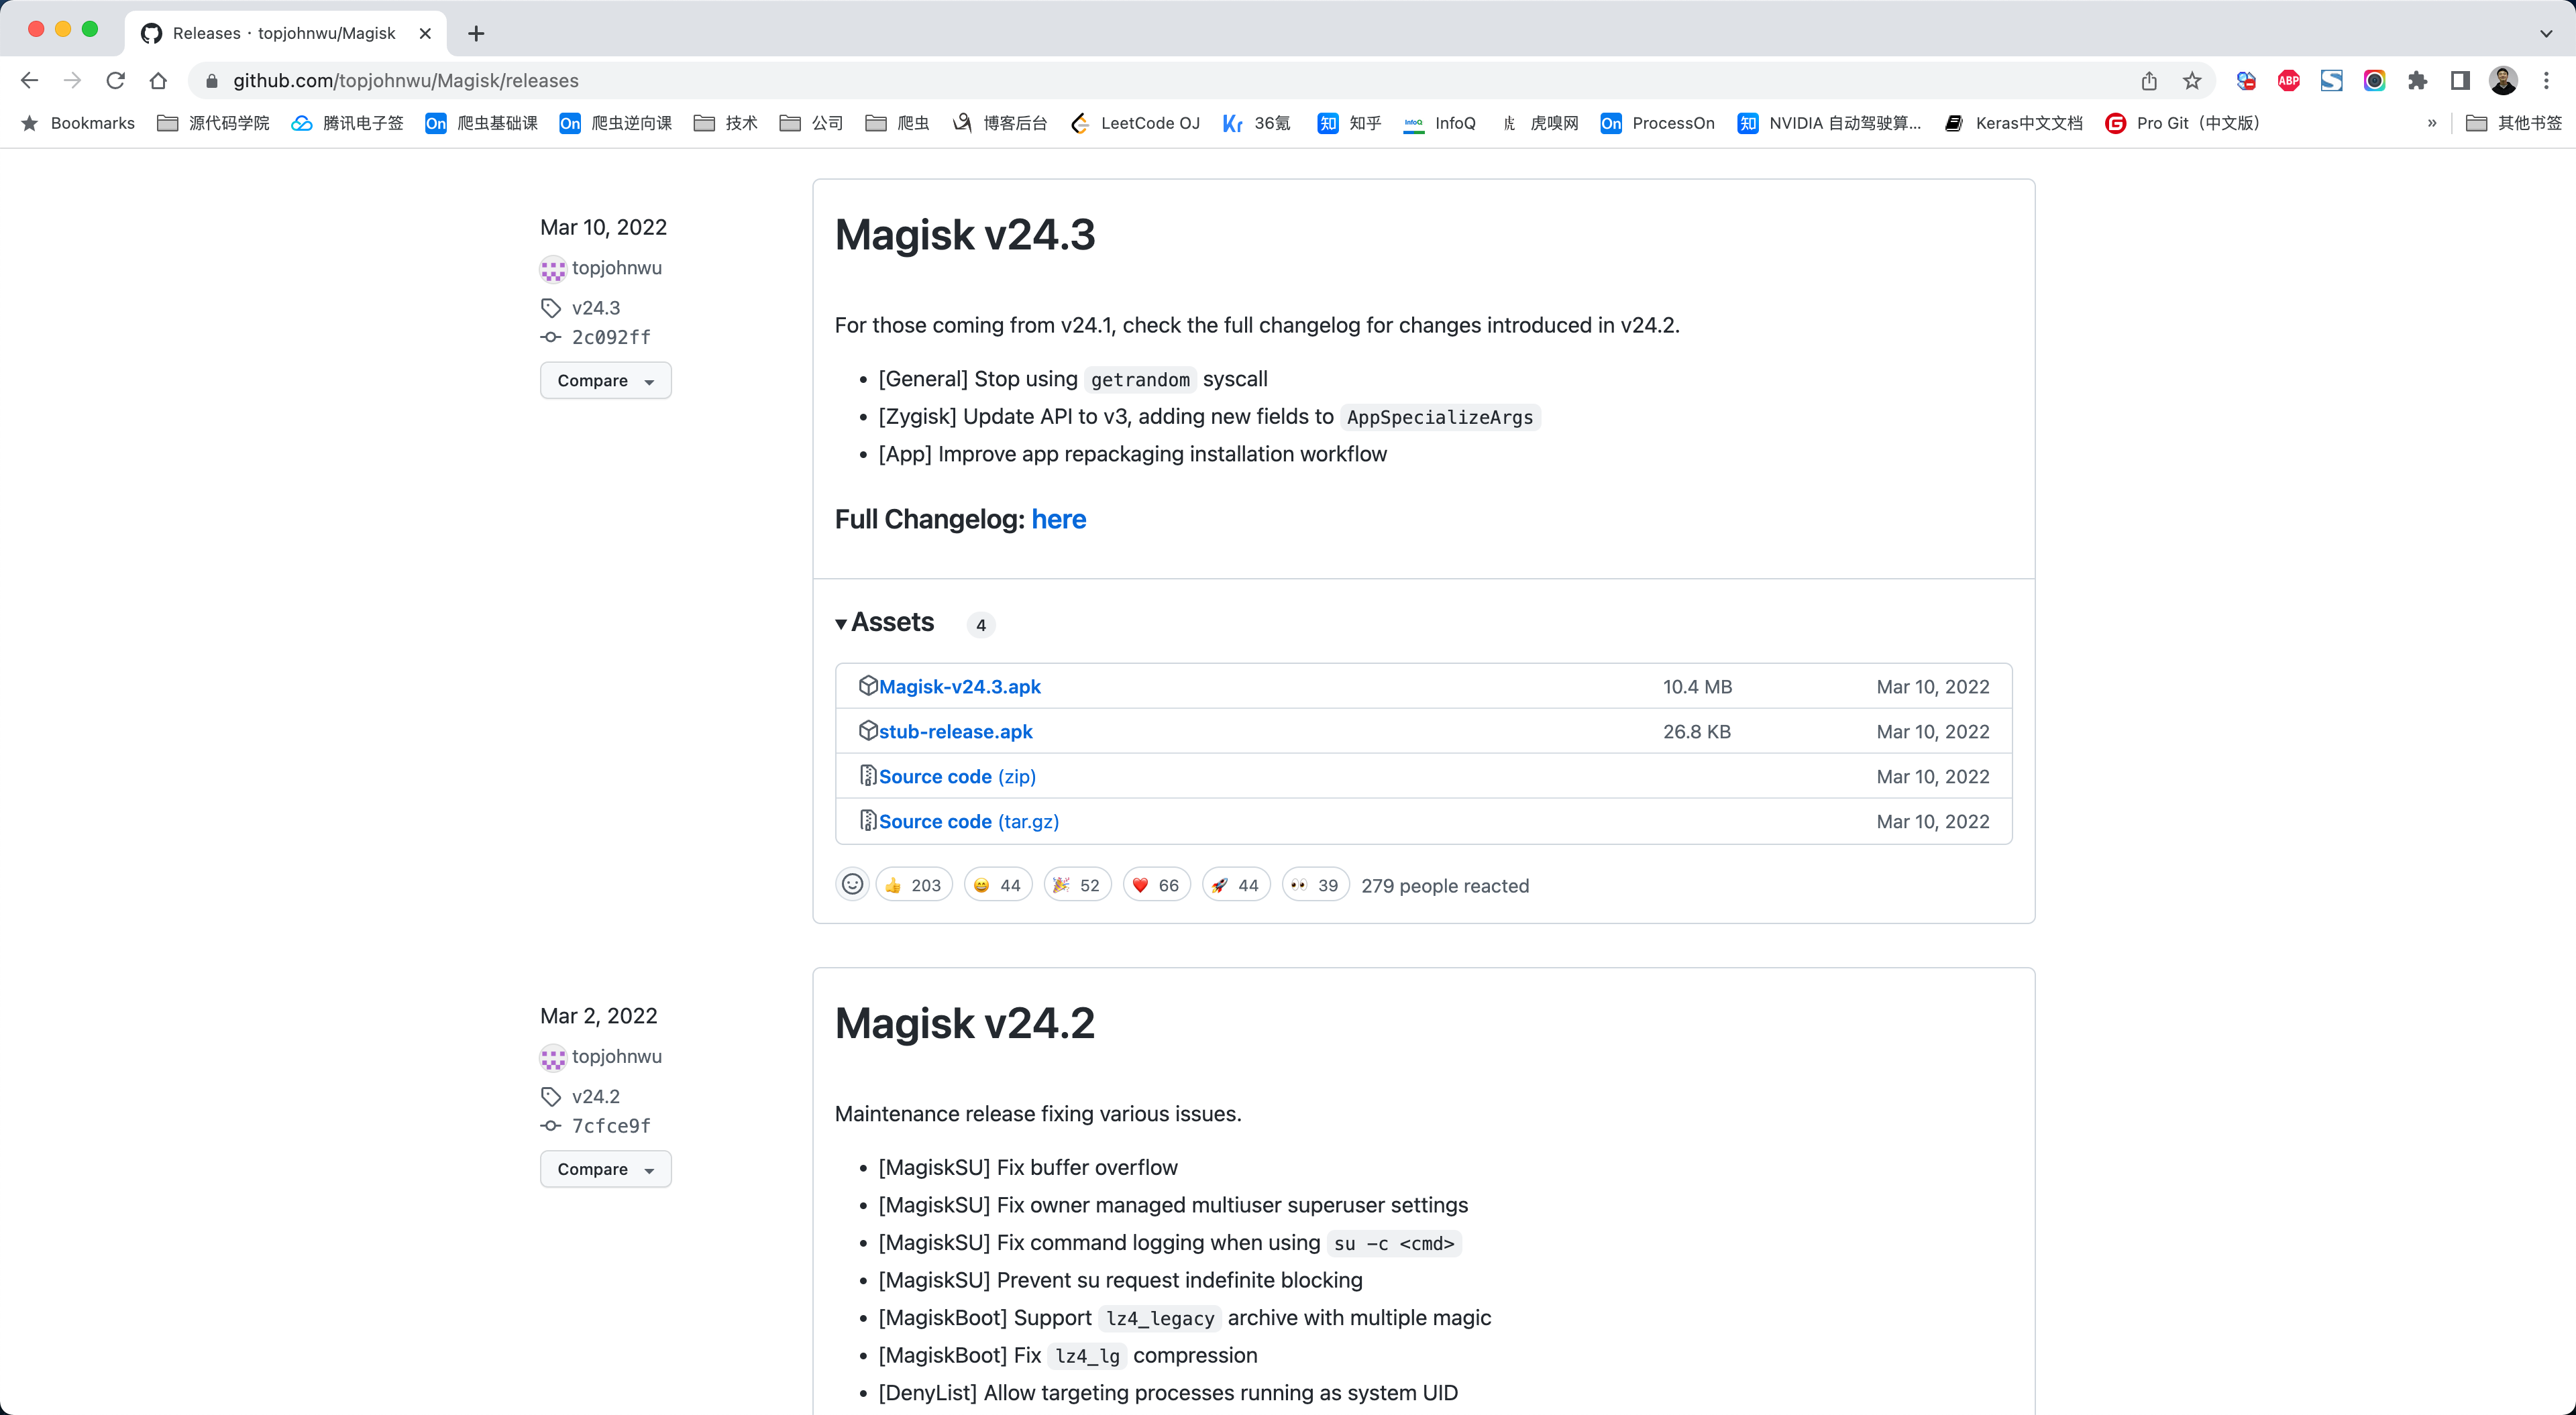
下载 magisk.apk 文件,并安装到手机上。
官方:https://github.com/topjohnwu/Magisk/releases
版本:v24.3(课上使用)
可以使用adb快速的在手机上安装APK:
>>>adb install APK文件路径
2.修补boot.img
接下来,需要将上一步刷机的官方包中 boot.img,传至手机,再手机中利用 magisk 进行修改,然后再回传至电脑端(用于后续刷机root)
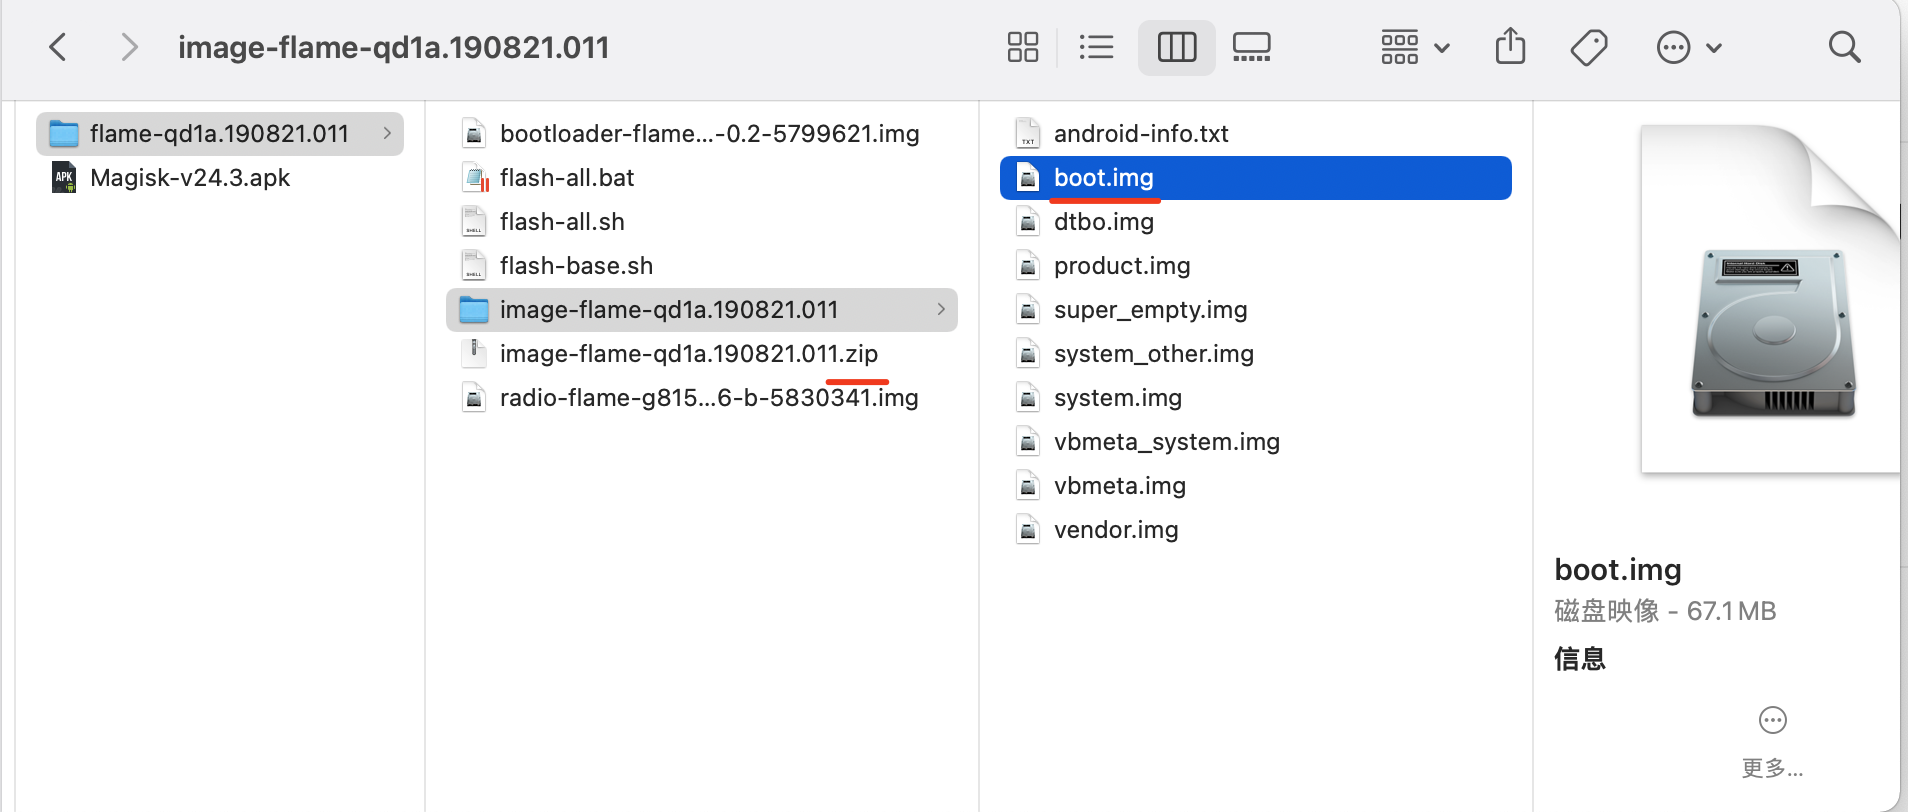
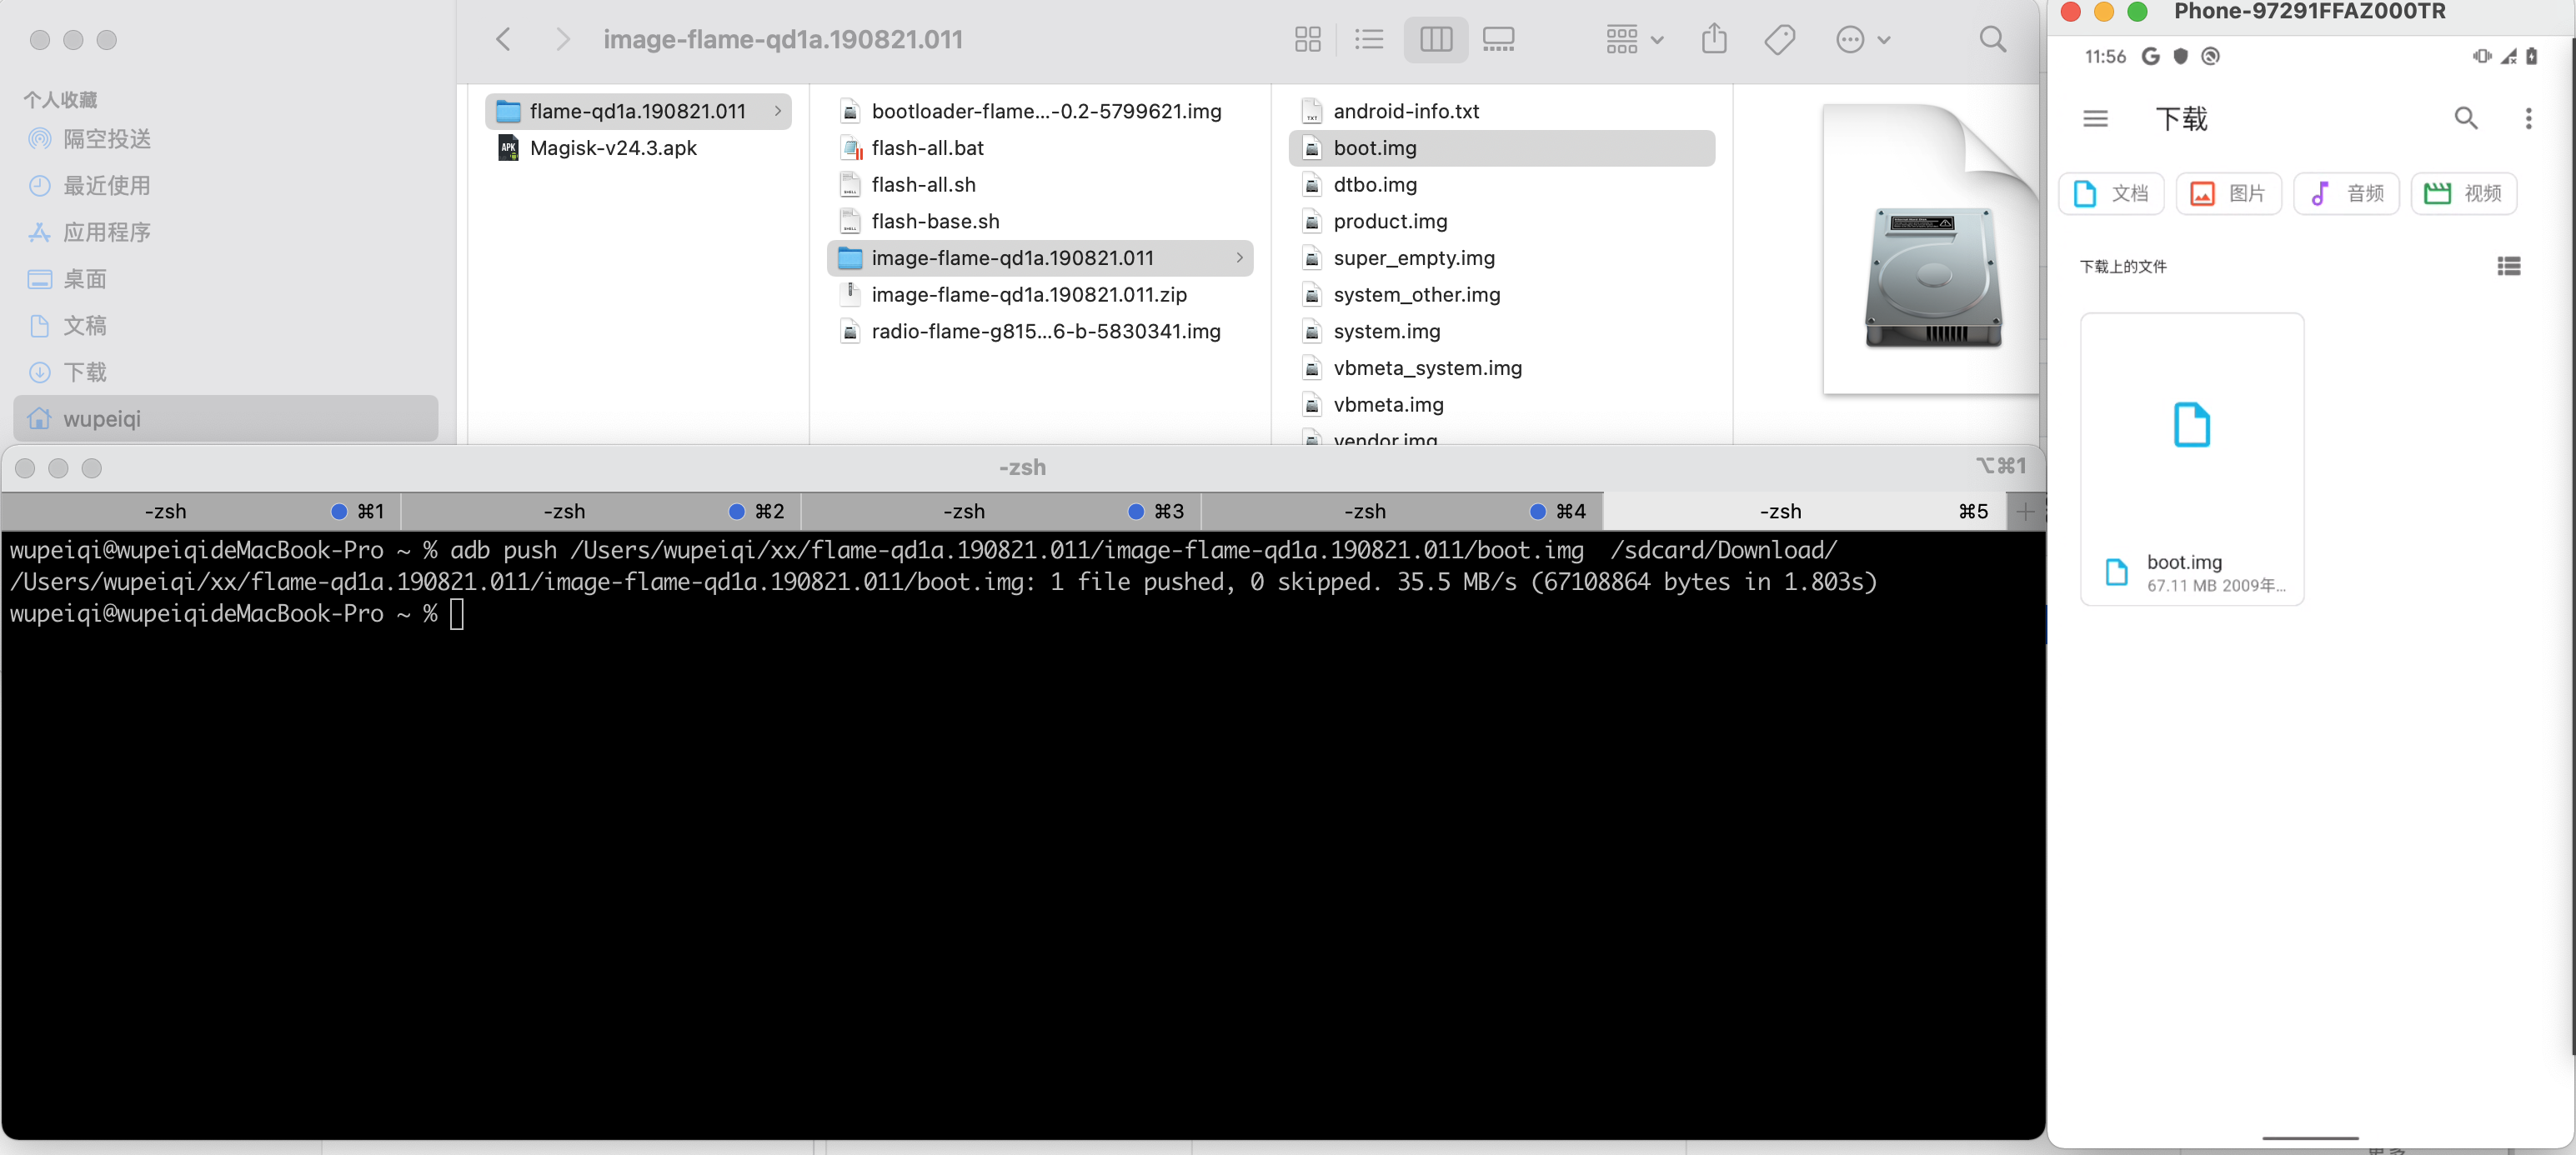
2.1 push boot.img
-
先解压官方包中的zip包,找到 boot.img
-
利用adb 命令,将boot.img发到手机的中
/sdcard/Download/目录。>>>adb push 电脑boot.img的路径 手机目标路径>>>adb push D:\..\.. /sdcard/Download/
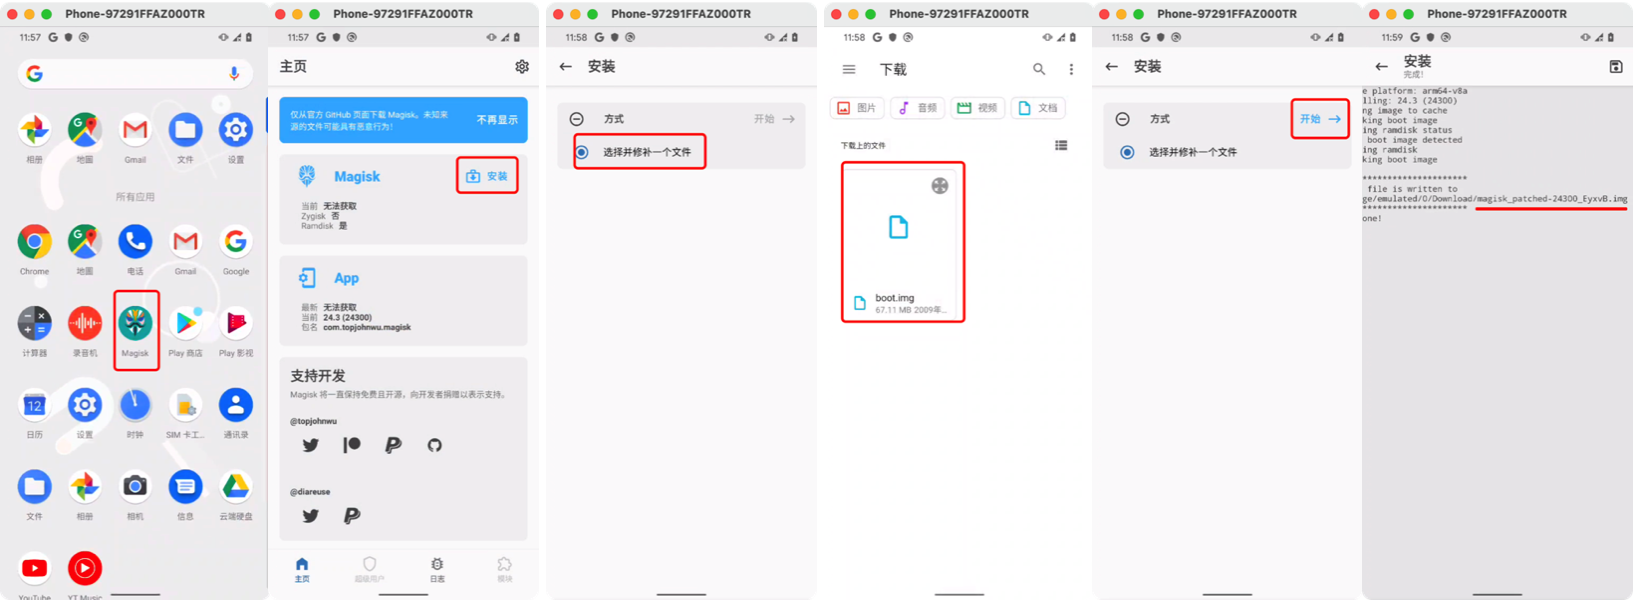
2.2 magisk修复
打开magisk,然后对boot.img进行修复。
2.3 pull boot.img
将手机上修复好的boot.img再拉回到自己电脑上(任意目录)。
>>>adb pull 手机文件路径 本地文件路径
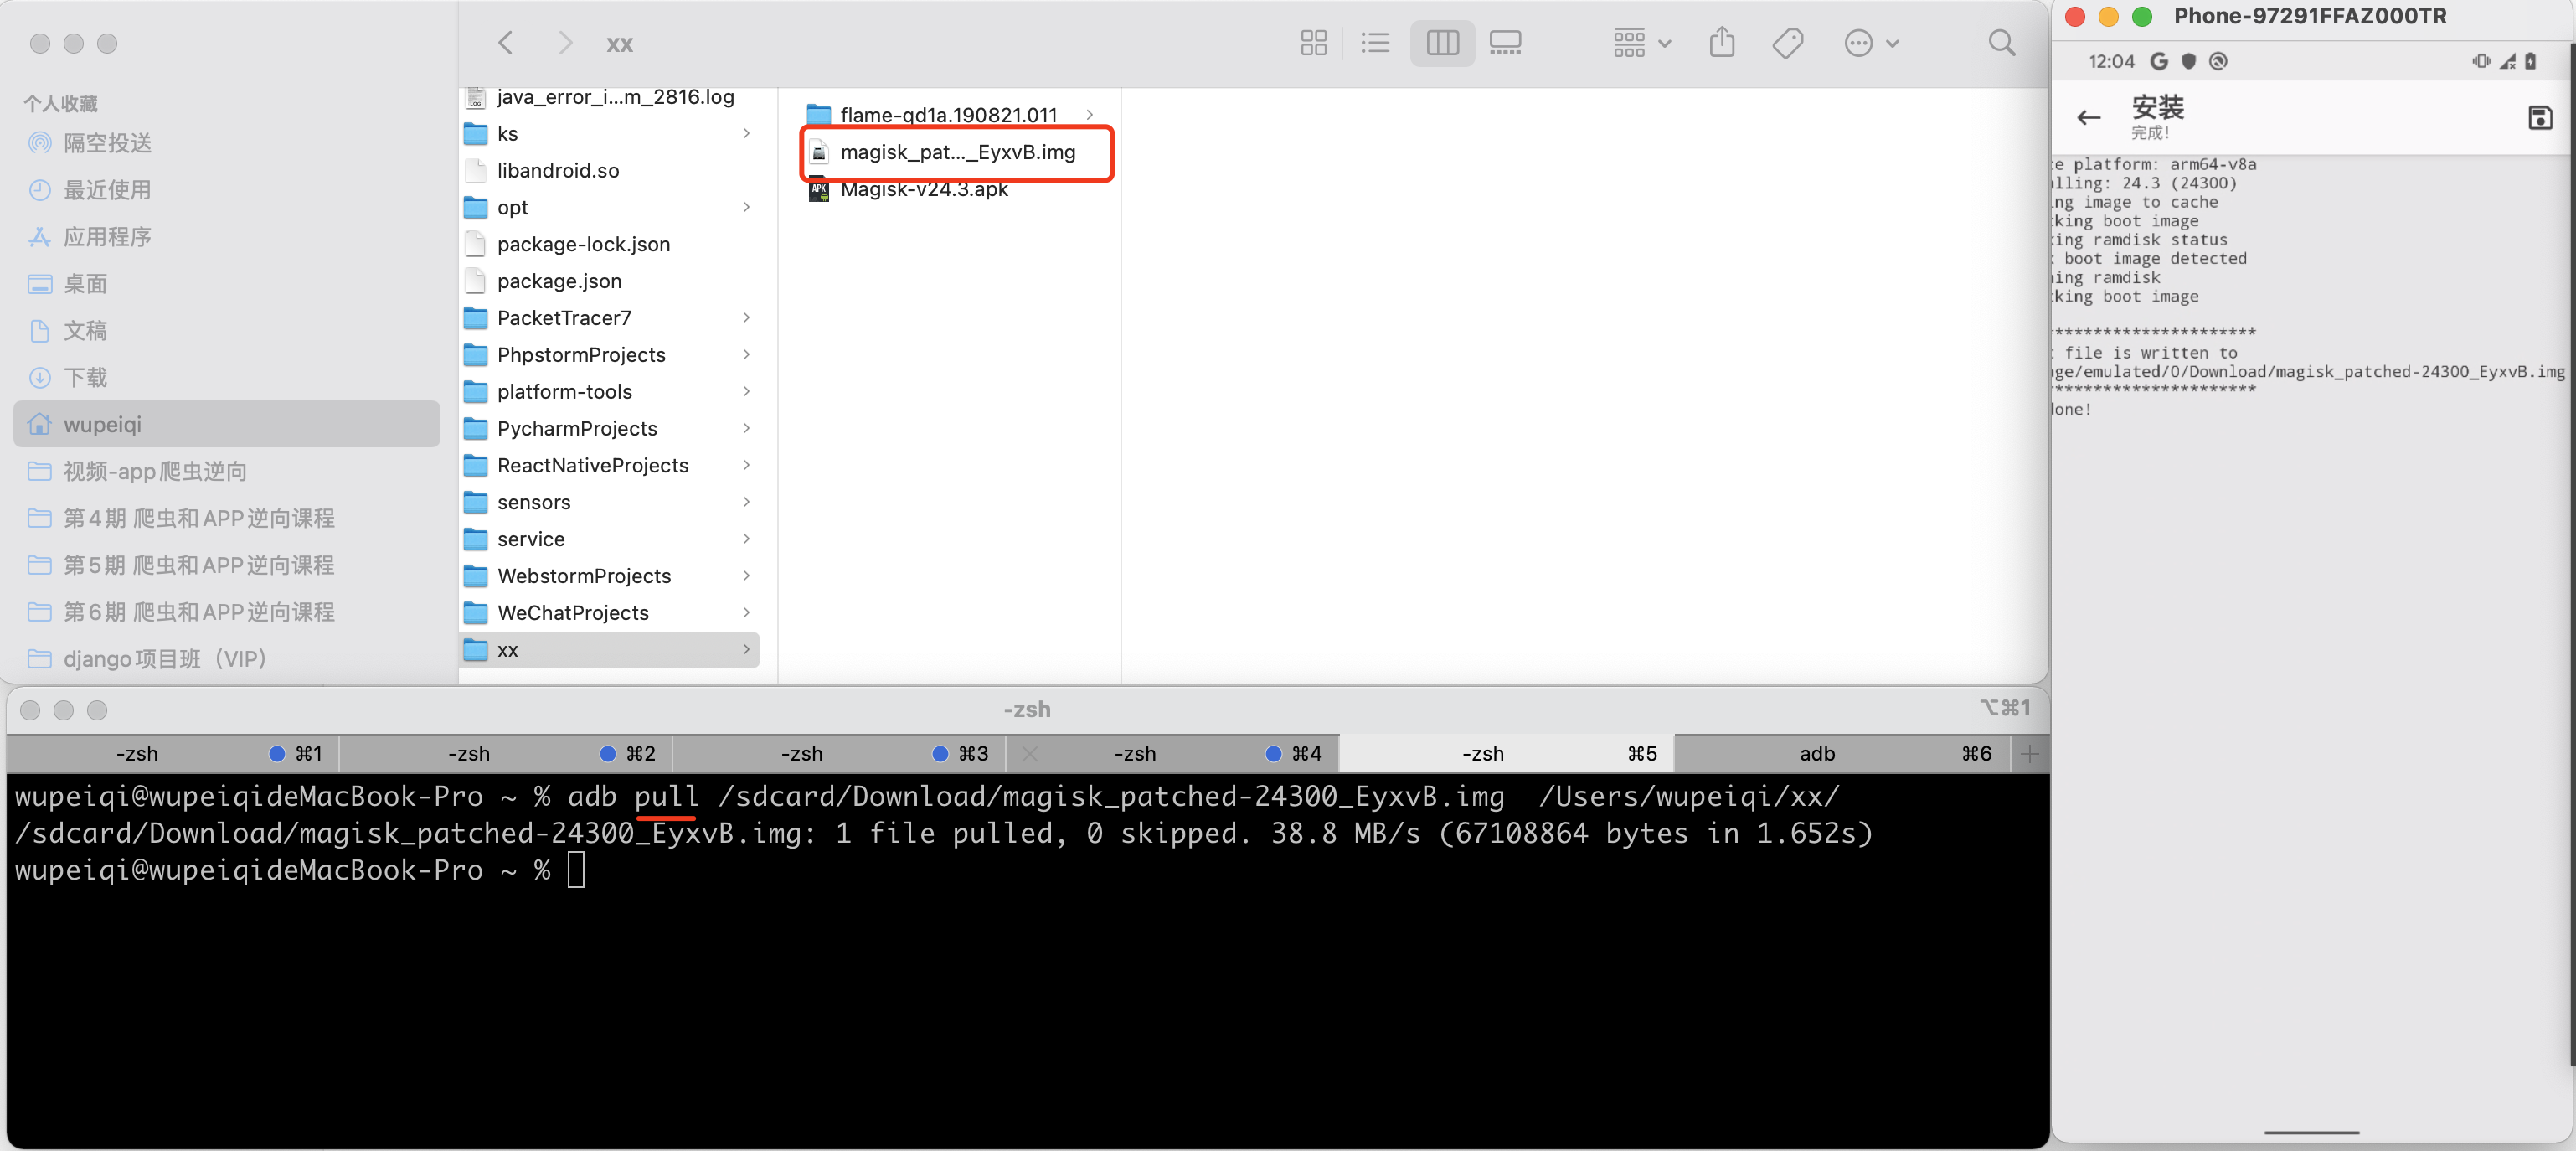
注意:如果觉得修复的boot.img文件名太长,也可以自己修改。
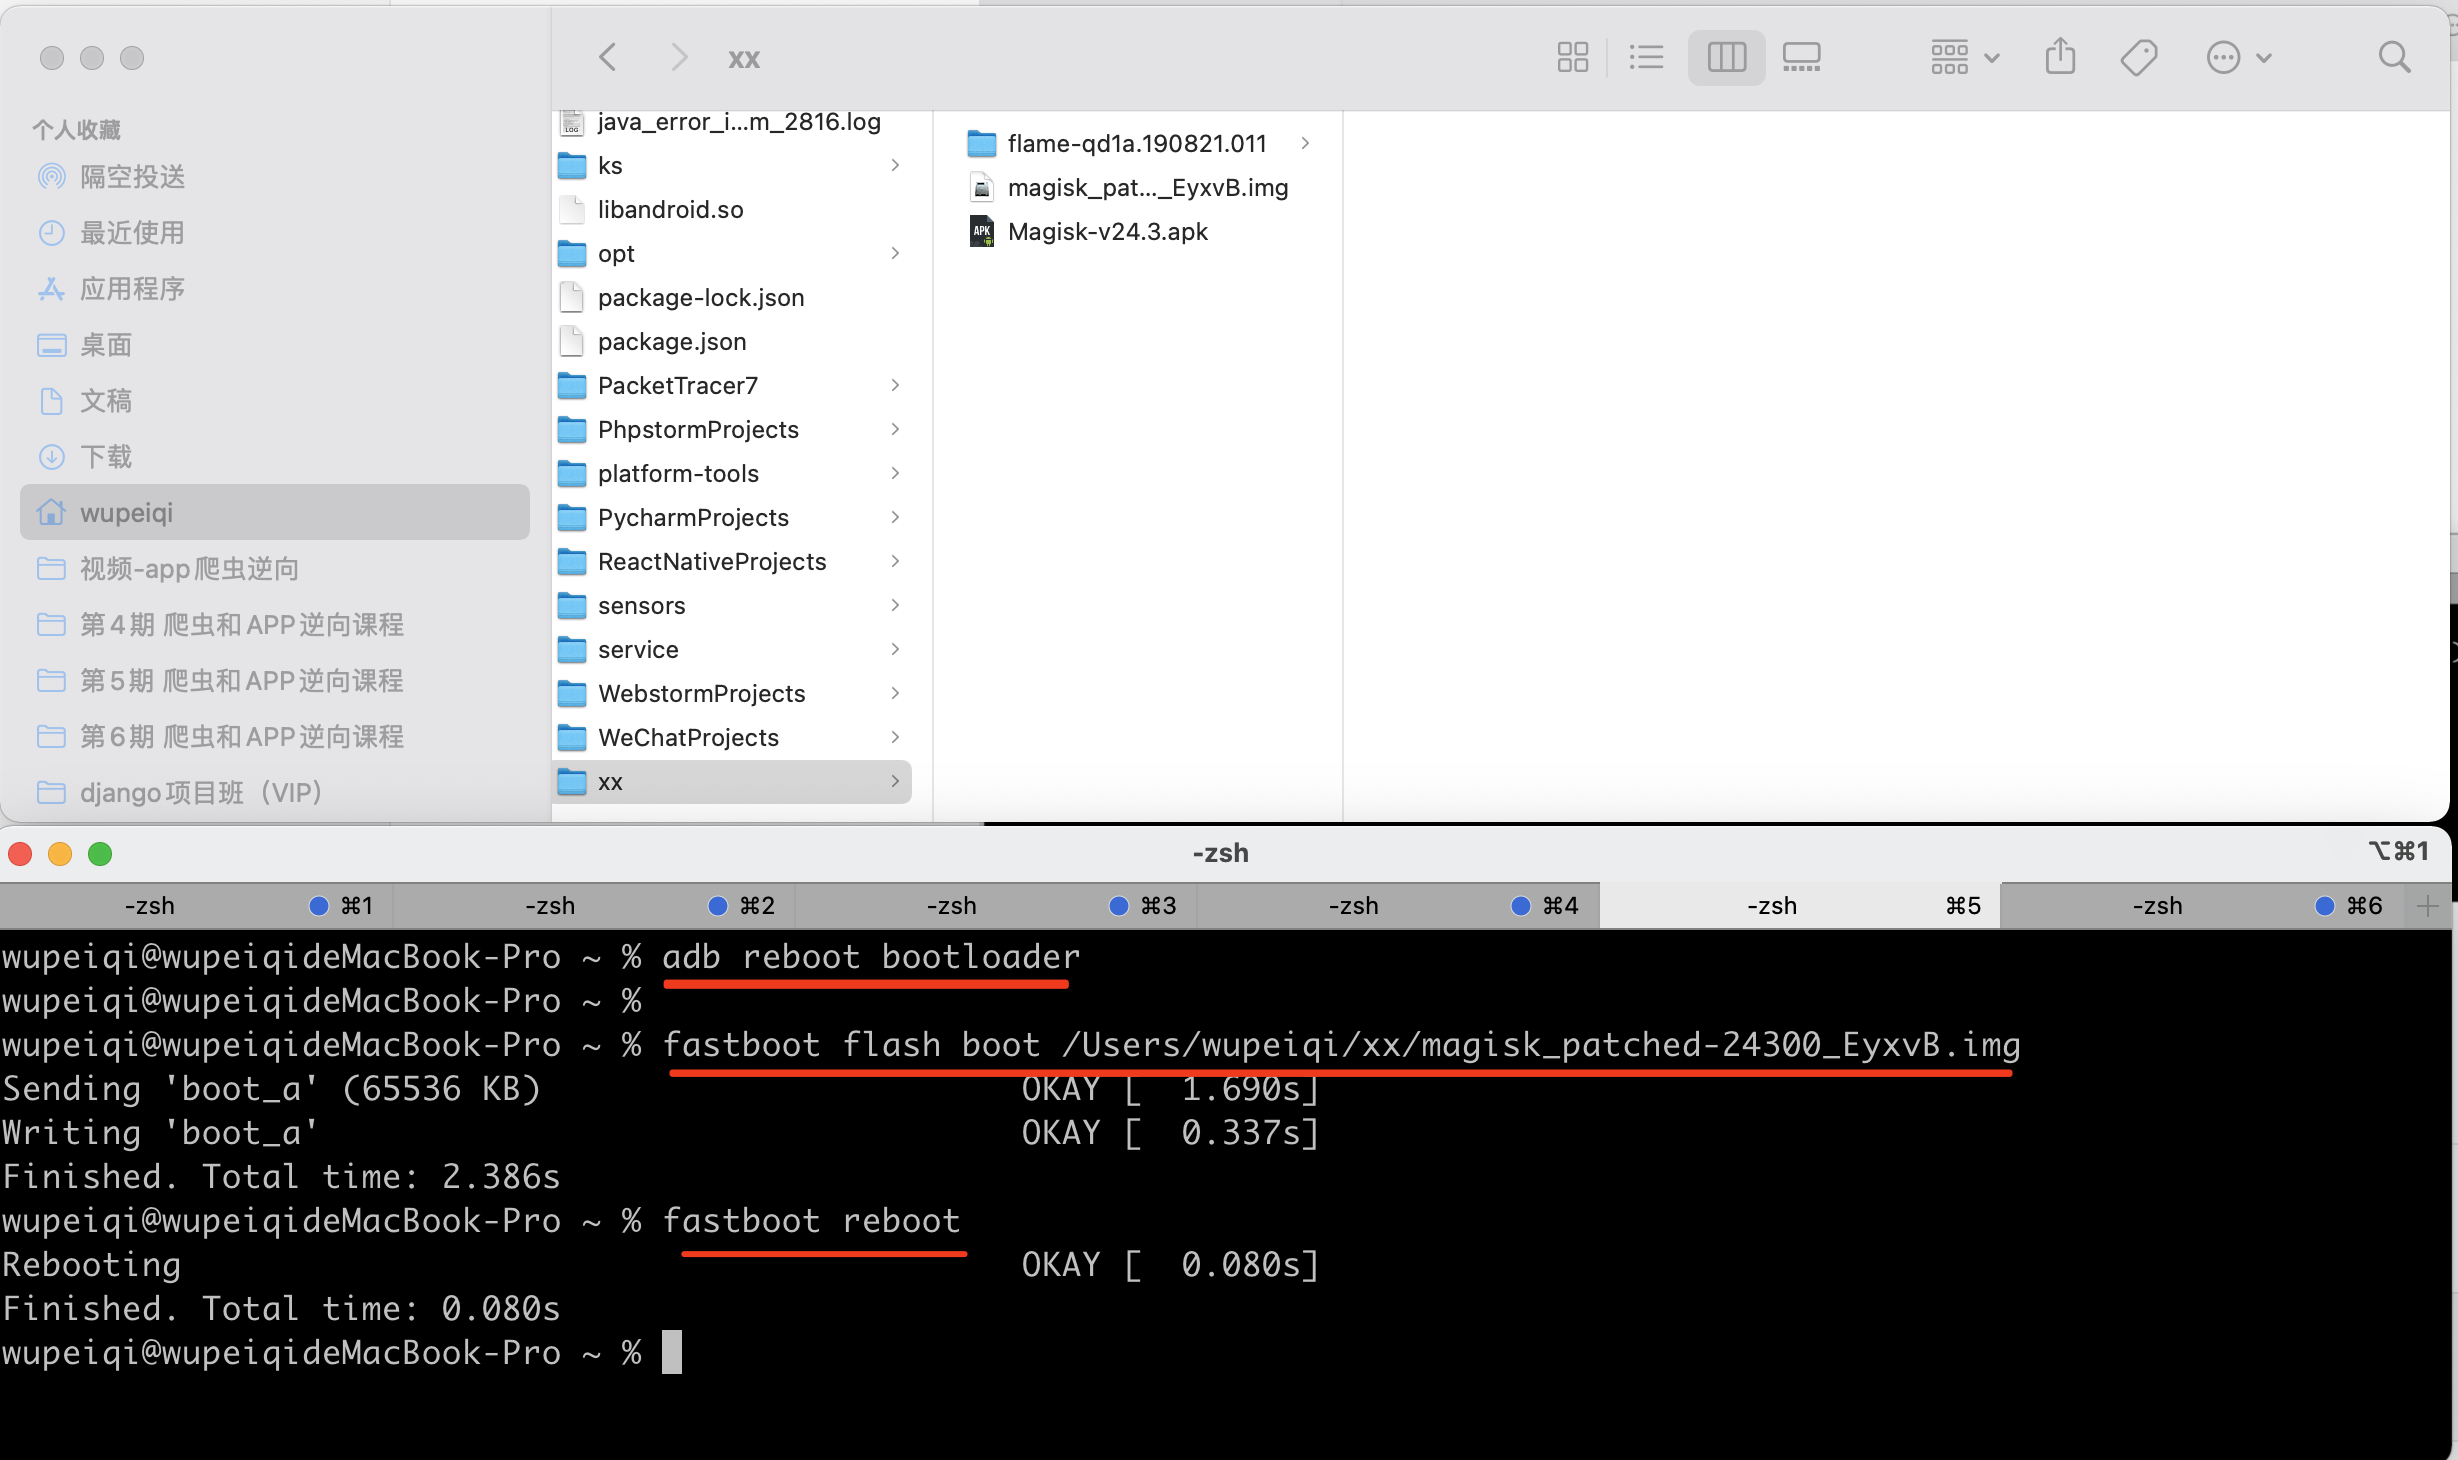
3.root
对手机进行root,其实就是将新修复的 boot.img 刷入到手机。
>>>adb reboot bootloader                    进入bootloader
>>>fastboot flash boot  修复的boot文件		 刷入boot
>>>fastboot reboot         					重启手机
对比root前后,打开magisk的不同:
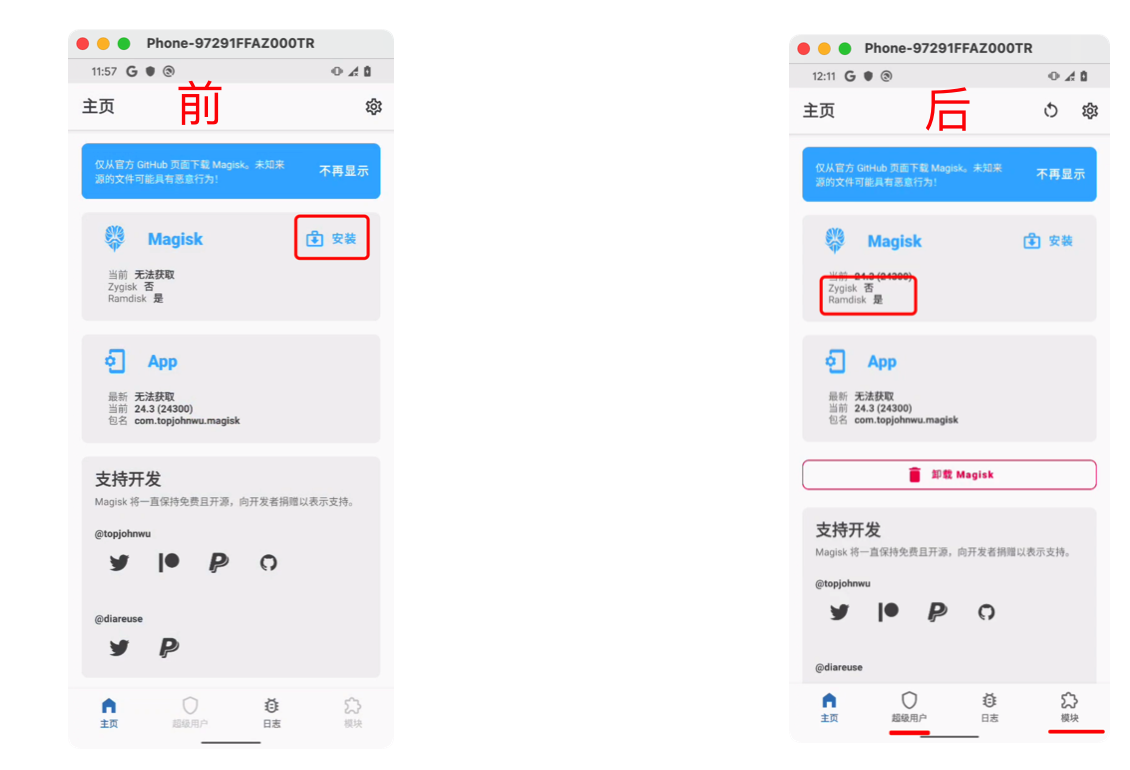
至此,手机root完成。。。
三. 谷歌Pixel相关:https证书
Pixel手机相关内容:
- 刷机,官方包。
- root,获取root权限。
- https证书,安装charles证书,实现抓包。
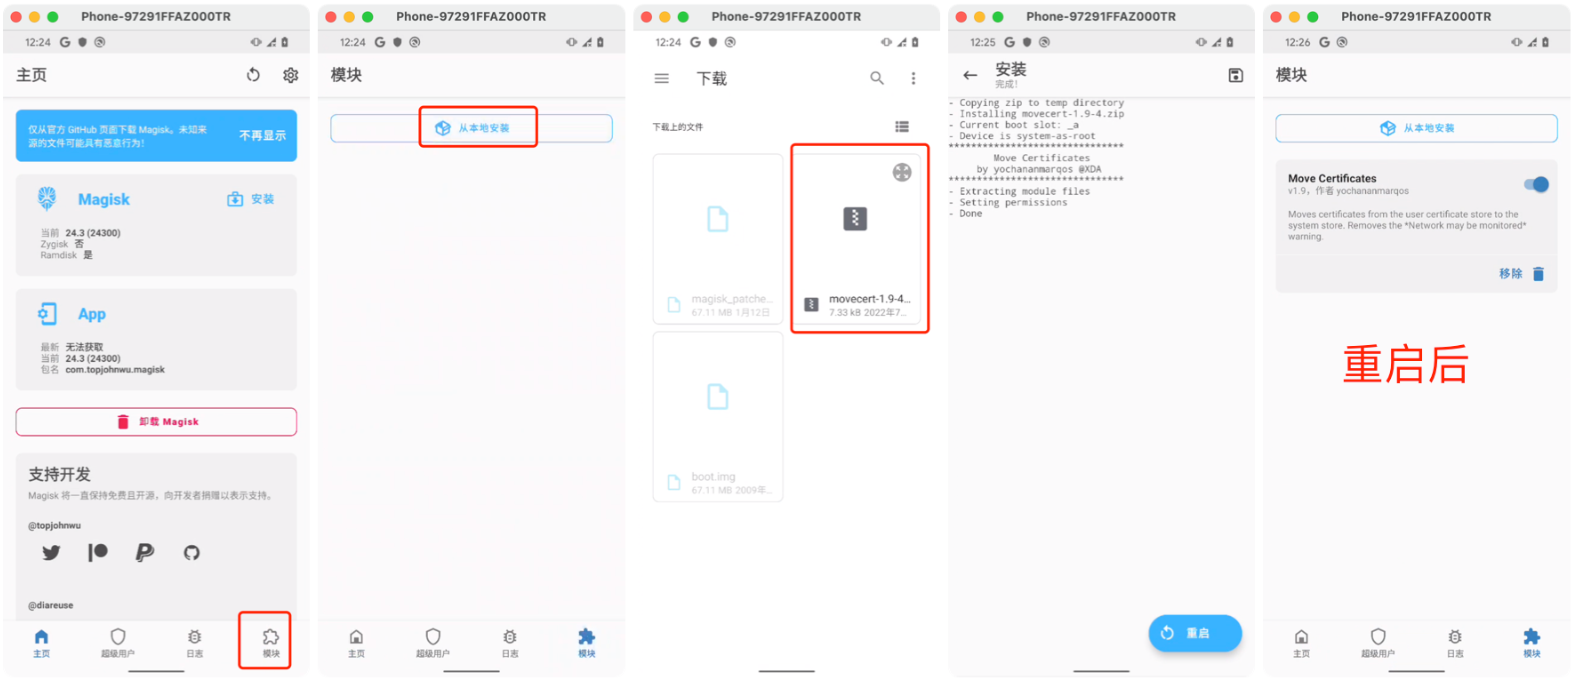
1.刷move cert模块
下载move cert模块并刷入到magisk面具中。
作用:可以将手机 用户级别证书自动移动到 系统级别。
- 安卓7以上,将证书安装在系统级别,才能抓https的包。
- 安卓7以下,将证书安装在用户级别,就可以抓https的包。
模块已准备好,请大家去随堂课件中获取。
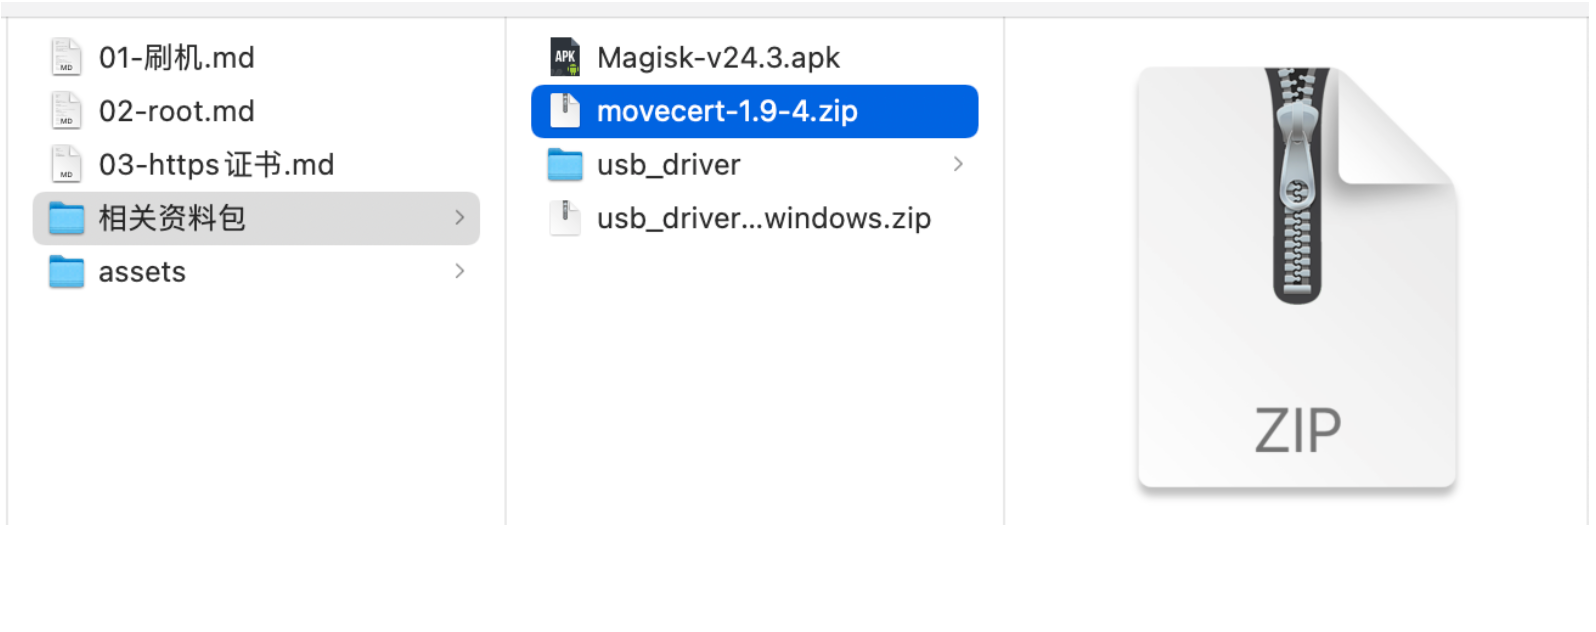
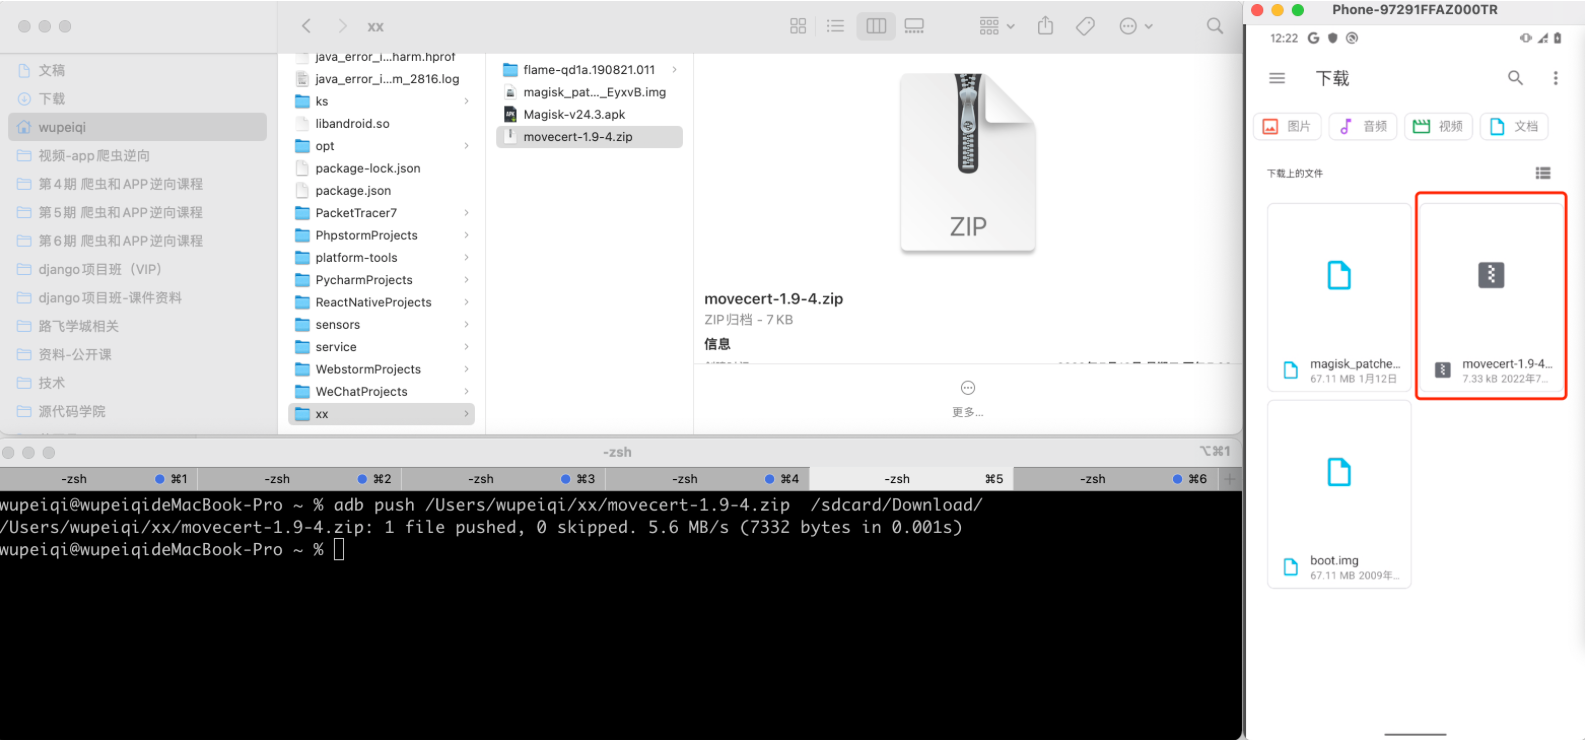
1.1 传至手机
将move cert压缩包传到手机(任意好找的一个目录 /sdcard/Download/)。
1.2 刷模块
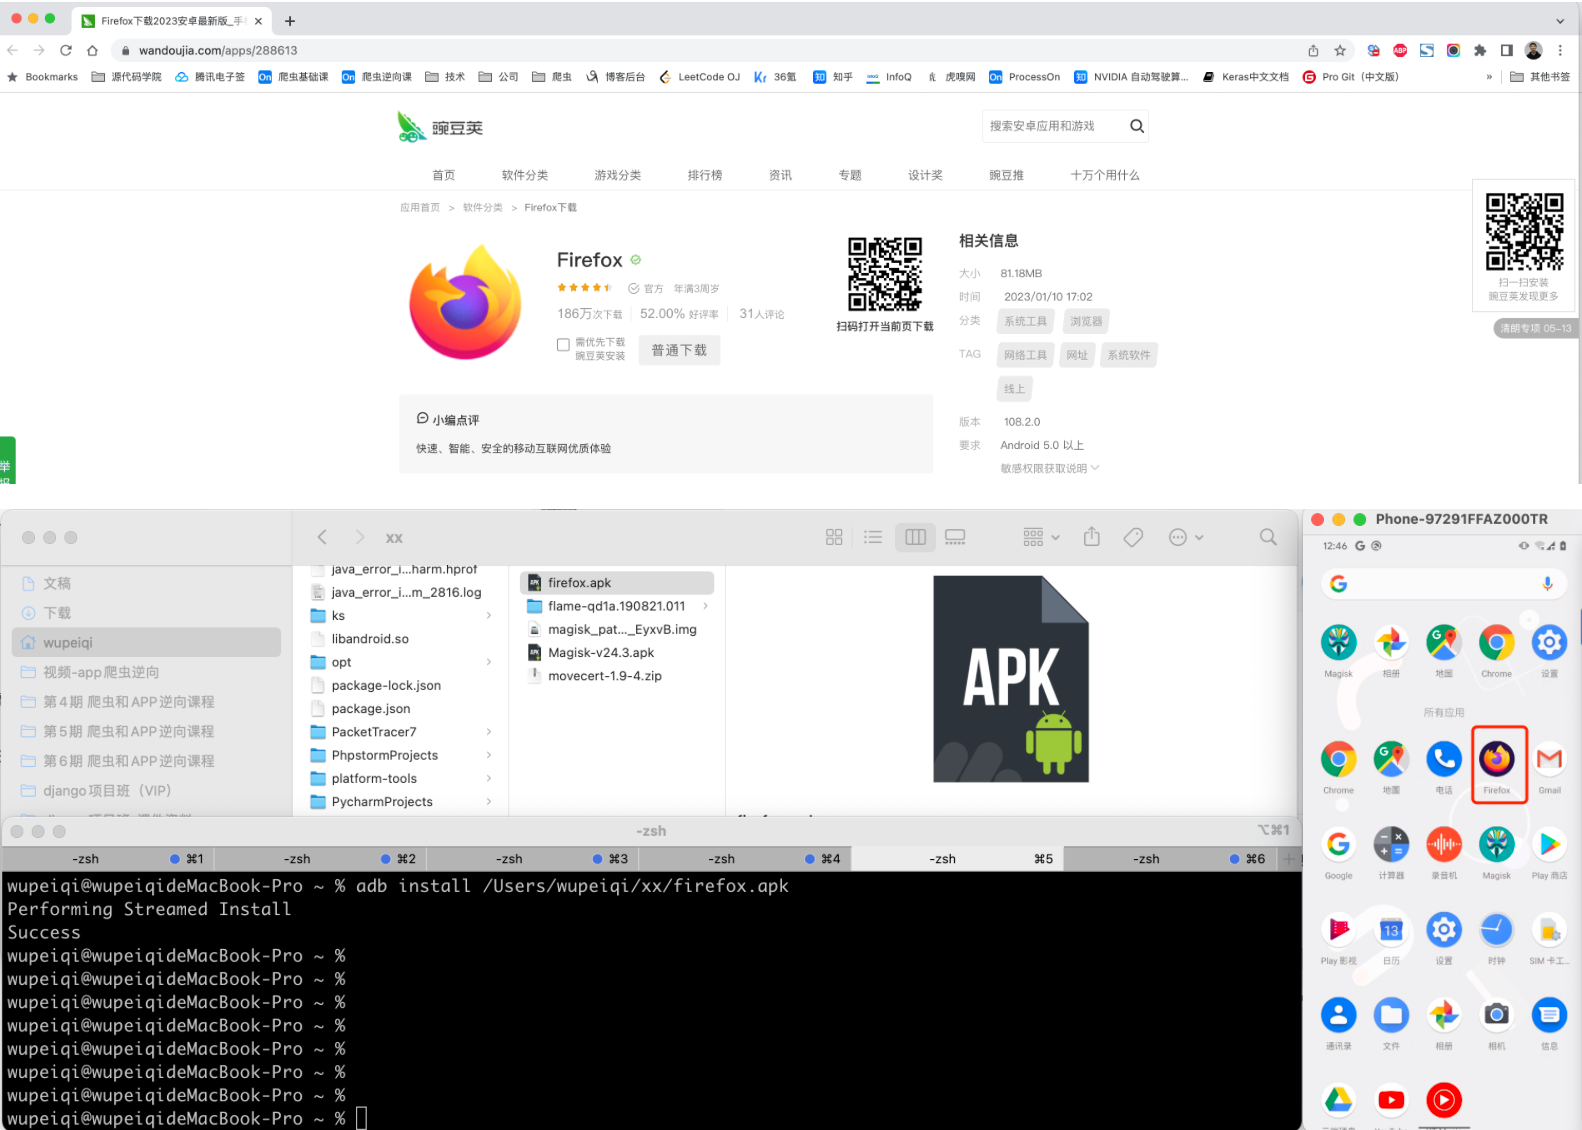
2.火狐浏览器
在手机上安装火狐浏览器,后续方便访问charles下载证书(有些机型Pixel自带谷歌浏览器不好使)。
>>>adb install xxx/xxx/xx/firefox.apk
https://www.wandoujia.com/apps/288613
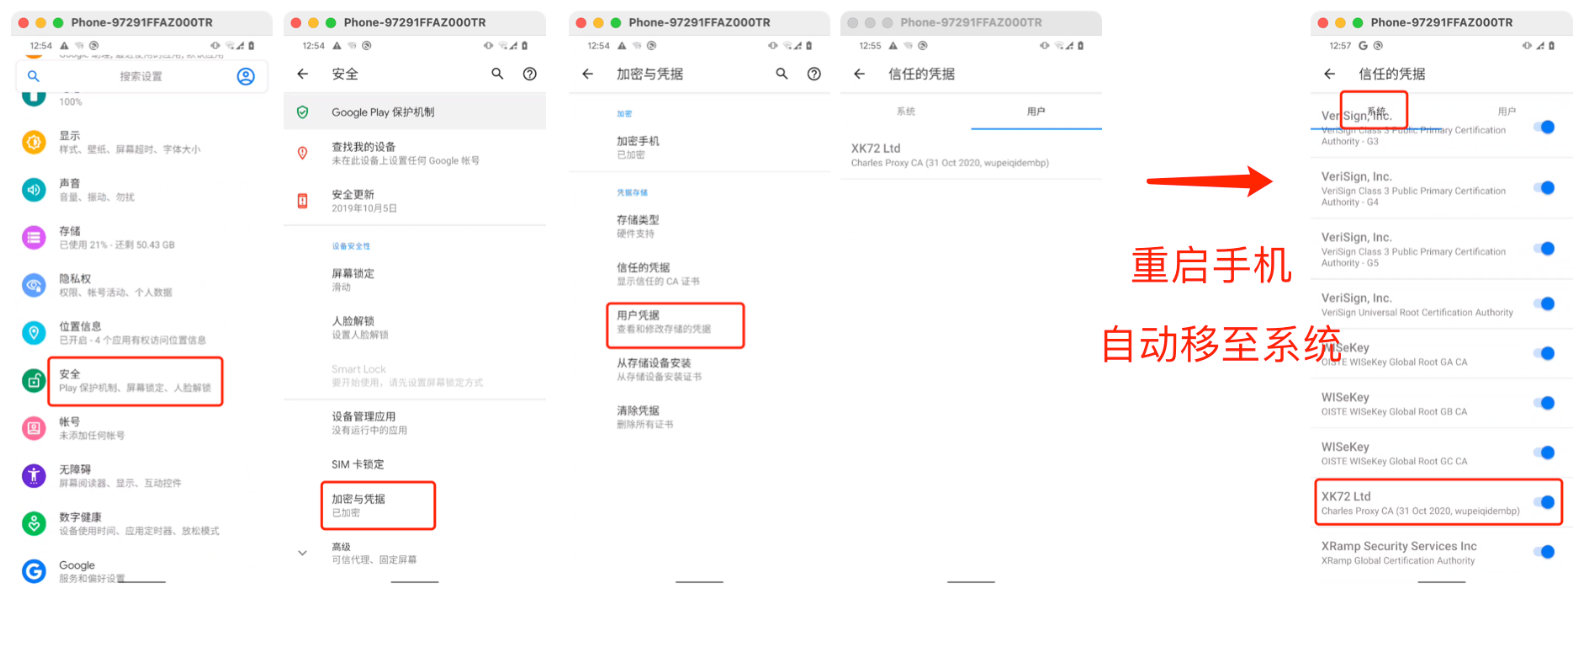
3.charles证书
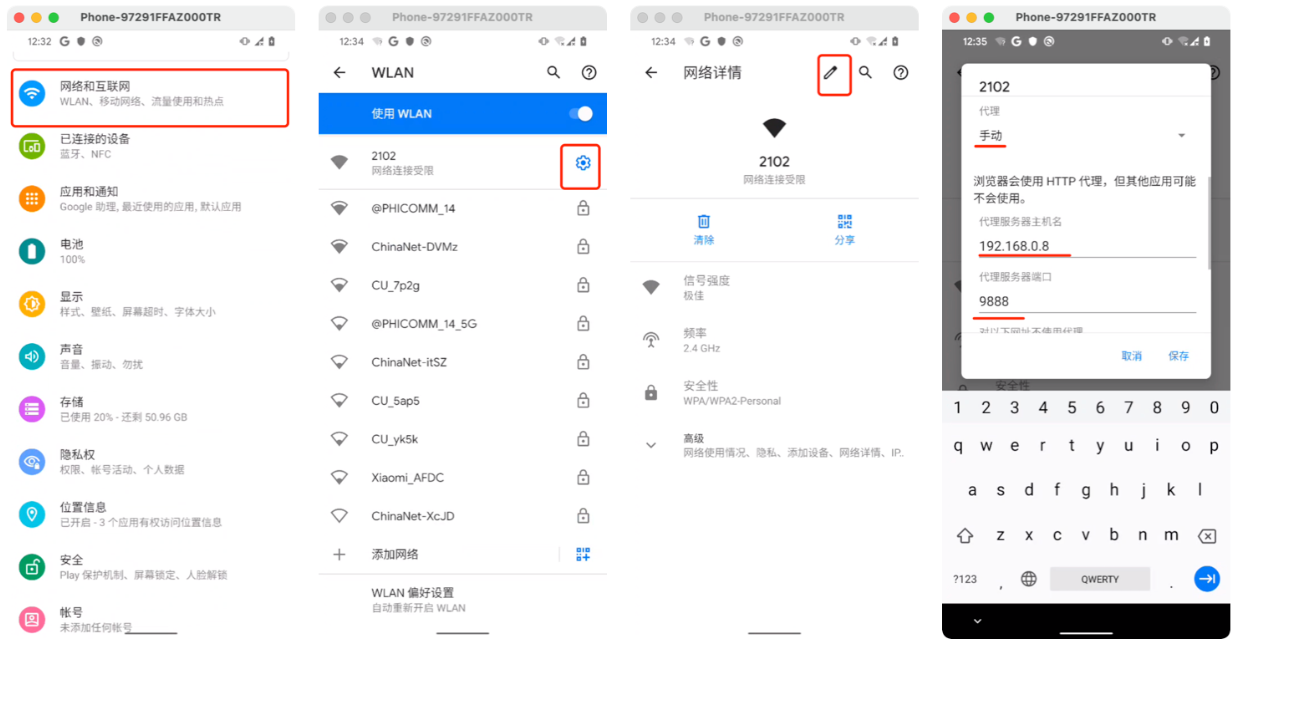
- 打开charles,然后在手机上配置系统代理,再在浏览器上输入
chls.pro/ssl安装用户级别证书 - 重启手机,自动将用户证书放在系统证书中。
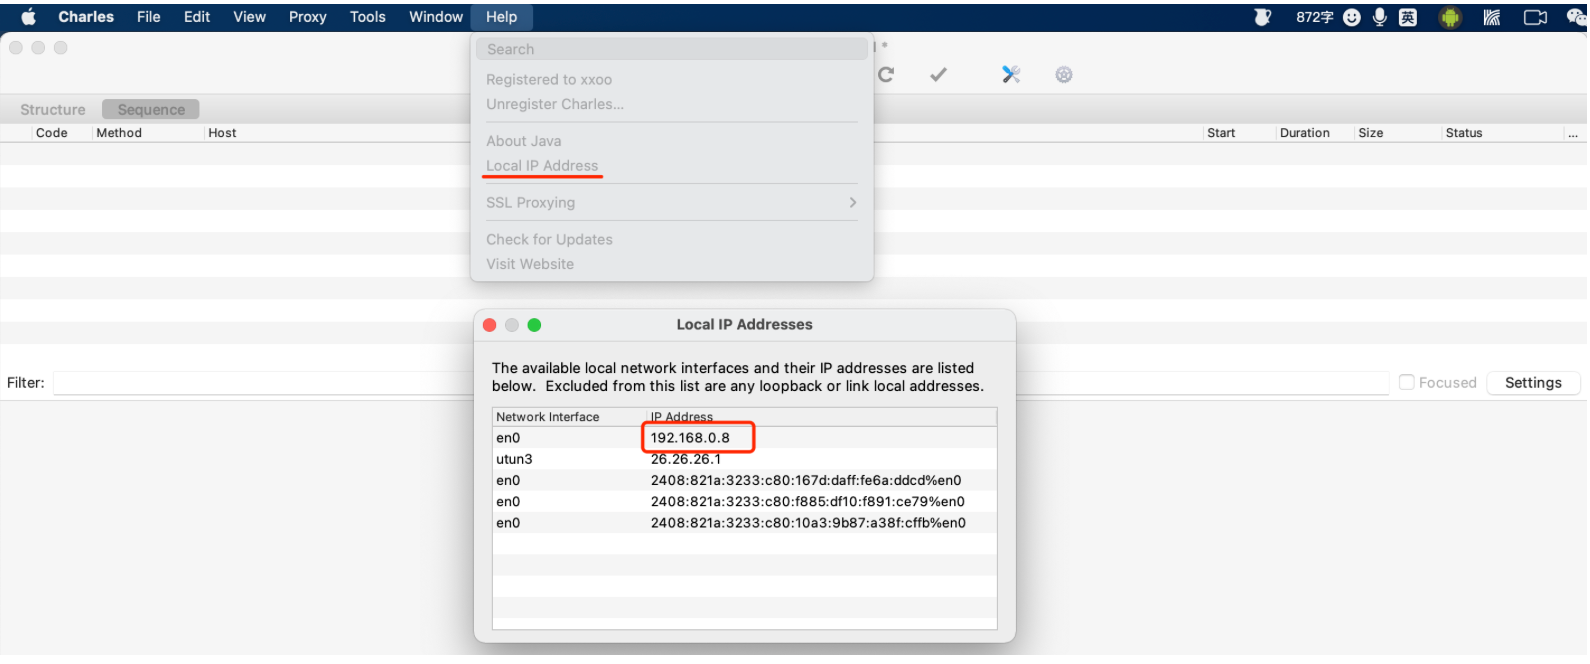
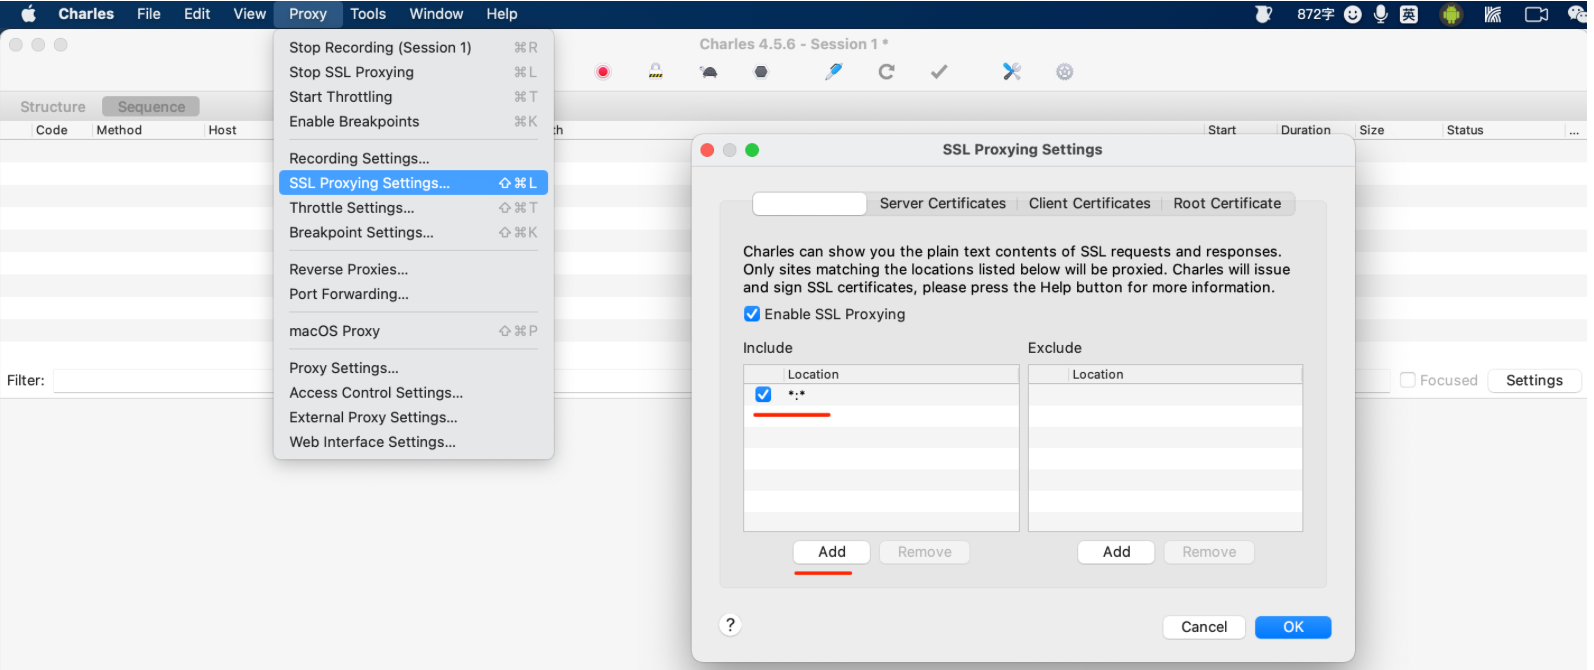
3.1 charles配置
在安装证书前,请确保自己电脑上charles的配置已完成:
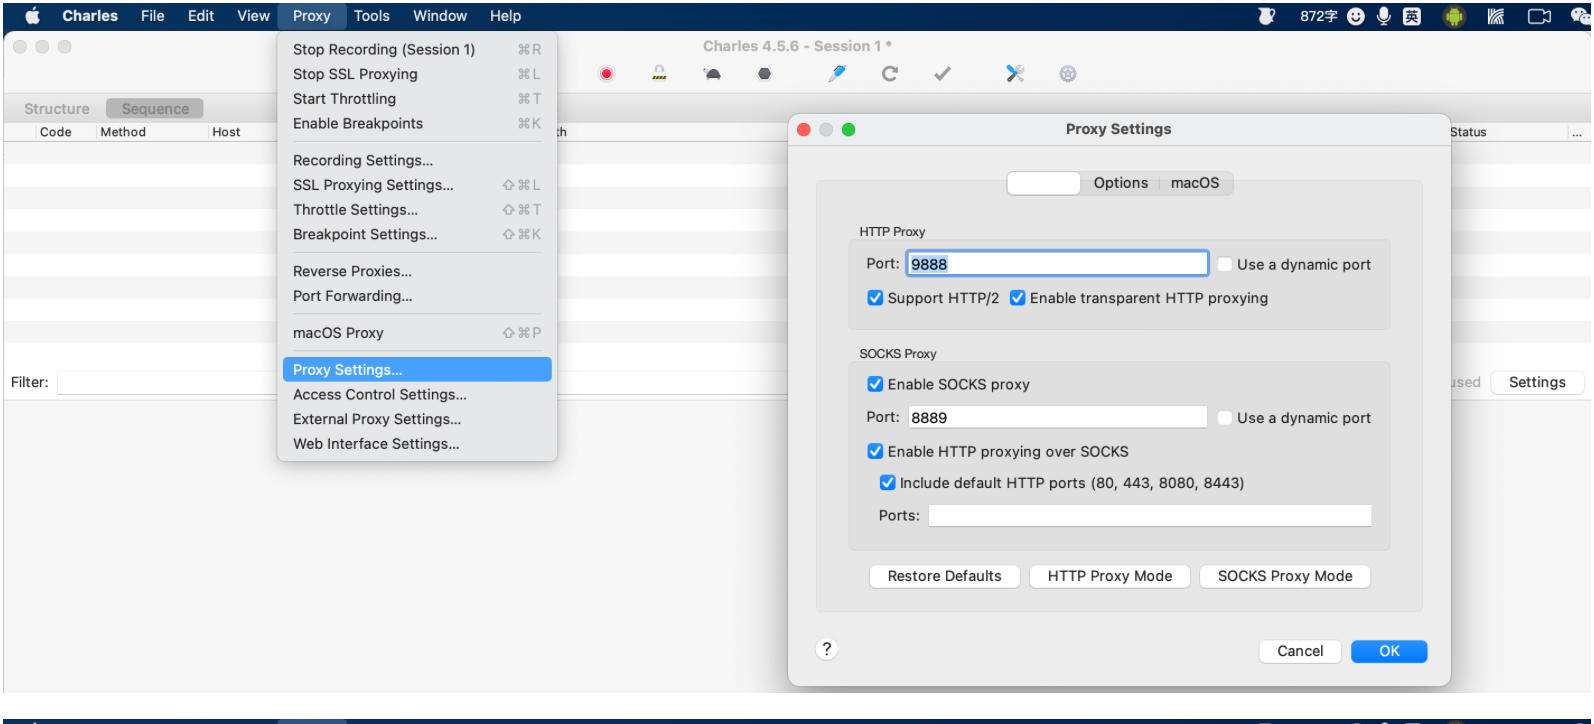
2.2 配置代理
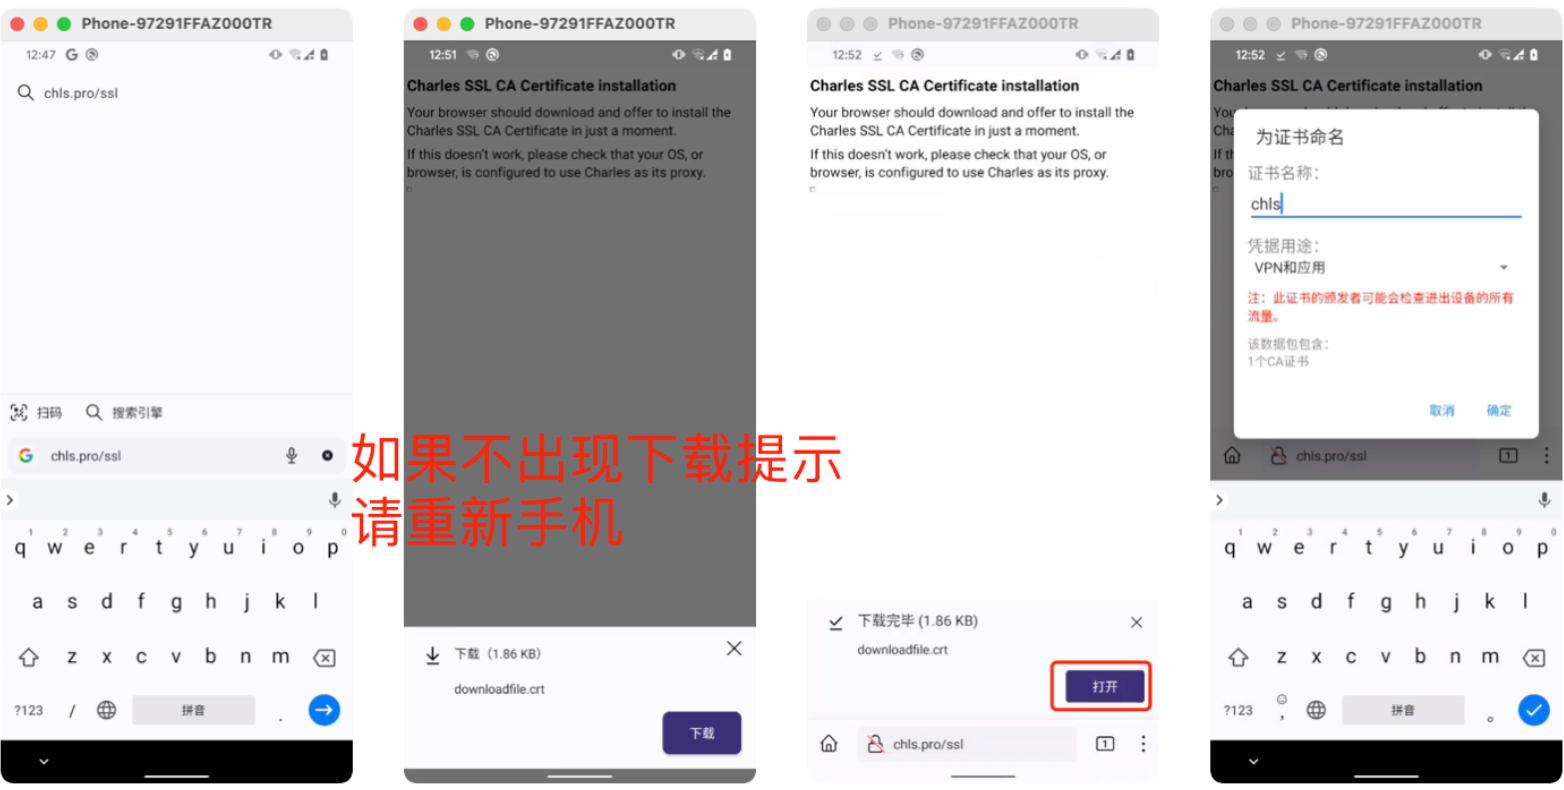
3.3 安装证书
用浏览器打开网址 chls.pro/ssl ,下载并安装 用户证书。
4.抓包测试
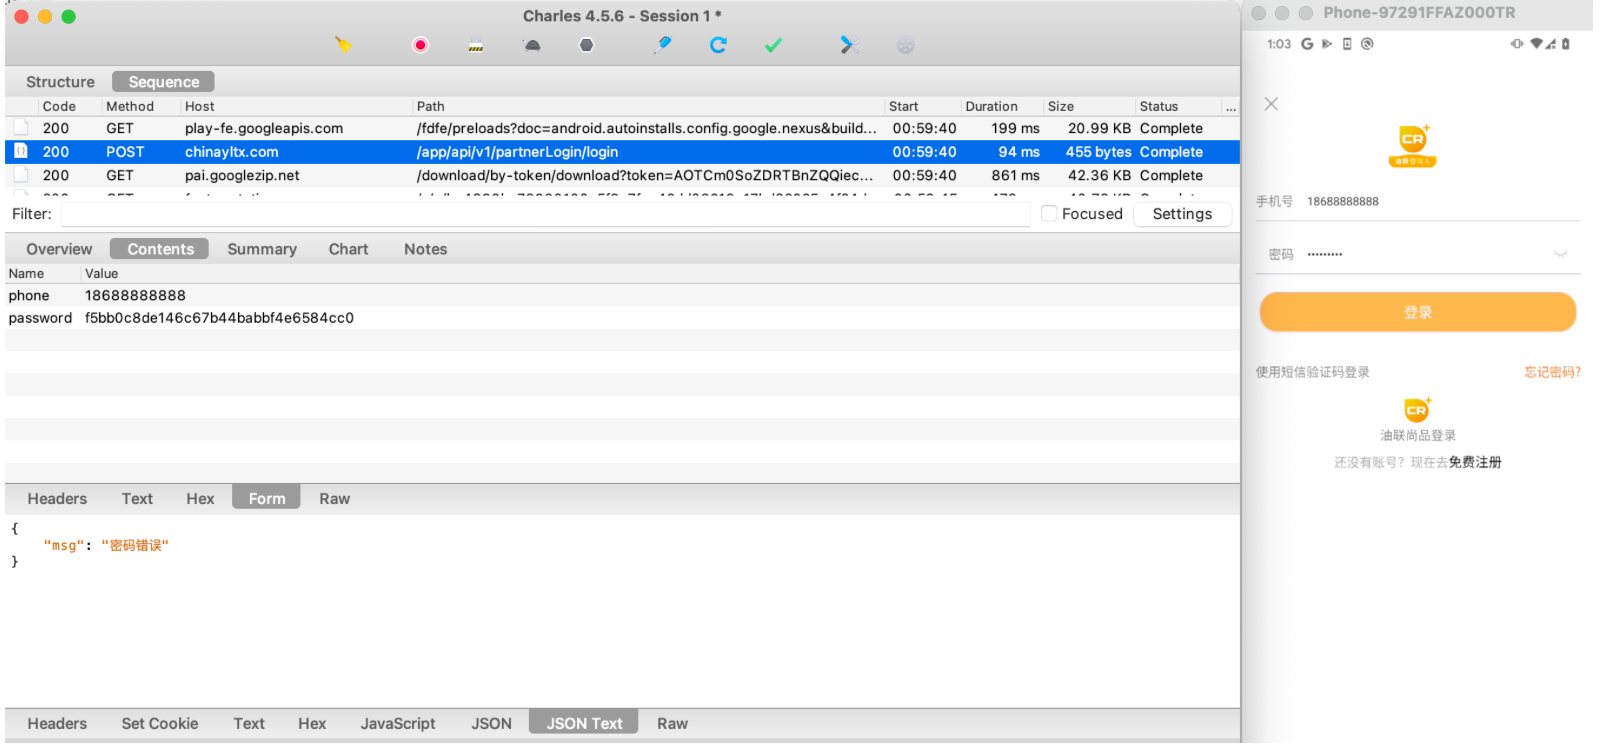
结束
Pixel手机相关内容:
-
刷机,官方包。
-
root,获取root权限。
-
https证书,安装charles证书,实现抓包。
后续:xposed、刷定制AOSP系统 等

 浙公网安备 33010602011771号