老男孩ansible资料
第1章 Ansible基础与playbook
1.1 Ansible课程大纲
Ansible大纲:
Ansible被红帽收购--->
1.什么是Ansible
2.Ansible特性\优点....
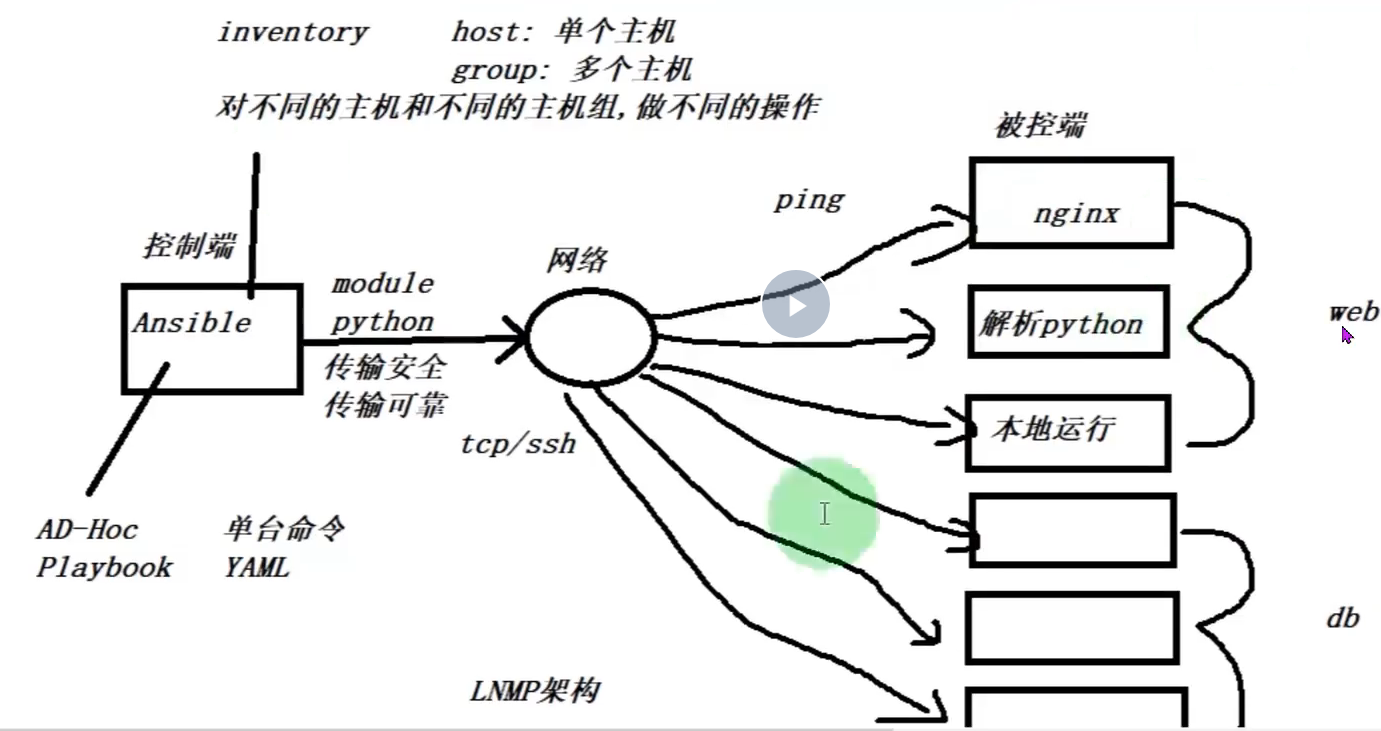
3.Ansible基础架构 (控制端\被控端\inventory\ad-hoc\playbook\连接协议....)
4.Ansible安装
5.ANsible配置
4.Ansible inventory
5.Ansible Ad-hoc shell命令
6.Ansible playbook shell脚本 YAML
7.变量 variables
变量优先级
8.判断语句
9.循环语句
10.异常处理
11.tag标签
12.handlers触发器
13.include包含
14.ansible jinja模板
keeplaived
nginx_proxy
15.ansible role角色
编排工具--->清晰目录规划--->严格按照目录规划来
16.ansible galaxy
17.ansible tower
18.ansible部署集群架构
1.2 Ansible基本介绍
1.3 Ansible基础架构
1.4 Ansible配置文件
ansible配置文件存在优先级的问题
		ANSIBLE_CONFIG
		ansible.cfg 					项目目录
		.ansible.cfg					当前用户的家目录
		/etc/ansible/ansible.cfg


[root@manager ~]# cat /etc/ansible/ansible.cfg
#inventory      = /etc/ansible/hosts      #主机列表配置文件
#library        = /usr/share/my_modules/  #库文件存放目录
#remote_tmp     = ~/.ansible/tmp          #临时py文件存放在远程主机目录
#local_tmp      = ~/.ansible/tmp          #本机的临时执行目录
#forks          = 5                       #默认并发数
#sudo_user      = root                    #默认sudo用户
#ask_sudo_pass = True                     #每次执行是否询问sudo的ssh密码
#ask_pass      = True                     #每次执行是否询问ssh密码
#remote_port    = 22                      #远程主机端口
host_key_checking = False                 #跳过检查主机指纹
log_path = /var/log/ansible.log           #ansible日志


[privilege_escalation]   #如果是普通用户则需要配置提权
#become=True
#become_method=sudo
#become_user=root
#become_ask_pass=False
1.5 Ansible主机清单Inventory
1.ansible管理机下发公钥

# sshpass -p 1 ssh-copy-id -i ~/.ssh/id_rsa.pub root@172.16.1.8

# mkdir project1/

# vim hosts

[oldboy]
172.16.1.7
172.16.1.8
1.6 Ansible取消SSH认证
生产案例1、如果控制端和被控制端第一次通讯,需要确认指纹信息,如果机器特别多少的情况下怎么办?

将 Ansible 配置文件中的 host_key_checking = False 参数注释打开即可。
但要注意ansible.cfg文件的读取顺序。
1.7 Ansible常用模块-yum
命令 command(默认) shell模块 scripts
安装 yum
配置 copy file get_url
启动 service systemd
用户 user group
任务 cron
挂载 mount
防火墙 firewall selinux
ansible-doc yum


command  shell  本质上执行都是基础命令  (command不支持管道技术)
[root@m01 project1]# ansible oldboy -m command -a "ps aux|grep nginx"  -i hosts
[root@m01 project1]# ansible oldboy -m shell -a "ps aux|grep nginx"  -i hosts


1.yum模块	(安装present 卸载absent 升级latest  排除exclude 指定仓库enablerepo)

#示例一、安装当前最新的Apache软件,如果存在则更新

# ansible oldboy -m yum -a "name=httpd state=latest" -i hosts

#示例二、安装当前最新的Apache软件,通过epel仓库安装

# ansible oldboy -m yum -a "name=httpd state=latest enablerepo=epel" -i hosts

#示例三、通过公网URL安装rpm软件

# ansible oldboy -m yum -a "name=https://mirrors.aliyun.com/zabbix/zabbix/4.2/rhel/7/x86_64/zabbix-agent-4.2.3-2.el7.x86_64.rpm state=latest" -i hosts

#示例五、更新所有的软件包,但排除和kernel相关的

# ansible oldboy -m yum -a "name=* state=latest exclude=kernel*,foo*" -i hosts

#示例六、删除Apache软件

# ansible oldboy -m yum -a "name=httpd state=absent" -i hosts
1.8 Ansible常用模块-copy
-------copy
 scp /etc/httpd/conf/httpd.conf root@172.16.1.61:/root/project1/

src
dest
owner
group
mode
backup
content

#示例一、将本地的httpd.conf文件Listen端口修改为9999,然后推送到远端服务。

# ansible oldboy -m copy -a "src=./httpd.conf dest=/etc/httpd/conf/httpd.conf owner=root group=root mode=644" -i hosts

#示例二、将本地的httpd.conf文件Listen端口修改为9090,然后推送到远端,检查远端是否存在上一次的备份文件

# ansible oldboy -m copy -a "src=./httpd.conf dest=/etc/httpd/conf/httpd.conf owner=root group=root mode=644 backup=yes" -i hosts

#示例三、往远程的主机文件中写入内容

# ansible oldboy -m copy -a "content=HttpServer... dest=/var/www/html/index.html" -i hosts
1.9 Ansible常用模块-file-get-url
-------get_url
#示例一、下载互联网的软件至本地
url  ==> http  https  ftp

# ansible oldboy -m get_url -a "url=http://fj.xuliangwei.com/public/ip.txt dest=/var/www/html/" -i hosts

#示例二、下载互联网文件并进行md5校验(了解)

# ansible oldboy -m get_url -a "url=http://fj.xuliangwei.com/public/ip.txt dest=/var/www/html/ checksum=md5:7b86f423757551574a7499f0aae" -i hosts
-------file	创建目录  授权
path
state
	touch
	directory
recurse
owner group mode

#示例一、创建文件,并设定属主、属组、权限。

# ansible oldboy -m file -a "path=/var/www/html/tt.html state=touch owner=apache group=apache mode=644" -i hosts

#示例二、创建目录,并设定属主、属组、权限。

# ansible oldboy -m file -a "path=/var/www/html/dd state=directory owner=apache group=apache mode=755" -i hosts

#示例三、递归授权目录的方式。

# ansible oldboy -m file -a "path=/var/www/html/ owner=apache group=apache mode=755" -i hosts

# ansible oldboy -m file -a "path=/var/www/html/ owner=apache group=apache recurse=yes" -i hosts
1.10 Ansible常用模块-service
#示例一、启动Httpd服务
[root@ansible ~]# ansible oldboy -m service -a "name=httpd state=started"

#示例二、重载Httpd服务
[root@ansible ~]# ansible oldboy -m service -a "name=httpd state=reloaded"

#示例三、重启Httpd服务
[root@ansible ~]# ansible oldboy -m service -a "name=httpd state=restarted"

#示例四、停止Httpd服务
[root@ansible ~]# ansible oldboy -m service -a "name=httpd state=stopped"

#示例五、启动Httpd服务,并加入开机自启
[root@ansible ~]# ansible oldboy -m service -a "name=httpd state=started enabled=yes"


-----------------

	yum			安装
	copy		配置
	file		创建目录,或授权
	get_url		下载文件
	service		启动服务  重载服务

-----------------
1.11 Ansible常用模块-user-group
group
#示例一、创建news基本组,指定uid为9999

# ansible oldboy -m group -a "name=news gid=9999 state=present" -i hosts

#示例二、创建http系统组,指定uid为8888

# ansible oldboy -m group -a "name=http gid=8888 system=yes state=present" -i hosts

yes		true	真
no		false	假

#示例三、删除news基本组

# ansible oldboy -m group -a "name=news state=absent" -i hosts

-----------------

user
#示例一、创建joh用户,uid是1040,主要的组是adm

# ansible oldboy -m user -a "name=joh uid=1040 group=adm" -i hosts

#示例二、创建joh用户,登录shell是/sbin/nologin,追加bin、sys两个组

# ansible oldboy -m user -a "name=joh shell=/sbin/nologin groups=bin,sys" -i hosts

#示例三、创建jsm用户,为其添加123作为登录密码,并且创建家目录

# ansible localhost -m debug -a "msg={{ '123' | password_hash('sha512', 'salt') }}"

$6$salt$jkHSO0tOjmLW0S1NFlw5veSIDRAVsiQQMTrkOKy4xdCCLPNIsHhZkIRlzfzIvKyXeGdOfCBoW1wJZPLyQ9Qx/1

# ansible oldboy -m user -a 'name=jsm password=$6$salt$jkHSO0tOjmLW0S1NFlw5veSIDRAVsiQQMTrkOKy4xdCCLPNIsHhZkIRlzfzIvKyXeGdOfCBoW1wJZPLyQ9Qx/1 create_home=yes'

#示例四、移除joh用户

# ansible oldboy  -m user -a 'name=joh state=absent remove=yes' -i hosts

#示例五、创建http用户,并为该用户创建2048字节的私钥,存放在~/http/.ssh/id_rsa

# ansible oldboy  -m user -a 'name=http generate_ssh_key=yes ssh_key_bits=2048 ssh_key_file=.ssh/id_rsa' -i hosts


------------

	1.yum
	2.copy
	3.group user  file
	4.service

------------
1.12 Ansible常用模块-cron
cron
#示例一、添加定时任务。每分钟执行一次ls  * * * * * ls >/dev/null

# ansible oldboy -m cron -a "name=job1 job='ls >/dev/null'" -i hosts

#示例二、添加定时任务,    每天的凌晨2点和凌晨5点执行一次ls。"0 5,2 * * ls >/dev/null

# ansible oldboy -m cron -a "name=job2 minute=0 hour=5,2 job='ls >/dev/null'" -i hosts

#示例三、关闭定时任务,使定时任务失效

# ansible oldboy -m cron -a "name=job2 minute=0 hour=5,2 job='ls >/dev/null' disabled=yes" -i hosts
mount
present	将挂载信息写入/etc/fstab 			unmounted	卸载临时,不会清理/etc/fstab
mounted	先挂载,在将挂载信息/etc/fstab		absent		卸载临时,也会清理/etc/fstab

#环境准备:将172.16.1.61作为nfs服务端,172.16.1.7、172.16.1.8作为nfs客户端挂载

# ansible localhost -m yum -a 'name=nfs-utils state=present'

# ansible localhost -m file -a 'path=/ops state=directory'

# ansible localhost -m copy -a 'content="/ops 172.16.1.0/24(rw,sync)" dest=/etc/exports'

# ansible localhost -m service -a "name=nfs state=restarted"

#示例一、挂载nfs存储至本地的/opt目录,并实现开机自动挂载

# ansible oldboy -m mount -a "src=172.16.1.61:/ops path=/opt fstype=nfs opts=defaults state=mounted"

#示例三、永久卸载nfs的挂载,会清理/etc/fstab

# ansible webservers -m mount -a "src=172.16.1.61:/ops path=/opt fstype=nfs opts=defaults state=absent"
selinux

# ansible oldboy -m selinux -a "state=disabled"  -i hosts

firewalld

# ansible oldboy -m service -a "name=firewalld state=started" -i hosts

示例一 永久放行https的流量,只有重启才会生效

# ansible oldboy -m firewalld -a "zone=public service=https permanent=yes state=enabled" -i hosts

示例一 永久放行8081端口的流量,只有重启才会生效

# ansible oldboy -m firewalld -a "zone=public port=8080/tcp permanent=yes state=enabled" -i hosts

示例一 放行8080-8090的所有tcp端口流量,临时和永久都生效.

# ansible oldboy -m firewalld -a "zone=public port=8080-8090/tcp permanent=yes immediate=yes state=enabled" -i hosts


-----------------------------------

1.安装http服务						yum
2.编写简单网页测试内容				copy		(Name-OldboyEdu.com)
3.启动服务并加入开机自启			service
4.放行firewalld对应的端口			firewalld
1.13 AnsiblePlaybook基本介绍
playbook

	playbook  剧本

	play	(找谁)
	task	(干什么)

找一个人干多件事情		playbook   1个play  多个task
找多个人干多件事情		playbook   多个play  多个task

playbook是由yml语法书写,结构清晰,可读性强,所以必须掌握yml基础语法

语法	描述
缩进	YAML使用固定的缩进风格表示层级结构,每个缩进由两个空格组成, 不能使用tabs
冒号	以冒号结尾的除外,其他所有冒号后面所有必须有空格。
短横线	表示列表项,使用一个短横杠加一个空格。多个项使用同样的缩进级别作为同一列表。


playbook
	1.安装http服务						yum
	2.编写简单网页测试内容				copy		(Name-OldboyEdu.com)
	3.启动服务并加入开机自启			service
	4.放行firewalld对应的端口			firewalld

1.针对oldboy组   play
2.做什么任务	task
1.14 AnsiblePlaybook编写NFS服务
案例一、使用ansible安装并配置nfs服务
服务端: 10.0.0.7
1.安装nfs
2.配置nfs
3.根据配置创建目录,创建用户,授权
4.启动并加入开机自启
客户端: 10.0.0.8
1.准备一个空目录
2.挂载10.7 上共享的目录即可
[root@m01 project1]# cat nfs.yaml
- hosts: 172.16.1.7
tasks:
- name: Install NFS Server
yum: name=nfs-utils state=present
- name: Configure NFS Server
copy: src=./exports.j2 dest=/etc/exports backup=yes
- name: Create NFS Group
group: name=www gid=666
- name: Create NFS User
user: name=www uid=666 group=666 shell=/sbin/nologin create_home=no
- name: Create NFS Data
file: path=/data state=directory owner=www group=www recurse=yes
- name: Service NFS Server
service: name=nfs state=started enabled=yes
- hosts: 172.16.1.8
tasks:
- name: Client Create NFS Data
file: path=/nfs_tt state=directory
- name: Client Mount NFS Server
mount:
src: 172.16.1.7:/data
path: /nfs_tt
fstype: nfs
opts: defaults
state: mounted
1.15 AnsiblePlaybook编写Httpd服务
案例二、使用ansible安装并配置httpd服务
	安装
	配置
	启动  注意端口
	防火墙

[root@m01 project1]# cat http.yaml

- hosts: oldboy
  tasks:

    - name: Installed Httpd Server
      yum: name=httpd state=present

    - name: Configure Httpd Server
      copy: src=./httpd.conf.j2 dest=/etc/httpd/conf/httpd.conf backup=yes

    - name: Configure Httpd WebSite
      copy: src=./tt.j2 dest=/var/www/html/tt.html owner=http group=http mode=644

    - name: Service Httpd Server
      service: name=httpd state=started enabled=yes

    - name: Service Firewalld Server
      service: name=firewalld state=started

    - name: Configure Firewalld Server
      firewalld: zone=public port=9988/tcp permanent=yes immediate=yes state=enabled

案例三、ansible安装并配置httpd服务,根据不同的主机配置不同的网站。(多个play使用方式,但不是生产推荐(了解即可),生产推荐使用循环方式)

清空原来http软件

# ansible oldboy -m yum -a "name=httpd state=absent" -i hosts

oldboy:
	1.安装http
	2.配置http
		用户		-->存在?	ttt		gid uid  7788
		端口		-->7788
	3.启动http
	4.防火墙		--->放行7788

172.16.1.7:		web-7...
172.16.1.7:		web-8...

yaml
	play	什么play
	task	什么task
	1.缩进
	2.冒号
	3.横线
1.16 AnsiblePlaybook搭建Kodcloud
作业:
使用AnsiblePlaybook方式构建LAMP架构,具体操作步骤如下:
1.使用yum安装 httpd、php、php-mysql、mariadb、firewalld等
2.启动httpd、firewalld、mariadb等服务
3.添加防火墙规则,放行http的流量,并永久生效
4.使用get_url下载http://fj.xuliangwei.com/public/index.php文件
5.扩展: 可道云代码下载解压到指定目录
效果: 执行完playbook后,访问网站,就跳出网站安装向导
apache+php   模块		重启apache
nginx+php    代理		fastcgi协议
版本冲突
1.卸载php71w,如果是全新的环境,就不用.
yum list installed |grep php71w|awk '{print $1}'|xargs|sed -r 's#(.*)#yum remove -y \1#g'|bash

[root@m01 project1]# cat lamp.yml
#1.缩进
#2.冒号
#3.短横线

- hosts: 172.16.1.8   #play
  tasks:

#1.使用yum安装 httpd、php、firewalld等
    - name: Install Httpd PHP firewalld
      yum: name=httpd,php,php-pdo,php-mbstring,php-gd,firewalld state=present

#2.启动httpd、firewalld、服务
    - name: Service Httpd Server
      service: name=httpd state=started

    - name: Service Firewalld Server
      service: name=firewalld state=started

#3.添加防火墙规则,放行http的流量
    - name: Configure Firewalld
      firewalld: port=80/tcp immediate=yes state=enabled

#4.使用get_url下载http://fj.xuliangwei.com/public/index.php文件
    - name: Get Url index.php
      get_url:
        url: http://fj.xuliangwei.com/public/index.php
        dest: /var/www/html/tt.php

#5.扩展:  可道云代码下载解压到指定目录
    - name: Copy Kod Cloud Code
      unarchive: src=./kodexplorer4.40.zip dest=/var/www/html/ mode=0777

#6.变更权限为Httpd进程的运行用户,apache
    - name: Chown Directory
      file: path=/var/www/html owner=apache group=apache recurse=yes
第2章 Ansible-variables变量
2.1 Ansible变量基本介绍
--------------------------------------vars----------------------------------------
playbook--->变量-->内容摘要
1.为什么要使用变量
2.ansible怎么定义变量 怎么使用变量{{ 变量名称 }}
	1.通过playbook文件中的play进行定义
		通过vars来进行定义变量
		通过vars_files来进行定义变量
	2.通过inventory主机清单进行变量定义
		通过host_vars对主机进行定义
		通过group_vars对主机组进行定义
	3.通过执行playbook时使用-e参数指定变量
3.ansible变量优先级
4.ansible 变量注册
4.ansible facts变量
1.为什么要使用变量
	简化playbook项目的一个维护. 使用一个固定的字符串-->表示一个不固定的值...

2.ansible怎么定义变量 怎么使用变量
	1.通过playbook文件中的play进行定义,通过vars来进行定义变量
		注意: 和shell定义变量的方式不一样,shell:  version=1.12   yml语法: version: 1.12

	定义变量:
		vars:
		  - v1: value
		  - v2: value
		  - v3: value
	使用变量:
		{{ v1 }}
		固定写法{{}} 中间直接填写变量名称即可
2.2 Ansible定义变量-vars-vars_file
1.在playbook文件中的play使用变量
[root@m01 project1]# cat vars_1.yml

- hosts: oldboy
  vars:

    - web_packages: httpd-2.4.6
    - ftp_packages: vsftpd-3.0.2

  tasks:

    - name: Installed {{ web_packages }} {{ ftp_packages }}
      yum:
        name:
          - "{{ web_packages }}"
          - "{{ ftp_packages }}"
        state: present


2.通过定义一个变量文件,然后使用playbook进行调用
[root@m01 project1]# cat vars_public.yml
web_packages: httpd-2.4.6
ftp_packages: vsftpd-3.0.2

[root@m01 project1]# cat vars_1.yml

- hosts: oldboy
  vars_files: ./vars_public.yml

  tasks:

    - name: Installed {{ web_packages }} {{ ftp_packages }}
      yum:
        name:
         - "{{ web_packages }}"
           - "{{ ftp_packages }}"
             state: present
2.3 Ansible定义变量-inventory
2.通过inventory主机清单进行变量定义

在项目目录下创建两个变量的目录,host_vars group_vars


    #1)在当前的项目目录中创建两个变量的目录
    [root@ansible project1]# mkdir host_vars
    [root@ansible project1]# mkdir group_vars

    #2)在group_vars目录中创建一个文件,文件名与inventory清单中的组名称要保持完全一致。

    [root@ansible project1]# cat group_vars/oldboy
   	web_packages: wget
   	ftp_packages: tree

   	#3)编写playbook,只需在playbook文件中使用变量即可。
   	[root@ansible project1]# cat f4.yml

   	- hosts: oldboy
   	  tasks:
   	    - name: Install Rpm Packages "{{ web_packages }}" "{{ ftp_packages }}"
   	      yum:
   	        name:
   	          - "{{ web_packages }}"
   	          - "{{ ftp_packages }}"
   	        state: present


  注意: 默认情况下,group_vars目录中文件名与hosts清单中的组名保持一致.
  	比如在group_vars目录中创建了oldboy组的变量,其他组是无法使用oldboy组的变量
  	系统提供了一个特殊组,all,只需要在group_vars目录下建立一个all文件,编写好变量,所有组都可使用.


#---------------------hosts_vars----------------
#1)在host_vars目录中创建一个文件,文件名与inventory清单中的主机名称要保持完全一致
[root@ansible project1]# cat hosts
[oldboy]
172.16.1.7
172.16.1.8

#2)在host_vars目录中创建文件,给172.16.1.7主机定义变量
[root@ansible project1]# cat host_vars/172.16.1.7
web_packages: zlib-static
ftp_packages: zmap

#3)准备一个playbook文件调用host主机变量
[root@ansible project1]# cat f4.yml

- hosts: 172.16.1.7
  tasks:
    - name: Install Rpm Packages "{{ web_packages }}" "{{ ftp_packages }}"
      yum:
        name:
          - "{{ web_packages }}"
          - "{{ ftp_packages }}"
        state: present

- hosts: 172.16.1.8
  tasks:
    - name: Install Rpm Packages "{{ web_packages }}" "{{ ftp_packages }}"
      yum:
        name:
          - "{{ web_packages }}"
          - "{{ ftp_packages }}"
        state: present

host_vars 特殊的变量目录,针对单个主机进行变量.
group_vars 特殊的变量目录,针对inventory主机清单中的组进行变量定义. 对A组定义的变量 B组无法调用
group_vars/all 特殊的变量文件,可以针对所有的主机组定义变量.
2.4 Ansible定义变量-extra-vars
3.通过执行playbook时使用-e参数指定变量
[root@m01 project1]# cat vars_7.yml

- hosts: "{{ hosts }}"	#注意:这是一个变量名称
  tasks:
    - name: Install Rpm Packages "{{ web_packages }}" "{{ ftp_packages }}"
      yum:
        name:
          - "{{ web_packages }}"
          - "{{ ftp_packages }}"
        state: present
      [root@m01 project1]# #ansible-playbook -i hosts  vars_7.yml -e "hosts=oldboy"
2.5 Ansible变量优先级
4.ansible变量优先级
定义相同的变量不同的值,来测试变量的优先级。操作步骤如下
1)在plabook中定义vars变量
2)在playbook中定义vars_files变量
3)在host_vars中定义变量
4)在group_vars中定义变量
5)通过执行命令传递变量
[root@m01 project1]# cat vars_8.yml

- hosts: oldboy
  vars:
    file_name: play_vars
  vars_files: ./vars_public.yml
  tasks:

    - name: Create Variables {{ file_name }}
      file: path=/tmp/{{ file_name }} state=touch

[root@m01 project1]# vim vars_public.yml
[root@m01 project1]# vim host_vars/172.16.1.7
[root@m01 project1]# vim group_vars/oldboy
[root@m01 project1]# vim group_vars/all
变量的优先级
外置传参--->playbook(vars_files--->vars)--->inventory(host_vars-->group_vars/group_name--->group_vars-all)
2.6 Ansible变量注册register
5.ansible 变量注册 register debug
[root@m01 project1]# cat vars_9.yml

- hosts: oldboy

  tasks:

    - name: Installed Httpd Server
      yum: name=httpd state=present

    - name: Service Httpd Server
      service: name=httpd state=started

    - name: Check Httpd Server
      shell: ps aux|grep httpd
      register: check_httpd

    - name: OutPut Variables
      debug:
        msg: "{{ check_httpd.stdout_lines }}"
2.7 AnsibleFacts变量
6.ansible facts变量
用来采集被控端的状态指标,比如: IP地址 主机名称 cpu信息 内存 等等
默认情况的facts变量名都已经预先定义好了, 只需要采集被控端的信息,然后传递至facts变量即可.
2.8 AnsibleFacts安装不同Memcached配置文件
7.使用facts变量根据不同的内存生成不同Memcached配置文件
1)准备两台物理内存不一样的主机
172.16.1.7 1G		memcached 500MB
172.16.1.8 2G		memcached 1Gb


2)如何提取被控端的总内存大小
[root@m01 project1]# ansible 172.16.1.8 -m setup -a "filter=ansible_memtotal_mb" -i hosts
172.16.1.8 | SUCCESS => {
    "ansible_facts": {
        "ansible_memtotal_mb": 1996,
        "discovered_interpreter_python": "/usr/bin/python"
    },
    "changed": false
}

[root@m01 project1]# cat vars_12.yml

- hosts: oldboy
  tasks:
    - name: Installed Memcached Server
      yum: name=memcached state=present

    - name: Configure Memcached Server
      template: src=./memcached.j2 dest=/etc/sysconfig/memcached

    - name: Service Memcached Server
      service: name=memcached state=started enabled=yes

    - name: Check Memcached Server
      shell: ps aux|grep memcached
      register: check_mem

    - name: Debug Memcached Variables
      debug:
        msg: "{{ check_mem.stdout_lines }}"
------------------在写任何新的服务之前,请先手动测试一遍,提取安装的命令\配置文件路径\启动命令
[root@m01 project1]# yum install memcached -y
[root@m01 project1]# cat /etc/sysconfig/memcached
PORT="11211"
USER="memcached"
MAXCONN="1024"
CACHESIZE="64"
OPTIONS=""
[root@m01 project1]# systemctl start memcached
第3章 Ansible--tasks任务控制
下午: (请尽可能的使用变量来实现)
2.通过facts变量中的cpu核心数 渲染出不同主机的nginx配置文件 worker_processes
3.完成渲染zabbix的配置文件
4.完成渲染memcached的配置文件
1.端口\最大连接数 设定成变量
使用ansible playbook
https://www.xuliangwei.com/bgx/1253.html
3.1 作业实现Kodcloud
作业1.nginx+php 完成 kod云搭建
#nginx+php
#1.卸载php低版本
#2.安装nginx1.12   ---> epel
#3.安装php5.4      ---> base
#4.创建组和用户 www
#5.配置nginx -->nginx.conf  指定运行的用户身份www
#6.配置nginx.conf.d/kod.conf 虚拟主机
#7.根据虚拟主机的配置创建存放代码的目录
#8.拷贝kod云的代码.解压
#9.授权目录的权限
#7.配置php-fpm 管理php的用户身份
#8.配置php程序,php.ini 调整可道云上传的大小
#9.测试nginx 和php的配置文件是否正确,正确则启动


[root@m01 project1]# cat group_vars/all
#nginx php variables
web_user: www
nginx_conf: /etc/nginx/nginx.conf
nginx_virt: /etc/nginx/conf.d
nginx_code: /ansible_code
php_fpm_conf: /etc/php-fpm.d/www.conf
php_ini_conf: /etc/php.ini
php_ini_max_upload: 200M

[root@m01 project1]# cat nginx_php.yml
- hosts: oldboy
  #1.卸载php低版本
  #2.安装nginx1.12 php5.4
  tasks:
    - name: Installed Nginx
      yum: name=nginx,php,php-fpm,php-pdo,php-gd,php-mbstring state=present
      #4.创建组和用户 www
    - name: Create Group {{ web_user }}
      group: name={{ web_user }} gid=666 state=present

    - name: Create User {{ web_user }}
      user: name={{ web_user }} uid=666 group=666 shell=/sbin/nologin state=present

#5.配置nginx -->nginx.conf  指定运行的用户身份www
    - name: Configure Nginx {{ nginx_conf }}
      template: src=./nginx.conf.j2 dest={{ nginx_conf }} backup=yes

#6.配置nginx.conf.d/kod.conf 虚拟主机
    - name: Configure Virtual {{ nginx_virt }}
      template: src=./kod.conf.j2 dest={{ nginx_virt }}/kod.conf backup=yes

#7.根据虚拟主机的配置创建存放代码的目录
    - name: Create Kod {{ nginx_code }} Directory
      file: path={{ nginx_code }} state=directory

#8.拷贝kod云的代码.解压
    - name: Unzip Kod {{ nginx_code }} Directory
      unarchive: src=./backup/kodexplorer4.40.zip dest={{ nginx_code }}

#9.授权目录的权限
    - name: Chown Kod Data {{ web_user }}
      file: path={{ nginx_code }} owner={{ web_user }} group={{ web_user }} recurse=yes mode=0777

#7.配置php-fpm 管理php的用户身份
    - name: Configure PHP-FPM {{ php_fpm_conf }}
      template: src=./php_www.conf.j2 dest={{ php_fpm_conf }}

#8.配置php程序,php.ini 调整可道云上传的大小
    - name: Configure PHP Server {{ php_ini_conf }}
      template: src=./php.ini.j2 dest={{ php_ini_conf }}

#9.测试nginx 和php的配置文件是否正确,正确则启动
    - name: Service Nginx Server
      service: name=nginx state=started enabled=yes

    - name: Service PHP-FPM Server
      service: name=php-fpm state=started enabled=yes
作业5.如何批量修改服务器主机名称(hostname) 8-10位随机数 (面试题)
  #解法一、web_随机数的解法
  [root@m01 ~]# cat te.yaml

  - hosts: all
    tasks:

    - name: 打印facts变量的内容
      debug: msg={{ ansible_default_ipv4.address }}
    - name: 使用hostname模块将主机名修改为web_ip
      hostname: name=web_{{ ansible_default_ipv4.address }}


    #解法二、web_随机数的解法
    [root@m01 ~]# cat te_2.yaml

    - hosts: all
      tasks:
    - name: 定义一个随机数,设定为变量,然后后续调用
      shell: echo $((RANDOM%200))
      register: System_SJ

    - name: 使用debug输出变量结果,这样好知道需要提取的关键值
      debug: msg={{ System_SJ }}

    - name: 使用hostname模块将主机名修改为web_随机数
      hostname: name=web_{{ System_SJ.stdout }}


[root@m01 project1]# cat vars_14.yml

- hosts: oldboy
  tasks:

    - name: SHell
      shell: echo $RANDOM|md5sum |cut -c 5-10
      register: get_random

    - name: Get Facts
      debug:
        msg: "{{ ansible_date_time.epoch }}"

    - name: Hostname
      hostname: name={{ get_random.stdout }}_{{ ansible_date_time.epoch }}
task控制:
1.判断语句 when
根据主机名称来安装不同的yum仓库
根据主机的系统安装不同的软件包
2.循环语句 with_items: 列表 item
基本循环
字典循环 facts
3.handlers触发
notify 通知
handlers 执行
4.include
	include 				tasks
	include_tasks			tasks
	import_playbook			playbook

5. tags标签
		调试模式使用
	-t 指定
	--skip-tags: 跳过

6.忽略错误ignore_errors: yes

7.错误处理
	fource_handlers: yes  强制调用handlers(少)
	change_when: false    抑制changed状态
	change_when: (check_nginx.stdout.find('ok')
playbook Tasks任务控制:
3.2 Ansible判断语句when
1.条件判断 when
实践案例一、根据不同操作系统,安装相同的软件包
[root@m01 project1]# cat tasks_1.yml

- hosts: oldboy
  tasks:

    - name: Installed {{ ansible_distribution }} Httpd Server
      yum: name=httpd state=present
      when: ( ansible_distribution == "CentOS" )

    - name: Installed {{ ansible_distribution }} Httpd2 Server
      yum: name=httpd2 state=present
      when: ( ansible_distribution == "Ubuntu" )
实践案例二、为所有的web主机名添加nginx仓库,其余的都跳过添加
[root@m01 project1]# cat tasks_2.yml

- hosts: all
  tasks:
    - name: Create YUM Repo
      yum_repository:
        name: ansible_nginx
        description: ansible_test
        baseurl: https://mirrors.oldboy.com
        gpgcheck: no
        enabled: no
      when: ( ansible_fqdn is match ("web*"))

主机名称是web*或主机名称是lb*的则添加这个nginx源
[root@m01 project1]# cat tasks_2.yml

- hosts: all
  tasks:
    - name: Create YUM Repo
      yum_repository:
        name: ansible_nginx
        description: ansible_test
        baseurl: https://mirrors.oldboy.com
        gpgcheck: no
        enabled: no
      when: ( ansible_fqdn is match ("web*")) or
          ( ansible_fqdn is match ("lb*"))
实践案例三、根据命令执行的结果进行判断
[root@m01 project1]# cat tasks_3.yml

- hosts: all
  tasks:
        #检查httpd服务是否是活动的

    - name: Check Httpd Server
      command: systemctl is-active httpd
      ignore_errors: yes
      register: check_httpd

    #如果check_httpd变量中的rc结果等于0,则执行重启httpd,否则跳过

    - name: Httpd Restart
      service: name=httpd state=restarted
      when: check_httpd.rc == 0
3.3 Ansible循环语句with_items
2.循环语句 with_items
实践案例一、使用循环启动多个服务
[root@m01 project1]# cat tasks_4.yml

- hosts: webserver
  tasks:

    - name: Service Nginx Server
      service: name={{ item }} state=restarted
      with_items:
        - nginx
        - php-fpm
实践案例二、定义变量方式循环安装软件包
[root@m01 playbook]# cat loop-service-v2.yml

- hosts: web
  tasks:
    - name: Installed Httpd Mariadb Package
      yum: name={{ pack }} state=latest
      vars:
       pack:
         - httpd
         - mariadb-server

[root@m01 project1]# cat tasks_5.yml

- hosts: webserver
  tasks:
    - name: Installed Httpd Mariadb Package
      yum: name={{ pack }} state=latest
      vars:
       pack:
         - httpd
         - mariadb-server
实践案例三、使用变量字典循环方式批量创建用户
[root@m01 project1]# cat tasks_6.yml

- hosts: webserver
  tasks:
     - name: Create User
       user: name={{ item.name }} groups={{ item.groups }} state=present
       with_items:
         - { name: 'www', groups: 'bin'}
         - { name: 'test', groups: 'root'}
#实践案例三、使用变量字典循环方式批量拷贝文件
	#rsync:    /etc/rsyncd.conf  644  /etc/rsync.pass    600

[root@m01 project1]# cat tasks_7.yml

- hosts: webserver
  tasks:

    - name: Configure Rsyncd Server
      copy: src={{ item.src }} dest={{ item.dest }} mode={{ item.mode }}
      with_items:

        - { src: './rsyncd.conf.j2', dest: '/tmp/rsyncd.conf', mode: '0644' }
        - { src: './rsync.pass.j2', dest: '/tmp/rsync.pass', mode: '0600' }


  #高级写法!!

    - name: Configure PHP-FPM {{ php_fpm_conf }}
      template: src={{ item.src }} dest={{ item.dest }}
      with_items:
        - { src: './docs1/php_www.conf.j2', dest: '{{ php_fpm_conf }}' }
        - { src: './docs1/php.ini.j2', dest: '{{ php_ini_conf }}' }
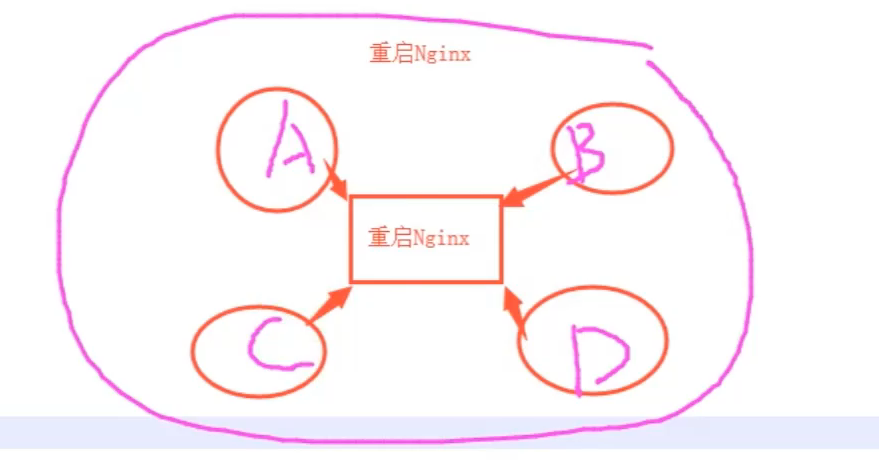
3.4 Ansible触发器handlers
3.handlers 触发器 notify监控 --->通知 ---> Handlers触发
1.安装nginx服务playbook
要求能够实现配置变更,服务自动重载 (万一配置修改错误.怎么办?)
[root@m01 ~]# cat webserver.yml

- hosts: webserver

#1.定义变量,在配置文件中调用
  vars:
    http_port: 8881

#2.安装httpd服务
  tasks:
    - name: Install Httpd Server
      yum: name=httpd state=present

#3.使用template模板,引用上面vars定义的变量至配置文件中
    - name: Configure Httpd Server
      template: src=./httpd.conf dest=/etc/httpd/conf/httpd.conf
      notify:   #调用名称为Restart Httpd Server的handlers(可以写多个)
        - Restart Httpd Server

#4.启动Httpd服务
    - name: Start Httpd Server
      service: name=httpd state=started enabled=yes
      notify:   #调用名称为Restart Httpd Server的handlers(可以写多个)
        - Restart Httpd Server
        - Restart Httpd Server1

#5.如果配置文件发生变化会调用该handlers下面的对应名称的task
  handlers:
    - name: Restart Httpd Server
      service: name=httpd state=restarted

    - name: Restart Httpd Server1
      service: name=httpd state=restarted
3.handlers注意事项
1.无论多少个task通知了相同的handlers,handlers仅会在所有tasks结束后运行一次。
2.只有task发生改变了才会通知handlers,没有改变则不会触发handlers
3.不能使用handlers替代tasks、因为handlers是一个特殊的tasks。
3.5 Ansible标签tags
4.tags标签 根据指定的标签执行 调试
1.对一个tasks指定一个tags标签
2.对一个tasks指定多个tags标签
3.多个tasks任务指定一个tags标签
nginx
installed
- tags: 1
configure
- tags: 1
service
- tags: 1
apache
installed
- tags: 4
configure
- tags: 4
service
- tags: 4
指定执行某个tags标签
[root@m01 docs1]# ansible-playbook -i hosts nginx_php.yml -t "test_user"

忽略执行某个tags标签
[root@m01 docs1]# ansible-playbook -i hosts nginx_php.yml --skip-tags "test_user"


[root@m01 project1]# cat tasks_8.yml

- hosts: webserver
  tasks:
    - name: Install Nfs Server
      yum: name=nfs-utils state=present
      tags: install_nfs

    - name: Service Nfs Server
      service: name=nfs-server state=started enabled=yes
      tags: start_nfs-server
3.6 Ansible包含Include
5.include包含
1)编写restart_httpd.yml文件
[root@ansible project1]# cat restart_httpd.yml	#注意这是一个tasks所有没有play的任何信息

- name: Restart Httpd Server
  service: name=httpd state=restarted


2)A Project的playbook如下
[root@ansible project1]# cat a_project.yml

- hosts: webserver
  tasks:
    - name: A Project command
      command: echo "A"

    - name: Restart httpd
      include: restart_httpd.yml

3)B Project的playbook如下
[root@ansible project1]# cat b_project.yml

- hosts: webserver
  tasks:

    - name: B Project command
      command: echo "B"

    - name: Restart httpd
      include_tasks: restart_httpd.yml
导入一个完整的playbook文件   (play  task)
[root@m01 project1]# cat tasks_total.yml

- import_playbook: ./tasks_1.yml
- import_playbook: ./tasks_2.yml
3.7 Ansible忽略错误ignore_errors
6.错误忽略ignore_errors
[root@m01 project1]# cat tasks_9.yml

- hosts: webserver
  tasks:
     - name: Command
       command: /bin/false
       ignore_errors: yes	#上一任务执行成功才会执行下一个任务

     - name: Create File
       file: path=/tmp/tttt state=touch
3.8 Ansible错误处理changed_when
7.错误处理changed_when
1.强制调用handlers
[root@m01 project1]# cat tasks_10.yml

- hosts: webserver
  force_handlers: yes #强制调用handlers

  tasks:

    - name: Touch File
      file: path=/tmp/bgx_handlers state=touch
      notify: Restart Httpd Server

    - name: Installed Packages
      yum: name=sb state=latest

  handlers:

    - name: Restart Httpd Server
      service: name=httpd state=restarted


2.关闭changed的状态(确定该tasks不会对被控端做任何的修改和变更.)
[root@m01 project1]# cat tasks_11.yml

- hosts: webserver
  tasks:
    - name: Installed Httpd Server
      yum: name=httpd state=present

    - name: Service Httpd Server
      service: name=httpd state=started

    - name: Check Httpd Server
      shell: ps aux|grep httpd
      register: check_httpd
      changed_when: false

    - name: OutPut Variables
      debug:
        msg: "{{ check_httpd.stdout_lines }}"


案例三、使用changed_when检查tasks任务返回的结果
[root@m01 project1]# cat tasks_12.yml

- hosts: webserver
  tasks:

    - name: Installed Nginx Server
      yum: name=nginx state=present

    - name: Configure Nginx Server
      copy: src=./nginx.conf.j2 dest=/etc/nginx/nginx.conf
      notify: Restart Nginx Server

    - name: Check Nginx Configure Status
      command: /usr/sbin/nginx -t
      register: check_nginx
      changed_when:
       - ( check_nginx.stdout.find('successful'))
       - false

    - name: Service Nginx Server
      service: name=nginx state=started


  handlers:
    - name: Restart Nginx Server
      service: name=nginx state=restarted
nginx +php : kod # 一定要实现自动化配置文件,注意有些不重要的内容,不要打印changd状态
问题: lnmp.yml 如何实现变更配置端口8080,执行playbook后,所有被控端主机马上变更. handlers:
问题: 测试希望仅执行某个特定的tasks任务时,怎么办? tags
问题: 检测nginx php的语法,正常则启动或重启,不正常则忽略. (changed_when var.stdout.find(''))
---------------先写思路:
[root@m01 project1]# cat lnmp.yml
- hosts: webserver
tasks:
- name: Installed Nginx PHP-FPM Server
yum: name={{ packages }} state=present
vars:
packages:
- nginx
- php
- php-fpm
- php-cli
- php-pdo
- php-mbstring
- php-gd
- name: Create Nginx Group {{ web_user }}
group: name={{ web_user }} gid=666 state=present
- name: Create Nginx User {{ web_user }}
user: name={{ web_user }} uid=666 group={{ web_user }} state=present
- name: Create Kod {{ kod_server_path }} Directory
file: path={{ kod_server_path }} state=directory
- name: Unzip Kod {{ kod_server_path }} Directory
unarchive: src=./playbook/kodexplorer4.40.zip dest={{ kod_server_path }}
- name: Chown Kod Data {{ web_user }}
file: path={{ kod_server_path }} owner={{ web_user }} group={{ web_user }} recurse=yes mode=0777
- name: Configure Nginx Server
template: src={{ item.src }} dest={{ item.dest }} backup=yes
with_items:
- {src: './nginx.conf.j2',dest: '/etc/nginx/nginx.conf'}
- {src: './kod.conf.j2',dest: '/etc/nginx/conf.d/kod.conf'}
notify: Restart Nginx Server
- name: Check Nginx Server
shell: /usr/sbin/nginx -t
register: check_nginx
changed_when:
- ( check_nginx.stdout.find('successful'))
- false
- name: Configure PHP-FPM Server
template: src={{ item.src }} dest={{ item.dest }} backup=yes
with_items:
- {src: './php.ini.j2',dest: '/etc/php.ini'}
- {src: './php_www.conf.j2',dest: '/etc/php-fpm.d/www.conf'}
notify: Restart PHP-FPM Server
- name: Check PHP-FPM Server
shell: /usr/sbin/php-fpm -t
register: check_phpfpm
changed_when:
- ( check_phpfpm.stdout.find('successful'))
- false
- name: Start Nginx PHP Server
service: name={{ item }} state=started enabled=yes
with_items:
- nginx
- php-fpm
handlers:
- name: Restart Nginx Server
service: name=nginx state=restarted
- name: Restart PHP-FPM Server
service: name=php-fpm state=restarted
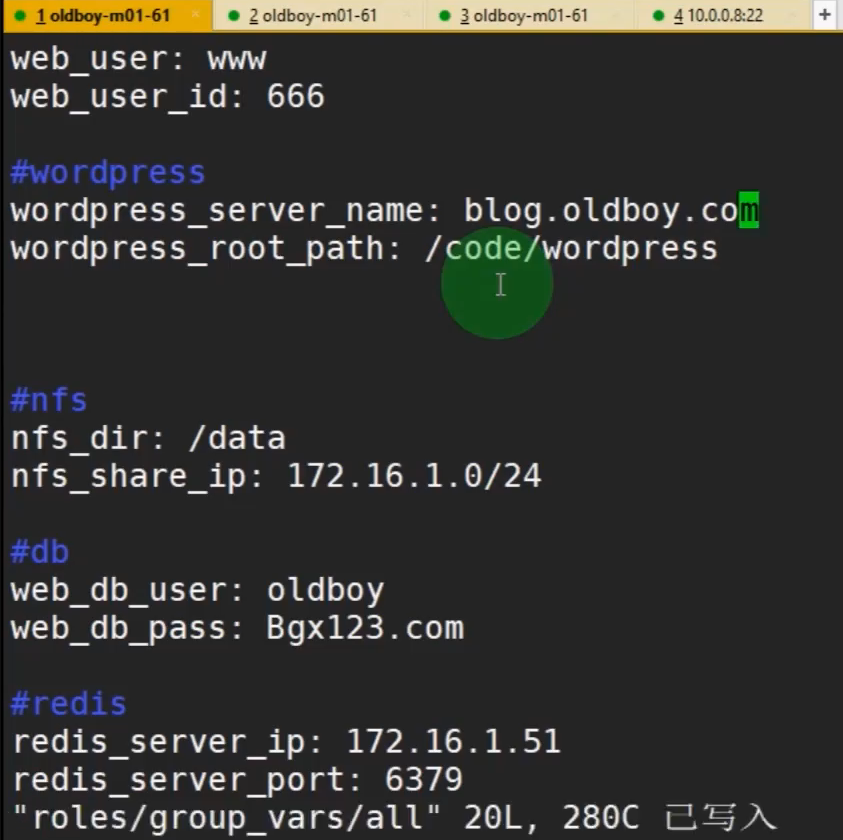
[root@m01 project1]# cat group_vars/all
#nginx php variables
web_user: www
nginx_conf: /etc/nginx/nginx.conf
nginx_virt: /etc/nginx/conf.d
nginx_code: /ansible_code
server_port: 80
kod_server_name: kod.oldboy.com
kod_server_path: /nginx_code
###
php_fpm_conf: /etc/php-fpm.d/www.conf
php_ini_conf: /etc/php.ini
php_ini_max_upload: 200M
第4章 Ansible-jinja-roles
4.1 Ansible Jinja基本介绍
jinja2 了解项
1.jinja2
2.ansible与jinja关系
3.jinja2循环 判断语句
{% if EXPR %}...{% elif EXPR %}...{% endif%} 作为条件判断

--------------------------------------判断语句
{% if ansible_fqdn == "web01" %}
	echo "123"
{% elif ansible_fqdn == "web02" %}
	echo "456"
{% else %}
	echo "789"
{% endif %}

--------------------------------------循环语句
{% for i in EXPR %}...{% endfor%} 作为循环表达式
{% for i in range(1,10) %}
     server 172.16.1.{{i}};
{% endfor %}

{# COMMENT #} 表示注释
[root@m01 project1]# cat jinja_1.yml

- hosts: webserver
  tasks:
    - name: Copy Template File /etc/motd
      template: src=./motd.j2 dest=/etc/motd


[root@m01 project1]# cat motd.j2
Welcome to Alibaba Cloud Elastic Compute Service !

This System Hostname: {{ ansible_hostname }}
This System total Memory is: {{ ansible_memtotal_mb }} MB
This System free Memory is: {{ ansible_memfree_mb }} MB
4.2 AnsibleJinja渲染NginxProxy配置
4.jinja2 渲染 nginx_proxy配置文件 keepalived配置文件
[root@m01 project1]# cat jinja_2.yml

- hosts: lbserver
  vars:
    - http_port: 80
    - server_name: kod.oldboy.com

  tasks:
    - name: Installed Nginx Server
      yum: name=nginx state=present

    - name: Configure Nginx Virt
      template: src=./kod_proxy.conf.j2 dest=/etc/nginx/conf.d/proxy_kod.oldboy.com.conf
      notify: Restart Nginx Server

    - name: Started Nginx Server
      service: name=nginx state=started enabled=yes

  handlers:

    - name: Restart Nginx Server
      service: name=nginx state=restarted
[root@m01 project1]# cat kod_proxy.conf.j2
      upstream {{ server_name }} {
      {% for i in range(1,10) %}
      server 172.16.1.{{i}}:{{http_port}} weight=2;
      {% endfor %}
      }

server {
	listen {{ http_port }};
	server_name {{ server_name }};
	location / {
		proxy_pass http://{{ server_name }};
		include proxy_params;
	}
}


# jinja循环高级用法
#循环inventory主机清单中的webserver组,将提取到的IP赋值给i变量.
upstream {{ server_name }} {
{% for i in groups['webserver'] %}
    server {{i}}:{{http_port}} weight=2;
{% endfor %}

官方
{% for host in groups['app_servers'] %}

   # something that applies to all app servers.

{% endfor %}

https://docs.ansible.com/ansible/latest/user_guide/playbooks_variables.html
4.3 AnsibleJinja渲染Keepalived配置
1.Inventory中的host_vars根据不同主机设定不同的变量。
[root@m01 project1]# cat host_vars/172.16.1.5
state: MASTER
prioroty: 150
[root@m01 project1]# cat host_vars/172.16.1.6
state: BACKUP
prioroty: 100


2. 准备keeplaived配置文件


   [root@m01 project1]# cat keepalived.conf.j2
      global_defs {
       router_id {{ ansible_fqdn }}
      }

   vrrp_instance VI_1 {
       state {{ state }}
       priority {{ prioroty }}
       interface eth0
       virtual_router_id 50
       advert_int 1
       authentication {
           auth_type PASS
           auth_pass 1111
   }
       virtual_ipaddress {
           10.0.0.3
       }
   }


3. 使用playbook分发配置文件

   [root@m01 project1]# cat jinja_3.yml

   - hosts: lbserver
     tasks:
       - name: Copy Keepalived
         template: src=./keepalived.conf.j2 dest=/tmp/keepalived.conf
2.在playbook中是when判断主机名称,然后分发不同的配置文件
  [root@m01 project1]# cat jinja_4.yml
  - hosts: lbserver
    tasks:
      - name: Copy Keepalived  Master
        template: src=./keepalived-master.conf dest=/tmp/keepalived.conf
        when: ( ansible_fqdn == "lb01" )


      - name: Copy Keepalived  Slave
        template: src=./keepalived-slave.conf dest=/tmp/keepalived.conf
        when: ( ansible_fqdn == "lb02" )
3.使用jinja2方式渲染出不同的配置文件
--------------------jinja实现keepalived
[root@m01 project1]# cat keepalived.conf.j2
global_defs {
    router_id {{ ansible_fqdn }}
}

vrrp_instance VI_1 {
{% if ansible_fqdn == "lb01" %}
    state MASTER
    priority 150

{% elif ansible_fqdn == "lb02" %}
    state BACKUP
    priority 100
{% endif %}
###------------------相同点
    interface eth0
    virtual_router_id 50
    advert_int 1
    authentication {
        auth_type PASS
        auth_pass 1111
}
    virtual_ipaddress {
        10.0.0.3
    }
}
------------------------------判断变量是否有值

- hosts: webservers
  gather_facts: no
  vars:
    PORT: 13306
  tasks:
    - name: Copy MySQL Configure
      template: src=./my.cnf.j2 dest=/tmp/my.cnf

---------------------------------------------

[root@m01 project1]# cat my.cnf.j2
{% if PORT %}
bind-address=0.0.0.0:{{ PORT }}
{% else %}
bind-address=0.0.0.0:3306
{% endif %}
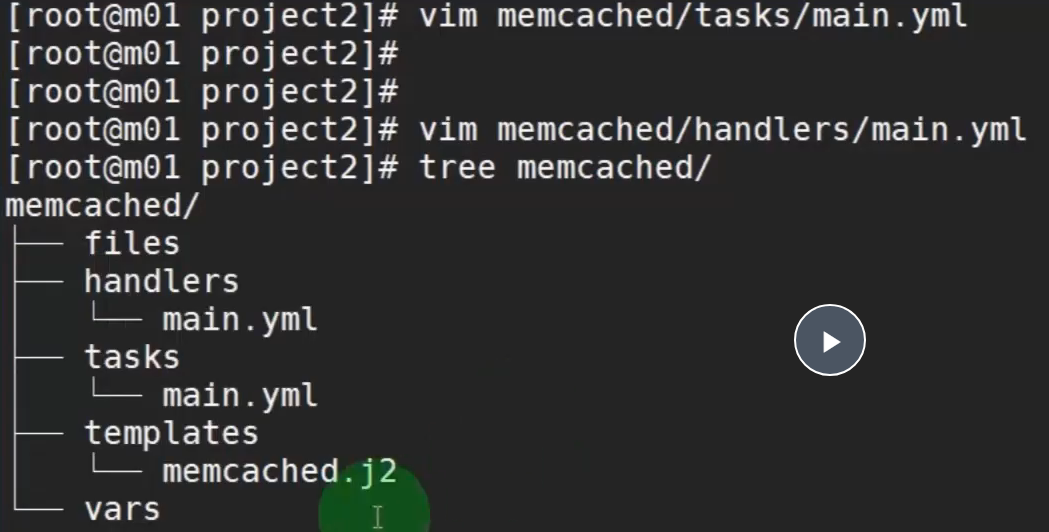
4.4 AnsibleRoles基本介绍
roles
Roles基于一个已知的文件结构 tasks handlers templates .....
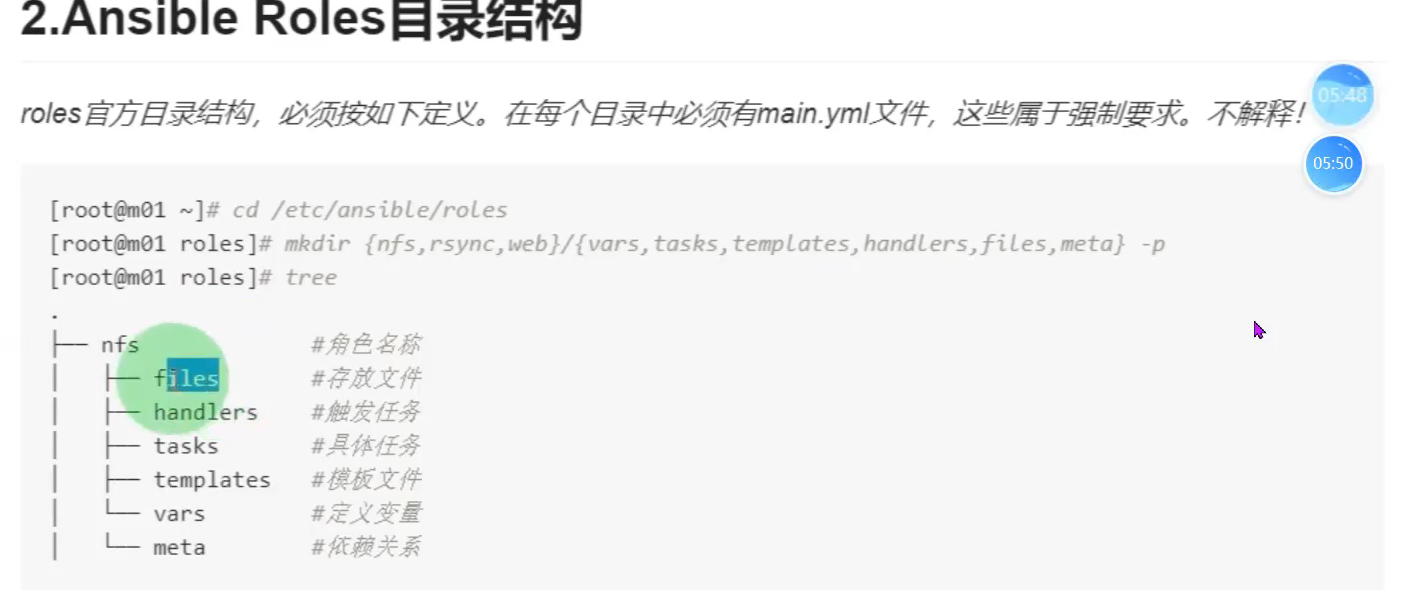
Roles小技巧:
1.创建roles目录结构,手动或使用ansible-galaxy init test roles
2.编写roles的功能,也就是tasks。
3.最后playbook引用roles编写好的tasks。
方法一:ansibile-galaxy init test roles
方法二:
[root@m01 project2]# mkdir memcached/{tasks,handlers,templates,vars,files} -pv
mkdir: 已创建目录 "memcached"
mkdir: 已创建目录 "memcached/tasks"
mkdir: 已创建目录 "memcached/handlers"
mkdir: 已创建目录 "memcached/templates"
mkdir: 已创建目录 "memcached/vars"
mkdir: 已创建目录 "memcached/files"
4.5 AnsibleRoles编写Nginx+PHP
作业:
1.使用roles编写nginx负载均衡的配置文件(jinja) + keepalived高可用(jinja2)
2.使用roles编写nginx+php实现kod正常运行
3.解析kod.oldboy.com 10.0.0.3 能正常打开可道云
4.测试keeplaived高可用
4.6 AnsibleGalaxy
galaxy官网:https://galaxy.ansible.com/ui/
默认路径:/root/.ansible/roles

第5章 Ansible-roles
5.1 Ansible项目实战-项目介绍与基础环境
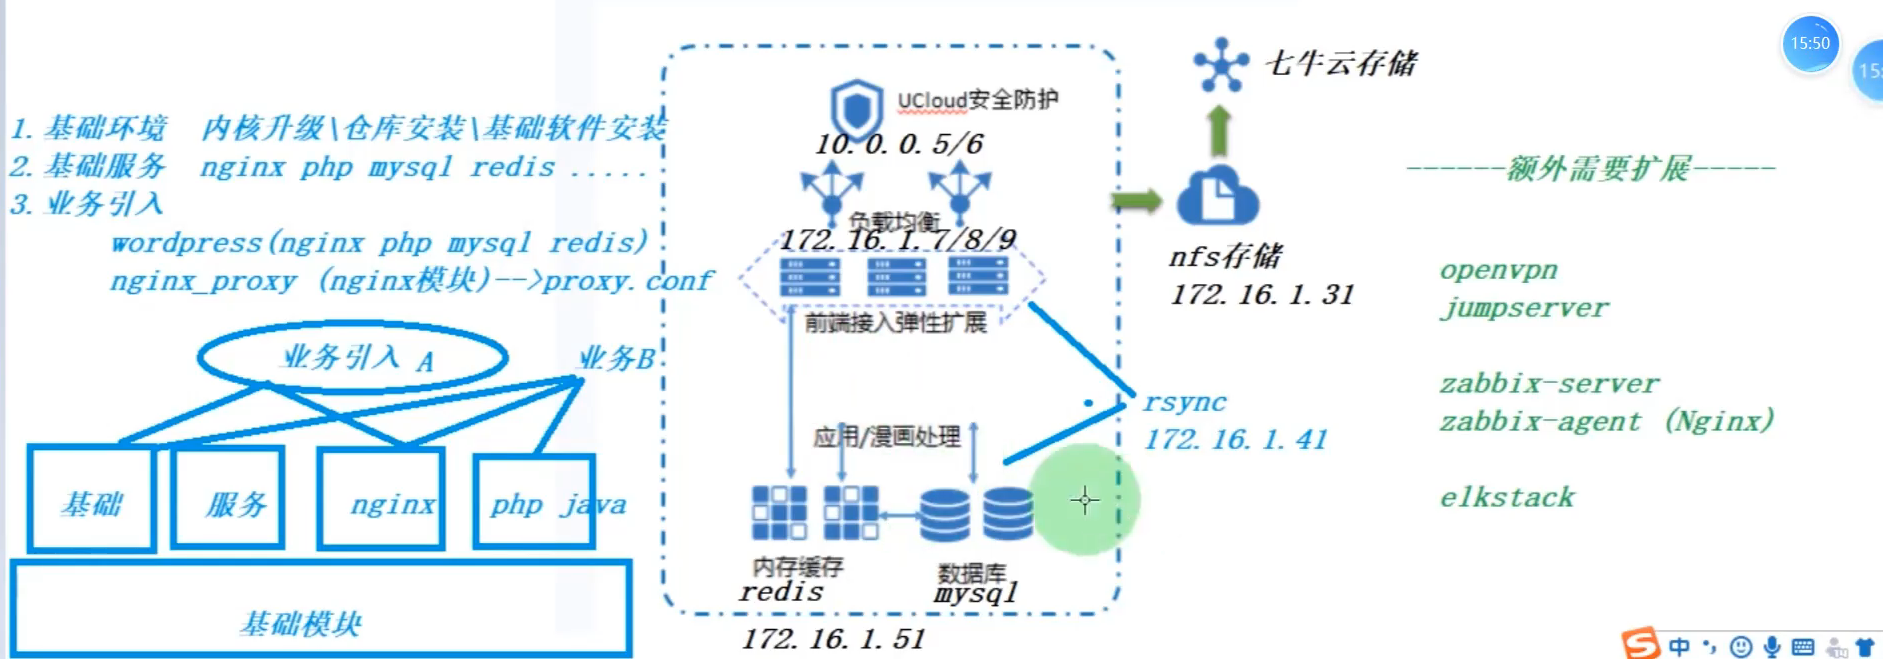
1.基础环境:
1) 关闭防火墙 Firewalld Selinux

2) 创建统一用户www,uid为666 gid为666

3) 添加base epel仓库

4) 负载均衡特定主机需要添加特定的仓库源   nginx php mysql zabbix elk .....

5) 安装基础软件包  rsync nfs-utils net-tools lrzsz wget unzip vim tree.....

6) 内核升级\内核参数调整\文件描述符调整
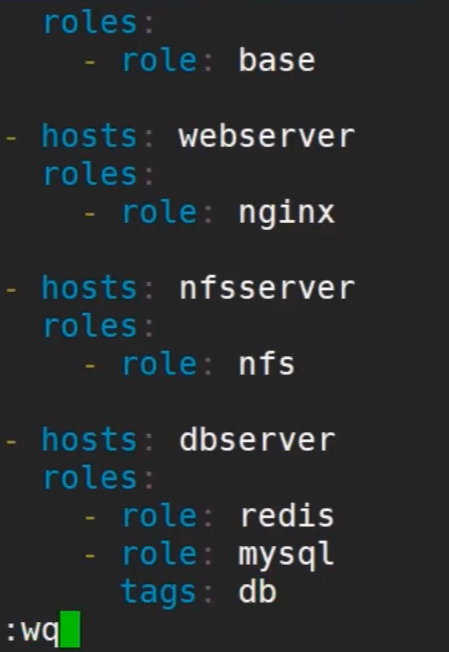
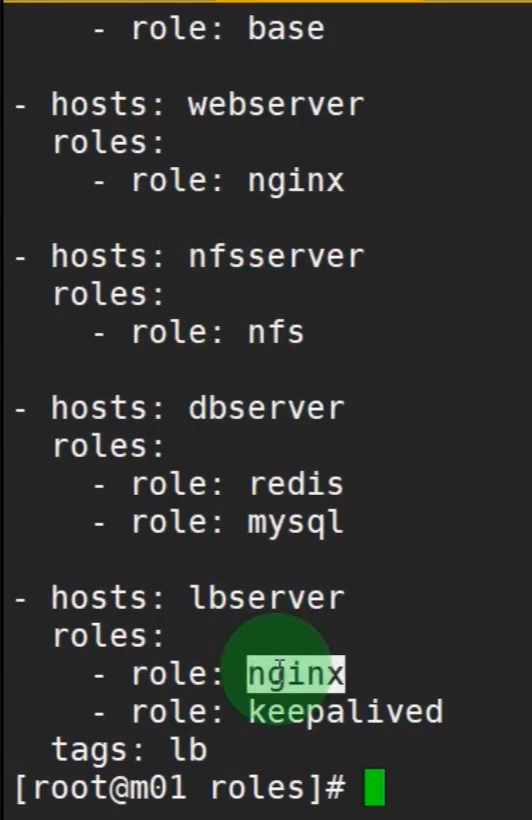
[root@m01 roles]# cat hosts
[lbserver]
172.16.1.5
172.16.1.6
[webserver]
172.16.1.7
172.16.1.8
[nfsserver]
172.16.1.31
[dbserver]
172.16.1.51
[root@m01 roles]# mkdir base/{tasks,handlers,templates,vars,files} -p
base/tasks/main.yml
- name: Disabled Firewalld Server
service: name=firewalld state=stopped enabled=no
- name: Disabled Selinux Server
selinux: state=disabled
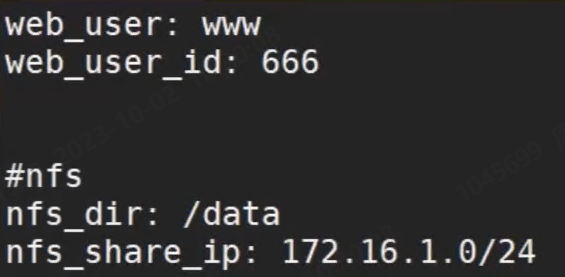
- name: Create Web {{ web_user }} {{ web_user_id }} Group
group: name={{ web_user }} gid={{ web_user_id|int }}
- name: Create Web {{ web_user }} {{ web_user_id }} User
user: name={{ web_user }} uid={{ web_user_id|int }} group={{ web_user }}
- name: Add Base Yum Repository
yum_repository:
name: base
description: Base Aliyun Repository
baseurl: http://mirrors.aliyun.com/centos/$releasever/os/$basearch/
gpgcheck: yes
gpgkey: http://mirrors.aliyun.com/centos/RPM-GPG-KEY-CentOS-7
- name: Add Epel Yum Repository
yum_repository:
name: epel
description: Epel Aliyun Repository
baseurl: http://mirrors.aliyun.com/epel/7/$basearch
gpgcheck: no
- name: Add Nginx Yum Repository
yum_repository:
name: nginx
description: Nginx Repository
baseurl: http://nginx.org/packages/centos/7/$basearch/
gpgcheck: no
when: ( ansible_hostname is match('web*')) or
( ansible_hostname is match ('lb*'))
- name: Add PHP Yum Repository
yum_repository:
name: php71w
description: php Repository
baseurl: http://us-east.repo.webtatic.com/yum/el7/x86_64/
gpgcheck: no
when: ( ansible_hostname is match('web*'))
- name: Installed Packages All
yum: name={{ packages }} state=present
vars:
packages:
- rsync
- nfs-utils
- net-tools
- wget
- tree
- lrzsz
- vim
- unzip
- httpd-tools
- bash-completion
- iftop
- iotop
- glances
- name: Change Limit /etc/security/limit.conf
pam_limits:
domain: "*"
limit_type: "{{ item.limit_type }}"
limit_item: "{{ item.limit_item }}"
value: "{{ item.value }}"
with_items:
- { limit_type: 'soft', limit_item: 'nofile',value: '100000' }
- { limit_type: 'hard', limit_item: 'nofile',value: '100000' }
base/tasks/site.yml
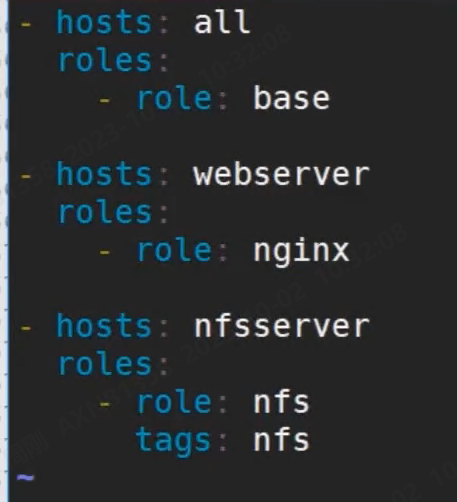
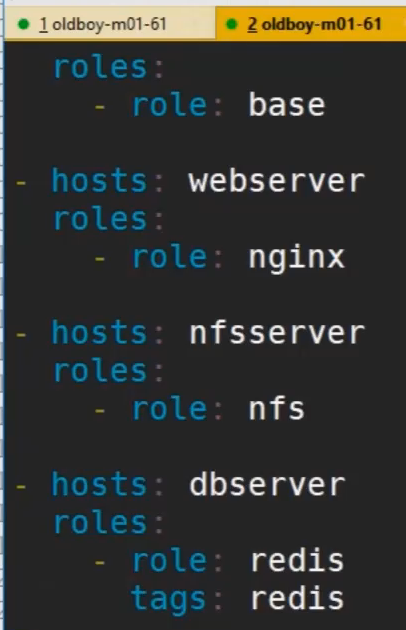
- hosts: all
roles:
- role: base
最后执行命令:ansible-playbook -i hosts site.yml
5.2 Ansible项目实战-编写Nginx服务模块
Nginx 基础模块
-------------------------------------------------------------------------------

[root@m01 roles]# mkdir nginx/{tasks,handlers,templates} -p

#基础任务
[root@m01 opt]# cat roles/nginx/tasks/main.yml

- name: Installed Nginx Server
  yum: name=nginx state=present

- name: Configure Nginx Server
  template: src=nginx.conf.j2 dest=/etc/nginx/nginx.conf
  notify: Restart Nginx Server

- name: Started Nginx Server
  service: name=nginx state=started

#触发器
[root@m01 opt]# cat roles/nginx/handlers/main.yml

- name: Restart Nginx Server
  service: name=nginx state=restarted

#nginx的模板配置文件
[root@m01 opt]# cat roles/nginx/templates/nginx.conf.j2
user  {{ web_user }};
error_log  /var/log/nginx/error.log warn;
pid        /var/run/nginx.pid;

worker_processes  {{ ansible_processor_cores }};

events {
    worker_connections  {{ ansible_processor_cores * 2048 }};
}

http {
    include       /etc/nginx/mime.types;
    default_type  application/octet-stream;
    client_max_body_size 64m;
    log_format  main  '$remote_addr - $remote_user [$time_local] "$request" '
                       '$status $body_bytes_sent "$http_referer" '
                       '"$http_user_agent" "$http_x_forwarded_for"';

    access_log  /var/log/nginx/access.log main;
    sendfile        on;
    tcp_nopush      on;
    tcp_nodelay     on;

    keepalive_timeout  65;
    keepalive_requests 100;

    server_tokens on;
    gzip on;
    include /etc/nginx/conf.d/*.conf;

}
5.3 Ansible项目实战-编写NFS服务模块
NFS 基础模块
-------------------------------------------------------------------------------

[root@m01 roles]# mkdir nfs/{tasks,handlers,templates} -p

#基础任务
[root@m01 opt]# cat roles/nfs/tasks/main.yml

- name: Install NFS Server
  yum: name=nfs-utils state=present

- name: Configure NFS Server
  template: src=exports.j2 dest=/etc/exports
  notify: Restart NFS Server

- name: Create NFS Server Share Directory
  file: path={{ nfs_dir }} state=directory owner={{ web_user }} group={{ web_user }}

- name: Started NFS Server
  service: name=nfs state=started enabled=yes

#触发器
[root@m01 opt]# cat roles/nfs/handlers/main.yml

- name: Restart NFS Server
  service: name=nfs state=restarted

#模板配置文件
[root@m01 opt]# cat roles/nfs/templates/exports.j2
{{ nfs_dir }} {{ nfs_share_ip }}(rw,sync,all_squash,anonuid={{ web_user_id }},anongid={{ web_user_id }})
5.4 Ansible项目实战-编写Redis服务模块
Redis 基础模块
-------------------------------------------------------------------------------

[root@m01 roles]# mkdir redis/{tasks,handlers,templates} -p

基础任务
[root@m01 opt]# cat roles/redis/tasks/main.yml

- name: Install Redis Server
  yum: name=redis state=present

- name: Configure Redis Server
  template: src=redis.conf.j2 dest=/etc/redis.conf
  notify: Restart Redis Server

- name: Started Redis Server
  service: name=redis state=started enabled=yes

触发器
[root@m01 opt]# cat roles/redis/handlers/main.yml

- name: Restart Redis Server
  service: name=redis state=restarted

redis模板配置文件(注意修改bind,其他略)
[root@m01 opt]# cat roles/redis/templates/redis.conf.j2
bind 127.0.0.1 {{ ansible_eth1.ipv4.address }}
5.5 Ansible项目实战-编写MySQL服务模块
MySQL 基础模块
-------------------------------------------------------------------------------

[root@m01 roles]# mkdir mysql/{tasks,handlers,templates} -p
mysql_db                                               Add or remove MySQL databases fr...
mysql_user                                             Adds or removes a user from a My..


基础任务
[root@m01 opt]# cat roles/mysql/tasks/main.yml

- name: Install Mriadb Server
  yum: name={{ packages }} state=present
  vars:
    packages:
      - mariadb
      - mariadb-server
      - MySQL-python	# 不装会报错


- name: Configure Mariadb Server
  template: src=my.cnf.j2 dest=/etc/my.cnf backup=yes
  notify: Restart Mariadb Server

- name: Started Mariadb Server
  service: name=mariadb state=started enabled=yes

- name: Create Application Database
  mysql_db: name={{ item }} state=present
  with_items:
    - wordpress
    - zh
    - phpmyadmin
    - zabbix
    - jpress

- name: Create Web Remote Application DB User
  mysql_user:
    name: "{{ web_db_user }}"
    password: "{{ web_db_pass }}"
    priv: '*.*:ALL'
    host: '%'
    state: present


触发器
[root@m01 opt]# cat roles/mysql/handlers/main.yml

- name: Restart Mariadb Server
  service: name=mariadb state=restarted

模板配置文件mysql
[root@m01 opt]# cat roles/mysql/templates/my.cnf.j2 r
[mysqld]
datadir=/var/lib/mysql
socket=/var/lib/mysql/mysql.sock
symbolic-links=0

[mysqld_safe]
log-error=/var/log/mariadb/mariadb.log
pid-file=/var/run/mariadb/mariadb.pid

!includedir /etc/my.cnf.d

5.6 Ansible项目实战-编写Keepalived服务模块
Keepalived 基础模块
-------------------------------------------------------------------------------

[root@m01 roles]# mkdir keepalived/{tasks,handlers,templates} -p

基础任务
[root@m01 opt]# cat roles/keepalived/tasks/main.yml

- name: Install keepalived Server
  yum: name=keepalived state=present

- name: Configure Keepalived Server
  template: src=keepalived.conf.j2 dest=/etc/keepalived/keepalived.conf
  notify: Restart keepalived Server

- name: Start Keepalived Server
  service: name=keepalived state=started enabled=yes


触发器
[root@m01 opt]# cat roles/keepalived/handlers/main.yml

- name: Restart keepalived Server
  service: name=keepalived state=restarted


模板配置文件
[root@m01 opt]# cat roles/keepalived/templates/keepalived.conf.j2
global_defs {
    router_id {{ ansible_hostname }}
}
vrrp_instance VI_1 {
{% if ansible_hostname == "lb01" %}
    state MASTER
    priority 150
{% elif ansible_hostname == "lb02" %}
    state BACKUP
    priority 100
{% endif %}
    interface eth0
    virtual_router_id 50
    advert_int 1
    authentication {
        auth_type PASS
        auth_pass 1111
}
    virtual_ipaddress {
        10.0.0.3
    }
}
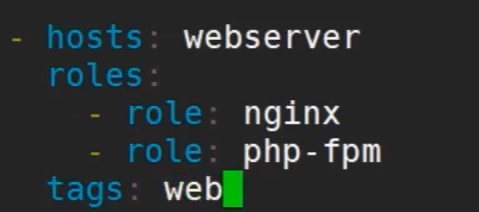
5.7 Ansible项目实战-编写php-fpm服务模块
PHP 基础模块
-------------------------------------------------------------------------------

[root@m01 roles]# mkdir php-fpm/{tasks,handlers,templates} -p

基础任务
[root@m01 opt]# cat roles/php-fpm/tasks/main.yml

- name: Remove PHP-FPM Server
  yum: name="php-*-5*" state=absent

- name: Installed PHP-FPM Server
  yum: name={{ packages }} state=present
  vars:
    packages:
      - php71w
      - php71w-cli
      - php71w-common
      - php71w-devel
      - php71w-embedded
      - php71w-gd
      - php71w-mcrypt
      - php71w-mbstring
      - php71w-pdo
      - php71w-xml
      - php71w-fpm
      - php71w-mysqlnd
      - php71w-opcache
      - php71w-pecl-memcached
      - php71w-pecl-redis
      - php71w-pecl-mongodb

- name: Configure PHP-FPM Server
  template: src=www.conf.j2 dest=/etc/php-fpm.d/www.conf
  notify: Restart PHP-FPM Server

- name: Configure PHP.INI Server
  template: src=php.ini.j2 dest=/etc/php.ini
  notify: Restart PHP-FPM Server

- name: Start PHP-FPM Server
  service: name=php-fpm state=started enabled=yes


触发器
[root@m01 opt]# cat roles/php-fpm/handlers/main.yml

- name: Restart PHP-FPM Server
  service: name=php-fpm state=restarted

php-fpm模板配置文件
[root@m01 opt]# cat roles/php-fpm/templates/www.conf.j2
[www]
user = {{ web_user }}
group = {{ web_user }}
listen = 127.0.0.1:9000
listen.allowed_clients = 127.0.0.1
pm = dynamic
pm.max_children = 50
pm.start_servers = 10
pm.min_spare_servers = 5
pm.max_spare_servers = 35
slowlog = /var/log/php-fpm/www-slow.log
php_admin_value[error_log] = /var/log/php-fpm/www-error.log
php_admin_flag[log_errors] = on
php_value[soap.wsdl_cache_dir]  = /var/lib/php/wsdlcache


php.ini配置文件...
[root@m01 opt]# cat roles/php-fpm/templates/php.ini.j2
....
[Session]
session.save_handler = redis
session.save_path = "tcp://{{ redis_server_ip }}:{{ redis_server_port }}"
....
5.8 Ansible项目实战-业务引入
wordpress引入 (nginx+php) code代码
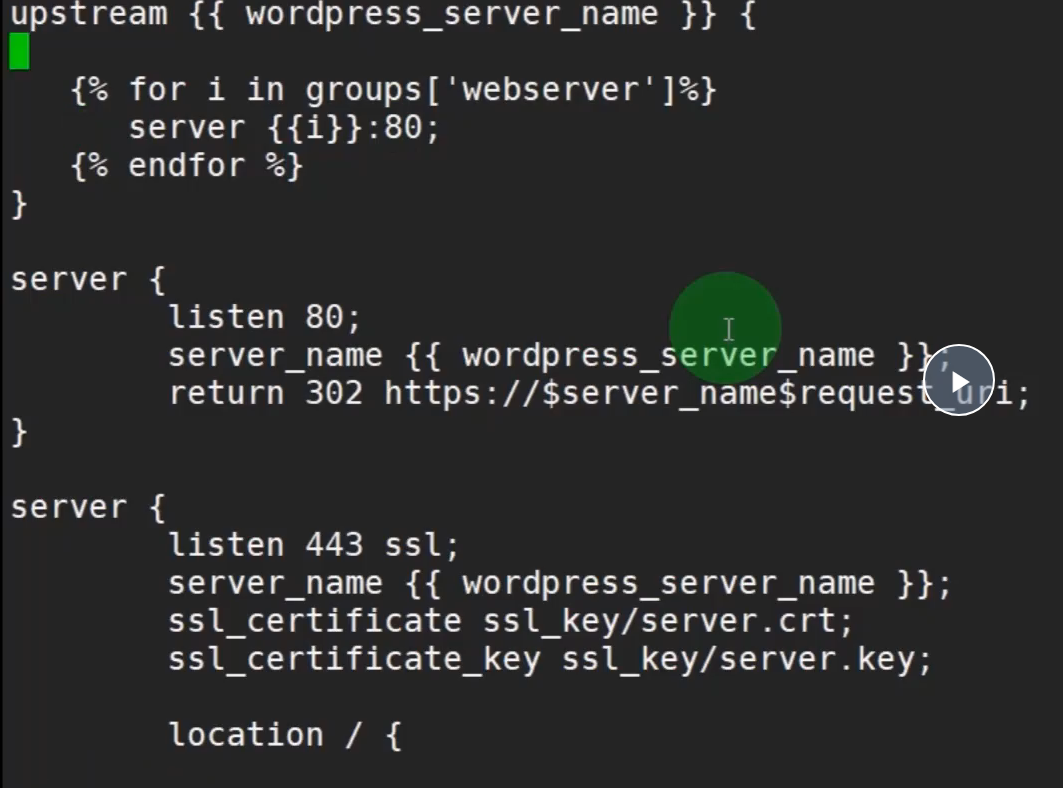
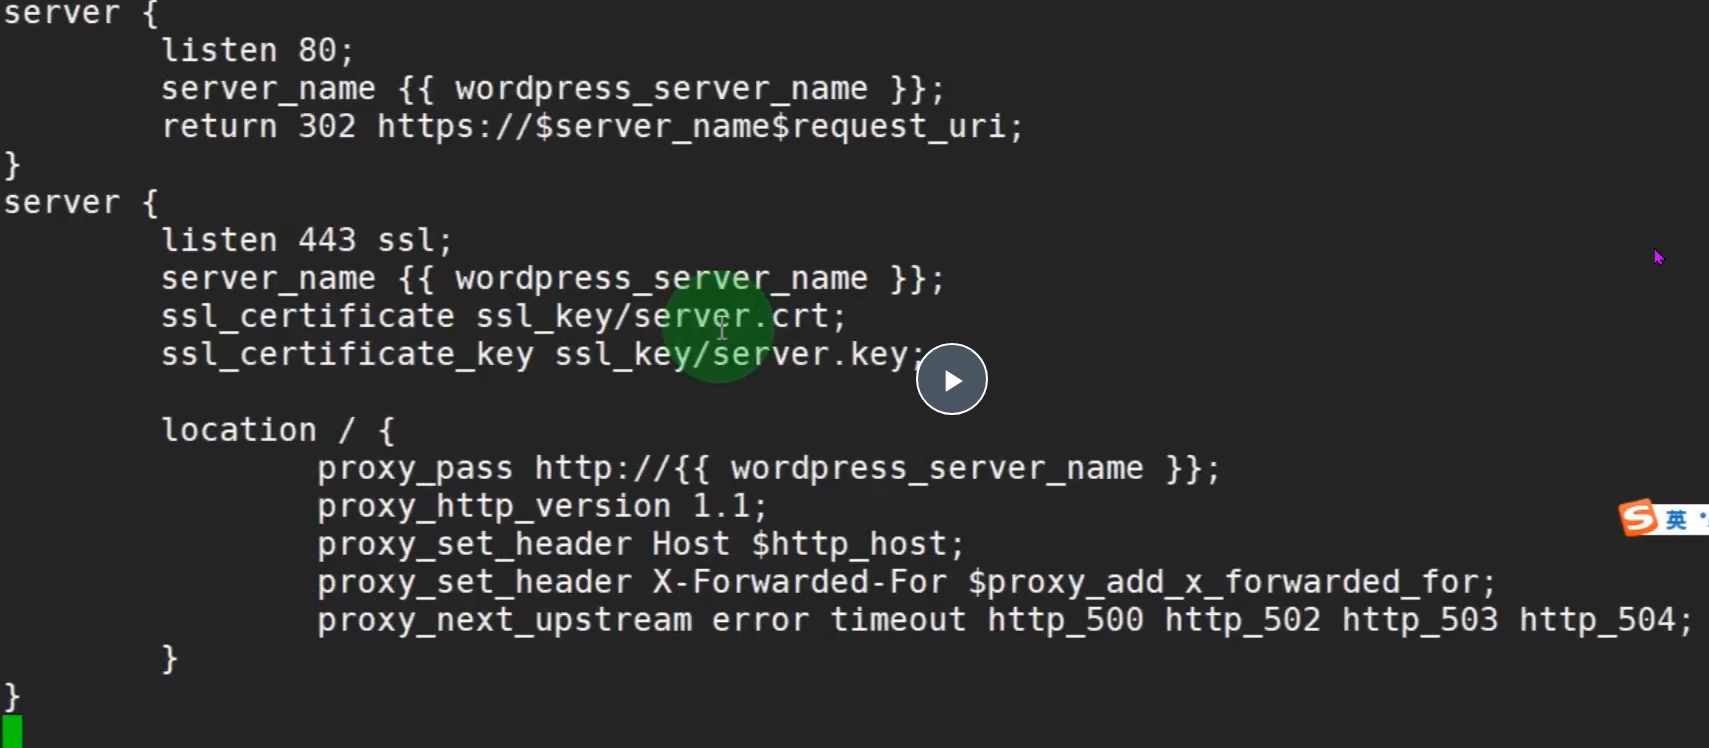
[root@m01 roles]# mkdir wordpress/{tasks,handlers,templates,files,meta} -p


wordpress引入 nginx_proxy
[root@m01 roles]# mkdir wordpress_proxy/{tasks,handlers,templates,files,meta} -p


。。。

 浙公网安备 33010602011771号