逆向案例和Java入门
day04 逆向案例和Java入门
课堂随笔
day04 逆向案例和Java入门
今日概要:
- 逆向案例
- Java环境入门
1.逆向案例
- 爱安丘 【更新,抓不到包+客户端证书校验】
- 美食天下
- 油联合伙人【服务器关闭】
- 尿大夫
1.1 美食天下
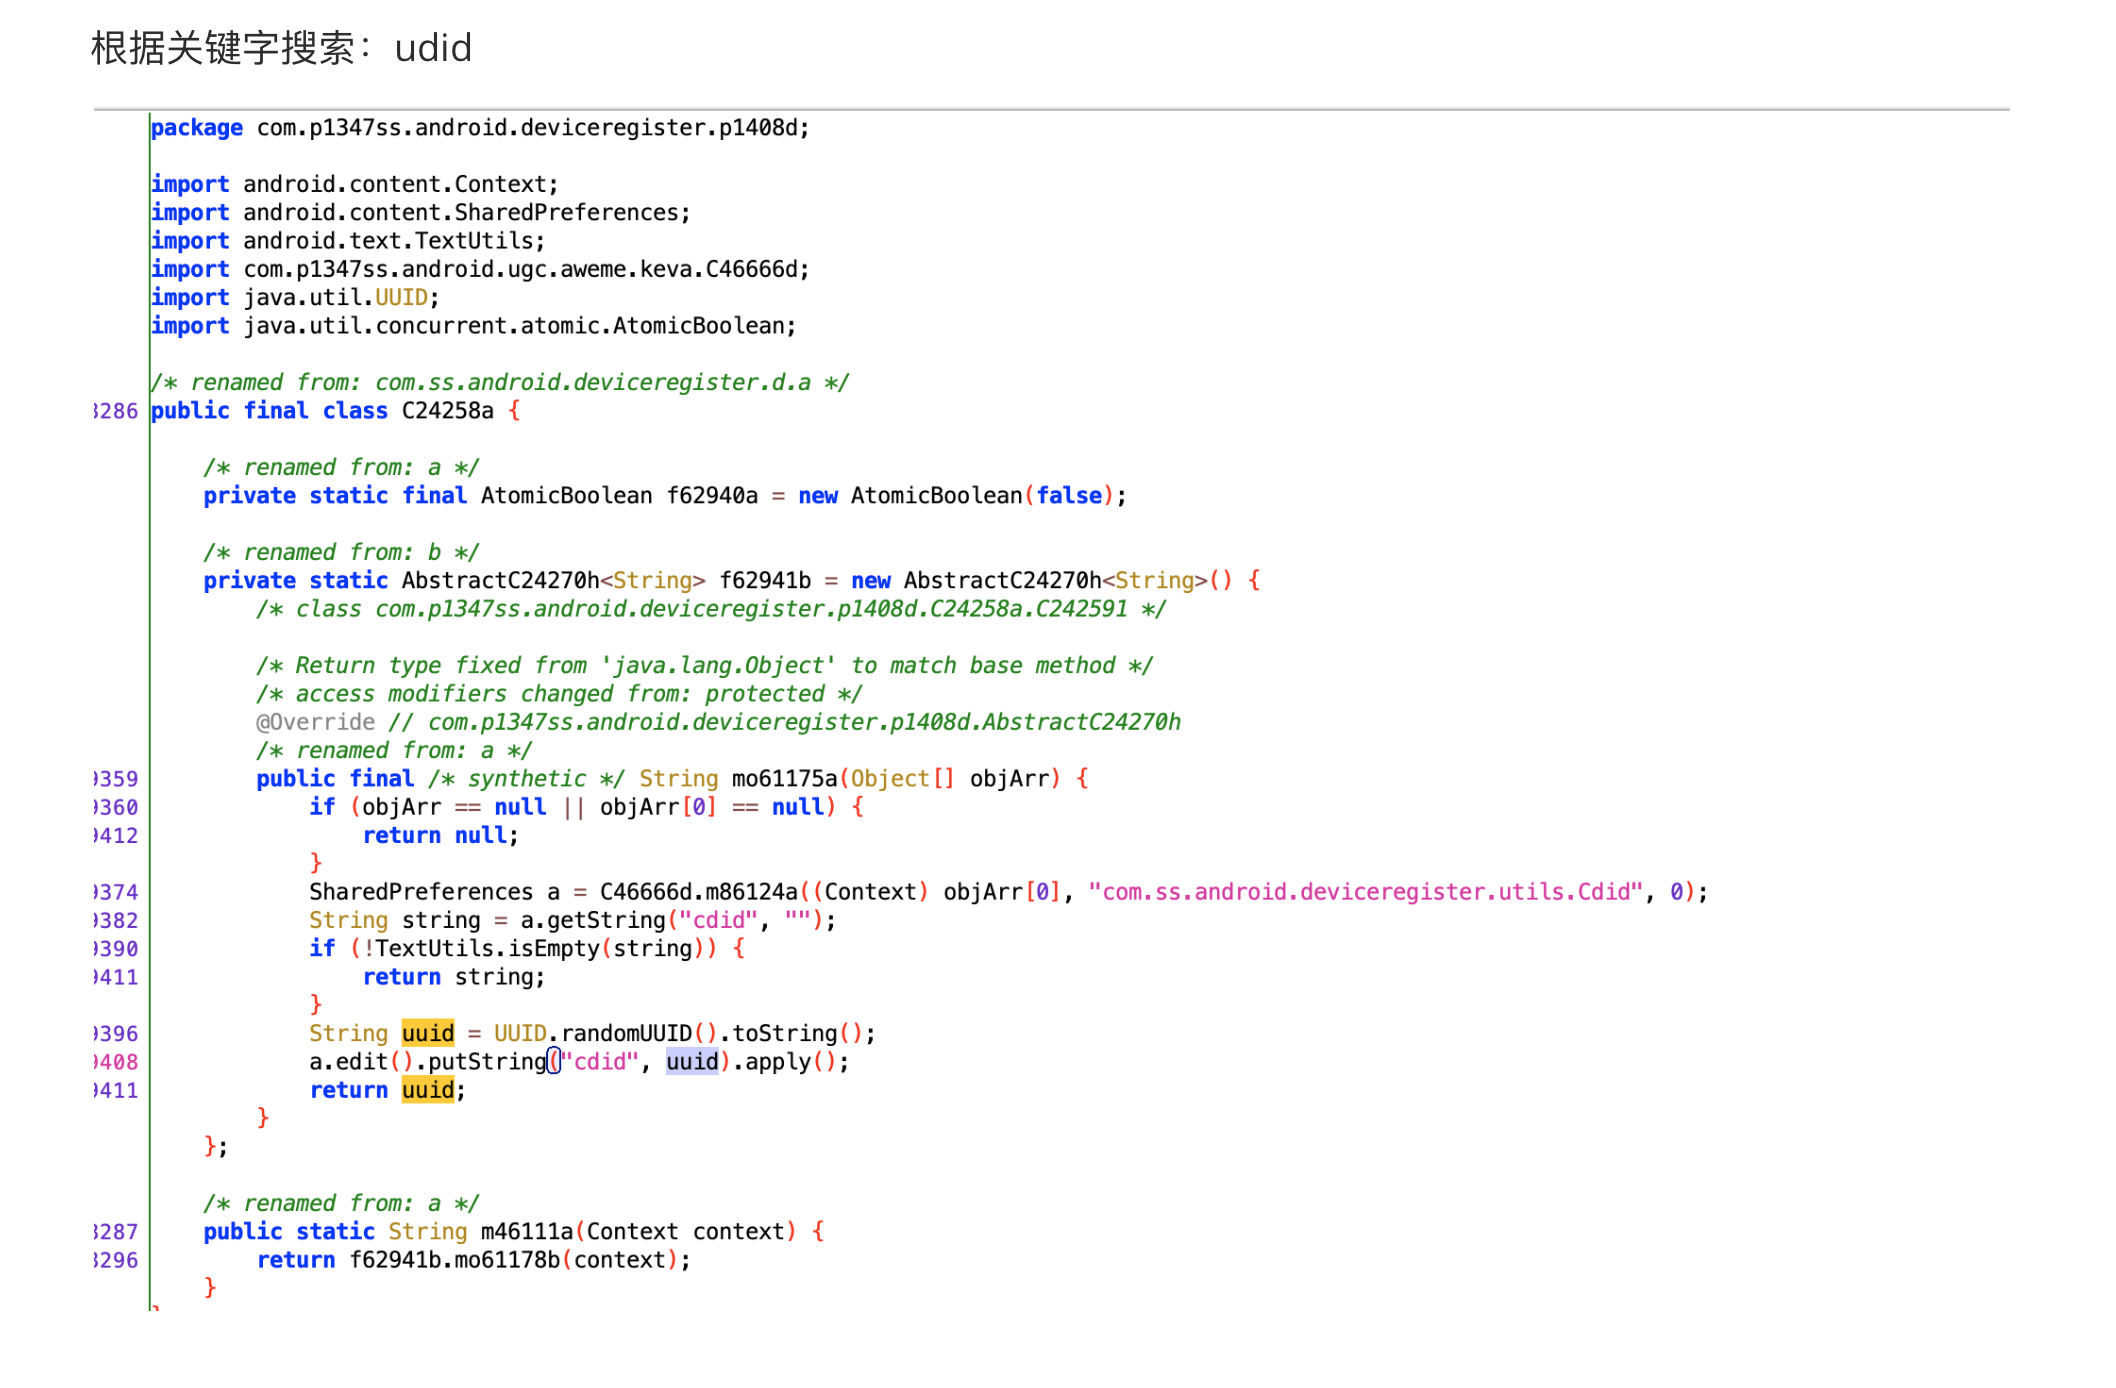
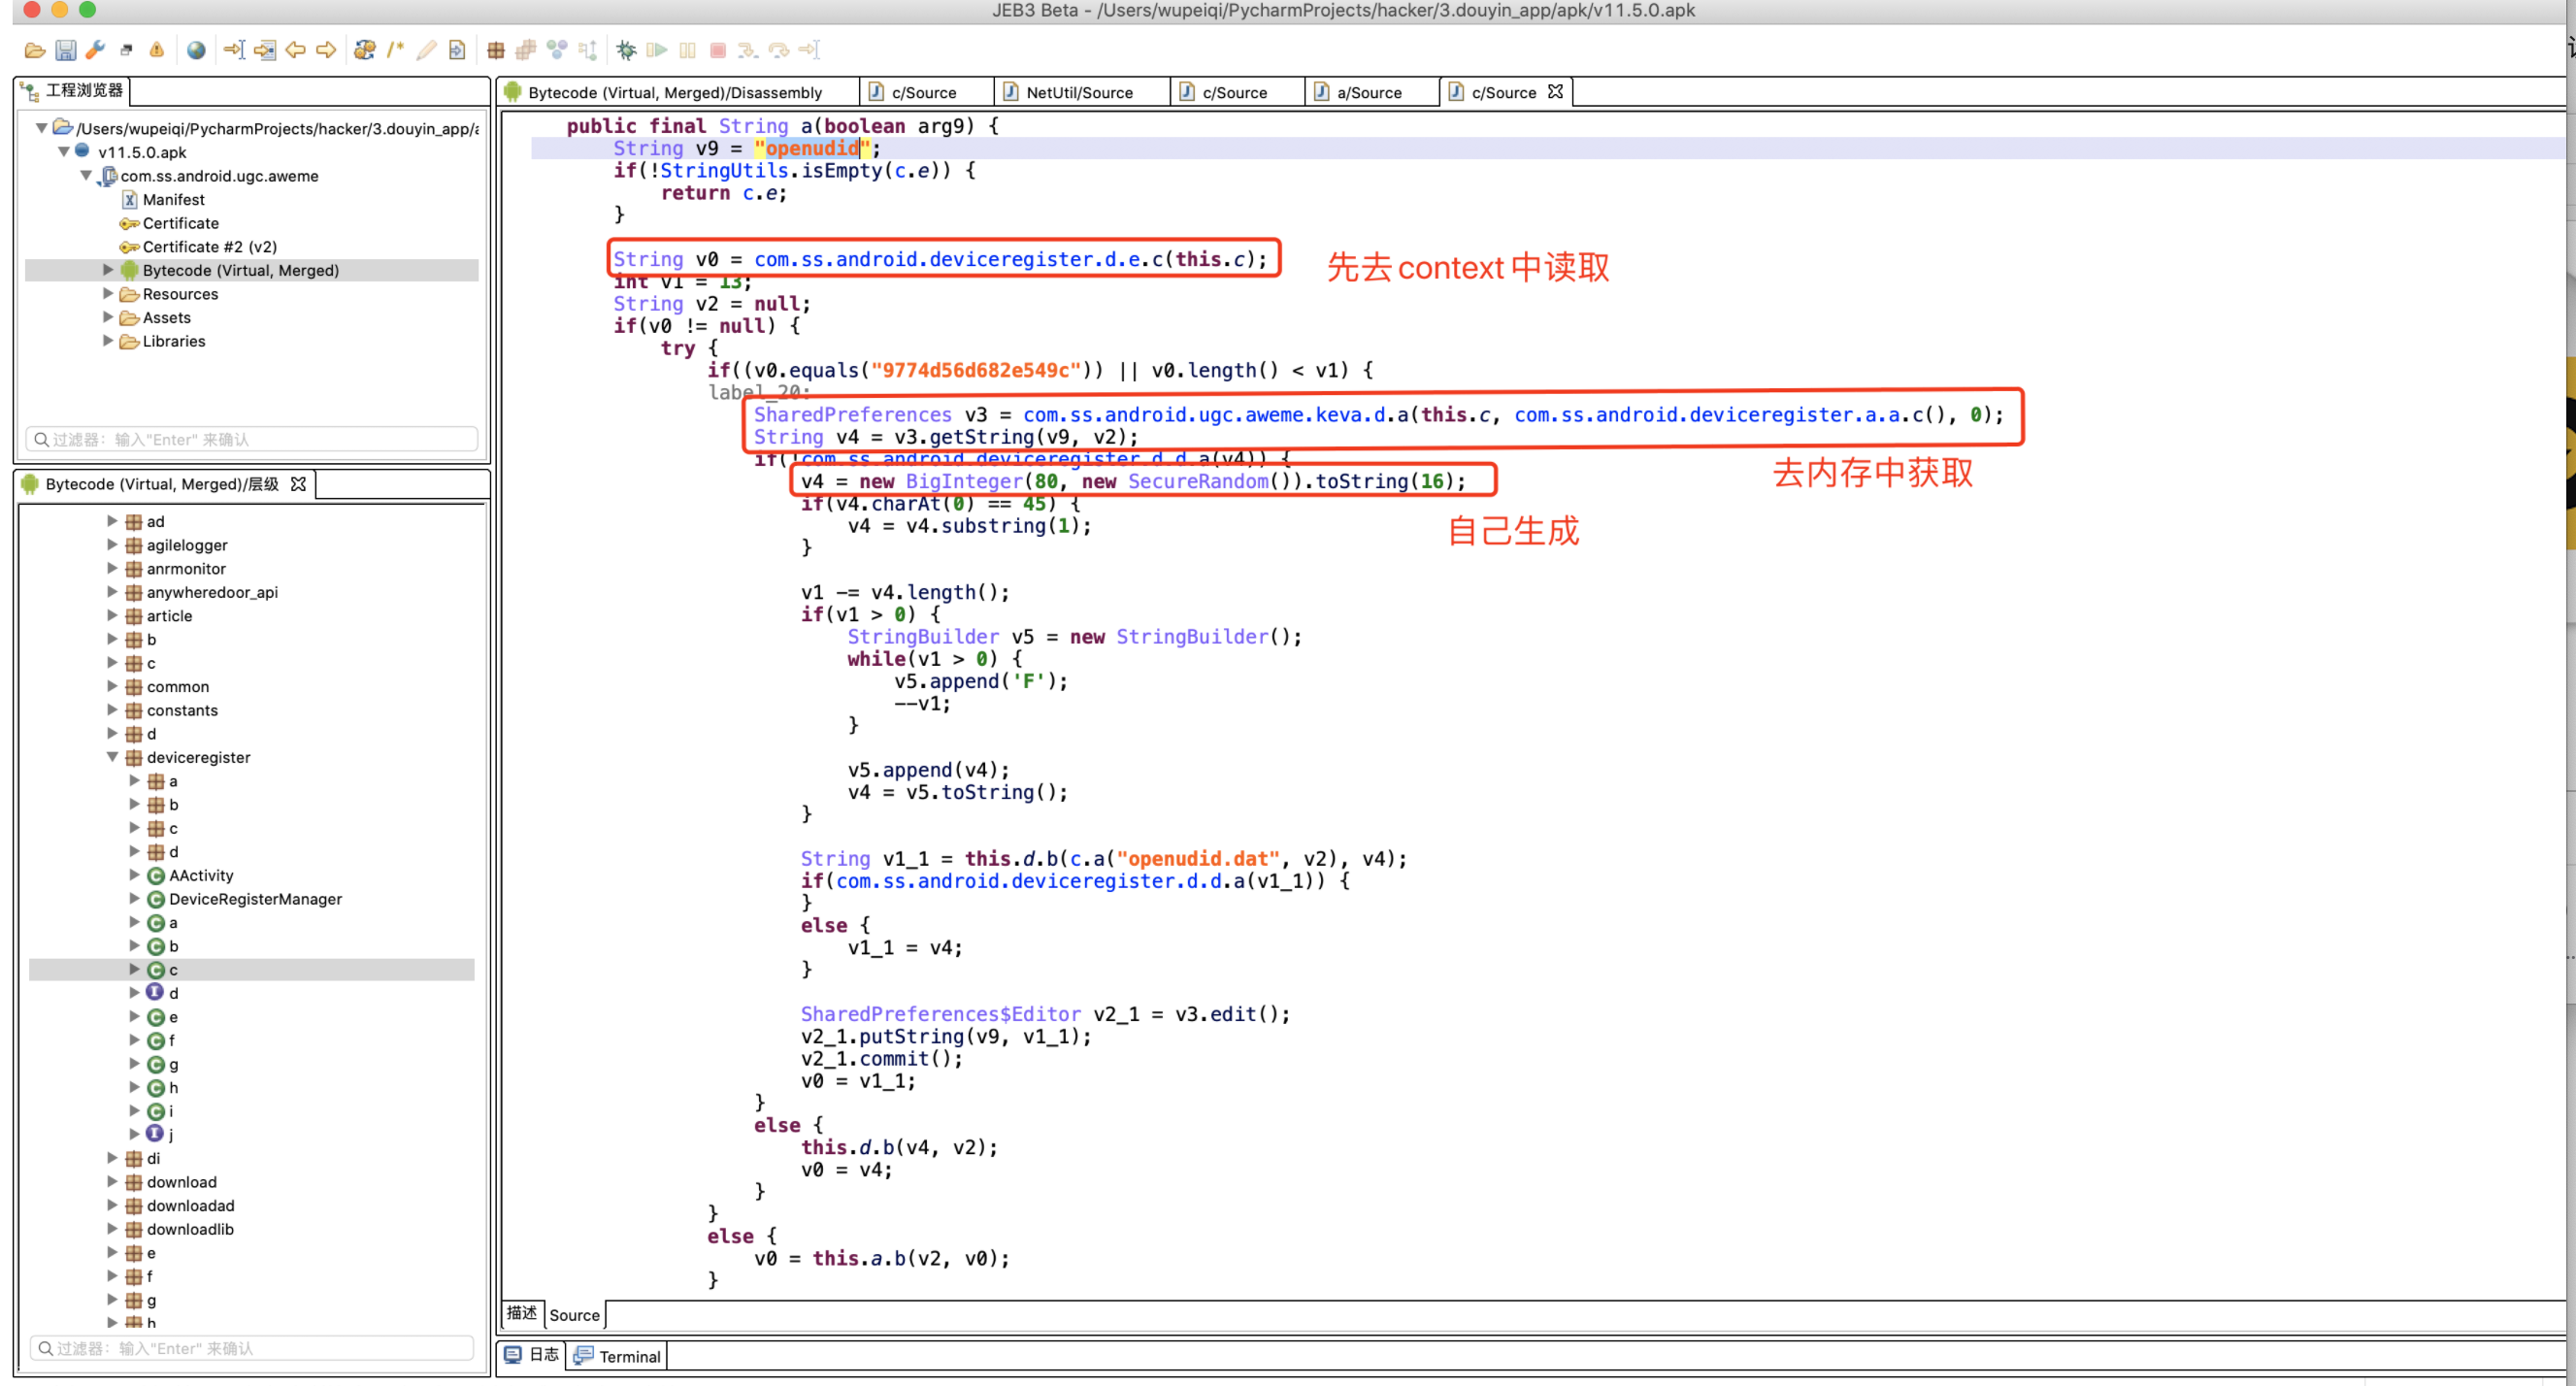
目标:关键字搜索
- 抓包 & 分析
https://api6.meishichina.com/api.php
POST
请求体:
p={"m":{"search_mobileHotSearch":{"keyword":"红烧排骨","pageindex":1,"pagesize":20,"type":"recipe"}},"openudid":"6a956ef804512bd9ee73b580f2c0bf5d","uid":"","session":"","appver":"6311","device":"google+Pixel+4","appname":"msc_android"}
请求头:
无
- 思考:参数的必要性(改包+发送)
- 删除测试
- 固定测试
- 不需逆向openudid,直接去请求发送
- 实现:...
1.2 爱安丘
目标:登录&注册
- 抓包
- 无法抓包,解决方案:LSposed + JustTrustMe(不着急操作)
- 分析:发送短信 + 登录
- 发短信
https://app-auth.iqilu.com/member/phonecode
POST
请求体:
{"phone":"18630087660"}
请求头:
user-agent: chuangqi.o.137.com.iqilu.app137/0.0.28.108
orgid: 137
cq-agent: {"os":"android","imei":"aabaf0fe375e5a2c","osversion":"10","network":"none","version":"0.0.28.108","core":"1.6.4"}
Content-Type: application/json
COOKIE
Cookie: orgid=137
返回值:
{
"code": 1,
"data": "s0HTsAzo+o7vKxxO68we74wmTvFzliX6cE6V+gKW7xk="
}
- 登录
POST
请求体:
{"phone":"18630087660","code":"123456","key":"s0HTsAzo+o7vKxxO68we74wmTvFzliX6cE6V+gKW7xk=","password":"","captcha":"","captchaKey":""}
请求头:
orgid: 137
cq-agent: {"os":"android","imei":"aabaf0fe375e5a2c","osversion":"10","network":"none","version":"0.0.28.108","core":"1.6.4"}
Content-Type: application/json
Content-Length: 135
Host: app-auth.iqilu.com
Connection: Keep-Alive
Accept-Encoding: gzip
COOKIE
Cookie: orgid=137
- 直接实现:...
小结:抓包分析就可以找到规律,用代码去模拟实现即可。
问题:关于接收短信
- 手动方式
- 自动方式(接码平台)
- 获取手机号:发送API,返回手机号
- 接码:发送API+手机号,短信内容返回
- 自动方式(卡商)
- 卖你手机号 18777777777 http://www.xxx.com?token=asdfasdfadf8aodf0ausdf
- ...
1.3 尿大夫
- 抓包
https://api.niaodaifu.cn/v4/site/loginnew
POST
请求体:
{
"devisetoken": "1507bfd3f6d1bbf4486", # 可以忽略
"password": "6q7uwhdjjd",
"mobile": "15639966666",
"channel": "android",
"sign": "0d5c04753937acdb7db038ad39942966", #
必须逆向
"time": "1680874075",
"mechanism": "0",
"platform": "1"
}
- 改包&发送
只要逆向出请求体中的sign即可
- 反编译apk
- 定位
- 搜索:"sign"
long currentTimeMillis = System.currentTimeMillis() / 1000;
- Hook校验
j= 1680875681
返回值= 23c42ffd7f234f4d28bca48d10c021c8
- 还原算法
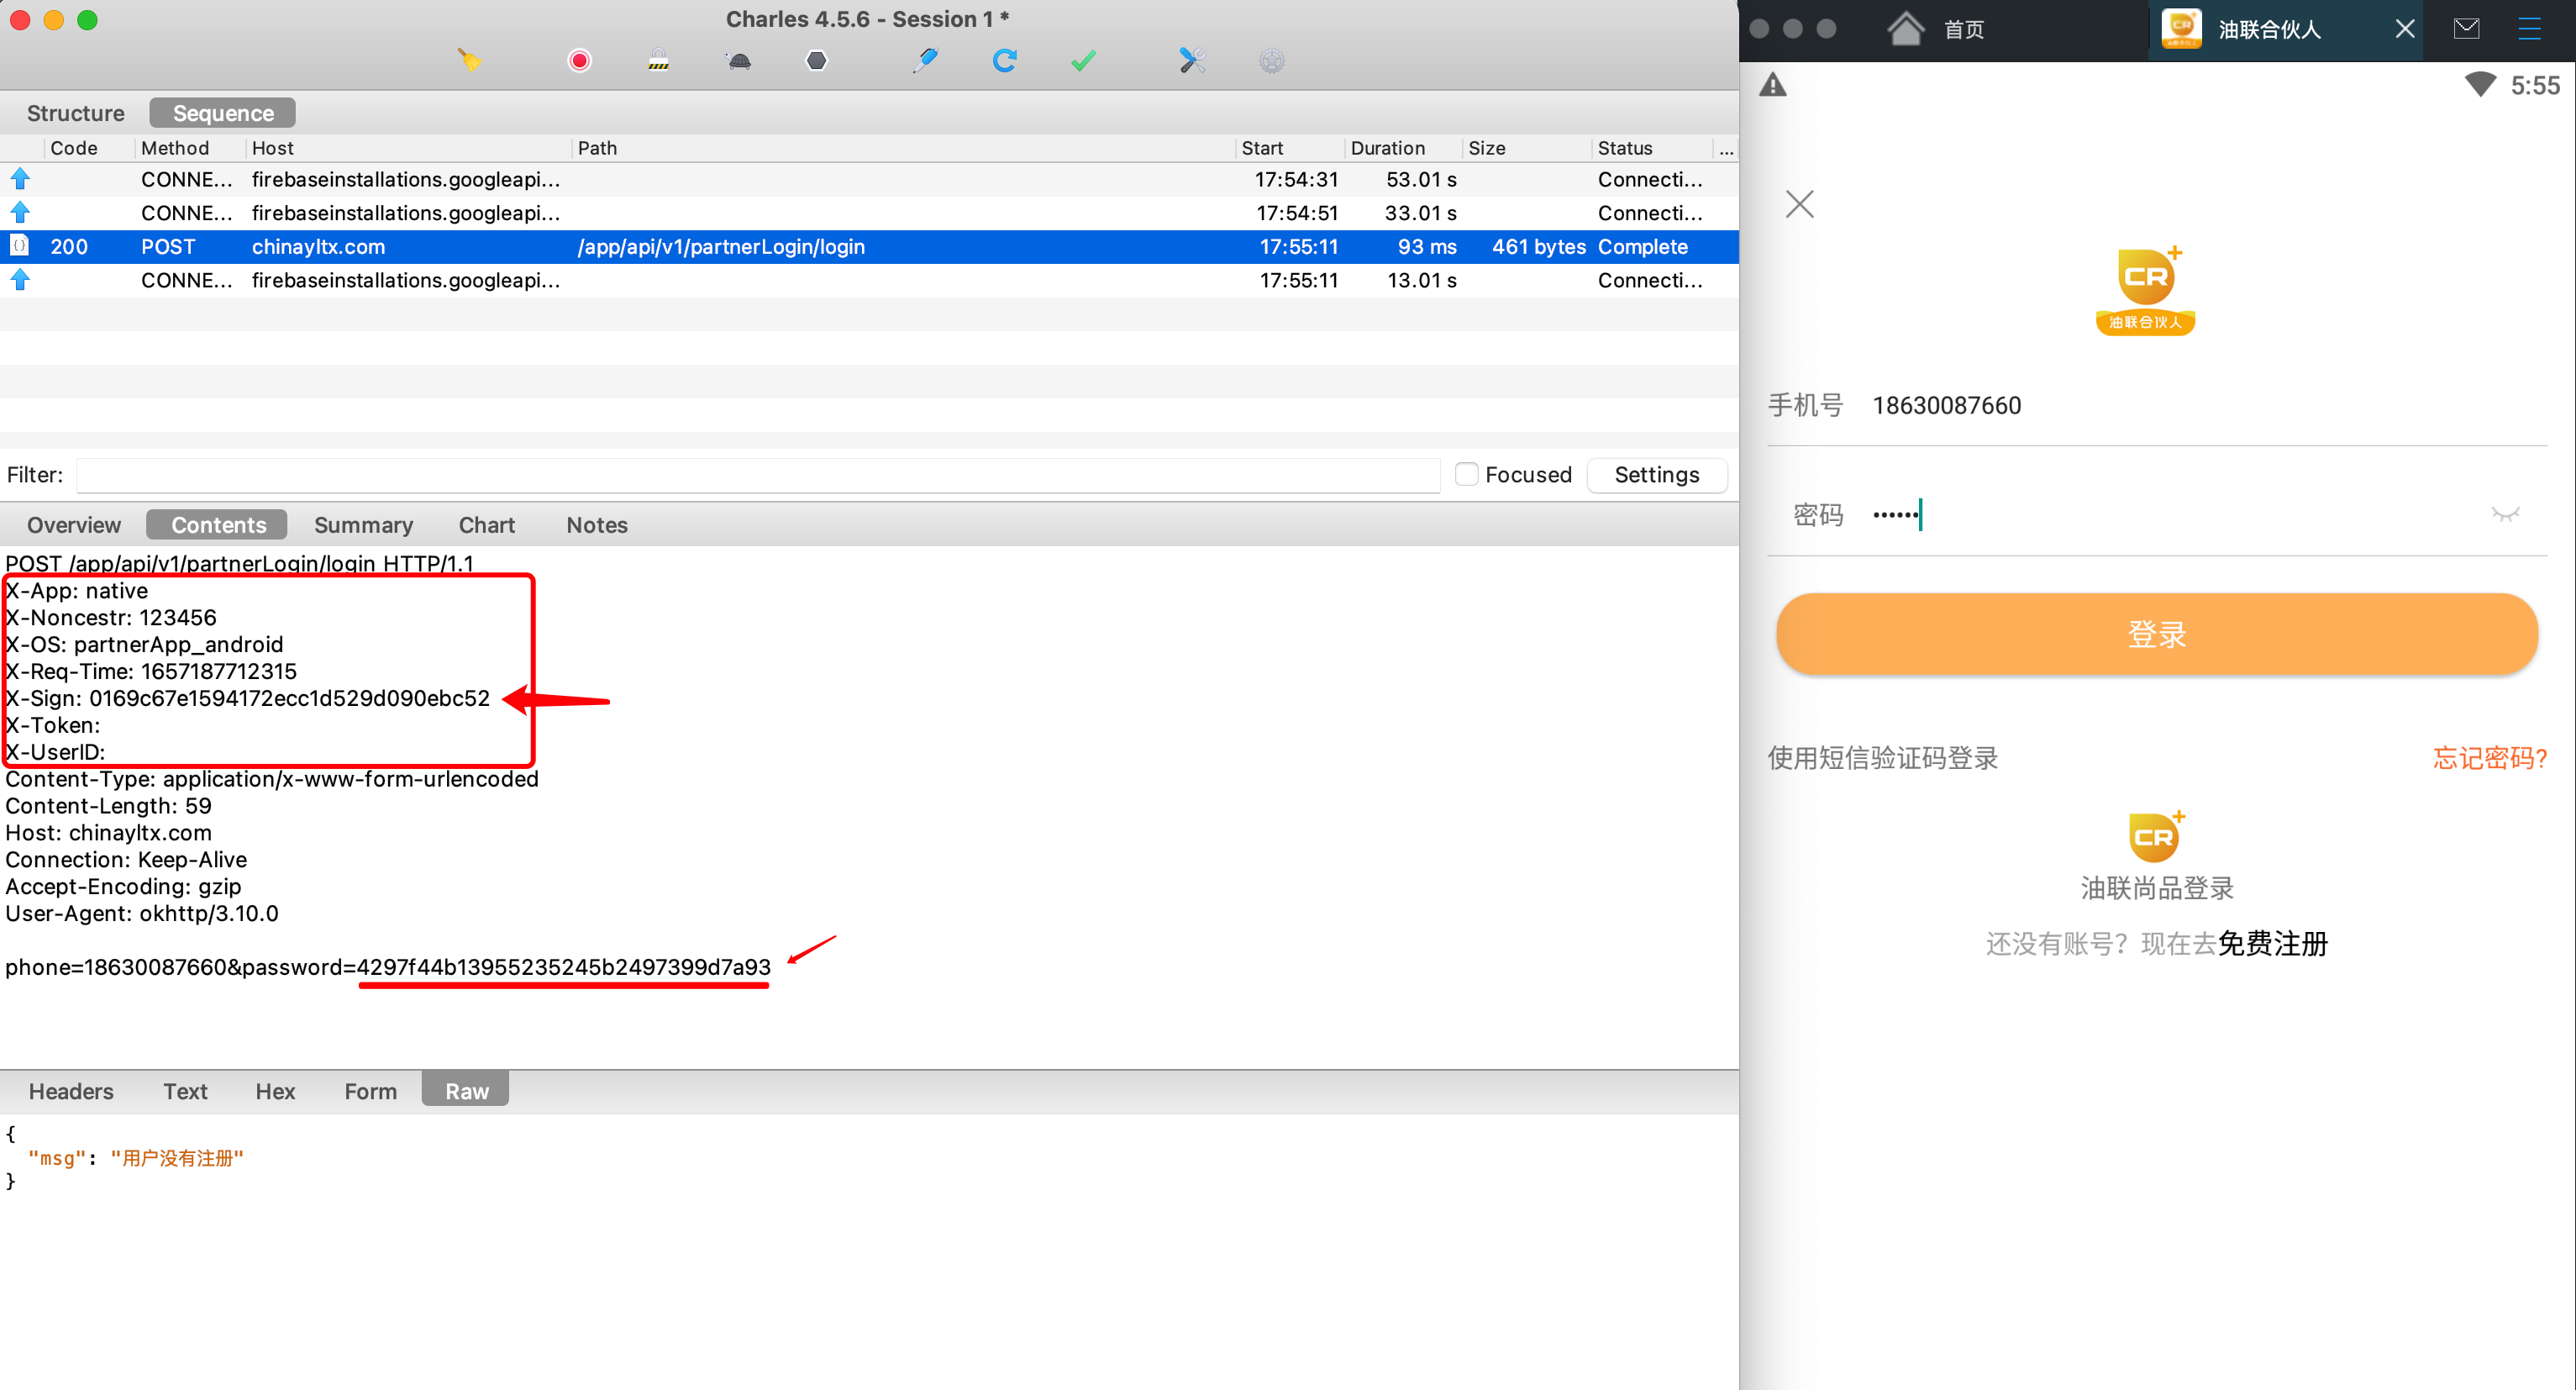
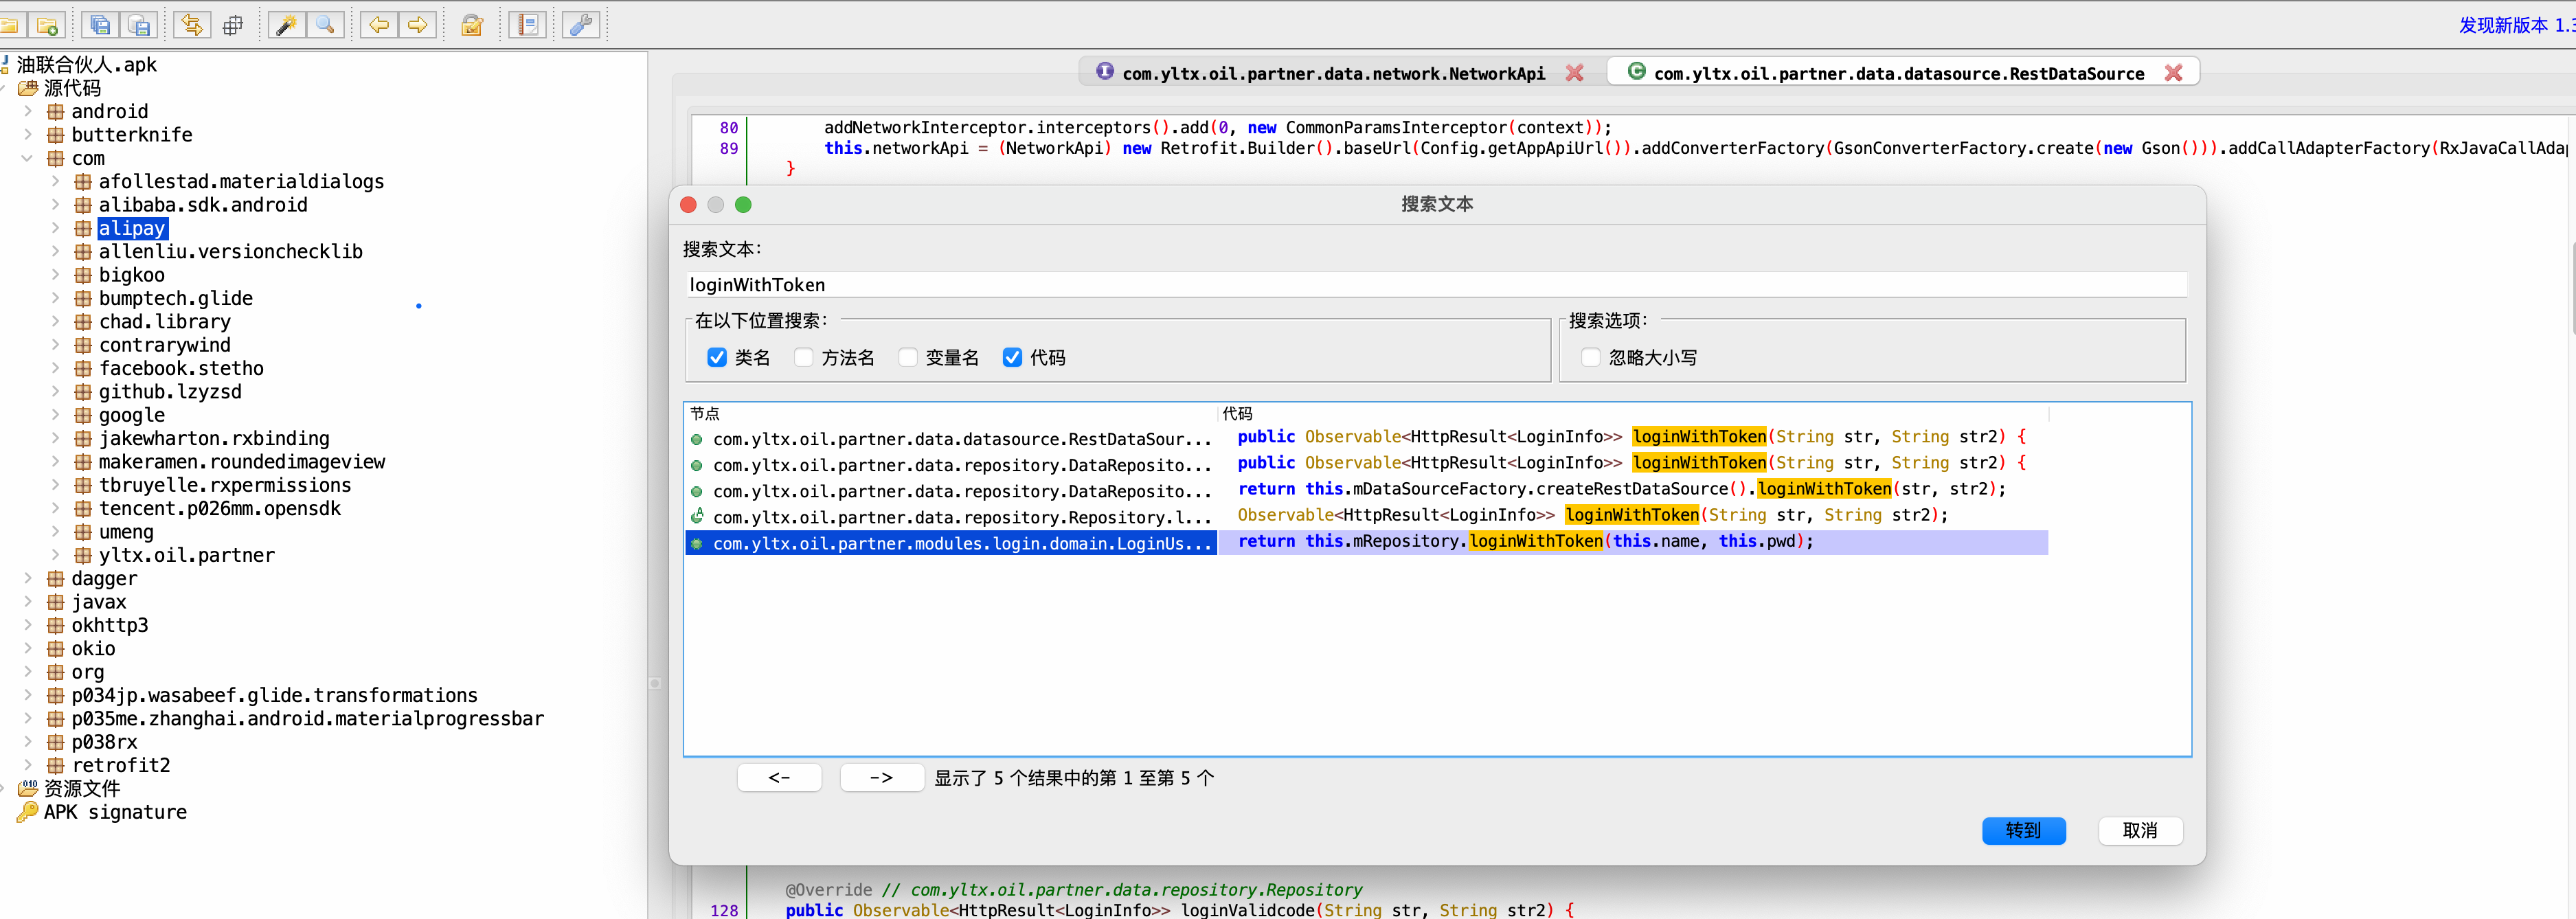
1.4 油联合伙人
目标:自动登录
- 抓包(无法抓取,服务器停止)
请求方式:POST
请求地址:https://chinayltx.com/app/api/v1/partnerLogin/login
请求体:
phone=18630087660
password=e10adc3949ba59abbe56e057f20f883e 【逆向】【搞定】
请求头:
X-App: native
X-Noncestr: 123456
X-OS: partnerApp_android
X-Req-Time: 1650980779832
X-Sign: 645b299fc29998e390d60d95a9b1ac5a 【逆向】【搞定】
X-Token:
X-UserID:
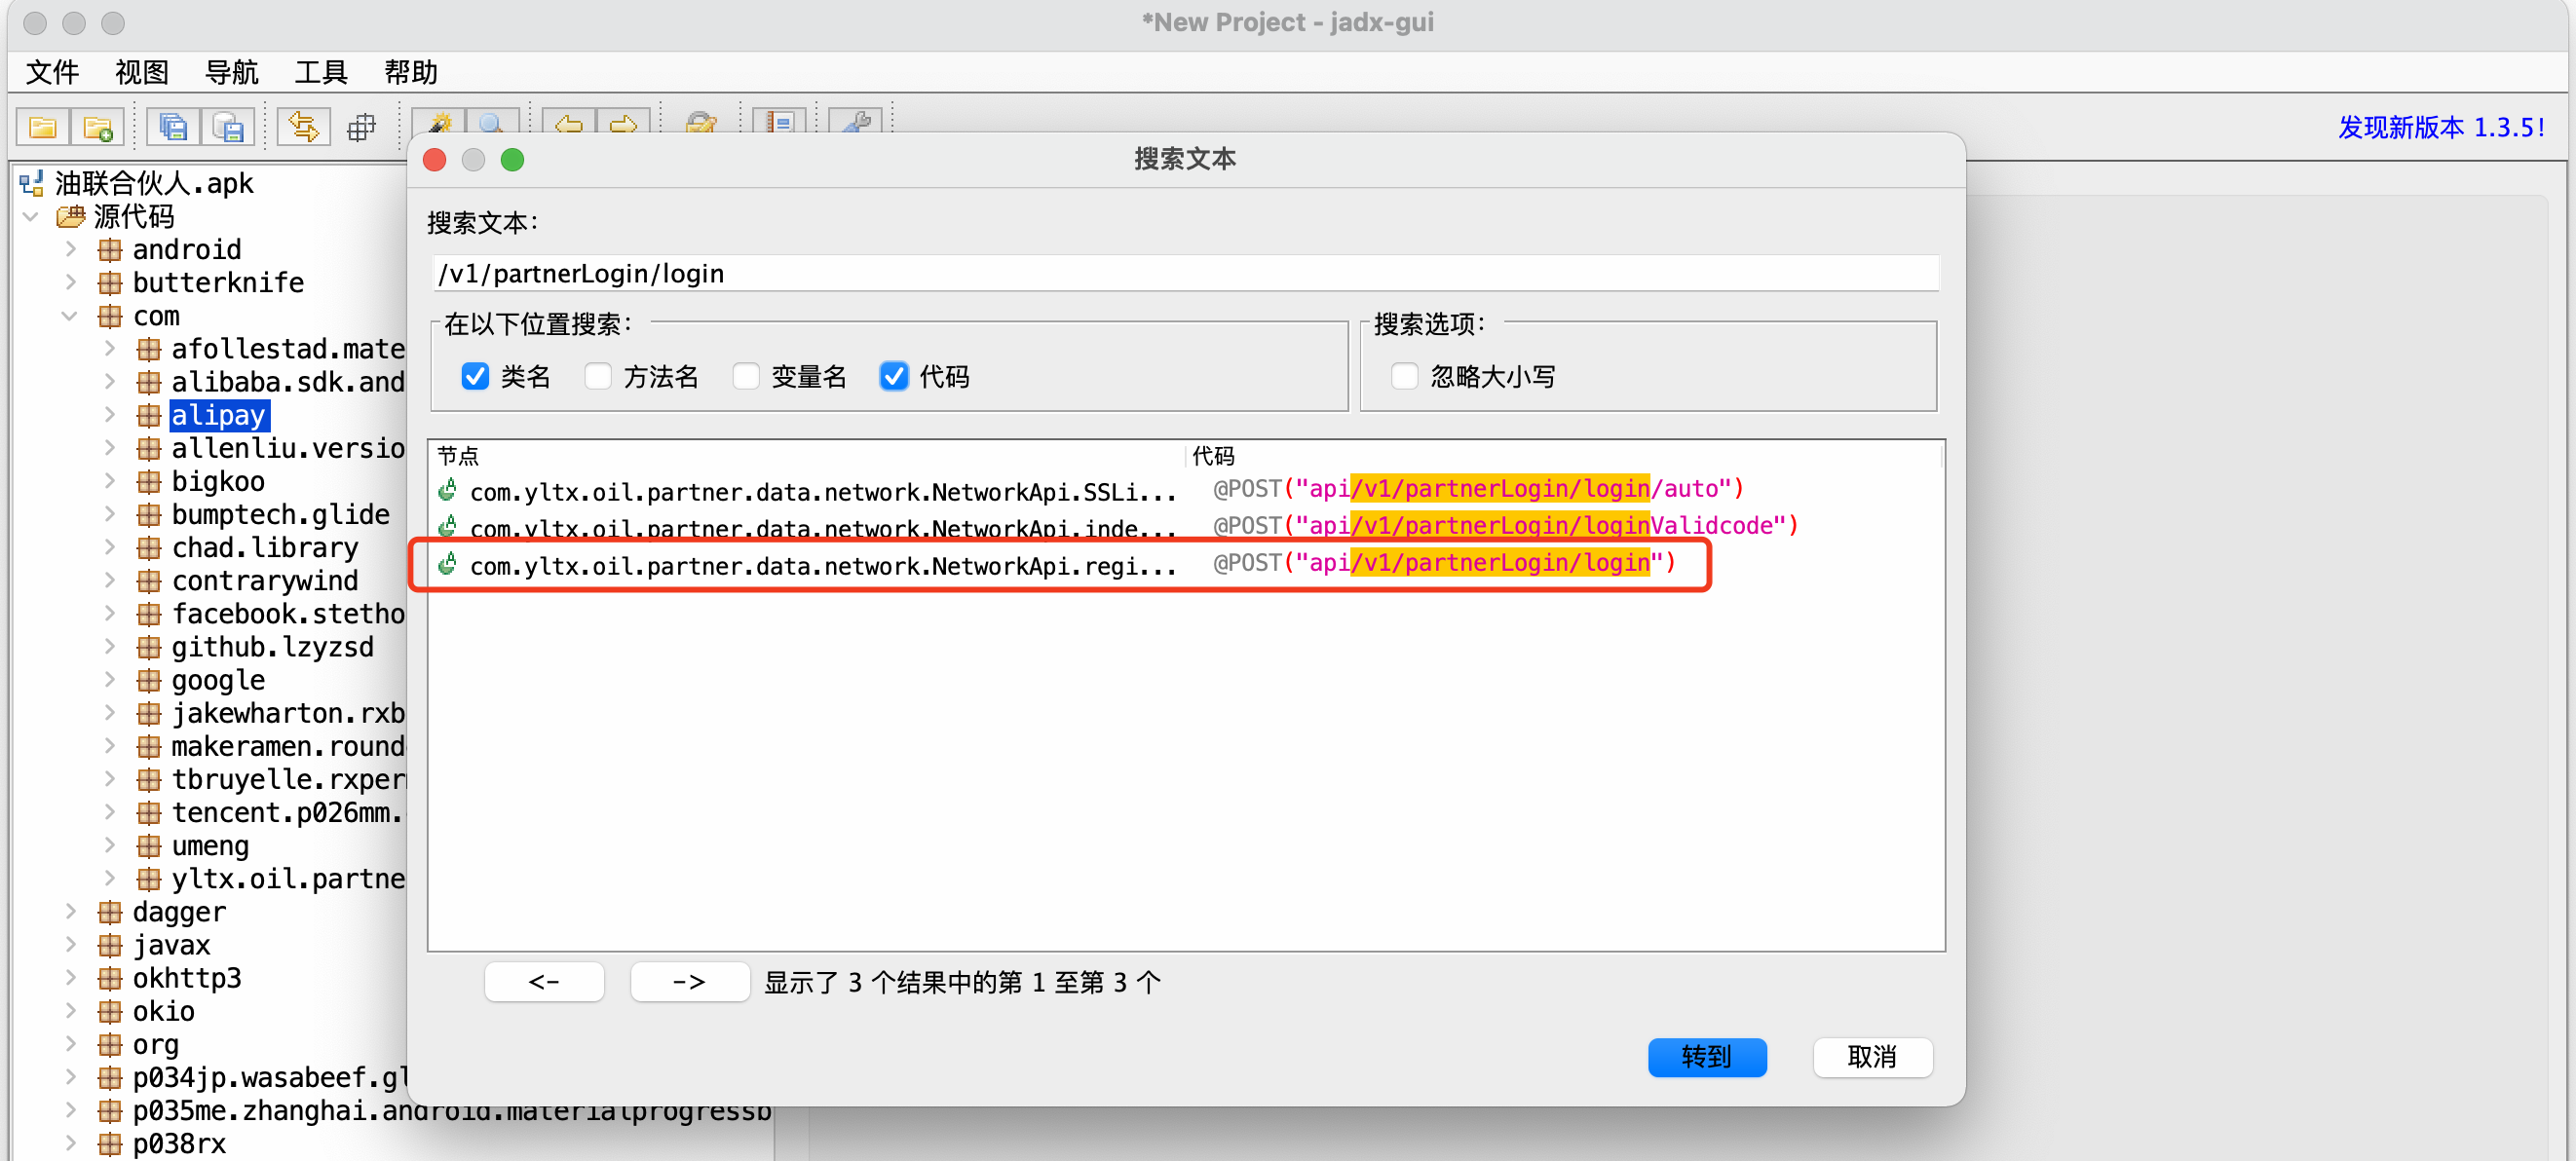
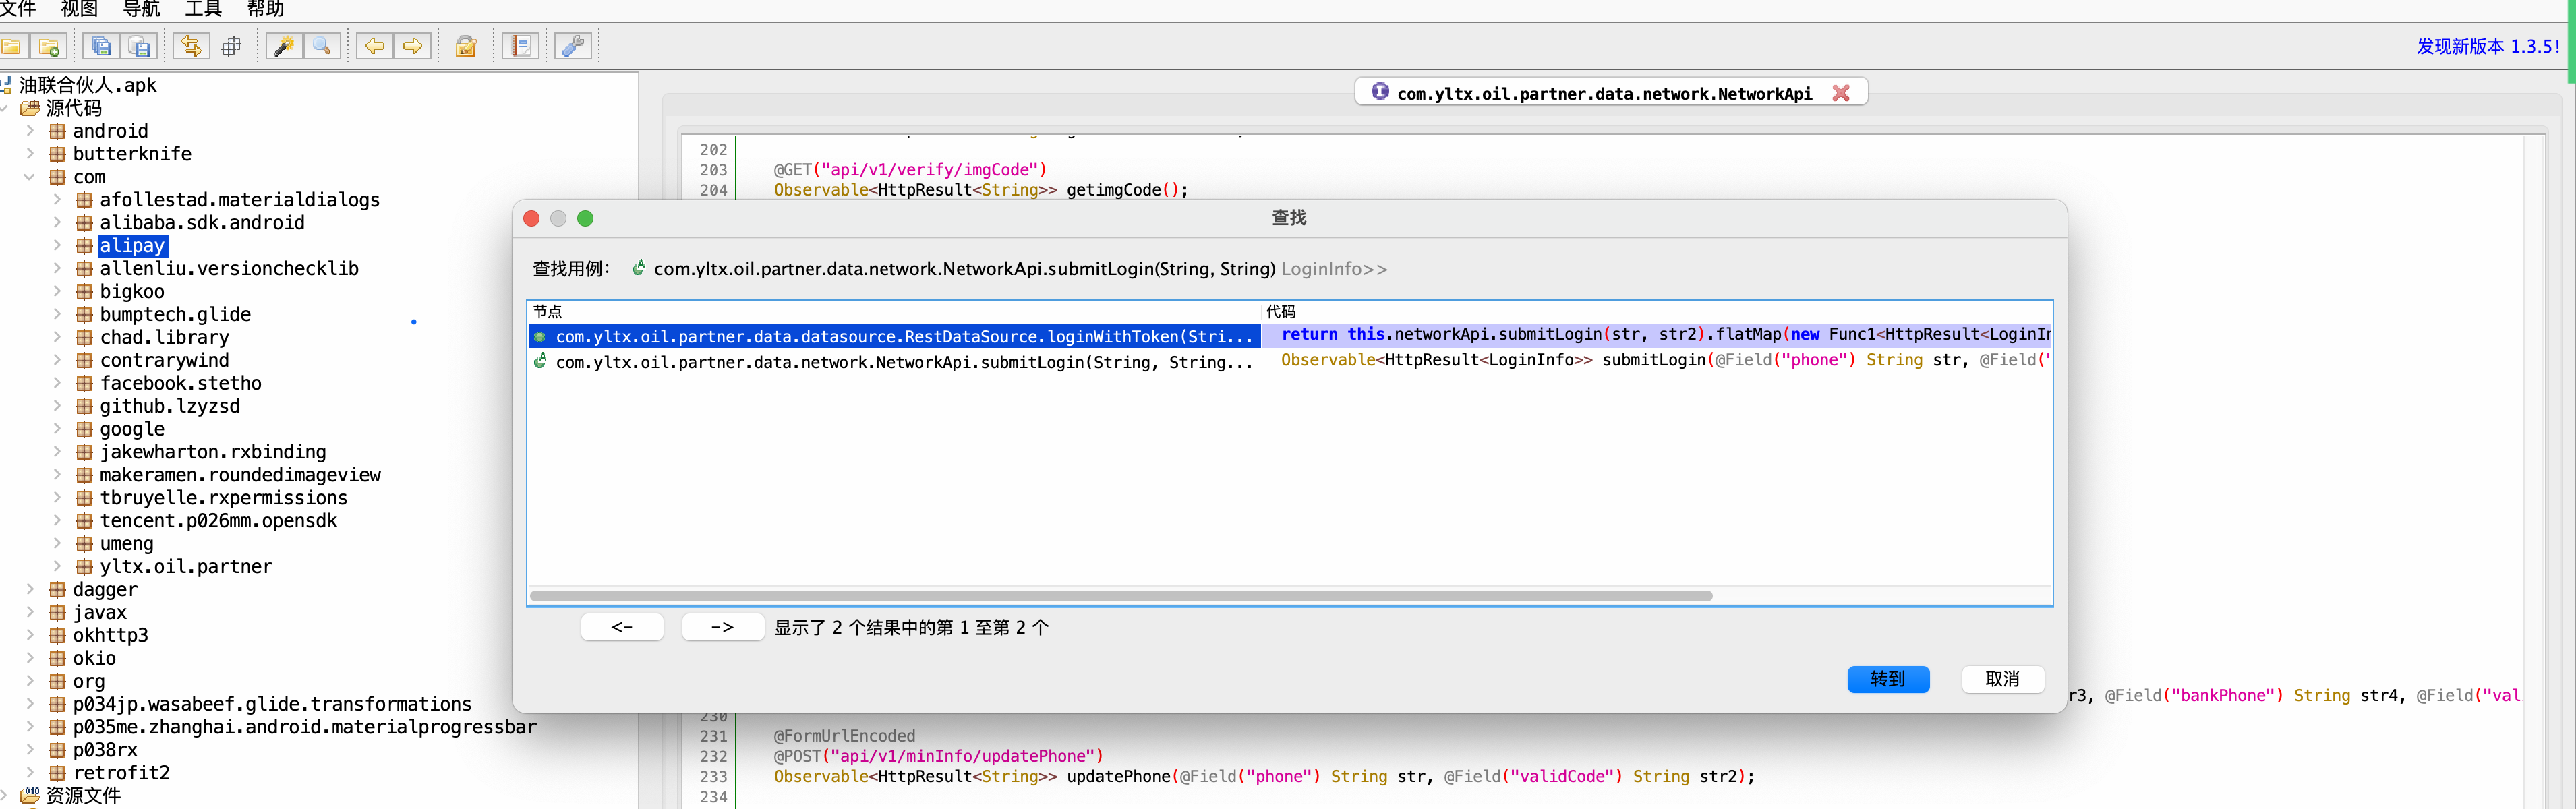
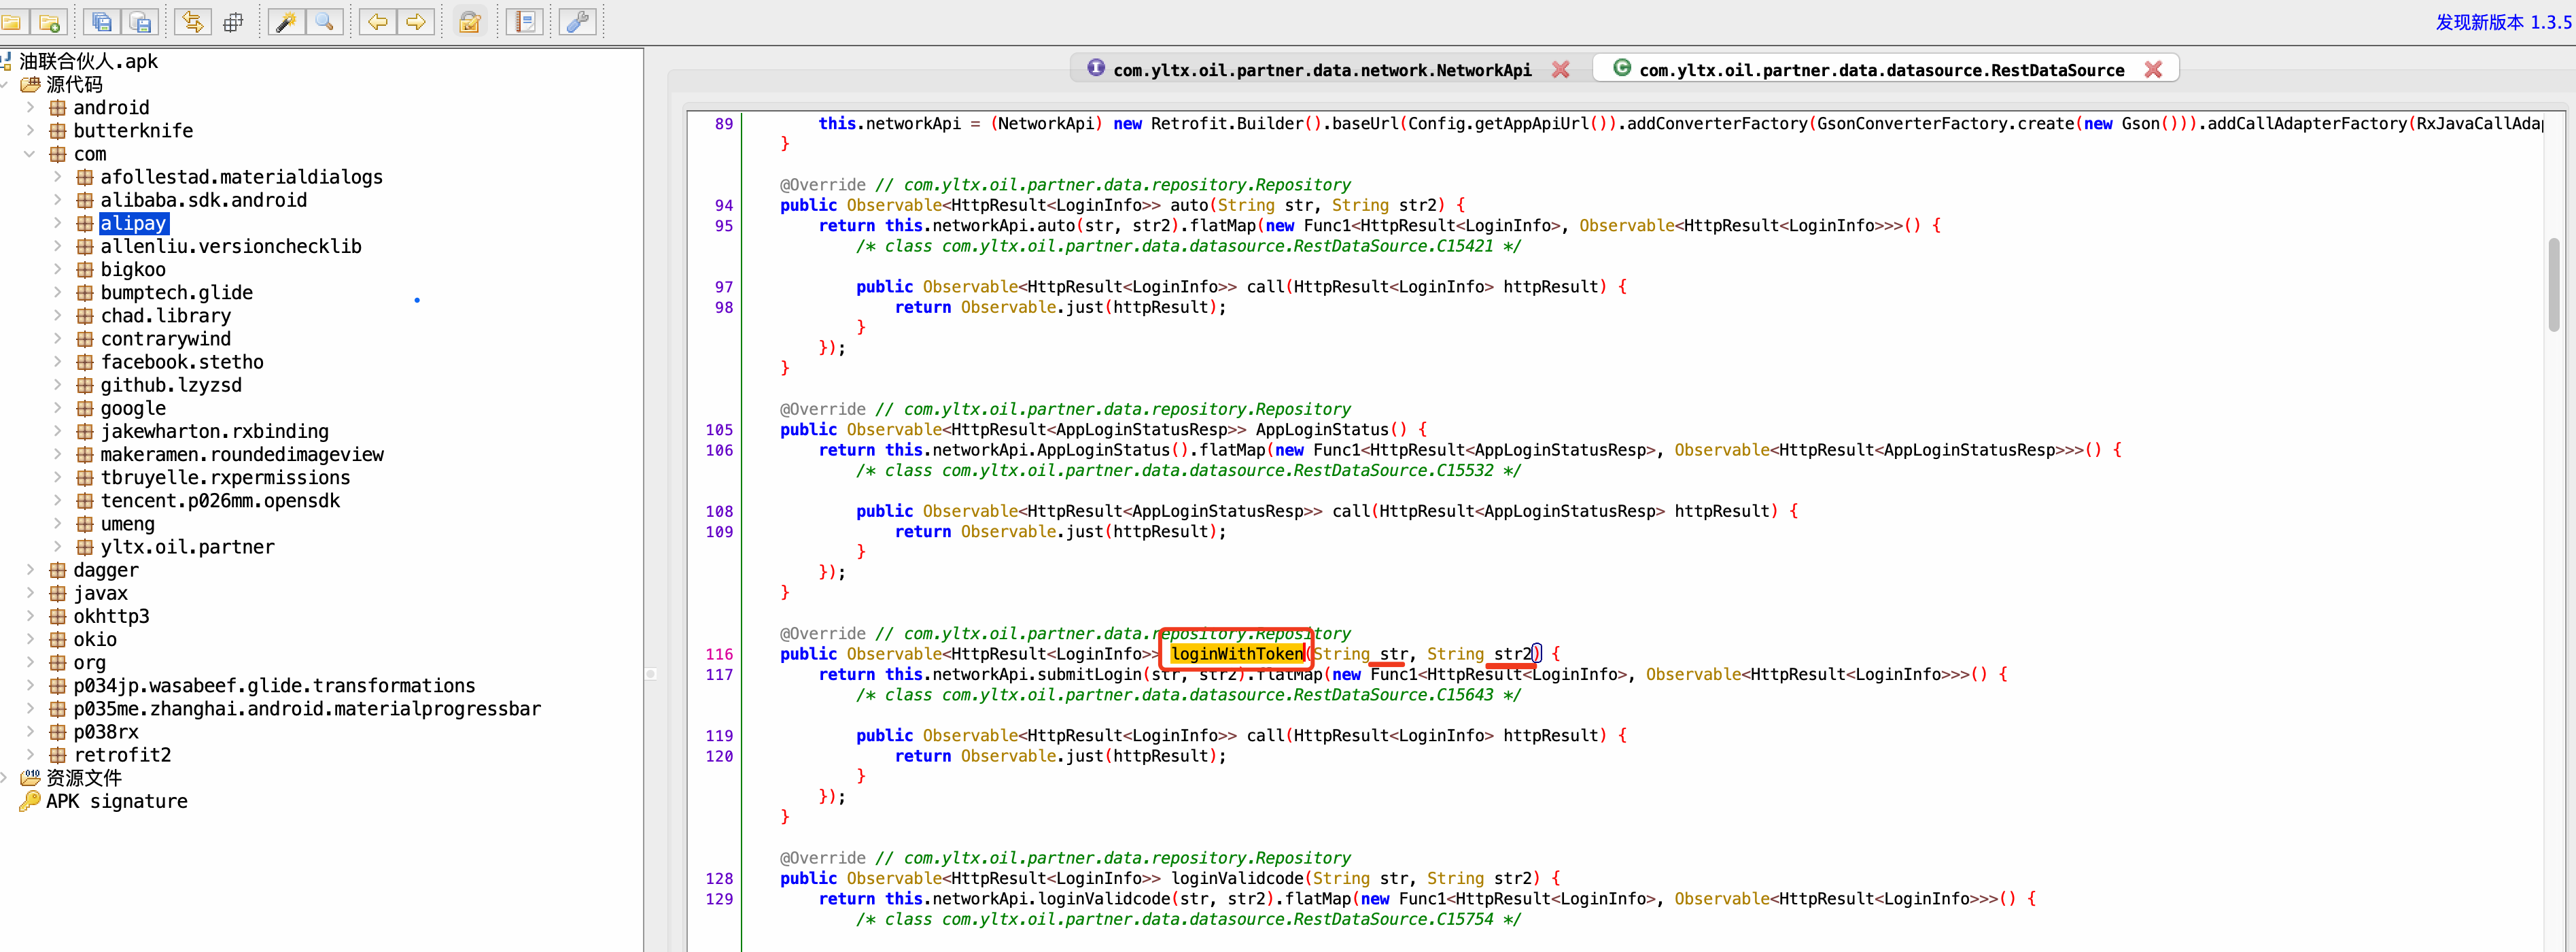
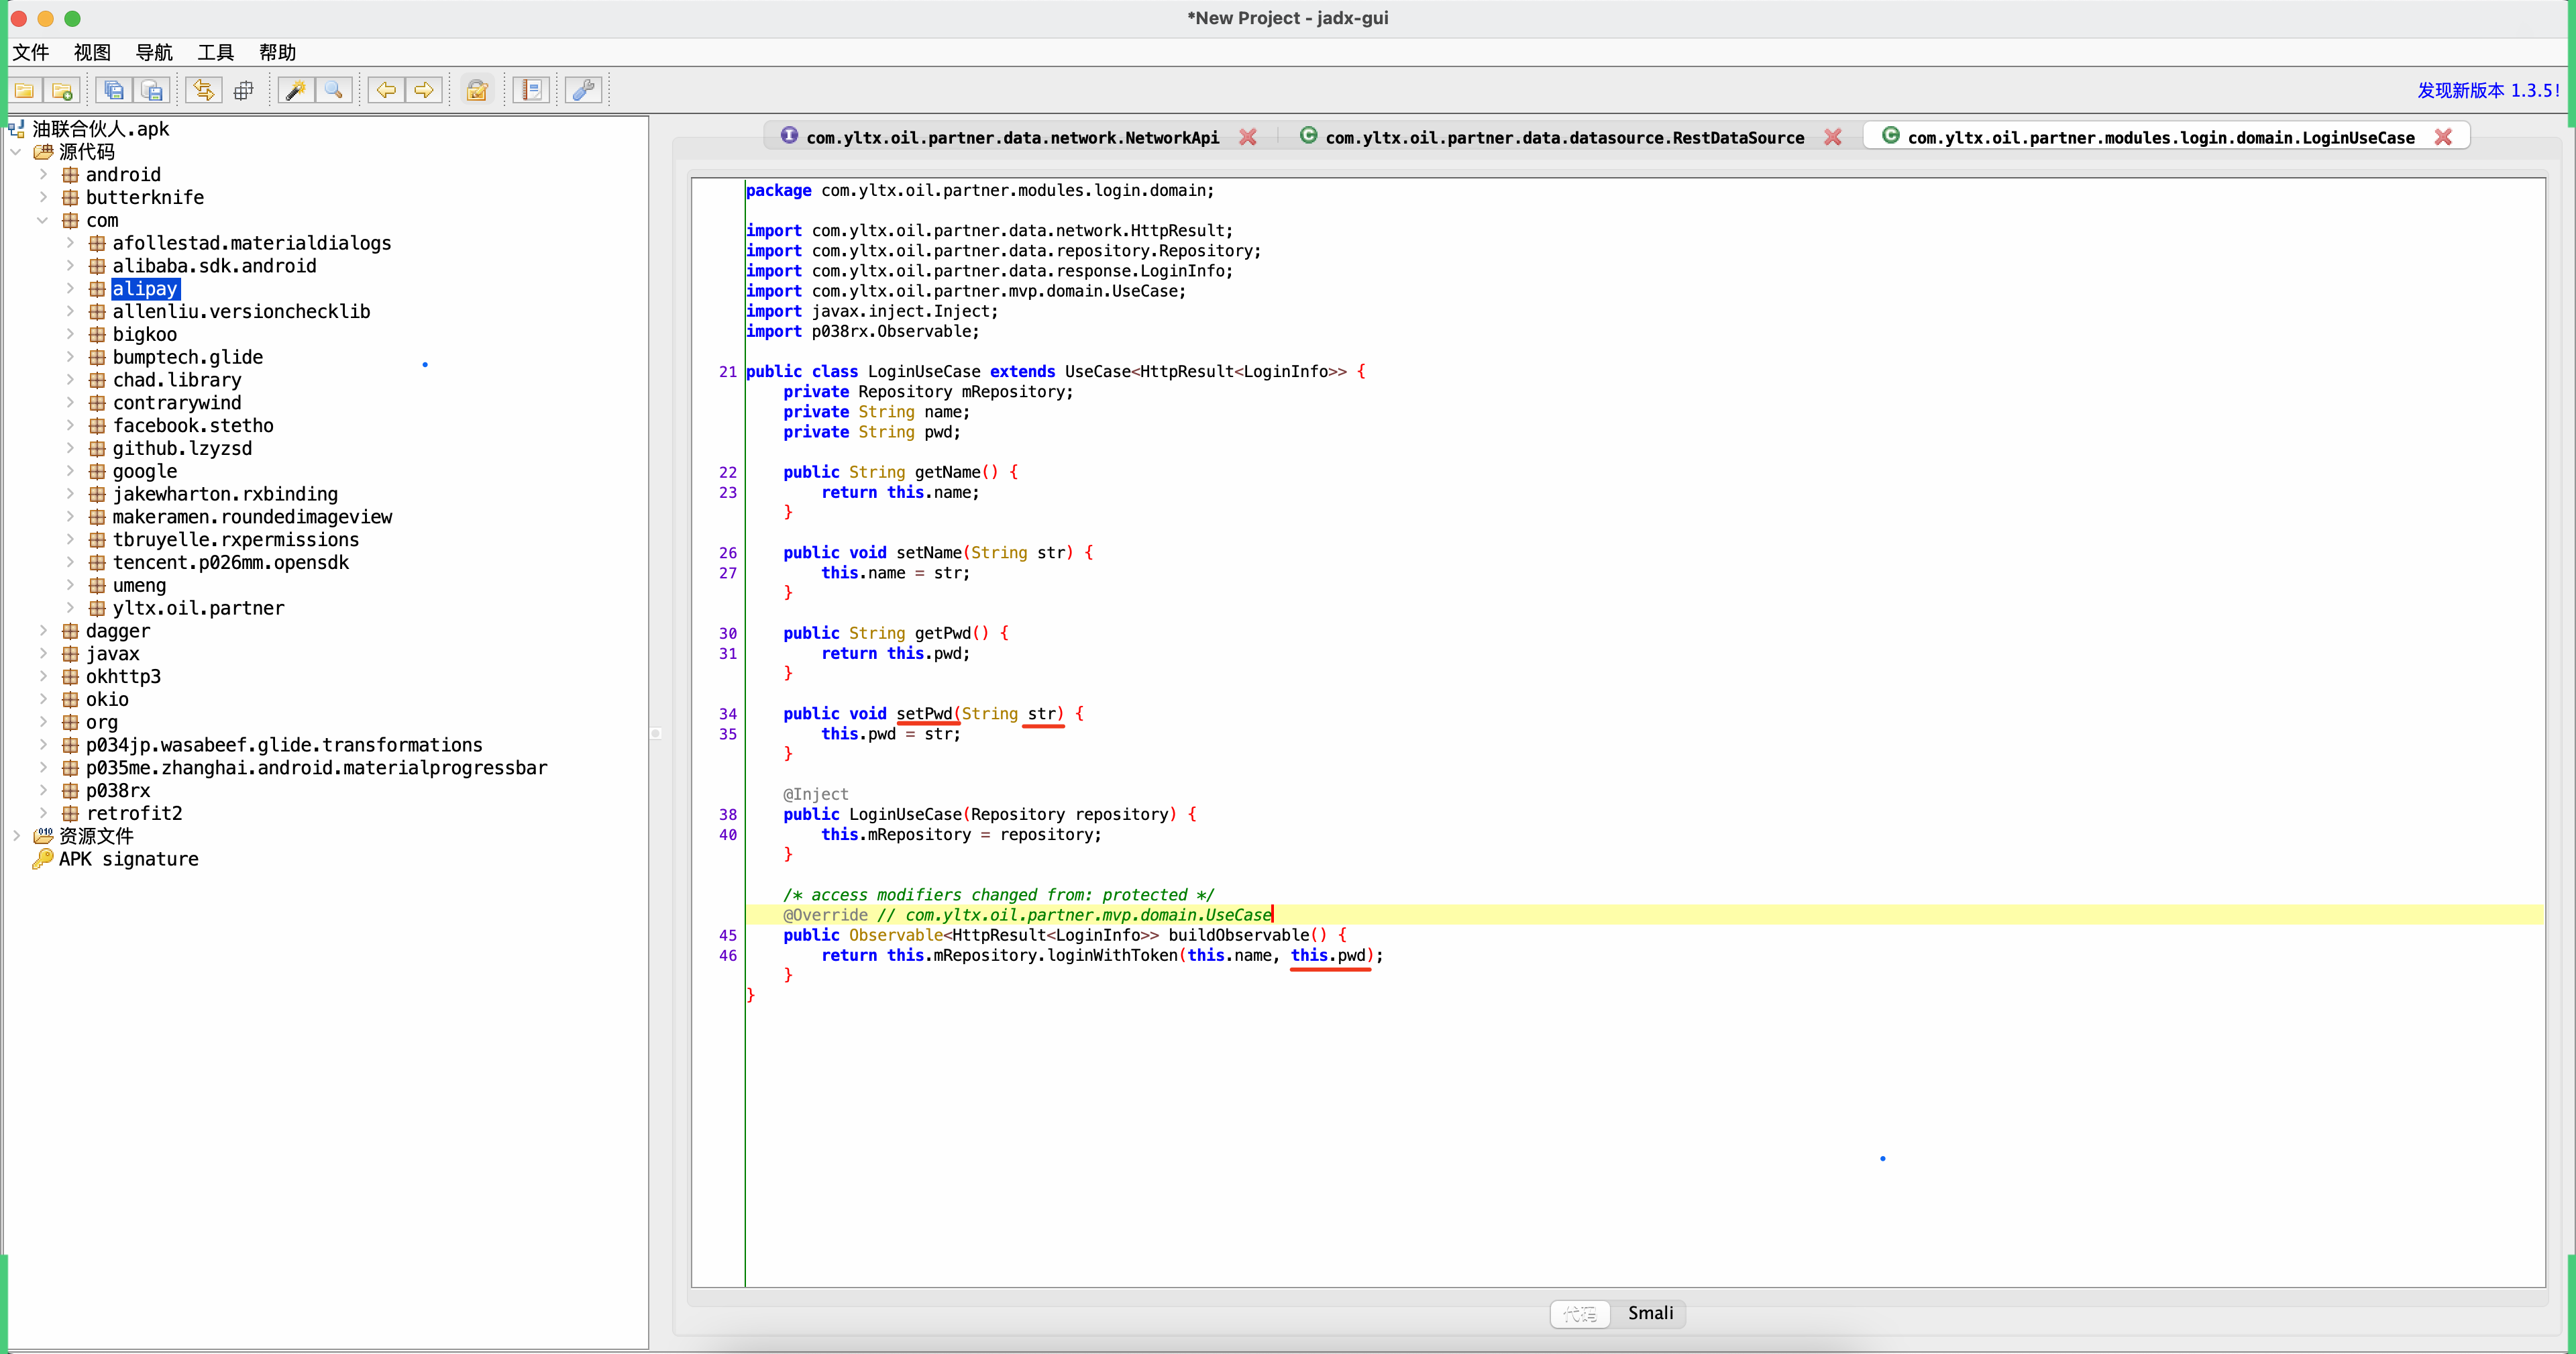
- 反编译 + 代码位置
1.搜:/v1/partnerLogin/login
2.代码
# 手机号
# 密码
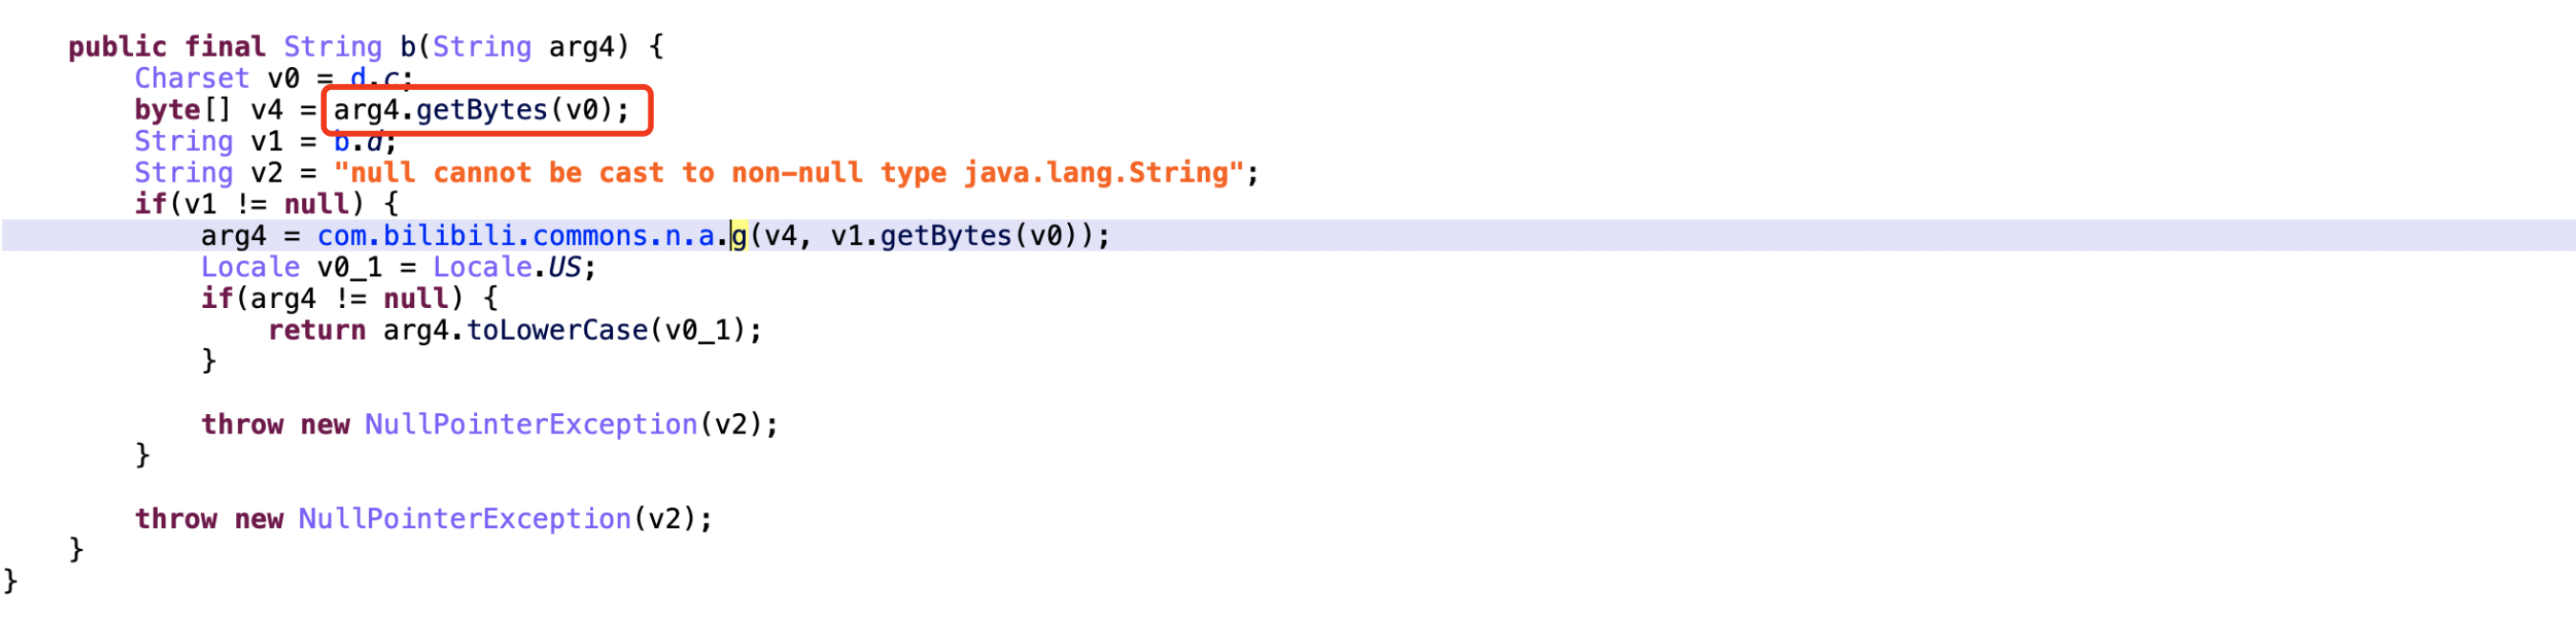
return this.mRepository.loginWithToken(this.name, this.pwd);
this.mLoginUseCase.setPwd( Md5.md5(str2) );
- Hook md5
...
pwd,其实就是对输入的密码明文进行md5加密的结果。
小结:反编译+定位代码+Hook+还原
毫无头绪:
- Java不懂
- 安卓不懂
2.Java环境搭建【正向+逆向案例】
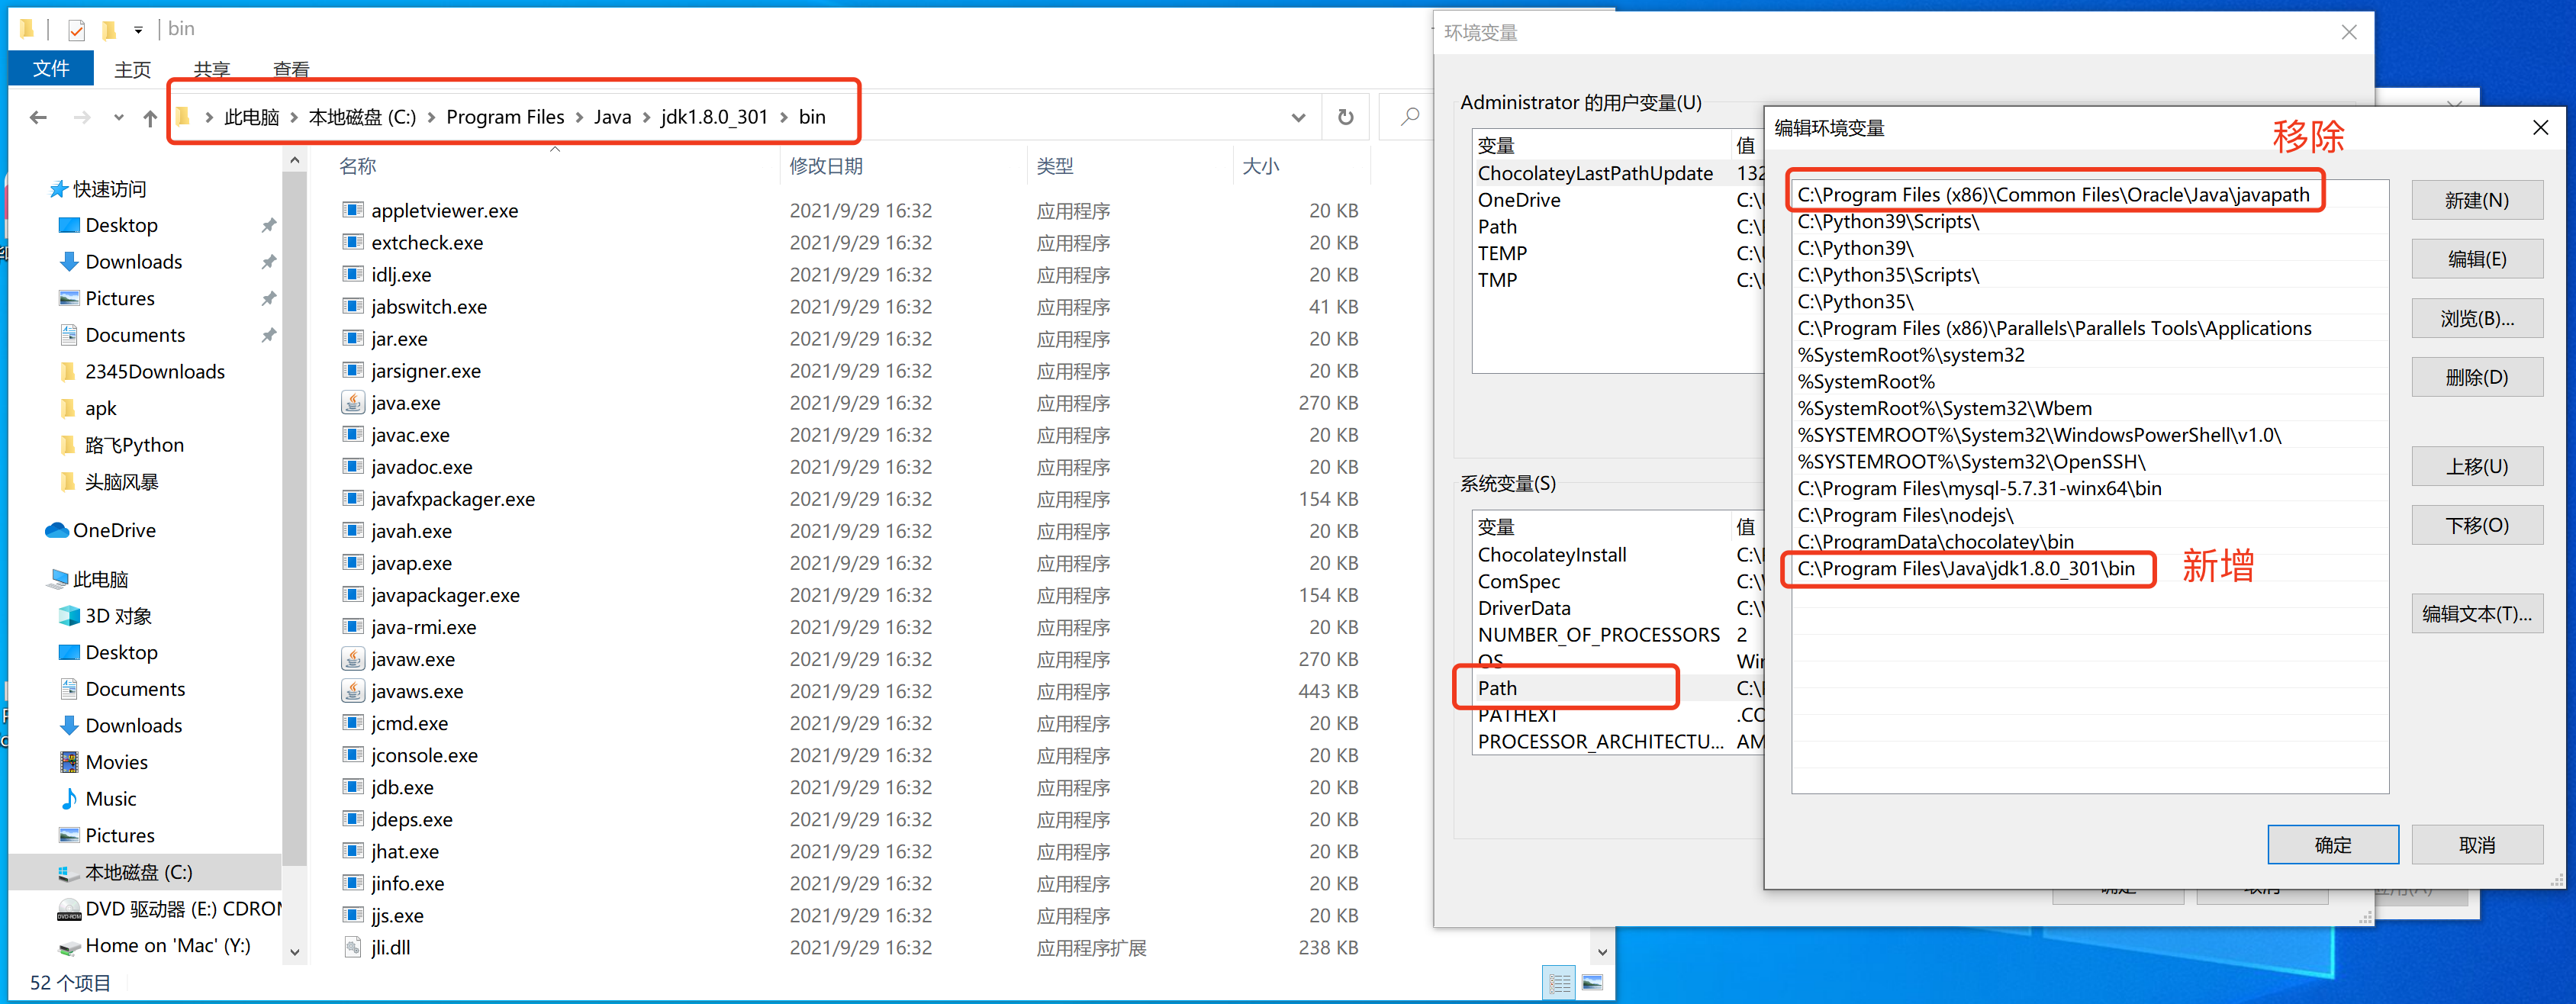
- 安装JDK(上节搞定)
安装目录/bin/java.exe
- 系统环境变量(上节搞定)
安装目录/bin/
- 编写代码+运行
- txt文本文档编写 + 终端运行 【太费劲】
- IntelliJ IDEA
2.1 安装IntelliJ 专业版
- 激活工具v1: 2020.1 【破解包】jetbrains-agent-latest.zip
https://www.zhihu.com/zvideo/1254435808801050624
- 激活工具v2: 2021 2022 【破解包】windows.zip
- 安装2021
- 解压 windows.zip -> 文件夹
https://www.bilibili.com/video/BV1JP411V7Gv/?spm_id_from=333.999.0.0
注意:激活之后,发现其他pycharm无法运行或闪退。
- 你曾经激活Pycharm,可以参考之前的方式(IntelliJ )
2.2 编写&运行代码
...
如果你会安卓开发:
1.定义接口
import retrofit2.http.Field;
import retrofit2.http.FormUrlEncoded;
import retrofit2.http.GET;
import retrofit2.http.POST;
import retrofit2.http.Query;
public interface NetworkApi {
@FormUrlEncoded
@POST("api/v1/partnerLogin/login")
Observable<HttpResult<LoginInfo>> submitLogin(@Field("phone") String str, @Field("password") String str2);
}
2.代码位置调用
NetworkApi.submitLogin("18630087660", "qwe123")
内部自动会发送请求:
地址:api/v1/partnerLogin/login POST
参数:
phone = “18630087660”
password = "qwe123"
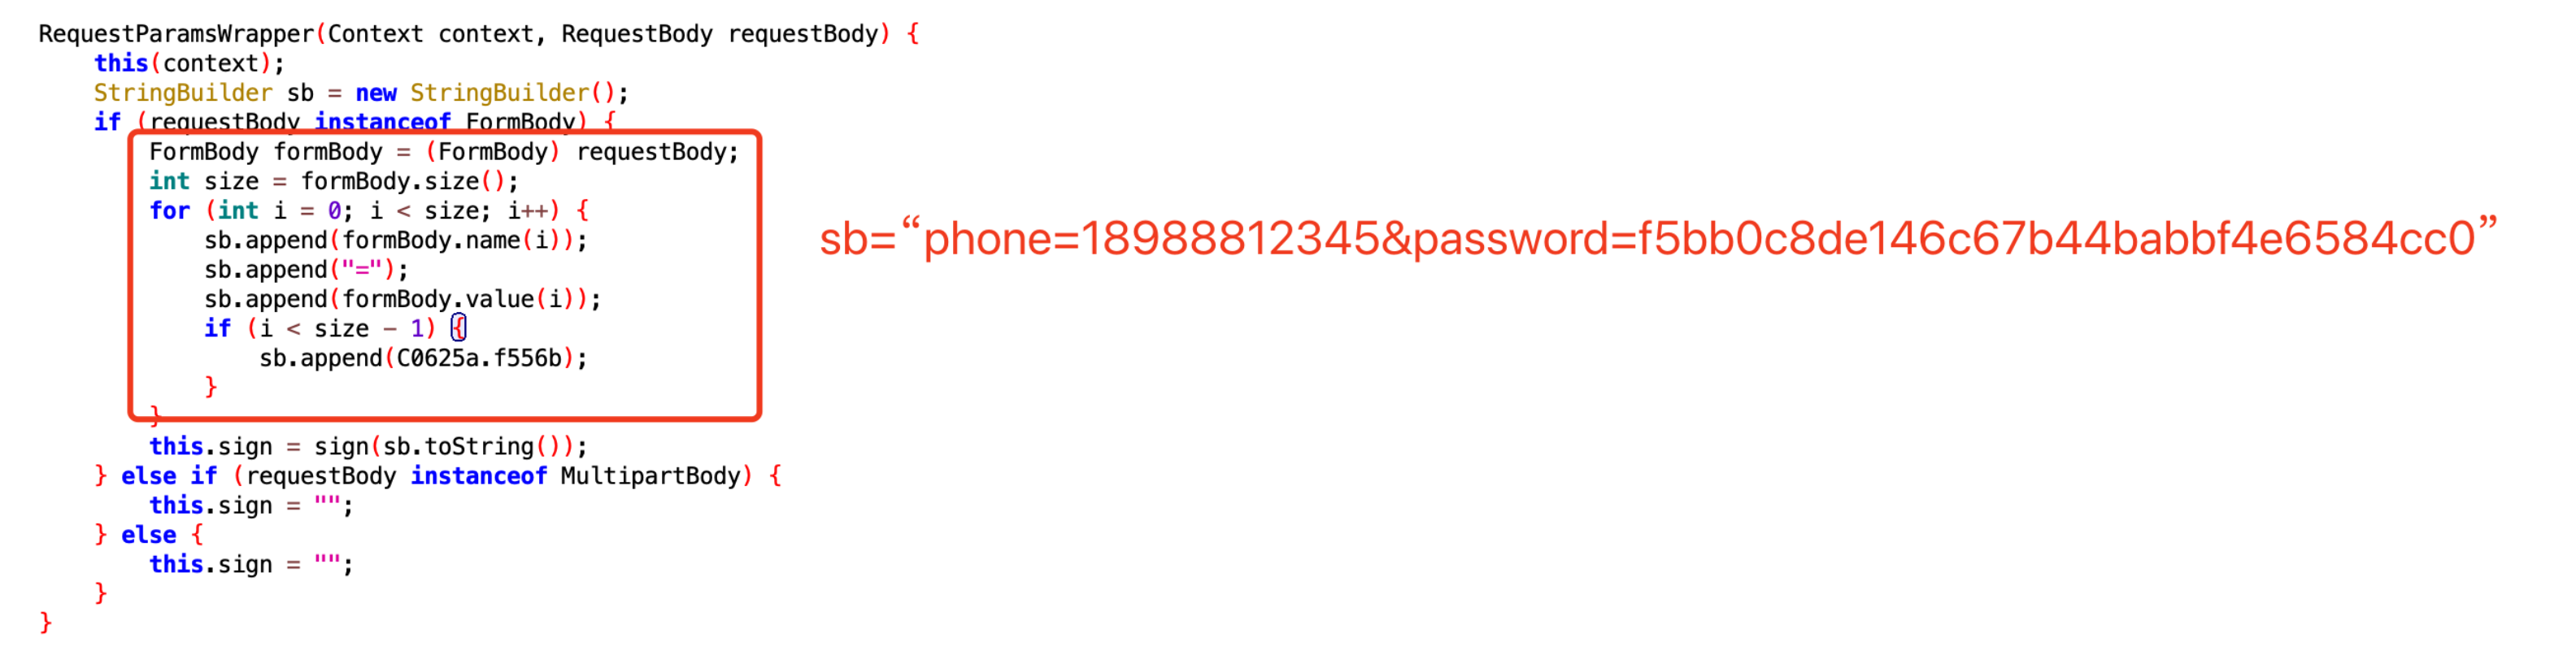
phone=18630087660&password=qwe123
1.案例:油联合伙人
目标:实现自动登录
注意:当前APP服务器连接不上,无法运行抓包,请参考抓包截图。
1.1 抓包
请求方式:POST
请求地址:https://chinayltx.com/app/api/v1/partnerLogin/login
请求体:
	phone=18630087660
	password=e10adc3949ba59abbe56e057f20f883e
请求头:
	X-App: native
    X-Noncestr: 123456
    X-OS: partnerApp_android
    X-Req-Time: 1650980779832
    X-Sign: 645b299fc29998e390d60d95a9b1ac5a
    X-Token:
    X-UserID:
接下来要解决:
- password是怎么加密的?
- X-Sign是怎么加密?
1.2 逆向
请求方式:POST
请求地址:https://chinayltx.com/app/api/v1/partnerLogin/login
请求体:
	phone=18630087660
	password=e10adc3949ba59abbe56e057f20f883e
请求头:
	X-App: native
    X-Noncestr: 123456
    X-OS: partnerApp_android
    X-Req-Time: 1650980779832
    X-Sign: 645b299fc29998e390d60d95a9b1ac5a
    X-Token:
    X-UserID:
接下来要解决:
- password是怎么加密的?
- X-Sign是怎么加密?
1.password算法
根据特点去搜索,可能搜到很多东西。
password    "password"     password=
phone
/v1/partnerLogin/login


按理说md5加密:
- 明文:123456
- 密文:e10adc3949ba59abbe56e057f20f883e
import hashlib

obj = hashlib.md5()
obj.update("123456".encode('utf-8'))
res = obj.hexdigest()
print(res) # e10adc3949ba59abbe56e057f20f883e
2.X-Sign算法
X-Sign
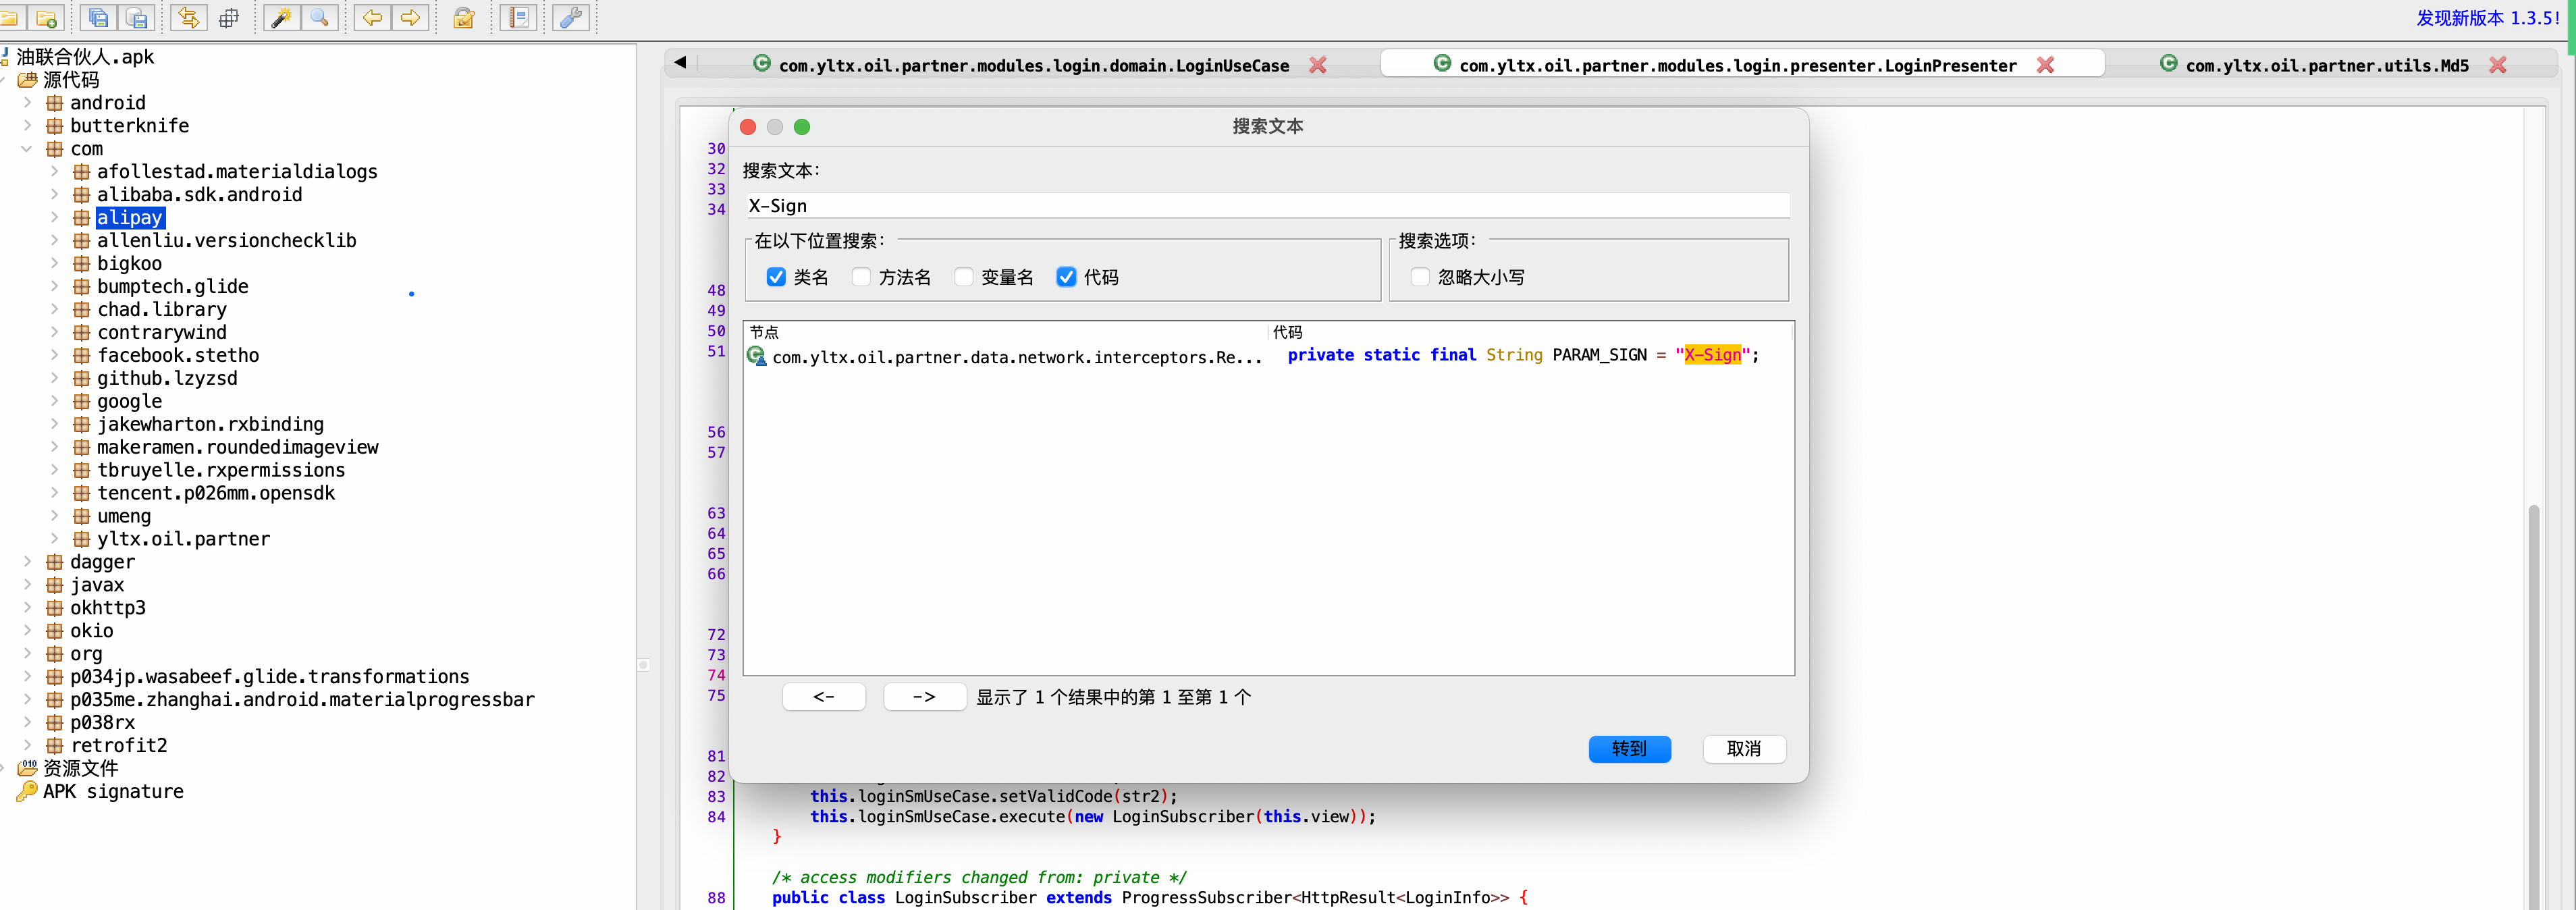
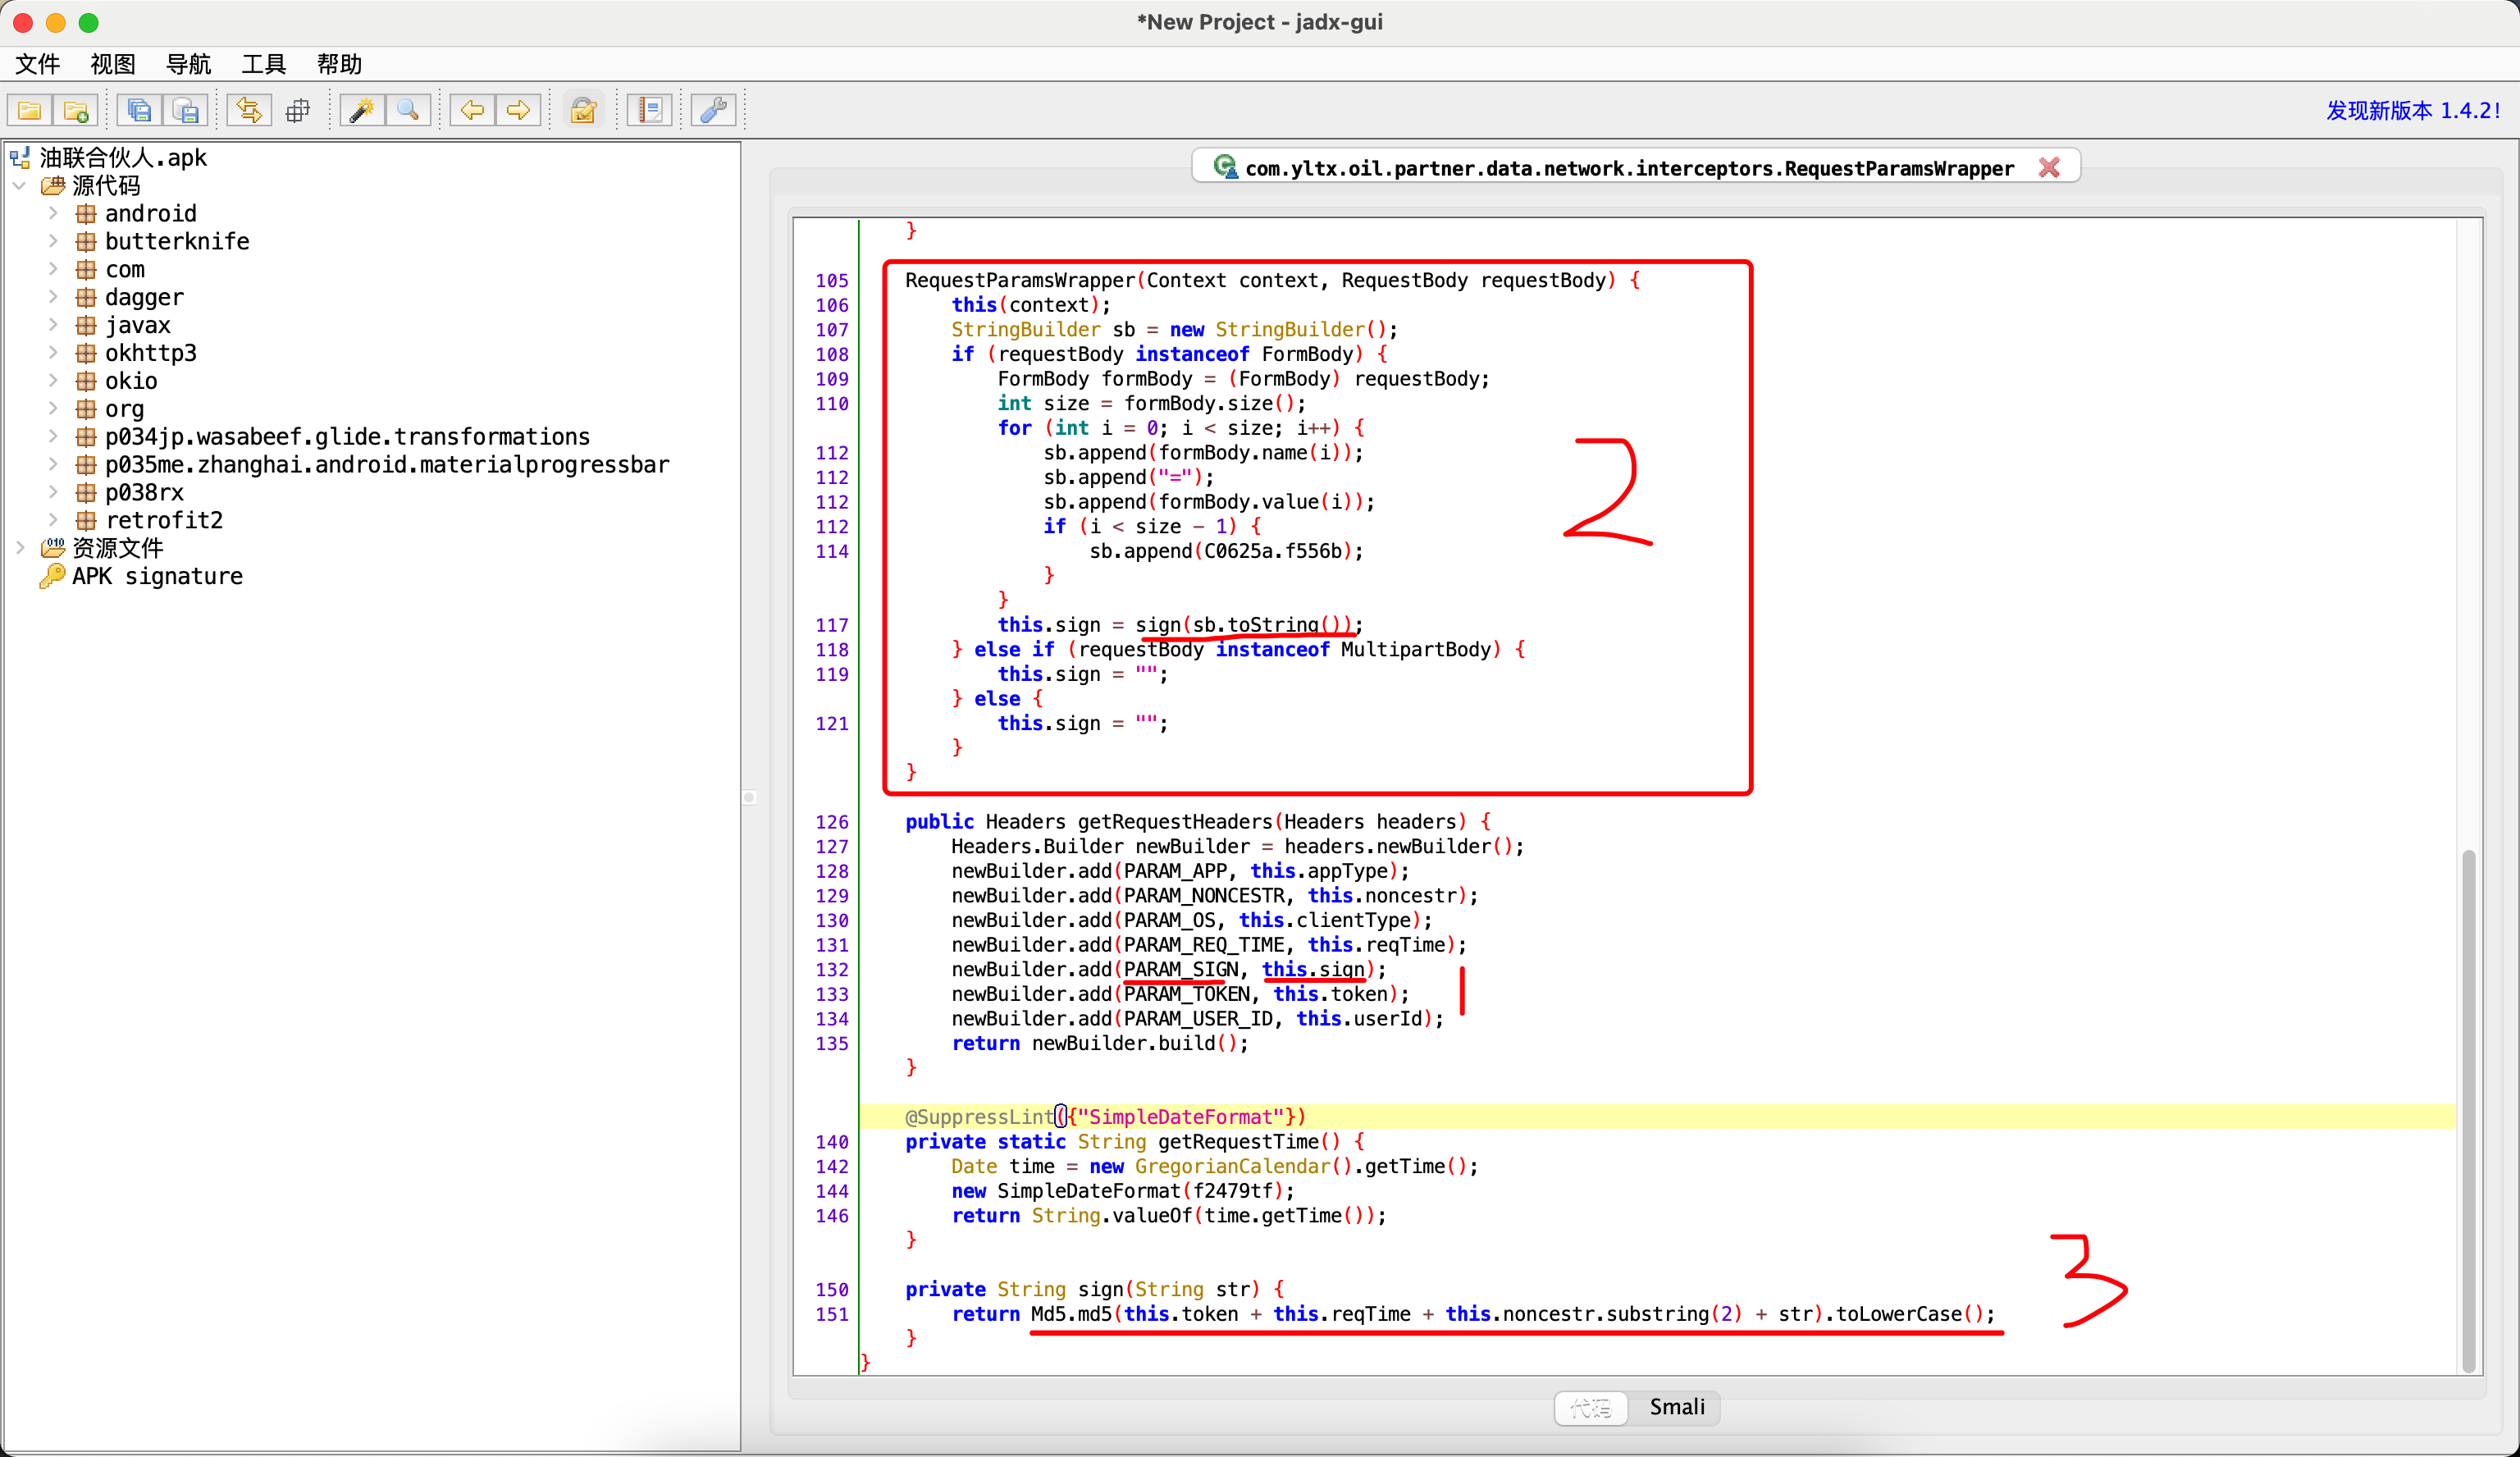
import hashlib

token = ""
reqTime = "1657201079926"
nonce_str = "123456"
nonce_str_sub_2 = nonce_str[2:]
body_string = "phone=18630099999&password=4297f44b13955235245b2497399d7a93"

encrypt_string = f"{token}{reqTime}{nonce_str_sub_2}{body_string}"

obj = hashlib.md5()
obj.update(encrypt_string.encode('utf-8'))
res = obj.hexdigest()
print(res)
1.3 实现代码
import time
import hashlib

import requests


def md5(data_string):
    obj = hashlib.md5()
    obj.update(data_string.encode('utf-8'))
    return obj.hexdigest()


def run():
    phone = input("请输入手机号:")
    password = input("请输入密码:")
    encrypt_password = md5(password)

    token = ""
    req_time = str(int(time.time() * 1000))
    nonce_str = "123456"
    nonce_str_sub_2 = nonce_str[2:]
    body_string = f"phone={phone}&password={encrypt_password}"
    encrypt_string = f"{token}{req_time}{nonce_str_sub_2}{body_string}"

    sign = md5(encrypt_string)

    res = requests.post(
        url="https://chinayltx.com/app/api/v1/partnerLogin/login",
        data={
            "phone": phone,
            "password": encrypt_password,
        },
        headers={
            "X-App": "native",
            "X-Noncestr": nonce_str,
            "X-OS": "partnerApp_android",
            "X-Req-Time": req_time,
            "X-Sign": sign,
            "X-Token": token,
            "X-UserID": ""
        }
    )

    print(res.text)


if __name__ == '__main__':
    run()
2.java入门
2.1 环境搭建
-
Python,解释型编程语言。
# xx.py
print("爬虫逆向开发")
print("结束")
>>>Python解释器的路径 代码文件的路径 >>>C:\python39\python.exe 代码文件的路径 C:\python39\加入环境变量。 >>>python xx.py -
Java,编译型&解释型语言。(编译型 vs 解释器)
// Hello.java
String name = "武沛齐";

System.out.println(name);
在执行代码时,需要对代码先进行编译。
>>>java安装bin目录下javac  Hello.java
>>>javac Hello.java

Hello.class
编译完成之后,你会得到一个文件
Hello.class,去运行代码。>>>java Hello
-
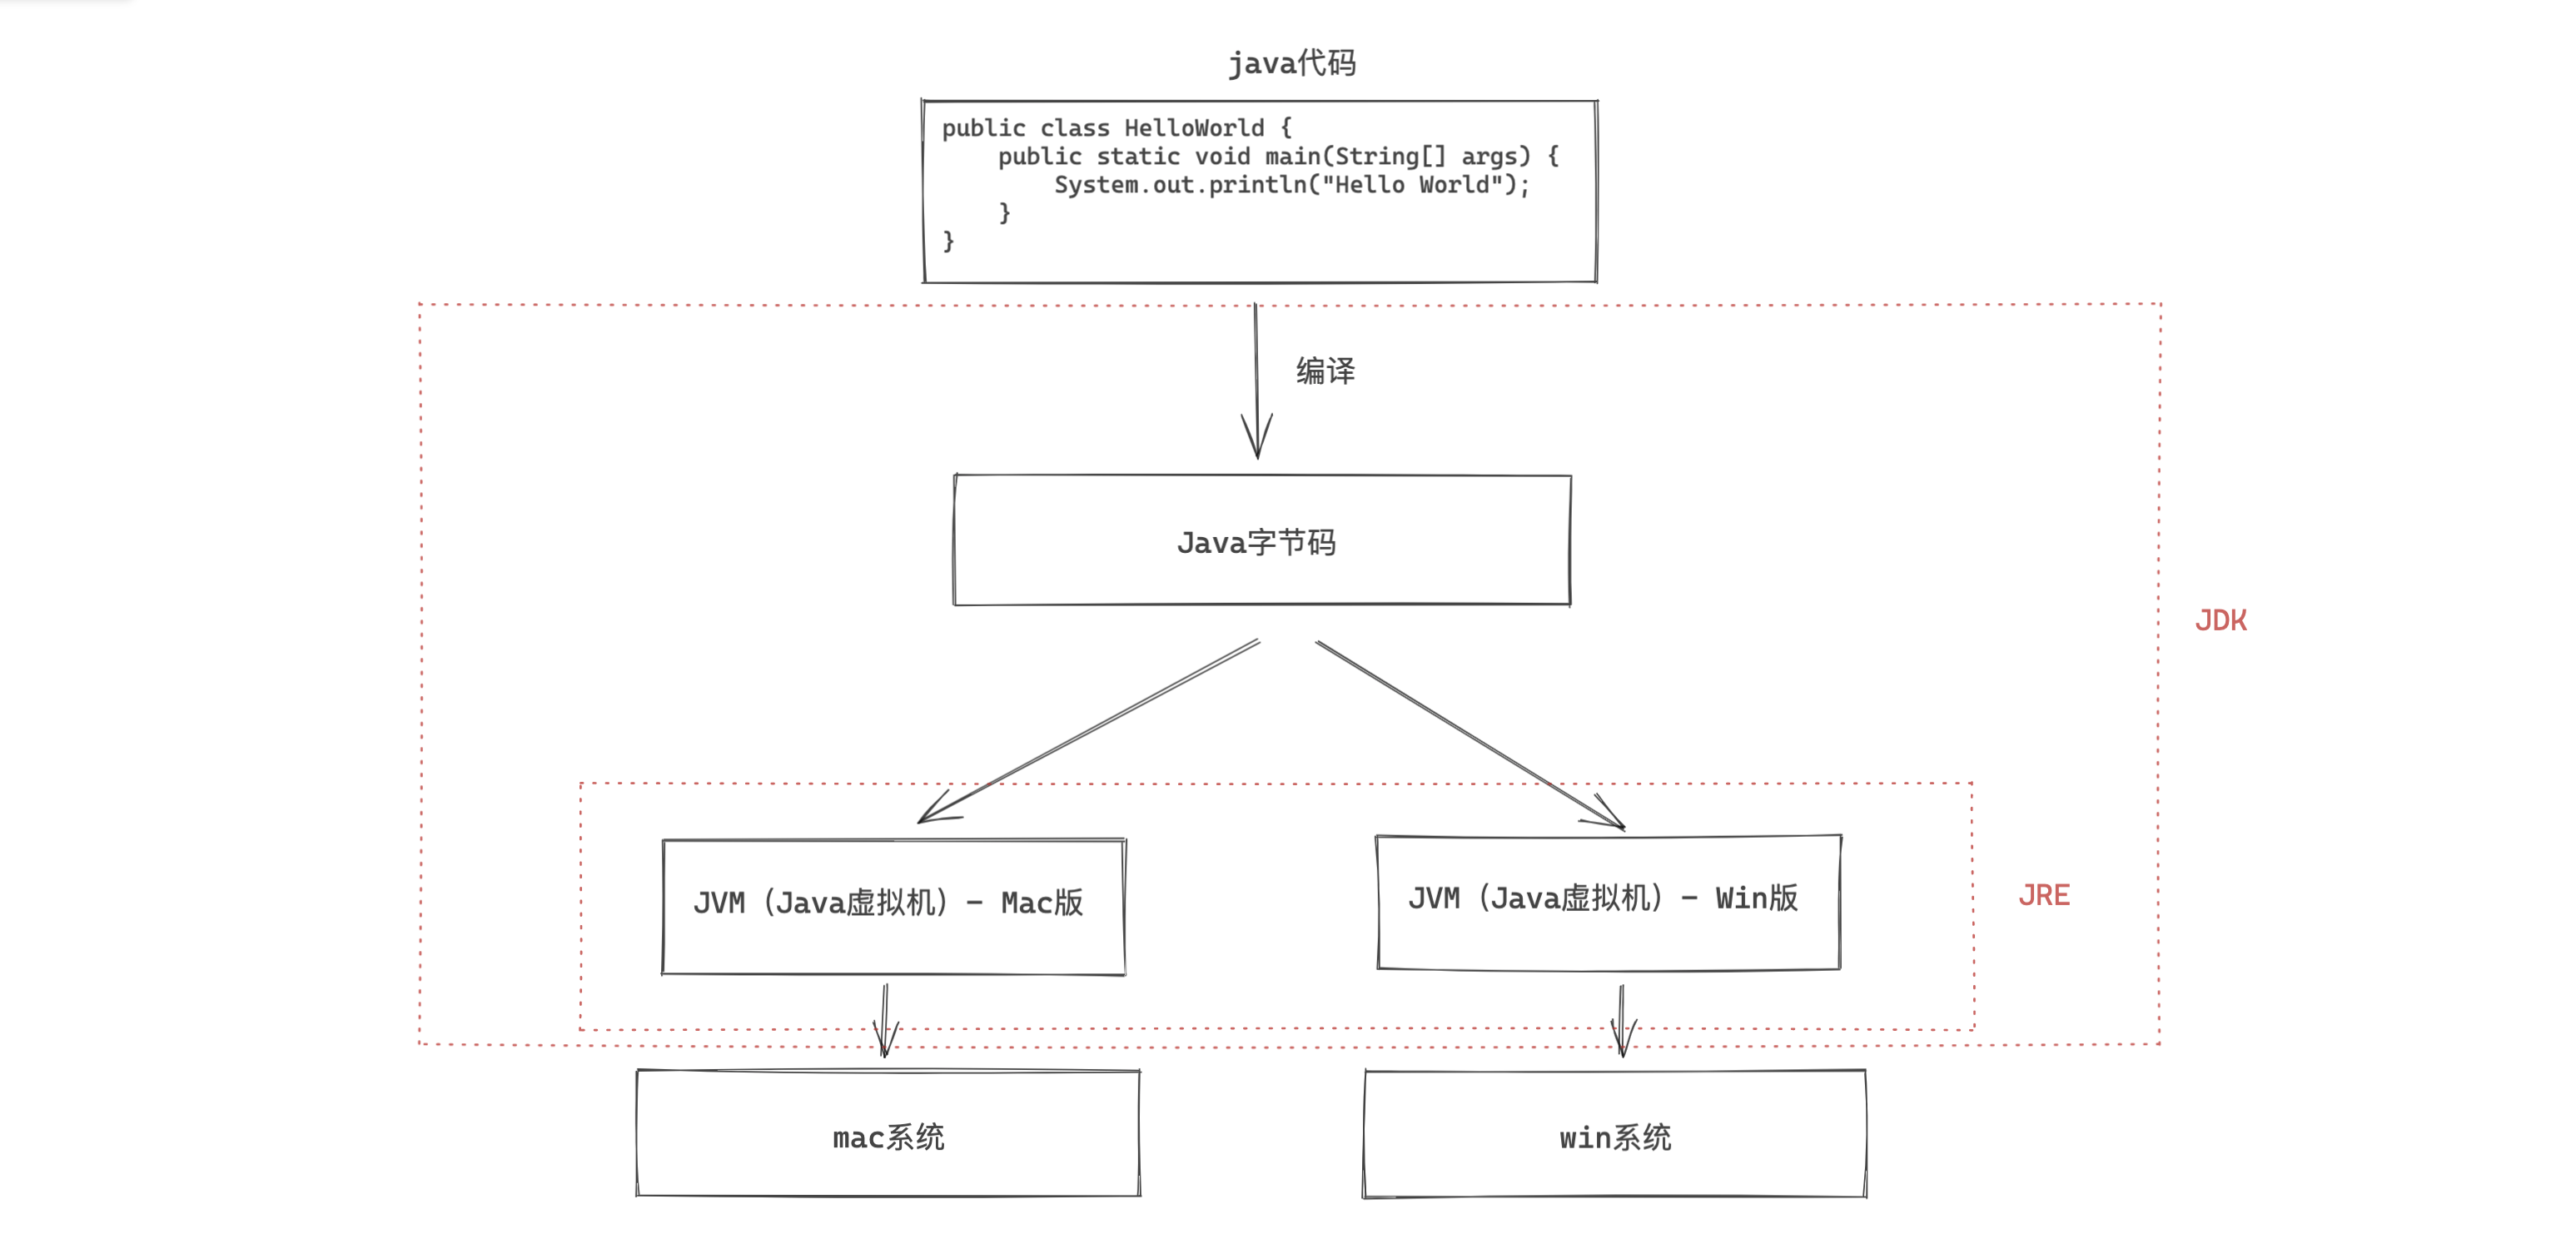
JRE,( Java Runtime Envrionment ),Java 运行时环境。
含JVM和运行必备的类库。 电脑上想要运行java程序,就必须安装JRE。 -
JDK,( Java Development Kit ),Java开发工具。【包含JRE】【Java开发】
含JRE 和 开发必备的工具。
工具包含:编译工具javac.exe 和 运行工具java.exe
想要开发Java应用程序,就必须安装JDK。
接下来,我们就来下载和安装吧。
JDK8(jdk 1.8)版本(目前最新已到17)

官方地址:https://www.oracle.com/java/technologies/downloads/#java8
百度云盘:资源目录
安装好之后需要配置下环境变量。
关于mac系统,自带JDK:

/Library/Java/JavaVirtualMachines

编写代码+编译+运行:
-
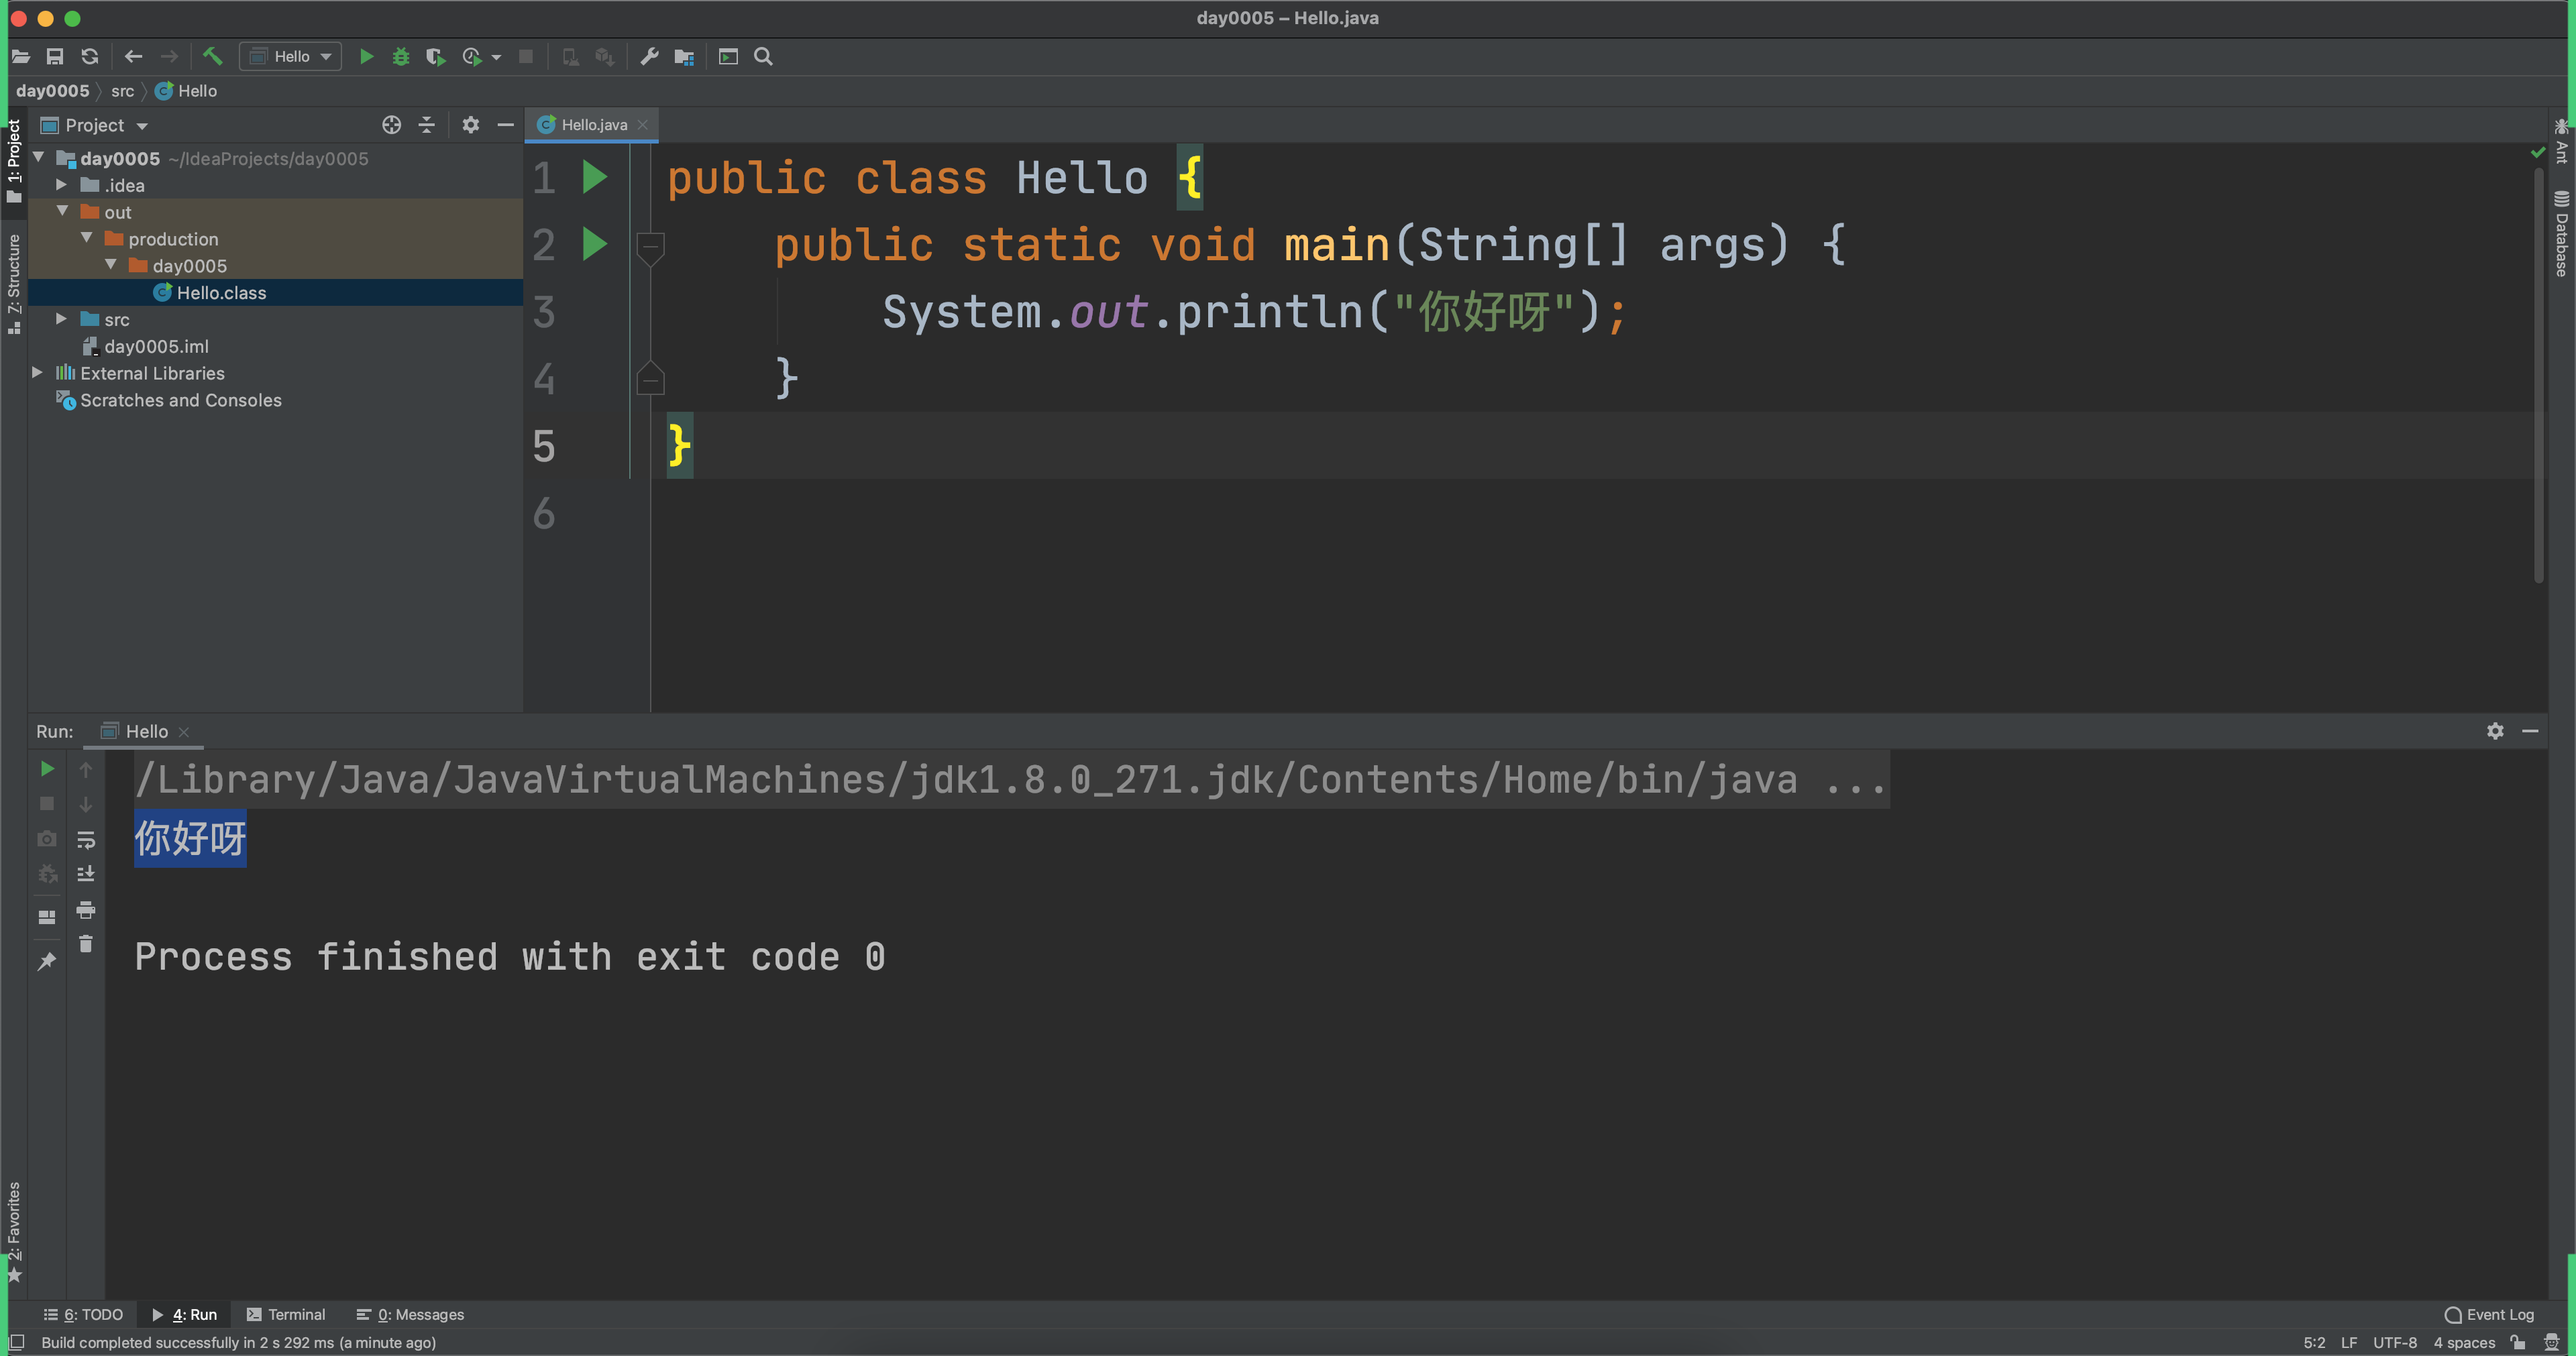
编写Java代码:Hello.java
public class Hello { public static void main(String[] args) { System.out.println("Hello World"); } } -
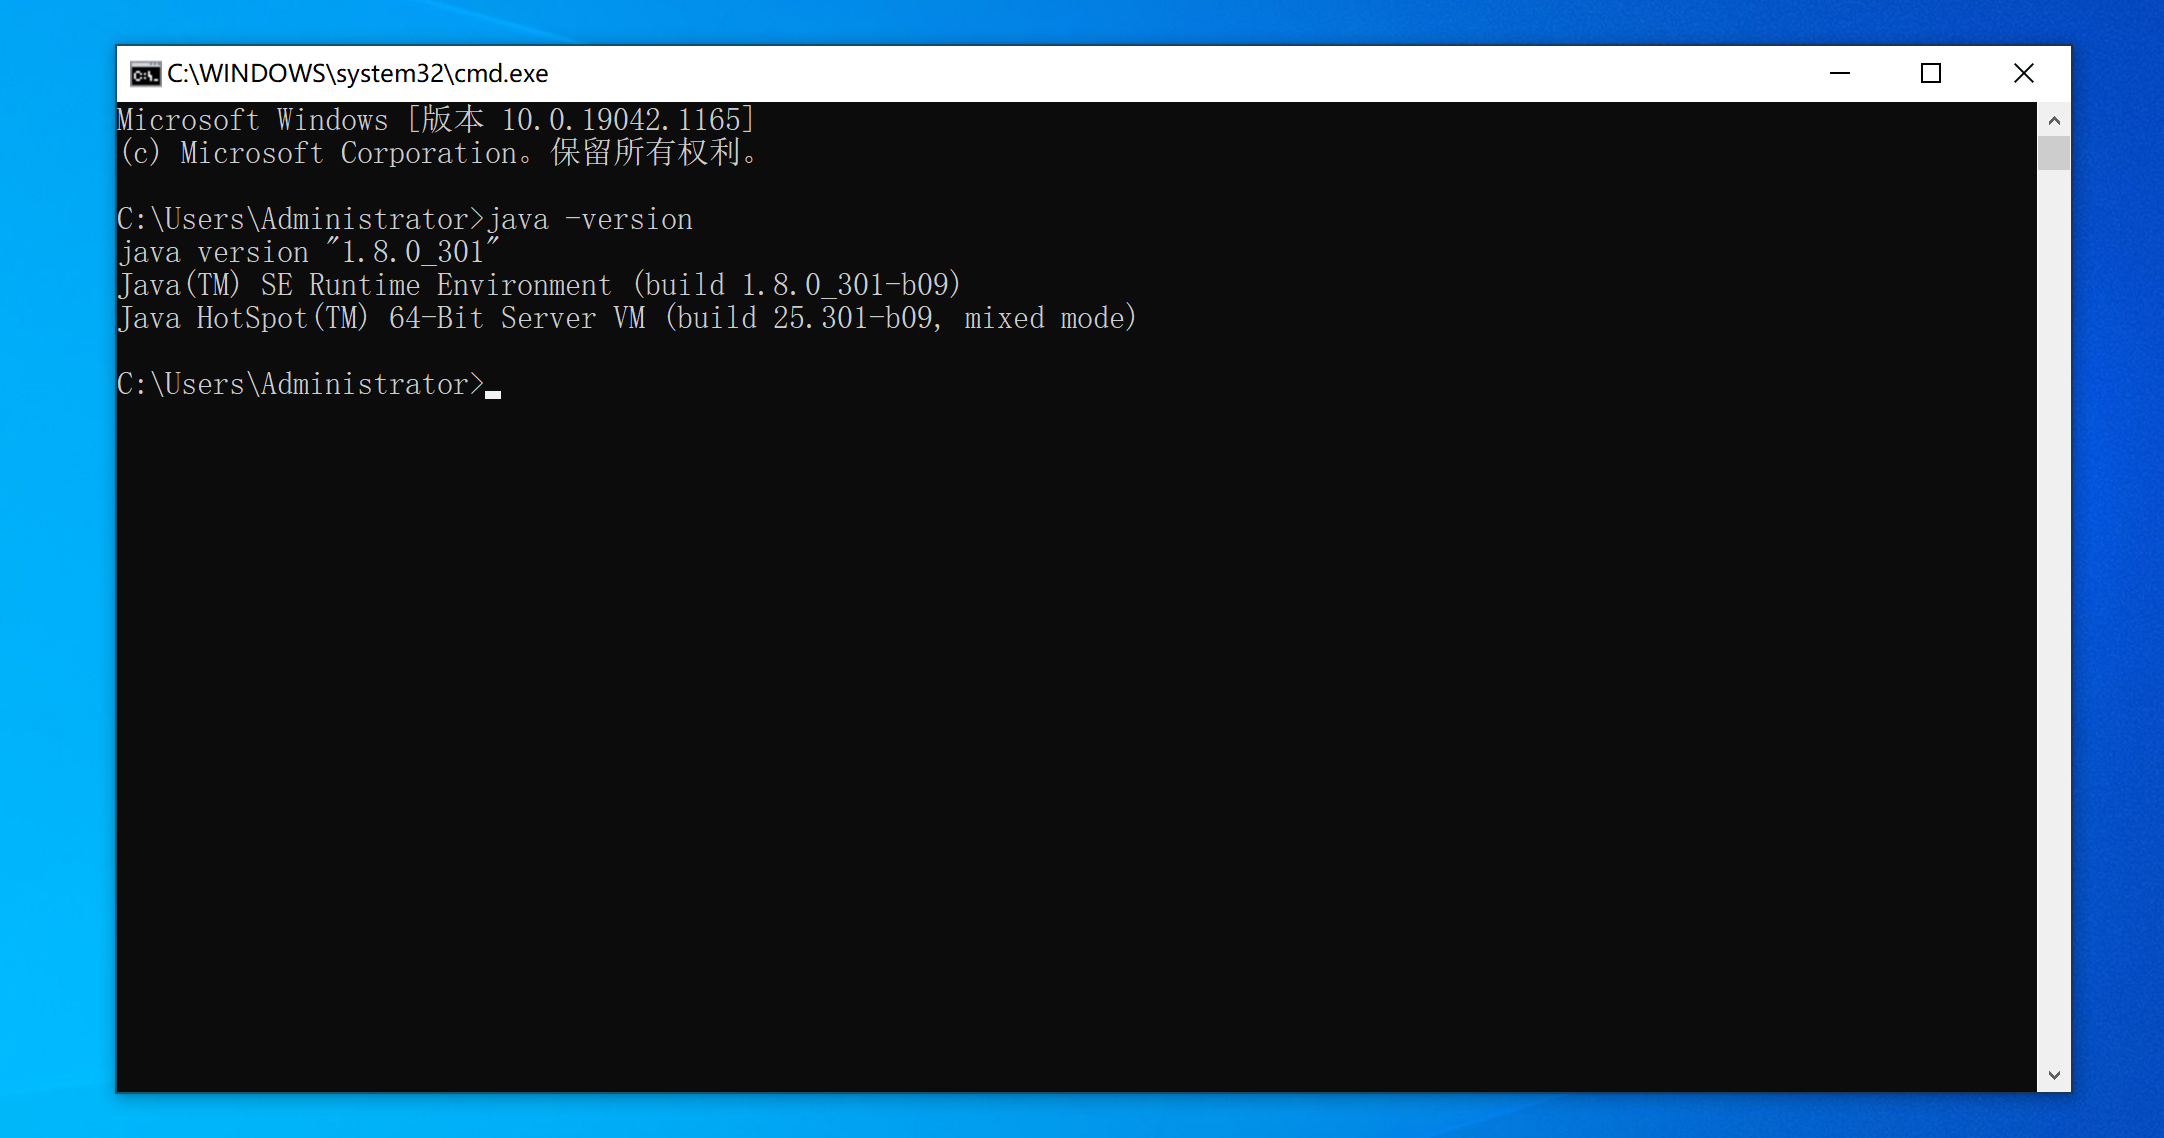
打开终端去运行命令
>>>javac Hello.java
>>>java Hello
2.2 Inteliji
编写Java代码时建议大家使用IDE(集成开发环境)来提供开发效率。
-
下载,建议【2020.1.1版本】
https://www.jetbrains.com/idea/download/other.html -
激活
视频:https://www.zhihu.com/zvideo/1254435808801050624
激活包:在网盘共享目录,其他共享资料包文件夹【jetbrains-agent-latest.zip】
2.3 Java基础语法
初步代码的分析:Hello.java
public class Hello {
    public static void main(String[] args) {
        System.out.println("你好呀");
    }
}
-
主函数 & 程序的入口。
def func(): pass if __name__ == "__main__": func() -
文件名
一个文件中最多只能有一个public类 且 文件名必须和public类名一致。 如果文件中有多个类,文件名与public类名一致。 如果文件中有多个类 且 无public类,文件名可以是任意类名。 -
类名
首字母大写且驼峰式命名,例如:Hello、UserInfo、PersonApplication -
类修饰符:public、default(不写)
-
类中成员修饰符:public、private、protected、default(不写)
-
静态成员,无序实例化就可以指定调用。
class MyTest{

    public void f1(){
        System.out.println("f1");
    }

    public static void f2(){
        System.out.println("f2");
    }
}

public class Hello {

    public static void main(String[] args) {
        MyTest.f2();

        //1.实例化
        MyTest obj = new MyTest();
        // 2.对象调用
        obj.f1();

    }
}
class Person{ public static void f1(){ // 静态方法 System.out.println("我是F1函数"); } } public class Hello { public static void main(String[] args) { Person.f1(); } }class Person { public void f2() { // 实例方法 System.out.println("我是F1函数"); } } public class Hello { public static void main(String[] args) { // 实例化对象 obj = Person(); Person obj = new Person(); // 对象调用f2 obj.f2(); } } -
void表示方法没有返回值
class MyTest{ public int f1(){ System.out.println("f1"); return 123; } public static String f2(){ System.out.println("f2"); return "哈哈哈"; } } public class Hello { public static void main(String[] args) { MyTest obj = new MyTest(); int v1 = obj.f1(); String v2 = MyTest.f2(); } } -
参数
class MyTest {

    public int f1(int a1, int a2) {
        int result = a1 + a2;
        return result;
    }

}

public class Hello {

    public static void main(String[] args) {
        MyTest obj = new MyTest();
        int v1 = obj.f1(1, 2);
    }
}
补充:
Python 官方源代码不也有java这样写的么?

def func(a1,a2):
	return a1 + a2

# 建议
def foo(a1: str a2:int) -> int
	return 1

foo(11,22)
2.3.1 注释
/**
 * 对这个类进行注释
 */
public class Hello {

    /**
     * 这个方法是干嘛....
     * @param v1 大小
     * @param v2 尺寸
     * @return 返回一个xxx
     */
    public static String getSign(int v1, String v2) {
        return "哈哈哈";
    }

    public static void main(String[] args) {
        // 单行注释 #
        // int age = 18;

        /* 多行注释 """sdfafd"""
        String name = "武沛齐";
        int size = 18;
         */
    }
}
注意:JavaScript
2.3.2 变量和常量
public class Hello {

    public static void main(String[] args) {
        String name = "武沛齐";
        name = "alex";

        int age = 19;
        age = 20;

        final int size = 18;
    }
}
v1 = [111,22]
v2 = 345
2.3.3 输入和输出
import java.util.Scanner;

public class Hello {

    public static void main(String[] args) {
        // 输入
        Scanner input = new Scanner(System.in);
        String text = input.nextLine();

        // 输出
        System.out.println(text);
        // System.out.print(text);
    }
}
import java.util.Scanner;

public class Hello {

    public static void main(String[] args) {
        // 输出
        System.out.print("请输入:");

        // 输入
        Scanner input = new Scanner(System.in);
        String text = input.nextLine();

        // 输出
        System.out.println(text);
    }
}
2.3.4 条件语句
import java.util.Scanner;

public class Hello {

    public static void main(String[] args) {
        int age = 19;

        if (age < 18) {
            System.out.println("少年");
        } else if (age < 40) {
            System.out.println("大叔");
        } else {
            System.out.println("老汉");
        }

    }
}
public class Hello {

    public static void main(String[] args) {
        int score = 19;

        switch (score) {
            case 10:
                System.out.println("xxx");
                System.out.println("xxx");
                System.out.println("xxx");
                break;
            case 20:
                System.out.println("xxx");
                System.out.println("xxx");
                System.out.println("xxx");
                break;
            default:
                System.out.println("xxx");
                break;
        }

    }
}
2.3.5 循环语句
while循环
public class Hello {

    public static void main(String[] args) {

        int count = 0;
        while (count < 3) {
            System.out.println("执行中...");
            count += 1;
        }
    }
}
do while循环(至少执行1次)
public class Hello {
    public static void main(String[] args) {

        int count = 0;
        do {
            System.out.println("执行中...");
            count += 1;
        } while (count < 3);

    }
}
for循环
public class Hello {

    public static void main(String[] args) {

        for (int i = 0; i < 10; i++) {
            System.out.println("哈哈哈");
        }

    }
}
public class Hello {

    public static void main(String[] args) {
        String[] nameList = {"修仙", "肖峰", "麻子", "十分"};
        // nameList.length   4
        // nameList[0]

        for (int idx = 0; idx < nameList.length; idx++) {
            String ele = nameList[idx];
            System.out.println(ele);
        }
    }
}
注意:也支持break/continue。
2.4 数据类型
2.4.1 整数类型
- byte,字节 【1字节】表示范围:-128 ~ 127 即:
-2^7 ~ 2^7 -1 - short,短整型 【2字节】表示范围:-32768 ~ 32767
- int,整型 【4字节】表示范围:-2147483648 ~ 2147483647
- long,长整型 【8字节】表示范围:-9223372036854775808 ~ 9223372036854775807
public class Hello {

    public static void main(String[] args) {
        byte v1 = 32;
        short v2 = 10000;
        int v3 = 22221331;
        long v4 = 554534353424L;
    }
}
提醒:逆向时有一些字符串是通过字节数组来表示(UTF-8编码)
v1 = "武沛齐"
v2 = [230, 173, 166, 230, 178, 155, 233, 189, 144]
import java.util.Arrays;

public class Hello {

    public static void main(String[] args) {
        // 1.字节数组(转换为字符串) [字节,字节,字节]
        byte[] dataList = {97, 105, 100, 61, 50, 52, 54, 51, 56, 55, 53, 55, 49, 38, 97, 117, 116, 111, 95, 112, 108, 97, 121, 61, 48, 38, 99, 105, 100, 61, 50, 56, 57, 48, 48, 56, 52, 52, 49, 38, 100, 105, 100, 61, 75, 82, 69, 104, 69, 83, 77, 85, 74, 104, 56, 116, 70, 67, 69, 86, 97, 82, 86, 112, 69, 50, 116, 97, 80, 81, 107, 55, 87, 67, 104, 67, 74, 103, 38, 101, 112, 105, 100, 61, 48, 38, 102, 116, 105, 109, 101, 61, 49, 54, 50, 55, 49, 48, 48, 57, 51, 55, 38, 108, 118, 61, 48, 38, 109, 105, 100, 61, 48, 38, 112, 97, 114, 116, 61, 49, 38, 115, 105, 100, 61, 48, 38, 115, 116, 105, 109, 101, 61, 49, 54, 50, 55, 49, 48, 52, 51, 55, 50, 38, 115, 117, 98, 95, 116, 121, 112, 101, 61, 48, 38, 116, 121, 112, 101, 61, 51};

        String dataString = new String(dataList);
        System.out.println("字符串是:" + dataString);

        // 2.字符串->字节数组
        try {
            // Python中的  name.encode("gbk")
            String name = "武沛齐";
            byte[] v1 = name.getBytes("GBK");
            System.out.println(Arrays.toString(v1)); // [-50, -28, -59, -26, -58, -21]

            // Python中的  name.encode("utf-8")
            byte[] v2 = name.getBytes("UTF-8");
            System.out.println(Arrays.toString(v2)); // [-26, -83, -90, -26, -78, -101, -23, -67, -112]
        } catch (Exception e) {

        }
    }
}
需求来了:某个app逆向,在Java代码中得到一个字节数组 [-50,-28,-59,-26,-58,-21],请通过Python代码将这个字节数组转换成字符串?
在Java中的字节范围:-128127;Python中字节的范围:0255。
  Java  0  1   2  3  4 .. 127 -128 -127 -126    -3  -2  -1
Python  0  1   2  3  4 .. 127  128  129  130 ...253 254 255
java, 有符号:-128~127 python,无符号:0~255byte_list = [-50,-28,-59,-26,-58,-21]让数字转化弄成字节并拼接起来 bytearray
# Python脚本,方便你们以后使用。
byte_list = [-50, -28, -59, -26, -58, -21]

bs = bytearray()  # python字节数组
for item in byte_list:
    if item < 0:
        item = item + 256
    bs.append(item)

str_data = bs.decode('gbk')  # data = bytes(bs)
print(str_data)
data_list = [-26, -83, -90, -26, -78, -101, -23, -67, -112]

num_list = bytearray()
for i in data_list:
    if i < 0:
        i = i + 256
    num_list.append(i)

text = num_list.decode('utf-8')
print(text)
2.4.2 字符
char v1 = 'x';
char v2 = '武';

String = "武沛齐";
注意:字符串是由多个字符串组成。
2.4.3 字符串
定义字符串
import java.io.UnsupportedEncodingException;

public class Hello {

    public static void main(String[] args) throws UnsupportedEncodingException {
        String v1 = "武沛齐";
        String v2 = new String("武沛齐");

        String v4 = new String(new byte[]{-26, -83, -90, -26, -78, -101, -23, -67, -112});
        String v5 = new String(new byte[]{-50, -28, -59, -26, -58, -21}, "GBK");

        String v6 = new String(  new char[]{'武', '沛', '齐'}   ) ;
    }
}
字符串中的方法:
public class Hello {

    public static void main(String[] args) {
        String origin = "alex是个大DB";

        char v1 = origin.charAt(5); // 指定字符
        int len = origin.length();  // 长度
        for (int i = 0; i < len; i++) {
            char item = origin.charAt(i);
        }

        String v2 = origin.trim(); // 去除空白
        String v3 = origin.toLowerCase(); // 小写
        String v4 = origin.toUpperCase(); // 大写
        String[] v5 = origin.split("是"); // 分割
        String v6 = origin.replace("D", "S"); // 替换
        String v7 = origin.substring(2, 6);  // 子字符串=切片 [2:6]
        boolean v8 = origin.equals("alex是个大SB"); // "alex是个大DB" "alex是个大SB"

        boolean v9 = origin.contains("el");
        boolean v10 = origin.startsWith("a");
        String v11 = origin.concat("哈哈哈");
    }
}
name = 'alex'
if name == 'sb':
    pass
字符串拼接
import java.io.UnsupportedEncodingException;

public class Hello {

    public static void main(String[] args) {
        // "name=alex&age=18"
        StringBuilder sb = new StringBuilder();  // StringBuffer线程安全
        sb.append("name");
        sb.append("=");
        sb.append("alex");
        sb.append("&");
        sb.append("age");
        sb.append("=");
        sb.append("18");

        String dataString = sb.toString();

        System.out.println(dataString);
    }
}
data = []
data.append("name")
data.append("=")
data.append("18")
data_string = "".join(data)
2.4.4 数组
存放固定长度的元素。
- 容器
- 固定长度
- 特定类型
import java.util.Arrays;

public class Hello {

    public static void main(String[] args) {
        // [123,1,999]
        int[] numArray = new int[3];
        numArray[0] = 123;
        numArray[1] = 1;
        numArray[2] = 99;

        System.out.println(Arrays.toString(numArray));

        String[] names = new String[]{"武沛齐", "alex", "eric"};
        System.out.println(Arrays.toString(names));


        String[] nameArray = {"武沛齐", "alex", "eric"};
        System.out.println(Arrays.toString(nameArray));

        // nameArray[0]
        // nameArray.length
        for (int idx = 0; idx < nameArray.length; idx++) {
            String item = nameArray[idx];
        }

    }
}
注意:数组一旦创建个数就不可调整。
2.4.5 关于Object
在Python中每个类都默认继承Object类(所有的类都是Object的子类)。
在Java所有的类都是默认继承Object类。
int v1 = 123;
String name = "武沛齐";
用基类可以泛指他的子类的类型。
import sun.lwawt.macosx.CSystemTray;

import java.util.Arrays;

public class Hello {

    public static void main(String[] args) {
        // String v1 = "wupeiqi";
        Object v1 = new String("wupeiqi");
        System.out.println(v1);
        System.out.println(v1.getClass());

        Object v2 = 123;
        System.out.println(v2);
        System.out.println(v2.getClass());
    }
}
import sun.lwawt.macosx.CSystemTray;

import java.util.Arrays;

public class Hello {

    public static void main(String[] args) {
        // 声明数组,数组中元素必须int类型;
        int[] v1 = new int[3];

        // 声明数组,数组中元素必须String类型;
        String[] v2 = new String[3];

        // 声明数组,数组中可以是必须int/String类型;
        Object[] v3 = new Object[3];
        v3[0] = 123;
        v3[1] = "wupeiqi";

    }
}
所以,如果以后想要声明的数组中想要是混合类型,就可以用Object来实现。
import java.util.Arrays;

public class Hello {

    public static void main(String[] args) {
        // v1是指上字符串对象;String
        String v1 = new String("wupeiqi");
        String res = v1.toUpperCase();
        System.out.println(res);

        // v2本质是字符串对象;Object
        Object v2 = new String("wupeiqi");
        String data = (String)v2;
    }
}
import java.util.Arrays;

public class Hello {

    public static void func(Object v1) {
        // System.out.println(v1);
        // System.out.println(v1.getClass());
        if (v1 instanceof Integer) {
            System.out.println("整型");
        } else if (v1 instanceof String) {
            System.out.println("字符串类型");
        } else {
            System.out.println("未知类型");
        }
    }

    public static void main(String[] args) {
        func(123);
        func("123");
    }
}
- Java中所有的类都继承Object,Object代指所有的类型。
- 自己创建关系
ArrayList v1 = new ArrayList();
LinkedList v2 = new LinkedList();
List v1 = new ArrayList();
List v2 = new LinkedList();
Object v1 = new ArrayList();
Object v2 = new LinkedList();
2.5 常见数据类型
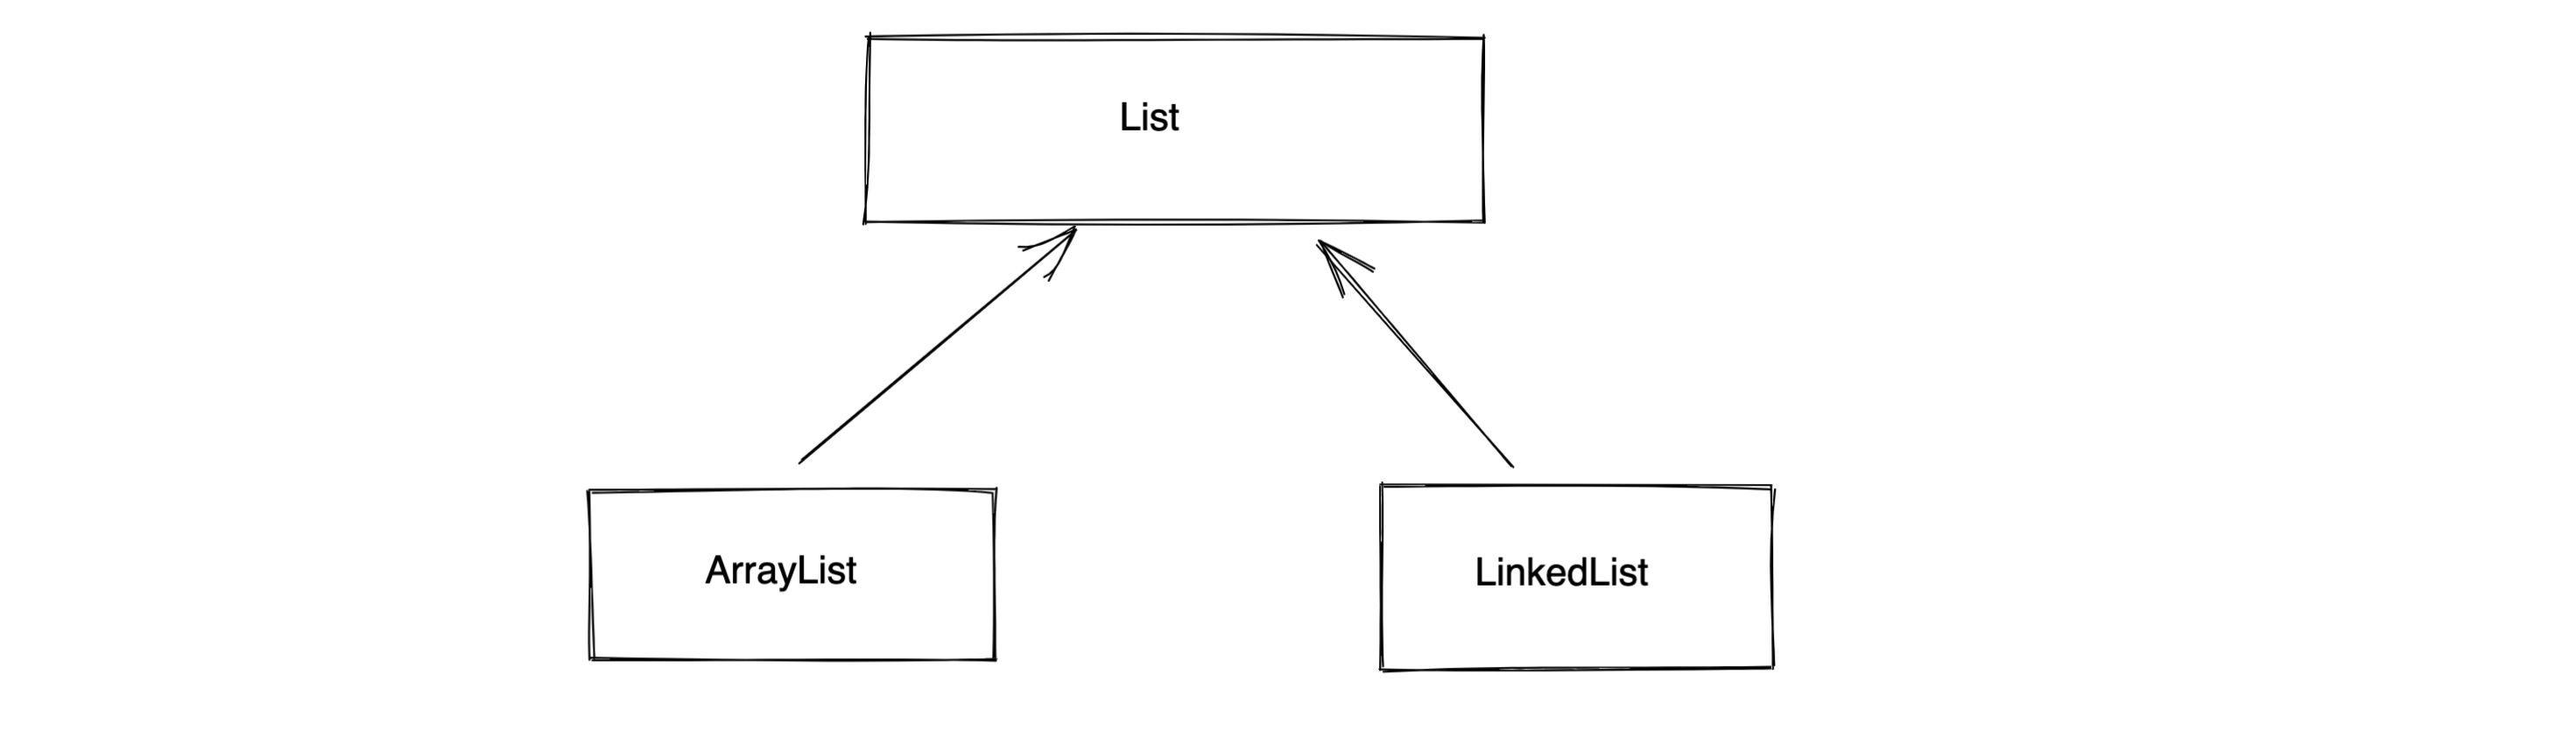
2.5.1 List系列
类似于Python中的列表。
List是一个接口,接口下面有两个常见的类型(目的是可以存放动态的多个数据)
- ArrayList,连续的内存地址的存储(内部自动扩容)。 -> Python列表的特点
- LinkedList,底层基于链表实现(自行车链条)。 -> Python列表的特点
ArrayList v1 = new ArrayList();
v1.add("武沛齐");
v1.add("麻子");
LinkedList v1 = new LinkedList();
v1.add("武沛齐");
v1.add("麻子");
Java中接口,是用来约束实现他的类,约束他里面的成员必须有xx。
interface List{
    public void add(Object data);   // 接口中的方法,不写具体的实现,只用于约束。
}

// 类ArrayList实现了接口List,此时这个类就必须有一个add方法。
class ArrayList implements List{
    public void add(Object data){
     	// 将数据data按照连续存储的方法放在内存。
        // ..
    }
}

// 类LinkedList实现了接口List,此时这个类就必须有一个add方法。
class LinkedList implements List{
    public void add(Object data){
     	// 将数据data按照链表的形式存储
        // ..
    }
}
List v1 = new ArrayList();
v1.add("武沛齐");
v1.add("麻子");
List v1 = new LinkedList();
v1.add("武沛齐");
v1.add("麻子");
ArrayList示例:
import java.util.ArrayList;
import java.util.Arrays;

public class Hello {

    public static void main(String[] args) {

        // ArrayList,默认内部存放的是混合数据类型。

        // ArrayList<String> data = new ArrayList<String>();
        // ArrayList<Object> data = new ArrayList<Object>();

        ArrayList data = new ArrayList();
        data.add("武沛齐");
        data.add("alex");
        data.add(666);
        data.add("tony");


        String value = data.get(1);
        // String value = (String) data.get(1);


        Object temp = data.get(1);
        String value = (String) temp; // 转化可转换的数据

        System.out.println(value);

        int xo = (int) data.get(2);
        System.out.println(xo);

        data.set(0, "哈哈哈哈");
        System.out.println(data);

        data.remove("eric");
        data.remove(0);
        System.out.println(data);

        int size = data.size();
        System.out.println(size);

        boolean exists = data.contains("武沛齐");
        System.out.println(exists);


        for (Object item : data) {
            System.out.println(item);
        }

        for (int i = 0; i < data.size(); i++) {
            Object item = data.get(i);
            System.out.println(item);
        }
    }
}
LinkedList示例:
import java.util.LinkedList;

public class Hello {

    public static void main(String[] args) {
        LinkedList<Integer> v1 = new LinkedList<Integer>();
        v1.push(11);
        v1.push(22);

        LinkedList<Object> v2 = new LinkedList<Object>();
        v2.push("有阪深雪");
        v2.push("大桥未久");
        v2.push(666);
        v2.push(123);

        //v2.remove(1);
        //v2.remove("路飞");

        v2.set(2, "苍老师");
        v2.push("哈哈哈");
        // v2.addFirst(11);


        for (int i = 0; i < v2.size(); i++) {
            Object item = v2.get(i);
            System.out.println(item);
        }

        for (Object item : v2) {
            System.out.println(item);
        }
    }
}
关于迭代器:
import java.util.*;

public class Hello {

    public static void main(String[] args) {

        ArrayList s1 = new ArrayList();
        s1.add("P站");
        s1.add("B站");
        s1.add("A站");


        Iterator it = s1.iterator(); // 迭代器
        while (it.hasNext()) {
            String item = (String) it.next();
            System.out.println(item);
        }
    }
}
2.5.2 Set系列
Set是一个接口,常见实现这个接口的有两个类,用于实现不重复的多元素集合。
- HashSet,去重,无序。
- TreeSet,去重,内部默认排序(ascii、unicode)【不同的数据类型,无法进行比较】。
import java.util.*;

public class Hello {

    public static void main(String[] args) {
        // HashSet s1 = new HashSet();
        // Set s1 = new HashSet();
        // HashSet<String> s1 = new HashSet<String>();
        HashSet s1 = new HashSet();
        s1.add("P站");
        s1.add("B站");
        s1.add("A站");
        s1.add("P站");
        s1.add(666);
        System.out.println(s1); // [B站, A站, P站,666]

        // s2 = {"东京热","东北热","南京热"}
        HashSet s2 = new HashSet(){
            {
                add("东京热");
                add("东北热");
                add("南京热");
            }
        };
        System.out.println(s2);


        // Set s2 = new TreeSet();
        // TreeSet<String> s2 = new TreeSet<String>();
        TreeSet s3 = new TreeSet();
        s3.add("P站");
        s3.add("B站");
        s3.add("A站");
        s3.add("P站");
        // s3.add(666); //不可以

        System.out.println(s3); // [B站, A站, P站]

        TreeSet s4 = new TreeSet(){
            {
                add("P站");
                add("B站");
                add("A站");
                add("P站");
            }
        };
        System.out.println(s4); // [B站, A站, P站]

    }
}
关于交并差:
import java.util.*;

public class Hello {

    public static void main(String[] args) {
        // Set s1 = new HashSet();
        HashSet s1 = new HashSet();
        s1.add("P站");
        s1.add("B站");
        s1.add("A站");
        s1.remove("P站");
        System.out.println(s1); // [B站, A站, P站]

        boolean exists = s1.contains("B站");
        System.out.println(exists);

        HashSet s2 = new HashSet();
        s2.add(123);
        s2.add(456);

        HashSet v1 = new HashSet(); // 空  -> [B站, A站, P站]
        v1.addAll(s1);
        v1.retainAll(s2); // 交集 &
        System.out.println(v1);


        HashSet v2 = new HashSet();
        v2.addAll(s1);
        v2.addAll(s2); // 并集 |
        System.out.println(v2);

        HashSet v3 = new HashSet();
        v3.addAll(s1);
        v3.removeAll(s2); // 差集 s1 - s2
        System.out.println(v3);


        HashSet v4 = new HashSet();
        v4.addAll(s2);
        v4.removeAll(s1); // 差集 s2 - s1
        System.out.println(v4);
    }
}
关于循环获取:
import java.util.*;

public class Hello {

    public static void main(String[] args) {

        TreeSet s1 = new TreeSet();
        s1.add("P站");
        s1.add("B站");
        s1.add("A站");

        for (Object item : s1) {
            System.out.println(item);
        }
    }
}
关于迭代器:
import java.util.*;

public class Hello {

    public static void main(String[] args) {

        TreeSet s1 = new TreeSet();
        s1.add("P站");
        s1.add("B站");
        s1.add("A站");


        Iterator it = s1.iterator();
        while (it.hasNext()) {
            String item = (String) it.next();
            System.out.println(item);
        }

    }
}
2.5.3 Map系列
Map是一个接口,常见实现这个接口的有两个类,用于存储键值对。
-
HashMap,无序。
-
TreeMap,默认根据key排序。(常用)
在Python中需要自己处理key排序的问题。
v4 = {
	"aid":123,
	"xx":999,
	"wid":888
}

# 1.根据key进行排序
# data = ["{}={}".format(key,v4[key])  for key in sorted(v4.keys())]
# 2.再进行拼接
# result = "&".join(data)

result = "&".join(["{}={}".format(key,v4[key])  for key in sorted(v4.keys())])
import java.util.*;

public class Hello {

    public static void main(String[] args) {
        HashMap h1 = new HashMap();
        h1.put("name","alex");
        h1.put("age",18);
        h1.put("hobby","男");
        System.out.println(h1); // {gender=男, name=alex, age=18}

        HashMap<String,String> h2 = new HashMap<String,String>();
        h2.put("name","alex");
        h2.put("age","18");
        h2.put("hobby","男");
        System.out.println(h2); // {gender=男, name=alex, age=18}


        HashMap<String,String> h3 = new HashMap<String,String>(){
            {
                put("name","alex");
                put("age","18");
                put("hobby","男");
            }
        };
        System.out.println(h3); // {gender=男, name=alex, age=18}
    }
}
import java.util.*;

public class Hello {

    public static void main(String[] args) {
        TreeMap h1 = new TreeMap(); // 改为了TreeMap
        h1.put("name","alex");
        h1.put("age",18);
        h1.put("hobby","男");
        System.out.println(h1); // {age=18, hobby=男, name=alex}

        TreeMap<String,String> h2 = new TreeMap<String,String>();
        h2.put("name","alex");
        h2.put("age","18");
        h2.put("hobby","男");
        System.out.println(h2); // {age=18, hobby=男, name=alex}


        TreeMap<String,String> h3 = new TreeMap<String,String>(){
            {
                put("name","alex");
                put("age","18");
                put("hobby","男");
            }
        };
        System.out.println(h3); // {age=18, hobby=男, name=alex}


        Map h4 = new TreeMap();
        h4.put("name","alex");
        h4.put("age",18);
        h4.put("hobby","男");
        System.out.println(h4); // {age=18, hobby=男, name=alex}
    }
}
常见操作:
import java.util.*;
public class Hello {
public static void main(String[] args) {
TreeMap h1 = new TreeMap(); // 改为了TreeMap
h1.put("name", "alex");
h1.put("age", "18");
h1.put("hobby", "男");
h1.put("hobby", "女人");
h1.remove("age");
int size = h1.size();
Object value = h1.get("name"); // 不存在,返回null
System.out.println(value);
boolean existsKey = h1.containsKey("age");
boolean existsValue = h1.containsValue("alex");
h1.replace("name", "李杰");
System.out.println(h1);
// 循环: 示例1
// { ("name", "alex"),("age", "18"), }
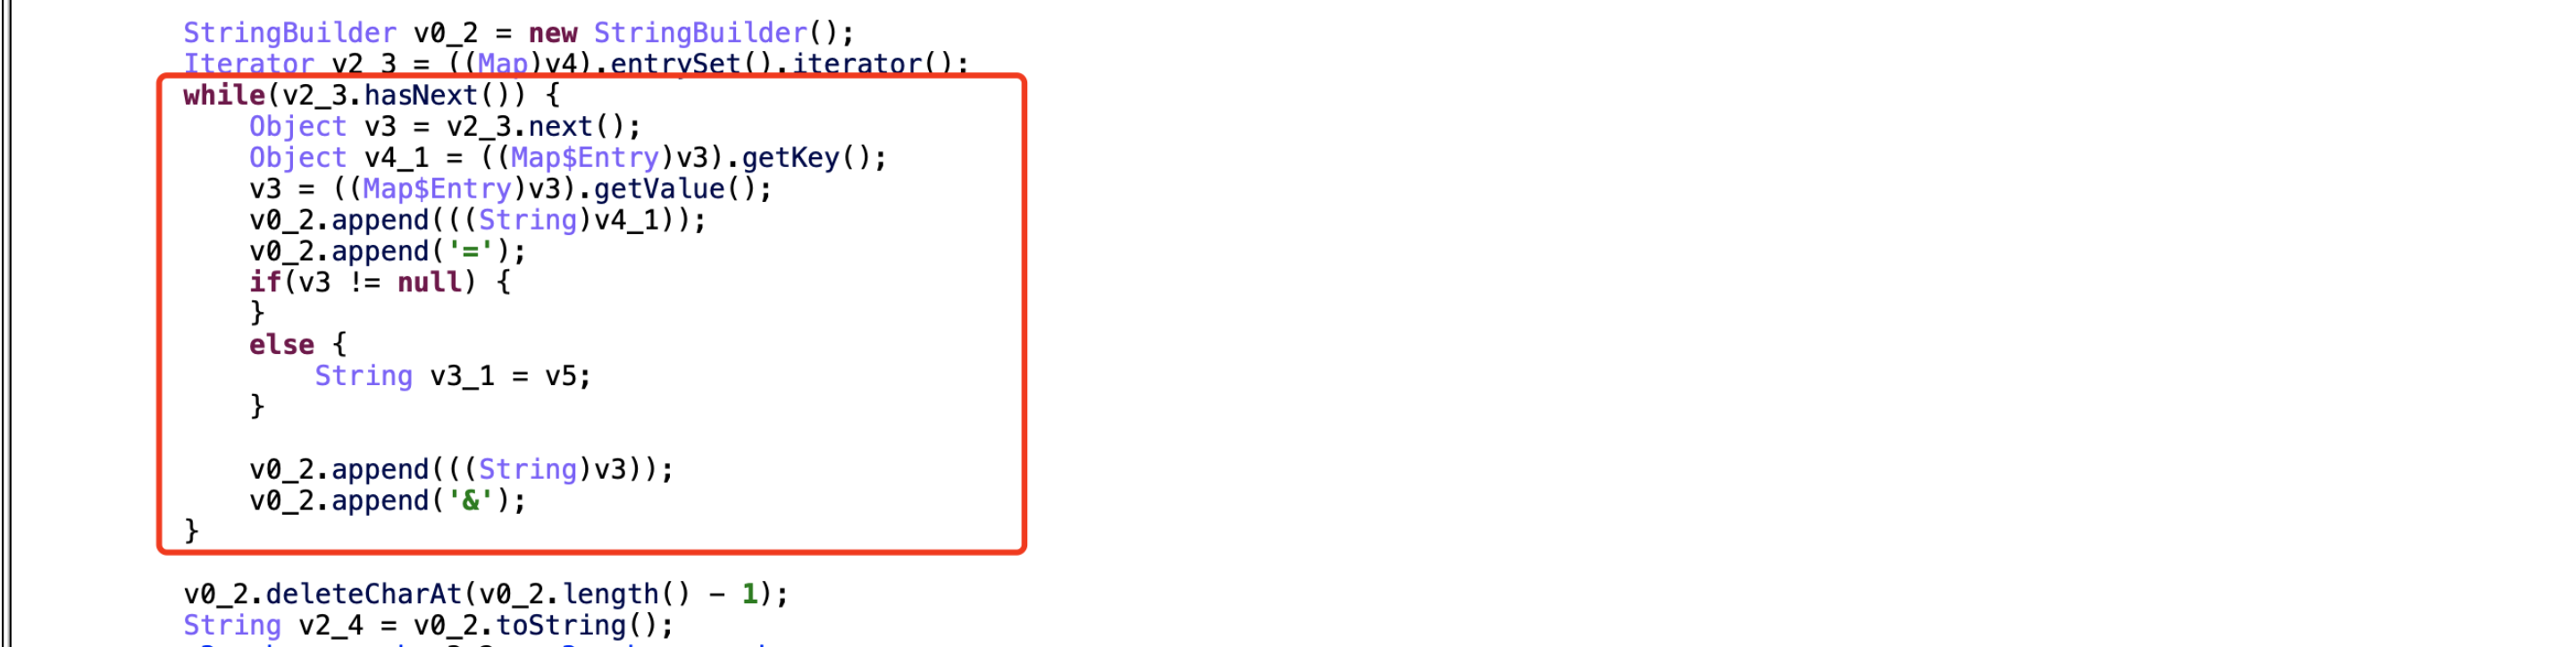
Set<Map.Entry<String, String>> s1 = h1.entrySet();
Iterator it1 = s1.iterator();
while (it1.hasNext()) {
// ("name", "alex")
Map.Entry<String, String> entry = (Map.Entry<String, String>) it1.next();
String k = (String) entry.getKey();
String v = (String) entry.getValue();
}
// 循环: 示例2
Set s2 = h1.entrySet();
Iterator it2 = s2.iterator();
while (it2.hasNext()) {
Map.Entry entry = (Map.Entry) it2.next();
String k = (String) entry.getKey();
String v = (String) entry.getValue();
}
// 循环: 示例3
TreeMap<String, String> h2 = new TreeMap<String, String>(); // 改为了TreeMap
h2.put("name", "alex");
h2.put("age", "18");
for (Map.Entry<String, String> entry : h2.entrySet()) {
String k = entry.getKey();
String v = entry.getValue();
}
// 循环: 示例4
TreeMap h3 = new TreeMap(); // 改为了TreeMap
h3.put("name", "alex");
h3.put("age", 18);
for (Object entry : h3.entrySet()) {
Map.Entry<String, Object> entryMap = (Map.Entry<String, Object>) entry;
String k = entryMap.getKey();
Object v = entryMap.getValue(); // 18 "alex"
if (v instanceof Integer) {
System.out.println("数字:" + Integer.toString((Integer) v));
} else if (v instanceof String) {
System.out.println("字符串:" + (String) v);
} else {
System.out.println("未知类型:" + v.toString());
}
}
}
}


day05 java基础
今日概要:
-
面向对象 相关(重要)
-
常见加密
1.面向对象相关
- Python,函数式+面向对象。
- Java,面向对象。
1.1 类和对象
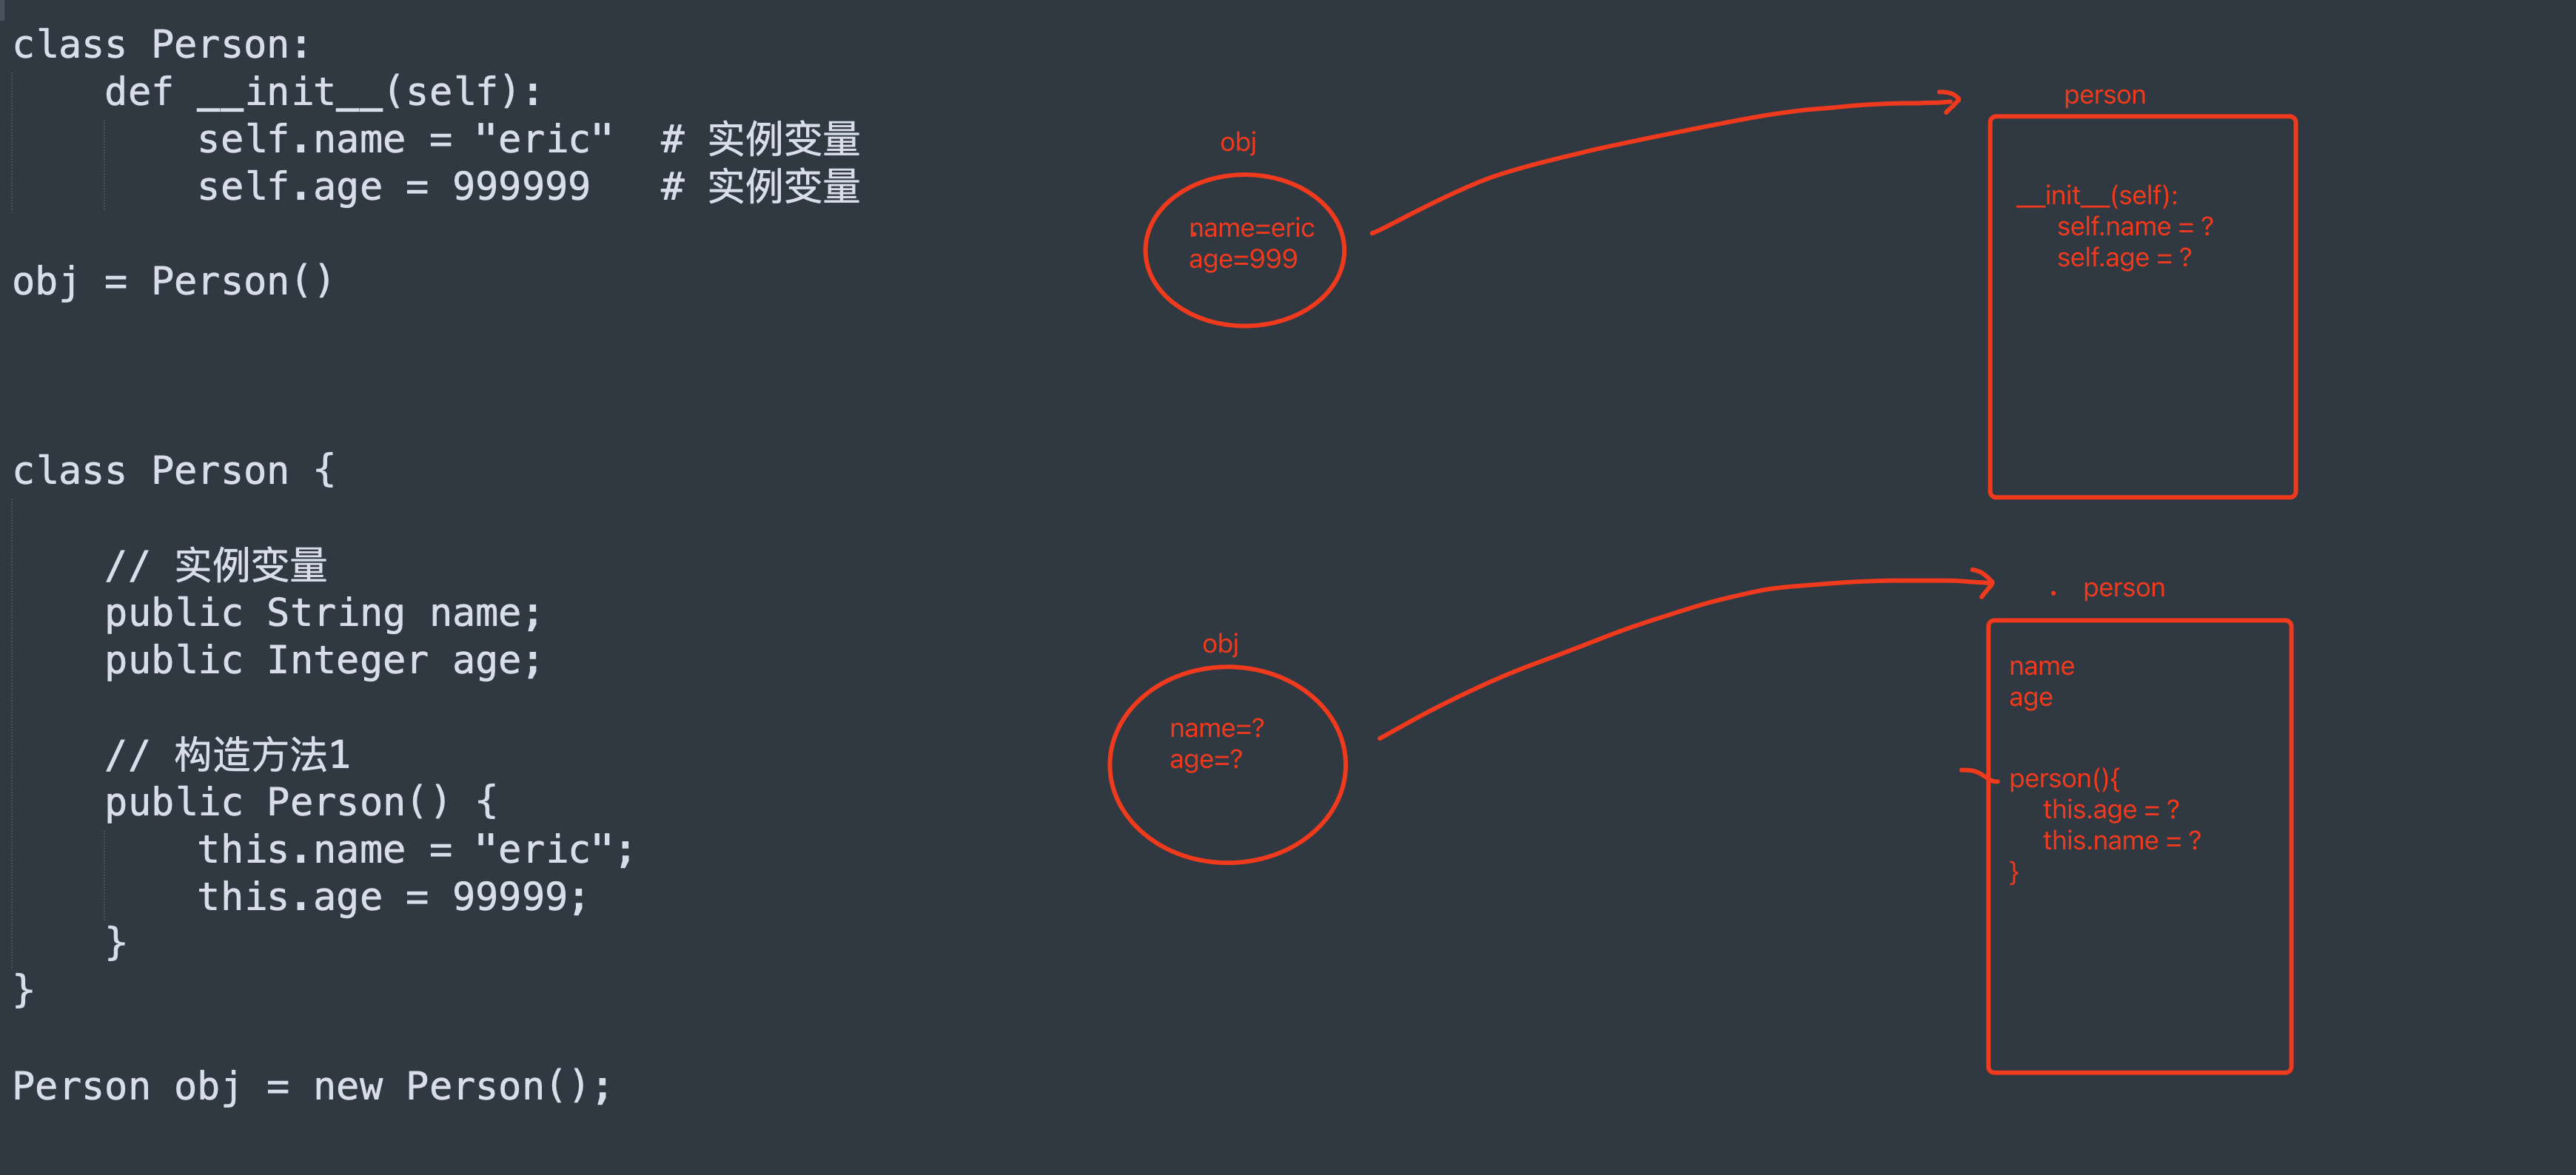
class Person {
    // 实例变量
    public String name;
    public Integer age;

    // 构造方法1
    public Person() {
        this.name = "Eric";
        this.age = 99999;
    }
}

Person obj = new Person();
class Person:

    # 初始化方法,  1. __new__方法,构造方法创建空对象 2.__init___方法
    def __init__(self):
        self.name = "eric"
        self.age = 999999

obj = Person()
class Person {

    // 实例变量
    public String name;
    public Integer age;
    public String email;

    // 构造方法1
    public Person() {
        this.name = "Eric";
        this.age = 99999;
    }

    // 构造方法2
    public Person(String name, Integer age) {
        this.name = name;
        this.age = age;
        this.email = "xxx@live.com";
    }

    // 构造方法3
    public Person(String name, String email) {
        this.name = name;
        this.age = 83;
        this.email = email;
    }
}

Person obj1 = new Person("wupeiqi",11);
Person obj2 = new Person();
class Person {

    // 实例变量
    public String name;
    public Integer age;
    public String email;

    // 构造方法1
    public Person() {
        this.name = "Eric";
        this.age = 99999;
    }

    // 构造方法2
    public Person(String name, Integer age) {
        this.name = name;
        this.age = age;
        this.email = "xxx@live.com";
    }

    // 构造方法3
    public Person(String name, String email) {
        this.name = name;
        this.age = 83;
        this.email = email;
    }

    // 定义方法(重载)
    public void doSomething() {
        System.out.println(this.name);
    }

	// 定义方法(重载)
    public void doSomething(String prev) {
        String text = String.format("%s-%s", prev, this.name);
        System.out.println(text);
    }

}

public class Hello {

    public static void main(String[] args) {

        // 实例化对象时,体现的主要是封装。
        Person p1 = new Person();
        Person p2 = new Person("alex", 73);
        Person p3 = new Person("tony", "alex@sb.com");

        p1.doSomething();
        p1.doSomething("你好呀,");

        p2.doSomething();
        p2.doSomething("你好呀,");

        p3.doSomething();
        p3.doSomething("你好呀,");
    }
}
var MessageDigest = Java.use("java.security.MessageDigest");
MessageDigest.update.overload("[B").implementation = function (data) {
    var ByteString = Java.use("com.android.okhttp.okio.ByteString");
    console.log(ByteString.of(data).utf8(), '\n' );
    return this.update(data);
}
1.2 静态成员
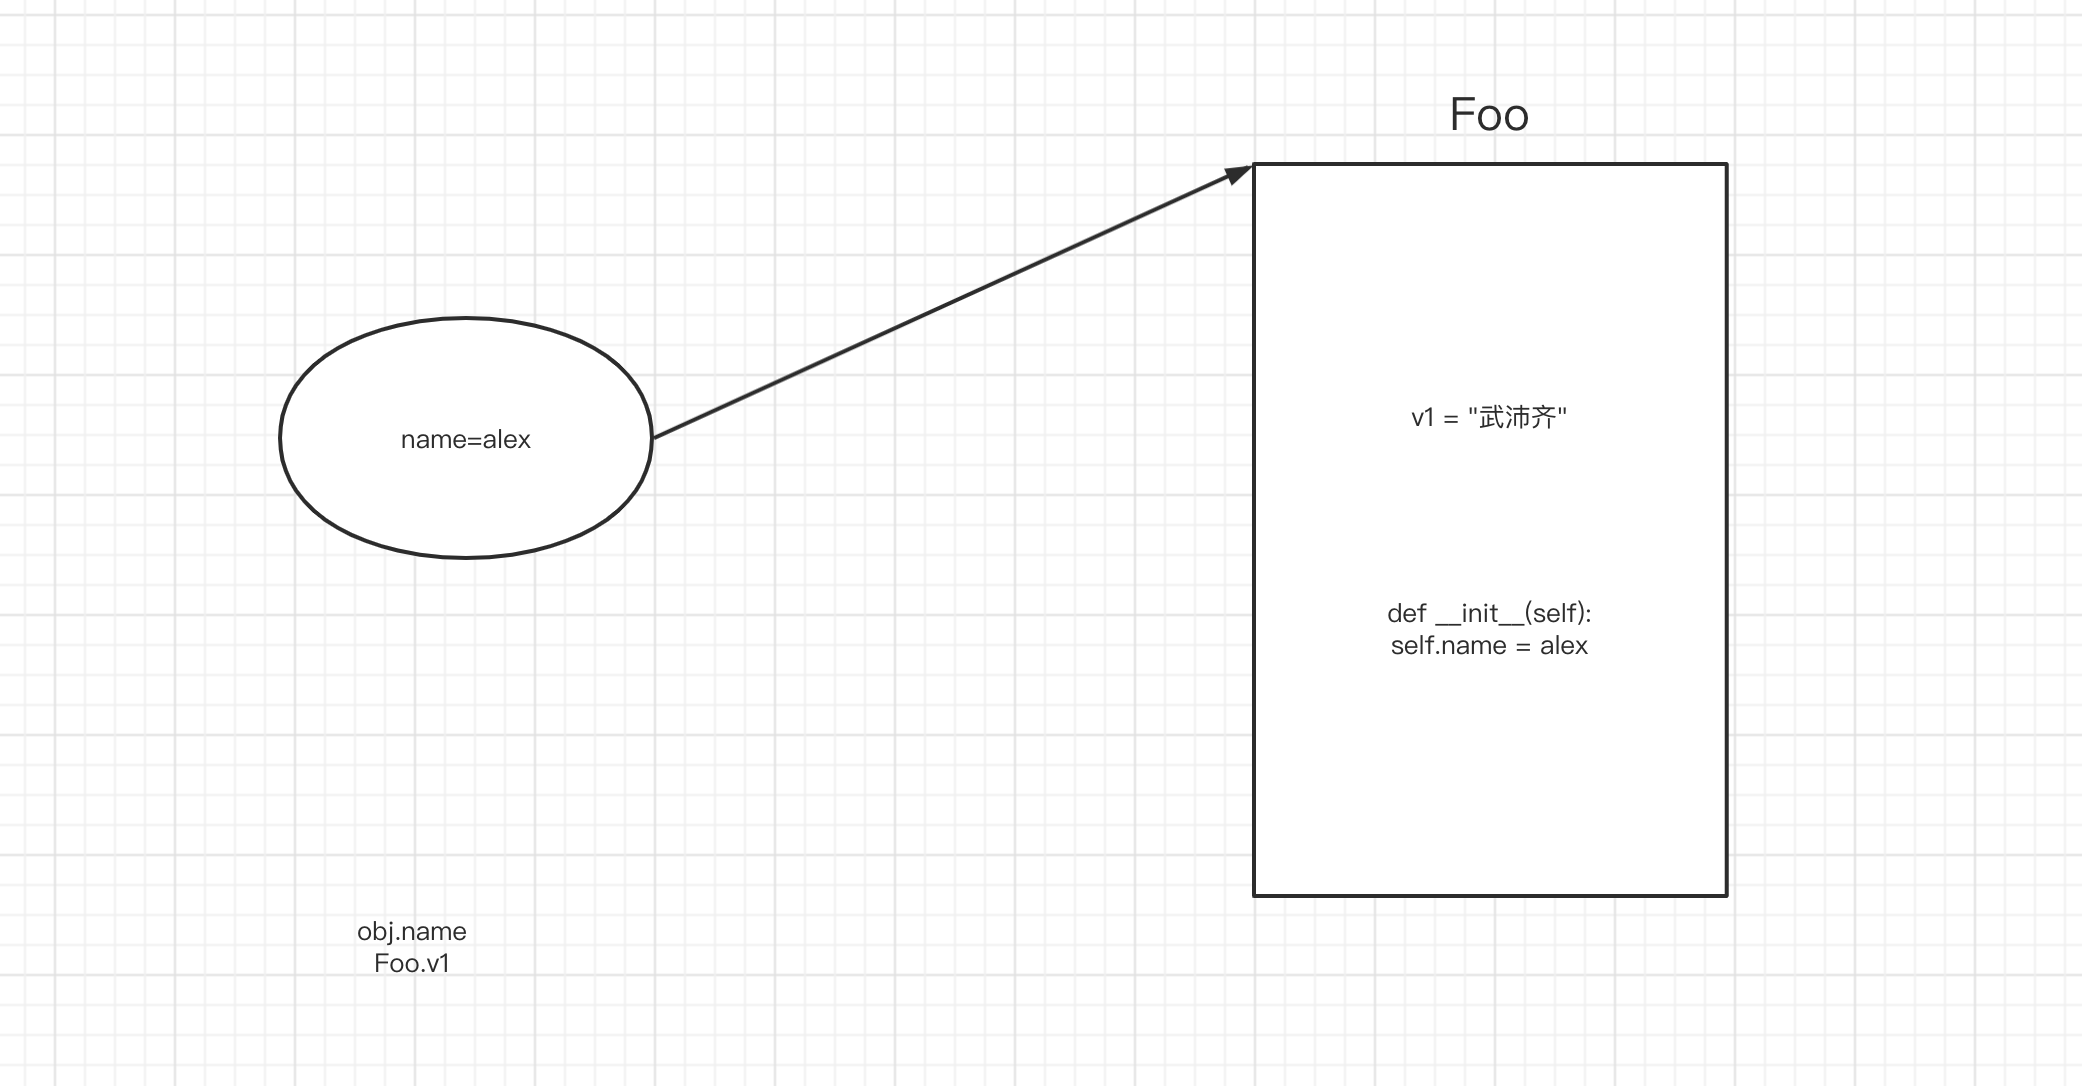
class Foo:
    v1 = "武沛齐"             # 静态变量(属于类,与对象无关)

    def __init__(self):
        self.name = "alex"   # 实例变量,属于对象

print(Foo.v1)

# 1.创建空的区域
# 2.自动执行构造方法 __init__
obj = Foo()
print(obj.name)
print(obj.v1)
class Person {
    // 静态变量
    public static String city = "北京";

    // 实例变量
    public String name;
    public Integer age;

    // 构造方法1
    public Person() {
        this.name = "Eric";
        this.age = 99999;
    }

    // 绑定方法
    public void showInfo(){
        System.out.println("哈哈哈哈");
    }

    // 静态方法
    public static void showData(){
        System.out.println("哈哈哈哈");
    }
}

Person.city;
Person.showData();

Person obj = new Person();
obj.name;
obj.age;
obj.showInfo();
本质:静态属于类;非静态属于对象。
1.3 继承
Java中的继承,只支持单继承,不支持多继承,但支持实现多个接口。
class Base{
    ...
}

class Foo{
    ...
}

class Son(Base){

}
interface Base{
    public void add();
}

interface Foo{
	public void plus();
}

class Son implements Base,Foo {
    public void add(){

    }
    public void plus(){

    }
}
Python中之和多继承。
class Foo(Base,Bar):
    pass

class Foo(IBase,IBar):
    pass
class Base {
    public String email;

    public Base(String email) {
        this.email = email;
    }

    public String getSubInfo() {
        return String.format("%s", this.email);
    }
}


// Base obj1 = new Base("xx");
// obj1.email; // "xx"
// obj1.getSubInfo();

class Person extends Base {

    public String name;
    public Integer age;

    public Person(String name, Integer age, String email) {
        super(email);// 执行父类的构造方法

        this.name = name;
        this.age = age;
    }

    public String getInfo(String v1) {
        return String.format("%s-%d-%s", this.name, this.age, this.email);
    }
}

// obj2 ==> email="xxx@live.com"  name="wupeiqi"  age=19
Person obj2 = new Person("wupeiqi",19,"xxx@live.com");

// obj2.name;
// obj2.age;
// obj2.email;

// obj2.getInfo("xxx");
// obj2.getSubInfo();
用父类泛指所有的子类。
class Base {

}

class Person extends Base {

}

Person v1 = new Person(); // v1是Person类型的对象
Base v2 = new Person();  //  v2是Person类型的对象
class Base {
    public void show() {
		System.out.println("111");
    }
}

class Person extends Base {
	public void show() {
		System.out.println("222");
    }
}

Person v1 = new Person();
v1.show(); // 222

Base v2 = new Base();
v2.show(); // 111

Base v3 = new Person();
v3.show(); // 222
class Base {
    public String email;

    public Base(String email) {
        this.email = email;
    }

    public void getSubInfo() {
		System.out.println("111");
    }
}

// Person类继承Base类
class Person extends Base {

    public String name;

    public Person(String name, Integer age, String email) {
        super(email);// 执行父类的构造方法
        this.name = name;
    }

     public void getSubInfo() {
		System.out.println("222");
    }
}

public class Hello {

    public static void handler(Base v1){
        v1.getSubInfo();
    }

    // 主函数
    public static void main(String[] args) {
        Person obj1 = new Person("wupeiqi",19,"xxx@live.com");
		handler(obj1); // 222

        Base obj2 = new Base("xxx@live.com");
        handler(obj2); // 111

        Base obj3 = new Person("wupeiqi",19,"xxx@live.com");
        handler(obj3); // 222
    }

}
1.4 接口
接口:
- 约束,实现他的类。
- 泛指
实现他了类。
interface IMessage {
    public void send();
}

// Wechat类"实现"了Imessage接口
class Wechat implements IMessage {
    public void send() {
        System.out.println("发送微信");
    }
}

class DingDing implements IMessage {
    public void send() {
        System.out.println("发送钉钉");
    }
}

class Sms implements IMessage {
    public void send() {
        System.out.println("发送短信");
    }
}

Wechat v1 = new Wechat();
IMessage v2 = new Wechat();
public class Hello {

    // 多态 -> 多种形态 IMessage
	public static void handler(IMessage v1){
        v1.send();
    }

    // 主函数
    public static void main(String[] args) {
       Sms v1 = new Sms();
       handler(v1);
    }
}
在Java中:不支持同时继承多个类;支持实现多个接口。
interface IPerson {
    public void f1();

    public void f1(int age);

    public void f2(String info);
}

interface IUser {
    public String f3(int num);
}

class Base {
    public String name;
    public Integer age;
    public String email;

    public Base(String name, Integer age, String email) {
        this.name = name;
        this.age = age;
        this.email = email;
    }

    public String getSubInfo() {
        return String.format("%s", this.email);
    }
}

class Person extends Base implements IUser, IPerson {

    public Person(String name, Integer age, String email) {
        super(name, age, email);
    }

    public String getInfo() {
        return String.format("%s-%d-%s", this.name, this.age, this.email);
    }


    public void f1() {
        System.out.println("F1,无参数");
    }

    public void f1(int age) {
        System.out.println("F1,age参数");
    }

    public void f2(String info) {
        System.out.println("F2");
    }

    public String f3(int num) {
        return "哈哈哈";
    }
}

public class Hello {

    public static void main(String[] args) {
        Person p = new Person("日天", 83, "ritian@live.com");
        p.f1();
    }
}
假设我现在在进行逆向,拿到apk,关于关键字去搜索:f2 ,定位到一个接口了。
interface IPerson {
    public void f1();

    public void f1(int age);

    public void f2(String info);
}
接下来,你就应该去看都有哪些类 实现了 IPerson 接口。
- 只有1个类实现 IPerson。
- 多类类实现 IPerson 接口,筛选到底是那个类?
1.5 抽象
// 抽象类
abstract class Base {

    // 抽象方法(约束子类中必须有这个方法)
    public abstract void play(String name);

    // 普通方法
    public void stop() {
        System.out.println("Stop");
    }
}

class Son extends Base{
    public void play(String name){
        // ...
    }
}

Son obj = new Son();
obj.stop();
obj.play();

Base obj1 = new Son();
注意:也可以泛指他的子类。
1.6 包
src
├── Hello.java
└── utils
    └── Helper.java
// hello.java
import utils.Helper;

public class Hello {

    public static void main(String[] args) {
        String data = Helper.getInfo();
        System.out.println(data);
    }
}
// helper.java
package utils;

public class Helper {
    public static String getInfo() {
        return "哈哈哈";
    }
}
类的修饰符:
- public,公共(任何人都能调用包中的类)。
- default,只能在当前包中被调用。
类成员修饰符:
- public,公共,所有的只要有权限访问类,类中的成员都可以访问到。
- private,私有,只允许自己类调用。
- protected,同一个包 或 子类可以访问(即使没有在同一个包内,也可以访问父类中的受保护成员)。
- default,只能在同一个包内访问。
目的:通过关键字让调用关系更加清晰(不过,很多项目不会用的那么专业)。
1.7 属性
class Person {

    private String name;

    public Person() {
        this.name = "eric";
    }


    public void setName(String data){
        this.name = data;
    }

    public String getName(){
        return this.name;
    }
}


Person obj = new Person();
obj.getName()
obj.setName("武沛齐")

-----------------------------------

class Person {
    private String name;

    public void setName(String data){
        this.name = data;
    }

    public String getName(){
        return this.name;
    }
}


Person obj = new Person();
obj.getName();
2.常见加密
2.1 隐藏字节
String salt = "xxssasdfasdfadsf";
String v4 = new String(new byte[]{-26, -83, -90, -26, -78, -101, -23, -67, -112});
-
示例1:
String v1 = new String(new byte[]{26, 83, 90, 26, 78, 101, 23, 67, 112});# 字节列表 byte_list = [26, 83, 90, 26, 78, 101, 23, 67, 112] # 字节列表 -> python的字节数组 bs = bytearray() for item in byte_list: bs.append(item) # python的字节数组 -> 编码 -> 字符串 str_data = bs.decode('utf-8') print(str_data) -
示例2:
String v4 = new String(new byte[]{-26, -83, -90, -26, -78, -101, -23, -67, -112});

# java字节:有符号 -128 ~ 127
# python:无符号  0 ~ 255
byte_list = [-26, -83, -90, -26, -78, -101, -23, -67, -112] bs = bytearray() # python字节数组 for item in byte_list: if item < 0: item = item + 256 bs.append(item) str_data = bs.decode('utf-8') # data = bytes(bs) print(str_data)
注意事项:什么编码?(utf-8)
	String v4 = new String(new byte[]{-26, -83, -90, -26, -78, -101, -23, -67, -112});
# 类似于Java中的字节数组
data = "张三懵逼了"
data_bytes = data.encode('utf-8')


data_list = bytearray()
for item in data_bytes:
    data_list.append(item)

res = data_list.decode('utf-8')
print(res)
提醒:MD5加密盐、AES加密key、iv;
2.2 uuid
import java.util.UUID;

public class Hello {
    public static void main(String[] args){
        String uid = UUID.randomUUID().toString();
        System.out.println(uid);
    }
}
import uuid

uid = str(uuid.uuid4())
print(uid)
2.3 随机值
import java.math.BigInteger;
import java.security.SecureRandom;

public class Hello {

    public static void main(String[] args) {
        // 随机生成80位,10个字节
        BigInteger v4 = new BigInteger(80, new SecureRandom());
        // 让字节以16进制展示
        String res = v4.toString(16);
        System.out.println(res);

    }
}
import random

data = random.randbytes(10)  # python3.9

ele_list = []
for item in data:
    ele = hex(item)[2:]
res = "".join(ele_list)
print(res)
data = "".join([ hex(item)[2:] for item in random.randbytes(10)])
import random

data = random.randbytes(10)  # pytho3.9  [199,112,88,10,232]

print(  [item for item in data]  )
print(  [hex(item)[2:] for item in data]  )
print(  [hex(item)[2:].rjust(2, "0") for item in data]   )


print(  "".join([hex(item)[2:].rjust(2, "0") for item in data])   )
import random

byte_list = [random.randint(0, 255) for i in range(10)]


print([item for item in byte_list])
print([hex(item)[2:] for item in byte_list])
print([hex(item)[2:].rjust(2, "0") for item in byte_list])

print("".join([hex(item)[2:].rjust(2, "0") for item in byte_list]))
小补充:十六进制
import random

data = random.randbytes(10)  # pytho3.9

ele_list = []
for item in data:
    ele = hex(item)[2:].rjust(2,"0")
res = "".join(ele_list)
print(res)
data = "".join([ hex(item)[2:].rjust(2,"0") for item in random.randbytes(10)])
注意:md5加密
- Python中的md5加密: digest hexdigest
- Java中的的md5加密:字节数组 -> 手动转换
2.4 时间戳
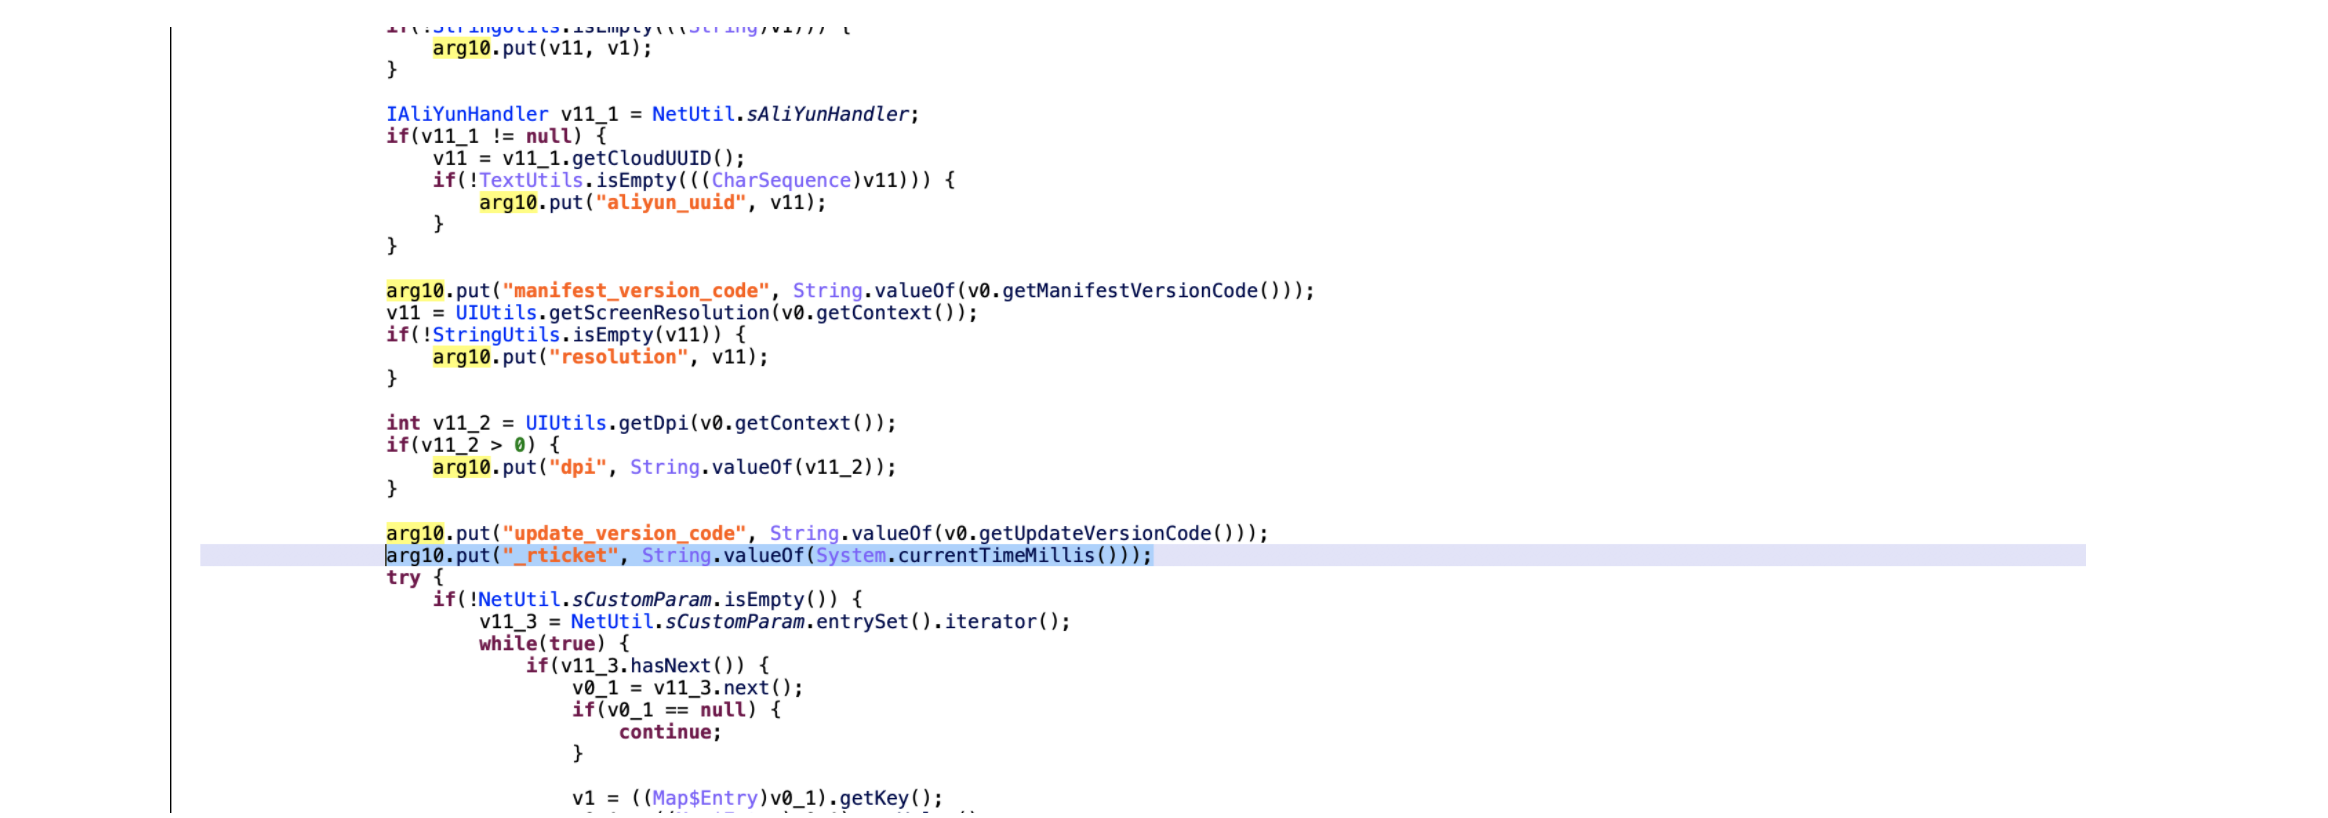
_ticket
public class Hello {

    public static void main(String[] args) {
        String t1 = String.valueOf(System.currentTimeMillis() / 1000);
        String t2 = String.valueOf(System.currentTimeMillis());

        System.out.println(t1);
        System.out.println(t2);
    }
}
import time

v1 = int(time.time())
v2 = int(time.time()*1000)
v1 = str(int(time.time()))
v2 = str(int(time.time()*1000))
requests.post(
	url="?"
    json={
        "xx":123
    },
    headers={
        "ticket":121231   # 报错,一定是字符串类型
    }
)
2.5 十六进制的字符串
在Java中字节是有符号:-128 ~ 127
# name_bytes = "武沛齐".encode('utf-8')
name_bytes = [10, -26, -83, -90, -26, -78, -101, -23, -67, -112]

data_list = []

for item in name_bytes:
    item = item & 0xff   # item<0时,让item+256
    ele = "%02x" % item
    data_list.append(ele)

print("".join(data_list))
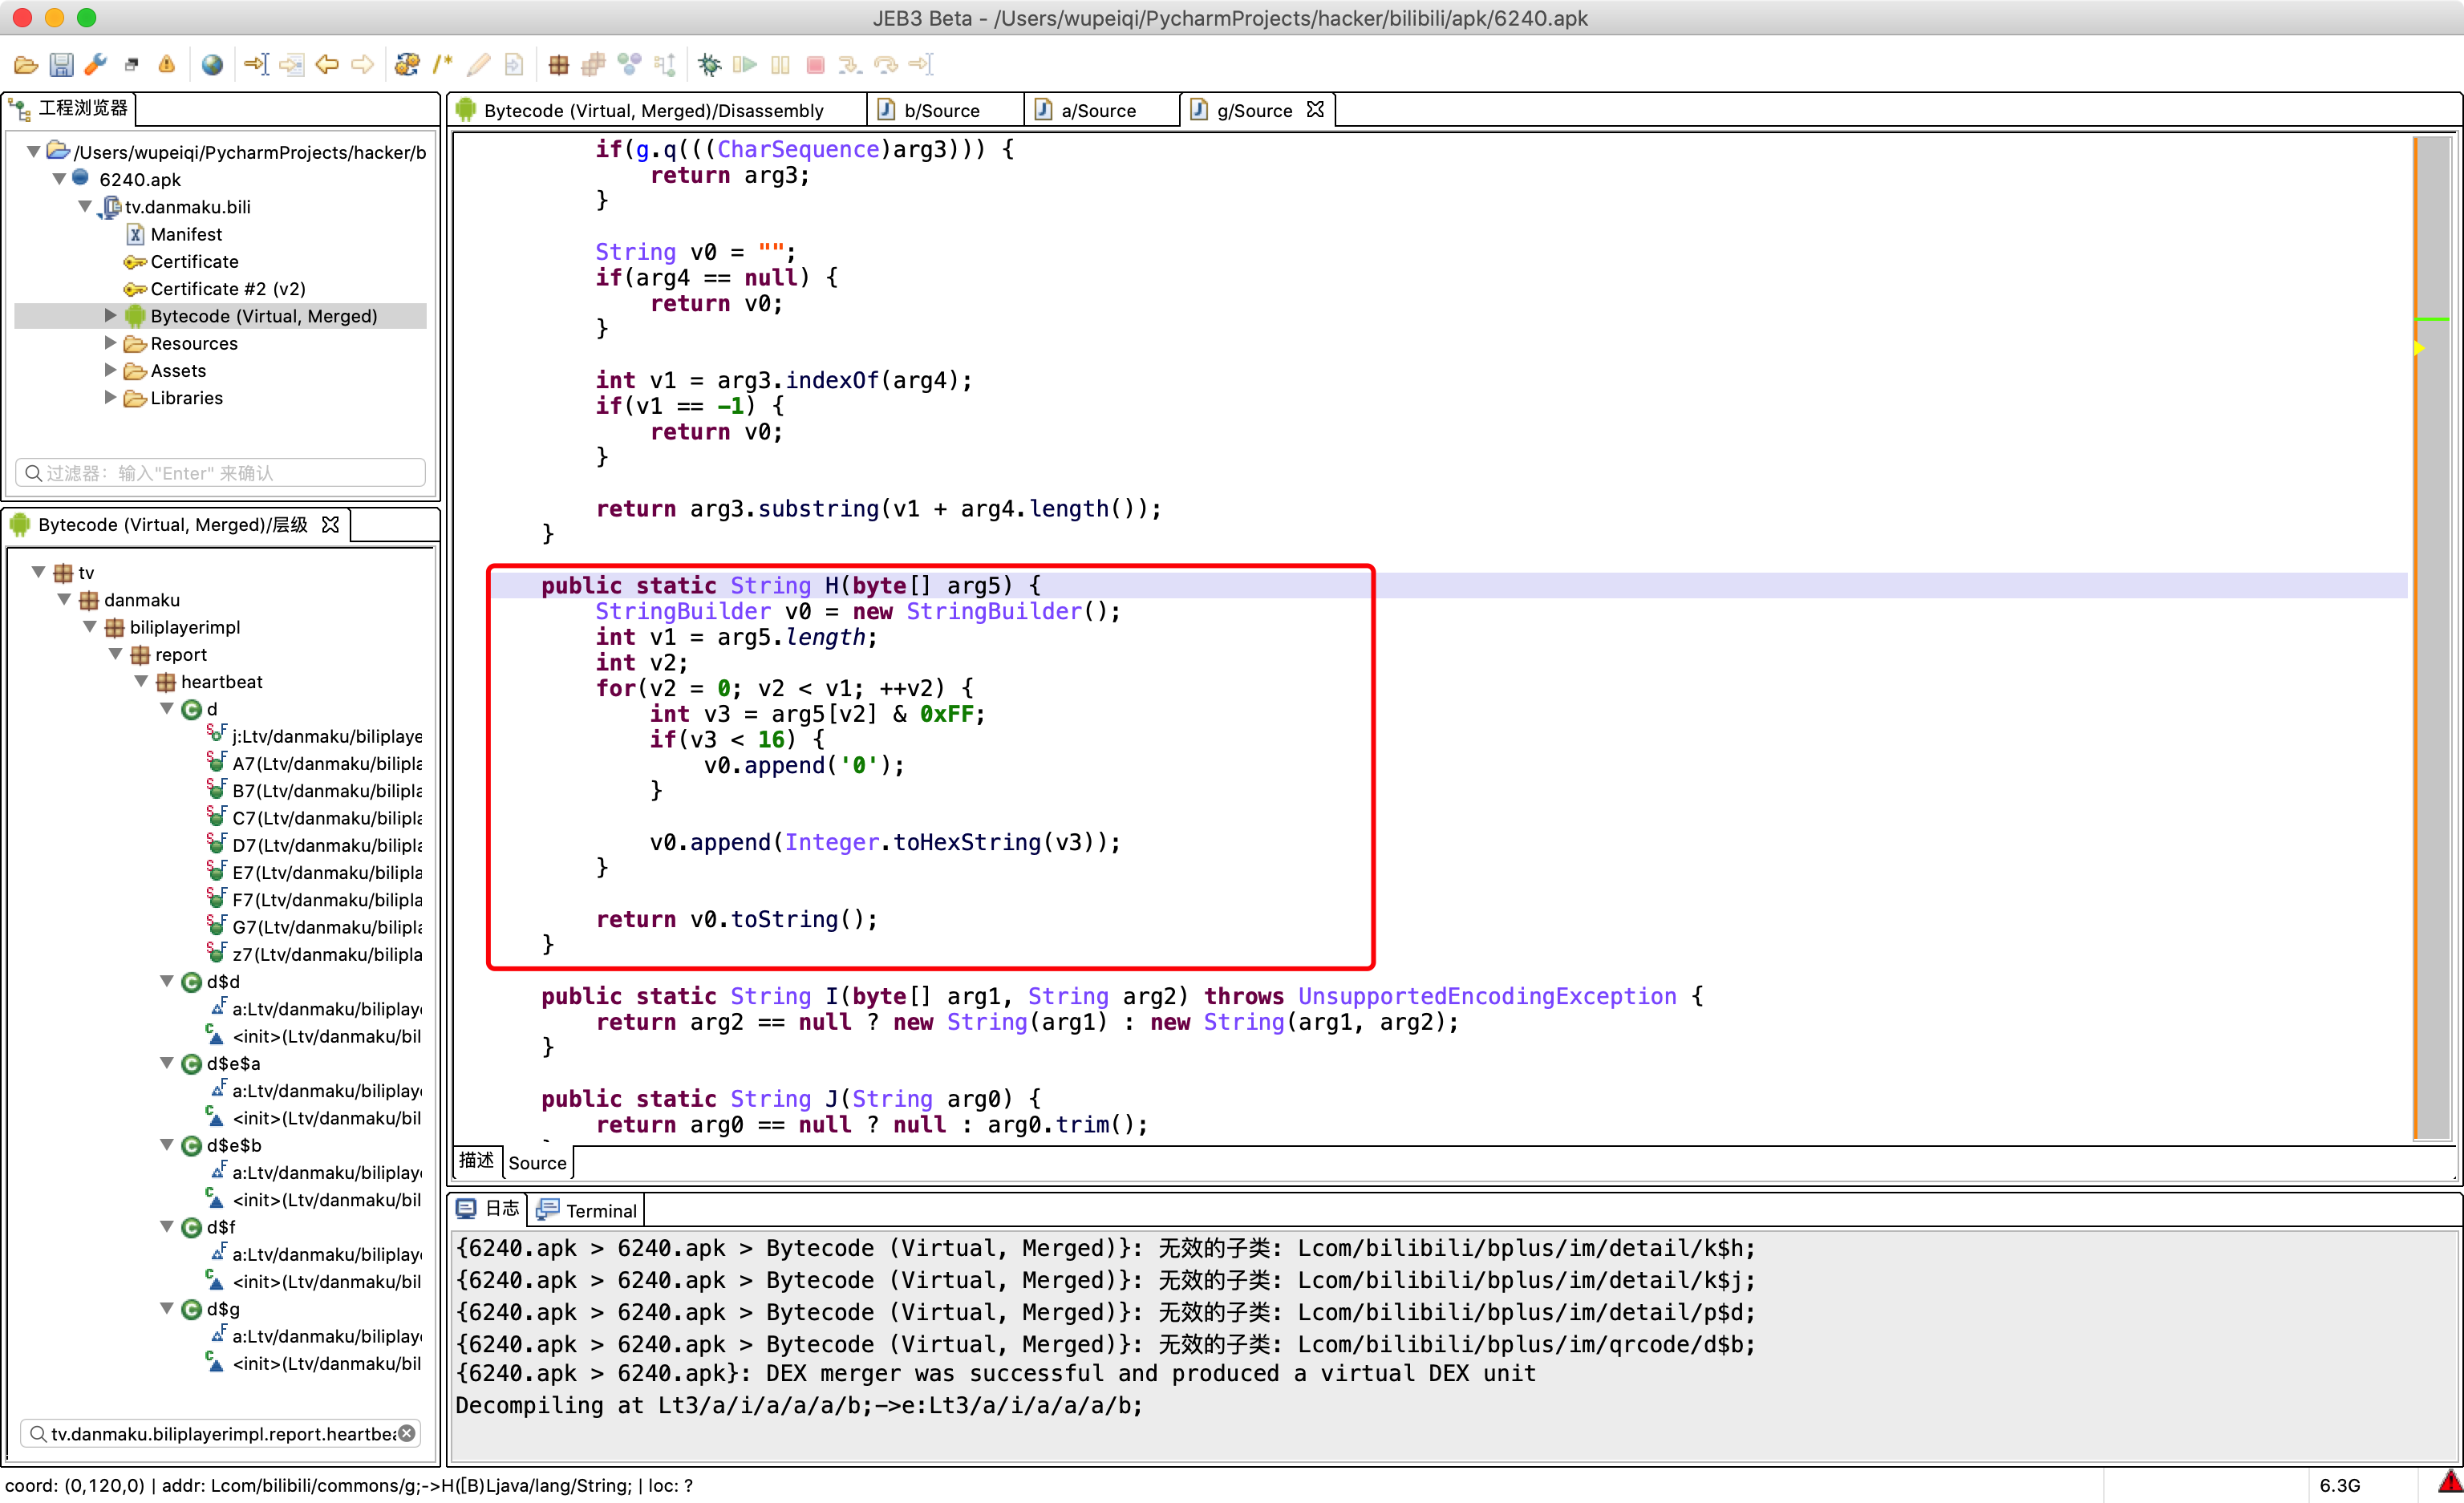
2.6 md5加密
import hashlib

obj = hashlib.md5('yyy'.encode('utf-8'))
obj.update('xxxxx'.encode('utf-8'))

# java中没有这个功能。
v1 = obj.hexdigest()
print(v1) # fb0e22c79ac75679e9881e6ba183b354

v2 = obj.digest()
print(v2) # b'\xfb\x0e"\xc7\x9a\xc7Vy\xe9\x88\x1ek\xa1\x83\xb3T'
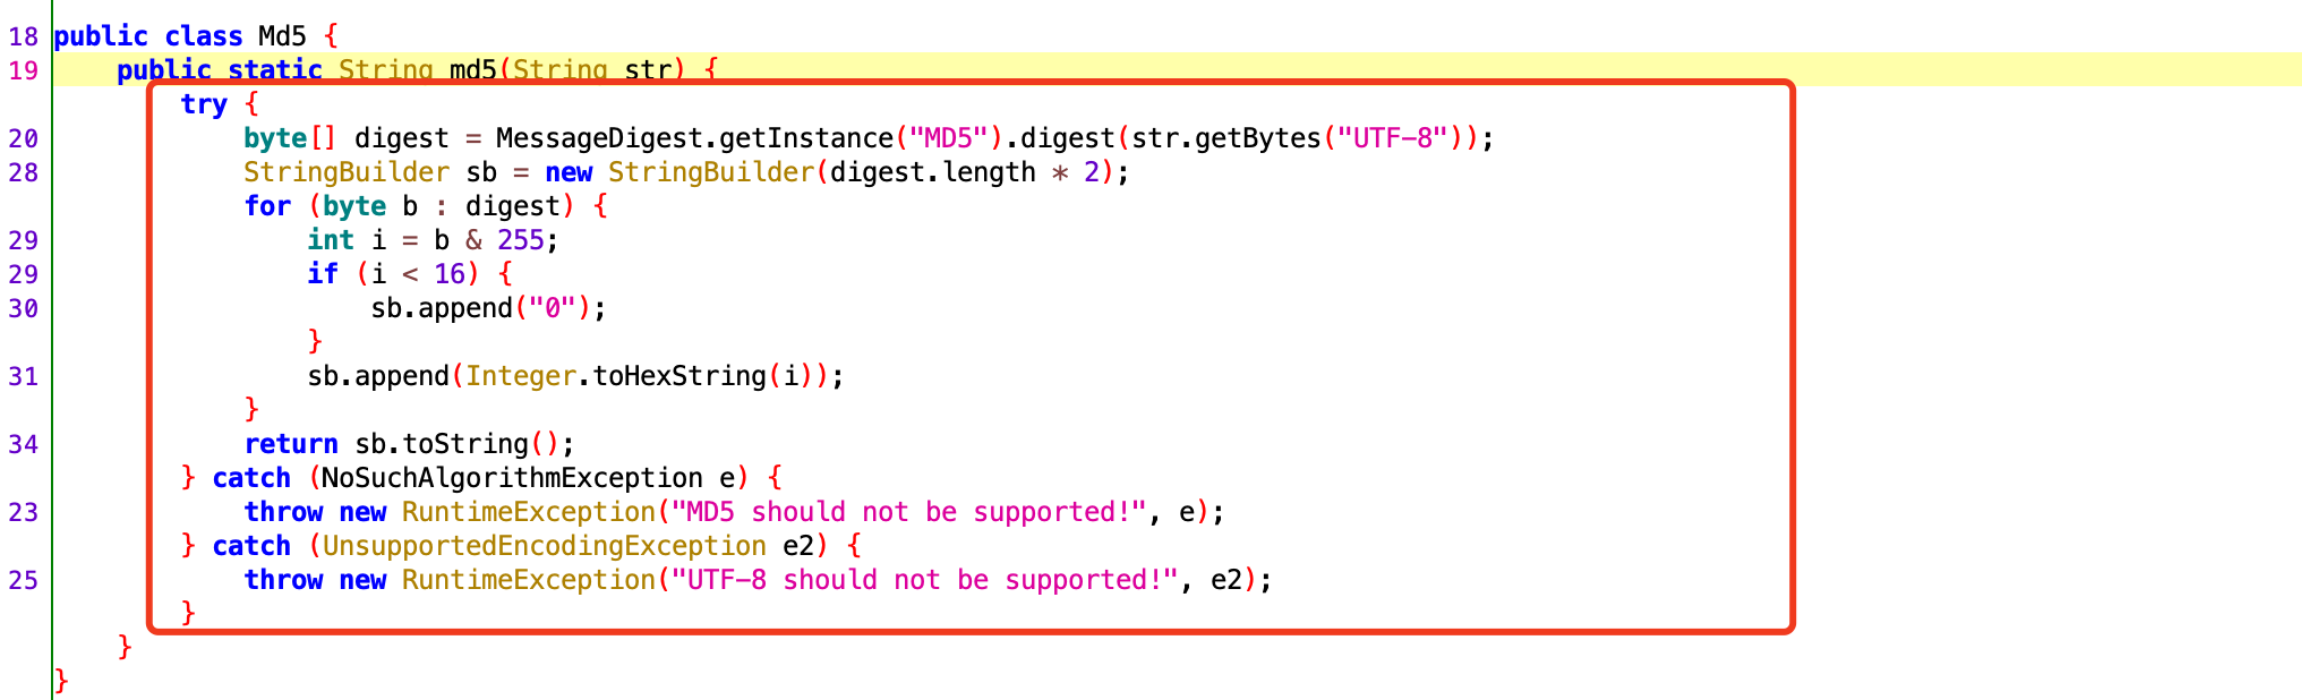
import java.security.MessageDigest;
import java.security.NoSuchAlgorithmException;
import java.util.Arrays;
import java.util.Base64;

public class Hello {

    public static void main(String[] args) throws NoSuchAlgorithmException {
        String name = "武沛齐";

        MessageDigest instance = MessageDigest.getInstance("MD5");
        byte[] nameBytes = instance.digest(name.getBytes());

        // 十六进制展示
        StringBuilder sb = new StringBuilder();
        for(int i=0;i<nameBytes.length;i++){
            int val = nameBytes[i] & 255;  // 负数转换为正数
            if (val<16){
                sb.append("0");
            }
            sb.append(Integer.toHexString(val));
        }
        String hexData = sb.toString();
        System.out.println(hexData); // e6ada6e6b29be9bd90
    }
}
import hashlib

m = hashlib.md5()
m.update("武沛齐".encode("utf-8"))

v1 = m.digest()
print(v1) # b'\x175\x10\x12G$)\xd5-\x0c\r#\xd4h\x17='

v2 = m.hexdigest()
print(v2) # 17351012472429d52d0c0d23d468173d
关于加盐:
import java.security.MessageDigest;
import java.security.NoSuchAlgorithmException;
import java.util.Arrays;
import java.util.Base64;

public class Hello {

    public static void main(String[] args) throws NoSuchAlgorithmException {
        String name = "武沛齐";
        MessageDigest instance = MessageDigest.getInstance("MD5");
        instance.update("xxxxxx".getBytes());

        byte[] nameBytes = instance.digest(name.getBytes());

        System.out.println(Arrays.toString(nameBytes));

        String res = new String(nameBytes);
        System.out.println(res);

        // 十六进制展示
        StringBuilder sb = new StringBuilder();
        for(int i=0;i<nameBytes.length;i++){
            int val = nameBytes[i] & 255;  // 负数转换为正数
            if (val<16){
                sb.append("0");
            }
            sb.append(Integer.toHexString(val));
        }
        String hexData = sb.toString();
        System.out.println(hexData); // e6ada6e6b29be9bd90
    }
}
import hashlib

m = hashlib.md5("xxxxxx".encode('utf-8'))
m.update("武沛齐".encode("utf-8"))

v2 = m.hexdigest()
print(v2) # 17351012472429d52d0c0d23d468173d
2.7 sha-256加密
B站:x/report/andriod2,请求体
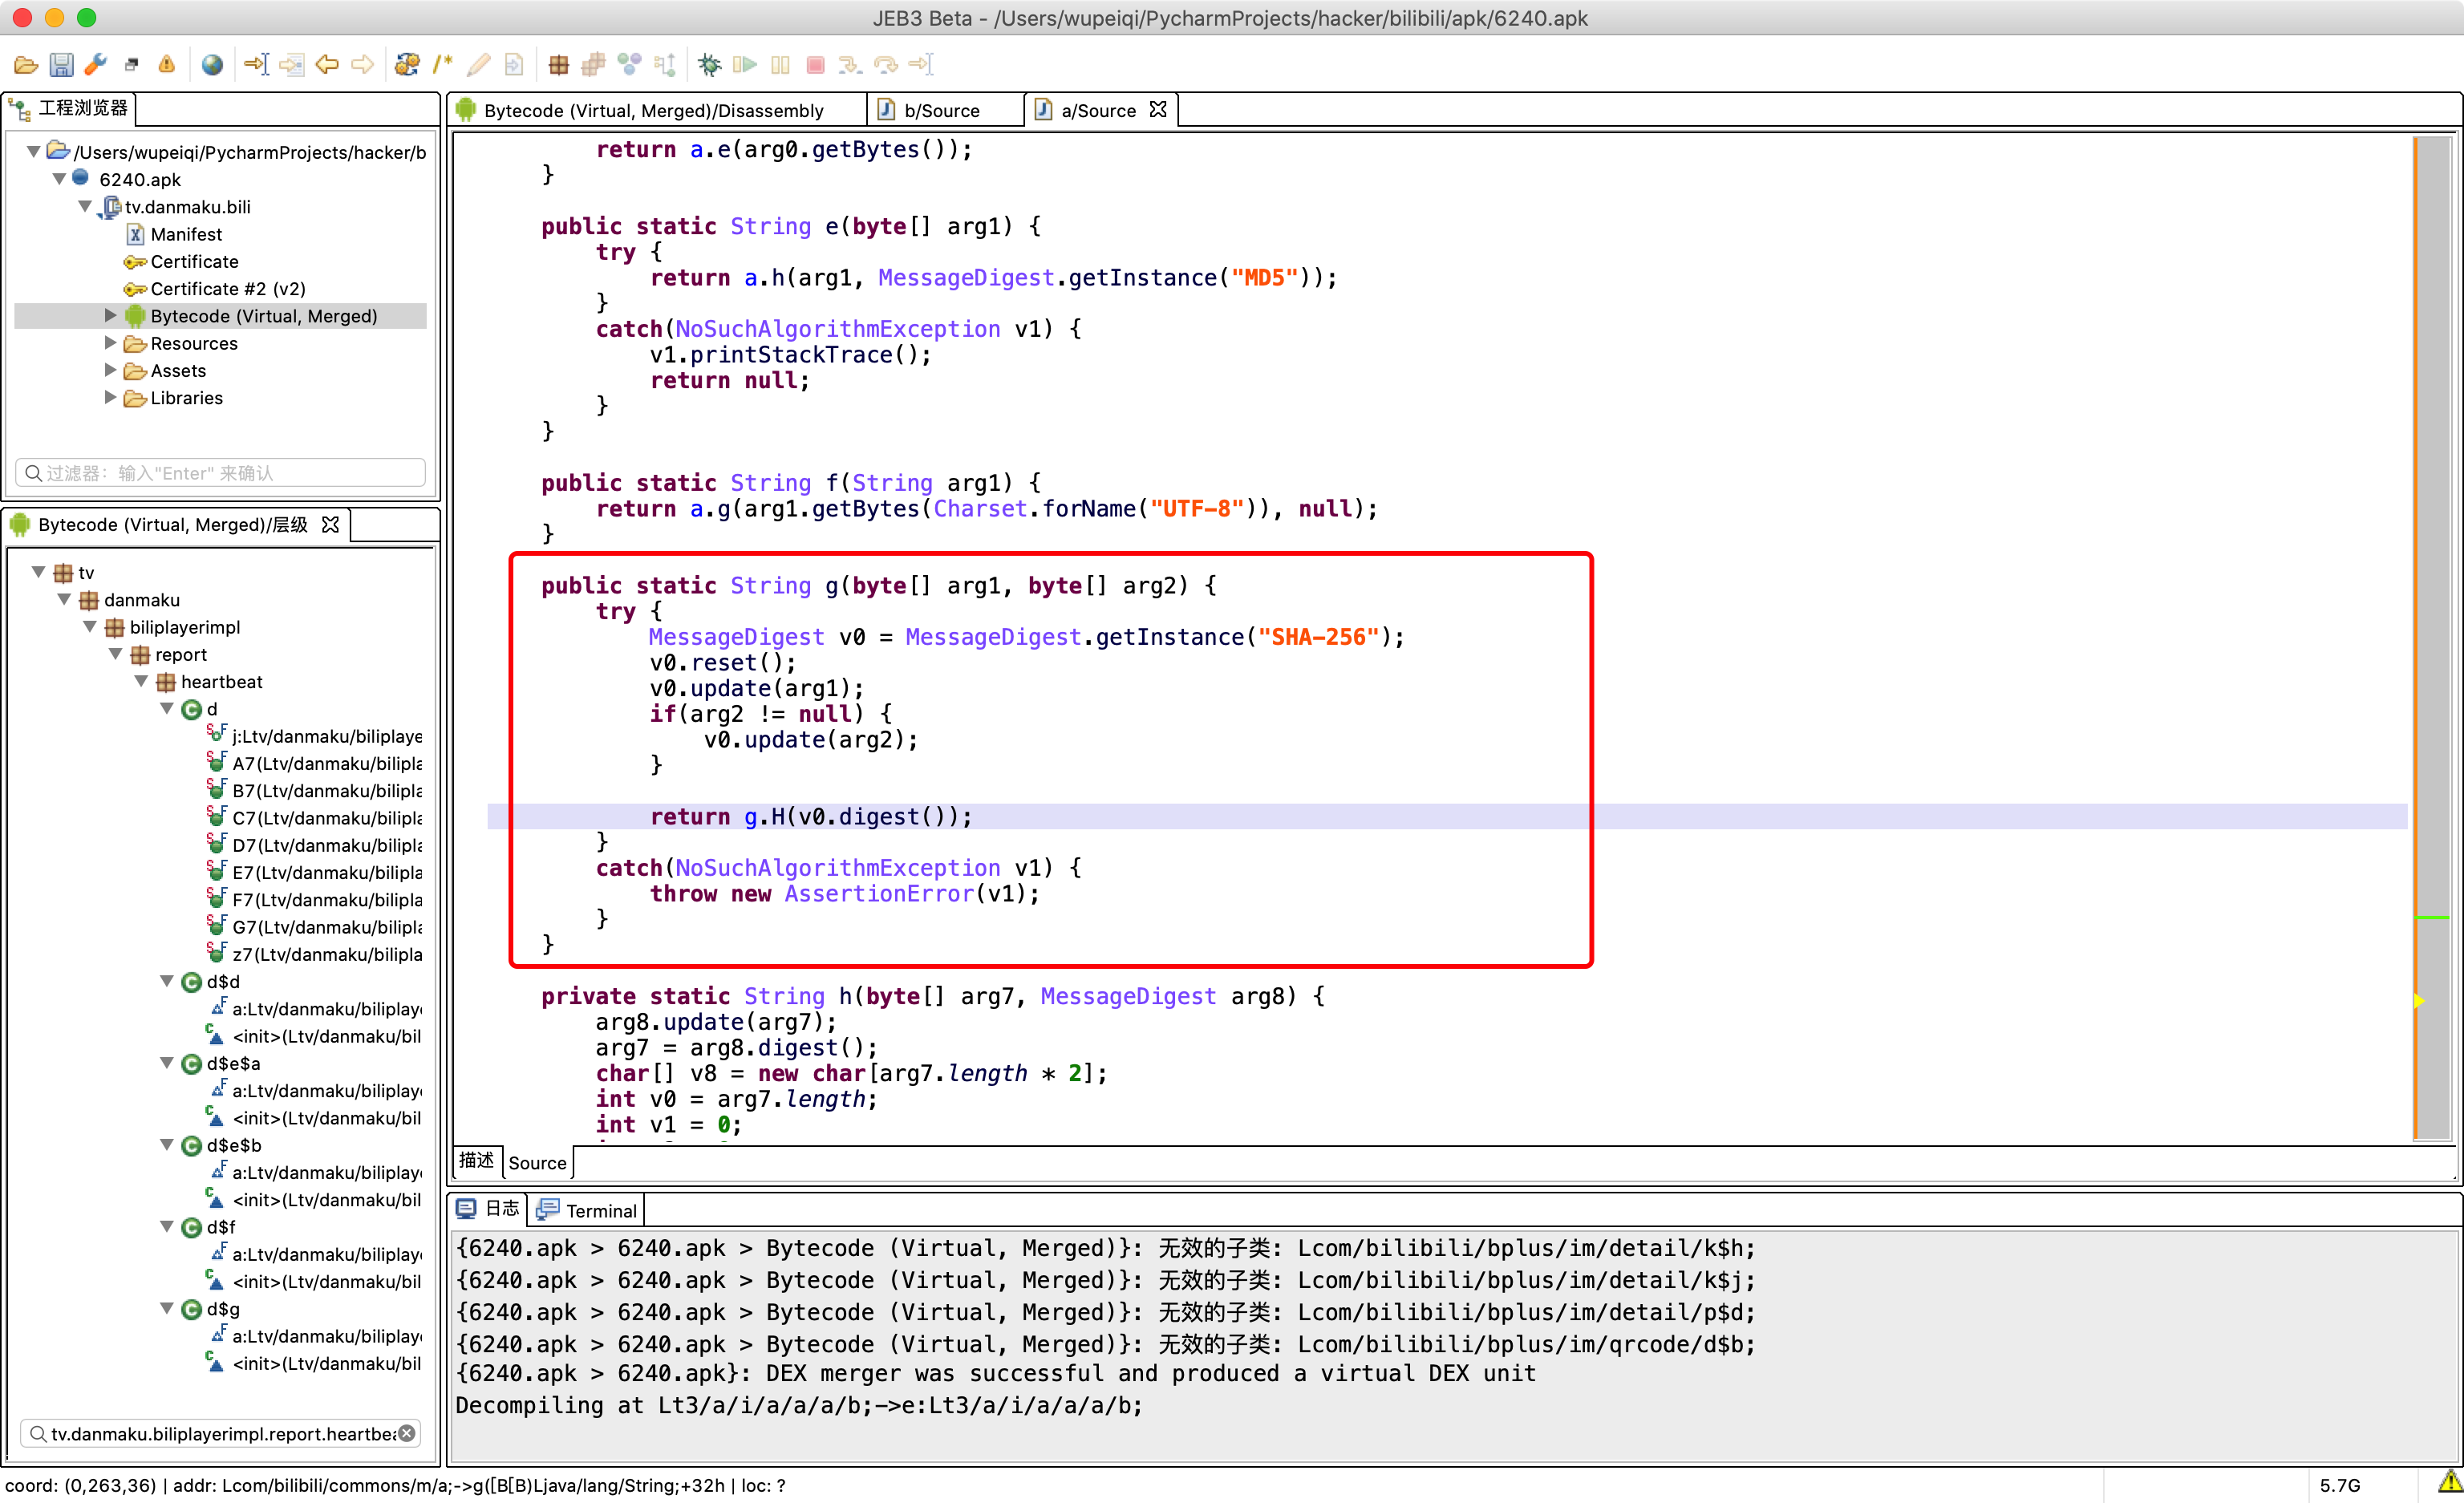

import java.security.MessageDigest;
import java.security.NoSuchAlgorithmException;
import java.util.Arrays;
import java.util.Base64;

public class Hello {

    public static void main(String[] args) throws NoSuchAlgorithmException {
        String name = "武沛齐";
        MessageDigest instance = MessageDigest.getInstance("SHA-256");
        byte[] nameBytes = instance.digest(name.getBytes());
        // System.out.println(Arrays.toString(nameBytes));

        // String res = new String(nameBytes);
        // System.out.println(res);

        // 十六进制展示
        StringBuilder sb = new StringBuilder();
        for(int i=0;i<nameBytes.length;i++){
            int val = nameBytes[i] & 255;  // 负数转换为正数
            if (val<16){
                sb.append("0");
            }
            sb.append(Integer.toHexString(val));
        }
        String hexData = sb.toString();
        System.out.println(hexData); // e6ada6e6b29be9bd90
    }
}
import hashlib

m = hashlib.sha256()
m.update("武沛齐".encode("utf-8"))

v2 = m.hexdigest()
print(v2)
2.8 AES加密
对称加密
- key & iv ,明文加密。【app端】
- key & iv ,解密。【API】
情况A: 请求体密文(抓包乱码)
情况B: sign,AES加密+base64编码
刷B站播放时,发送POST请求。
AES加密(请求体中的数据) -> 密文(JS央视频 key & iv & 加密)。
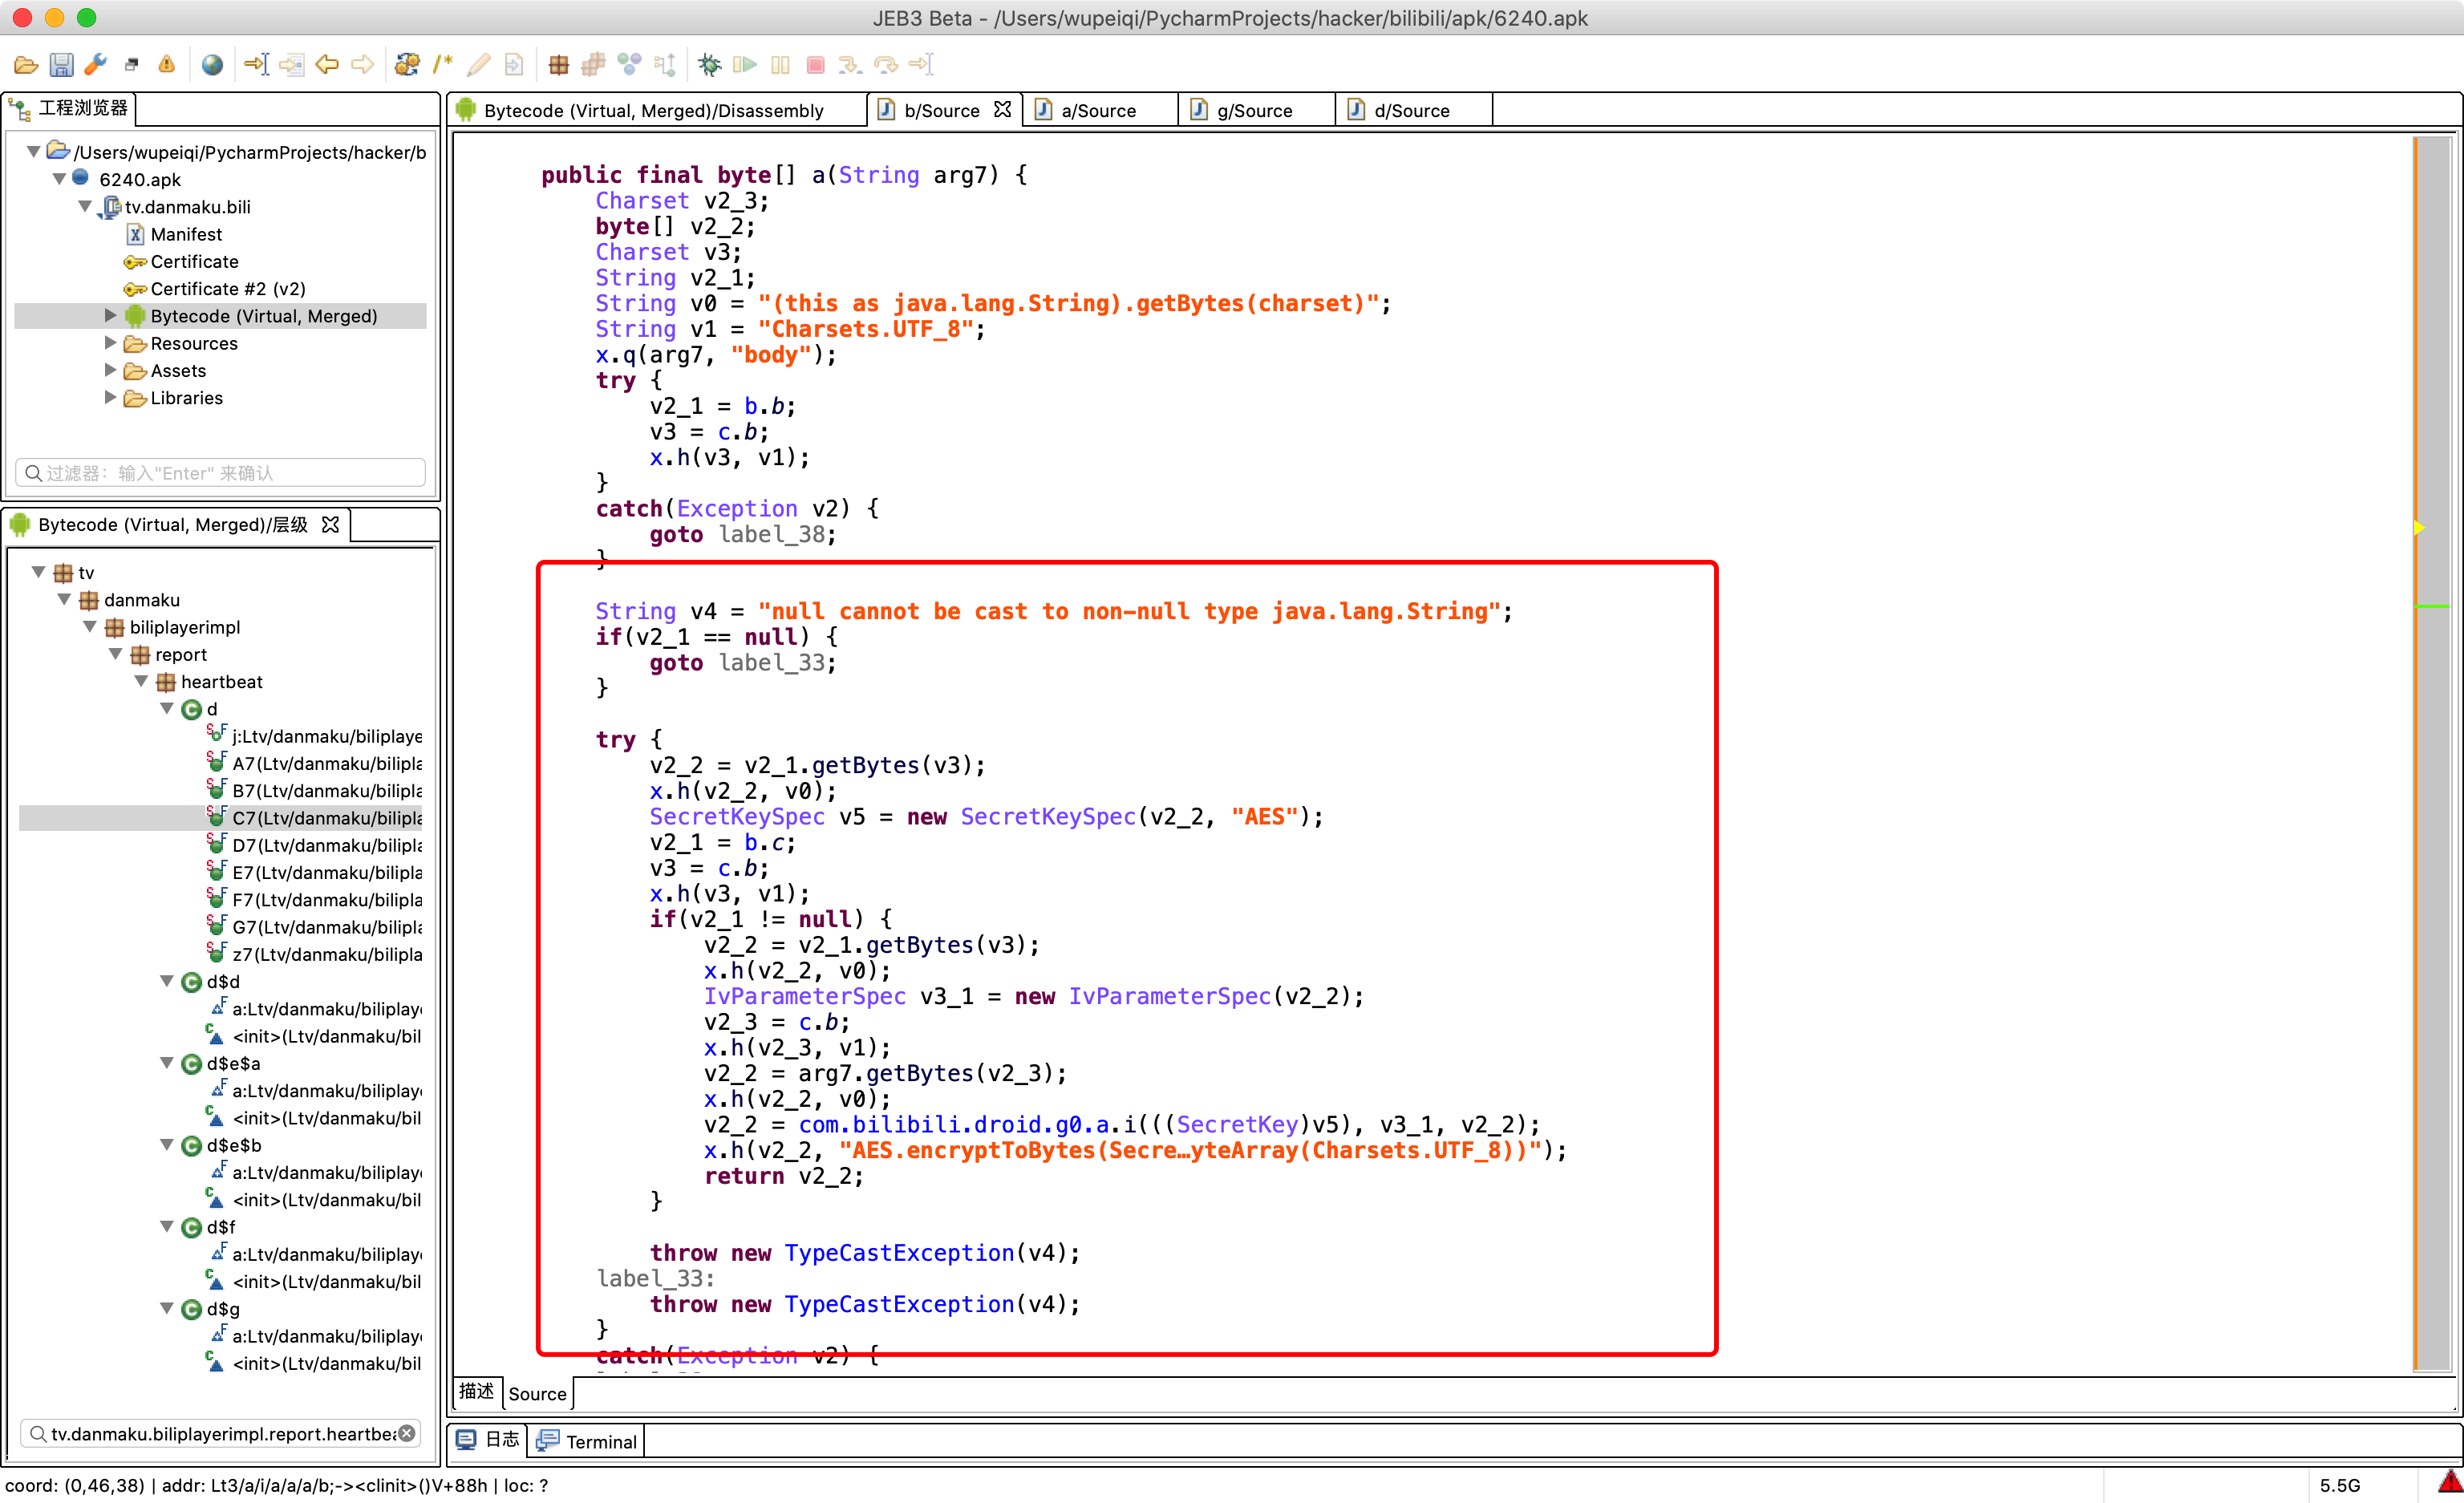
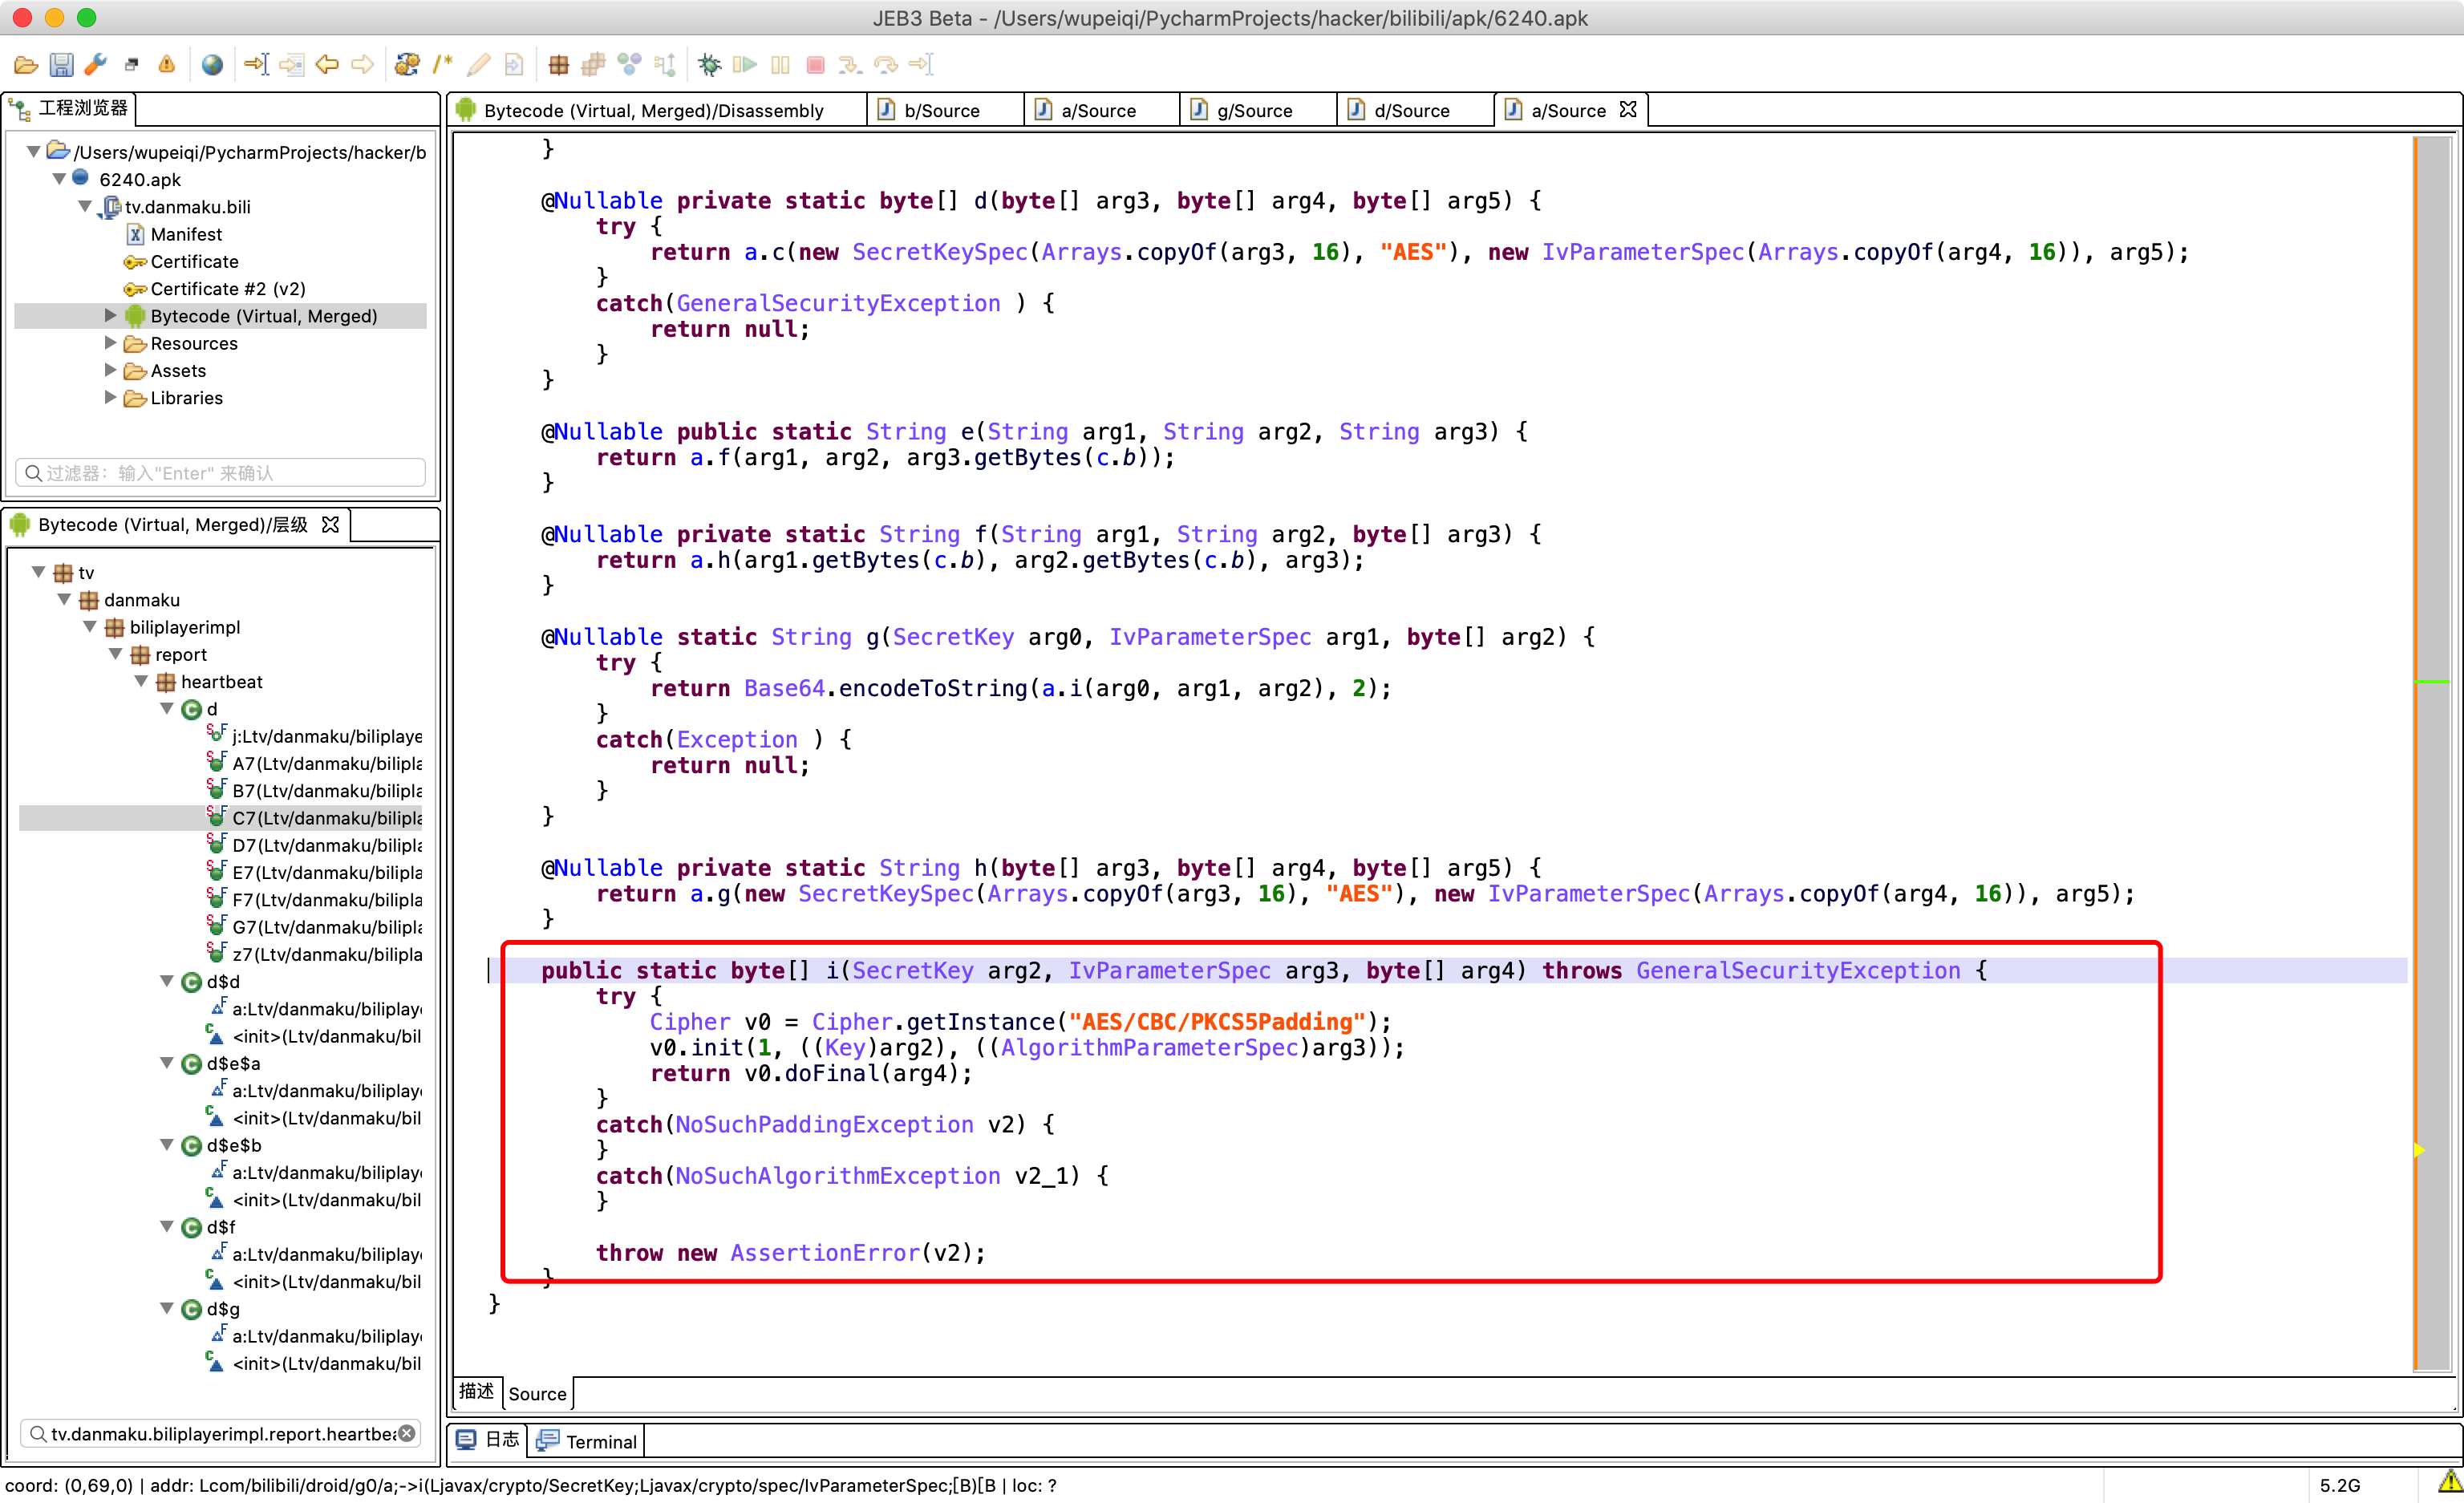
import javax.crypto.BadPaddingException;
import javax.crypto.Cipher;
import javax.crypto.IllegalBlockSizeException;
import javax.crypto.NoSuchPaddingException;
import javax.crypto.spec.IvParameterSpec;
import javax.crypto.spec.SecretKeySpec;
import java.io.UnsupportedEncodingException;
import java.security.InvalidAlgorithmParameterException;
import java.security.InvalidKeyException;
import java.security.MessageDigest;
import java.security.NoSuchAlgorithmException;
import java.util.Arrays;
import java.util.Base64;

public class Hello {

    public static void main(String[] args) throws Exception {
        String data = "武沛齐";
        String key = "fd6b639dbcff0c2a1b03b389ec763c4b";
        String iv = "77b07a672d57d64c";

        Cipher cipher = Cipher.getInstance("AES/CBC/PKCS5Padding");

        // 加密
        byte[] raw = key.getBytes();
        SecretKeySpec skeySpec = new SecretKeySpec(raw, "AES");
        IvParameterSpec ivSpec = new IvParameterSpec(iv.getBytes());


        cipher.init(Cipher.ENCRYPT_MODE, skeySpec, ivSpec);
        byte[] encrypted = cipher.doFinal(data.getBytes());

        // System.out.println(Arrays.toString(encrypted));

    }
}
# pip install pycryptodome
from Crypto.Cipher import AES
from Crypto.Util.Padding import pad

KEY = "fd6b639dbcff0c2a1b03b389ec763c4b"
IV = "77b07a672d57d64c"


def aes_encrypt(data_string):
    aes = AES.new(
        key=KEY.encode('utf-8'),
        mode=AES.MODE_CBC,
        iv=IV.encode('utf-8')
    )
    raw = pad(data_string.encode('utf-8'), 16)
    return aes.encrypt(raw)

data = aes_encrypt("武沛齐")
print(data)
print([ i for i in data])
2.9 base64编码
import java.util.Base64;

public class Hello {

    public static void main(String[] args) {
        String name = "武沛齐";
        // 编码
        Base64.Encoder encoder  = Base64.getEncoder();
        String res = encoder.encodeToString(name.getBytes());
        System.out.println(res); // "5q2m5rKb6b2Q"

        // 解码
        Base64.Decoder decoder  = Base64.getDecoder();
        byte[] origin = decoder.decode(res);
        String data = new String(origin);
        System.out.println(data); // 武沛齐

    }
}
import base64

name = "武沛齐"

res = base64.b64encode(name.encode('utf-8'))
print(res) # b'5q2m5rKb6b2Q'


data = base64.b64decode(res)
origin = data.decode('utf-8')
print(origin) # "武沛齐"


# 不同,换行符 + ==

 浙公网安备 33010602011771号