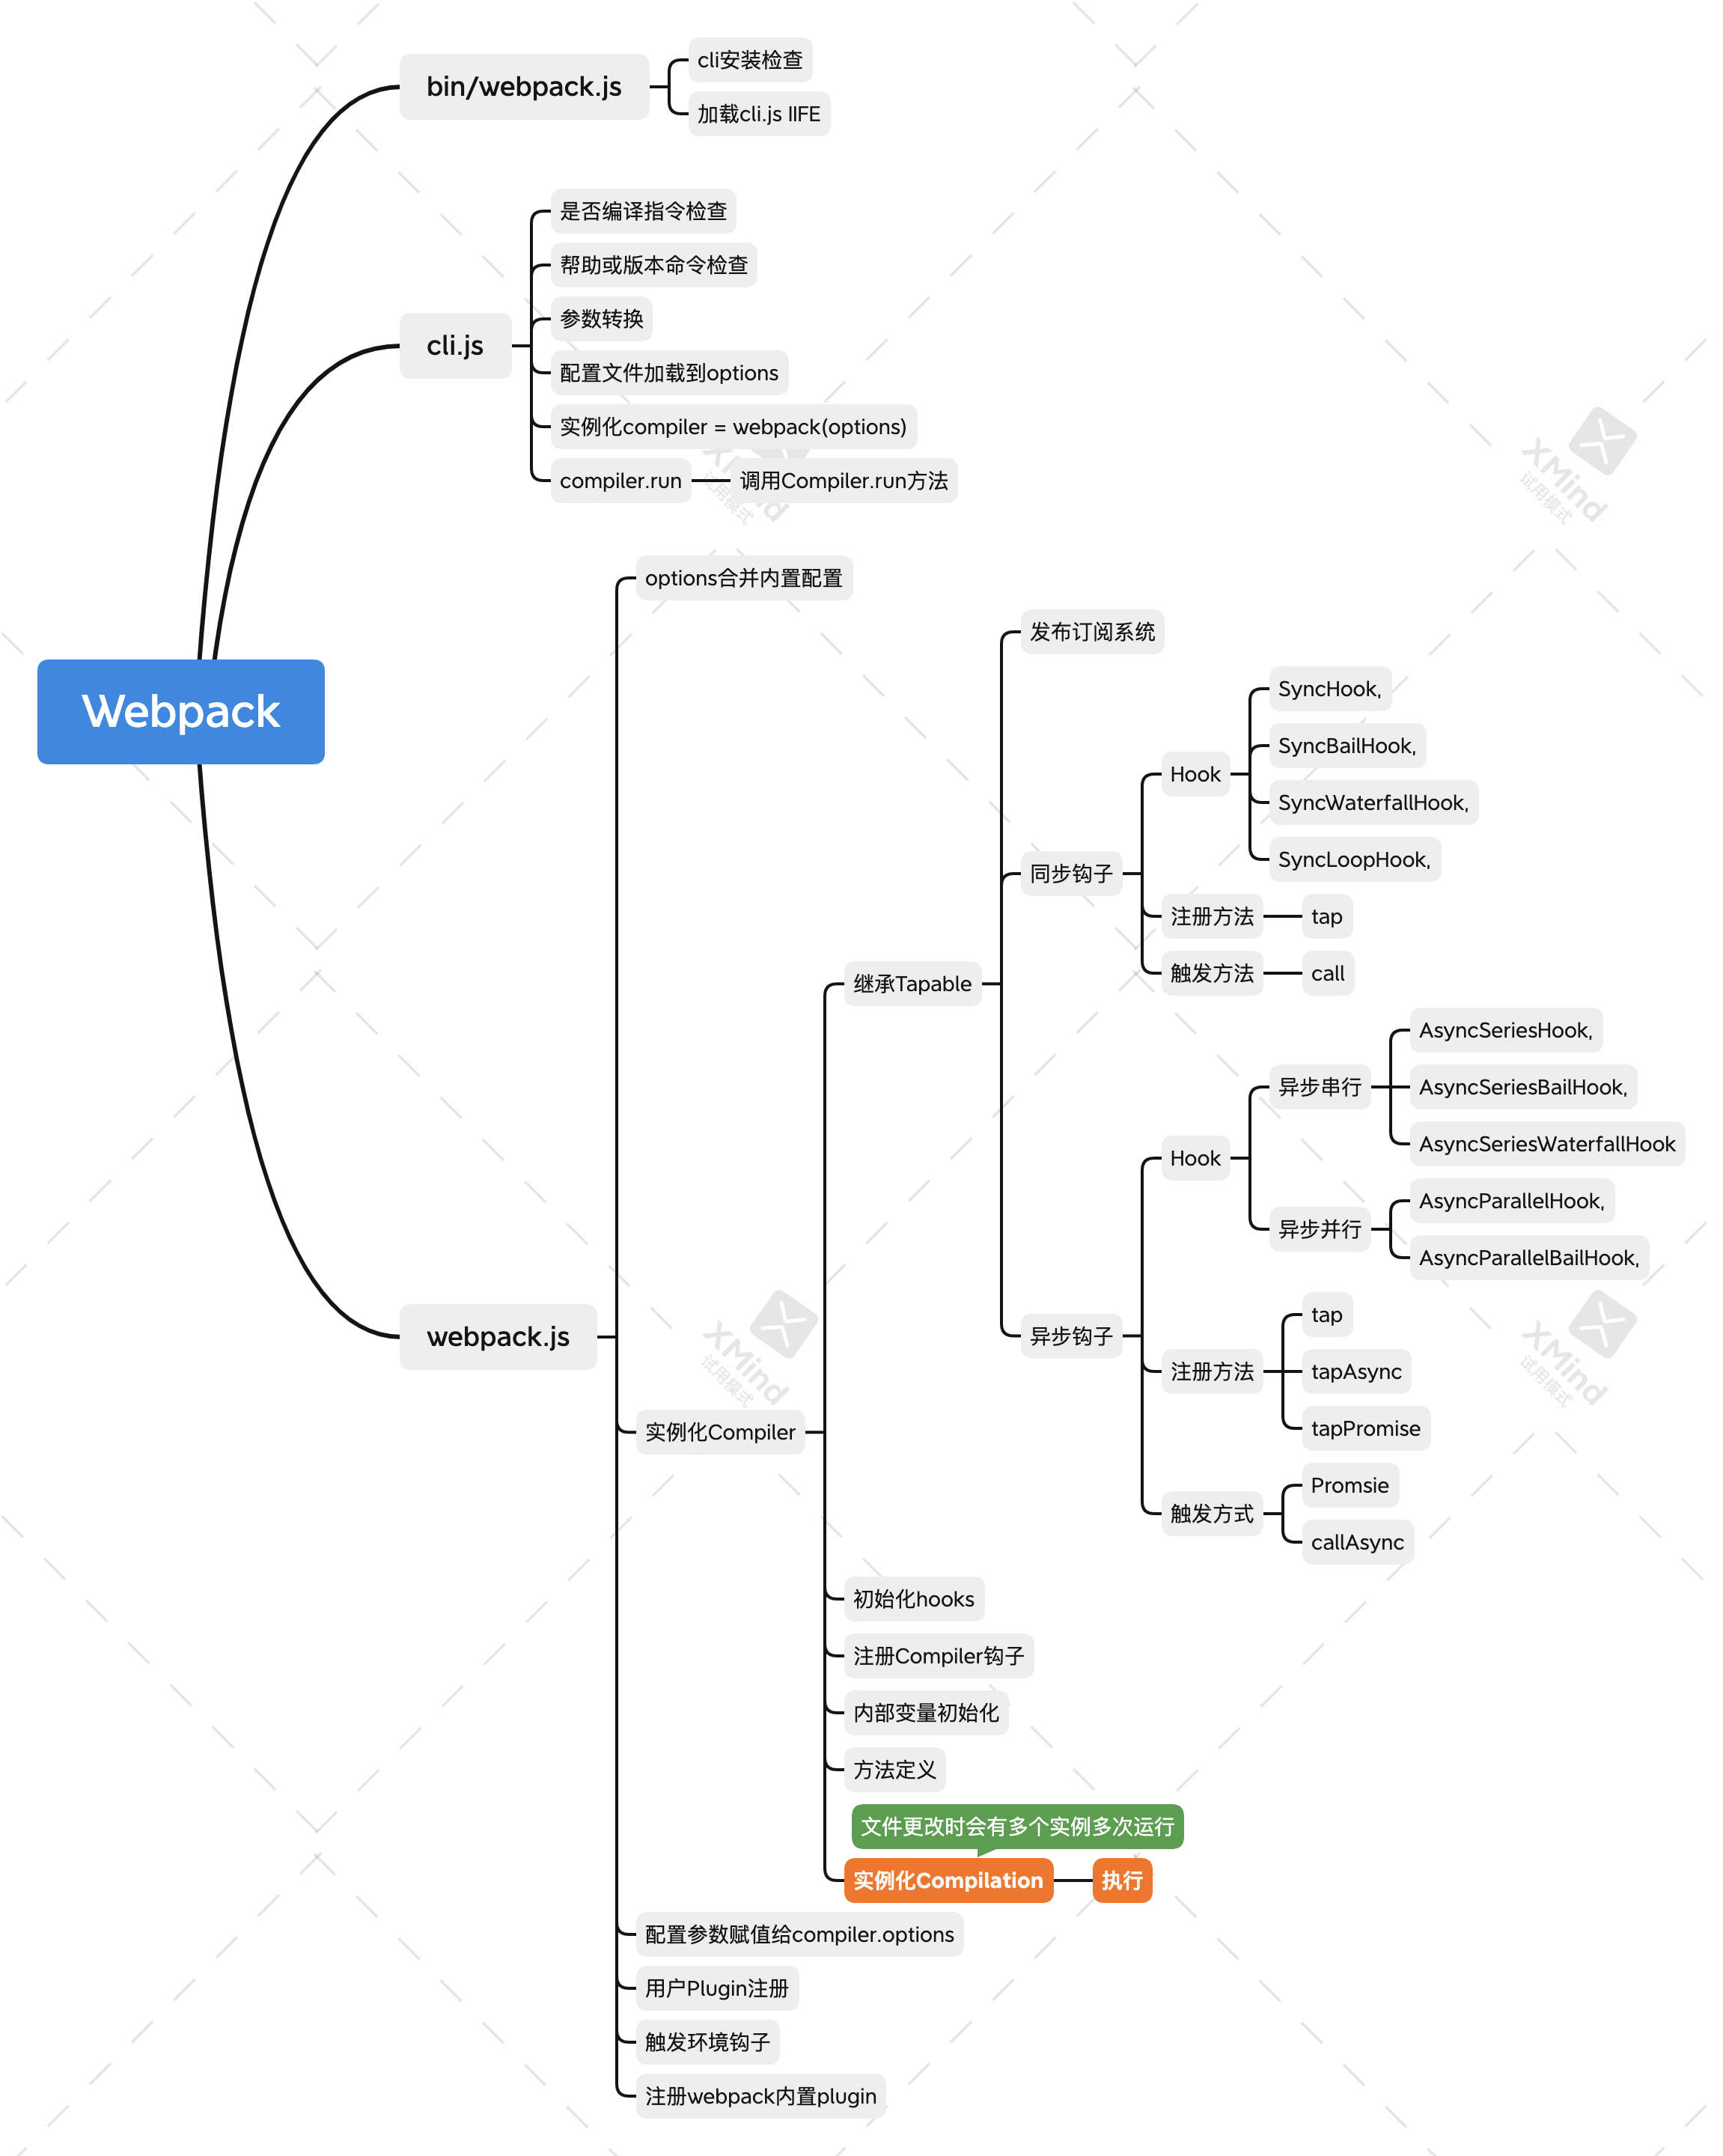
Webpack的核心原理应该是基于Tapable的支持复杂发布订阅流程控制的工具,内置大量的plugin,再结合loader做资源编译。
先上图:

1. 编译入口
version:webpack@4.46.0
webpack的编译命令一般是这样的:
webpack --config webpack.config.js
该命令会执行node_modules/webpack/bin/webpack.js文件
//webpack/bin/webpack.js
//...line:150 判断有cli
else if (installedClis.length === 1) {
	const path = require("path");
	const pkgPath = require.resolve(`${installedClis[0].package}/package.json`);
	// eslint-disable-next-line node/no-missing-require
	const pkg = require(pkgPath);
	// eslint-disable-next-line node/no-missing-require
  // 这里会加载webpack-cli/bin/cli.js
	require(path.resolve(
		path.dirname(pkgPath),
		pkg.bin[installedClis[0].binName]
	));
}

//webpack-cli/bin/cli.js 整体为IIFE
(function() {
  //此处忽略参数检查,环境检查等预处理
  ...
  		function processOptions(options) {
			...
			//忽略其他参数,关注编译入口
			const webpack = require("webpack");
			let lastHash = null;
			let compiler;
			try {
        //webpack初始化
				compiler = webpack(options);
			} catch (err) {
				...
			}
			...
      //如果没有配置中没有watch
			if (firstOptions.watch || options.watch) {
				...
			} else {
        //webpack执行
				compiler.run((err, stats) => {
					if (compiler.close) {
						compiler.close(err2 => {
							compilerCallback(err || err2, stats);
						});
					} else {
						compilerCallback(err, stats);
					}
				});
			}
		}
  	//实际调用
		processOptions(options);
})();
在执行compiler.run之前,先看看webpack初始化做了些什么。
2. Webpack初始化
//webpack/lib/webpack.js
const webpack = (options, callback) => {
	...
	let compiler;
	if (Array.isArray(options)) {
		compiler = new MultiCompiler(
			Array.from(options).map(options => webpack(options))
		);
	} else if (typeof options === "object") {
    //将用户本地的配置文件拼接上webpack内置的参数
		options = new WebpackOptionsDefaulter().process(options);
    //初始化compiler对象
		compiler = new Compiler(options.context);
		compiler.options = options;
    //注册NodeEnvironmentPlugin插件
		new NodeEnvironmentPlugin({
			infrastructureLogging: options.infrastructureLogging
		}).apply(compiler);
    //注册用户配置的插件
		if (options.plugins && Array.isArray(options.plugins)) {
			for (const plugin of options.plugins) {
				if (typeof plugin === "function") {
					plugin.call(compiler, compiler);
				} else {
					plugin.apply(compiler);
				}
			}
		}
    //触发environment和afterEnvironment上注册的事件
		compiler.hooks.environment.call();
		compiler.hooks.afterEnvironment.call();
    //注册webpack内置插件,源码如下
		compiler.options = new WebpackOptionsApply().process(options, compiler);
	} else {
		throw new Error("Invalid argument: options");
	}
	//回调函数处理
  ...
	return compiler;
};
2.1 Compiler初始化
Compiler继承自Tapable,而Tapable是一个基于发布/订阅的复杂事件流注册及调用框架。这里不展开Tapable的实现细节。
class Compiler extends Tapable {
	constructor(context) {
		super();
		this.hooks = {
      //初始化所有钩子--省略
			...
			beforeRun: new AsyncSeriesHook(["compiler"]),
			run: new AsyncSeriesHook(["compiler"])
      ...
		};
    //注册Compiler钩子更改options为异步
		this._pluginCompat.tap("Compiler", options => {
					...
					options.async = true;
			}
		});
		//内部变量初始化赋值
		this.name = undefined;
		this.outputPath = "";
    ...
	}
  //方法定义
	watch:fn;
  run:fn;
	compile:fn;
	...
}
2.2 内置Plugin注册
以target=web为例,会加载以下模板,此处省略大量代码,所以webpack体量并不小
class WebpackOptionsApply extends OptionsApply {
  process(options, compiler) {
		...
			switch (options.target) {
				case "web":
					JsonpTemplatePlugin = require("./web/JsonpTemplatePlugin");
					FetchCompileWasmTemplatePlugin = require("./web/FetchCompileWasmTemplatePlugin");
					NodeSourcePlugin = require("./node/NodeSourcePlugin");
					new JsonpTemplatePlugin().apply(compiler);
					new FetchCompileWasmTemplatePlugin({
						mangleImports: options.optimization.mangleWasmImports
					}).apply(compiler);
					new FunctionModulePlugin().apply(compiler);
					new NodeSourcePlugin(options.node).apply(compiler);
					new LoaderTargetPlugin(options.target).apply(compiler);
					break;
				case "webworker":
				case "node":
				case "async-node":
				case "electron-renderer":
				case "electron-preload":
				default:
			}
		}
  	//这个plugin就是传说中生成AST语法树的acorn库所在的地方
    //AST太过底层,这里就不深入了
  	new JavascriptModulesPlugin().apply(compiler);
    ...
    //注册的对应钩子调用
		compiler.hooks.entryOption.call(options.context, options.entry);
    ...
    compiler.hooks.afterPlugins.call(compiler);
		...
		compiler.hooks.afterResolvers.call(compiler);
		return options;
	}
}
3. Webpack执行编译
//以下代码已省略hook调用逻辑
class Compiler extends Tapable {
	run(callback) {
    ...
		const startTime = Date.now();
		this.running = true;

		const onCompiled = (err, compilation) => {
			//done钩子调用
			if (this.hooks.shouldEmit.call(compilation) === false) {
					return finalCallback(null, stats);
			}
			//注入资源
			this.emitAssets(compilation, err => {
				if (compilation.hooks.needAdditionalPass.call()) {
							//这里可能会触发再次编译
							this.compile(onCompiled);
					return;
				}
				...
			});
		};
		//钩子调用
		...
		//调用compile方法
		this.compile(onCompiled);
	}

  compile(callback) {
    //Compilation参数生成
		const params = this.newCompilationParams();
    //钩子调用
    ...
			//构建单次Compilation对象实例,调用finish和seal方法
			const compilation = this.newCompilation(params);
			//注意:SingleEntryPlugin和MultiEntryPlugin都订阅了make钩子
			this.hooks.make.callAsync(compilation, err => {
				compilation.finish(err => {
					compilation.seal(err => {
							return callback(null, compilation);
				});
			});
		});
	}
}

class SingleEntryPlugin {
	apply(compiler) {
		compiler.hooks.compilation.tap(
			"SingleEntryPlugin",
			(compilation, { normalModuleFactory }) => {
				compilation.dependencyFactories.set(
					SingleEntryDependency,
					normalModuleFactory
				);
			}
		);
		//订阅hooks.make消息并触发addEntry
		compiler.hooks.make.tapAsync(
			"SingleEntryPlugin",
			(compilation, callback) => {
				const { entry, name, context } = this;

				const dep = SingleEntryPlugin.createDependency(entry, name);
				compilation.addEntry(context, dep, name, callback);
			}
		);
	}
}
所以最核心的工作还是由Compilation来完成的。
4. Compilation单次编译
class Compilation extends Tapable {
	constructor(compiler) {
		this.hooks = {
			buildModule: new SyncHook(["module"]),
			rebuildModule: new SyncHook(["module"]),
      //省略其他hook
      ...
    }
    //变量初始化
    this.modules = []; //记录了所有解析后的模块
		this.chunks = []; //记录了所有chunk
    this.assets = {}; //记录了所有要生成的文件
    ...
  }
  getModule:fn,
  waitForBuildingFinished:fn,
  buildModule:fn,
  ...
  //看来finish并没有做什么事情
  finish(callback) {
		const modules = this.modules;
		this.hooks.finishModules.callAsync(modules, err => {
			for (let index = 0; index < modules.length; index++) {
				const module = modules[index];
				this.reportDependencyErrorsAndWarnings(module, [module]);
			}
			callback();
		});
	}

	addEntry(context, entry, name, callback) {
    this._addModuleChain(...){
      this.addModule(...);
    	this.buildModule(...);
    }
  }
}
5. Loader的调用
其中的module是由NormalModuleFactory或者MultiModuleFactory创建的NormalModule或MultiModule。
//NormalModule.js
class NormalModule extends Module {
  build(options, compilation, resolver, fs, callback) {
  	return this.doBuild(options, compilation, resolver, fs, err => {...})
  }
  doBuild(options, compilation, resolver, fs, callback) {
  	const loaderContext = this.createLoaderContext(...);
  	runLoaders(
			{
				resource: this.resource,
				loaders: this.loaders,
				context: loaderContext,
				readResource: fs.readFile.bind(fs)
			},
			(err, result) => {...}
		);
  }
}
6. Seal过程
-
优化我们编译过后的代码(代码混淆、分包优化等等)
-
生成我们最后需要的打包过后的文件
class Compilation extends Tapable {
  ...
  //seal过程,省略大部分hook调用
  seal(callback) {
    ...
		for (const preparedEntrypoint of this._preparedEntrypoints) {
			const module = preparedEntrypoint.module;
			const name = preparedEntrypoint.name;
			const chunk = this.addChunk(name);
			const entrypoint = new Entrypoint(name);
			entrypoint.setRuntimeChunk(chunk);
			entrypoint.addOrigin(null, name, preparedEntrypoint.request);
			this.namedChunkGroups.set(name, entrypoint);
			this.entrypoints.set(name, entrypoint);
			this.chunkGroups.push(entrypoint);

			GraphHelpers.connectChunkGroupAndChunk(entrypoint, chunk);
			GraphHelpers.connectChunkAndModule(chunk, module);

			chunk.entryModule = module;
			chunk.name = name;

			this.assignDepth(module);
		}
		buildChunkGraph(
			this,
			/** @type {Entrypoint[]} */ (this.chunkGroups.slice())
		);
		this.sortModules(this.modules);
		this.hooks.optimizeTree.callAsync(this.chunks, this.modules, err => {
			...
			this.applyModuleIds();
			this.sortItemsWithModuleIds();
			this.applyChunkIds();
			this.sortItemsWithChunkIds();
			this.createHash();
			this.createModuleAssets();
			if (this.hooks.shouldGenerateChunkAssets.call() !== false) {
				this.hooks.beforeChunkAssets.call();
				this.createChunkAssets();
			}
			this.summarizeDependencies();
			...
		});
	}
}
7. 结束
以上就是整个webpack源码的大致流程,由于细节太多省略很多hook的通知代码。
由此可知Compiler和Compilation的关系是:
- 每个
Webpack的配置,对应一个Compiler对象,记录着整个Webpack的生命周期; - 在构建的过程中,每次构建都会产生一次
Compilation实例,Compilation则是构建周期的产物。
根据以上流程就知道,如果自己需要写一个Plugin或者loader应该怎么去做了。
7.1 Plugin
- 只需要提供apply方法供webpack加载
- 订阅对应的hook
- 在hook触发后处理自己需要的逻辑,如更改输出内容,额外输出内容等等
const { compilation } = require("webpack");

const pluginName="consolePlugin";
class consolePlugin{
    apply(compiler){
        compiler.hooks.run.tap(pluginName,compilation=>{
            console.log("The webpack build progress is starting!!!");
            // 这个实现的功能就是简单的打印这句话
        })
    }
}
module.exports=consolePlugin;
7.2 Loader
来个最简单的,在所有匹配的模块最后加个end的注释,如下:
Loader可以很简单但是也可以很复杂,因为编译原理可不是一个简单的东西,比如babel,因为这些不在webpack本身,这里就不说了。
module.exports = source =>{
    var result = source + " //end";
    return result;
}


 浙公网安备 33010602011771号