【Django基础】Django使用Markdown 编辑器
使用Markdown 编辑器
pip install django-mdeditor  # 用于后台编辑
pip install markdown # 用于前端显示
首先 settings.py 中添加配置,将mdeditor 这个app加进来
INSTALLED_APPS = [
    ... 省略 ...
    'mdeditor',
]
urls.py 中添加path(注意路径不要配错了,前面没有/)
path("mdeditor/", include('mdeditor.urls'))
修改models中的field的类型,之前是TextField,改成MDTextField
from mdeditor.fields import MDTextField

class Article(BaseModel):
    title = models.CharField("标题", max_length=200, editable=True, blank=True)
    body = MDTextField("正文", default="", editable=True, blank=True)
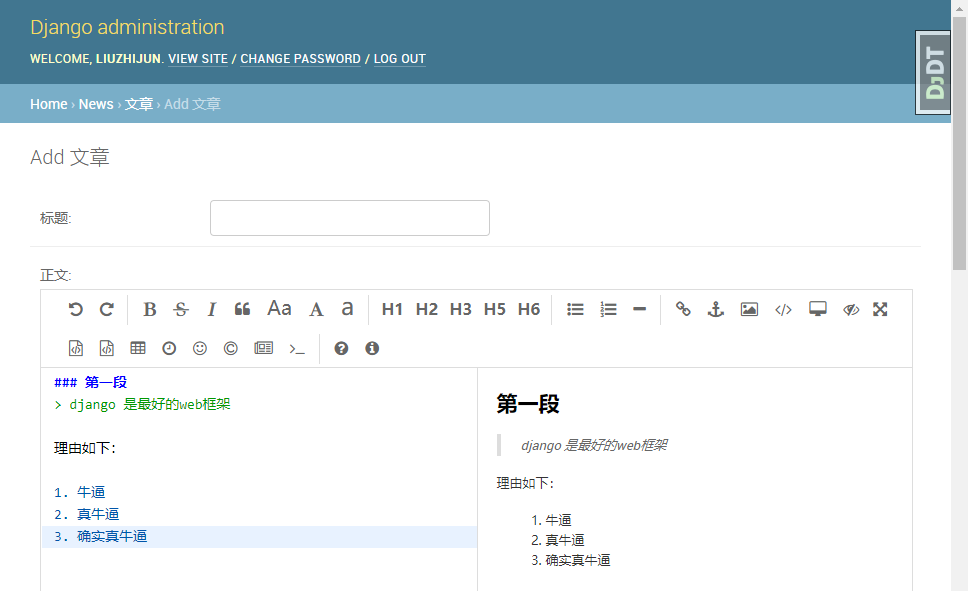
将 Article 在admin中注册后,可以看到如下效果,左边是编辑器,右边是预览,很方便

前端展示处理
先在服务端将markdown渲染成html返回给前端处理
import markdown

def detail(request, pk):
    article = get_object_or_404(Article, pk=pk)
    article.body = markdown.markdown(article.body,
                                  extensions=[
                                     'markdown.extensions.extra',
                                     'markdown.extensions.codehilite',
                                     'markdown.extensions.toc',
                                  ])
    return render(request, 'article/detail.html', context={'article': article})
模板代码
<div>
    {{ post.body|safe }}
</div>
图片大小控制
默认的图片是 100% 展示的,图片太大了
在网上看到有解说怎么控制图片大小的,上传的时候,在图片格式后面,加上{:width="100%" align=center}
比如:[](http://pxpfco2u1.bkt.clouddn.com/markdown20190921144356.png){:width="100%" align=center}
后端要增加扩展
可以把所有的扩展全部加上。页面布局会变好看很多。这些是从 markdown 的官网扩展官网 https://python-markdown.github.io/extensions/查到的
def bugdetailPage(request):
    bug_name = request.GET.get("bug_name")
    logger.warn(bug_name)
    bug_obj = BugManage.objects.filter(bug_name__exact=bug_name).first()
    # 将markdown语法渲染成html样式
    extensions=[
        # # 包含 缩写、表格等常用扩展
        # 'markdown.extensions.extra',
        # # 语法高亮扩展
        # 'markdown.extensions.codehilite',
        # # 自动生成目录
        # 'markdown.extensions.toc',
        'markdown.extensions.extra',
        'markdown.extensions.abbr',
        'markdown.extensions.attr_list',
        'markdown.extensions.def_list',
        'markdown.extensions.fenced_code',
        'markdown.extensions.footnotes',
        'markdown.extensions.md_in_html',
        'markdown.extensions.tables',
        'markdown.extensions.admonition',
        'markdown.extensions.codehilite',
        'markdown.extensions.legacy_attrs',
        'markdown.extensions.legacy_em',
        'markdown.extensions.meta',
        'markdown.extensions.nl2br',
        'markdown.extensions.sane_lists',
        'markdown.extensions.smarty',
        'markdown.extensions.toc',
        'markdown.extensions.wikilinks'
    ]
    bug_detail = markdown.markdown(bug_obj.bug_detail, extensions=extensions)

    bug_detail = bug_detail.replace('<img alt="" src=', '<img alt="" style="width: 40%;" src=')
    bug_detail = bug_detail.replace('/></p>', '/></p></br>')

    logger.warn(bug_detail)

    result = {'bug_detail': bug_detail}
    # logger.warn(result)
    return render(request, 'ruleroam/bugdetail.html', result)
数据展示
前端的html 中要加入高亮引用
 <link rel="stylesheet" href="/static/bootstrap/css/bootstrap.min.css">
 <link rel="stylesheet" type="text/css" href="/static/mdeditor/css/markdown_emacs.css">
 <div style="margin-left: 100px">
     {{ bug_detail | safe }}
 </div>
那个 | safe 必须要加,适用于html转义用的
那么高亮引用的文件从哪里来呢,使用这个工具生成。
生成方式:
#
# pip install markdown #view视图中获取到数据库的数据,修饰为html语句,传到前端
# pip install Pygments #实现代码高亮
# 安装第二个包后还要执行
# pygmentize -S default -f html -a .codehilite > markdown_highlighy.css
# pygmentize -S default -f html -a .codehilite > default.css
# pygmentize -S monokai  -f hl -a .codehilite > monokai.css
#
# 查看支持的风格
# from pygments.styles import STYLE_MAP
# for key in STYLE_MAP.keys():
#     print(key)
# https://blog.csdn.net/mouday/article/details/83114164
#
# 在文件夹下会发现生成了code.css文件,将这个css文件加入到你的static文件夹下css里面(路径自己定,只要用的时候引入正确就行了)
# 最后一步在需要高亮的html文件里面导入刚刚生成的css文件,例如我的是->要在
# <link rel="stylesheet" type="text/css" href="{% static 'static/css/markdown_highlighy.css' %}">  {#语法高亮#}


