SSM框架实现附带信息的文件上传&下载
SSM框架实现附带信息的文件上传&下载
目录
技术概述
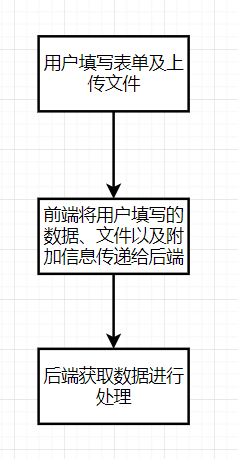
在进行团队开发时,分配到了资源和作业部分的后端相关内容,需要实现文件的上传和下载。但是由于各个文件保存路径不相同,以及存在需要附带信息保存的情况,如提交作业时同时有附件、正文内容以及附带学生id与班级id,教师上传资源时要传递班级id与教师id等。在同时上传文件和传递信息时,本来使用form表单传递即可,但是前端用了vue框架,加上除了表单中填写的信息还要附带其他信息,最后找到了form-data传递的办法。
技术详述
- 我们使用一个类封装了需要的信息和文件
public class ResourceDTO {
    private int id;
    private String resourceName;
    private int type;
    private int downloads;
    private String filePath;
    private int teacherId;
    private int clazzId;
    private MultipartFile file;
    ......
其他字段用于保存信息,file用来存文件。
- 准备好依赖
pom.xml
<!-- 文件上传 -->
<dependency>
<groupId>commons-fileupload</groupId>
<artifactId>commons-fileupload</artifactId>
<version>1.3</version>
</dependency>
springmvc.xml中
    <bean id="multipartResolver" class="org.springframework.web.multipart.commons.CommonsMultipartResolver">
        <property name="maxUploadSize" value="#{1024*1024*20}"/>
        <property name="defaultEncoding" value="utf-8"/>
    </bean>
- 在Controller中,接受前端数据并存储
    @RequestMapping("upload")
    @ResponseBody
    public ResponseVO upload(@ModelAttribute ResourceDTO requestResource, HttpServletRequest request) {
        try {
            MultipartFile file = requestResource.getFile();
            String originalFileName = file.getOriginalFilename();
            String fileUrl  = "/WEB-INF/resource/" + requestResource.getTeacherId() +"/" + requestResource.getClazzId() + "/" + originalFileName;//这是路径,可以自定义
            //获取路径
            fileUrl = request.getSession().getServletContext().getRealPath(fileUrl);
            //向url地址存储文件
            FileUtil.writeFileToUrl(file, fileUrl);
            //接下来就是将requestResource的数据存到数据库中,这里就不放了
            ......
             }
        catch(Exception e){
            e.printStackTrace();
        }
        ......
FileUtil的代码如下:
import org.springframework.web.multipart.MultipartFile;
import java.io.File;
import java.io.FileOutputStream;
import java.io.IOException;
import java.util.Date;

public class FileUtil {
    public static void writeFileToUrl(MultipartFile file, String fileUrl) throws IOException {
        File file1 = new File(fileUrl);
        if (!file1.getParentFile().exists()) {
            file1.getParentFile().mkdirs();
        }
        FileOutputStream fos = new FileOutputStream(file1);
        fos.write(file.getBytes());
        fos.flush();
        fos.close();
    }
}
- 可以写个表单测试一下
<form action = "upload" method="post" enctype="multipart/form-data">
 	   	<input type="file" name = "file">
 	   	<input type="submit" value="上传文件">
</form>
- 下载我采用了简单的数据流下载
    @RequestMapping(value = "/resource/download")
    public void download(HttpServletRequest request, HttpServletResponse response ,@RequestParam("id") int id){
        try {
            Resource requestResource = resourceService.findById(id);
            String filePath =  requestResource.getFilePath();
            File file = new File(filePath);//如果文件存在的话
            resourceService.modifyDownload(requestResource.getId());
            if (file.exists()) {//获取输入流
                InputStream bis = new BufferedInputStream(new FileInputStream(file));//假如以中文名下载的话
                String filename = requestResource.getResourceName() ;
                filename = URLEncoder.encode(filename, "UTF-8" );//设置文件下载头
                response.addHeader("Content-Disposition", "attachment;filename=" + filename);
                response.setContentType ( "multipart/form-data" );
                BufferedOutputStream out = new BufferedOutputStream(response.getOutputStream());int len = 0;
                while ((len = bis.read()) != -1) {
                    out.write(len);
                }
                out.close();
            }
        } catch (IOException ioException) {
            ioException.printStackTrace();
        }
    }
技术使用中遇到的问题和解决过程
我们遇到的问题是:前端使用了vue框架,上传文件时我们不知道如何进行附带信息的传递。
解决:翻了很多博客,最后使用form-data来进行数据与文件的传递,与负责相关前端的组长同志交流测试后完成,确认可用。
ps:以下前端代码是由我们伟大的组长完成的
表单部分:
    <div id="divForm">
      <el-form :model="publishForm" ref="publishForm" label-position="top">
        <el-form-item label="资源信息" class="label">
          <i class="el-icon-star-on">选择分组</i>
          <br>
          <el-select v-model="typeValue" placeholder="课程资源">
            <el-option
              v-for="item in typeOptions"
              :key="item.value"
              :label="item.label"
              :value="item.value">
            </el-option>
          </el-select>
        </el-form-item>

        <el-form-item  label="资源内容" class="label">
          <i class="el-icon-star-on">上传文件</i>
          <br/>
          <input class="file" name="file" type="file"  @change="select"/>
          <p id="p">提示:单个文件不超过20MB</p>
        </el-form-item>

        <el-form-item>
          <el-button id="cancel" type="primary" plain size="mini" @click="cancelClick">取消</el-button>

          <el-popover
            placement="top"
            width="160"
            v-model="visible">
            <p>确定发布该资源吗?</p>
            <div style="text-align: right; margin: 0">
              <el-button size="mini" type="text" @click="visible = false">取消</el-button>
              <el-button type="primary" size="mini" @click="publishClick">确定</el-button>
            </div>
            <el-button slot="reference" id="publish" class="button" type="primary" plain size="mini">发布</el-button>
          </el-popover>
        </el-form-item>
      </el-form>
    </div>
以下是数据处理
publishClick() {//确定上传
      let param = new FormData() // 创建form对象
      param.append('file', this.file, this.file.name) // 通过append向form对象添加数据
      param.append('teacherId', this.tId)
      param.append('clazzId',this.clazzValue)
      param.append('type',this.typeValue)// 添加form表单中其他数据
      // withCredentials: true 使得后台可以接收表单数据  跨域请求
      const instance = this.$axios.create({
        withCredentials: true,
        headers:{
          'Content-type': 'application/json;charset=UTF-8',
          'Authorization': localStorage.getItem('token')
        }
      })
      // url为后台接口
      instance.post('http://1.15.149.222:8080/coursewebsite/teacher/resource/upload', param)
        .then((response) => {
          console.log(response.data)
          if (response.data.code==='200') {
            alert('上传成功')
            this.$router.push('/teacher/source/study')
            this.$router.go(0)
          }
        }) // 成功返回信息 调用函数  函数需自己定义,此处后面省略
        .catch((error) => {
          console.log(error)       //请求失败返回的数据
        })
    }
总结
1.准备好依赖与封装好的类
2.写好Controller的处理
3.写好前端的处理
参考链接
作者:fujiangfer
-------------------------------------------
个性签名:没有
如果觉得这篇文章对你有小小的帮助的话,记得在右下角点个“推荐”哦,博主在此感谢!
万水千山总是情,打赏一分行不行(っ•̀ω•́)っ✎⁾⁾!


 浙公网安备 33010602011771号