审计系统---堡垒机项目之用户交互程序开发
settings.py
1 2 3 4 5 6 7 8 9 10 11 12 13 14 15 16 17 18 19 20 21 22 | INSTALLED_APPS = [ ... 'app01', # 注册app]MIDDLEWARE = [...# 'django.middleware.csrf.CsrfViewMiddleware', ...]ALLOWED_HOSTS = ["*"] # Linux下启动用0.0.0.0 添加访问的host即可在Win7下访问STATICFILES_DIRS = (os.path.join(BASE_DIR, "statics"),) # 现添加的配置,这里是元组,注意逗号TEMPLATES = [ ... 'DIRS': [os.path.join(BASE_DIR, 'templates')],]# 自定义账户生效AUTH_USER_MODEL = "app01.UserProfile" # app名.表名# 监测脚本SESSION_TRACKER_SCRIPT = "%s/backend/session_trackor.sh" %BASE_DIRAUDIT_LOG_PATH = "%s/logs/audit" % BASE_DIR |
user_enterpoint.py
1 2 3 4 5 6 7 8 9 10 11 12 13 14 15 16 17 18 19 20 21 22 23 24 25 26 27 28 29 30 31 32 33 34 35 36 37 38 39 40 41 42 43 44 45 46 47 48 49 50 51 52 53 54 55 56 57 58 59 60 61 62 63 64 65 66 67 68 69 70 71 72 73 74 75 76 77 78 79 80 81 82 83 84 85 86 87 88 89 90 91 92 93 94 95 96 97 98 99 100 101 102 103 104 105 106 107 108 109 110 111 112 113 114 115 116 117 118 119 120 121 122 123 124 125 126 127 128 129 | import getpassimport osimport hashlib, timeimport subprocessfrom django.contrib.auth import authenticate# 用户输入命令行端交互入口class UserPortal(object): def __init__(self): self.user = None # 用户交互认证 def user_auth(self): retry_count = 0 while retry_count < 3: username = input("Username:").strip() if (len(username) == 0): continue# password = getpass.getpass("Password:").strip() password = input("Password:").strip() if (len(password) == 0): print("password must not be null") continue user = authenticate(username=username, password=password) if(user): self.user = user print("welcome login...") return else: print("invalid password or username...") retry_count += 1 else: exit("Too many atttempts....") # 交互函数 def interactive(self): self.user_auth() print("验证完成...") if self.user: exit_flag = False while not exit_flag: # 显示用户可以访问的用户组信息信息 host_groups = self.user.host_groups.all() host_groups_count = self.user.host_groups.all().count() print('----------------------------------------------------------------------') print("host_groups: ", host_groups) print('host_groups_count:', host_groups_count) print('----------------------------------------------------------------------') # 记录主机组所关联的全部主机信息 for index, hostGroup in enumerate(host_groups): # 0, Webserver【Host Count: 2】 print("%s. %s【Host Count: %s】" % (index, hostGroup.name, hostGroup.bind_hosts.all().count())) # 用户直接关联的主机信息 # 1. Ungrouped Hosts[1] # Py特性,这里的index并未被释放,在循环完成后index值还存在,且值为最后循环的最后一个值 print("%s. Ungrouped Hosts[%s]" % (index + 1, self.user.bind_hosts.select_related().count())) # 用户选择需要访问的组信息 user_input = input("Please Choose Group:").strip() if len(user_input) == 0: print('please try again...') continue if user_input.isdigit(): user_input = int(user_input) # 在列表范围之内 if user_input >= 0 and user_input < host_groups_count: selected_group = self.user.host_groups.all()[user_input] # 选中了未分组的那组主机 elif user_input == self.user.host_groups.all().count(): # 之所以可以这样,是因为self.user里也有一个bind_hosts,跟HostGroup.bind_hosts指向的表一样 selected_group = self.user # 相当于更改了变量的值,但期内都有bind_hosts的属性,所以循环是OK的 else: print("invalid host group") continue print('selected_group:', selected_group.bind_hosts.all()) print('selected_group_count:', selected_group.bind_hosts.all().count()) while True: for index, bind_host in enumerate(selected_group.bind_hosts.all()): print("%s. %s(%s user:%s)" % (index, bind_host.host.hostname, bind_host.host.ip_addr, bind_host.host_user.username)) user_input2 = input("Please Choose Host:").strip() if len(user_input2) == 0: print('please try again...') continue if user_input2.isdigit(): user_input2 = int(user_input2) if user_input2 >= 0 and user_input2 < selected_group.bind_hosts.all().count(): selected_bindhost = selected_group.bind_hosts.all()[user_input2] print("--------------start logging -------------- ", selected_bindhost) md5_str = hashlib.md5(str(time.time()).encode()).hexdigest() login_cmd = 'sshpass -p {password} /usr/local/openssh7/bin/ssh {user}@{ip_addr} -o "StrictHostKeyChecking no" -Z {md5_str}'.format( password=selected_bindhost.host_user.password, user=selected_bindhost.host_user.username, ip_addr=selected_bindhost.host.ip_addr, md5_str=md5_str ) print('login_cmd:', login_cmd) # 这里的ssh_instance在subprocess的run执行完之前是拿不到的 # 因为run会进入终端界面 # 问题来了? 怎么拿到进程PID进行strace呢? 重启一个监测进程 # start session tracker script session_tracker_script = settings.SESSION_TRACKER_SCRIPT tracker_obj = subprocess.Popen("%s %s" % (session_tracker_script, md5_str), shell=True, stdout=subprocess.PIPE, stderr=subprocess.PIPE, # 这个cwd命名式指定python运行的路径的 cwd=settings.BASE_DIR) # time.sleep(15) # 测试网络延时情况 # create session log models.SessionLog.objects.create(user=self.user, bind_host=selected_bindhost, session_tag=md5_str) ssh_instance = subprocess.run(login_cmd, shell=True) print("------------logout---------") print("session tracker output", tracker_obj.stdout.read().decode(), tracker_obj.stderr.read().decode()) # 不解码显示的是二进制 print("--------------end logging ------------- ") # 退出循环 if user_input2 == 'b': breakif __name__ == '__main__': os.environ.setdefault("DJANGO_SETTINGS_MODULE", "CityHunter.settings") import django django.setup() from django.conf import settingsfrom app01 import models portal = UserPortal() portal.interactive() |
admin.py
1 2 3 4 5 6 7 8 9 10 11 12 13 14 15 16 17 18 19 20 21 22 23 24 25 26 27 28 29 30 31 32 33 34 35 36 37 38 39 40 41 42 43 44 45 46 47 48 49 50 51 52 53 54 55 56 57 58 59 60 61 62 63 64 65 66 67 68 69 70 71 72 73 74 75 76 77 78 79 80 81 82 83 84 85 86 87 88 89 90 91 92 93 94 | from django.contrib import adminfrom django import formsfrom django.contrib.auth.models import Groupfrom django.contrib.auth.admin import UserAdmin as BaseUserAdminfrom django.contrib.auth.forms import ReadOnlyPasswordHashFieldfrom app01 import modelsclass UserCreationForm(forms.ModelForm): """A form for creating new users. Includes all the required fields, plus a repeated password.""" password1 = forms.CharField(label='Password', widget=forms.PasswordInput) password2 = forms.CharField(label='Password confirmation', widget=forms.PasswordInput) class Meta: model = models.UserProfile fields = ('email', 'name') def clean_password2(self): # Check that the two password entries match password1 = self.cleaned_data.get("password1") password2 = self.cleaned_data.get("password2") if password1 and password2 and password1 != password2: raise forms.ValidationError("Passwords don't match") return password2 def save(self, commit=True): # Save the provided password in hashed format user = super(UserCreationForm, self).save(commit=False) user.set_password(self.cleaned_data["password1"]) if commit: user.save() return userclass UserChangeForm(forms.ModelForm): """A form for updating users. Includes all the fields on the user, but replaces the password field with admin's password hash display field. """ password = ReadOnlyPasswordHashField() class Meta: model = models.UserProfile fields = ('email', 'password', 'name', 'is_active', 'is_superuser') def clean_password(self): # Regardless of what the user provides, return the initial value. # This is done here, rather than on the field, because the # field does not have access to the initial value return self.initial["password"]class UserProfileAdmin(BaseUserAdmin): # The forms to add and change user instances form = UserChangeForm add_form = UserCreationForm # The fields to be used in displaying the User model. # These override the definitions on the base UserAdmin # that reference specific fields on auth.User. list_display = ('email', 'name', "is_active", 'is_superuser') list_filter = ('is_superuser',) # 不添加会报错,因为BaseAdmin里面有一个list_filter字段,不覆盖会报错 fieldsets = ( (None, {'fields': ('email', 'password')}), ('Personal', {'fields': ('name',)}), ('Permissions', {'fields': ('is_superuser',"is_active","bind_hosts","host_groups","user_permissions","groups")}), ) # add_fieldsets is not a standard ModelAdmin attribute. UserAdmin # overrides get_fieldsets to use this attribute when creating a user. add_fieldsets = ( (None, { 'classes': ('wide',), 'fields': ('email', 'name', 'password1', 'password2')} ), ) search_fields = ('email',) ordering = ('email',) filter_horizontal = ("bind_hosts","host_groups","user_permissions","groups")class HostUserAdmin(admin.ModelAdmin): list_display = ('username','auth_type','password')class SessionLogAdmin(admin.ModelAdmin): list_display = ('id','session_tag','user','bind_host','date')admin.site.register(models.UserProfile, UserProfileAdmin)admin.site.register(models.Host)admin.site.register(models.HostGroup)admin.site.register(models.HostUser,HostUserAdmin)admin.site.register(models.BindHost)admin.site.register(models.IDC)admin.site.register(models.SessionLog,SessionLogAdmin) |
models.py
1 2 3 4 5 6 7 8 9 10 11 12 13 14 15 16 17 18 19 20 21 22 23 24 25 26 27 28 29 30 31 32 33 34 35 36 37 38 39 40 41 42 43 44 45 46 47 48 49 50 51 52 53 54 55 56 57 58 59 60 61 62 63 64 65 66 67 68 69 70 71 72 73 74 75 76 77 78 79 80 81 82 83 84 85 86 87 88 89 90 91 92 93 94 95 96 97 98 99 100 101 102 103 104 105 106 107 108 109 110 111 112 113 114 115 116 117 118 119 120 121 122 123 124 125 126 127 128 129 130 131 132 133 134 135 136 137 138 139 140 141 | from django.db import modelsfrom django.contrib.auth.models import ( BaseUserManager, AbstractBaseUser,PermissionsMixin)from django.utils.translation import ugettext_lazy as _from django.utils.safestring import mark_safe# Create your models here.class Host(models.Model): """主机信息""" hostname = models.CharField(max_length=64) ip_addr = models.GenericIPAddressField(unique=True) port = models.PositiveIntegerField(default=22) idc = models.ForeignKey("IDC", on_delete=True) enabled = models.BooleanField(default=True) def __str__(self): return "%s(%s)"%(self.hostname,self.ip_addr)class IDC(models.Model): """机房信息""" name = models.CharField(max_length=64,unique=True) def __str__(self): return self.nameclass HostGroup(models.Model): """主机组""" name = models.CharField(max_length=64,unique=True) bind_hosts = models.ManyToManyField("BindHost",blank=True,) def __str__(self): return self.nameclass UserProfileManager(BaseUserManager): def create_user(self, email, name, password=None): """ Creates and saves a User with the given email, date of birth and password. """ if not email: raise ValueError('Users must have an email address') user = self.model( email=self.normalize_email(email), name=name, ) user.set_password(password) self.is_active = True user.save(using=self._db) return user def create_superuser(self,email, name, password): """ Creates and saves a superuser with the given email, date of birth and password. """ user = self.create_user( email, password=password, name=name, ) user.is_active = True user.is_superuser = True #user.is_admin = True user.save(using=self._db) return userclass UserProfile(AbstractBaseUser,PermissionsMixin): """堡垒机账号""" email = models.EmailField( verbose_name='email address', max_length=255, unique=True, null=True ) password = models.CharField(_('password'), max_length=128, help_text=mark_safe('''<a href='password/'>修改密码</a>''')) name = models.CharField(max_length=32) is_active = models.BooleanField(default=True) #is_admin = models.BooleanField(default=False) bind_hosts = models.ManyToManyField("BindHost",blank=True) host_groups = models.ManyToManyField("HostGroup",blank=True) objects = UserProfileManager() USERNAME_FIELD = 'email' REQUIRED_FIELDS = ['name'] def get_full_name(self): # The user is identified by their email address return self.email def get_short_name(self): # The user is identified by their email address return self.email def __str__(self): # __unicode__ on Python 2 return self.email @property def is_staff(self): "Is the user a member of staff?" # Simplest possible answer: All admins are staff return self.is_activeclass HostUser(models.Model): """主机登录账户""" auth_type_choices = ((0,'ssh-password'),(1,'ssh-key')) auth_type = models.SmallIntegerField(choices=auth_type_choices,default=0) username = models.CharField(max_length=64) password = models.CharField(max_length=128,blank=True,null=True) def __str__(self): return "%s:%s" %(self.username,self.password) class Meta: unique_together = ('auth_type','username','password')class BindHost(models.Model): """绑定主机和主机账号""" host = models.ForeignKey("Host", on_delete=True) host_user = models.ForeignKey("HostUser", on_delete=True) def __str__(self): return "%s@%s"%(self.host,self.host_user) class Meta: unique_together = ('host', 'host_user')class SessionLog(models.Model): """存储session日志""" # 堡垒机用户 主机信息 唯一标示 user = models.ForeignKey("UserProfile", on_delete=True) bind_host = models.ForeignKey("BindHost", on_delete=True) session_tag = models.CharField(max_length=128,unique=True) date = models.DateTimeField(auto_now_add=True) def __str__(self): return self.session_tag |
更改db文件的权限,方便sessioni日志的记录
1 2 | omc@omc-virtual-machine:~$ cd CityHunter/omc@omc-virtual-machine:~$ chmod 777 db.sqlite3 【更改文件属组为cityhunber也可以】 |
上传Django项目到服务器并解压
1 | omc@omc-virtual-machine:~$ unzip CityHunter.zip 【解压Django的zip包】 |
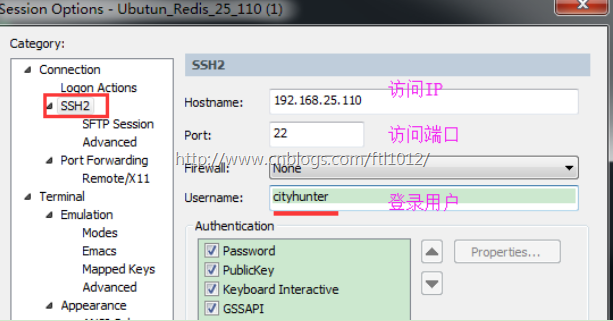
创建登录堡垒机服务器[Ubuntun]的账户
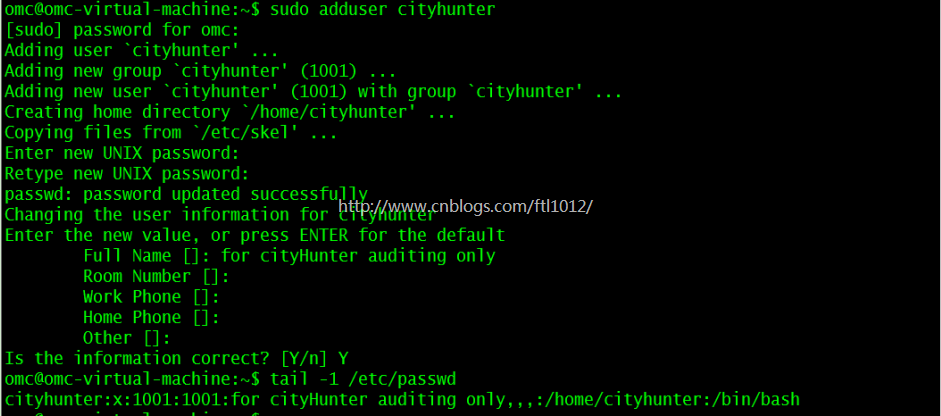
Ubuntu上创建ciythunber用户:
1 2 3 | omc@omc-virtual-machine:~$ sudo adduser cityhunteromc@omc-virtual-machine:~$ tail -1 /etc/passwd |
cityhunter用户增加sudo权限
1 2 3 | root@omc-virtual-machine:~# vim /etc/sudoersroot@omc-virtual-machine:~# visudo -croot@omc-virtual-machine:~# grep 'cityhunter' /etc/sudoers |
设置登录堡垒机服务器后自动执行user_enterpoint.py脚本且执行完成后自动退出服务器
1 2 3 4 | cityhunter@omc-virtual-machine:~$ tail -3 /home/cityhunter/.bashrc 【仅添加3行内容】# for cityhunter auditing: after user logged auto execute this python file/usr/bin/python3 /home/omc/CityHunter/user_enterpoint.py logout |
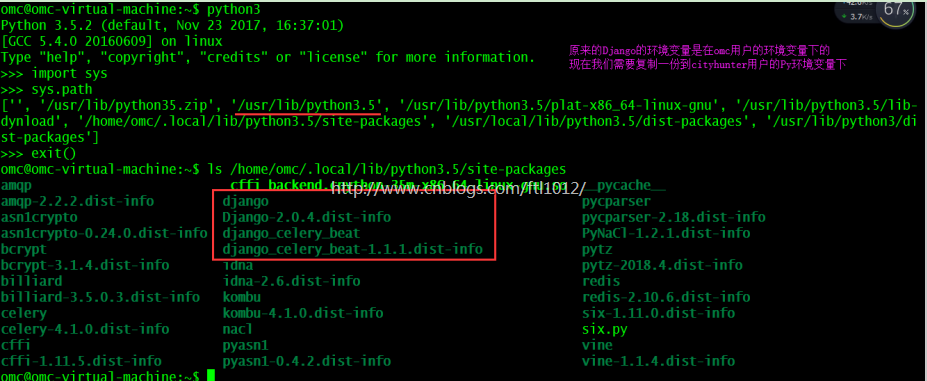
另:新创建的用户没有Django的环境变量,需要手动添加才能执行脚本成功
Ps: 如果环境上有DJango环境变量则不用执行如下操作
查看omc用户的Django变量所在的位置
1 2 3 4 5 6 | omc@omc-virtual-machine:~/CityHunter$ python3Python 3.5.2 (default, Nov 23 2017, 16:37:01) [GCC 5.4.0 20160609] on linuxType "help", "copyright", "credits" or "license" for more information.>>> import sys>>> sys.path |
新创建的cityhunter用户添加py的环境变量
1 | cityhunter@omc-virtual-machine:~$ pip3 install pika 【仅仅是为了添加Py变量方便】 |
查看新用户cityhunter的Py环境变量
1 2 3 4 5 6 | cityhunter@omc-virtual-machine:~$ python3 Python 3.5.2 (default, Nov 23 2017, 16:37:01) [GCC 5.4.0 20160609] on linuxType "help", "copyright", "credits" or "license" for more information.>>> import sys>>> sys.path |
复制omc用户下的Django文件到cityhunter用户下
1 2 | omc@omc-virtual-machine:~/CityHunter$ sudo cp -rf /home/omc/.local/lib/python3.5/site-packages/ /home/cityhunter/.local/lib/python3.5/ |
更改Django文件属组,让cityhunter用户可以访问
1 2 3 | cityhunter用户下查看属组:cityhunter@omc-virtual-machine:~$ id cityhunter 【cityhunter用户下查看用户属组】uid=1001(cityhunter) gid=1001(cityhunter) groups=1001(cityhunter) |
cmc用户下更改属组[服务器是omc服务器]
1 | omc@omc-virtual-machine:~/CityHunter$ sudo chown cityhunter:cityhunter -R /home/cityhunter/.local/ |
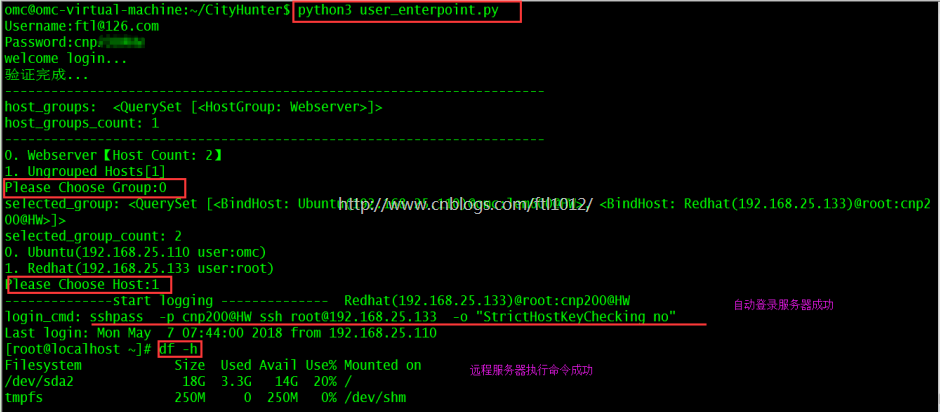
Ubuntu下cityhunter用户执行命令:
1 2 3 4 5 6 7 8 9 10 11 12 13 14 15 16 17 18 19 20 21 22 23 24 25 | cityhunter@omc-virtual-machine:~/CityHunter$ python3 /home/omc/CityHunter/user_enterpoint.py Username:ftl@126.com Password:cnpXXXwelcome login...验证完成...----------------------------------------------------------------------host_groups: <QuerySet [<HostGroup: Webserver>]>host_groups_count: 1----------------------------------------------------------------------0. Webserver【Host Count: 2】1. Ungrouped Hosts[1]Please Choose Group:0selected_group: <QuerySet [<BindHost: Ubuntu(192.168.25.110)@omc:lem600XXX>, <BindHost: Redhat(192.168.25.133)@root:cnpXXX>]>selected_group_count: 20. Ubuntu(192.168.25.110 user:omc)1. Redhat(192.168.25.133 user:root)Please Choose Host:1--------------start logging -------------- Redhat(192.168.25.133)@root:cnp200XXXlogin_cmd: sshpass -p cnp200XXX ssh root@192.168.25.133 -o "StrictHostKeyChecking no"Last login: Mon May 7 07:44:00 2018 from 192.168.25.110[root@localhost ~]# df -hFilesystem Size Used Avail Use% Mounted on/dev/sda2 18G 3.3G 14G 20% /tmpfs 250M 0 250M 0% /dev/shm/dev/sda1 291M 32M 245M 12% /boot |
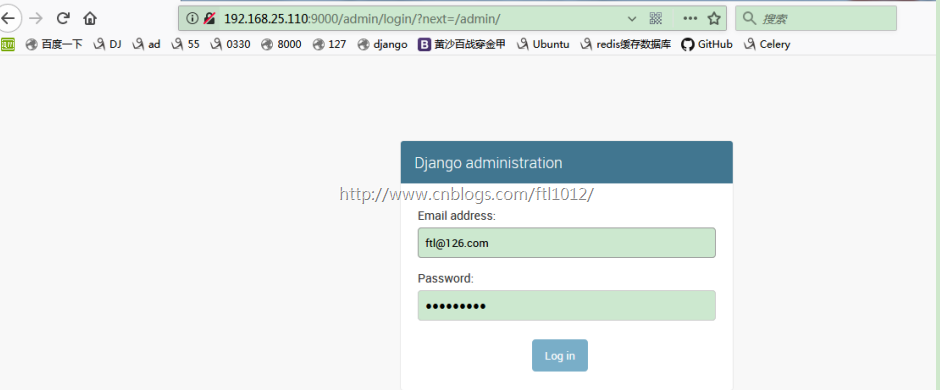
Linux服务器[Ubuntu]下DJango的运行:
1 2 3 4 | 后台启动Django:omc@omc-virtual-machine:~$ cd /home/omc/CityHunter/omc@omc-virtual-machine:~/CityHunter$ python3 manage.py runserver 0.0.0.0:9000omc@omc-virtual-machine:~$ netstat -an|grep 9000 |
前台Win7访问:
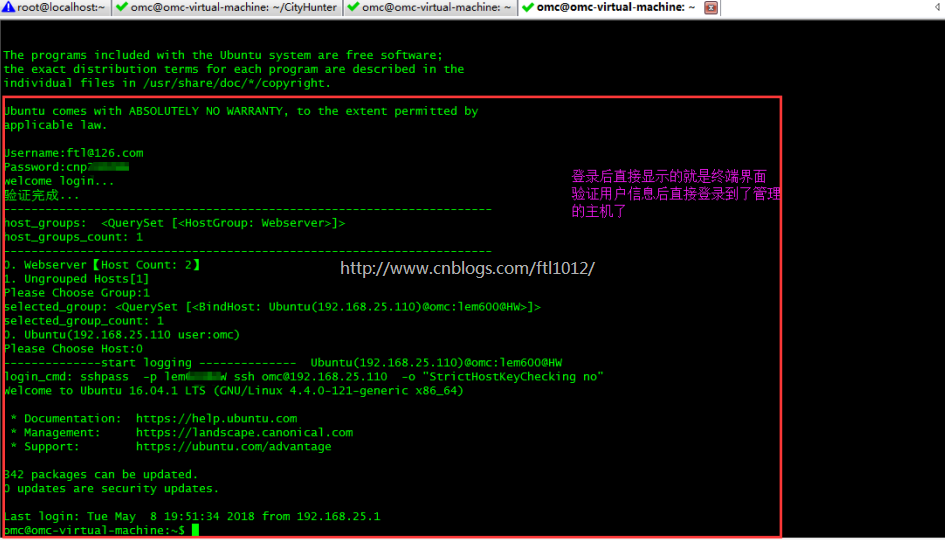
远程使用cityhunter用户登录结果演示:
终端登录:
问题记录
问题现象1:
django.core.exceptions.ImproperlyConfigured: Requested setting AUTHENTICATION_BACKENDS, but settings are not configured. You must either define the environment variable DJANGO_SETTINGS_MODULE or call settings.configure() before accessing settings
我们在自己的Py脚本里面调用Django的数据库,没有添加环境变量导致验证失败【参考manage.py,添加环境变量解决】
问题解决:
后台结果:
问题现象2:
django.core.exceptions.AppRegistryNotReady: Apps aren't loaded yet.
问题定位:
问题解决:
1. 添加Django的环境变量后导入DJango的东西
2. 删除导入信息[不实际]









【推荐】还在用 ECharts 开发大屏?试试这款永久免费的开源 BI 工具!
【推荐】国内首个AI IDE,深度理解中文开发场景,立即下载体验Trae
【推荐】编程新体验,更懂你的AI,立即体验豆包MarsCode编程助手
【推荐】轻量又高性能的 SSH 工具 IShell:AI 加持,快人一步
· 理解Rust引用及其生命周期标识(下)
· 从二进制到误差:逐行拆解C语言浮点运算中的4008175468544之谜
· .NET制作智能桌面机器人:结合BotSharp智能体框架开发语音交互
· 软件产品开发中常见的10个问题及处理方法
· .NET 原生驾驭 AI 新基建实战系列:向量数据库的应用与畅想
· C# 13 中的新增功能实操
· Ollama本地部署大模型总结
· 2025成都.NET开发者Connect圆满结束
· langchain0.3教程:从0到1打造一个智能聊天机器人
· 用一种新的分类方法梳理设计模式的脉络