Celery学习--- Celery 最佳实践之与django结合实现异步任务
django 可以轻松跟celery结合实现异步任务,只需简单配置即可
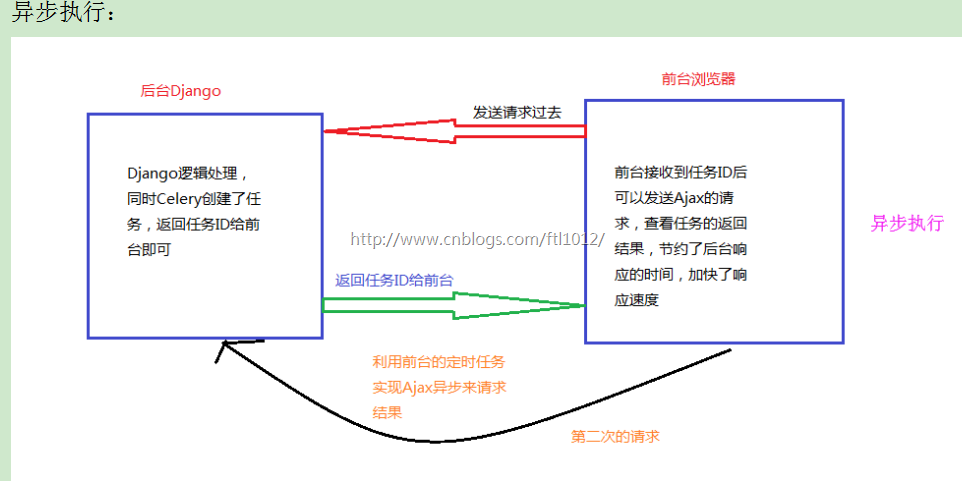
同步执行和异步执行
注意:即使Celery的任务没有执行完成,但是已经创建了任务ID。可以利用前台的定时任务发送Ajax异步请求根据ID查询结果
项目整合
项目的目录结构:
项目前提: 安装并启动Redis
CeleryTest/settings.py
INSTALLED_APPS = [
   ...
 'app01',   # 注册app
]
MIDDLEWARE = [
...
# 'django.middleware.csrf.CsrfViewMiddleware',
      ...
]

STATICFILES_DIRS = (os.path.join(BASE_DIR, "statics"),)  # 现添加的配置,这里是元组,注意逗号
TEMPLATES = [
   ...
   'DIRS': [os.path.join(BASE_DIR, 'templates')],
]
# for celery
CELERY_BROKER_URL = 'redis://192.168.2.105',
CELERY_BACKEND_URL = 'redis://192.168.2.105',  # 用于Celery的返回结果的接收
CeleryTest/urls.py
from django.contrib import admin
from django.urls import path
from django.conf.urls import url, include
from app01 import views
urlpatterns = [
   url(r'index/', views.Index),
   url(r'task_res/', views.task_res),
]
app01/views.py
from django.shortcuts import render,HttpResponse
from app01 import tasks
# Create your views here.
# 视图触发Celery的用户请求

def Index(request):
    print('进入Index...')
    res1 = tasks.add(5, 999)
    res = tasks.add.delay(5, 1000)
    print("res:", res)
    return HttpResponse(res)

# 前台通过ID获取Celery的结果
from celery.result import AsyncResult
def task_res(request):
    result = AsyncResult(id="5cf8ad07-8770-450e-9ccd-8244e8eeed19")
    # return HttpResponse(result.get())
    return HttpResponse(result.status)  # 状态有Pending, Success, Failure等结果
app01/tasks.py 文件名必须为tasks.py
# 文件名必须为tasks.py,Djaogo才能发现Celery
from __future__ import absolute_import, unicode_literals
from celery import shared_task

# Django starts so that the @shared_task decorator (mentioned later) will use it:
@shared_task    # Django的各个App里都可以导入这个任务,否则只能在app01这个Django的App内使用
def add(x, y):
    return x + y

@shared_task
def mul(x, y):
    return x * y

@shared_task
def xsum(numbers):
    return sum(numbers)
CeleryTest/celery.py 文件名必须为celery.py
from __future__ import absolute_import, unicode_literals
import os
from celery import Celery

# set the default Django settings module for the 'celery' program.
os.environ.setdefault('DJANGO_SETTINGS_MODULE', 'CeleryTest.settings')

app = Celery('CeleryTest')

# Using a string here means the worker don't have to serialize
# the configuration object to child processes.
# - namespace='CELERY' means all celery-related configuration keys
#   should have a `CELERY_` prefix.
app.config_from_object('django.conf:settings', namespace='CELERY')

# Load task modules from all registered Django app configs.
app.autodiscover_tasks()
@app.task(bind=True)
def debug_task(self):
    print('Request: {0!r}'.format(self.request))
CeleryTest/__init__.py
from __future__ import absolute_import, unicode_literals

# This will make sure the app is always imported when
# Django starts so that shared_task will use this app.
from .celery import app as celery_app

__all__ = ['celery_app']
Django前台运行结果[获取到了任务ID]:此时只有Django操作
Django后台运行结果:此时只有Django操作
上传文件到Linux服务器【Linux服务器需安装好Django服务】
需要Ubuntu下安装Django
pip3 install -i https://pypi.tuna.tsinghua.edu.cn/simple django
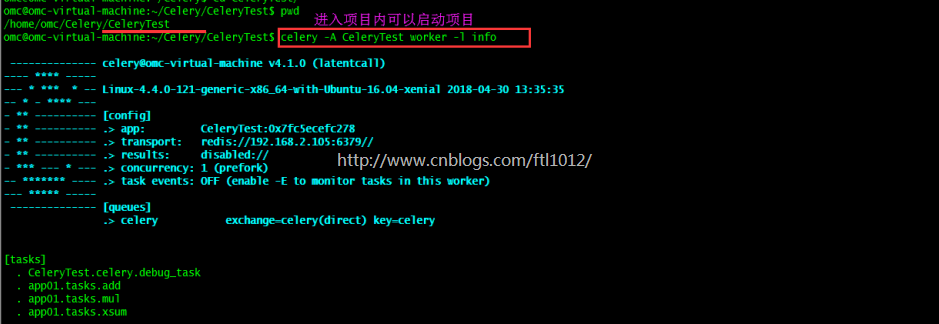
Linux下启动Celery的worker: 【此时Win7下的Django配合Linux下的Celery执行】
omc@omc-virtual-machine:~/Celery/CeleryTest$ celery -A CeleryTest worker -l info
前台浏览器触发Django的views请求到Linux的Celery的worker进行结果处理
梳理一下整个的流程:
Win7下的Django配置好了和Celery的整合,连接上Redis。当有请求从浏览器发送过来的时候,从URL映射到Django的views里面,在views里面调用了tasks.add.delay(5, 1000)此时将任务请求存储在了Redis里面。后台Linux下同样也放了一份根Win7下同样的工程[实际上只需要Celery的部分即可],进入Linux下的目录后启动Celery的worker,worker从Redis中取出任务去执行。而与此同时Django已经将任务的ID返回给了前台,前台可以根据任务ID返回的状态判断任务是否完成,完成后从Redis中获取任务的结果进行页面渲染即可,从而达到了异步的效果,就是前台不用直接等待结果的返回,而是根据结果的状态来获取最后的结果。
Linux下安装Django
pip3 install -i https://pypi.tuna.tsinghua.edu.cn/simple django
问题解决
【20180430】一个由于Django版本和Celery版本差异引起的错误,导致一下午很失落,最后误打误撞解决,很失望
报错信息:
KeyError: 'backend'
During handling of the above exception, another exception occurred:
settings.py ---Celery的配置错误:
  # for celery
CELERY_BROKER_URL = 'redis://192.168.2.105',
CELERY_RESULT_BACKEND = 'redis://192.168.2.105',  # 用于Celery的返回结果的接收
问题解决:
settings.py
# for celery
CELERY_BROKER_URL = 'redis://192.168.2.105',
CELERY_BACKEND_URL = 'redis://192.168.2.105',  # 用于Celery的返回结果的接收
-------------------------------------------
个性签名: 所有的事情到最後都是好的,如果不好,那說明事情還沒有到最後~
本文版权归作者【小a玖拾柒】和【博客园】共有,欢迎转载,但未经作者同意必须保留此段声明,且在文章页面明显位置给出原文连接,否则保留追究法律责任的权利!


