微信小程序 接口渲染
本章实现的内容:1.微信调后端接口 实现微信小程序渲染页面
2.微信小程序列表页、详情页
后台接口:
路由:
//微信小程序
Route::get('Wx','WxController@Wx');     //查询所有数据
Route::get('w_id','WxController@w_id'); //详情页
控制器:
//查询所有数据
    public function Wx(){
        $da = DB::table('wx')->get();       //查询所有数据
        $data = json_decode(json_encode($da),true);     //数据转为json数组

        return $data;
    }
1、小程序列表页:
微信小程序js调接口:
/**
   * 页面的初始数据
   */
  data: {
      result:[]
  },

  /**
   * 生命周期函数--监听页面加载
   */
  onLoad: function (options) {
      // 请求后台的数据方法
      this.user();
  },
  user(){
    var a = this;
    wx.request({
      url: 'http://w.fsp.com/Wx', //调用后台接口
      data: {
      },
      header: {
        'content-type': 'application/json' // 默认值
      },
      success (res) {
        console.log(res.data);
        a.setData({
          result:res.data
        })
      }
    })
  }
微信小程序wxml:
<!-- 列表页循环 -->
<view class="big" wx:for="{{result}}">
      <!-- data-index、data-place分别是传递id和地址 -->
      <view bindtap="chuan" data-index="{{item.id}}" data-place="{{item.area}}">
                  <image src="{{item.img}}" class="imgg"></image>
      </view>
      <view class="right">
            <view class="ctx">
                  {{item.ctx}}
            </view>
            <!-- 手机号 -->
            <view class="phone">
                  {{item.phone}}
            </view>
            <!-- 邮箱 -->
            <view class="email">
                  {{item.email}}
            </view>
            <!-- 用户名 -->
            <view class="name1">
                  {{item.name}}
            </view>
      </view>
</view>
效果图:

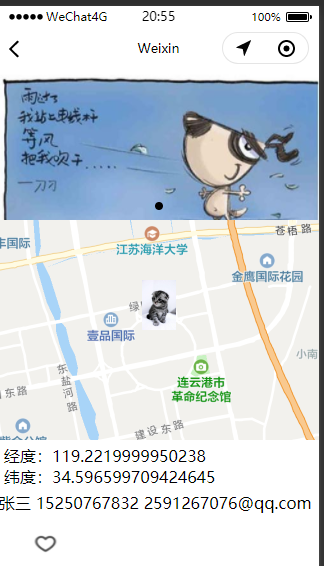
2、小程序详情页及根据城市调用地图
百度地图:点我
js;
var wxMarkerData = [];
Page({
  data: {
    markers: [],
    latitude: '',
    longitude: '',
    aa:[],
    bb:[],
    cc:[]
  },

  onLoad: function (option) {
    // console.log(option)
    //获取方法
    var that = this;
    wx.request({
     url: 'http://w.fsp.com/w_id?id='+option.id, //调用详情页接口
     data: {},
     header: {
       'content-type': 'application/json' // 默认值
     },
     success (res) {
       that.setData({
         bb:res.data,   //取到的值写入bb
       })
     }

   })

  // 地图
    var BMap = new bmap.BMapWX({
      ak: '1PZ6yEk0LzUignzIRZYXN2Q6NeEeWpGS',
    });
    var fail = function (data) {
      console.log(data)
    };
    var success = function (data) {
      wxMarkerData = data.wxMarkerData;
      that.setData({
        markers: wxMarkerData
      });
      that.setData({
        latitude: wxMarkerData[0].latitude
      });
      that.setData({
        longitude: wxMarkerData[0].longitude
      });
    }
    BMap.geocoding({
      address: option.area,
      fail: fail,
      success: success,
      iconPath: 'https://timgsa.baidu.com/timg?image&quality=80&size=b9999_10000&sec=1605248769591&di=1818e0ab25dff2338bcf79aa0bbb4bdb&imgtype=0&src=http%3A%2F%2Fa1.att.hudong.com%2F05%2F00%2F01300000194285122188000535877.jpg',
      iconTapPath: 'https://timgsa.baidu.com/timg?image&quality=80&size=b9999_10000&sec=1605248769591&di=1818e0ab25dff2338bcf79aa0bbb4bdb&imgtype=0&src=http%3A%2F%2Fa1.att.hudong.com%2F05%2F00%2F01300000194285122188000535877.jpg'
    });
  },
微信小程序wxml:
<!--pages/xiang/xiang.wxml-->
<swiper indicator-dots="true" autoplay="true">
    <swiper-item >
      <image src="{{bb.img}}"></image>
</swiper-item>
</swiper>
<view class="map_container">
  <map class="map" id="map" longitude="{{longitude}}" latitude="{{latitude}}" scale="14" show-location="true" markers="{{markers}}" bindmarkertap="makertap"></map>
</view>
<view class="rgc_info">
  <text>经度:{{longitude}}</text>
  <text>纬度:{{latitude}}</text>
</view>

  {{bb.name}}
  {{bb.phone}}
  {{bb.email}}
  {{dizhi}}
效果图:
可能你看完了不懂:
捋一下思路:
1.后端写好所有数据接口
2.微信小程序发起请求,接收到后端数据,渲染列表页
3.渲染列表页的时候 data-index、data-place分别是传递id和地址
4.列表页js接收id、城市,根据id跳转到对应详情页
5.详情页根据id在请求后端接口,查到数据在渲染详情页
其他微信小功能请看主页!
初步做法,水平优待大大提高,勿喷!!!

 浙公网安备 33010602011771号