Mongoose的使用,以及表单增删改查实战
Mongoose的使用
4.1简介
Mongoose是一个对象文档模型(ODM)库,它对Node原生的MongoDB模块进行了进一步的优化封装,并提供了更多的功能。
4.2优势
1) 可以为文档创建一个模式结构(Schema)
2) 可以对模型中的对象/文档进行验证
3) 数据可以通过类型转换转换为对象模型
4) 可以使用中间件来应用业务逻辑挂钩
5) 比Node原生的MongoDB驱动更容易
4.3核心对象
4.3.1 Schema
模式(约束)对象,通过Schema可以对集合进行约束
4.3.2 Model
模型对象,相当于数据库中的集合,通过该对象可以对集合进行操作
4.3.3 Document
文档对象,它和数据库中的文档相对应,通过它可以读取文档的信息,也可以对文档进行各种操作
4.4使用
4.4.1连接数据库
npm init 先自动创建一个package.json文件
1) 下载安装Mongoose
npm i mongoose --save
2) 引入Mongoose
var mongoose = require("mongoose");
3) 连接MongoDB数据库
mongoose.connect("mongodb://ip地址:端口号/数据库名");
const  mongoose = require("mongoose");


//1.连接数据库
// connect
//第一个实参是数据库地址URL
//第二个实参是配置对象
//第三个实参是连接数据库的回调参数

mongoose.connect("mongodb://localhost:27017/0318_mongoose_demo",{
    useNewUrlParser: true,
    useUnifiedTopology: true,
    useCreateIndex:true
},function(err){
    if(err){
        console.log("连接数据库失败");
    }else{
        console.log("连接数据库成功");
    }
});


// mongoose.connection.once("open",function(err){
//     if(err){
//         console.log("连接数据库失败");
//     }else{
//         console.log("连接数据库成功");
//     }
// })

// 2.创建约束对象(Schema)
let starsSchema = new mongoose.Schema({
    name:{
        type:String,    //声明当前字段数据类型
        required:true,  //声明当前字段是否必传
        unique:true     //声明当前字段是否唯一
    },
    age:Number,
    sex:{
        type:String,
        default:"未知" //声明当前字段的默认值
    },
    roles:[String],    //声明当前字段数据类型为数组, 内部子元素的类型必须是String
    info:mongoose.Schema.Types.Mixed
})

//3.创建模型对象(Model)
//第一个实参->集合名称
//第二个实参->约束对象
let starsModel = mongoose.model('stars',starsSchema);

//4.创建文档对象
let starDocument = new starsModel({
    name:"彭于晏",
    age:18.01,
    sex:"猛男",
    roles:["唐钰小宝"],
    info:"断臂帅哥"
})

//5.将文档对象存储至数据库中,是一个promise对象
starDocument.save()
    .then(function(){
        console.log('数据添加成功!!!')
    })
即可将数据保存在mongodb中,前提是mongodb服务已启动
使用方式
1) Model的方法
create()
- 创建一个或多个文档对象并添加到数据库中
find()
- 查找所有符合条件的文档,返回的是数组
update()
- 修改(替换)一个或多个
remove()
- 删除一个或多个文档
let mongoose = require('mongoose');

//1.连接数据库
mongoose.connect("mongodb://localhost:27017/0318_mongoose_demo",{
    useNewUrlParser: true,
    useUnifiedTopology: true,
    useCreateIndex:true
},function(err){
    if(err){
        console.log("连接失败")
    }else{
        console.log("连接成功")
    }
})

// 2.创建约束对象(Schema)
let starsSchema = new mongoose.Schema({
    name:{
        type:String,    //声明当前字段数据类型
        required:true,  //声明当前字段是否必传
        unique:true     //声明当前字段是否唯一
    },
    age:Number,
    sex:{
        type:String,
        default:"未知" //声明当前字段的默认值
    },
    roles:[String],    //声明当前字段数据类型为数组, 内部子元素的类型必须是String
    info:mongoose.Schema.Types.Mixed
})

//3.创建模型对象(Model)
//第一个实参->集合名称
//第二个实参->约束对象
let starsModel = mongoose.model('stars',starsSchema);

//C->create ,是个promise
// starsModel.create({
//     name:"鸡你太美",
//     age:9.99,
//     sex:"男孩子",
//     roles:["NBA形象大使"],
//     info:"cxk"
// })
//     .then(function(){
//         console.log("添加成功")
//     })

//R->read
// starsModel.find({age:17.99})
//     .then(function(res){
//         console.log(res)
//     })
// starsModel.findOne({age:17.99})
//     .then(function(res){
//         console.log(res)
//     })

// U->update
// starsModel.updateMany({age:17.99},{$set:{age:37.99}})
//     .then(function(res){
//         console.log(res)
//     })
// starsModel.updateOne({age:37.99},{$set:{age:27.99}})
//     .then(function(res){
//         console.log(res)
//     })

// D->delete
// starsModel.remove({sex:"男孩子"})
//     .then(function(res){
//             console.log(res)
//         })


required: true 必传字段
minlength:3 字符串最小长度
maxlength: 20 字符串最大长度
min: 2 数值最小为2
max: 100 数值最大为100
enum: ['html', 'css', 'javascript', 'node.js']
trim: true 去除字符串两边的空格
validate: 自定义验证器
default: 默认值
// 引入mongoose第三方模块 用来操作数据库
const mongoose = require('mongoose');
// 数据库连接
mongoose.connect('mongodb://localhost/playground', { useNewUrlParser: true})
    // 连接成功
    .then(() => console.log('数据库连接成功'))
    // 连接失败
    .catch(err => console.log(err, '数据库连接失败'));

const postSchema = new mongoose.Schema({
    title: {
        type: String,
        // 必选字段
        required: [true, '请传入文章标题'],
        // 字符串的最小长度
        minlength: [2, '文章长度不能小于2'],
        // 字符串的最大长度
        maxlength: [5, '文章长度最大不能超过5'],
        // 去除字符串两边的空格
        trim: true
    },
    age: {
        type: Number,
        // 数字的最小范围
        min: 18,
        // 数字的最大范围
        max: 100
    },
    publishDate: {
        type: Date,
        // 默认值
        default: Date.now
    },
    category: {
        type: String,
        // 枚举 列举出当前字段可以拥有的值
        enum: {
            values: ['html', 'css', 'javascript', 'node.js'],
            message: '分类名称要在一定的范围内才可以'
        }
    },
    author: {
        type: String,
        validate: {
            validator: v => {
                // 返回布尔值
                // true 验证成功
                // false 验证失败
                // v 要验证的值
                return v && v.length > 4
            },
            // 自定义错误信息
            message: '传入的值不符合验证规则'
        }
    }
});

const Post = mongoose.model('Post', postSchema);

Post.create({title:'aa', age: 60, category: 'java', author: 'bd'})
    .then(result => console.log(result))
    .catch(error => {
        // 获取错误信息对象,数组
        const err = error.errors;
        // 循环错误信息对象
        for (var attr in err) {
            // 将错误信息打印到控制台中
            console.log(err[attr]['message']);
        }
    })

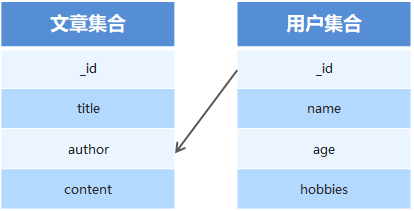
通常不同集合的数据之间是有关系的,例如文章信息和用户信息存储在不同集合中,但文章是某个用户发表的,要查询文章的所有信息包括发表用户,就需要用到集合关联。

使用id对集合进行关联
使用populate方法进行关联集合查询

// 引入mongoose第三方模块 用来操作数据库
const mongoose = require('mongoose');
// 数据库连接
mongoose.connect('mongodb://localhost/playground', { useNewUrlParser: true})
    // 连接成功
    .then(() => console.log('数据库连接成功'))
    // 连接失败
    .catch(err => console.log(err, '数据库连接失败'));

// 用户集合规则
const userSchema = new mongoose.Schema({
    name: {
        type: String,
        required: true
    }
});
// 文章集合规则
const postSchema = new mongoose.Schema({
    title: {
        type: String
    },
    // Post和User集合进行关联
    author: {
        type: mongoose.Schema.Types.ObjectId,
        ref: 'User'
    }
});
// 用户集合
const User = mongoose.model('User', userSchema);
// 文章集合
const Post = mongoose.model('Post', postSchema);

// 创建用户
// User.create({name: 'itheima'}).then(result => console.log(result));
// 创建文章
// Post.create({titile: '123', author: '5c0caae2c4e4081c28439791'}).then(result => console.log(result));
//联合查询
Post.find().populate('author').then(result => console.log(result))
打印结果


搭建网站服务器,实现客户端与服务器端的通信
连接数据库,创建用户集合,向集合中插入文档
当用户访问/list时,将所有用户信息查询出来
将用户信息和表格HTML进行拼接并将拼接结果响应回客户端
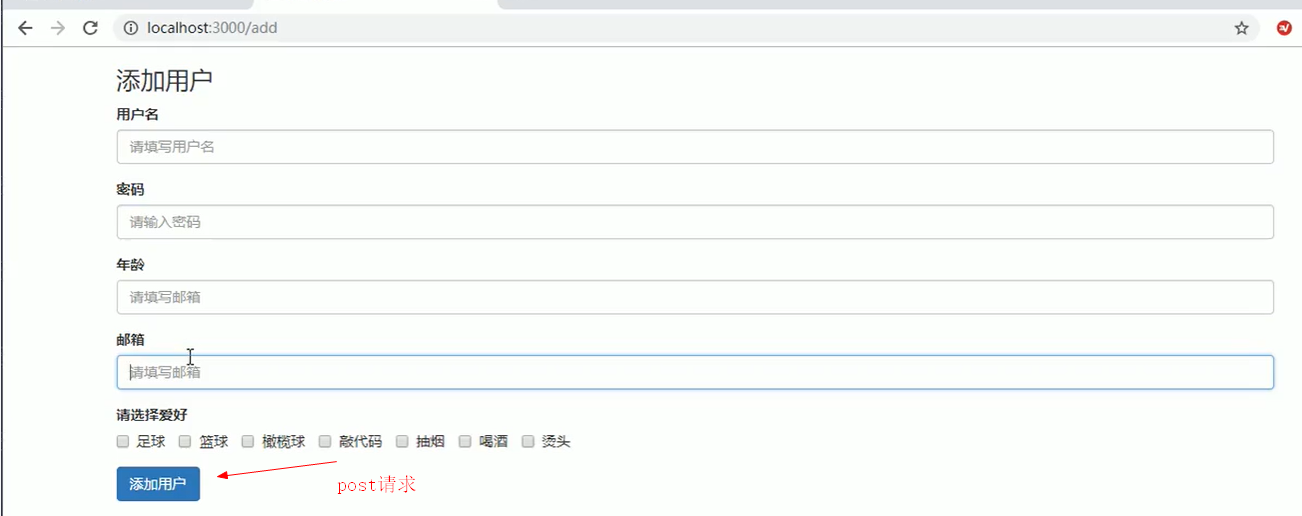
当用户访问/add时,呈现表单页面,并实现添加用户信息功能
当用户访问/modify时,呈现修改页面,并实现修改用户信息功能
当用户访问/delete时,实现用户删除功能
提前将这些数据导入mogodb数据库playground中的User集合中
{"_id":{"$oid":"5c09f1e5aeb04b22f8460965"},"name":"张三","age":20,"hobbies":["足球","篮球","橄榄球"],"email":"zhangsan@itcast.cn","password":"123456"}
{"_id":{"$oid":"5c09f236aeb04b22f8460967"},"name":"李四","age":10,"hobbies":["足球","篮球"],"email":"lisi@itcast.cn","password":"654321"}
{"_id":{"$oid":"5c09f267aeb04b22f8460968"},"name":"王五","age":25,"hobbies":["敲代码"],"email":"wangwu@itcast.cn","password":"123456"}
{"_id":{"$oid":"5c09f294aeb04b22f8460969"},"name":"赵六","age":50,"hobbies":["吃饭","睡觉","打豆豆"],"email":"zhaoliu@itcast.cn","password":"123456"}
{"_id":{"$oid":"5c09f2b6aeb04b22f846096a"},"name":"王二麻子","age":32,"hobbies":["吃饭"],"email":"wangermazi@itcast.cn","password":"123456"}
{"_id":{"$oid":"5c09f2d9aeb04b22f846096b"},"name":"狗蛋","age":14,"hobbies":["打豆豆"],"email":"goudan@163.com","password":"123456"}
从数据库中获取数据,然后将数据填充 到模板中,返回html给浏览器,俗称ssr渲染
app.js
// 搭建网站服务器,实现客户端与服务器端的通信
// 连接数据库,创建用户集合,向集合中插入文档
// 当用户访问/list时,将所有用户信息查询出来
//     实现路由功能
//     呈现用户列表页面
//     从数据库中查询用户信息 将用户信息展示在列表中
// 将用户信息和表格HTML进行拼接并将拼接结果响应回客户端
// 当用户访问/add时,呈现表单页面,并实现添加用户信息功能
// 当用户访问/modify时,呈现修改页面,并实现修改用户信息功能
//     修改用户信息分为两大步骤
//         1.增加页面路由 呈现页面
//             1.在点击修改按钮的时候 将用户ID传递到当前页面
//             2.从数据库中查询当前用户信息 将用户信息展示到页面中
//         2.实现用户修改功能
//             1.指定表单的提交地址以及请求方式
//             2.接受客户端传递过来的修改信息 找到用户 将用户信息更改为最新的
// 当用户访问/delete时,实现用户删除功能

const http = require('http');

const url = require('url');
const querystring = require('querystring');

require('./model/index.js');
// 导入数据库集合模块
const User = require('./model/user');


// 创建服务器
const app = http.createServer();

// 为服务器对象添加请求事件
app.on('request', async (req, res) => {
    // 请求方式
    const method = req.method;
    // 请求地址,query为路由路径?后携带的参数如id, 默认是字符串,后面加个true,转换为对象
    const { pathname, query } = url.parse(req.url, true);

    if (method == 'GET') {
        // 呈现用户列表页面
        if (pathname == '/list') {
            // 查询用户信息,返回数组
            let users = await User.find();
            // html字符串
            let list = `
                <!DOCTYPE html>
                <html lang="en">
                <head>
                    <meta charset="UTF-8">
                    <title>用户列表</title>
                    <link rel="stylesheet" href="https://cdn.jsdelivr.net/npm/bootstrap@3.3.7/dist/css/bootstrap.min.css">
                </head>
                <body>
                    <div class="container">
                        <h6>
                            <a href="/add" class="btn btn-primary">添加用户</a>
                        </h6>
                        <table class="table table-striped table-bordered">
                            <tr>
                                <td>用户名</td>
                                <td>年龄</td>
                                <td>爱好</td>
                                <td>邮箱</td>
                                <td>操作</td>
                            </tr>
            `;

            // 对数据进行循环操作
            users.forEach(item => {
                list += `
                    <tr>
                        <td>${item.name}</td>
                        <td>${item.age}</td>
                        <td>
                `;

                item.hobbies.forEach(item => {
                    list += `<span>${item}</span>`;
                })

                list += `</td>
                        <td>${item.email}</td>
                        <td>
                            <a href="/remove?id=${item._id}" class="btn btn-danger btn-xs">删除</a>
                            <a href="/modify?id=${item._id}" class="btn btn-success btn-xs">修改</a>
                        </td>
                    </tr>`;
            });

            list += `
                        </table>
                    </div>
                </body>
                </html>
            `;
            // 返回一个html给浏览器
            res.end(list);
        }else if (pathname == '/add') {
            // 呈现添加用户表单页面
            let add = `
                <!DOCTYPE html>
                <html lang="en">
                <head>
                    <meta charset="UTF-8">
                    <title>用户列表</title>
                    <link rel="stylesheet" href="https://cdn.jsdelivr.net/npm/bootstrap@3.3.7/dist/css/bootstrap.min.css">
                </head>
                <body>
                    <div class="container">
                        <h3>添加用户</h3>
                        <form method="post" action="/add">
                          <div class="form-group">
                            <label>用户名</label>
                            <input name="name" type="text" class="form-control" placeholder="请填写用户名">
                          </div>
                          <div class="form-group">
                            <label>密码</label>
                            <input name="password" type="password" class="form-control" placeholder="请输入密码">
                          </div>
                          <div class="form-group">
                            <label>年龄</label>
                            <input name="age" type="text" class="form-control" placeholder="请填写邮箱">
                          </div>
                          <div class="form-group">
                            <label>邮箱</label>
                            <input name="email" type="email" class="form-control" placeholder="请填写邮箱">
                          </div>
                          <div class="form-group">
                            <label>请选择爱好</label>
                            <div>
                                <label class="checkbox-inline">
                                  <input type="checkbox" value="足球" name="hobbies"> 足球
                                </label>
                                <label class="checkbox-inline">
                                  <input type="checkbox" value="篮球" name="hobbies"> 篮球
                                </label>
                                <label class="checkbox-inline">
                                  <input type="checkbox" value="橄榄球" name="hobbies"> 橄榄球
                                </label>
                                <label class="checkbox-inline">
                                  <input type="checkbox" value="敲代码" name="hobbies"> 敲代码
                                </label>
                                <label class="checkbox-inline">
                                  <input type="checkbox" value="抽烟" name="hobbies"> 抽烟
                                </label>
                                <label class="checkbox-inline">
                                  <input type="checkbox" value="喝酒" name="hobbies"> 喝酒
                                </label>
                                <label class="checkbox-inline">
                                  <input type="checkbox" value="烫头" name="hobbies"> 烫头
                                </label>
                            </div>
                          </div>
                          <button type="submit" class="btn btn-primary">添加用户</button>
                        </form>
                    </div>
                </body>
                </html>
            `;
            res.end(add)
        }else if (pathname == '/modify') {
            // 查询对应的数据
            let user = await User.findOne({_id: query.id});
            let hobbies = ['足球', '篮球', '橄榄球', '敲代码', '抽烟', '喝酒', '烫头', '吃饭', '睡觉', '打豆豆']
            console.log(user)
            // 呈现修改用户表单页面
            let modify = `
                <!DOCTYPE html>
                <html lang="en">
                <head>
                    <meta charset="UTF-8">
                    <title>用户列表</title>
                    <link rel="stylesheet" href="https://cdn.jsdelivr.net/npm/bootstrap@3.3.7/dist/css/bootstrap.min.css">
                </head>
                <body>
                    <div class="container">
                        <h3>修改用户</h3>
                        <form method="post" action="/modify?id=${user._id}">
                          <div class="form-group">
                            <label>用户名</label>
                            <input value="${user.name}" name="name" type="text" class="form-control" placeholder="请填写用户名">
                          </div>
                          <div class="form-group">
                            <label>密码</label>
                            <input value="${user.password}" name="password" type="password" class="form-control" placeholder="请输入密码">
                          </div>
                          <div class="form-group">
                            <label>年龄</label>
                            <input value="${user.age}" name="age" type="text" class="form-control" placeholder="请填写邮箱">
                          </div>
                          <div class="form-group">
                            <label>邮箱</label>
                            <input value="${user.email}" name="email" type="email" class="form-control" placeholder="请填写邮箱">
                          </div>
                          <div class="form-group">
                            <label>请选择爱好</label>
                            <div>


            `;

            hobbies.forEach(item => {
                // 判断当前循环项在不在用户的爱好数据组,checked,选中
                let isHobby = user.hobbies.includes(item);
                if (isHobby) {
                    modify += `
                        <label class="checkbox-inline">
                          <input type="checkbox" value="${item}" name="hobbies" checked> ${item}
                        </label>
                    `
                }else {
                    modify += `
                        <label class="checkbox-inline">
                          <input type="checkbox" value="${item}" name="hobbies"> ${item}
                        </label>
                    `
                }
            })

            modify += `
                            </div>
                          </div>
                          <button type="submit" class="btn btn-primary">修改用户</button>
                        </form>
                    </div>
                </body>
                </html>
            `;
            res.end(modify)
        }else if (pathname == '/remove') {
            // res.end(query.id)
            // 通过id,删除一个
            await User.findOneAndDelete({_id: query.id});
            res.writeHead(301, {
                Location: '/list'
            });
            res.end();
        }
    }else if (method == 'POST') {
        // 用户添加功能
        if (pathname == '/add') {
            // 接受用户提交的信息
            let formData = '';
            // 接受post参数,流式接收
            req.on('data', param => {
                formData += param;
            })
            // post参数接受完毕
            req.on('end', async () => {
                // 将接收的post参数,字符串转为对象形式
                let user = querystring.parse(formData)
                // 将用户提交的信息添加到数据库中
                await User.create(user);
                // 301代表重定向
                // location 跳转地址
                res.writeHead(301, {
                    Location: '/list'
                });
                res.end();
            })
        }else if (pathname == '/modify') {
            // 接受用户提交的信息
            let formData = '';
            // 接受post参数,流式接收参数
            req.on('data', param => {
                formData += param;
            })
            // post参数接受完毕
            req.on('end', async () => {
                // 转换成对象形式
                let user = querystring.parse(formData)
                // 将用户提交的信息跟新到数据库中
                await User.updateOne({_id: query.id}, user);
                // 301代表重定向
                // location 跳转地址
                res.writeHead(301, {
                    Location: '/list'
                });
                res.end();
            })
        }
    }

});
// 监听端口
app.listen(3000);
model--》index.js, 连接数据库
const mongoose = require('mongoose');
// 数据库连接 27017是mongodb数据库的默认端口
mongoose.connect('mongodb://localhost/playground', { useNewUrlParser: true })
    .then(() => console.log('数据库连接成功'))
    .catch(() => console.log('数据库连接失败'));
model-->user.js, 创建数据库集合
const mongoose = require('mongoose');
// 创建用户集合规则
const userSchema = new mongoose.Schema({
    name: {
        type: String,
        required: true,
        minlength: 2,
        maxlength: 20
    },
    age: {
        type: Number,
        min: 18,
        max: 80
    },
    password: String,
    email: String,
    hobbies: [ String ]
});

// 创建集合 返回集合构造函数
const User = mongoose.model('User', userSchema);

module.exports = User;
第一步(数据查询),用户地址栏输入/list路径,返回html页面给浏览器

第二步(添加用户),点击添加用户按钮连接,a标签,get请求,跳转到/add, 收集好参数,点击添加用户按钮,form表单,重定向到/list,post请求,查看是否增加用户成功

第三部(修改用户),在/list,点击修改按钮,a标签,跳转到/modify, 并将用户id传递过去,填写数据后,点击修改用户按钮,form表单,post请求携带用户id参数,用户数据库根据id跟新数据,然后重定向/list,查看修改用户数据是否成功

第四部分(修改用户),点击删除按钮,a标签,get请求,跳转到/remove,并携带用户id参数,数据库根据id去删除该用户,并跳转到/list,是否删除成功
总结,返回的html用字符串拼接,太麻烦,需要用到模板引擎就就简便了


