
vue基础(六)全局事件总线
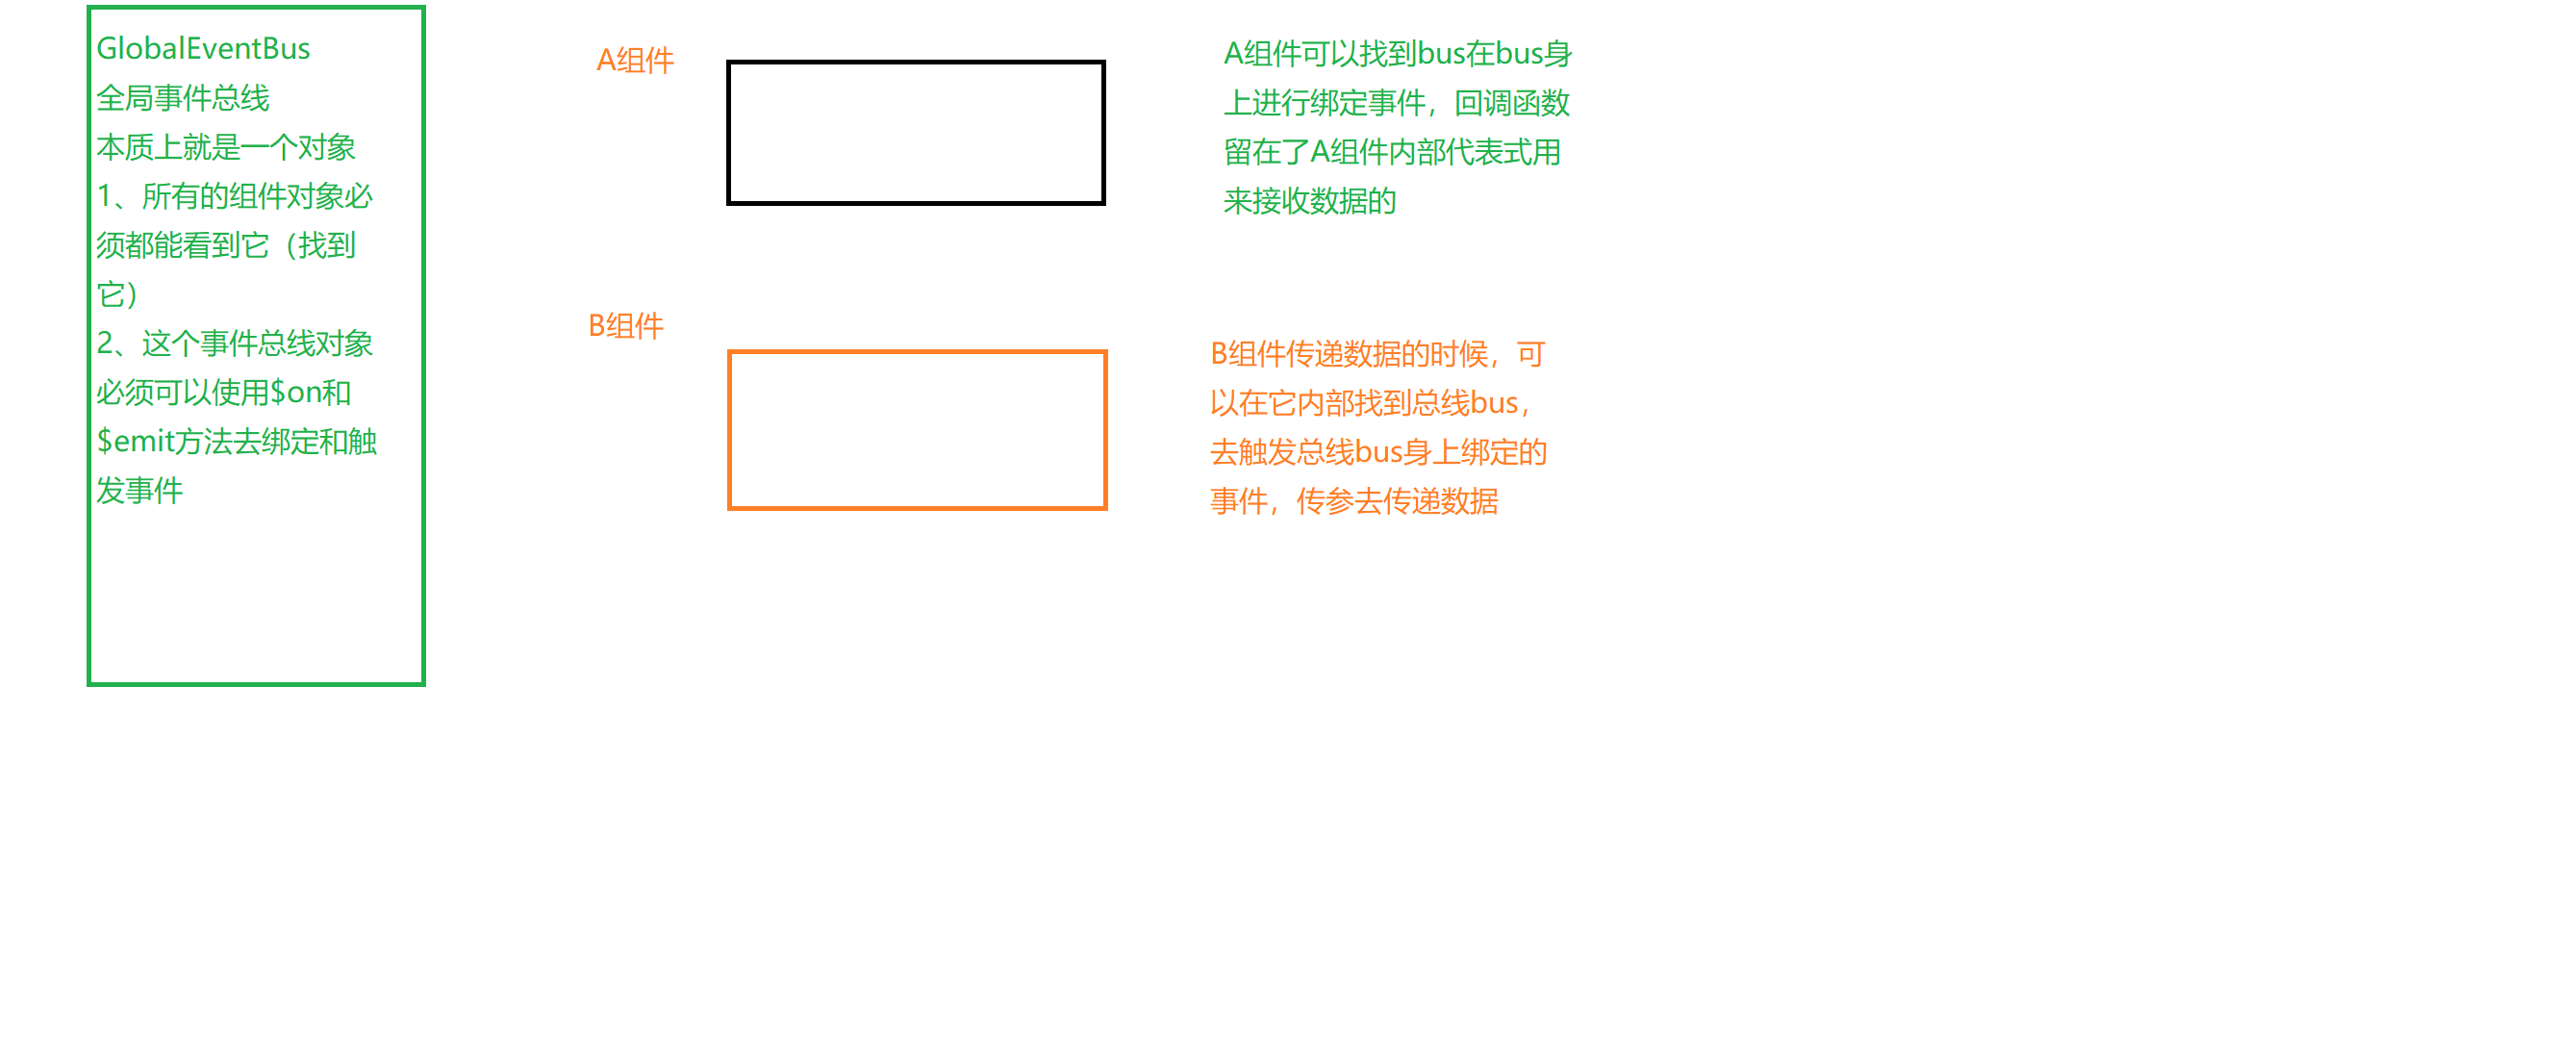
全局事件总线原理图
通信方式 props
父子之间传递
父向子传递属性,通过属性把数据交给子组件
子向父传递数据,子组件通过调用父组件的行为函数,把数据当参数交给父组件
通信方式 全局事件总线(自定义事件是全局事件总线的基础)
vm对象和组件对象的关系
vm的原型对象 === 组件对象的原型对象的原型对象
本身自定义事件可以完成子父之间的传递,因为父组件中可以看到子组件,可以为子组件绑定事件,子组件中可以触发事件
但是如果不是子向父,那么其余的就没办法了,因为两个组件互相是看不到的,没办法再其中一个给另外一个绑定事件
此时我们可以借助中间人,也就是他们都可以同时看到的一个人,就是全局事件总线(所有的组件对象都能看到)
在接收数据的组件中,获取总线绑定事件
在发送数据的组件中,获取总线触发事件
全局事件总线说到底就是个对象,我们通常就是用vm对象作为全局事件总线使用
把vm对象添加到Vue原型对象 就形成全局事件总线(vm)
在main.js中设置全局事件总线
// new Vue()实例化了一个Vue的实例化对象
//因为只有组件对象或者Vue的实例化对象才能调用$on和$emit

//想要成为事件总线的条件:
//1、所有的组件对象必须都能看得到这个总线对象,因此我们把这个对象放在了Vue原型
//2、这个事件总线对象必须能调用$on和$emit方法(总线对象必须是Vue的实例化对象或者是组件对象)


new Vue({
  beforeCreate(){
    Vue.prototype.$bus = this
  },
  el:'#root',
  render: h => h(App)
})
在父组件app中绑定事件
  mounted(){
    this.$bus.$on('updateOne',this.updateOne)
    //跟新事件
    this.$bus.$on("addTodo",this.addTodo)
    //删除一个事件
    this.$bus.$on("deleteOne",this.deleteOne)
    //删除全部事件
    this.$bus.$on("deleteAll",this.deleteAll)
    //全选框,跟新所有的li状态
    this.$bus.$on("updateAll", this.updateAll)
  },
在子组件中触发事件,并且传递数据给父组件
addT(){
      //回车之后干活
      let {content} = this
      if(content.trim()){
        let id = Date.now()
        let isOver = false
        let todo = {
          id,
          content,
          isOver
        }

        this.$bus.$emit('addTodo',todo)
二, 具名插槽,默认插槽, 作用域插槽
通信方式 slot插槽
    一个组件会多次使用,但是不同场景下又有少部分结构数据会发生变化,(当然可以用不同的子组件)
    那么就得通过父组件告诉子组件变化的内容是什么,此时就要用到这个插槽
    子组件当中<slot></sloat>其实就是占位用的,让父元素给它填充内容,可以带标签
作用域插槽
        子组件的slot可以通过 属性传递值给父组件,然后父组件可以根据不同需求改变这个slot内部的显示结构
        把子组件的值,传给父组件固定的区域进行操作
        默认不能有其它插槽,如果要有其它插槽,必须设置为具名插槽
App组件
<template>
  <div>
    <Child>
      <template slot="btn">
        <button>点我</button>
      </template>
      <template slot="aa">
        <a href="http://www.atguigu.com">点我去学习</a>
      </template>
      <template slot="ss">
        <span>嘿嘿</span>
      </template>
    </Child>


    <Child>
      <template>
        <h2>我爱你</h2>
      </template>
    </Child>


    <Child2 :todos="todos">
      <!-- 决定子组件内部的结构,比如假设isOver为true,那么内容需要包含在span当中并且内容前面带√ -->
      <!-- slot-scope会把子组件传递过来的数据,放在一个对象当中作为属性 -->

      <!-- 什么时候用作用域插槽: 当碰到数据是在子组件当中展示的,而结构是由父组件决定的,此时必然使用作用域插槽 -->
      <template slot-scope="scopePerps">
        <span v-if="scopePerps.todo.isOver">
          √
        </span>
        {{scopePerps.todo.content}}
      </template>
    </Child2>


  </div>
</template>

<script>
import Child from '@/components/Child'
import Child2 from '@/components/Child2'
export default {
  name: '',
  components:{
    Child,
    Child2
  },
  data(){
    return {
      todos:[
        {id:1,content:'抽烟',isOver:false},
        {id:2,content:'喝酒',isOver:true},
        {id:3,content:'烫头',isOver:false}
      ]
    }
  },

}
</script>

<style scoped>

</style>
Child1 组件
<template>
    <div>
      <h1>我爱你</h1>
      <!-- slot占位置,结构不确定,需要父组件传递 -->
      <slot name="btn"></slot>
      <slot  name="aa"></slot>
      <slot  name="ss"></slot>
      <!-- 默认插槽,没有名字的slot -->
      <slot  name="btn"></slot>
    </div>
</template>

<script>
export default {
    data() {
        return {

        };
    },

};
</script>

<style scoped >

</style>
Childer2组件
<template>
  <div>
    <h1>我爱你赵丽颖</h1>

    <ul>
      <li v-for="(todo, index) in todos" :key="todo.id">
        <slot :todo="todo">
          <!-- 这个:todo="todo" 是作用域插槽的一部分,会传递给父组件当中固定的某个区域 -->
          <!-- {{todo.content}} -->
        </slot>
      </li>
    </ul>


  </div>
</template>

<script>
export default {
  name: '',
  props:['todos']
}
</script>

<style scoped>

</style>
二, 利用全局事件总线传递数据, 组件内发送请求,获取数据
main.js中设置全局事件总线
// 引入vue
import Vue from 'vue'
//引入app
import APP from '@/APP'

Vue.config.productionTip=false

new Vue({
  beforeCreate() {
    // 设置事件总线
  Vue.prototype.$bus=this
  },

  el:"#root",
  render:h=>h(APP)
})
app组件
<template>
  <div >
    <Header></Header>
   <Main></Main>

  </div>
</template>

<script>
import Header from '@/components/Header'
import Main from '@/components/Main'

export default {
  data() {
    return {};
  },

  components:{
    Header,
    Main,
  }
};
</script>

<style scoped ></style>
header组件
<template>
  <section class="jumbotron">
    <h3 class="jumbotron-heading">Search Github Users</h3>
    <div>
      <input type="text" placeholder="enter the name you search" v-model="content"  />
      <button  @click="sendSj">Search</button>
    </div>
  </section>
</template>

<script>
export default {
  //在该组件中,需要将输入的数据传递给main,让main组件去发送请求,获取数据
  //兄弟关系,需要用事件总线传递

  name:"Header",
  data() {
    return {
      content:'',
    };
  },

  methods:{
    sendSj(){
      this.$bus.$emit('addO', this.content)
    }
  }


};
</script>

<style scoped></style>
main组件, 安装axios, 引入axios
<template>
  <div class="row">
    <h2 v-if="isFirst">欢迎光临,请输入关键字进行搜索</h2>
    <h2 v-else-if="isLoading">正在搜索中,请稍后</h2>
    <h2 v-else-if="errMsg">请求出错:{{ errMsg }}</h2>
    <div v-else class="card" v-for="(user, index) in users" :key="user.id">
      <a :href="user.url" target="_blank">
        <img
          :src="user.imgUrl"
          style="width: 100px"
        />
      </a>
      <p class="card-text">{{user.name}}</p>
    </div>
  </div>
</template>

<script>
// 引入axios
import axios from "axios";

export default {
  //发送请求前,isFirst为fasle, isLoading为true
  //发送请求后,isLoading为false,

  name: "Main",
  data() {
    return {
      users: [],
      isFirst: true,
      isLoading: false,
      errMsg: "",
    };
  },
  //页面加载后获取header的数据
  mounted() {
    this.$bus.$on("addO", this.addO);
    // this.addO()
    console.log(111)
  },

// #region
  // methods:{
  //   addO(q){

  //     //发送请求前,在搜索中
  //       this.isFirst= false
  //       this.isLoading= true
  //     axios({
  //       url:"https://api.github.com/search/users",
  //       method:'get',
  //       params:{
  //           q
  //       }
  //     }).then((res)=>{
  //      let newArray=  res.data.items.map(item=>({name:item.login, url:item.url, imgUrl: item.avatar_url, id:item.id}))
  //       // console.log(newArray)
  //      this.users = newArray
  //      //发送请求后,更改状态
  //       this.isLoading = false

  //     }).catch((error)=>{
  //       console.log(error.message)
  //       //发送请求有误,更改状态
  //       this.errMsg = error.message
  //       this.isLoading = false
  //     })
  //   }
  // }
//  #endregion

  methods: {
    // 接口2: https://api.github.com/search/users?q=aa
    //收到header组件的数据,并且去发送请求,获取数据
    async addO(content) {
      //发送请求前,在搜索中
        this.isFirst= false
        this.isLoading= true

      try {
        let result = await axios({
          url: "https://api.github.com/search/users",
          method: "get",
          params: {
            q: content,
          },
        });
        //map计算一个新数组
        let newAarry=  result.data.items.map(item =>({name:item.login, url:item.url, imgUrl: item.avatar_url, id:item.id}))
        this.users = newAarry
        //发送请求后,更改状态
        this.isLoading = false
      } catch (error) {
        console.log(error.message)
        //发送请求有误,更改状态
        this.errMsg = error.message
        this.isLoading = false
      }
    },
  },
};
</script>

<style scoped>
.card {
  float: left;
  width: 33.333%;
  padding: 0.75rem;
  margin-bottom: 2rem;
  border: 1px solid #efefef;
  text-align: center;
}

.card > img {
  margin-bottom: 0.75rem;
  border-radius: 100px;
}

.card-text {
  font-size: 85%;
}
</style>
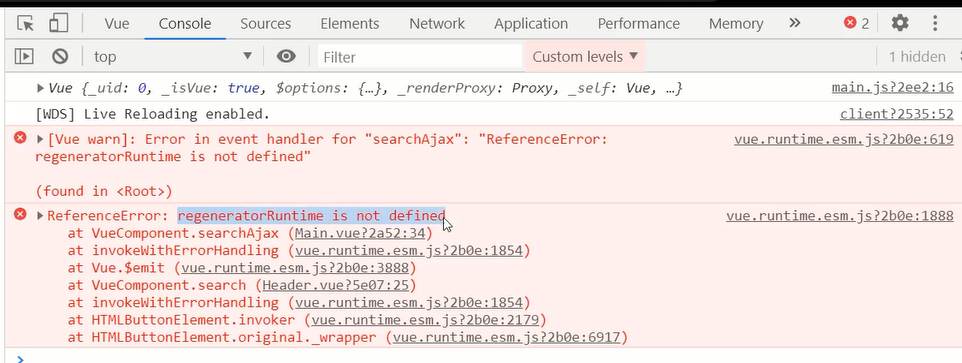
注;async, awiat 是es8语法,需要用它babel- polyfill来转换,安装;npm install --save @babel/polyfill
webpackde.config.js的 entry配置, entry: ["@babel/polyfill", "./src/main.js"], 在任何组件中引入async和await, 都不会报错了
报错情况

 浙公网安备 33010602011771号