Ansible 快速部署 Zabbix 4
阅读本文章需要具有Ansible、Zabbix基础。本次教程基于如下环境:
CentOS 7.x
Zabbix 4.0
Ansible 2.5
服务器初始化
关闭防火墙、selinux,添加epel常用源,安装常用工具、添加普通用户并禁止root远程登录、重启服务器
cat init.yaml
---
- hosts: all

  tasks:
    - name: disable selinux、firewalls,replace ali sources
      shell: |
        sed -i 's/SELINUX=enforcing/SELINUX=disabled/' /etc/selinux/config
        systemctl disable firewalld
        mkdir -p /etc/yum.repos.d/backup
        mv /etc/yum.repos.d/* /etc/yum.repos.d/backup/
        curl -o /etc/yum.repos.d/CentOS-Base.repo http://mirrors.aliyun.com/repo/Centos-7.repo

    - name: ensure a list of packages installed
      yum:
        name: "{{ packages }}"
      vars:
        packages:
        - wget
        - vim
        - sysstat
        - lrzsz
        - lsof

    - name: Add the user centos
      user:
        name: centos
        group: wheel

    - name:  disabled root remote login
      replace:
        path: /etc/ssh/sshd_config
        regexp: '\#PermitRootLogin yes'
        replace: 'PermitRootLogin no'
        backup: yes

    - name: modify ssh port
      shell: sed -i '/^\#Port/a\Port 22201' /etc/ssh/sshd_config

    - name: restart ssh
      service:
        name: sshd
        state: restarted

    - name: Add epel and reboot server
      shell: |
        reboot
执行初始化
# ansible-playbooks init.yaml
Zabbix-Server部署
这个很惭愧,没做成playbooks。主要用shell
安装MySQL
安装MySQL5.6,并创建zabbix需要的数据库
# yum install http://www.percona.com/downloads/percona-release/redhat/0.1-6/percona-release-0.1-6.noarch.rpm
# yum install Percona-Server-server-56 -y
# systemctl start mysqld
# mysql -uroot -p
password
mysql> create database zabbix character set utf8 collate utf8_bin;
mysql> grant all privileges on zabbix.* to zabbix@localhost identified by 'password';
mysql> quit;
安装zabbix-server
# yum install zabbix-server-mysql zabbix-web-mysql zabbix-agent -y
导入表结构及数据
# zcat /usr/share/doc/zabbix-server-mysql*/create.sql.gz | mysql -uzabbix -p zabbix
修改配置文件
编辑 /etc/httpd/conf.d/zabbix.conf
# php_value date.timezone Europe/Riga
修改为
# php_value date.timezone Asia/Shanghai
编辑 /etc/zabbix/zabbix_server.conf
DBPassword=password
开启服务,并设置开机启动
# systemctl restart zabbix-server zabbix-agent httpd
# systemctl enable zabbix-server zabbix-agent httpd
Zabbix-Agent 部署
准备agent安装包、修改zabbix-agent.conf的shell脚本
# cd /root
# wget https://mirrors.tuna.tsinghua.edu.cn/zabbix/zabbix/4.0/rhel/7/x86_64/zabbix-agent-4.0.2-1.el7.x86_64.rpm
cat zabbix_agent.sh
#!/bin/bash
# 将zabbix服务端从127.0.0.1换成server ip
# 将主机名设置为本机ip
# 开启服务
sed -i 's/127.0.0.1/172.16.103.57/g' /etc/zabbix/zabbix_agentd.conf

j=`/usr/sbin/ip a|grep enp2s1|grep inet|awk '{print $2}'|awk -F '/' '{print $1}'`
sed -i "s/Hostname=Zabbix server/Hostname=${j}/"  /etc/zabbix/zabbix_agentd.conf
systemctl start zabbix-agent
cat zabbix-agent.yaml
---
- hosts: all
  gather_facts:  false

  tasks:
    - name: copy file
      copy:
        src: /root/zabbix-agent-4.0.0-2.el7.x86_64.rpm
        dest: /tmp/zabbix-agent-4.0.0-2.el7.x86_64.rpm


    - name: install zabbix
      yum:
        name: /tmp/zabbix-agent-4.0.0-2.el7.x86_64.rpm
        state: present

    - name: copy bash
      copy:
        src: /root/zabbix_agent.sh
        dest: /tmp/zabbix_agent.sh

    - name: exclude bash
      become: yes
      become_method: su
      shell: /bin/bash /tmp/zabbix_agent.sh
执行批量安装zabbix-agent剧本
# ansible-playbook zabbix-agent.yaml
自动发现
这么多机器不可能在页面上一台台添加的,所以要用到Zabbix的精髓,自动发现。
以下内容来自官方:
Zabbix为用户提供了高效灵活的网络自动发现功能。
适当的网络发现配置可以:
加快Zabbix部署
简化管理
无需过多管理,也能在快速变化的环境中使用Zabbix
Zabbix网络发现基于以下信息:
IP范围
可用的外部服务(FTP,SSH,WEB,POP3,IMAP,TCP等)
来自 zabbix agent 的信息(仅支持未加密模式)
来自 snmp agent 的信息
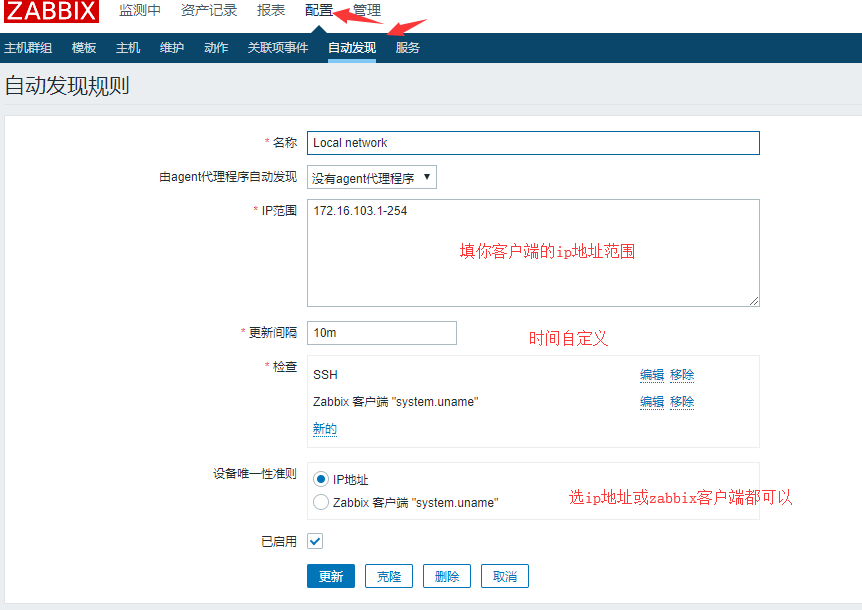
登录zabbix---配置自动发现

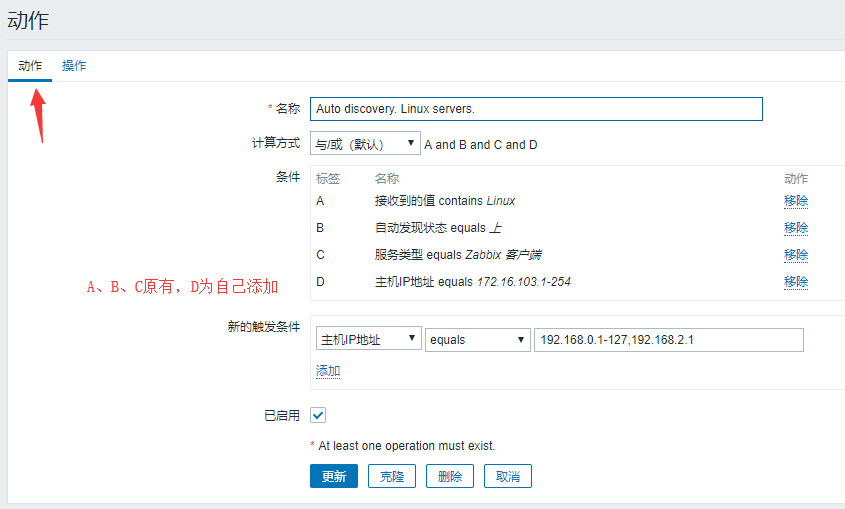
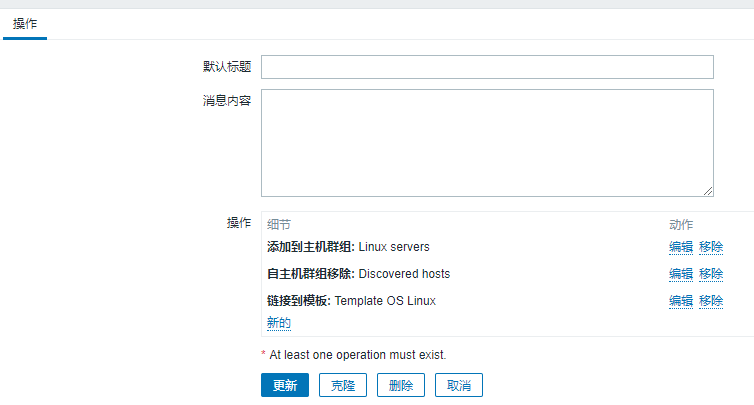
配置---动作----触发器---创建动作


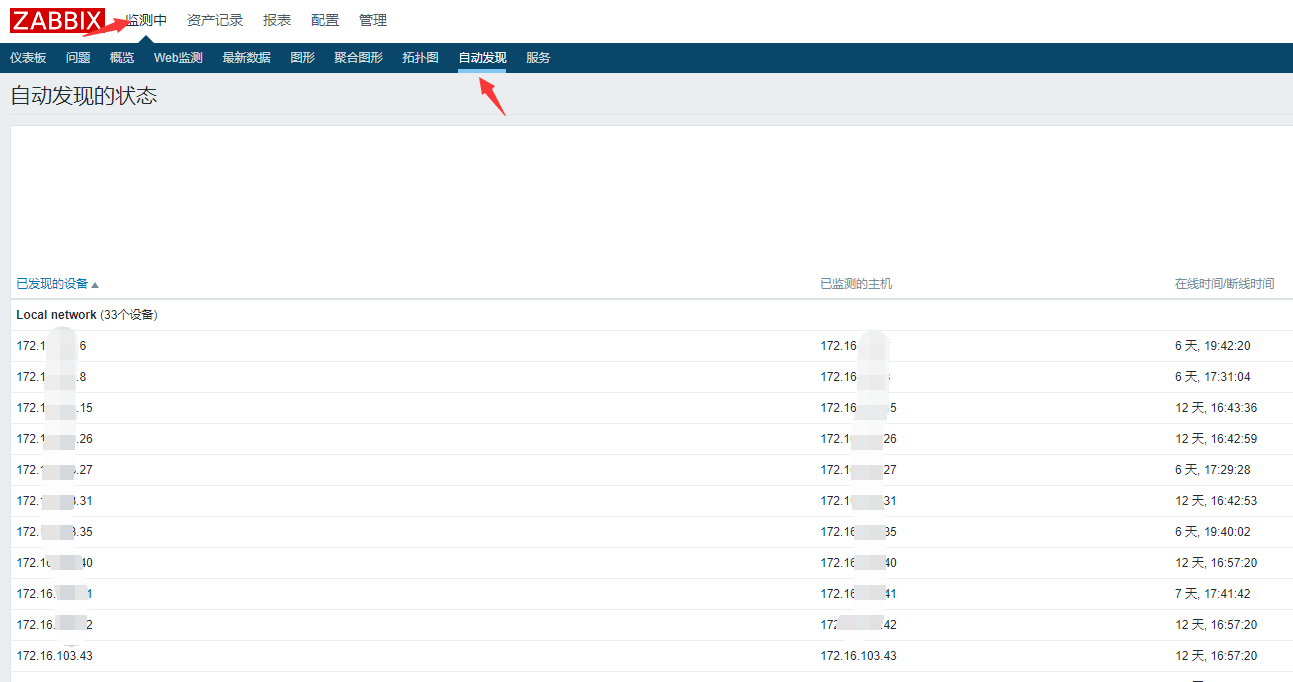
配置完毕,等几分钟后到 zabbix -- 监控中 -- 自动发现


 浙公网安备 33010602011771号