[转]Jira Work with issue workflows
本文转自:https://support.atlassian.com/jira-cloud-administration/docs/work-with-issue-workflows/
A Jira workflow is a set of statuses and transitions that an issue moves through during its lifecycle, and typically represents a process within your organization. Workflows can be associated with particular projects and, optionally, specific issue types by using a workflow scheme.
Jira has built-in workflows that you can use without needing to make any changes, or you can start fresh and create your own. You can't edit the built-in workflows, but you can copy them and use the copy as a basis to create your own.
Another option is to import workflows from the Atlassian Marketplace.
You need to log in as a user with the Administer Jira global permission to access and manage workflows.
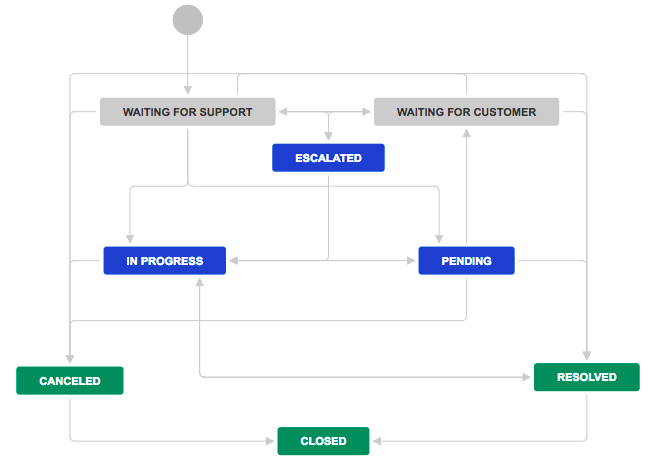
Here's an example of a default workflow:

Statuses and transitions
Two concepts define a workflow:
-
Statuses: the steps in your team’s working process that describe the state of a task.
-
Transitions: usually, how a piece of work can move between statuses. In order for an issue to move between two statuses, a transition must exist. A transition is a one-way link, so if an issue needs to move back and forth between two statuses, two transitions need to be created. The available workflow transitions for an issue are listed on the View issue screen. Transitions can also be "looped," meaning the status remains the same. These transitions are used to open transition screens so users can perform actions without setting a new status or for workflow triggers.
Active and inactive workflows
There are slight differences between editing an inactive and an active workflow. We place restrictions on the modifications you can make to an active workflow, due to the impact the changes will have on projects and/or issue types that use this workflow.
|
Workflow status |
Description |
|---|---|
|
Inactive workflow |
An inactive workflow is a workflow that is not currently being used by any projects. Because there are no issues currently transitioning through an inactive workflow, you can edit the workflow's steps and transitions directly. For details on activating a workflow, see steps below. For more detailed information, see Working in text mode. |
|
Active workflow |
An active workflow is a workflow that is currently being used by one or more projects. When you edit an active workflow, Jira first creates a draft of it. When you've finished, you can publish your draft and, optionally, save your original workflow as an inactive backup. The following limitations apply when editing the draft for an active workflow:
To make any of the modifications listed above, you need to copy the workflow, modify the copy, and then activate it. |
Activating a workflow
All workflows are inactive until you associate them with a workflow scheme, which can then be associated with a project. To activate a workflow:
-
Select
-
> Issues.
-
Click Workflow schemes.
-
Either click Add workflow scheme or edit an active workflow scheme.
-
Add your workflow to the scheme. (See Configuring workflow schemes for more detailed information.)
To finish activating your workflow, associate the workflow scheme it's in with a project (if an issue type is not defined in the project's issue type scheme, that specific workflow is not used):
-
In the sidebar, click Issue type schemes.
-
Click Associate to begin the migration process.
Each issue needs to have a valid status, so you may need to assign statuses to a select number of issues after you switch workflow schemes.
A Jira project must always be associated with a workflow scheme, since all issues must move through a workflow. To disassociate a custom workflow scheme from a project, simply associate that project to the default workflow scheme instead.
Adding a transition to a workflow
To add a transition, open your workflow in text mode:
-
Select
-
> Issues.
-
Click Workflows > Edit your selected workflow.
-
Click the Text tab > Add Transition, then fill in the details.
In the Transition View field, select either:
-
No view for transition — choose this if you do not need to prompt the user for input before the transition is executed (i.e. the transition will occur instantly when the user clicks the transition)
-
Or, the name of a screen (from the dropdown menu) that will be shown to users, asking for input before the transition is executed. You can choose one of Jira's default screens or any other screen you have created. If no existing screen is suitable, you may wish to create a new screen for the transition.
You can view workflow statuses and transitions in company-managed projects. Click the status dropdown when viewing an issue and choose View workflow.
Adding a status to a workflow
-
Select
-
> Issues.
-
Click Statuses > Add status.
Add an issue action
Transitioning an issue can mean moving it to another status, or performing a "looped" transition where the transition allows you to perform an action but keep the issue in its current status. We refer to these looped transitions as issue actions. Sometimes you may just want to perform an action to an issue without moving its status through the workflow.
To add an issue action:
-
Select
-
> Issues.
-
Click Workflows > Edit your selected workflow.
-
Click Add Transition.
-
Select a From status. If you choose Any status, your issue action will be able to be performed from anywhere in the workflow. Otherwise, it can only be from the status you choose.
-
For To status, select Itself.
-
Choose a name and fill in the rest of the details, then select Add when you're done.
Add post functions to the transition to trigger a particular event when the issue action is used.
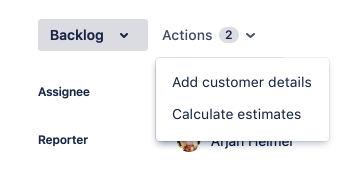
Issue actions show up on the new issue view next to the status like this:

Workflow designer
The workflow designer is a graphical tool that allows you to see the layout of your workflow and to create and edit a workflow's steps and transitions. You will need to log in as a user with the Administer Jira global permission to access the functionality described below.
With the workflow designer, you can:
-
Manage status and transitions: add, click and drag, or select to edit properties (Workflow properties) to rename, or delete (from the workflow but not Jira).
-
Add a global transition that allows every other status in the workflow to transition to the selected status. Select Allow all statuses to transition to this one in the properties panel for the transition.
-
Change the screen that a transition uses. See Working in text mode for details.
-
Configure advanced transition options, such as triggers, conditions, validators, and post functions. See the Advanced workflow configuration page.
-
Statuses are global objects. Changing the name of a status on one workflow also changes it in all workflows that use that status.
-
Hover over a transition or a status to see the relevant transition labels.
-
Zoom the diagram with your mouse wheel. Pan the diagram by clicking and holding the mouse while on white space, then moving your mouse across the diagram.
-
You cannot clone transitions in the workflow designer.
-
You cannot create annotations in the workflow designer.
-
You cannot directly set the issue.editable property. To do this, simply add the issue.editable property to the status properties.
-
The workflow designer will automatically validate your workflow and highlight any statuses that have no incoming or outgoing transitions. The workflow validator will also highlight all transitions that have an invalid permission condition that you don't have available in Jira. The validator is particularly useful if you import workflows, or deal with complex workflows.
Creating workflows
Check out Adding and deleting an issue workflow for more information on the ways to import and create workflows.
Configuring workflows
Check out Editing an issue workflow for more information about editing workflow triggers, transitions, validators, and post functions.
Setting the resolution field
In Jira, an issue is either open or closed, based on the value of its resolution field (not its status).
-
An issue is open if its resolution field isn't set.
-
An issue is closed if its resolution field has a value (fixed or can't reproduce, for example).
This is true regardless of the issue's current status (open or in progress, for example). If you need your workflow to force an issue to be open or closed, you will need to set the issue's resolution field during a transition. There are two ways to do this:
-
Set the resolution field automatically via a post function.
-
Prompt the user to choose a resolution via a screen. See Working in text mode for details on this.
Renaming workflow transition buttons
If you copied the system workflow and you wish to rename the workflow transition buttons on the View Issue page, you must delete the following properties from all transitions in the copied workflow:
-
jira.i18n.title
-
jira.i18n.description
Otherwise, the default names (i.e. values of these properties) will persist. Read more about transition properties.
Working in text mode
Text mode is an advanced way of working with workflows, and it shows the difference between steps and statuses. In text mode, you work directly with steps. For details, see Working in text mode.
Advanced workflow configuration
See the documentation on Advanced workflow configuration.
posted on 2022-03-19 07:39 freeliver54 阅读(142) 评论(0) 编辑 收藏 举报


