6、Jenkins-Vue项目发布+Jenkins权限管理
全部文章导航
1、Jenkins vue项目发布
1、Jenkins服务器安装npm
# 安装
sudo yum install -y npm

# 设置淘宝镜像
npm config set registry [https://registry.npm.taobao.org](https://registry.npm.taobao.org/)
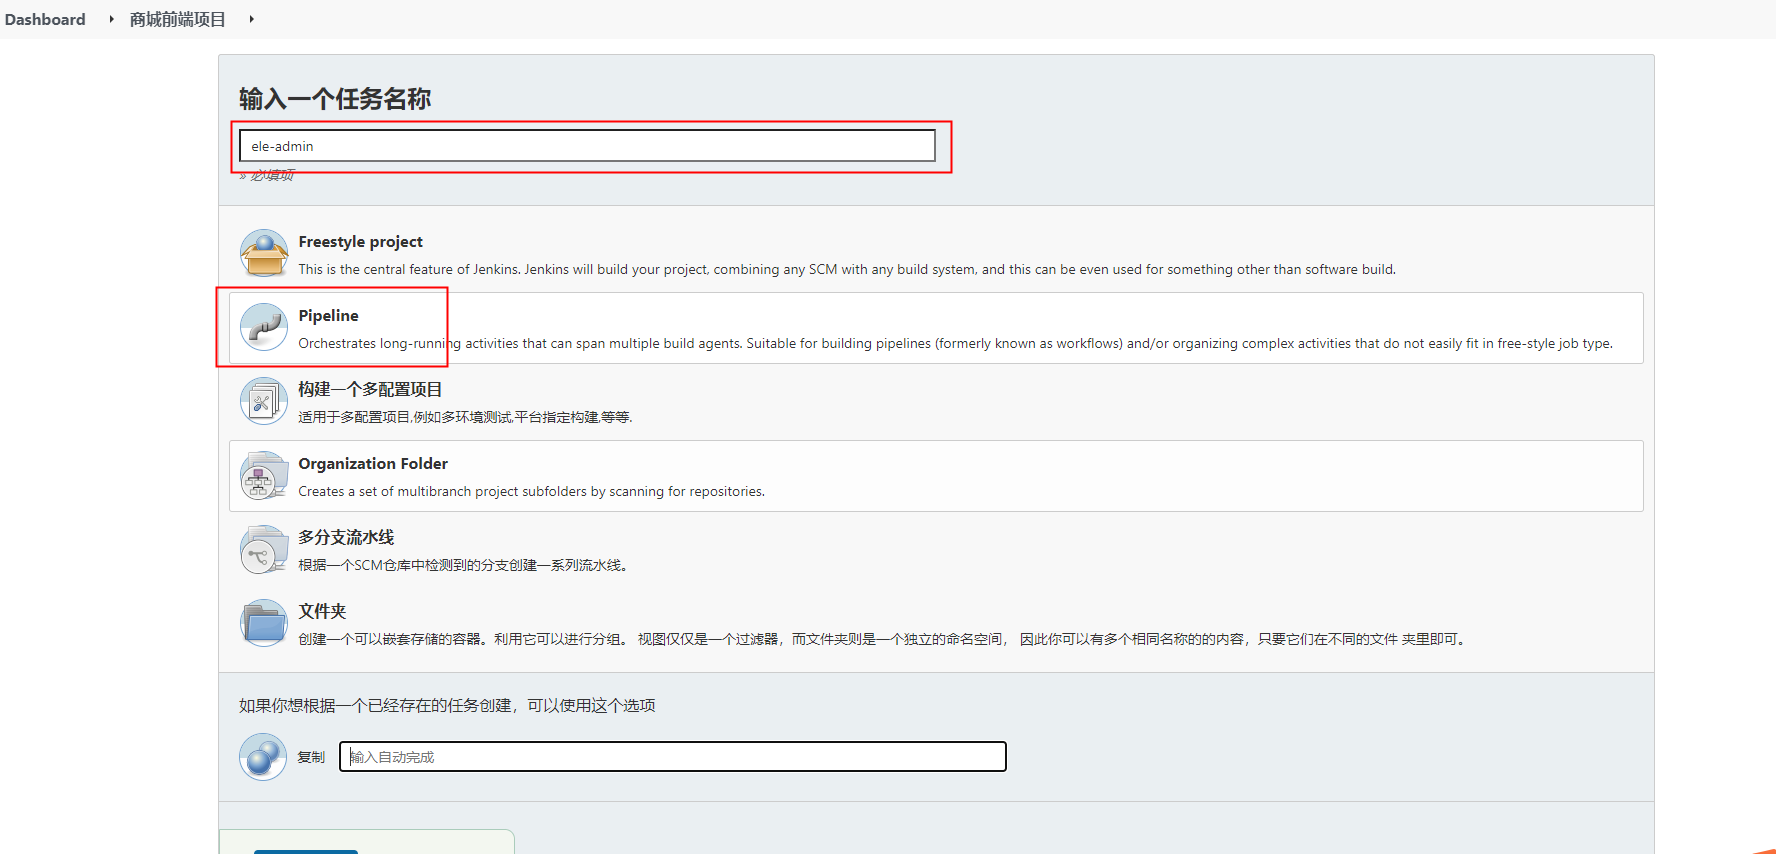
2、新建vue前端项目发布任务
3、添加参数
参数清单:
| 名称 | 类型 | 选项 | 描叙 | 默认值 |
|---|---|---|---|---|
| BRANCH | Choice Parameter | develop master |
develop: 开发分支 master: 主干分支 |
|
| ENVIRONMENT | Choice Parameter | development production |
development: 开发环境 production: 测试环境 |
|
| SERVICE_VERSION | String Parameter | 发布版本号 | 1.0.0 | |
| REPLICAS | String Parameter | 发布实例数量 | 1 |
添加参数按钮:

4、添加Pipeline script
示例项目源码地址: https://gitee.com/RiverBied/vue-element-admin.git
添加脚本。确认好脚本变量信息,添加好脚本后一个任务就算配好了。
第一种方式(Pipeline script)
- 调整变量: harbor_host、harbor_project、harbor_crt_id、git_auth_id、k8s_crt_id
| 变量名称 | 描述 | 来源 | 示例 |
|---|---|---|---|
| harbor_host | harbor服务地址,格式: $ | 看Harbor安装服务器和开放端口 | 192.168.110.104:9999 |
| harbor_project | harbor项目名称 | 镜像存放的项目,需要配置的harbor账号有该项目权限 | free-test |
| harbor_crt_id | harbor凭证Id | 添加凭据时自定义,在Jenkins全局凭证列表查看 | HARBOR_CRT_ID |
| git_auth_id | git凭证Id | 添加凭据时自定义,在Jenkins全局凭证列表查看 | GITEE_RIVERBIED |
| k8s_crt_id | k8s凭证Id | 添加凭据时自定义,在Jenkins全局凭证列表查看 | KUBE_CONFIG_FILE_ID |
| k8s_namespace | k8s发布项目的空间 | 可通过'kubectl create ns free'命令进行创建 | free |
- 脚本
// git
def git_url = 'https://gitee.com/RiverBied/vue-element-admin.git'
def git_auth_id = 'GITEE_RIVERBIED'

// harbor
def harbor_host = '192.168.110.104:9999'
def harbor_project = 'free-test'
def harbor_crt_id = 'HARBOR_CRT_ID'

// k8s shf
def k8s_crt_id = 'KUBE_CONFIG_FILE_ID'
def k8s_namespace = 'free'

// common
def api_name = ''
def docker_file_path= ''
def docker_image = "${harbor_host}/${harbor_project}/${api_name}:${SERVICE_VERSION}-${ENVIRONMENT.toLowerCase()}"
def service_node_port = ''
def current_timespan = System.currentTimeMillis().toString()

pipeline {
    agent any
    stages {
        stage('参数初始化+代码拉取') {
            steps {
                script {
                            api_name = "ele-admin"
                            docker_file_path = "Dockerfile"
                            docker_image = "${harbor_host}/${harbor_project}/${api_name}-${ENVIRONMENT.toLowerCase()}:${SERVICE_VERSION}_${current_timespan}"
                            service_node_port = "32500"
                }
               dir("${ENVIRONMENT.toLowerCase()}") {
               // 如果是公开仓库,可以直接使用 git url: "${git_url}" 拉取代码
                git branch: BRANCH, credentialsId: "${git_auth_id}", url: "${git_url}"
               }
            }
        }

        stage('代码编译') {
            steps {
                dir("${ENVIRONMENT.toLowerCase()}") {
                sh (script: """
                npm install
                npm run build:${ENVIRONMENT.toLowerCase()}
                """)
                }
            }
        }

        stage('镜像构建') {
            steps {
                dir("${ENVIRONMENT.toLowerCase()}") {
                sh (script: """
                oldImage=\$(docker images ${harbor_host}/${harbor_project}/${api_name}:${SERVICE_VERSION}  | grep ${api_name} | awk \'{ print \$1":"\$2 }\')
                if [ -z \$oldImage ]; then
                    echo "正常构建镜像"
                else
                     echo "删除存在镜像"
                     docker rmi \$oldImage
                fi
                """)
                sh 'pwd'
                // 生成镜像
                sh "docker build -t ${docker_image}  -f ${docker_file_path} ."
                // 查看镜像
                sh "docker images ${harbor_host}/${harbor_project}/${api_name}"
                }
            }
        }
        stage('镜像上传') {
            steps {
                withCredentials([usernamePassword(credentialsId: "${harbor_crt_id}", passwordVariable: 'harbor_password', usernameVariable: 'harbor_user_name')]) {
                sh (script: """
                # 登录镜像仓库
                HARBOR_PASSWORD=${harbor_password} && echo "\$HARBOR_PASSWORD" | docker login ${harbor_host}  -u ${harbor_user_name} --password-stdin
                # 推送镜像
                docker push ${docker_image}
                # 登出
                docker logout ${harbor_host}
                # 删除镜像
                docker rmi ${docker_image}
                """)
                }
            }
        }
        stage('发布到K8S') {
         steps {
            dir("${ENVIRONMENT.toLowerCase()}") {
            sh """
            api_name=${api_name}
            deploy_api_name=\${api_name/./-}
            export REGISTRY_HOST_IMAGE=${docker_image}
            export SERVICE_NAME=\${deploy_api_name}
            export SERVICE_VERSION=\${SERVICE_VERSION}
            export SERVICE_DEPLOYNAME_NAME=\${deploy_api_name}-deployment
            export ASPNETCORE_ENVIRONMENT=${ENVIRONMENT}
            export SERVICE_SERVICE_NAME=\${deploy_api_name}-service
            export SERVICE_SERVICE_PORT_NAME=\${deploy_api_name}-port
            export SERVICE_SERVICE_SELECT_NAME=\${deploy_api_name}
            export SERVICE_SERVICE_NODE_PORT=${service_node_port}
            export SERVICE_REPLICAS=${REPLICAS}
            export K8S_DEPLOY_NAMESPACE=${k8s_namespace}

            envsubst < deploy/k8s-master/template/api-deployment.yaml > deploy/k8s-master/template/api-real-deployment.yaml
            echo 'deployment发布内容'
            cat deploy/k8s-master/template/api-real-deployment.yaml

            envsubst < deploy/k8s-master/template/api-service.yaml > deploy/k8s-master/template/api-real-service.yaml
            echo 'service发布内容'
            cat deploy/k8s-master/template/api-real-service.yaml
          """
          withKubeConfig([credentialsId: "${k8s_crt_id}"]) {
            sh 'kubectl apply -f deploy/k8s-master/template/api-real-deployment.yaml'
            sh 'kubectl apply -f deploy/k8s-master/template/api-real-service.yaml'
          }
        }
        }
       }
    }
}
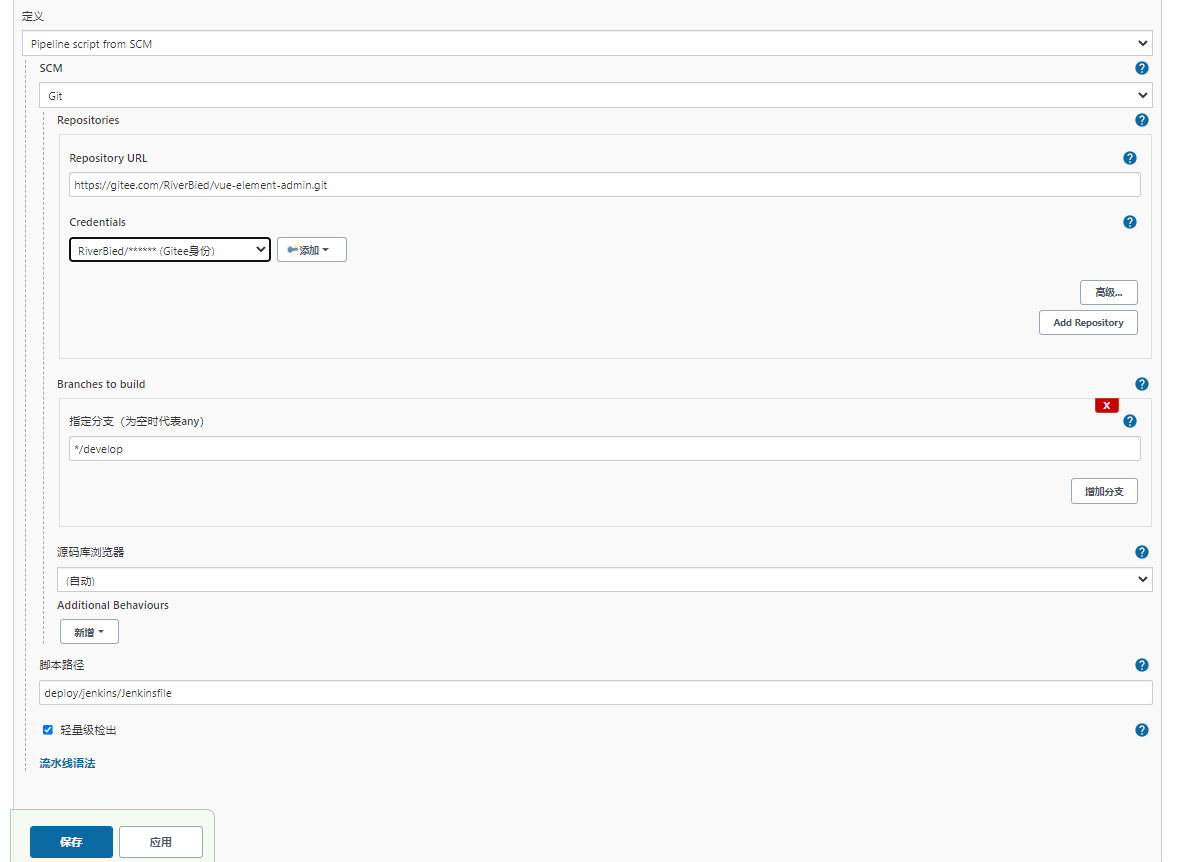
第二种方式(Pipeline script from SCM)
配置从源代码读取Jenkinsfile文件,Jenkinsfile内容为第一种方式的脚本信息。
5、执行发布到k8s
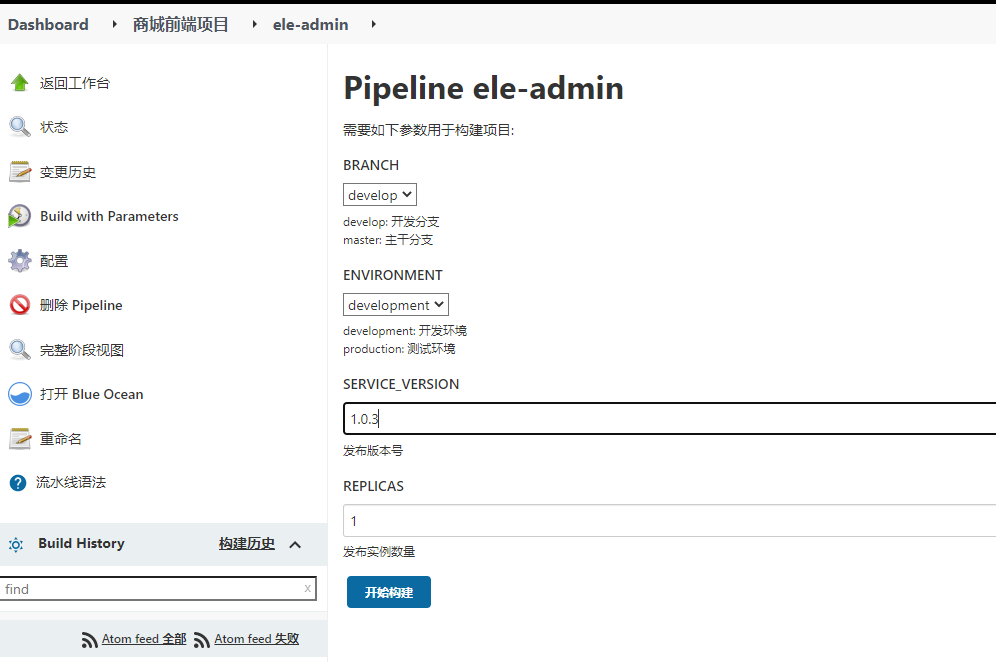
1、选择任务,点击Bulid with Parameters,点击开始构建。
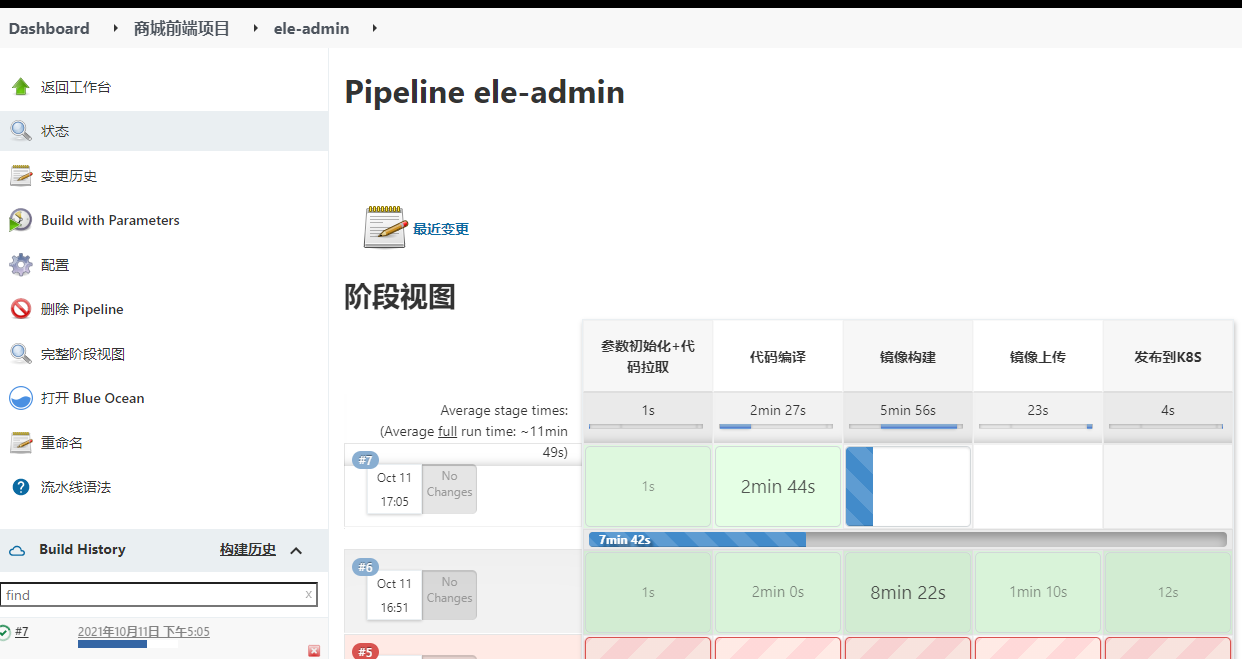
2、构建查看,失败可查看详情错误原因。
2、Jenkins项目权限管理
1、安装Role-based Authorization Strategy插件

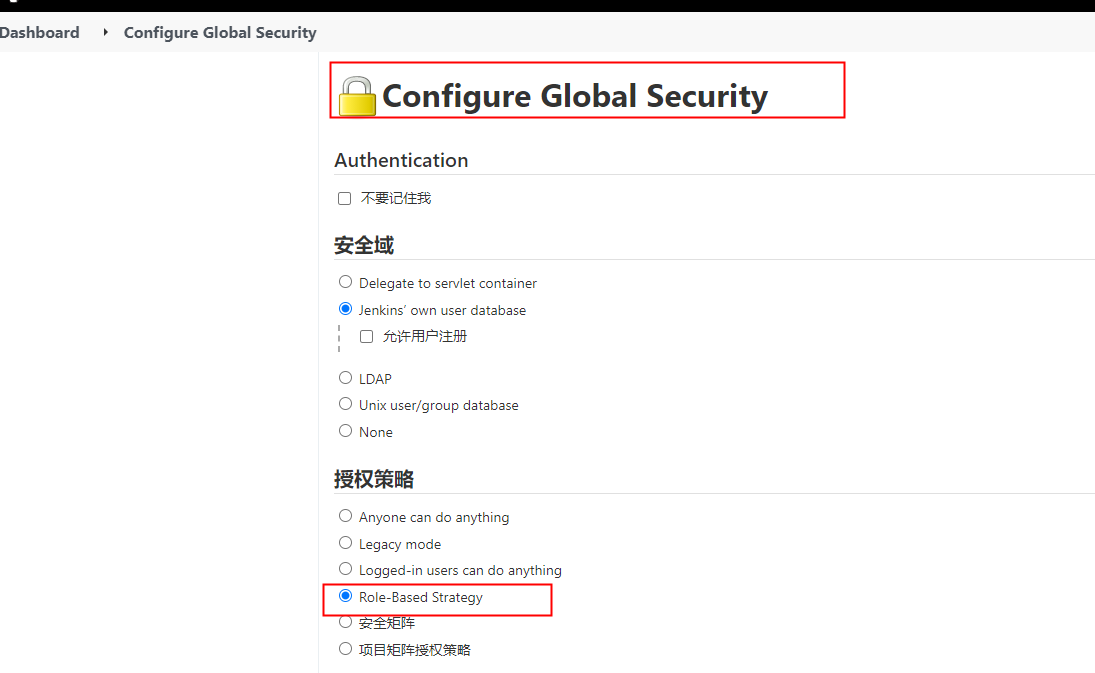
2、授权策略设置为Role-Based Strategy
3、新建用户: "free1"
Manage Jenkins -> Manage Users

4、角色管理
需要将授权策略设置为Role-Based Strategy才会显示。

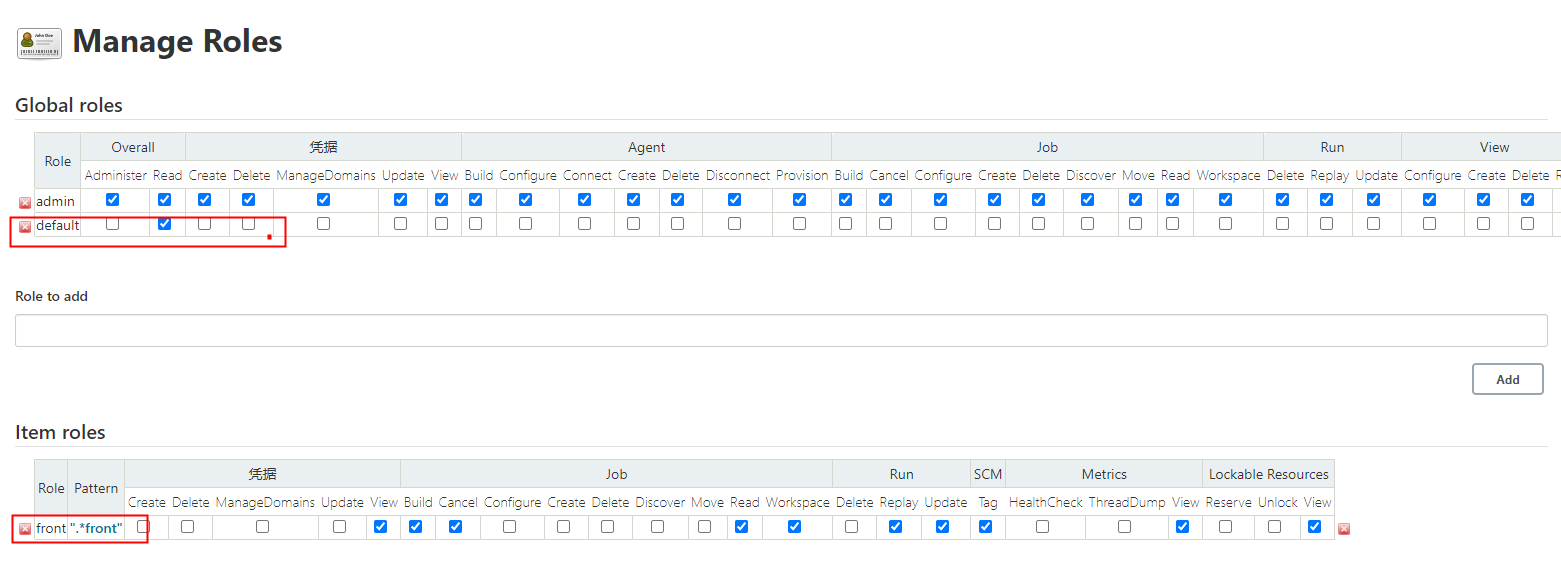
管理角色: Global roles添加"default"角色,Item roles添加"front"角色。点击Pattern列的内容可以查看匹配的任务。
将任务“ele-admin”名称修改为"ele-admin-front"。
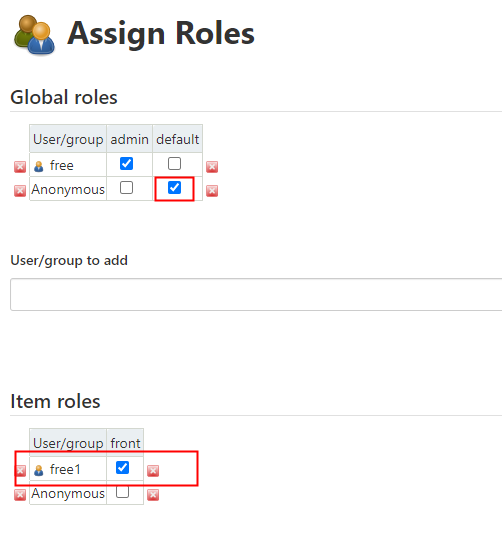
分配角色: Global roles给Anonymous设置default角色,给Item roles添加用户free、权限角色设置为front。
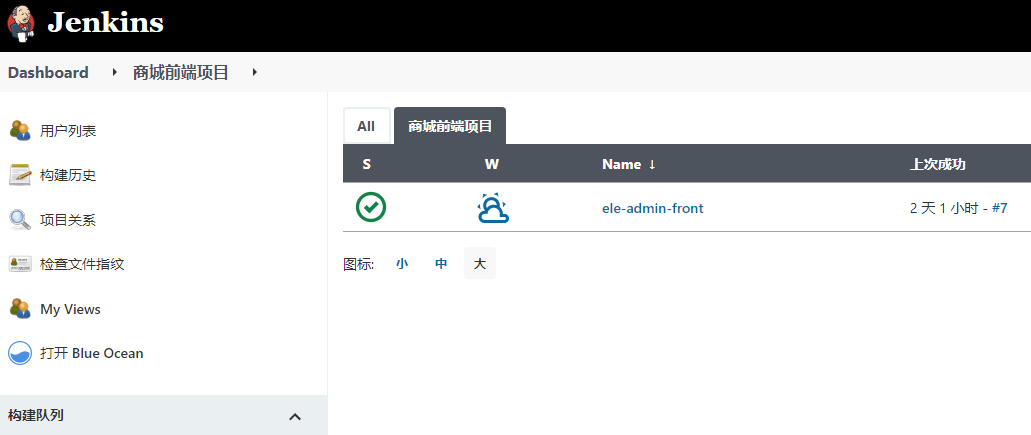
5、使用free2登录Jenkins管理界面
独立之精神,自由之思想

