利用canvas将 图片切图
html
<!DOCTYPE html>
<html lang="en">
<head>
<meta charset="UTF-8">
<meta name="viewport" content="width=device-width, initial-scale=1.0">
<title>Document</title>
<style>

</style>
</head>
<body>

<canvas id="canvas"></canvas>

<script>


// 更新:
// 05.27: 1、保证回调执行顺序:error > ready > load;2、回调函数this指向img本身
// 04-02: 1、增加图片完全加载后的回调 2、提高性能

/**
 * 图片头数据加载就绪事件 - 更快获取图片尺寸
 * @version    2011.05.27
 * @author    TangBin
 * @see        http://www.planeart.cn/?p=1121
 * @param    {String}    图片路径
 * @param    {Function}    尺寸就绪
 * @param    {Function}    加载完毕 (可选)
 * @param    {Function}    加载错误 (可选)
 * @example imgReady('http://www.google.com.hk/intl/zh-CN/images/logo_cn.png', function () {
        alert('size ready: width=' + this.width + '; height=' + this.height);
    });
 */
var imgReady = (function () {
    var list = [], intervalId = null,

    // 用来执行队列
    tick = function () {
        var i = 0;
        for (; i < list.length; i++) {
            list[i].end ? list.splice(i--, 1) : list[i]();
        };
        !list.length && stop();
    },

    // 停止所有定时器队列
    stop = function () {
        clearInterval(intervalId);
        intervalId = null;
    };

    return function (url, ready, load, error) {
        var onready, width, height, newWidth, newHeight,
            img = new Image();

        img.src = url;

        // 如果图片被缓存,则直接返回缓存数据
        if (img.complete) {
            ready.call(img);//this指向img
            load && load.call(img);
            return;
        };

        width = img.width;
        height = img.height;

        // 加载错误后的事件
        img.onerror = function () {
            error && error.call(img);
            onready.end = true;
            img = img.onload = img.onerror = null;
        };

        // 图片尺寸就绪
        onready = function () {
            newWidth = img.width;
            newHeight = img.height;
            if (newWidth !== width || newHeight !== height ||
                // 如果图片已经在其他地方加载可使用面积检测
                newWidth * newHeight > 1024
            ) {
                ready.call(img);
                onready.end = true;
            };
        };
        onready();

        // 完全加载完毕的事件
        img.onload = function () {
            // onload在定时器时间差范围内可能比onready快
            // 这里进行检查并保证onready优先执行
            !onready.end && onready();

            load && load.call(img);

            // IE gif动画会循环执行onload,置空onload即可
            img = img.onload = img.onerror = null;
        };

        // 加入队列中定期执行
        if (!onready.end) {
            list.push(onready);
            // 无论何时只允许出现一个定时器,减少浏览器性能损耗
            if (intervalId === null) intervalId = setInterval(tick, 40);
        };
    };
})();


imgReady("./images/1.jpg",function(){//在这个回调内可以拿到图片原始宽高
    // this指向要绘制的img
    console.log(this.width,this.height);//图片的宽高
    // 下面是canvas方法
    var canvasNode = document.getElementById("canvas");
    canvasNode.width = this.width;
    canvasNode.height = this.height;
    var ctx = canvasNode.getContext("2d");
    ctx.clearRect(0,0,this.width,this.height);//清除画布
    ctx.drawImage(this, this.width/4, this.height/4, this.width/4, this.height/4, 0, 0, this.width, this.height);
})

</script>


</body>
</html>
以上代码中,用到了drawImage方法,该方法接收9个参数。
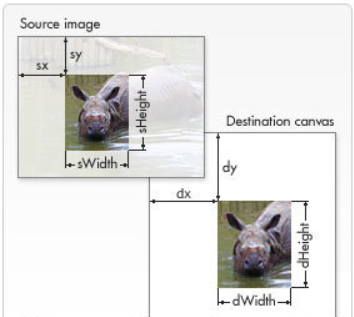
drawImage(image, sx, sy, sWidth, sHeight, dx, dy, dWidth, dHeight);
第一个参数是一个图像或者另一个 canvas 的引用。其它8个参数最好是参照右边的图解,前4个是定义图像源的切片位置和大小,后4个则是定义切片的目标显示位置和大小。见证下图:

。


【推荐】国内首个AI IDE,深度理解中文开发场景,立即下载体验Trae
【推荐】编程新体验,更懂你的AI,立即体验豆包MarsCode编程助手
【推荐】抖音旗下AI助手豆包,你的智能百科全书,全免费不限次数
【推荐】轻量又高性能的 SSH 工具 IShell:AI 加持,快人一步
· 基于Microsoft.Extensions.AI核心库实现RAG应用
· Linux系列:如何用heaptrack跟踪.NET程序的非托管内存泄露
· 开发者必知的日志记录最佳实践
· SQL Server 2025 AI相关能力初探
· Linux系列:如何用 C#调用 C方法造成内存泄露
· 无需6万激活码!GitHub神秘组织3小时极速复刻Manus,手把手教你使用OpenManus搭建本
· Manus爆火,是硬核还是营销?
· 终于写完轮子一部分:tcp代理 了,记录一下
· 别再用vector<bool>了!Google高级工程师:这可能是STL最大的设计失误
· 单元测试从入门到精通
2019-09-06 vue中封装一个倒计时