react的生命周期
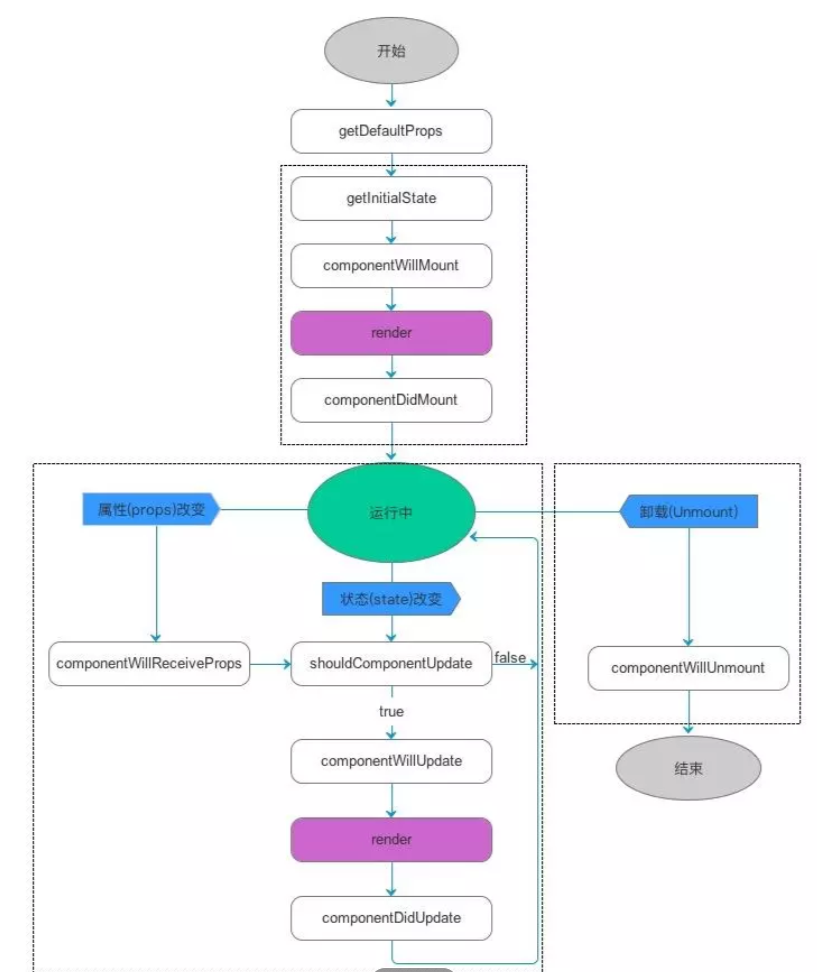
组件的生命周期可分成三个状态:
- Mounting:已插入真实 DOM
- Updating:正在被重新渲染
- Unmounting:已移出真实 DOM
生命周期的方法有:
-
componentWillMount 在渲染前调用,在客户端也在服务端。
-
componentDidMount : 在第一次渲染后调用,只在客户端。之后组件已经生成了对应的DOM结构,可以通过this.getDOMNode()来进行访问。 如果你想和其他JavaScript框架一起使用,可以在这个方法中调用setTimeout, setInterval或者发送AJAX请求等操作(防止异步操作阻塞UI)。
-
componentWillReceiveProps 在组件接收到一个新的 prop (更新后)时被调用。这个方法在初始化render时不会被调用。
-
shouldComponentUpdate 返回一个布尔值。在组件接收到新的props或者state时被调用。在初始化时或者使用forceUpdate时不被调用。
可以在你确认不需要更新组件时使用。 -
componentWillUpdate在组件接收到新的props或者state但还没有render时被调用。在初始化时不会被调用。
-
componentDidUpdate 在组件完成更新后立即调用。在初始化时不会被调用。
-
componentWillUnmount在组件从 DOM 中移除之前立刻被调用
实例:
以下实例在 Hello 组件加载以后,通过 componentDidMount 方法设置一个定时器,每隔100毫秒重新设置组件的透明度,并重新渲染:
    class Hello extends React.Component{
            constructor(props){
                super(props);
                this.state={opacity:1.0};
            }

            componentDidMount(){
                this.timer=setInterval(() => {
                    var opacity=this.state.opacity;
                    opacity-=0.05;
                    if(opacity<0.1){
                        opacity=1.0;
                    }
                    this.setState({
                        opacity:opacity
                    })
                },100);
            }

            render(){
                return(
                    <div style={{opacity: this.state.opacity}}>
                        Hello {this.props.name}
                    </div>
                )
            }
        }

        ReactDOM.render(
            <Hello name="world!"/>,
            document.getElementById("app")
        );
以下实例初始化 state , setNewnumber 用于更新 state。所有生命周期在 Content 组件中。
class Button extends React.Component{
            constructor(props){
                super(props);
                this.state={
                    data:0
                }
                this.setNewNumber=this.setNewNumber.bind(this);
            }
            setNewNumber(){
                this.setState({
                    data:this.state.data+1
                })
            }
            render(){
                return(
                    <div>
                        <button onClick={this.setNewNumber}>增加</button>
                        <Content myNumber={this.state.data}/>
                    </div>
                )
            }
        }

        class Content extends React.Component{
            componentWillMount(){
                console.log("渲染前")
            }
            componentDidMount(){
                console.log("第一次渲染完毕!")
            }
            componentWillReceiveProps(newProps){
                console.log("接收到新值,更新完毕")
            }
            shouldComponentUpdate(newProps, newState){
                return true;
            }
            componentWillUpdate(nextProps, nextState) {
                console.log('接到新值,即将更新dom');
            }
            componentDidUpdate(prevProps, prevState) {
                console.log('组件完成更新后立即调用');
            }
            componentWillUnmount() {
                console.log('组件即将重dom中移除')
            }

            render() {
                return (
                    <div>
                        <h3>{this.props.myNumber}</h3>
                    </div>
                );
            }
        }
        ReactDOM.render(
            <div>
                <Button />
            </div>,
            document.getElementById('app')
        );
。
个人理解:
React的生命周期从广义上分为三个阶段:挂载、渲染、卸载
因此可以把React的生命周期分为两类:挂载卸载过程和更新过程。
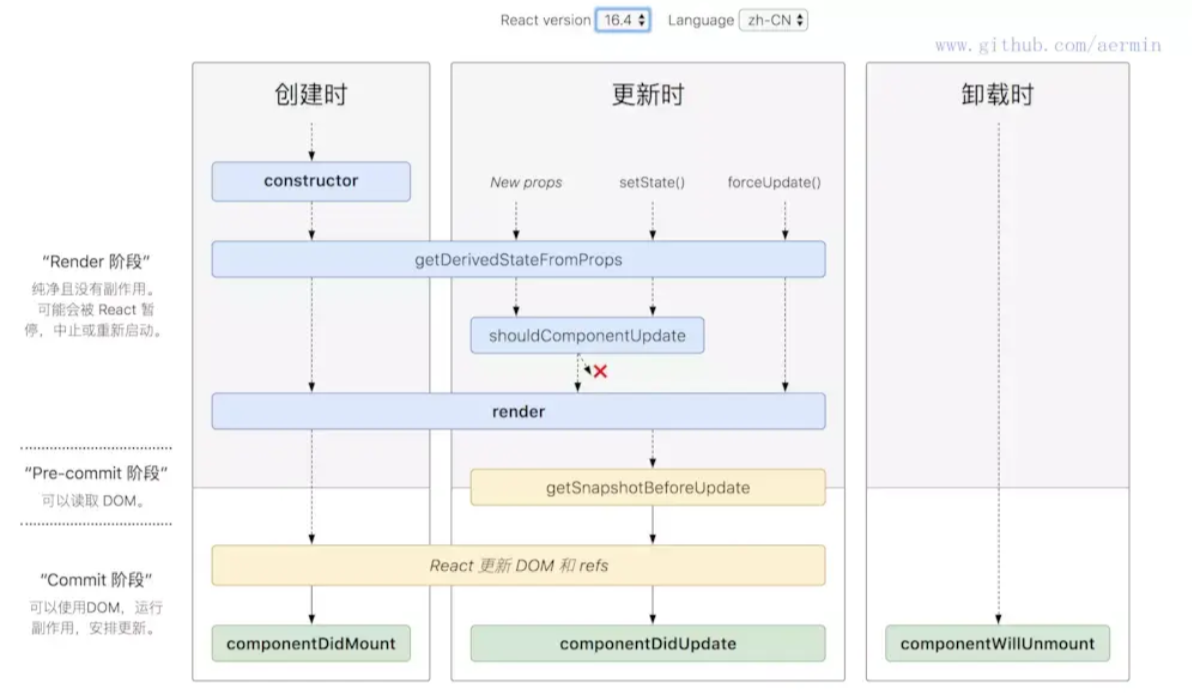
React的生命周期图:

1. 挂载卸载过程
1.1.constructor()
注意:只要使用了constructor()就必须写super(),否则会导致this指向错误。
1.2.componentWillMount()
componentWillMount()一般用的比较少,它更多的是在服务端渲染时使用。它代表的过程是组件已经经历了constructor()初始化数据后,但是还未渲染DOM时。
1.3.componentDidMount()
组件第一次渲染完成,此时dom节点已经生成,可以在这里调用ajax请求,返回数据setState后组件会重新渲染
1.4.componentWillUnmount ()
在此处完成组件的卸载和数据的销毁。
- clear你在组建中所有的setTimeout,setInterval
- 移除所有组建中的监听 removeEventListener
- 有时候我们会碰到这个warning:
Can only update a mounted or mounting component. This usually means you called setState() on an unmounted component. This is a no-op. Please check the code for the undefined component.
原因:因为你在组件中的ajax请求返回setState,而你组件销毁的时候,请求还未完成,因此会报warning
解决方法:
componentDidMount() {
    this.isMount === true
    axios.post().then((res) => {
    this.isMount && this.setState({   // 增加条件ismount为true时
      aaa:res
    })
})
}
componentWillUnmount() {
    this.isMount === false
}
2. 更新过程
2.1. componentWillReceiveProps (nextProps)
- 在接受父组件改变后的props需要重新渲染组件时用到的比较多
- 接受一个参数nextProps
- 通过对比nextProps和this.props,将nextProps的state为当前组件的state,从而重新渲染组件
  componentWillReceiveProps (nextProps) {
    nextProps.openNotice !== this.props.openNotice&&this.setState({
        openNotice:nextProps.openNotice
    },() => {
      console.log(this.state.openNotice:nextProps)
      //将state更新为nextProps,在setState的第二个参数(回调)可以打         印出新的state
  })
}
2.2.shouldComponentUpdate(nextProps,nextState)
- 主要用于性能优化(部分更新)
- 唯一用于控制组件重新渲染的生命周期,由于在react中,setState以后,state发生变化,组件会进入重新渲染的流程,在这里return false可以阻止组件的更新
- 因为react父组件的重新渲染会导致其所有子组件的重新渲染,这个时候其实我们是不需要所有子组件都跟着重新渲染的,因此需要在子组件的该生命周期中做判断
2.3.componentWillUpdate (nextProps,nextState)
shouldComponentUpdate返回true以后,组件进入重新渲染的流程,进入componentWillUpdate,这里同样可以拿到nextProps和nextState。
2.4.componentDidUpdate(prevProps,prevState)
2.5.render()
3. React新增的生命周期(借鉴别人)

3.1. getDerivedStateFromProps(nextProps, prevState)
老版本中的componentWillReceiveProps()方法判断前后两个 props 是否相同,如果不同再将新的 props 更新到相应的 state 上去。这样做一来会破坏 state 数据的单一数据源,导致组件状态变得不可预测,另一方面也会增加组件的重绘次数。
举个例子:
// before
componentWillReceiveProps(nextProps) {
  if (nextProps.isLogin !== this.props.isLogin) {
    this.setState({
      isLogin: nextProps.isLogin,
    });
  }
  if (nextProps.isLogin) {
    this.handleClose();
  }
}

// after
static getDerivedStateFromProps(nextProps, prevState) {
  if (nextProps.isLogin !== prevState.isLogin) {
    return {
      isLogin: nextProps.isLogin,
    };
  }
  return null;
}

componentDidUpdate(prevProps, prevState) {
  if (!prevState.isLogin && this.props.isLogin) {
    this.handleClose();
  }
}
这两者最大的不同就是:
在 componentWillReceiveProps 中,我们一般会做以下两件事,一是根据 props 来更新 state,二是触发一些回调,如动画或页面跳转等。
- 在老版本的 React 中,这两件事我们都需要在 componentWillReceiveProps 中去做。
- 而在新版本中,官方将更新 state 与触发回调重新分配到了 getDerivedStateFromProps 与 componentDidUpdate 中,使得组件整体的更新逻辑更为清晰。而且在 getDerivedStateFromProps 中还禁止了组件去访问 this.props,强制让开发者去比较 nextProps 与 prevState 中的值,以确保当开发者用到 getDerivedStateFromProps 这个生命周期函数时,就是在根据当前的 props 来更新组件的 state,而不是去做其他一些让组件自身状态变得更加不可预测的事情。
3.2. getSnapshotBeforeUpdate(prevProps, prevState)
常见的 componentWillUpdate 的用例是在组件更新前,读取当前某个 DOM 元素的状态,并在 componentDidUpdate 中进行相应的处理。
这两者的区别在于:
- 在 React 开启异步渲染模式后,在 render 阶段读取到的 DOM 元素状态并不总是和 commit 阶段相同,这就导致在
componentDidUpdate 中使用 componentWillUpdate 中读取到的 DOM 元素状态是不安全的,因为这时的值很有可能已经失效了。 - getSnapshotBeforeUpdate 会在最终的 render 之前被调用,也就是说在 getSnapshotBeforeUpdate 中读取到的 DOM 元素状态是可以保证与 componentDidUpdate 中一致的。
此生命周期返回的任何值都将作为参数传递给componentDidUpdate()。
。


【推荐】国内首个AI IDE,深度理解中文开发场景,立即下载体验Trae
【推荐】编程新体验,更懂你的AI,立即体验豆包MarsCode编程助手
【推荐】抖音旗下AI助手豆包,你的智能百科全书,全免费不限次数
【推荐】轻量又高性能的 SSH 工具 IShell:AI 加持,快人一步
· 基于Microsoft.Extensions.AI核心库实现RAG应用
· Linux系列:如何用heaptrack跟踪.NET程序的非托管内存泄露
· 开发者必知的日志记录最佳实践
· SQL Server 2025 AI相关能力初探
· Linux系列:如何用 C#调用 C方法造成内存泄露
· 无需6万激活码!GitHub神秘组织3小时极速复刻Manus,手把手教你使用OpenManus搭建本
· Manus爆火,是硬核还是营销?
· 终于写完轮子一部分:tcp代理 了,记录一下
· 别再用vector<bool>了!Google高级工程师:这可能是STL最大的设计失误
· 单元测试从入门到精通