d函数式图像编程
D中的函数式处理图像
最近完成了D库图形包大修.大修受到D的std.algorithm和std.range模块启发:
序号 | 特点 |
|---|---|
1 | 按可组合小型组件展示内容 |
2 | 避免隐式复制,更喜欢懒求值 |
3 | 用模板编写高效代码 |
从第一次迭代,按颜色类型模板化图像包组件.这不是实现图形库的像多数库抽出面向对象接口后面用的确切颜色类型,或简单按单内存像素转换图像等传统方法.
然而,一般,这很浪费且低效.通常,除了用户输入的应用(如图像编辑器)的图像数据,已知道图像确切格式.相反,该库按模板声明图像类型,模板参数指示图像颜色类型.
我很满意,分享一些亮点.
从定义视图开始:
enum isView(T) =
  is(typeof(T.init.w) : size_t) && // 宽
  is(typeof(T.init.h) : size_t) && // 高
  is(typeof(T.init[0, 0])     );   // 颜色信息
//视提供宽高,且可用坐标来索引取颜色
该定义静态接口方法,类似D的std.range如isInputRange中使用方法.与面向对象接口不同,D静态接口通过一般用IsExpression或compiles特征,检查预期操作是否无误编译或求值为某种类型,判断实现特征来定义的.
类似std.range.ElementType,定义提取指示像素颜色视图的类型模板:
alias ViewColor(T) = typeof(T.init[0, 0]);
//返回指定视图颜色类型
接下来,定义特化视图:
/// 视图为只读或可写
enum isWritableView(T) =
	isView!T &&
	is(typeof(T.init[0, 0] = ViewColor!T.init));
/// 视图可直接访问像素,叫直接视
enum isDirectView(T) =
	isView!T &&
	is(typeof(T.init.scanline(0)) : ViewColor!T[]);
同样类似,定义isForwardRange:检查类型是否实现了基类型所有特征,及特化版特征.
由于可从直接视图的scanline基元派生视图的访问像素原语,声明模板插件来完成:
/// 在已存在直接视原语上实现视图原语插件
mixin template DirectView()
{
	alias COLOR = typeof(scanline(0)[0]);
	/// 实现view[x, y].
	ref COLOR opIndex(int x, int y)
	{
		return scanline(y)[x];
	}
	/// view[x, y] = c .
	COLOR opIndexAssign(COLOR value, int x, int y)
	{
		return scanline(y)[x] = value;
	}
}
如,这是图像模板的定义,定义了具体内存图像:
/// 平数组中内存图像
struct Image(COLOR)
{
	int w, h;
	COLOR[] pixels;

	/// 按y行返回像素数组
	COLOR[] scanline(int y)
	{
		assert(y>=0 && y<h);
		return pixels[w*y..w*(y+1)];
	}

	mixin DirectView;

	this(int w, int h)
	{
		size(w, h);
	}

	/// 不缩放
	void size(int w, int h)
	{
		this.w = w;
		this.h = h;
		if (pixels.length < w*h)
			pixels.length = w*h;
	}
}
D中数组仅为指针和长度(仅调整/连接时分配),因此pixels[w*y..w*(y+1)]不会创建副本.
测试单元静态地验证Image确实满足isDirectView接口:
unittest
{
	static assert(isDirectView!(Image!ubyte));
}
可用该模型干什么呢?
一方面,可定义内存中无像素存储的图像,而是按需生成像素:
/// 需要时,返回指定公式计算的视图
template procedural(alias formula)
{
	alias fun = binaryFun!(formula, "x", "y");
	alias COLOR = typeof(fun(0, 0));

	auto procedural(int w, int h)
	{
		struct Procedural
		{
			int w, h;
			auto ref COLOR opIndex(int x, int y)
			{
				return fun(x, y);
			}
		}
		return Procedural(w, h);
	}
}
同名模板用std.functional.binaryFun按串式(用插件)或闭包字面(λ)形式接受判词.该函数有动返回类型并返回函数内声明的构,因而是隐藏类型的例子.
过程图像的最简单示例是一种纯色:
/// 返回指定维度和颜色的视图
auto solid(COLOR)(COLOR c, int w, int h)
{
	return procedural!((x, y) => c)(w, h);
}
注意,如何从c参数类型推断出来返回视图颜色类型,因此即使无全名,solid(RGB(1,2,3),10,10)将返回带RGB像素视图.
还可用该模型来创建按某种方式转换其他视图的视图.对常见代码定义了另一模板插件:
/// 在另一视图上用转换坐标函数实现视图原语插件
mixin template Warp(V)
{
	V src;
	auto ref ViewColor!V opIndex(int x, int y)
	{
		warp(x, y);
		return src[x, y];
	}

	static if (isWritableView!V)
	ViewColor!V opIndexAssign(ViewColor!V value, int x, int y)
	{
		warp(x, y);
		return src[x, y] = value;
	}
}
注意static if(isWritableView!V)行.它表示view[x,y]=c仅在底层视图支持src时,才定义该操作.这样,仅在底层视图可写时,可写扭曲视图.
有了它,可实现展示另一视图矩形部分的裁剪视图:
/// 裁剪为指定矩形
auto crop(V)(auto ref V src, int x0, int y0, int x1, int y1)
	if (isView!V)
{
	assert( 0 <=    x0 &&  0 <=    y0);
	assert(x0 <     x1 && y0 <     y1);
	assert(x1 <= src.w && y1 <= src.h);

	static struct Crop
	{
		mixin Warp!V;

		int x0, y0, x1, y1;

		@property int w() { return x1-x0; }
		@property int h() { return y1-y0; }

		void warp(ref int x, ref int y)
		{
			x += x0;
			y += y0;
		}

		static if (isDirectView!V)
		ViewColor!V[] scanline(int y)
		{
			return src.scanline(y0+y)[x0..x1];
		}
	}

	static assert(isDirectView!V == isDirectView!Crop);

	return Crop(src, x0, y0, x1, y1);
}
if(isView!V)模板约束验证第1参满足isView接口.
因此,如底层图像支持,则crop用isDirectView直接访问像素.同大量像素工作时,与依次访问每像素相比,直接访问像素很有用,性能提高很多.如传输A图像到B图像时,用数组切片副本(D的memcpy类型安全版)比单独赋值每个像素快得多:
/// 块传输至另一块,视图大小要求一样.
void blitTo(SRC, DST)(auto ref SRC src, auto ref DST dst)
	if (isView!SRC && isWritableView!DST)
{
	assert(src.w == dst.w && src.h == dst.h, "大小不匹配");
	foreach (y; 0..src.h)
	{
		static if (isDirectView!SRC && isDirectView!DST)
			dst.scanline(y)[] = src.scanline(y)[];
		else
		{
			foreach (x; 0..src.w)
				dst[x, y] = src[x, y];
		}
	}
}
crop理念,还可用于平铺另一视图,或缩放最近邻视图.(更复杂缩放算法最好按命令式实现),代码类似crop,因此没写了.
即使crop按普通参数取源,该函数及其兄弟的预期用途,好像是源视图的方法:someView.nearestNeighbor(100,100).tile(1000,1000).crop(50,50,950,950).该特征叫"统调"(简称UFCS),允许编写a.fun(b...)而不是fun(a,b...).最大好处是允许链式调用(a.fun1().fun2().fun3()而不是fun3(fun2(fun1(a)))),Phobos和该包都利用了它.
对不改变视图大小的简单转换,可定义简单应用用户指定公式到每个像素坐标的辅助函数:
/// 根据给定公式返回转换坐标源视图
template warp(string xExpr, string yExpr)
{
	auto warp(V)(auto ref V src)
		if (isView!V)
	{
		static struct Warped
		{
			mixin Warp!V;

			@property int w() { return src.w; }
			@property int h() { return src.h; }

			void warp(ref int x, ref int y)
			{
				auto nx = mixin(xExpr);
				auto ny = mixin(yExpr);
				x = nx; y = ny;
			}

			private void testWarpY()()
			{
				int y;
				y = mixin(yExpr);
			}

			/// 不影响x,y不依赖x,可转换扫描行
			static if (xExpr == "x" &&
				__traits(compiles, testWarpY()) &&isDirectView!V)
			ViewColor!V[] scanline(int y)
			{
				return src.scanline(mixin(yExpr));
			}
		}

		return Warped(src);
	}
}
warp用有技巧方法来检查用户提供公式.按参数为零模板声明testWarpY函数.导致编译器在实例化前,不会分析主体语义.且该函数域中无x符号,因此只有在不引用yExpr式时,才能成功实例化x.在__traits(compiles,testWarpY())静态表达检查了这一点.这允许安全时定义直接视图scanline原语,例子:
//返回逆转x坐标的源视图
alias hflip = warp!(q{w-x-1}, q{y});

///返回逆转y坐标的源视图
alias vflip = warp!(q{x}, q{h-y-1});

///返回逆转x,y坐标的源视图
alias flip = warp!(q{w-x-1}, q{h-y-1});
该q{...}声明串很酷.常用于包含D代码,稍后mixin它.插件点式可访问本例是Warped结构体的warp和testWarpY方法的所有符号.
由于vflip满足声明scanline方法所需的前两个条件,如果someView是,则someView.vflip()也是直接访问.不用特殊声明vflip.
因为使用抽象不依赖运行时多态,编译器可自由跨转换层内联调用.两次水平翻转图像是空操作的,i[5,5]与i.hflip().hflip()[5,5]产生相同机器码.(ldc)D编译器优化更多:如定义翻转视图X轴和Y轴的flipXY函数,及按src.flipXY().hflip()定义(顺时针旋转90度图像)的rotateCW函数,那么四个连续调用rotateCW(完整的360度)优化为空操作.
继续操作像素.std.algorithm返回懒应用式至另一区间的区间的map旗舰函数.colorMap函数也这样:
/// 返回应用区间判定像素颜色的视图
template colorMap(alias pred)
{
	alias fun = unaryFun!(pred, false, "c");

	auto colorMap(V)(auto ref V src)
		if (isView!V)
	{
		alias OLDCOLOR = ViewColor!V;
		alias NEWCOLOR = typeof(fun(OLDCOLOR.init));

		struct Map
		{
			V src;

			@property int w() { return src.w; }
			@property int h() { return src.h; }

			auto ref NEWCOLOR opIndex(int x, int y)
			{
				return fun(src[x, y]);
			}
		}

		return Map(src);
	}
}
用colorMap声明反转图像颜色函数,非常简单:
alias invert = colorMap!q{~c};
colorMap不要求输入和输出颜色类型相同.允许转换颜色类型:read("image.bmp").parseBMP!RGB().colorMap!(c=>BGRX(c.b,c.g,c.r)),按BGRX视图展示RGB位图.
处理图像,通常是令人尴尬的并行化任务.D的std.parallelism帮助并行处理图像:
//分割视图为段,为并行在每段上调用函数
//返回可用vjoin或vjoiner合并的段数组
template parallel(alias fun)
{
	auto parallel(V)(auto ref V src, size_t chunkSize = 0)
		if (isView!V)
	{
		auto processSegment(R)(R rows)
		{
			auto y0 = rows[0];
			auto y1 = y0 + rows.length;
			auto segment = src.crop(0, y0, src.w, y1);
			return fun(segment);
		}

		import std.range : iota, chunks;
		import std.parallelism : taskPool, parallel;

		if (!chunkSize)
			chunkSize = taskPool.defaultWorkUnitSize(src.h);

		auto range = src.h.iota.chunks(chunkSize);
		alias Result = typeof(processSegment(range.front));
		auto result = new Result[range.length];
		foreach (n; range.length.iota.parallel(1))
			result[n] = processSegment(range[n]);
		return result;
	}
}
因为签名且操作类型不同,即使parallel与std.parallelism用的函数模板共享名字也不冲突.
可用image.parallel!(segment=>segment.process()).vjoin()替换image.process()来跨多线程拆分应用.
实际例子:
创建小动画图像:
import std.algorithm;
import std.parallelism;
import std.range;
import std.stdio;
import std.string;

import ae.utils.geometry;
import ae.utils.graphics.color;
import ae.utils.graphics.draw;
import ae.utils.graphics.gamma;
import ae.utils.graphics.image;

void main()
{
	enum W = 4096;

	const FG = L16(0);
	const BG = L16(ushort.max);

	auto image = Image!L16(W, W);
	image.fill(BG);

	enum OUTER = W/2 * 16/16;
	enum INNER = W/2 * 13/16;
	enum THICK = W/2 *  3/16;

	image.fillCircle(W/2, W/2, OUTER, FG);
	image.fillCircle(W/2, W/2, INNER, BG);
	image.fillRect(0, W/2-INNER, W/2, W/2+INNER, BG);
	image.fillRect(W/2-THICK/2, W/2-INNER, W/2+THICK/2, W/2+INNER, FG);

	enum frames = 32;
	foreach (n; frames.iota.parallel)
		image
		.rotate(TAU * n / frames, BG)
		.copy
		.downscale!(W/16)
		.lum2pix(gammaRamp!(ushort, ubyte, ColorSpace.sRGB))
		.toPNG
		.toFile("loading-%02d.png".format(n++));
}
该程序用更高分辨率绘制初始图像,用16位亮度,稍后缩小后转换为8位sRGB.从更高分辨率缩小来避免混叠,且需要伽马转换来准确调整大小.
输出(转换PNG为GIF动画后):

渲染Mandelbrot集灰度图像:
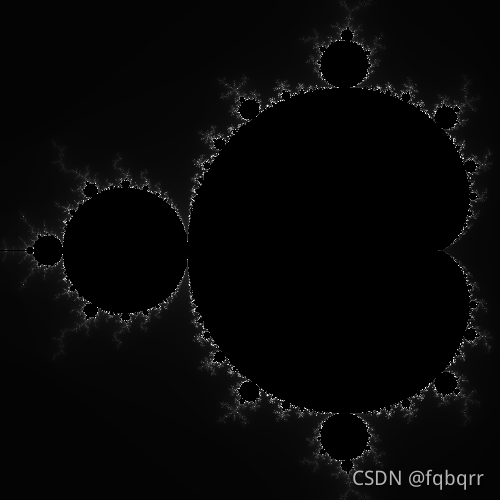
{
	import std.algorithm, std.range;
	import ae.utils.graphics.view;
	return procedural!((x, y)
	{
		auto c = (2.0*x/w - 1.5) + (2.0*y/h - 1.0)*1i;
		return cast(ubyte)(1+
			recurrence!((a, n) => c + a[n-1]^^2)(0+0i)
			.take(ubyte.max)
			.countUntil!(z => z.re^^2 + z.im^^2 > 4));
	})(w, h);
}

void main()
{
	import std.stdio;
	import ae.utils.graphics.image;
	mandelbrot(500, 500).toPNG().toFile("mandel.png");
}
该程序使用了recurrence,take和countUntild区间原语,及D原生支持的复数,允许通常需要十几行,而现在更加简洁的实现.(不过已放弃std.complex,d不支持复数了).
模板化带来巨大性能优势.简单的基准测试,该程序缩小了25%图像目录:
import std.path;
import std.stdio;

import ae.utils.graphics.color;
import ae.utils.graphics.gamma;
import ae.utils.graphics.image;

void main()
{
	alias BGR16 = Color!(ushort, "b", "g", "r");
	auto gamma = GammaRamp!(ushort, ubyte)(2.2);
	foreach (de; dirEntries("input", "*.bmp", SpanMode.shallow))
	{
		static Image!BGR scratch1;
		static Image!BGR16 scratch2, scratch3;

		de
		.read
		.parseBMP!BGR(scratch1)
		.parallel!(segment =>
			segment
			.pix2lum(gamma)
			.copy(scratch2)
			.downscale!4(scratch3)
			.lum2pix(gamma)
			.copy
		)(4)
		.vjoin
		.toBMP
		.toFile(buildPath("output-d", de.baseName));
	}
}
与等价的ImageMagick命令比较:
convert\
input/*.bmp\
-depth16\
-gamma0.454545\
-filterbox\
-resize25%\
-gamma2.2\
-depth8\
output-im/%02d.bmp
D程序快大约4-5倍.当然,这不公平:尽管两者都用16位色深,伽马校正,多线程并有相同的CPU架构,而D程序专门优化过.通用处理图像库缺少某种JIT,因而无法匹敌.


【推荐】国内首个AI IDE,深度理解中文开发场景,立即下载体验Trae
【推荐】编程新体验,更懂你的AI,立即体验豆包MarsCode编程助手
【推荐】抖音旗下AI助手豆包,你的智能百科全书,全免费不限次数
【推荐】轻量又高性能的 SSH 工具 IShell:AI 加持,快人一步
· 分享一个免费、快速、无限量使用的满血 DeepSeek R1 模型,支持深度思考和联网搜索!
· 基于 Docker 搭建 FRP 内网穿透开源项目(很简单哒)
· ollama系列01:轻松3步本地部署deepseek,普通电脑可用
· 25岁的心里话
· 按钮权限的设计及实现