Spring的Aop切面xml配置和注解(基于AspectJ)
Spring的AOP引入步骤:
1.引入jar,maven加入spring-aop坐标.
2.创建目标接口和目标对象(类).
3.创建切面类(类有before或after增强方法).
4.将目标对象和切面类交由Spring管理.
5.在applicationContext.xml中配置AOP的织入关系.
6.测试代码.
一,创建接口和目标类
package com.cc8w.aop;

/**
 * 目标接口
 * @author Administrator
 */
public interface TargetInterface {
    //保存方法
    public void save();

}
package com.cc8w.aop;

/**
 * 目标对象
 * @author Administrator
 *
 */
public class TargetImpl implements TargetInterface {

    @Override
    public void save() {
        // TODO Auto-generated method stub
        System.out.println("类Target的保存方法....");
    }

}
二.创建切面类
package com.cc8w.aop;

/**
 * 目标对象的增强切面
 * @author Administrator
 *
 */
public class TargetAspect {

    public void before() {
        System.out.println("前置增强切面...");
    }

}
三. 让Spring管理Bean类,和配置aop织入关系(即:配置applicationContext.xml)
<?xml version="1.0" encoding="UTF-8"?>
<beans xmlns="http://www.springframework.org/schema/beans"
    xmlns:xsi="http://www.w3.org/2001/XMLSchema-instance"
    xmlns:aop="http://www.springframework.org/schema/aop"
    xmlns:c="http://www.springframework.org/schema/c"
    xmlns:cache="http://www.springframework.org/schema/cache"
    xmlns:context="http://www.springframework.org/schema/context"
    xmlns:jdbc="http://www.springframework.org/schema/jdbc"
    xmlns:mybatis-spring="http://mybatis.org/schema/mybatis-spring"
    xmlns:p="http://www.springframework.org/schema/p"
    xmlns:tx="http://www.springframework.org/schema/tx"
    xmlns:util="http://www.springframework.org/schema/util"
    xsi:schemaLocation="http://www.springframework.org/schema/beans http://www.springframework.org/schema/beans/spring-beans.xsd
        http://www.springframework.org/schema/aop http://www.springframework.org/schema/aop/spring-aop-4.3.xsd
        http://www.springframework.org/schema/cache http://www.springframework.org/schema/cache/spring-cache-4.3.xsd
        http://www.springframework.org/schema/context http://www.springframework.org/schema/context/spring-context-4.3.xsd
        http://www.springframework.org/schema/jdbc http://www.springframework.org/schema/jdbc/spring-jdbc-4.3.xsd
        http://mybatis.org/schema/mybatis-spring http://mybatis.org/schema/mybatis-spring-1.2.xsd
        http://www.springframework.org/schema/tx http://www.springframework.org/schema/tx/spring-tx-4.3.xsd
        http://www.springframework.org/schema/util http://www.springframework.org/schema/util/spring-util-4.3.xsd">


    <!-- 设置目标bean -->
    <bean name="target" class="com.cc8w.aop.TargetImpl"></bean>
    <!-- 设置切面bean -->
    <bean name="targetAspect" class="com.cc8w.aop.TargetAspect"></bean>
    <!-- 配置织入,告诉Spring框架,哪些方法(切点)需要进行增强(前置后置...) 切点表达式书写 -->
    <aop:config>
        <aop:aspect ref="targetAspect">
            <aop:before method="before" pointcut="execution(public void com.cc8w.aop.TargetImpl.save())"/>
        </aop:aspect>
    </aop:config>


</beans>
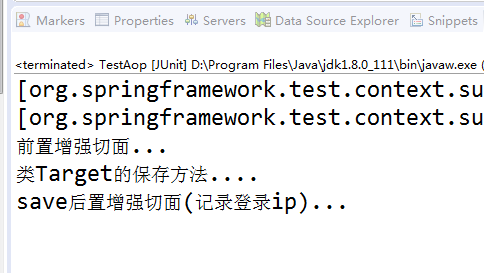
四.测试结果
package com.cc8w.test;

import org.junit.Test;
import org.junit.runner.RunWith;
import org.springframework.beans.factory.annotation.Autowired;
import org.springframework.test.context.ContextConfiguration;
import org.springframework.test.context.junit4.SpringJUnit4ClassRunner;

import com.cc8w.aop.TargetInterface;

@RunWith(SpringJUnit4ClassRunner.class)
@ContextConfiguration(locations = {"classpath:testApplicationContext.xml"})
public class TestAop {
    @Autowired
    TargetInterface target;

    @Test
    public void testAopBefore1() {
        target.save();
    }


}
------------------------------------------
Spring的Aop切面注解配置(基于AspectJ)
一,创建接口和目标类(和上面的一样)
二,创建切面类(这里就要配置注解了)
package com.cc8w.aop;

import org.aspectj.lang.annotation.After;
import org.aspectj.lang.annotation.Aspect;
import org.aspectj.lang.annotation.Before;

/**
 * 目标对象的增强切面
 * @author Administrator
 *
 */
@Aspect
@Component
public class TargetAspect {

    public void before() {
        System.out.println("前置增强切面...");
    }
    //注意切面表达式书写
    @After("execution(public void com.cc8w.aop.TargetImpl.save())")
    public void after() {
        System.out.println("save后置增强切面(记录登录ip)...");
    }

}
三. 让Spring管理Bean类,和配置aop织入关系(即:配置applicationContext.xml)
<?xml version="1.0" encoding="UTF-8"?>
<beans xmlns="http://www.springframework.org/schema/beans"
    xmlns:xsi="http://www.w3.org/2001/XMLSchema-instance"
    xmlns:aop="http://www.springframework.org/schema/aop"
    xmlns:c="http://www.springframework.org/schema/c"
    xmlns:cache="http://www.springframework.org/schema/cache"
    xmlns:context="http://www.springframework.org/schema/context"
    xmlns:jdbc="http://www.springframework.org/schema/jdbc"
    xmlns:mybatis-spring="http://mybatis.org/schema/mybatis-spring"
    xmlns:p="http://www.springframework.org/schema/p"
    xmlns:tx="http://www.springframework.org/schema/tx"
    xmlns:util="http://www.springframework.org/schema/util"
    xsi:schemaLocation="http://www.springframework.org/schema/beans http://www.springframework.org/schema/beans/spring-beans.xsd
        http://www.springframework.org/schema/aop http://www.springframework.org/schema/aop/spring-aop-4.3.xsd
        http://www.springframework.org/schema/cache http://www.springframework.org/schema/cache/spring-cache-4.3.xsd
        http://www.springframework.org/schema/context http://www.springframework.org/schema/context/spring-context-4.3.xsd
        http://www.springframework.org/schema/jdbc http://www.springframework.org/schema/jdbc/spring-jdbc-4.3.xsd
        http://mybatis.org/schema/mybatis-spring http://mybatis.org/schema/mybatis-spring-1.2.xsd
        http://www.springframework.org/schema/tx http://www.springframework.org/schema/tx/spring-tx-4.3.xsd
        http://www.springframework.org/schema/util http://www.springframework.org/schema/util/spring-util-4.3.xsd">


    <!-- 设置目标bean -->
    <bean name="target" class="com.cc8w.aop.TargetImpl"></bean>
    <!-- 设置切面bean -->
    <bean name="targetAspect" class="com.cc8w.aop.TargetAspect"></bean>

    <!-- 上面两个可以不要,只要bean在Spring容器中就可以,但是由于applicationContext.xml没有扫描控制器,如果给控制器也加切面,我本人感觉XXX-Servlet.xml中也加入下面的配置 -->
    <!-- 声明自动为spring容器中那些配置@aspectJ切面的bean创建代理,织入切面。 -->
    <aop:aspectj-autoproxy proxy-target-class="true"></aop:aspectj-autoproxy>

</beans>
四.测试结果(和上面一样)
最后会多一个后置通知...

参考 : https://blog.csdn.net/weixin_36328444/article/details/81322484


【推荐】编程新体验,更懂你的AI,立即体验豆包MarsCode编程助手
【推荐】凌霞软件回馈社区,博客园 & 1Panel & Halo 联合会员上线
【推荐】抖音旗下AI助手豆包,你的智能百科全书,全免费不限次数
【推荐】轻量又高性能的 SSH 工具 IShell:AI 加持,快人一步