网络编程Netty IoT百万长连接优化
IoT推送系统
IoT是什么
The Internet of things的简称IoT,即是物联网的意思,具体的知识请查阅:什么是Iot?什么是AIot?
IoT推送系统的设计
比如说,像一些智能设备,需要通过APP或者微信中的小程序等,给设备发送一条指令,让这个设备下载或者播放音乐,那么需要做什么才可以完成上面的任务呢?

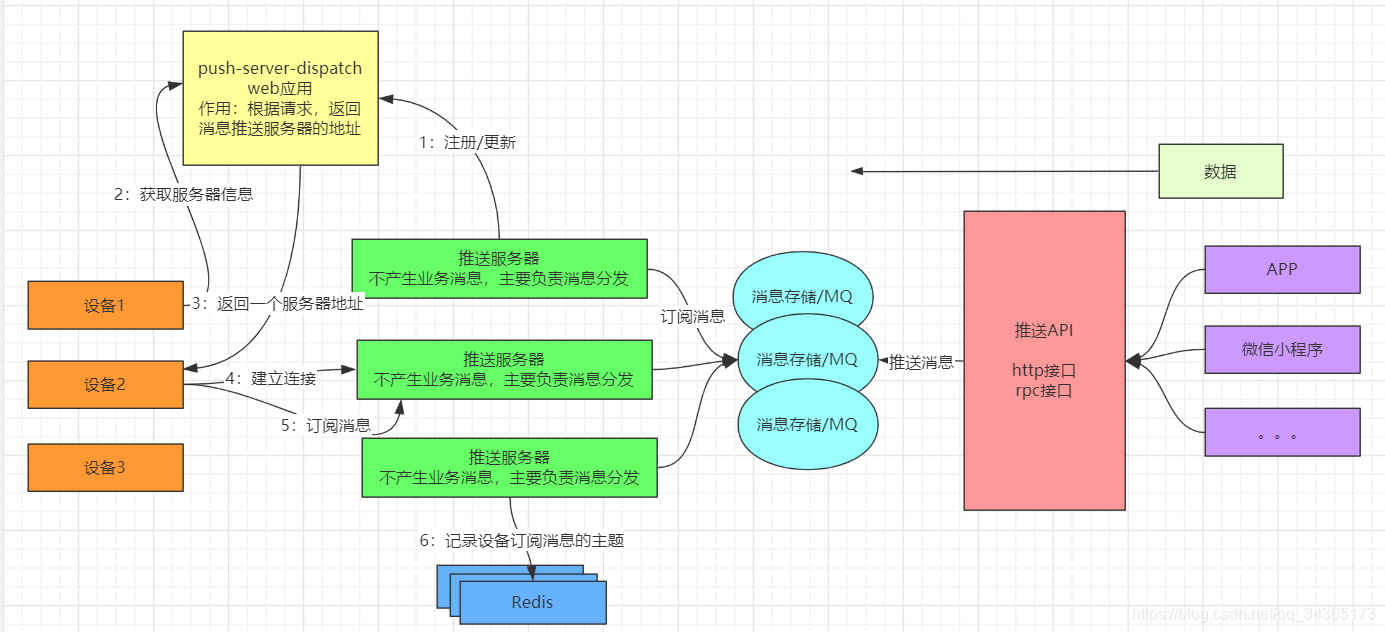
首先需要推送服务器,这个服务器主要负责消息的分发,不处理业务消息;设备会连接到推送服务器,APP通过把指令发送到推送服务器,然后推送服务器再把指令分发给相应的设备。
可是,当买设备的人越来越多,推送服务器所能承受的压力就越大,这个时候就需要对推送服务器做集群,一台不行,就搞十台,那么还有一个问题,就是推送服务器增加了,设备如何找到相应的服务器,然后和服务器建立连接呢,注册中心可以解决这个问题,每一台服务器都注册到注册中心上,设备会请求注册中心,得到推送服务器的地址,然后再和服务器建立连接。
而且还会有相应的redis集群,用来记录设备订阅的主题以及设备的信息;APP发送指令到设备,其实就是发送了一串数据,相应的会提供推送API,提供一些接口,通过接口把数据发送过去;而推送API不是直接去连接推送服务器的,中间还会有MQ集群,主要用来消息的存储,推送API推送消息到MQ,推送服务器从MQ中订阅消息,以上就是简单的IoT推送系统的设计。
下面看下结构图:

注意:设备连接到注册中心的是短连接,设备和推送服务器建立的连接是长连接
心跳检测机制
简述心跳检测
心跳检测,就是判断对方是否还存活,一般采用定时的发送一些简单的包,如果在指定的时间段内没有收到对方的回应,则判断对方已经挂掉
Netty提供了IdleStateHandler类来实现心跳,简单的使用如下:
pipeline.addFirst(new IdleStateHandler(0, 0, 1, TimeUnit.SECONDS));
下面是IdleStateHandler的构造函数:
public IdleStateHandler(
            long readerIdleTime, long writerIdleTime, long allIdleTime,
            TimeUnit unit) {
        this(false, readerIdleTime, writerIdleTime, allIdleTime, unit);
}
四个参数说明:
1:readerIdleTime,读超时时间
2:writerIdleTime,写超时时间
3:allIdleTime,所有事件超时时间
4:TimeUnit unit,超时时间单位

心跳检测机制代码示例
简单示例:
服务端:
static final int BEGIN_PORT = 8088;
    static final int N_PORT = 100;

    public static void main(String[] args) {
        new PingServer().start(BEGIN_PORT, N_PORT);
    }

    public void start(int beginPort, int nPort) {
        System.out.println("启动服务....");

        EventLoopGroup bossGroup = new NioEventLoopGroup(1);
        EventLoopGroup workerGroup = new NioEventLoopGroup();

        ServerBootstrap bootstrap = new ServerBootstrap();
        bootstrap.handler(new LoggingHandler(LogLevel.INFO));
        bootstrap.group(bossGroup, workerGroup);
        bootstrap.channel(NioServerSocketChannel.class);
        bootstrap.childOption(ChannelOption.SO_REUSEADDR, true);

        bootstrap.childHandler(new ChannelInitializer<SocketChannel>() {
            @Override
            protected void initChannel(SocketChannel ch) throws Exception {
                ChannelPipeline pipeline = ch.pipeline();
                pipeline.addFirst(new IdleStateHandler(0, 0, 1, TimeUnit.SECONDS));
                pipeline.addLast(new PingHandler());
                //每个连接都有个ConnectionCountHandler对连接记数进行增加
                pipeline.addLast(new ConnectionCountHandler());
            }
        });

        bootstrap.bind(beginPort).addListener((ChannelFutureListener) future -> {
            System.out.println("端口绑定成功: " + beginPort);
        });
        System.out.println("服务已启动!");
}
public class PingHandler extends SimpleUserEventChannelHandler<IdleStateEvent> {
    private static final ByteBuf PING_BUF = Unpooled.unreleasableBuffer(Unpooled.wrappedBuffer("ping".getBytes()));

    private int count;

    @Override
    public void channelRead(ChannelHandlerContext ctx, Object msg) throws Exception {
        ByteBuf buf = (ByteBuf) msg;
        byte[] data = new byte[buf.readableBytes()];
        buf.readBytes(data);
        String str = new String(data);
        if ("pong".equals(str)) {
            System.out.println(ctx + " ---- " + str);
            count--;
        }
        ctx.fireChannelRead(msg);
    }

    @Override
    protected void eventReceived(ChannelHandlerContext ctx, IdleStateEvent evt) throws Exception {
        if (evt.state() == ALL_IDLE) {
            if (count >= 3) {
                System.out.println("检测到客户端连接无响应,断开连接:" + ctx.channel());
                ctx.close();
                return;
            }

            count++;
            System.out.println(ctx.channel() + " ---- ping");
            ctx.writeAndFlush(PING_BUF.duplicate());
        }
        ctx.fireUserEventTriggered(evt);
    }
}
客户端:
//服务端的IP
 private static final String SERVER_HOST = "localhost";

 static final int BEGIN_PORT = 8088;
 static final int N_PORT = 100;

 public static void main(String[] args) {
     new PoneClient().start(BEGIN_PORT, N_PORT);
 }

 public void start(final int beginPort, int nPort) {
     System.out.println("客户端启动....");
     EventLoopGroup eventLoopGroup = new NioEventLoopGroup();
     final Bootstrap bootstrap = new Bootstrap();
     bootstrap.group(eventLoopGroup);
     bootstrap.channel(NioSocketChannel.class);
     bootstrap.option(ChannelOption.SO_REUSEADDR, true);
     bootstrap.handler(new ChannelInitializer<SocketChannel>() {
         @Override
         protected void initChannel(SocketChannel ch) {
             ch.pipeline().addLast(new PongHandler());
         }
     });

     int index = 0;
     int port;

     String serverHost = System.getProperty("server.host", SERVER_HOST);
     ChannelFuture channelFuture = bootstrap.connect(serverHost, beginPort);
     channelFuture.addListener((ChannelFutureListener) future -> {
         if (!future.isSuccess()) {
             System.out.println("连接失败,退出!");
             System.exit(0);
         }
     });
     try {
         channelFuture.get();
     } catch (ExecutionException e) {
         e.printStackTrace();
     } catch (InterruptedException e) {
         e.printStackTrace();
     }
 }
public class PongHandler extends SimpleChannelInboundHandler<ByteBuf> {
    private static final ByteBuf PONG_BUF = Unpooled.unreleasableBuffer(Unpooled.wrappedBuffer("pong".getBytes()));

    @Override
    protected void channelRead0(ChannelHandlerContext ctx, ByteBuf msg) throws Exception {
        ByteBuf buf = (ByteBuf) msg;
        byte[] data = new byte[buf.readableBytes()];
        buf.readBytes(data);
        String str = new String(data);
        if ("ping".equals(str)) {
            ctx.writeAndFlush(PONG_BUF.duplicate());
        }
    }
}
服务端输出结果:

百万长连接优化
连接优化代码示例
服务端:
    static final int BEGIN_PORT = 11000;
    static final int N_PORT = 100;

    public static void main(String[] args) {
        new Server().start(BEGIN_PORT, N_PORT);
    }

    public void start(int beginPort, int nPort) {
        System.out.println("启动服务....");

        EventLoopGroup bossGroup = new NioEventLoopGroup(1);
        EventLoopGroup workerGroup = new NioEventLoopGroup();

        ServerBootstrap bootstrap = new ServerBootstrap();
        bootstrap.group(bossGroup, workerGroup);
        bootstrap.channel(NioServerSocketChannel.class);
        bootstrap.childOption(ChannelOption.SO_REUSEADDR, true);

        bootstrap.childHandler(new ChannelInitializer<SocketChannel>() {
            @Override
            protected void initChannel(SocketChannel ch) throws Exception {
                ChannelPipeline pipeline = ch.pipeline();
                //每个连接都有个ConnectionCountHandler对连接记数进行增加
                pipeline.addLast(new ConnectionCountHandler());
            }
        });

        //这里开启 10000到100099这100个端口
        for (int i = 0; i < nPort; i++) {
            int port = beginPort + i;
            bootstrap.bind(port).addListener((ChannelFutureListener) future -> {
                System.out.println("端口绑定成功: " + port);
            });
        }
        System.out.println("服务已启动!");
    }
客户端:
//服务端的IP
    private static final String SERVER_HOST = "192.168.231.129";

    static final int BEGIN_PORT = 11000;
    static final int N_PORT = 100;

    public static void main(String[] args) {
        new Client().start(BEGIN_PORT, N_PORT);
    }

    public void start(final int beginPort, int nPort) {
        System.out.println("客户端启动....");
        EventLoopGroup eventLoopGroup = new NioEventLoopGroup();
        final Bootstrap bootstrap = new Bootstrap();
        bootstrap.group(eventLoopGroup);
        bootstrap.channel(NioSocketChannel.class);
        bootstrap.option(ChannelOption.SO_REUSEADDR, true);

        int index = 0;
        int port;

        String serverHost = System.getProperty("server.host", SERVER_HOST);
        //从10000的端口开始,按端口递增的方式进行连接
        while (!Thread.interrupted()) {
            port = beginPort + index;
            try {
                ChannelFuture channelFuture = bootstrap.connect(serverHost, port);
                channelFuture.addListener((ChannelFutureListener) future -> {
                    if (!future.isSuccess()) {
                        System.out.println("连接失败,退出!");
                        System.exit(0);
                    }
                });
                channelFuture.get();
            } catch (Exception e) {
            }

            if (++index == nPort) {
                index = 0;
            }
        }
    }
ConnectionCountHandler类:
public class ConnectionCountHandler extends ChannelInboundHandlerAdapter {

    //这里用来对连接数进行记数,每两秒输出到控制台
    private static final AtomicInteger nConnection = new AtomicInteger();

    static {
        Executors.newSingleThreadScheduledExecutor().scheduleAtFixedRate(() -> {
            System.out.println("连接数: " + nConnection.get());
        }, 0, 2, TimeUnit.SECONDS);
    }

    @Override
    public void channelActive(ChannelHandlerContext ctx) {
        nConnection.incrementAndGet();
    }

    @Override
    public void channelInactive(ChannelHandlerContext ctx) {
        nConnection.decrementAndGet();
    }
}
上述的代码会打包成jar放到linux上运行,对于上述的优化来说,程序方面的就暂时不做,下面会从操作系统层面进行优化,让其支撑起百万连接。
TCP连接四元组
在优化之前先来看下网络里的一个小知识,TCP连接四元组:
服务器的IP+服务器的POST+客户端的IP+客户端的POST
端口的范围一般是1到65535:

配置优化
现在在虚拟机上安装两个linux系统,配置分别是:
| 地址 | CPU | 内存 | JDK | 作用 |
|---|---|---|---|---|
| 192.168.15.130 | VM-4核 | 8G | 1.8 | 客户端 |
| 192.168.15.128 | VM-4核 | 8G | 1.8 | 服务端 |
| 启动服务端: | ||||
| java -Xmx4g -Xms4g -cp network-study-1.0-SNAPSHOT-jar-with-dependencies.jar com.dongnaoedu.network.netty.million.Server > out.log 2>&1 & | ||||
| 启动客户端: | ||||
| java -Xmx4g -Xms4g -Dserver.host=192.168.15.128 -cp network-study-1.0-SNAPSHOT-jar-with-dependencies.jar com.dongnaoedu.network.netty.million.Client |
启动服务端后可以使用tail -f命令查看out.log中的日志:

客户端启动后,如果报了以下错误,需要修改系统的文件最大句柄和进程的文件最大句柄:
Caused by: java.io.IOException: Too many open files
        at sun.nio.ch.FileDispatcherImpl.init(Native Method)
        at sun.nio.ch.FileDispatcherImpl.<clinit>(FileDispatcherImpl.java:35)
        ... 8 more
优化系统最大句柄:
查看操作系统最大文件句柄数,执行命令cat /proc/sys/fs/file-max,查看最大句柄数是否满足需要,如果不满足,通过vim /etc/sysctl.conf命令插入如下配置:
fs.file-max = 1000000
- 设置单进程打开的文件最大句柄数,执行命令
ulimit -a查看当前设置是否满足要求:
[root@test-server2 download]# ulimit -a | grep "open files"
open files                      (-n) 1024
当并发接入的Tcp连接数超过上限时,就会提示“Too many open files”,所有的新客户端接入将会失败。通过vim /etc/security/limits.conf 修改配置参数:
* soft nofile 1000000
* hard nofile 1000000
修改配置参数后注销生效。
- 如果程序被中断,或报了异常
java.io.IOException: 设备上没有空间
	at sun.nio.ch.EPollArrayWrapper.epollCtl(Native Method)
	at sun.nio.ch.EPollArrayWrapper.updateRegistrations(EPollArrayWrapper.java:299)
	at sun.nio.ch.EPollArrayWrapper.poll(EPollArrayWrapper.java:268)
	at sun.nio.ch.EPollSelectorImpl.doSelect(EPollSelectorImpl.java:93)
	at sun.nio.ch.SelectorImpl.lockAndDoSelect(SelectorImpl.java:86)
	at sun.nio.ch.SelectorImpl.selectNow(SelectorImpl.java:105)
	at io.netty.channel.nio.SelectedSelectionKeySetSelector.selectNow(SelectedSelectionKeySetSelector.java:56)
	at io.netty.channel.nio.NioEventLoop.selectNow(NioEventLoop.java:750)
	at io.netty.channel.nio.NioEventLoop$1.get(NioEventLoop.java:71)
	at io.netty.channel.DefaultSelectStrategy.calculateStrategy(DefaultSelectStrategy.java:30)
	at io.netty.channel.nio.NioEventLoop.run(NioEventLoop.java:426)
	at io.netty.util.concurrent.SingleThreadEventExecutor$5.run(SingleThreadEventExecutor.java:905)
	at io.netty.util.concurrent.FastThreadLocalRunnable.run(FastThreadLocalRunnable.java:30)
	at java.lang.Thread.run(Thread.java:748)
- 此时可以查看操作系统的日志
more /var/log/messages,或在程序启动时执行tail -f /var/log/messages监控日志。如果日志中出现以下内容,说明需要优化TCP/IP参数
Jun  4 16:55:01 localserver kernel: TCP: too many orphaned sockets
Jun  4 16:55:01 localserver kernel: TCP: too many orphaned sockets
Jun  4 16:55:01 localserver kernel: TCP: too many orphaned sockets
Jun  4 16:55:01 localserver kernel: TCP: too many orphaned sockets
Jun  4 16:55:01 localserver kernel: TCP: too many orphaned sockets
Jun  4 16:55:01 localserver kernel: TCP: too many orphaned sockets
Jun  4 16:55:01 localserver kernel: TCP: too many orphaned sockets
优化TCP/IP相关参数:
- 查看客户端端口范围限制
cat /proc/sys/net/ipv4/ip_local_port_range
-
通过
vim /etc/sysctl.conf修改网络参数 -
客户端修改端口范围的限制
net.ipv4.ip_local_port_range = 1024 65535
- 优化TCP参数
net.ipv4.tcp_mem = 786432 2097152 3145728
net.ipv4.tcp_wmem = 4096 4096 16777216
net.ipv4.tcp_rmem = 4096 4096 16777216
net.ipv4.tcp_keepalive_time = 1800
net.ipv4.tcp_keepalive_intvl = 20
net.ipv4.tcp_keepalive_probes = 5
net.ipv4.tcp_tw_reuse = 1
net.ipv4.tcp_tw_recycle = 1
net.ipv4.tcp_fin_timeout = 30
参数说明:
net.ipv4.tcp_mem: 分配给tcp连接的内存,单位是page(1个Page通常是4KB,可以通过
getconf PAGESIZE命令查看),三个值分别是最小、默认、和最大。比如以上配置中的最大是3145728,那分配给tcp的最大内存=31457284 / 1024 / 1024 = 12GB。一个TCP连接大约占7.5KB,粗略可以算出百万连接≈7.51000000/4=1875000 3145728足以满足测试所需。
net.ipv4.tcp_wmem: 为每个TCP连接分配的写缓冲区内存大小,单位是字节。三个值分别是最小、默认、和最大。
net.ipv4.tcp_rmem: 为每个TCP连接分配的读缓冲区内存大小,单位是字节。三个值分别是最小、默认、和最大。
net.ipv4.tcp_keepalive_time: 最近一次数据包发送与第一次keep alive探测消息发送的事件间隔,用于确认TCP连接是否有效。
net.ipv4.tcp_keepalive_intvl: 在未获得探测消息响应时,发送探测消息的时间间隔。
net.ipv4.tcp_keepalive_probes: 判断TCP连接失效连续发送的探测消息个数,达到之后判定连接失效。
net.ipv4.tcp_tw_reuse: 是否允许将TIME_WAIT Socket 重新用于新的TCP连接,默认为0,表示关闭。
net.ipv4.tcp_tw_recycle: 是否开启TIME_WAIT Socket 的快速回收功能,默认为0,表示关闭。
net.ipv4.tcp_fin_timeout: 套接字自身关闭时保持在FIN_WAIT_2 状态的时间。默认为60。


