freetype矢量字体 —— 例程1源码解析
例程源码exmaple1
本地源码路径freetype-2.10.2/docs/tutorial/example1.c
or 官网地址:https://freetype.org/freetype2/docs/tutorial/example1.c
例程主要工作:在控制台打印一行字符串对应的用freetype处理后用于显示的bitmap,第一个字符左上角坐标(300, 200),模拟的LCD区域大小WIDTH x HEIGHT = 640 x 480。
其中,image[][]数组用于存放模拟lcd的像素值,相当于lcd的Framebuffer。
注意:如果要在LCD上显示文字内容, 就将draw_bitmap中的image[j][i]赋值语句, 替换为写LCD的Framebuffer缓冲区,而且无需调用show_image。
每行代码解析,见下方代码注释:
/* example1.c                                                      */
/*                                                                 */
/* This small program shows how to print a rotated string with the */
/* FreeType 2 library.                                             */

#include <stdio.h>
#include <string.h>
#include <math.h>

// 1. 包含freetype头文件
#include <ft2build.h>
#include FT_FREETYPE_H // for freetype 基础API

// 用于显示的目标LCD区域大小
#define WIDTH   640
#define HEIGHT  480

/* origin is the upper left corner */
unsigned char image[HEIGHT][WIDTH];

/* Replace this function with something useful. */

// 如果要在LCD上显示文字内容, 就将image[j][i]赋值语句, 替换为写LCD的Framebuffer缓冲区

/**
  以LCD坐标(x, y)为起始位置, 显示bitmap
  @param bitmap 要绘制的bitmap, 通常包含在slot中
  @param x 要绘制的bitmap的起始横坐标
  @param y 要绘制的bitmap的起始纵坐标
  @details 坐标采用的LCD坐标系
*/
void
draw_bitmap( FT_Bitmap* bitmap, FT_Int x, FT_Int y)
{
  FT_Int  i, j, p, q;
  FT_Int  x_max = x + bitmap->width;
  FT_Int  y_max = y + bitmap->rows;

  /* for simplicity, we assume that `bitmap->pixel_mode' */
  /* is `FT_PIXEL_MODE_GRAY' (i.e., not a bitmap font)   */

  for ( i = x, p = 0; i < x_max; i++, p++ ) // x 轴方向
  {
    for ( j = y, q = 0; j < y_max; j++, q++ ) // y轴方向
    {
      if ( i < 0      || j < 0       ||
           i >= WIDTH || j >= HEIGHT )
        continue;

      // 将bitmap中1写入image矩阵
      // LCD的y轴对应image的行数, x轴对应列数
      image[j][i] |= bitmap->buffer[q * bitmap->width + p];
    }
  }
}

/**
  串口打印image内容, 即一行字符串对应的bitmap内容
 */
void
show_image( void )
{
  int  i, j;

  for ( i = 0; i < HEIGHT; i++ )
  {
    for ( j = 0; j < WIDTH; j++ )
      putchar( image[i][j] == 0 ? ' '
                                : image[i][j] < 128 ? '+'
                                                    : '*' );
    putchar( '\n' );
  }
}

int
main( int     argc,
      char**  argv )
{
  FT_Library    library; // freetype库
  FT_Face       face;    // face对象, 包含了字体信息

  FT_GlyphSlot  slot;  // 插槽slot, 保存了处理后的bitmap
  FT_Matrix     matrix;                 /* transformation matrix */
  FT_Vector     pen;                    /* untransformed origin  */
  FT_Error      error; // 错误码

  char*         filename; // 字体文件
  char*         text;     // 要显示的一行字符串

  double        angle;   // 要旋转的角度
  int           target_height; // 用于显示的目标区域高度, 通常为LCD高度
  int           n, num_chars;

  if ( argc != 3 )
  {
    fprintf ( stderr, "usage: %s font sample-text\n", argv[0] );
    exit( 1 );
  }

  // 字体文件名
  filename      = argv[1];                           /* first argument     */
  // 要显示的文本内容
  text          = argv[2];                           /* second argument    */
  // 要显示的文本长度
  num_chars     = strlen( text );
  // 旋转角度, 单位为弧度
  angle         = ( 25.0 / 360 ) * 3.14159 * 2;      /* use 25 degrees     */
  target_height = HEIGHT;

  // 2. 初始化freetype库
  error = FT_Init_FreeType( &library );              /* initialize library */
  /* error handling omitted */

  // 3. 加载/打开字体face, 会创建一个face对象
  error = FT_New_Face( library, filename, 0, &face );/* create face object */
  /* error handling omitted */

  // 4. 设置字体大小, 单位pt
  /* use 50pt at 100dpi */
  error = FT_Set_Char_Size( face, 50 * 64, 0,
                            100, 0 );                /* set character size */
  /* error handling omitted */

  // 5. (略)选择charmap: FT_Select_Charmap

  /* cmap selection omitted;                                        */
  /* for simplicity we assume that the font contains a Unicode cmap */

  slot = face->glyph;  //  获取glyph slot, 存放了glyph image

  // 设置旋转矩阵
  /* set up matrix */
  matrix.xx = (FT_Fixed)( cos( angle ) * 0x10000L );
  matrix.xy = (FT_Fixed)(-sin( angle ) * 0x10000L );
  matrix.yx = (FT_Fixed)( sin( angle ) * 0x10000L );
  matrix.yy = (FT_Fixed)( cos( angle ) * 0x10000L );

  /* 反推出第一个字符的origin */
  // 设置pen, 即绘制字体的起始位置, 笛卡尔坐标
  // 要显示的第一个字符左上角LCD坐标(300,200), 转换为笛卡尔坐标(300, target_height - 200)
  // *64是因为FT_Set_Transform要求坐标单位是1/64像素
  /* the pen position in 26.6 cartesian space coordinates; */
  /* start at (300,200) relative to the upper left corner  */
  pen.x = 300 * 64;
  pen.y = ( target_height - 200 ) * 64;

  // 循环显示字符串的所有字符
  // 按行显示
  for ( n = 0; n < num_chars; n++ )
  {
    // 9. 移动/旋转glyph image
    /* set transformation */
    FT_Set_Transform( face, &matrix, &pen );

    // 5/6/7. 加载glyph image到slot, 可以直接得到bitmap, 存放在slot中
    /* load glyph image into the slot (erase previous one) */
    error = FT_Load_Char( face, text[n], FT_LOAD_RENDER );
    if ( error )
      continue;                 /* ignore errors */

    // 绘制每个字符的bitmap
    // 字符外框左上角坐标(bitmap_left, bitmap_top), 转换为LCD坐标(bitmap_left, target_height - bitmap_top)
    /* now, draw to our target surface (convert position) */
    draw_bitmap( &slot->bitmap,
                 slot->bitmap_left,
                 target_height - slot->bitmap_top );

    // 计算下一个字体的起始位置origin
    /* increment pen position */
    pen.x += slot->advance.x;
    pen.y += slot->advance.y;
  }

  show_image(); // 控制台打印bitmap对应的image数组, 如果要在LCD显示, 就应该写framebuffer

  FT_Done_Face    ( face ); // 释放指定face对象及其子slots和尺寸, 与FT_New_Face配对
  FT_Done_FreeType( library ); // 释放字体文件缓存, 与FT_Init_FreeType配对

  return 0;
}

/* EOF */
注:例程中,第一个字符的左上角位置是直接给定的,并没有按整行字符串的外框来调整。
小结
freetype显示字体流程
使用freetype绘制一行字符通用流程:
1)包含freetype头文件;
2)初始化freetype库:FT_Init_FreeType;
3)加载字体文件,创建face对象:FT_New_Face;
4)设置字体大小:FT_Set_Char_Size(单位pt)或FT_Set_Pixel_Size(单位pixel);
5)(可选)设置charmap(非默认编码时选用): FT_Select_Charmap;
6)根据编码值charcode寻找glyph_index: FT_Get_Char_Index;
7)根据glyph_index取出glyph: FT_Load_Glyph;
8)将glyph image转换为bitmap: FT_Render_Glyph
9)移动或旋转字符origin: FT_Set_Transform,坐标单位要求1/64像素;
10)显示bitmap:调用自定义draw_bitmap
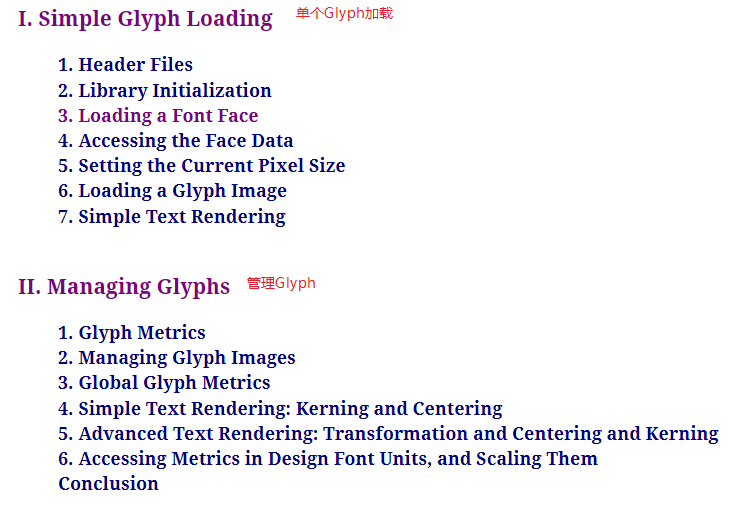
步骤6,7,8 可以用一个函数替代FT_Load_Char(face, charcode, FT_LOAD_RENDER),直接得到glyph对应bitmap。
参考下图描述:

截取自 https://freetype.org/freetype2/docs/tutorial/index.html
LCD与笛卡尔坐标系转换
LCD显示使用LCD坐标系,freetype库使用笛卡尔坐标系。注意不同坐标系下的坐标转换。
已知LCD区域,通常是LCD屏幕大小(H, V)(宽、高)。那么,LCD坐标系下的(x, y),对应笛卡尔坐标系下(x, V - y)


 浙公网安备 33010602011771号